
Sixty-five million years ago, dinosaurs ruled the Earth. These massive beasts existed for about 180 million years before a cataclysmic event left them mere fossils. Fittingly, “Dinosaur Day” gives dino fans an ample opportunity to pay homage to these near-mythical titans.

Released: 28 February 2021
Originally Released: 4 March 1997
Developer: Nightdive Studios
Original Developer: Iguana Entertainment
Metacritic Scores: 85 / 8.0
Also Available For: Nintendo 64, Nintendo Switch, Nintendo Switch 2, PC (Original Release); Nintendo Switch, Nintendo Switch 2, PlayStation 4, PlayStation 5, Xbox One, Xbox Series S (Remaster)
Quick Facts:
Based on the Valiant Comics revival of Dell Comics’ Turok, Son of Stone, Turok: Dinosaur Hunter came about after Acclaim Entertainment purchased Valiant in 1994. The fifteen-person team developed Turok as a first-person shooter (FPS) to showcase the power of the Nintendo 64. A critical and commercial success, Turok impressed at the time and spawned sequels and spin-offs of varying quality before being remastered for modern consoles to largely positive reviews.
Gameplay and Power-Ups:
Turok: Dinosaur Hunter is an early FPS title for the generation-defining Nintendo 64, actually the first FPS game developed for the system and, as such, set the bar for future FPS games released for the console (to the point where Turok’s control scheme was often a default or alternative for other shooters). Naturally, Turok takes a lot of inspiration from Doom (id Software, 1993) for its gameplay and controls, with players assuming control of Tal’Set, the titular Turok (despite the original Nintendo 64 version depicting his successor, Joshua Fireseed), and journeying across eight levels (nine, if you include the hub world) to oppose the mysterious Campaigner’s plot to tear apart reality with his techno-organic army of dinosaurs and other minions. The game’s controls are entirely customisable, and I’d recommend tweaking them to your liking. For example, I set the “bindings” to have the Right Trigger attack with Turok’s current weapon, A to jump, and the Left and Right Bumpers switch weapons. I had X toggle between ammo types (where available), Y bring up the surprisingly useful wireframe map, and set the run toggle to the right directional pad. There’s no reloading in Turok, though you can tweak the settings to set whether or not you automatically switch weapons upon acquiring new ones, change the colour of the blood, toggle Turok’s head bob, and toggle various sound and graphic effects (such as draw distance and fog). Turok offers a “Training” mode for you to get accustomed to the gameplay, which mainly sees you exploring levels cutting down respawning enemies, collecting various keys, and tackling one of the worst affronts to FPS gameplay ever conceived: first-person platforming! Although this is a remaster of the classic Nintendo 64 game, Nightdive Studios haven’t implemented modern quality of life features like save states or rewinds, so you’ll still be relying on extra lives (acquired by collecting 100 Life Force points) and rare checkpoints and manual save points scattered across each level.
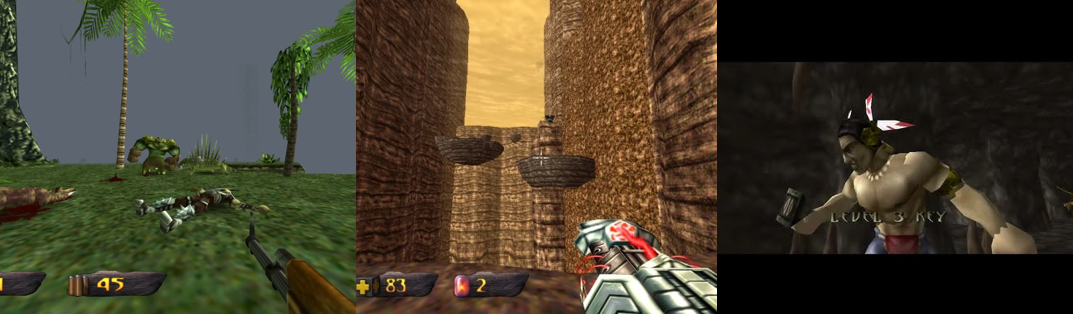
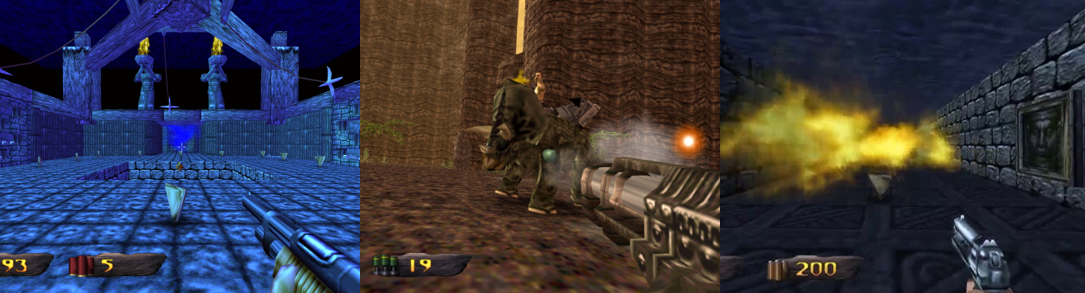
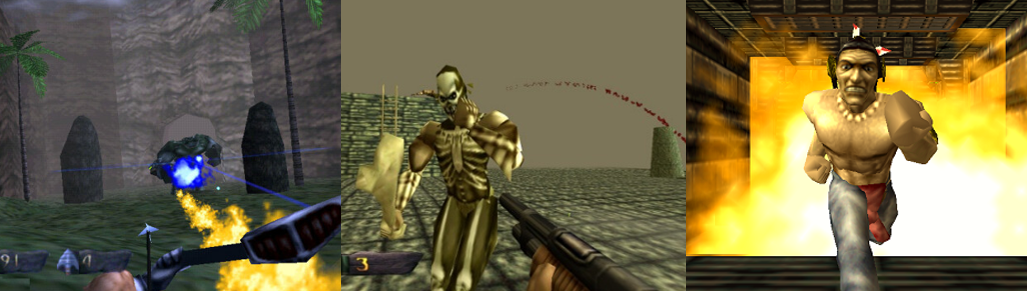
Turok’s reasonably durable and can partially or fully recover his health with various pickups and can even permanently extend it by collecting “Mortal Wounds” that randomly drop when you kill enemies with your knife or basic arrows. “Spiritual Invincibility” temporarily makes you invincible and slows enemies, “Tek Armour” grant additional armour points, and backpacks increase how much ammo you can carry. Turok can (awkwardly) swim and climb vine walls and ladders; while he doesn’t take fall damage, he will be hurt by lava or boiling tar pits, and you lose a life if you plummet down a pit. This respawns you from your last checkpoint, though any collectibles and non-respawning enemies helpfully stay gone. Turok utilises a wide array of weapons, starting with a simple knife and a bow that fires regular and “Tek Arrows” that explode on contact. You quickly grab a pistol, a shotgun, and a fairly useless assault rifle. The automatic shotgun later became my default weapon, especially when you acquire explosive shells, while the minigun is great for shredding larger enemies. The rapid-fire pulse rifle is a far better alternative to the assault rifle, the grenade launcher is decent for blowing up enemies from a distance, and you even get a heavy-duty quad rocket launcher that’s best saved for bosses. Search around enough and you’ll find an alien weapon that fires explosive energy bursts, a shockwave cannon, and the ridiculously powerful particle cannon, though these all have very limited ammunition. Every level also hides part of the legendary “Chronoscepter”, the ultimate weapon that you’ll only complete right before the final boss and which decimates anything caught in its blast radius. Although ammo is plentiful, it’s usually best not to kill most enemies as they quickly respawn and most can just be avoided. However, there are times when you’re forced to defeat all enemies in a given area to lower barriers or raise platforms. It’s also worth noting that hazards like falls, falling boulders, and even some enemy attacks hurt your enemies, and also that some areas are rigged with flame bursts, spike pits and traps, wall lasers, and heavy cannons.
Although things start fairly linear, later levels become much larger or more maze-like, which can leave you running in circles frantically searching for the right path. The map helps but it can be difficult following it when dealing with the respawning enemies. Each level contains several keys that must be found to unlock levels from the hub and these can be easily missed, meaning you must replay previous levels to hunt them down. The pause menu tracks which ones you’re missing and they’re fairly easy to spot, either being out in the open, across short jumps, or accessed via obvious alternative paths. Teleporters transport you across levels, pressure switches lower gates, raise paths, or open doors, and you must occasionally race from a switch to a door before it closes. Turok is littered with aggravating platforming challenges that start relatively safe (you’ll drop to water or a lower level if you fall and must climb back up to try again) but quickly become very tricky as you’re jumping to moving or extremely narrow platforms over lava or bottomless pits. The longer you hold the jump button, the further Turok jumps, and it can help to look down before you jump, but these platforms and columns eventually become so small that it’s very anxiety-inducing jumping to them. When on the Ruins level, you must jump to ledges so narrow they’re barely distinguishable from the rest of the environment or you must take running jumps from tiny platforms and will be frustrated by failure. The Lost Land sees you hopping to stone columns that rise and fall, making jumps difficult to judge while the Ancient City are more labyrinthine, offering higher paths and tunnels to goodies or shortcuts, and containing various doors and narrow corridors where enemies skulk around every corner. Blue portals also spawn all over, transporting you to relatively safe bonus areas where you must hop to or cross various platforms to stock up on ammo or Life Force points, though these are entirely optional.
Presentation:
I remember the original Turok. I think everyone had a copy on Nintendo 64 back in the day. It was a foggy mess whose environments popped in from the murk and your vision was largely obscured when underwater. Thankfully, this remaster fixes most of that but there’s still a lot of fog. The Treetop Village employs it as a gameplay mechanic, however, as you’re high up in villages built around giant trees, watching as gigantic Brontosauruses stomp around you. Fog also obscures much of the Ruins level to make jumps to narrow ledges or wooden platforms even more troublesome and there’s a murky haze in the Lost Land that’s explained by the volcanic activity. Surprisingly, and disappointingly, there’s no story in Turok, not even some text setting the stage. You get no in-game context behind anything, no ending beyond watching Tal’Set escape the Campaigner’s exploding citadel, and no introductory sequence beyond Tal’Set dramatically shooting an arrow at the title screen. Even the old instruction manual was light on context, which is a shame as even Doom had some text to set the scene. You rarely see Tal’Set during gameplay unless you mess up, then you’re treated to various fun death animations (if enabled), but you do hear him grunt and scream when attacked and loudly proclaim “I am Turok!” when you earn an extra life. Turok’s music is a largely forgettable mixture of tribal sounds, ambient noises, and thumping bass. I did like the growls and screeches of unseen animals lurking in the jungle and appreciated the sounds of enemies teleporting in, which kept me moving at a steady (if often frantic) pace. You’ll often see wild boar, deer, and monkeys wandering levels that can be attacked for extra health, fish in the water, and blood will splatter with each attack. Enemies have some fun death animations, like slowly choking to death as arterial spray juts from the necks or blowing to pieces when you fire grenades at their bodies.
Sadly, there’s not much visual variety to Turok. You start in the hub, which is a dense, linear jungle area consisting of various crumbling ruins, water pools, narrow canyons, and bottomless spits. This leads directly into the first level, the Jungle, which is mostly the same and establishes that you must find keys, press switches, and defeat waves of respawning enemies. The Jungle introduces log bridges, abandoned settlements, and that the Tek Arrows can blow up certain areas. You’ll venture into narrow, twisting caverns, wade or dive into water, and hop across some simple gaps as a taste for things to come. The Ancient City takes the jungle assets and muddies them up, placing more emphasis on vaguely Aztec ruins, temples, and structures made from dilapidated stone. The Ruins up the emphasis on platform as the level is based almost entirely around a cliffside area, with twisting log platforms winding around stone columns, narrow rope bridges threaten to drop you to your death, a maze of pillars, and various waterfalls and flooded areas. When in the Catacombs, things become more restrictive and maze-like as you avoid boiling tar and press switches to open various doors, dodging blade gears, raiding tombs, and being surprised when the brutish Pur-Lins burst through the stone walls. This ancient tomb also sees stone panels breathe fire at you, has you climbing blocky walls, and sees you pressing a specific switch to drain water and open a new area. The Treetop Village was surprisingly impressive, despite the fog, as you’re suspended high above, fighting past wooden huts, making numerous jumps to narrow cliff ledges, and battling waves of enemies against a thunderstorm backdrop. The Lost Land is a largely barren hellscape full of volcanos, lava pits, and the Campaigner’s heavily guarded, futuristic citadel. This level features some of the trickiest platforming as you hop to floating platforms and to extremely narrow columns, and narrow corridors within the highly advanced citadel that represents the game’s busiest location. It all gets a bit samey, however, as the same jungle environments, caverns, cliffsides, and ruins and recycled across each area, meaning many levels lack a strong visual identity.
Enemies and Bosses:
The Campaigner’s forces are many and varied, ranging from humanoid to dinosaur to alien warriors. You’ll encounter aggressive natives who wield knifes, pistols, spears, and shotguns, with some tossing grenades or unloading with assault rifles. These are upgraded to cyborgs in the Final Confrontation, with their shotgun-wielding commanders being notably durable. Demonic humanoids also appear, with their priests being particularly annoying as they launch fireballs and lightning and can take a lot of shots to put down, while their skeleton-painted minions spit darts. Acid-spitting, man-eating plants later appear, extremely annoying beetles and gremlin-like Lurkers hop around the various caverns, and giant prehistoric dragonflies flitter about in the skies of the Lost Land. You’ll also encounter giant grabs in the fetid sewers of the Campaigner’s citadel, giant burrowing sandworms, and heavily armoured battle robots who boast minigun arms and quad rocket launchers. The hulking Pur-Lins are smartly positioned like mini bosses, dropping in to guard keys, switches, or gates. They also produce a shockwave, launch fireballs, and tumble into you when downed so it’s best to keep your distance, especially if you’re near a pit. Various cybernetically enhanced, frog-like aliens also appear, firing plasma shots, flying with a jetpack, and occasionally initiating a self-destruct. You’ll also encounter voracious Utahraptors who bite, swipe, and jump kick you, slower Dimetrodons wander about snapping at your heels, and enemies will ride Triceratopses in the Lost Land. Like later Dimetrodons and Utahraptors, these are cybernetically enhanced, boasting miniguns and grenade launchers, which can make these usually simple (if annoying) enemies much more formidable as they’re packing serious heat!
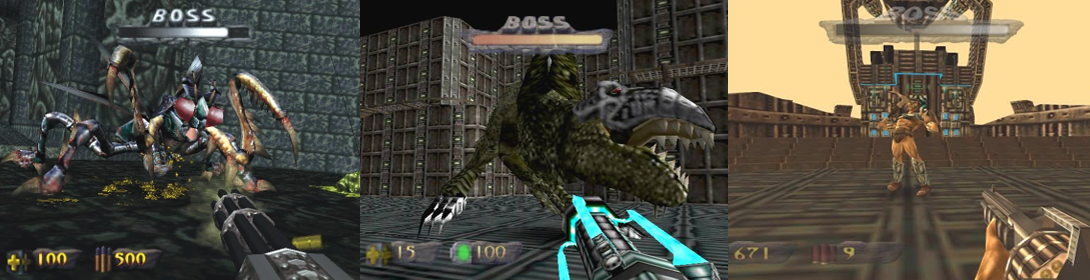
Although Turok boasts eight levels, there are only five bosses to contend with so the battle robots, Pur-Lins, and Triceratopses often act as mid- or end guardians. When you do fight bosses, they boast a health bar and you respawn in the boss arena if you die, which is super helpful. You may encounter some bosses out of order depending on what keys you have, but you’ll most likely fight the Longhunter first. This is a two-stage battle that first sees you attacked by two Humvees that race around firing machine guns and rockets and ram into you if you get too close. Once they’re gone, the Longhunter rolls about firing plasma shots and tossing a boomerang-like razor blade that’s tricky to avoid. Oddly, the gigantic Mantis was a far easier fight despite it being much larger and having better attacks. The Mantis leaps about, destroying walls and spitting corrosive acid that lingers for a short time. It also swipes with its bladed arms and eventually flies about dropping gunk or scrambling about on the ceiling and firing explosive shots, though I did pretty good with the minigun and pulse rifle. After clearing out the aliens, cyborgs, and hulking robots littered throughout the Campaigner’s futuristic citadel, players area teleported to a circular arena and fight a titanic, cybernetically enhanced Tyrannosaurs rex named “Thunder”. A fast, huge enemy, Thunder quickly stomps towards you and will decimate your health if it bites you. If you stay back, Thunder produces a shockwave off a leap and breathes fire, eventually sweeping the arena with is laser eye as your attacks destroy its mechanical parts. Thankfully, you’re given a save point and loads of gear prior to battling the Campaigner, who frantically teleports about, hides behind an energy shield, and unleashes a barrage of enemy projectiles. He also attacks with an axe-like club and can restrict your more powerful weapons if they’re used, though the Chronoscepter drains huge chunk of his help if you have it and if you can get a clear shot.
Additional Features:
There are a paltry ten Achievements up for grabs in this remaster of Turok, with one being awarded each time you defeat a boss and when you complete the game on any difficulty. You’ll get another if you collect enough Mortal Wounds, another for killing three enemies at once with the knife (I recommended doing this against the beetles), and another for clearing the “Training” mode and assembling the Chronoscepter. Although the game has four difficulty modes, you’re better off sticking to “Easy” unless you really need a greater challenge, and there’s little point in jumping into the blue bonus portals unless you’re really low on resources. There are a bunch of secret areas to discover, which generally yield additional health or weapons, and finding them all grants you another Achievement. Though there’s no multiplayer option, there is a time trial mode that gifts another Achievement if you beat it fast enough. You can input a bunch of cheat codes to gain infinite lives, all weapons and keys, big head mode, invincibility, and more, however they disable the Achievements.
Final Thoughts:
Like I said, it seemed as though everyone owned Turok: Dinosaur Hunter back in the day, and that includes me. However, this is the first time I’ve ever legitimately beaten the game much less played through it from start to finish. I used to just mess around with cheats, blowing enemies up with the Chronoscepter and skipping to the bosses, so it was nice to finally sit down and play it. Sadly, Turok hasn’t aged well, despite the graphical and performance enhancements made to this remaster. It’s a very barebones FPS, even with the emphasis on exploration to find all the keys and Chronoscepter pieces. You’ll mostly see the same enemies in every level, the same assets recycled into tougher challenges, and repeat the same gameplay loop of shooting, pressing switches, and teleporting about until you reach the end. The game is disappointingly light on story, even for an FPS title or an early Nintendo 64 release, and I found myself holding back from using most of the heavier weapons as I wanted to save them for the bosses, only for bosses to be extremely rare and such bullet sponges that you quickly exhaust your best ammo. I really liked the cybernetic dinosaurs and wish these had been more prominent, with less humanoid enemies and more prehistoric or alien enemies to lean into the game’s unique setting. The environments also really needed more visual variety. The jungle setting and Aztec ruins are fine for the first two levels, and I loved the atmosphere of the Treetop Village, but the futuristic, alien aesthetic should’ve been incorporated more prominently, perhaps with crashed alien craft or outposts set up by the Campaigner in each area. The lack of multiplayer is a surprising omission given how popular “Deathmatches” were back then and the focus on FPS platforming really drags Turok down. It’s a fairly unique gimmick, for sure, but FPS platforming is never fun and some of the jumps are ridiculously finnicky and frustrating. Therefore, while Turok: Dinosaur Hunter may be a Nintendo 64 classic and have a place in the history books, it’s largely inferior to other FPS titles from yesteryear even with its bizarre enemies and setting.
My Rating:
Could Be Better
Did you own Turok: Dinosaur Hunter on the Nintendo 64 back in the day or was this your first time discovering it? Did you ever read the Valiant comics? Were you also annoyed by the finnicky, first-person platforming? Did you also find the levels lacking in visual variety? Did you ever construct the Chronoscepter and defeat the Campaigner? Which Turok videogame is your favourite and how are you celebrating Dinosaur Day this year? Whatever your thoughts on Turok: Dinosaur Hunter, and dinosaurs in general, leave them below and donate to my Ko-Fi if you want to see more Turok content.


You must be logged in to post a comment.