Game Corner: Rocket Knight Adventures (Nintendo Switch)

Released: 11 June 2024
Originally Released: 6 August 1993
Developer: Konami
Also Available For: Mega Drive, PC, PlayStation 4, PlayStation 5

The Background:
Thanks, largely, to the phenomenal success of Sonic the Hedgehog (Sonic Team, 1991), anthropomorphic mascot platformers were all the rage back in the 1990s to the point where, in a landscape featuring a gun-toting jackrabbit, an acrobatic bat, a superpowered earthworm, and an intergalactic adventurer, a sword singing possum with a rocket pack doesn’t seem all that strange! Designed by Nobuya Nakazato, the man behind many of the notoriously challenging Contra videogames (Konami, 1987 to present), Rocket Knight Adventures was lauded as one of the best titles available for SEGA’s all-powerful Mega Drive. Though a popular and well-regarded title, Rocket Knight Adventures was essentially Sparkster’s peak; a Super Nintendo port was allegedly cancelled and its sequels were both region-locked and ridiculously expensive for decades. While Sparkster received a six-part story in Sonic the Comic (1993 to 2002), he didn’t get an animated spin-off like some of his peers and remained in obscurity until Climax Studios attempted a revival in 2010. Mixed reviews notwithstanding, the game captured a lot of Rocket Knight Adventures’ spirit and long-time fans of the franchise finally got a modern re-release of the original three games with this Re-Sparked! collection, a warmly received release that included a handful of bonus materials to celebrate the unfairly forgotten series.

The Plot:
When the Kingdom of Zephyrus is invaded by Emperor Devilgus Devotindos’s pig army, heroic Rocket Knight Sparkster fights to rescue Princess Sherry from the clutches of his rival, Axel Gear, and stop their forces.

Gameplay and Power-Ups:
Rocket Knight Adventures is a 2D, sidescrolling action platformer with elements of run-and-gun action and some sidescrolling shoot-‘em-up sections. Players take control of Sparkster, the titular Rocket Knight, a possum clad head to toe in armour, armed with a sword, and carrying a surprisingly versatile rocket pack on his back. You swing Sparkster’s sword with A or Y, sending out an energy spiral to attack enemies from a set distance, and press B to jump, with Sparkster snagging poles and branches with his tail. By holding A or Y, you charge Sparkster’s rocket pack; once the meter is full and flashing, you can release and Sparkster will fly off in the direction you press. You must often use this manoeuvre to richochet off walls to progress higher in stages, sometimes over lava, and to blast between vines over large, spiked balls. If you don’t press a direction, Sparkster performs a grounded spin attack to deal damage and reflect certain projectiles and Sparkster is often invulnerable when performing his rocket attacks. The rocket pack can take some time to charge so it’s worth planning ahead if you’re looking to quickly blast away and you must often blast off while jumping for additional height, either to reach doors, platforms, or high up goodies. Sparkster has a large health bar (represented by hearts) but it’s whittled down quite quickly. Apples and bananas will partially or fully fill it and you can snag a handful of generous 1-ups along the way. You also earn extra lives if you collect enough points, receiving a bonus at the end of each stage. Before you start, you can also adjust the game’s difficulty, which changes how many lives and continues you have, though trust me when I say the game’s hard enough even on “Easy” mode.

Rocket through colourful stages and take on tricky platforming as the sword-wielding Sparkster.

Occasionally, Sparkster collects a power pack or is dropped into an area where he flies indefinitely. These sections turn the game into a high-speed, action-packed autoscrolling shoot-‘em-up and have you weaving Sparkster between missile and other projectiles while picking off airborne enemies. Sparkster can also swim, automatically treading water and moving through the drink depending on your button presses, attacking with his sword and blasting from the water with his jet pack. However, his movement becomes noticeably sluggish and his hit box alters, making it tricky to navigate the tight, hazard-ladened depths. Each stage tests Sparkster’s platforming and rocket pack skills in different ways, from simple ricochet tricks to jumping to vines and branches, to racing from hazards (such as walls of fire, spiked knights, and crushing floors) that spell instant doom to the Rocket Knight. Platforming is largely satisfactory here and the usual tropes of swinging platforms and precarious handholds appear, but you’ll also be riding mine carts, leaping across bottomless pits and ducking under spiked ceilings. Stage 2 has you pass behind waterfalls using special platforms to progress, Stage 3 sees you using the reflective surface of rising and falling lava to hop to platforms, while Stage 4 has you clambering on the underbelly of Axel’s ship trying not to plummet to your doom. When on the roof, and during the final confrontation with Axel, you battle a strong wind that’ll suck you to an instant death, while Stage 5 has you race through claustrophobic tunnels avoiding knights that kill you on contact. The challenge is palpable but increases as you progress, easing you into the game’s surprising difficulty and introducing new gimmicks that test how you control Sparkster. Unfortunately, there are no power-ups to aid you (no shields or invincibility or anything like that) and you’re limited by your lives and continues, though thankfully this version includes rewind and save state features that finally allowed me to beat the game after more than thirty years!

Various gimmicks and dangerous hazards make the late game a considerable challenge.

It’s not long before hazards become troublesome for Sparkster. Each stage is split into multiple, interconnected areas, with the first stage culminating in you traversing Castle Zephyrus, which is full of burning pits and sees you being chased by a wall of fire. This will instantly kill you if you don’t keep moving, made harder by the stone walls you must hop over and the flame bursts you must duck to avoid, though this is all practice for a similar section in Stage 5, where you must run, ricochet, and jump away from Axel as he pursues in an insta-death mech suit! While it’s simple enough to hop to tree branches in Stage 1, Stage 2 introduces spiked balls to avoid while jumping, while spiked ceilings and surfaces dog both your high-speed jaunts on mine carts and your efforts to control a propeller platform in Stage 5. Stage 4 sees you taking out bazooka-wielding pig soldiers in tight corridors, your progress barred by temporary energy barriers, while Stage 5 introduces the rising floor gimmick that ended my runs as a kid. With enough speed and timing, you can outrun this hazard but it’s very tight, even when abusing the rewind feature. This stage also includes teleporter doors that represent your goal in each section, though they’re functionally no different from the regular doors you enter prior to this stage. Stage 7 introduces a springing ground, almost a quasi-anti-gravity feature, to boost your jumps, though it’s limited to snagging some out of the way goodies and battling a boss. The autoscrolling sections start off simple, with you mowing down aerial enemies and attacking a giant, robotic snake, but your manoeuvrability is tested in Stage 5, where you weave between gigantic missiles and cross-crossing gunfire and engage in glorified dog fights with mech walkers. Things are much simpler when you’re blasting through an asteroid field in Stage 6, though you must still be mindful of the small projectiles that can get lost against the stars. Stage 5 also culminates in you taking control of your own giant mech, though your options are simply limited to stomping back and forth and swinging its buzzsaw arms with A or Y; there’s no block or charge attack or anything.

Presentation:
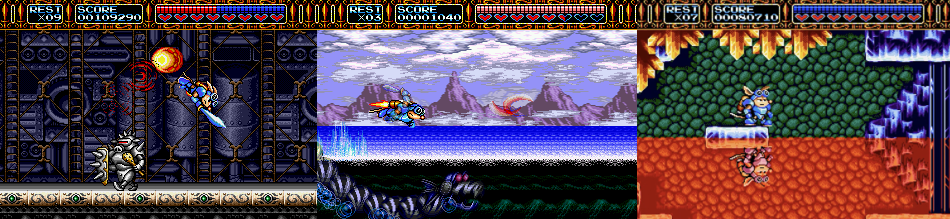
Rocket Knight Adventures is and always has been a joy to play, purely from a visual standpoint. Released at the peak of the Mega Drive’s popularity, when mascot platformers were extremely popular, the game oozes colourful, cartoonish appeal. Presented with a steampunk-style fantasy land, players explore environments teeming with personality. You see the castle being attacked in the background of the first stage, panicked civilians and chickens run and flutter, and enemies are sent into a panic when hit, running around with their briefs on show! Though he can be a little clunky and his hit box is quite large, Sparkster is a wonderfully realised character. Blasting past the Konami logo at the start and standing proud against the title screen and in the brief prelude, he radiates heroism. Not only does Sparkster bop up and down by default, but he also judges the player when idle and calls to them to get a move on. He also squeals in pain when killed, reacts with panic when falling, and regularly advances towards his objective and enemies in the handful of cutscenes between stages. As if these stunningly lively and detailed visuals weren’t enough, Rocket Knight Adventures is bolstered by an infectious soundtrack, one of my favourites of the era. However, it’s true that the game peaks with Stage 1’s iconic and instantly memorable overture, which is rightly evoked for the end stage score tally. Still, the boss themes are really good and add to the tension when facing these troublesome foes. One negative about Rocket Knight Adventures, however, is the slowdown which occurs when there’s too many sprites on the screen. Thanks to the large scale of some enemies and the many explosions and effects peppering certain moments, the game can struggle along for a few seconds. It’s never impacted my progress, but it is noticeable. Furthermore, the title screen, despite showcasing large sprite art for Sparkster and the game logo, is surprisingly bland, especially compared to the detailed environments.

A visually impressive treat with one of gaming’s best and most memorable soundtracks.

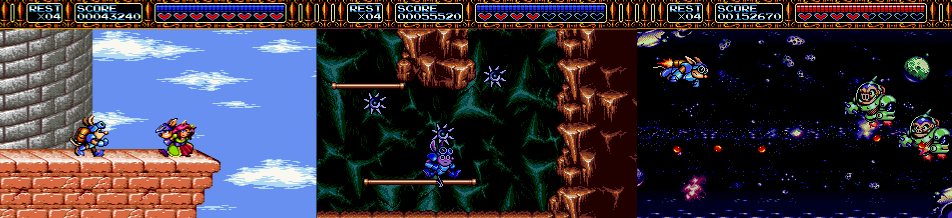
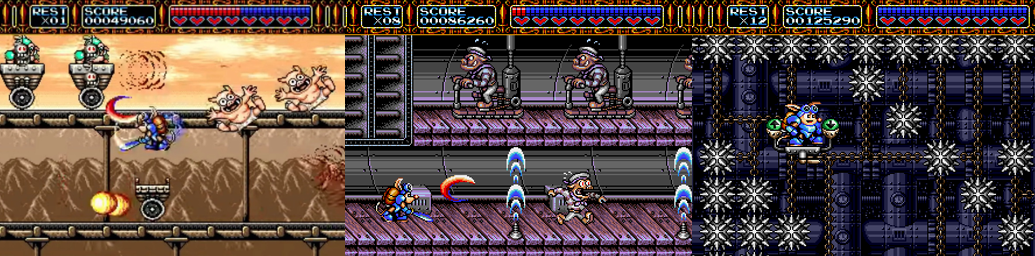
Things start out safe enough with Stage 1’s flat fields, which act as a testing ground for players to test Sparkster’s moves, but even this area is full of detail, from the aforementioned castle in the background to the besieged homes and ransacked environment. As you blast through the skies, mountains and water rush past, with a lovely splash effect appearing as you skim the water’s surface. Sparkster loves to charge head-first into enemy strongholds, the first of which includes busts, skewed portraits, and windows where the first stage’s boss looms. While Stage 2 starts comparatively bland, you’re soon climbing vines and avoiding spikes amidst a large waterfall and racing around on high-speed mine carts. Stage 3 begins in a quartz cavern with a reflective effect applied to the lava, extends to an underwater cavern, and ends with you battling a gigantic robotic fish in a volcano. Stage 4 takes place on Axel’s ship and really leans into the steampunk aesthetic, having you navigate inside and outside the ship, clambering to poles, jumping to platforms, and passing energy barriers powered by pigs on treadmills! Stage 5 takes the steampunk aesthetic to the next level as you blast through the skies of a heavily polluted, heavily guarded pig city. There’s a real depth to the polluted backgrounds that’s married with the mechanical facility to crash into, a robot factory full of narrow corridors and insta-kill hazards. Stage 6 and 7 add a science-fiction twist to the steampunk fantasy and see Sparkster blasting through an asteroid field and infiltrating Emperor Devotindos’s “Pig Star” space station. Though you’re limited to a few rooms and boss battles here, you can see the stars and asteroids in the background and end up falling back to Earth in an escape pod, burning up on re-entry and showered by debris from the exploding space station! The large sprite art returns for the end credits, which feature Sparkster heroically flying towards the camera, and the pantomime-like cutscenes add to the game’s visual charm, with Princess Sherry, King Zephyrus, and Axel gear all exuding the same personality seen in Sparkster’s cartoonish animations.

Enemies and Bosses:
The Devotindos Empire is primary made up of armour-clad pigs, disposable ground forces who stand no chance against Sparkster’s sword and rocket pack. Though they leap from the background, drop down on balloons, and wield swords of their own, the pig infantry is easily dispatched in a single hit. Occasionally, you battle large groups of them, but you can simply rocket through them, making them more of a nuisance than anything. The sailor variants are a bit more formidable thanks to their bazookas and you being confined to tight corridors, as are the jet ski riders, who fire a spread shot while you’re floundering in the water. Pigs also race around in steampunk-style cars and chicken walkers, which can be trickier to put down as they’re much bigger and take more hits to defeat. At least they can be defeated, though, which is more than can be said of the later spiked armour variants. You’ll simply bounce off these guys and be killed if you touch them, so you must run from them and lure them into a molten metal trap to end their threat. Emperor Devotindos bolsters his forces with other robot minions, such as robo-owls who can spoil your jumps and robotic duplicates of himself, which spring to life at the worst possible moments, take a few hits to put down, and offer a significant obstacle thanks to their large hit boxes and pursuing you across the environment.

The piggy pests pilot some perilous mechanical marvels that’ll test your reflexes.

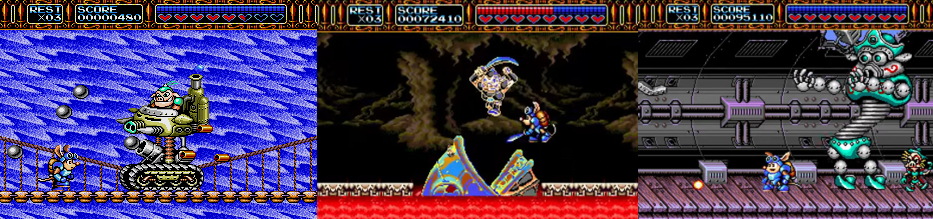
The pig infantry also controls numerous large, steampunk-style craft to act as mini- and end bosses. The first is a lumbering tank that fires slow moving cannonballs and tries to roast you with its flamethrower. Your best bet is to rocket behind it to quickly pummel it, but you’re then forced to avoid and frantically slash it as it pinballs around in the rapids in an exploding frenzy. A large mech greets you at the start of Stage 2, taking up the background and sporting extendable arms with buzzsaw-like hands. You must battle the finnicky swimming controls to avoid being hit, attacking the glowing red sphere on the front of the mech to put it down. Stage 3 sees you battle a gigantic crab mech, attacking its extendable pincers and avoiding its ring shots once they’re destroyed, floating precariously close to the craft to hit its cockpit. This stage ends with you fighting a giant robot fish in a battle not unlike the Lava Reef Zone boss. You must jump to floating platforms, which get faster and faster, avoiding the lava and the shower of pellets the fish spits. When the pilot appears, be sure to smack him a few times and grab the bananas if you’re low on health. A more powerful pig walker attacks in Stage 5, one that fires dual lasers and is protected by an energy barrier you must whittle down before the craft can be destroyed. Finally, Captain Fleagle constantly hounds you in Stage 4. First, he hides behind an energy barrier and tosses bombs which you must reflect back at him (the timing can be tricky and the bombs have a large blast radius, so watch out!) You must avoid Captain Fleagle’s shots on the roof and send him running once more. After knocking sentient bombs onto a flying mechanical pig head on the underside of the ship, Captain Fleagle calls in his large mechanical doppelgänger. Mirroring Captain Fleagle’s movements, this mech causes debris to  by shaking its hips and fires large blasts from its torso, giving you a small window to attack it. Once it’s destroyed, the battered Captain Fleagle runs and jumps around in a panic as the battleship explodes, finally finished for good after a few whacks with your sword.

Giant, steampunk-style robots and mechs often act as gruelling end of stage bosses.

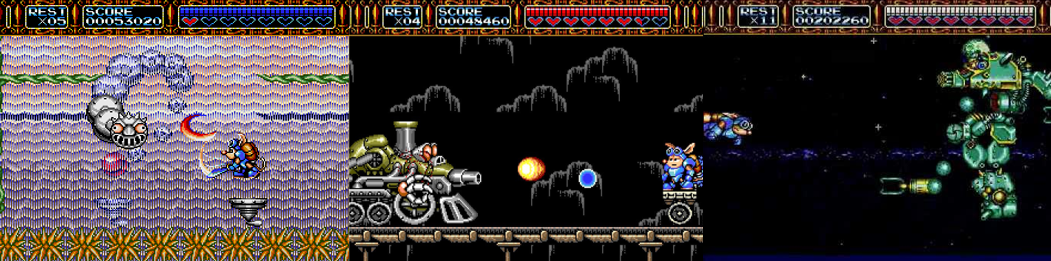
Gigantic mechanical enemies also appear as mini- and end bosses, such as the Snake Mecha that lunges at you in the first flying section and the Big Spider at the end of Stage 1. This thing crashes its head through the castle walls and ceilings, giving you a chance to land some attacks, but you must avoid standing in the wrong place and being smacked by its spiked tail. Stage 2 features a weird collection of spheres, not unlike a mechanical caterpillar, that dives in and out of a waterfall. You must do the same and blast between vines to avoid its wide arc and pummel the weak spot on the end of its tail, which is pretty tricky given the hazardous environment. Stage 2 ends with you battling a menacing steampunk train that charges towards you firing slow shots and then transitions to an upper path, swinging and extending its claw arms, before finally firing bouncing shots from its wrecked behind, its weak spot changing each time. A satellite-like robot challenges you in Stage 6’s asteroid field, blocking your shots with a shield and firing a dual spread shot, and you must take on the strangely sized pig mothership, too. Since this hurts you if you touch it and fires relentlessly, you must target the many turrets to deal damage, switching position as it teleports in and out, taking out its minions, and dispatching its giant mouth cannon before you get fried! As the fight progresses, the cockpit detaches, leaving you to destroy the main body of the ship. However, the cockpit transforms into a mech that fires pellets, a ricocheting laser, and flailing its arms. You must strike the ball it bounces between its hands to deal damage, then fly around as it bounces around the screen in a frenzy, which makes for a troublesome boss due to its large hit box and the lack of health pickups.

Axel Gear and the persistent Emperor Devotindos won’t go down without a fight!

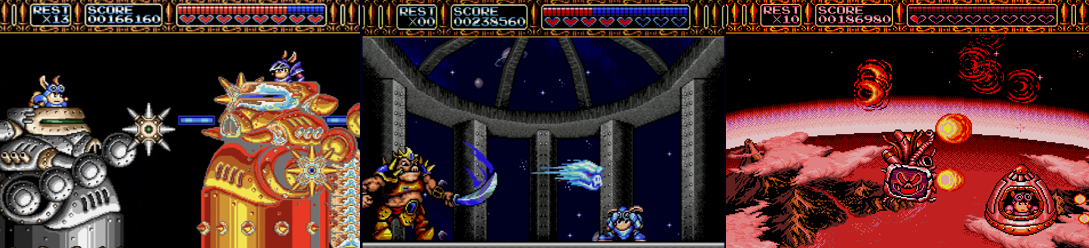
Your most persistent enemy is rival, corrupt Rocket Knight Axel Gear, who kidnaps Princess Sherry and constantly ducks you. When you finally go toe-to-toe with Axel in Stage 5, it’s in a Rock ’Em Sock ’Em Robots mech battle. After racing to your mech, you must avoid his hits and tap A or Y to swing your buzzsaw-like, extendable arms and damage his craft. It’s a bit clunky and difficult to avoid damage but, eventually, Axel’s mech is destroyed. Axel then appears at the end of the asteroid section of Stage 6, now sporting a gigantic laser cannon and firing smaller homing missiles. You must loop behind him to attack and take out his smaller shots, watching for his circular movements as he prepares each shot. Axel than challenges you to a more traditional sword fight mid-way through Stage 7’s gruelling boss gauntlet. Here, Axel sports the same abilities as you, swinging his sword, unleashing a rocket spin, and ricocheting about. Note that your sword beams cancel each other out and he’ll eventually cause explosive decompression! You must cling to the poles, attacking Axel with your sword beam and avoiding his missiles and circle motions, finally flying with your rocket charge when he’s charging his own. Emperor Devotindos is the game’s final boss and certainly doesn’t go down easily! Your first battle isn’t too bad, with you simply dashing from across the screen and charging into the pig monarch, dodging his progressively faster projectiles. After enough hits, he reconstitutes himself into a maniacal cyborg and you must avoid his extendable legs and rocket into him diagonally. Emperor Devotindos downloads his consciousness into the Pig Star’s main core, causing it to float, teleport, and bounce around firing various laser spreads that you must avoid while charging at the small red weak spot. As you escape the exploding Pig Star, Emperor Devotindos (now little more than a television screen) pursues you, thrashing tentacle-like limbs, firing ring projectiles, and barging into you. You cannot attack here and must simply survive until atmospheric re-entry finishes the bovine bastard off, a daunting prospect as Emperor Devotindos is hard to avoid and deals a lot of damage.

Additional Features:
There are four difficulty settings to challenge in Rocket Knight Adventures, with each one altering how many lives and continues you play with and slightly altering the end text. If you beat the game on anything other than the hardest difficulty, you’ll be challenged to try a harder difficulty once the credits have rolled. Interestingly, you can input a code from the pause screen to record your progress as the game’s demo mode, though the level select code apparently only works in the Japanese version of the game. Luckily, Rocket Knight Adventures: Re-Sparked lets you pick between the American and Japanese versions of the game and offers a host of additional features, too. There’s the slick, sexy, anime style opening that makes me wish we’d gotten a cartoon back in the day, various filter and border effects, and the always helpful rewind and save state features. You can also play a boss rush mode and view various advertisements and concept art for the game, peruse the box art and manuals, and freely listen to the game’s kick-ass soundtrack. The PlayStation 4/5 version also comes with numerous Trophies for you to earn, with nine specifically earned from playing this game (best done on the hardest mode to stack them) and clearing its boss rush.

The Summary:
I’ve been in love with Rocket Knight Adventures since I was a kid. I was captivated by its bright, cartoonish visuals and fun, action-packed gameplay from the start and regularly find myself humming that memorable Stage 1 theme in my day-to-day life. One of the biggest gripes of my life-long gaming career is that I was never able to beat this game back in the day; that damn crushing floor always ended my playthroughs. However, this version of the game changed all that. It’s telling that I needed the rewind and save state features to finally beat this game and shows just how challenging Rocket Knight Adventures is. It lulls you into a false sense of security by easing you into the challenge, slowly adding more and more obstacles and insta-death hazards and leaning more on split second reaction times as you progress through its detailed and varied stages. Yet, while the difficulty curve is off-putting at times and the game occasionally seems needlessly unfair and cheap (infinite continues would’ve helped mitigate this), I still find it a hugely enjoyable experience. Sparkster is a fantastic character and often unfairly forgotten in the pantheon of mascot platformers and I loved his sword- and rocket-based gameplay. The ricochet mechanics were a neat feature; however, if anything, they were underutilised and the game relies on traditional platforming tropes and mechanics than its unique selling point, which is a bit odd. I loved all the big enemies and bosses, the switch to sidescrolling shooter sections, and the sheer variety on offer. No two stages are the same and the game’s constantly throwing new gimmicks at you, from mine carts to flying platforms to mech battles and races through mazes. There are few games as visually appealing on the Mega Drive than Rocket Knight Adventures, which has such franchise and merchandise appeal that I’m honestly surprised we didn’t get more games and tie-ins, such as toys and comics and cartoons. Still, that doesn’t diminish how enjoyable Rocket Knight Adventures is. To this day, it’s one of the best platformers on the system and this Re-Sparked version just makes it more accessible and entertaining than ever before.

My Rating:

Rating: 5 out of 5.

Fantastic

Was Rocket Knight Adventures in your Mega Drive library back in the day? What did you think of the rocket-based mechanics and the colourful visuals? Which of the game’s bosses was your favourite? Did you manage to clear the game without modern quality of life features? Which of Sparkster’s sequels was your favourite and would you like to see him brought back from obscurity? Either way, whatever your thoughts on Rocket Knight Adventures, leave a comment below, consider supporting me on Ko-Fi, and check out my other Rocket Knight reviews.

Game Corner [DK Day]: Donkey Kong Country 3: Dixie Kong’s Double Trouble! (Nintendo Switch)


In 1981, Shigeru Miyamoto and his team at Nintendo R&D1 created Donkey Kong, an arcade title that introduced gamers to two of Nintendo’s most recognisable characters: Mario and Donkey Kong. To celebrate everyone’s favourite King Kong knock-off, I’m dedicating a few days this week to gaming’s most famous ape!


Released: 18 December 2020
Originally Released: 18 November 1996
Developer: Rare
Also Available For: Game Boy Advance, Nintendo Wii (Virtual Console), Nintendo Wii U (Virtual Console), Super Nintendo Entertainment System (SNES)

The Background:
After establishing themselves in the United States with the financial and critical success of Donkey Kong, Nintendo captured the home console market. While Donkey Kong was still relevant during this time, legendary British developers Rare reinvigorated the cantankerous ape with their Donkey Kong Country series (Rare, 1994 to 1996). Debuting in 1994, the first game pushed the SNES to its limits, reimagined Donkey Kong for a new generation, and became the third-bestselling game on the SNES. After garnering overwhelmingly positive reviews, Donkey Kong Country was quickly followed by a purposely tougher and less linear sequel that was also critical and commercial hit. Emboldened by their success, rare fast-tracked a third game, using the same pioneering technology to convert prerendered graphics into 2D sprites and seeing Dixie Kong joined not by the titular ape, but her baby cousin! Although Donkey Kong Country 3: Dixie Kong’s Double Trouble! sold over 3.5 million units worldwide, the impending release of the Nintendo 64 is said to have impacted sales. Reviews were largely positive, praising the improved visuals and the expanded gameplay mechanics, though criticising the lack of innovation compared to is predecessors. Like the last two games, Donkey Kong Country 3 was ported to the Game Boy Advance (to some criticism) and featured on Nintendo’s online services, such as this version for the Nintendo Switch.

The Plot:
When Donkey Kong and Diddy Kong suddenly disappear in the Northern Kremisphere, Dixie Kong teams up with her baby cousin, Kiddy Kong, to brave the forces of the robotic KAOS and rescue their family.

Gameplay and Power-Ups:
Just like the last two games, Donkey Kong Country 3: Dixie Kong’s Double Trouble! is a 2D, sidescrolling platformer that utilises 2D sprite conversions of pre-rendered graphics. Like in the second game, Donkey Kong is entirely absent and no longer playable, and this time his nephew joins him on the bench to allow Diddy’s girlfriend, Dixie Kong, to take the spotlight. As ever, you have three save files to work with and three game modes: you can tackle the adventure alone, tagging between Dixie and Kiddy with -, team up with a friend for two-player simultaneous co-op, or go head-to-head with your friend to see who can play better. Donkey Kong Country 3 retains the same controls and fundamental mechanics of its predecessors, meaning you’ll be jumping and swimming with B, attacking with Y, teaming your Kongs up or grabbing barrels with A, and throwing both with Y. Each Kong plays a little differently, with Dixie being lighter and faster and Kiddy being slower and heavier, and also has a different method of attacking. Dixie retains her ponytail twirl (which also allows her to glide across gaps to greatly aid platforming) while Kiddy rolls ahead and can skip across the surface of water (though his stunted jump makes him more of a liability). You must smash DK barrels to spawn your partner if they’re lost because, without them, you’ll lose a life the next time you’re hit. However, you can once again accumulate extra lives by grabbing various colourful balloons, collecting 100 bananas, finding the four KONG letters, in every stage, and playing Swanky Kong’s Sideshow mini game. To play this, you’ll need silver Bear Coins, which are also hidden in stages, while larger, golden DK Coins are earned by defeating the tricky Koin Kremlin hidden in each stage (usually by finding innovative ways of chucking a metal barrel behind them). Those hoping for new in-game power-ups will again have to settle for the odd invincibility barrel (I literally encountered one in my playthrough), and you must still manually save at Wrinkly Kong’s save cave (though the Nintendo Switch’s rewind and save state features largely make this irrelevant).

There’s a greater emphasis on exploration and collectibles thanks to the Kongs’ new vehicles.

There is a far greater emphasis on collectibles in Donkey Kong Country 3, with more hidden items scattered throughout every stage and a family of bear brothers on hand looking for you to bring them special items (which allow access to additional areas on the overworld), often awarded after defeating bosses, offering hints, or selling you items. As you explore each stage, you’ll inevitably find secret hideaways or special barrels that’ll blast you to a timed bonus challenge in these, you must collect stars or green bananas or defeat all onscreen enemies against a strict time limit to earn one of the special coins, or even a Cog. Additional barrels will blast you across the environment (sometimes right into bottomless pits or enemies if you’re not careful), rocket you about, or shield you from enemy projectiles when climbing ropes. Dixie and Kiddy can again call upon a few animal friends to aid them, transforming into, riding, or being joined by them depending on the level. Enguarde, Squitter, and the parrots Squarks and Quarks return from the last two games and function the same (cutting through water, spitting webs, flapping about, and firing peanuts, respectively) alongside three new “First-Class Friends”. Ellie the elephant is the primary addition, though I found her to be a poor substitute for Rambi. She’s smaller, slipperier, and isn’t much use except in certain situations where you need her water spitting technique. Parry was similarly disappointing, simply flying above you and collecting items or defeating certain enemies, and Nibbla was a constant threat since it will take a bite out of your Kong if you don’t swim near enemies and keep it fed. Funky Kong also returns and, this time, builds various vehicles for you to use to navigate the main map. You start out with a motor boat, but soon upgrade to a hovercraft to pass over rocks, a turbo ski to traverse waterfalls, and eventually a gyrocopter, though you’ll need to search high and low and replay each stage to collect everything needed to build these vehicles, which also open up new areas of the map for you to challenge new levels, meet new bears, or discover Banana Fairies.

Varied gimmicks and challenges await, but it’s all a bit too familiar and uninventive.

While bottomless pits and thorny mazes weren’t as prevalent this time around, and Donkey Kong Country 3 generally seemed much easier an experience (as long as you’re not going for 100% completion), it’s still a tough game. Hit boxes are quite large, both Kongs are quite clunky to control, and it’s easy to slip off platforms or down pits even when on stable ground, much less the snowy landscapes and moving platforms you’ll find. Ropes were emphasised far ore than barrels, with you hopping to ropes, clambering up them, or being dragged along by them, all while avoiding Buzzes. Minecarts are gone this time, replaced by a few fun, high speed toboggan challenges, though you’ll still encounter the odd dark, murky level (requiring you to hit special fish to light up the area or use overhead lights). you’re essentially defenceless when swimming, as ever, unless you switch to Enguarde, and vats of molten steel, toxic gunk, or lightning bolts will cause you to rethink your jumps. In “Krack Shot Kroc”, you must hide behind metal shields to avoid an offscreen sharpshooter; you’ll be bouncing off barrels fired by Bazuka Kremlins to cross gaps, and must contend with poisonous water that reverses your controls in “Poisonous Pipeline”. Occasionally, the game switches to a quasi-third-person perspective to have to you toss coconuts or snowballs at targets, you must defeat Sneeks in giant wheels and grab overhead pulleys to open doors, and outrun a gigantic ripsaw in “Ripsaw Rage”’s autoscrollers chase. Some stages see you at risk of falling or looping around by dropping through trapdoors, many contain moving wooden platforms, and occasionally hop up moving or temporary platforms or to barrels to progress to the end goal. It’s all very familiar, though with a largely reduced challenge in terms of onscreen hazards. The game’s quite generous with 1-ups and chances for extra lives, but you’ll definitely want both Kongs on hand, and to favour Dixie, since you’re often tasked with making tricky jumps past, through, or over troublesome enemies and it can be easy to screw up your jump and drop down a pit.

Presentation:
Donkey Kong Country 3 retains the same presentation as the last two games, though even I, someone who’s never been the biggest fan of the franchise’s aesthetic, have to admit that it’s probably the cleanest, best-looking game of the trilogy. Though there’s no introductory story, there’s a fair bit of text as you chat with your allies or are taunted by enemies, and Dixie and Kiddy have a decent amount of personality. Both have idle poses and fun reactions to being hurt or left alone, though the end of level celebrations are gone and basically all of the sound effects are recycled from the last two games. Kiddy might be a fun, childish little soul, but he’s janky as anything to control, which hampered his utility in my opinion and I would’ve liked to see him have a more memorable playstyle to differentiate him from the other Kongs. The title screen is far better than before and there’s more emphasis on exploration here, with new areas opening up as you explore the larger overworld and non-playable characters requiring specific items to unlock additional areas or map features. However, there isn’t much to differentiate the three basic vehicles you acquire. I would’ve liked to see a submarine to access an underwater world or a drilling machine to burrow into a mine, rather than limiting them all to water traversal. The music has taken a hell of a downgrade this time around, too. Sure, it’s decent enough but there’s nothing as memorable as the first game and I just found it to be jaunty noise rather than fun earworms. Similarly, Donkey Kong Country 3 employs a similar approach to its stages as the last two games, with a handful of areas being recycled throughout your adventure. You’ll be hopping past a pier, exploring drainpipes, traversing an underground cave, and swimming in murky coral reefs, with the odd jungle and dungeon thrown in for good measure.

While the visuals are at there best, nothing really jumps out as especially memorable.

I found few of these to be that interesting, to be honest, or different from what came in the last two games. There are some fun background effects at times, such as the time of day changing or a snowstorm raging, or some areas being seeped in darkness. Donkey Kong Country 3 employs colour palettes to give the illusion of variety, changing vast of molten metal to toxic gunk or giving gigantic, hollowed out trees an autumnal glow. I quite liked these latter areas, to be fair, which see you jumping between branches, navigating claustrophobic trees, and outrunning that aforementioned ripsaw. Snowy peaks, with their frigid cabins and snowmen, were also fun, if few and far between, and I did like the cliffside stages, where waterfalls loom in the background and must be moved behind or clambered up using barrels and such. Rather than battling through mines, you’ll be dropping down trapdoors and opening doors in mills; the jungles are full of ancient ruins and raging thunderstorms; and dodging snipers in factories. As mentioned, there are loads of vines and ropes this time, which I definitely prefer to thorns and loads of pits, but everything just felt a little played out for me. while Donkey Kong Country 3 performs really well and looks great for what it is, there were some instances of slowdown and odd hiccups that took me out of the game, and it definitely felt like the game was struggling to justify itself at times and needed more new gimmicks to impress. Indeed, while the game emphasises collectibles on the save screen and in the Brothers Bear’s dialogue, this feels like an afterthought when you’re playing and couldn’t been played up more, like presenting you with unique visual challenges to get what the bears are looking for or Funky’s last piece of scrap.

Enemies and Bosses:
While Dixie and Kiddy are facing a new enemy this time around, you’ll still be dealing with the remnants of the Kremlin army. And “remnants” is a good way to describe them as these guys are far more stripped down this time around, consisting of a regular grunt who just walks about, a spring Kremlin who can give you a boost with good timing, and a larger blue one who’ll shrug off your regular attacks. The Bazuka variant caused me a bit of trouble as it was tricky timing my jumps to bounce off their barrels, while the Kopter Kremlins could be as annoying as the Buzzes, mechanical wasps that hover or swoop about right in your path. Kremlins also hide in barrels this time, clambering on ropes, tossing explosives, or trying to push you down pits, not unlike the Koindozers (who you can trick into giving you a boost). Little crocodiles, dung beetles, rats, and sliding penguins must be hopped on or avoided, you’ll use hopping spider platforms to reach higher areas, and must take cover behind half barrels when Minkeys toss their acorns. Red porcupines spin at you, an invincible swarm of bees incessantly chase you in “Riverside Race”, and various marine animals (from voracious Bazzas, spiny Lurchins, and clown-like Kocos) lurk in the water. You can pop Booty Birds to grab collectibles, dodge fireballs fired from the background by Karbines, and carefully position yourself so lightnign strikes your enemies rather than you! each stage naturally ends in a boss battle, though you get different rewards depending on which boss you’re fighting, two are recycled in the game, and one takes the form of a snowball fight. This is actually one of the more innovative bosses as Bleak pops up from behind snowy ridges in the fore-, mid-, or background tossing snowballs or firing a spread from his top hat. This can be a tricky boss due to the Kongs’ hit boxes and how small the target is you must hit, but it hints at how Donkey Kong Country 3 could’ve used its new mechanics to help it stand out (like, why not have a toboggan race against a boss?)

The big, challenging bosses task you to think outside the box and hint at the game’s full potential.

The first boss you face is Belcha, a giant barrel who spits out barrels and tries to force you down a pit. Immune to conventional damage, you must break open its barrels and toss the bugs that emerge into its mouth until you force it down that same pit. I quite liked Arich, the giant spider that awaits at the end of Kremwood Forest, purely because it was visually very interesting. You must dodge Arich’s erratic movements and venom spit to hop on its back and grab the barrel sitting there, then toss this into its face, which is quite tricky due to the spider’s gigantic size. Squirt was easily the most frustrating boss since you must fight it while riding Ellie, sucking water from Squirt’s waterfall and spitting it into the creature’s eyes when they pop out. However, Squirt fires a continuous stream of water that’s incredibly difficult to fight against, meaning it’s very easily to slip to your doom. Barbes wasn’t exactly a cakewalk either. Fought underwater, while using Enguarde, you must charge into the Lurchins it spawns to then attack its weak spot, but the timing is tricky and its so big and fills the screen with spines that I struggled quite a bit. You battle the malicious tin can robot KAOS twice, once in Mekanos and then as the penultimate boss. In both fights, you must dash beneath it, avoiding its jet burst, and bop its head using the propeller-like blades that emerge from its body. KAOS defends itself with boxing golf fists, its laser-firing head, and a missile barrage, though barrels turn the tide in the second fight. Once you defeat it, King K. Rool (in the guise of mad scientist Baron K. Roolenstein) attacks in a multi-stage battle. You must dash beneath him as he hovers about, grabbing barrels to toss at his butt, while avoiding the electrical bolt he fires, hopping to pulleys, and using stationary and moving wooden platforms. While this is a troublesome fight, it’s not too bad to get the hang of with liberal rewinding, though a much tougher rematch awaits if you unearth Krematoa.

Additional Features:
Every time you save your game, you’ll get a glimpse of you far you’ve progressed and how many collectibles you’ve found. When you finish the game, you’ll be played on a high score table according to completion percentage and be granted a title by Cranky Kong, as well as being treated to a roll call of the game’s enemies and characters. If you want to hit 100% completion, you must reload your save and go searching for KONG letters, defeat Koins for DK Coins, and collect Bear Coins, to say nothing of acquiring the different items for the Brothers Bear and Funky Kong. While the skis patch are easily acquired by defeating bosses, you must buy the mirror, trade it for a wrench, and hunt down presents and other trinkets to access bonus areas. Some of these house Banana Fairies, with the legendary Banana Queen being rescued if you find all the DK Coins and acquire the gyrocopter. By using the turbo ski, you can bring Krematoa up from the depths and tackle its five additional, challenging stages, including a tougher rematch with Baron K. Roolenstein. There are various mini games and challenges to tackle not just in each stage, but at Swanky’s Sideshow, a few fun cheats you can enter by renaming your save file, and of course the usual save states and rewind features when playing this version. If you’re playing the Game Boy Advance version, the game comes with an autosave, a new seventh world, additional collectibles, and graphical and mechanical tweaks to the stages and bosses for an additional challenge.

The Summary:
There isn’t anything fundamentally wrong with Donkey Kong Country 3: Dixie Kong’s Double Trouble!, it’s just not especially innovative or memorable and does little to stand out against its predecessors. The game is simply more of the same, with a noticeable reduction in the moment-to-moment difficulty while still being challenging, though largely because of how clunky the Kongs can be and the cheapness of the hit boxes and enemy placements. I wasn’t a big fan of Dixie Kong in her debut title but she was my go-to character here as Kiddy Kong is just a useless lump, barely utilising his incredible strength and existing simply as a health bar for me. while the visuals are the best they’ve ever been for the series and things have been expanded, particularly on the overworld, I wasn’t exactly blown away by the game’s environments, which either borrowed to heavily from the last two games or didn’t live up to expectations. While the enemies were largely forgettable, I did enjoy the big, colourful, unique bosses that challenged you to think about how to damage them, though the massive hit boxes and awkward controls made them an uphill battle. I was disappointed that the animal friends were so mediocre and that the soundtrack wasn’t more memorable, and that the game didn’t place greater emphasis on the collectibles. I simply aimed to finish the game and still hit 50% by the end, and felt no urge to help out the Brothers Bear or grab every DK Coin. Donkey Kong Country 3 continues the traditional of the franchise, but it really feels like this was a game that was made simply for the sake of it, with nothing really jumping out at me as being especially appealing or on par with the first game. Yet, it’s s visual treat and a fun little challenge, so I don’t want to be too harsh, but there’s really no reason to play this one over the last two unless you’re really itching for some more DK action.

My Rating:

Rating: 3 out of 5.

Pretty Good

Did you enjoy Donkey Kong Country 3: Dixie Kong’s Double Trouble!? Do you think I was too harsh and were you more impressed by the game’s visuals and mechanics? What did you think to Kiddy Kong and Ellie? Did you help all the Brothers Bear and snag all of the game’s collectibles? Which of the bosses was your favourite and what did you think to the game’s difficulty curve? Which of the Donkey Kong Country games is your favourite and why? How are you celebrating Donkey Kong’s anniversary this year? Whatever your thoughts on Donkey Kong Country, leave them below, support me on Ko-Fi, and go check out my other Donkey Kong content.

Game Corner [DK Day]: Donkey Kong Country 2: Diddy’s Kong Quest (Nintendo Switch)


In 1981, Shigeru Miyamoto and his team at Nintendo R&D1 created Donkey Kong, an arcade title that introduced gamers to two of Nintendo’s most recognisable characters: Mario and Donkey Kong. To celebrate everyone’s favourite King Kong knock-off, I’m dedicating a few days this week to gaming’s most famous ape!


Released: 23 September 2020
Originally Released: 21 November 1995
Developer: Nintendo
Original Developer: Rare
Also Available For: Game Boy Advance, Nintendo 3DS, Nintendo Wii, Nintendo Wii U, Super Nintendo Entertainment System (SNES)

The Background:
After making a name for themselves Stateside with the financial and critical arcade classic Donkey Kong (Nintendo R&D1, 1981), Nintendo captured the home console market with the Nintendo Entertainment System (NES). Largely supplanted by their moustachioed mascot, Super Mario, Donkey Kong gained a new lease of life thanks to legendary British developers Rare. Donkey Kong Country’s (Rare, 1994) revolutionary pre-rendered graphics pushed the SNES to its limits, saw a redesign of Donkey Kong Jr., and became the third-bestselling SNES game. Accompanied by universal praise, development of a sequel began shortly after Donkey Kong Country’s release and was purposely designed to be more challenging compared to its predecessor. Although it utilised the same pre-rendered graphics pioneered in the first game, Donkey Kong Country 2 was designed to be less linear and focus more on speed, leading to Diddy Kong taking the lead role. He was joined by a new character, Dixie Kong, who was designed to offer gameplay mechanics similar to those in the first game but different enough to be unique. Donkey Kong Country 2 was a massive hit upon release, one met by both critical acclaim and numerous awards. The game was seen as an overall improvement in every way and has been ported to both other platforms and Nintendo’s digital mediums, and inspired Retro Studios’ 2020 revival of the franchise.

The Plot:
When Donkey Kong is kidnapped by the vengeful King K. Rool, his nephew, Diddy Kong, teams up with his girlfriend to rescue him from the Kremling army.

Gameplay and Power-Ups:
Like its predecessor, Donkey Kong Country 2: Diddy’s Kong Quest (a clever pun that took me years to pick up on) is a 2D, sidescrolling adventure brought to life using pre-rendered graphics converted into 2D sprites. This time around, Donkey Kong has been kidnapped, forcing you (and a friend, if you have one) to play as his nephew, Diddy Kong, or Diddy’s girlfriend, Dixie Kong, and traverse the Gangplank Galleon worlds to rescue him. You’re given three saves and three player options: either going it alone, tagging between the Kongs with -, playing two-player co-op or playing a “contest” mode against a friend. The control scheme should be immediately familiar to anyone who’s played the first game: you jump with B, attack with Y, grab your partner with A, and throw them with Y. Your Y attack differs depending on which Kong you’re playing as: Diddy performs a cartwheel to hit enemies in his path and add some momentum to his jump while Dixie twirls her ponytail, which lets her glide for a few seconds and thus makes her the better choice for clearing the game’s many gaps and bottomless pits. Your partner acts as your life bar; as long as you have a partner Kong, you can take at least one hit. You’ll need to smash DK barrels to reunite with your partner and collect bananas, KONG letters, and 1-Up balloons to earn 1-Ups. These can also be earned by spending Banana Coins to play Swanky Kong’s Bonus Bonanza mini game, and you’ll need a fair few lives as the game’s platforming and hazard placement can get pretty tough as you progress. Occasionally, you’ll find the odd invincibility barrel but there are no new power-ups included here. You can save your game at Wrinkly Kong’s Kong Kollege, where you can also spend Banana Coins to learn about various game mechanics, or abuse the Nintendo Switch’s rewind and save state feature to mitigate some of the game’s difficulty.

Diddy, Dixie, and their buddies hop and battle through stages filled with tough hazards.

Whereas Donkey Kong and Diddy Kong controlled very differently in Donkey Kong Country, with one being slower, bigger, and more suited to attacking and the other being fast, nimble, and better suited for platforming, Diddy and Dixie are very similar here. Dixie’s better for crossing gaps, though, and since there’s a lot of platforming and tricky jumps you’re usually better off sticking with her. It’s a shame that Diddy Kong remains unchanged from the last game as there’s little incentive to play as him beyond giving yourself a greater challenge. The Kongs’ animal friends are back, once again freed from crates and opening additional exploration and attack options. Rambi charges through enemies and destructible walls, Enguard slices through water with a sleekness the Kongs can only dream of, and Squawks the parrot spits peanuts with Y. Not only can Rambi charge up a gore, Enguarde attacks with his needle-like nose, and Squawks flies with taps of B, they’re joined by two new animal buddies. Squitter the spider fires a web projectile with Y and creates temporary web platforms with B while Rattly the snake allows you to charge a big leap to reach higher areas. Many of the hidden mini game rooms are played with these companions, too, and multiple animals can be found in certain stages, allowing you to take different routes and acquire different collectibles. The Kongs can also hurl barrels, TNT barrels, cannonballs, and treasure chests, with the latter two activating cannons to bonus games and yielding collectibles, respectively. Your goal is the target at the end of each stage, with each set up to gift different rewards depending on when and how hard you hit the target, awarding you extra bananas, lives, coins, or a KONG letter. Giant DK Coins and Kremkoins are also hidden across the various worlds; the latter are spent at Klubba’s Kiosk to access a bonus world. You can also hire Funky Kong’s airplane to fast travel across the overworld, climb ropes, chains, and ride wind gusts and, of course, blast across the environment using various barrels.

Some incredibly difficult platforming challenges and gimmicks await in this retread.

Barrels either automatically shoot you or you must time your shot to reach an adjacent barrel, often with the risk of plummeting to your death or hitting spiked thorns. Pits, water, toxic gunk, and lava all spell instant death and can be difficult to avoid thanks to some gaps being frustrating to clear. Dixie helps with this, as does bouncing on enemies, but you’ll also want to utilise any animal companions to help squeeze through narrow gaps or around thorns. Some stages have you traveling from the right side of the screen to the left; others force you into a race or a timed challenge. You’ll see many of these in the many bonus rooms, which challenge you to defeat multiple enemies, collect bananas or stars, or reach the end goal after a short obstacle course to earn rewards. Many hazards and gimmicks seen in the first game return here: you’ll ride mine carts and high-speed rollercoasters (hitting lights to open gates and jumping to new tracks), swim through mazes of crates, avoid plenty of pits, and slip on icy ground. Vertical traversal is as prominent as horizontal, requiring you to hop and barrel blast up ship masts as often as you explore the submerged interiors. Sometimes, water, lava, and toxic gunk rises after you, creating a sense of panic as you desperately hop to platforms and climb higher. Others, the floor rises, creating a crushing hazard, or you’re forced to make pixel perfect jumps or fly through thorny mazes. Sometimes, you’ll need to jump on seals to freeze water or cool lava, giving you a short window to slide under enemies or swim to safety. Other times, you’re floating between Zingers, dodging cannonballs, jumping to poles and hooks, and making desperate leaps across chasms to progress. Your animal friends are invaluable in many of these situations but you’ll definitely want both Kongs on hand, especially in the endgame when tight corridors filled with spikes and obstacles make even the simplest movements hazardous.

Presentation:
Donkey Kong Country 2 doesn’t really look or play any better than the first game, in my opinion. I’ve never been a fan of the aesthetic of this franchise and it continues to be ugly, blurry and pixelated here. The sprites, especially, have some mess on them that looks sloppy at times, though I did like how animated and cartoonish the Kongs were. Diddy and Dixie celebrate when you hit the end goal, cry when thrown, juggle and loaf about when left idle, and it’s funny how their eyes comically bug out whenever they see bosses. Each has little exclamations for when they’re hit or victorious and they control pretty well, but they have large hit boxes and can be clunky to move around, making them easy targets for the equally large hit boxes of enemies and hazards. There’s no introduction cutscene this time and the title screen is as basic as you can get, but you can talk to a few more Kongs (including the returning Cranky Kong) for some lore, tips, and to break up the gameplay. The music is mostly the same as before; I recognised some of the tunes from the first game and it’s all very whimsical and enjoyable, if not very memorable. Gangplank Galleon is a more foreboding overworld than Donkey Kong Country’s, featuring lava, dungeons, and a frigid mountaintop. I liked that Pirate Panic starts you on King K. Rool’s pirate ship, essentially starting the game where the first one left off, and the pirate theme continues throughout in the enemy sprites and level layouts.

The visuals, though ambitious, can be muddy and blurry, obscuring the clunky action.

Typically, stages fall into a routine very quickly. You’ll either be hopping about on the deck of a ship, clambering about in the masts up top, or exploring the inside, with these areas being flooded, riddled with lava, or beset by wind and rain. Wind is a particularly dangerous element as, while you can ride updrafts to new areas and it boosts your jump, it also pushes against you and can screw up your platforming. Caves, mines, and frozen mountaintops also appear, with some being remixed into the pirate-themed stages. While the mine cart stages are disappointingly bland, the game makes up for it with Krazy Kremland’s fairground and rollercoaster, where you’ll see fireworks and rides in the background. Stages like Jungle Jinx and Mudhole Marsh can be difficult thanks to the dense forest and contrasting colours, which swallow up the sprites and make for some muddy, ugly visuals. I liked stages set in the beehives, with their sticky nectar offering new platforming challenges, and those like Gloomy Gulch that adopted the haunted forest trope and the scorching volcano aesthetic of Crocodile Cauldron. However, any stages that incorporate the thick, maze-like mess of thorns and brambles can go die in a ditch. By the time you reach Toxic Tower, you’re avoiding toxic gunk in a suitably medieval dungeon before boarding King K. Rool’s steampunk-like airship, The Flying Krock. Gangplank Galleon features many paths, shortcuts, new worlds, and required stages, though it can be clunky to navigate. Also, while Donkey Kong Country 2 performs well, I did notice some frustrating slowdown one I reached K. Rool’s Keep. The game struggled to render all the sprites and hazards, slowing the gameplay to a crawl, and the large hit boxes became aggravating thanks to the sadistic enemy and obstacle placements of the game’s latter stages.

Enemies and Bosses:
King K. Rool’s army is familiar but largely original here in Donkey Kong Country 2. His ships are infested with rats and little snapping crocodiles and seemingly every stage is populated by Zingers, spiked bees whose red variants can’t be killed and who act as much as hazards as they do enemies, flying back and forth, in circles, or in vertical formations that force you to squeeze by. His Kremlin army is still easily dispatched with a simply bop on the head or a barrel to the face, but they’re sporting some new designs. Some bounce in place or at you, larger Kremlins wield cannonball-firing blunderbusses or toss boomerang-like hooks, smaller ones patrol back and forth with cutlasses that have a shockingly large hit box, and others are large and muscular and become enraged (and harmful) when you hit them. The wacky (and somewhat familiar) Cat-O-9-Tails either hurt you or toss you across gaps (or into spikes) with their tentacle-like tails, vultures swoop from the skies, porcupines totter across the ground, and stingrays and voracious fish lurk in water. You’ll be chased by a skeletal pirate ghost while speeding across broken rollercoaster tracks, jump to temporary ropes that are actually snake-like ghosts, slide and jump out of the way of rope-climbing Kremlins, gain a mid-air boost from passing dragonflies, and get bashed about (usually down a pit) by barrel-wearing Kremlins. You’ll race against Screech, hop to Krocheads to clear bodies of water or swampland, hop to Kannon’s barrels to achieve the same goal, tip over Click-Clack beetles to attack their underbelly, and encounter rotund sorcerer-type enemies who toss barrels and suicidal Kremlins at you.

Bosses offer a tough challenge but only King Zing is truly unique.

Each of Donkey Kong Country 2’s worlds end with a boss battle, though you’re awarded a Kremkoin rather than a giant banana this time around. Each boss has at least two phases, no life bar, and rarely a DK barrel to restore your partner if you’re hit, and they’re all essentially invulnerable until a barrel spawns for you to throw. Your first boss is Krow, a large, pirate-themed crow fought up in a crow’s nest (…get it?) Krow dives at you and launches giant egg from his nest. You must hop on this egg and toss it at Krow to deal damage, which eventually sends Krow into such a frenzy that he causes eggs to erratically rain down, making it trickier to score the final two hits. Kleever, a sentient sword, hides in lava for the first phase and tosses fireballs you must dodge. Eventually, a cannonball drops which you must throw at Kleever, then you must use the hooks to cross the lava pool and repeat. In the second phase, Kleever emerges from the lava and flies about, swiping and chasing you as you hop to the many hooks scattered around, tossing cannonballs to finish it whenever you get a chance. Kudgel, a roided-up Kremlin wielding a massive club, leaps offscreen and stuns you when he lands if you’re standing on the ground. He also swings his club like a baseball bat, after which a TNT barrel drops in. Toss this at him enough times and he’ll start pouncing at you, forcing you to run or cartwheel under him and making timing your throws a tad more difficult. King Zing is fought in a sticky beehive after previously chasing the player (on Rambi) in Rambi Rumble. King Zing is unique in that you fight him as Squawks, fluttering around and spitting peanuts at his stinger (a difficult target to hit considering how small it is). After enough hits, King Zing fires a spread of stingers and splits into smaller, regular Zingers, all of which can be tricky to avoid with Squawks’ awkward controls and hit box.

As if the final battle with K. Rool wasn’t bad enough, tougher challenges await to challenge you.

Another giant crow stands as the game’s penultimate boss. Fundamentally, battling the spirit of Kreepy Krow is the same as battling Krow except this time you’re up in the masts and sails of a pirate ship and he sends his minions after you. You must avoid the ghosts and hit the living enemies to spawn a barrel to toss at Kreepy Krow, trying not to plummet to your doom or be hit by the giant bird’s swoop. In the second phase, more baddies fly at you and you must climb hooks and chains, dodging Kreepy Krow’s falling eggs, to finish the deadbeat off. When you finally confront King K. Rool in his stronghold, where he’s gleefully torturing Donkey Kong, the Kremlin captain flees to his airship and you’re forced to beat Screech in a race through dangerous thorns and brambles. With Donkey Kong held hostage aboard The Flying Krock, you battle King K. Rool and his gigantic blunderbuss in a three-stage fight. In the first phase, you must dodge his rocket-powered charge and toss his cannonballs back when he sucks you in for a clobber. After enough hits, he collapses and the game tricks you into thinking you’ve won, only for King K. Rool to rise again and add new attacks to his arsenal. He fires spiked balls that reduce your dodging and jumping area, blue shots that freeze you, red shots that slow you, and purple shots that screw up your controls. He also turns invisible and speeds up his shots which, alongside his large hit box and the lack of DK barrels, makes this the toughest boss fight in the game as it just keeps going on and the margin for error is very small. If you’re playing the Game Boy Advance version, you’ll also battle a final final, version exclusive boss, Kerozene. A titanic Kremlin, Kerozene attacks by slamming his fists and summoning two Kleevers. You must dispatch these with cannonballs and then chuck another at Kerozene’s face when he starts glowing. After ducking his fists, you must jump to them to avoid the plumes of fire he spawns, waiting for them to die down so you can retrieve your cannonball and continue your attack.

Additional Features:
Your save file tracks the collectibles you’ve obtained in your playthrough and Cranky Kong will comment on or criticise your progress once you complete the game. While KONG letters and Banana Coins are easy to spot, they’re not always easy to acquire. DK Coins are even more elusive, requiring skilled platforming and tricks to reach. Many are rewarded by finding and completing bonus stages or discovering hidden paths. These are fun distractions and offer bite-sized challenges, but it can be tedious and frustrating revisiting the stages to hunt these down. If you collect all seventy-five Kremkoins, you’ll not only collect everything the game has to offer but also pay off Klubba and access the Lost World, six additional stages that remix enemies and gimmicks from the main game and offer an even tougher challenge for hardcore players. The final of these, Krocodile Kore, offers another boss battle with King K. Rool that’s a reskin of the regular final boss, but made even tougher. As if that wasn’t enough, the Game Boy Advance version adds Golden Feathers to upgrade Expresso II’s stats in the version exclusive Expresso Racing mini game and Photographs to fill Wrinkly Kong’s scrapbook. Collecting everything sees Cranky commend your performance and places you higher on the pedestal in the final cutscene, but offers no other tangible unlocks.

The Summary:
There’s no doubt that Donkey Kong Country is a Nintendo classic. While I’m not the biggest fan of its visual style or clunky gameplay mechanics, it was an impressive title that breathed new life into the cantankerous ape and showcased the power of the Super Nintendo. Donkey Kong Country 2: Diddy’s Kong Quest is more of the same, which you might think means it’s just as good if not better, but there’s something decidedly off about the execution. The absence of Donkey Kong hurts the game as there’s just not enough visual or gameplay difference between Diddy and Dixie Kong. If Diddy gained some new, tangible gameplay mechanic beyond just being a bit faster, maybe I’d appreciate the game more. Like, maybe Diddy could toss barrels but Dixie couldn’t; or if Diddy’s jumps were shorter to emphasise Dixie’s helicopter mechanic more. Instead, they’re so similar that you may as well stick to Dixie since you need her to clear gaps. The animal friends were fun, as ever, and the new additions added some unique aspects to the game, but I would’ve liked to see them incorporated more. The developers almost did this by giving Squawks race sections and a boss battle, but it would’ve been nice to see the other animal get this luxury, too. There is a load more collectibles this time around, which adds some nice replay value, but many are so difficult to reach and you don’t get anything substantial for finding them all so it’s barely worth your effort unless you want to punish yourself with the more difficult Lost World stages. I liked that the bosses were a bit more diverse this time, but I would’ve liked to see more variety in the environments. Everything feels like a carbon copy of the first game, just with the difficulty cheaply ramped up and very few new mechanics to make this an improvement on the original. It’s a shame as there was a fair but to like here, but the janky hit boxes, aggravating difficulty spike, and lack of originality mean Donkey Kong Country 2 feels like an inferior and less enjoyable retread of the first game to me.

My Rating:

Rating: 3 out of 5.

Pretty Good

What did you think to Donkey Kong Country 2: Diddy’s Kong Quest? Was it part of your SNES library back in the day? What did you think to Dixie Kong and the new animal friends? Which of the boss battles was your favourite? Did you find all of the game’s secrets and bonus rooms? Did you struggle with the dramatic difficulty spike? Which of the Donkey Kong Country games is your favourite and why? How are you celebrating Donkey Kong’s anniversary this year? Whatever your thoughts on Donkey Kong Country 2, leave them below, support me on Ko-Fi, and go check out my other Donkey Kong content.

Mini Game Corner [DK Day]: Donkey Kong ’94 (Nintendo Switch)


In 1981, Shigeru Miyamoto and his team at Nintendo R&D1 created Donkey Kong, an arcade title that introduced gamers to two of Nintendo’s most recognisable characters: Mario and Donkey Kong. To celebrate everyone’s favourite King Kong knock-off, I’m dedicating a few days this week to gaming’s most famous ape!


Released: 7 March 2025
Originally Released: 14 Jun 1994
Developer: Nintendo EAD / Pax Softnica
Also Available For: Game Boy and Nintendo 3DS (Virtual Console)

A Brief Background:
Back in 1981, Nintendo were in a tight spot after their plans to expand into North America with Radar Scope (Nintendo R&D2/Ikegami Tsushinki, 1980) failed. President Hiroshi Yamauchi thus tasked young designer Shigeru Miyamoto to create a new arcade cabinet to turn things around and, when plans to adapt the popular comic strip character Popeye fell through, Miyamoto took inspiration from Beauty and the Beast (Barbot de Villeneuve, 1740) and King Kong (Cooper and Schoedsack, 1933) to create Donkey Kong (Nintendo R&D1/Ikegami Tsushinki, 1981). A critical and financial success, Donkey Kong not only introduced to world to a prototype of Nintendo’s plumber mascot and ensured a foothold for Nintendo in the United States, it also kick-started a slew of ports and sequels. Perhaps the most notable conversion of the title was this version for Nintendo’s popular handheld, the Game Boy. Unlike the version released for the Game Boy’s home console counterpart, this Donkey Kong was more of a puzzle platformer and greatly expanded upon the core gameplay and mechanics of the original, solidifying Mario’s character following his successful solo ventures and bringing more eyes to Nintendo’s Super Game Boy peripheral. Widely praised and highly ranked amongst Donkey Kong’s solo ventures, Donkey Kong inspired a spiritual successor in 2004 and finally saw life outside of the retrogaming scene when it was released digital via Nintendo’s online services in 2011 and 2025.

The Review:
Although this version of Donkey Kong (referred to on the title screen as Game Boy Donkey Kong and widely known as Donkey Kong ’94) is a fundamentally different and expanded version of the original arcade game, it’s still technically quite simple and not varied enough in some aspects to warrant my usual full review. Upon first starting the game, players pick from three save files and immediately get underway playing an adaptation of the arcade hit, guiding a distinctly Mario-looking Mario across girders, through a pie factory, and removing rivets to reach the cantankerous ape, who escapes with Pauline each time. After clearing the first four stages, however, Donkey Kong scarpers across nine additional stages, each with anywhere from eight to fifteen levels, and the game completely changes from a simple platformer to a puzzle platformer. Luckily, Mario’s abilities have been expanded to accommodate this. His jump is far better now, allowing you to hop between platforms and across gaps and even survive falls from short to medium heights, largely eliminating the aggravating fall deaths from the original game. By crouching and pressing A, Mario performs a handstand to protect himself from Donkey Kong’s barrels and other hazards and then performs a somersault jump by pressing A again to hop to higher ground. Mario can also pull off a back flip if you quickly press the directional pad (D-pad) in the opposite direction alongside A, which is great for hopping over enemies or out of tight corners, as well as crouch to fit through narrow gaps. By pressing B on barrels and certain enemies, Mario picks these up and throws them, though you’ll primarily use this to retrieve the many keys hidden across the game’s stages. Finally, Mario can still grab his trusty hammer to take out enemies, though he can’t jump while using it. The game also includes the Super Hammer, which destroys certain blocks, and Mario can toss both weapons and quickly retrieve them to solve puzzles.

Smash blocks with your hammer and utilise various platforming skills to get the key to the door.

Many stages feature ladders and ropes you must climb. Sometimes these ladders rise and fall to make you time you climb, sometimes there are ropes, vines, or chains or you must carefully grab nearby vines, avoiding any enemies or a potentially fatal plummet like in Donkey Kong Jr. (Nintendo R&D1, 1982). There are also wires to spin on by holding up on the D-pad, which will fling you into the air or across the stage, though you must watch for insta-kill hazards like electrical sparks and spikes. Mario can also swim by tapping A, collect extra lives from 1-Up Hearts hidden in stages, and hop over enemies or retrieve Pauline’s lost items for bonus points. Finding all three of these and clearing a level takes you to a bonus game, where you must stop a slot machine or number icons to earn additional lives. Finally, players pull levers to open doors, activate or change the direction of moving platforms, and switch the direction of conveyer platforms, as well as utilise timed item blocks to aid their traversal. You can grab a ladder to quickly reach higher platforms, create a temporary bridge to toss the key to, and spawn a spring to bounce upwards, with some stages requiring multiple item blocks to clear them, avoid a deadly fall, or get the key to higher ground. You must retrieve the key and carry it to the door before the timer expires, taking care not to toss it into pits or water or leave it idle as it’ll vanish. Sometimes, the door is invisible, requiring you to pay attention during the intro cutscene; other times, it’s deep underwater or protected by hazards. While you can toss the key to defeat some enemies, you can’t carry it up ladders so you must use the item blocks, conveyors, platforms, and levers to get the key where you need it to go. While the challenge of getting the key to the door starts quite simple, with you simply avoiding some enemies or hazards, it quickly becomes complicated as the game throws deep chasms, hazardous mazes, and brain teasing puzzles that’ll have you checking a guide or using trial and error. The Nintendo Switch’s save state and rewind feature is a godsend here as it can be tricky figuring out what to do, though often the solution is very simple and you can even ride some enemies to cross gaps and such.

The game’s challenge is bolstered by some impressive visuals for the handheld.

It’s pretty amazing how visually engaging this version of Donkey Kong is compared to the original, and the other home console ports, especially considering the Game Boy’s limitations. Mario, Donkey Kong, and Pauline are all rendered very accurately, with the latter two having some fun animations. I enjoyed seeing Donkey Kong squeeze his butt through doors and the cute little chase animations that play between stages, and Mario has some amusing death animations here. He’ll be squashed flat as a pancake, incinerated, face plant and be left twitching or simply crash to the ground and die, which all adds to the visual charm. Add to that some fun and impressive animated sprite art and in-game cutscenes and you have a game that blows its counterparts away, as long as you don’t focus too hard on the backgrounds and sound. While the backgrounds are varied and you end up exploring a deep jungle, slipping around on a frozen iceberg, swimming through water, exploring a hazardous city, and climbing Donkey Kong’s fortified tower, they’re obviously very limited due. The game performs really well, though, with no real slowdown or sprite flickering, and makes good use of its assets by scrolling the screen in larger areas. It’s also surprisingly long and challenging, with some stages featuring so many levels that it can get quite taxing, though the music is naturally limited and quite repetitious. Each stage introduces new gimmicks, or turns old ones on their head, though, to have you riding Thwomp blocks, clinging to Monchee tails, avoiding Poison Mushrooms, riding platforms, creating bridges over gaps, battling against strong winds, and contending with the cheeky Donkey Kong Jr. as he pulls levers to mess up your progress.

Donkey Kong and his cheeky sprog regularly challenge your platforming skills.

Each stage is filled with puzzles, hazards, and enemies, some of which aid you since you can walk on or get a boost from them, but most of which will immediately kill you. Some resemble recognisable Mario enemies like Piranha Plants, Cheep-Cheeps, and Bloopers, others return from the original Donkey Kong games, like the flammable oil and egg-dropping birds, while others are quirky newcomers ranging from waddling penguins and aggressive crabs to spiky porcupines, deep sea divers, and various oddball anthropomorphs who patrol each platform. Every fourth level pits you against the titular Donkey Kong and forces you to hop up platforms, avoiding his projectiles, and either get to Pauline or toss a barrel at him three times. Sometimes, the action takes place over a bottomless pit, a body of water, or a bed or spikes. Other times, you hop to conveyor belts, ride platforms, or race across disappearing block platforms. Sometimes, you pull levers to reverse the direction of these gimmicks; others, these same levers open doors for you to reach Pauline. Often, Donkey Kong Jr. blocks your path or undoes your progress until you eventually trap him in a cage and take him out of the equation in Stage 9. Donkey Kong is largely stationary but sometimes jumps and causes debris to rain down, or also pull levers to annoy you. He throws barrels that must be picked up and thrown at him, oil barrels that you must jump over, boulders and springs that you can hop on to climb higher, and Poison Mushrooms to shrink you. Reaching and battling him is generally easier than tackling the obstacle courses that precede him, but things can get tricky when enemies spit projectiles or Donkey Kong smashes barrels to spawn Poison Mushrooms. When you reach the finale of Stage 9, you must again climb chains to push keys into holes and send Donkey Kong plummeting, only to be surprised by a three-stage final boss against a gigantic Donkey Kong! In this final bout, you must avoid his crushing fists and hop to higher ground, using your handstand to tip over barrels to toss at his big, stupid face. His fists also slam together and erratically smash the ground to mix things up, but as long as you stay high and in a handstand, you can mostly avoid his attacks and any damage.

The Summary:
I spent a long time regretting not getting this version of Donkey Kong when the Nintendo 3DS Virtual Console was active. I’d heard a lot of good things about it and was attracted to how it expanded upon the core gameplay of the admittedly limited original, though even I was surprised by just how much is packed into this little game! I find it amazing that Nintendo chose to create this expanded version for their less powerful handheld and not their industry changing home console, though it’s quite the technical marvel for the Game Boy. I loved how animated Mario and Donkey Kong were, how much variety was packed into every stage, and the clever way the developers reused and retooled each gimmick in challenging ways. Make no mistake, this Donkey Kong is a thinking man’s platformer and some of the stages really had me baffled about how to get the key to the door. The gameplay loop did become tiresome after a while, though, even with the fun cutscenes and throwaway bonus stages, especially in stages with an obscene number of levels. It was also disappointing that the battles against Donkey Kong and his sprog didn’t deviate too wildly from the original arcade game, especially as the developers could’ve snuck in some autoscrolling chasers to mix up the formula. I enjoyed Mario’s new moves and the item blocks, which had to be placed strategically to solve some puzzles, and the tension of racing to the key before it or your items disappeared. Some levels were more unfair than others, require multiple reloads, but this was a fun way to pass the time and a great expansion on the original title. While the Game Boy Donkey Kong did get a little too tiresome at times for me to rate it any higher, it’s still the best version of the original game, though it’s a shame the Nintendo Switch doesn’t allow for the Super Game Boy colour palette to be utilised.

My Rating:

Rating: 3 out of 5.

Pretty Good

Did you ever own Donkey Kong for the Game Boy back in the day? How do you think it compares to the original arcade version? Did you enjoy the challenge on offer or do you agree that it gets a bit tedious after a while? What did you think to the puzzle/platformer gameplay and Mario’s expanded moveset? Did you ever clear every stage in the game? Which Donkey Kong videogame is your favourite and why? How are you celebrating Donkey Kong’s anniversary this year? Whatever your thoughts on Donkey Kong, feel free to leave a comment below, support me on Ko-Fi, and check out my other Mario and Donkey Kong content.

Game Corner: Marvel: Ultimate Alliance 3: The Black Order (Nintendo Switch)

Released: 19 July 2019
Developer: Team Ninja

The Background:
For decades, few videogame publishers were as synonymous with Marvel Comics as Activision, who produced adaptations Marvel’s most popular properties. While some were better than others, Activision’s efforts were largely praised, especially after they partnered with Raven Software on the X-Men Legends games (2004; 2005). Activision and Raven Software expanded their scope to the rest of the Marvel universe with Marvel: Ultimate Alliance (2006), a largely successful team-based brawer praised for improving upon its predecessors. Though now delisted, it was followed by a sequel three years later, courtesy of Vicarious Visions, which tweaked the gameplay with team-based attacks to encourage experimentation. Though Marvel: Ultimate Alliance 2 (2009) was praised for its branching storyline, the stripped down roleplaying mechanics were criticised. While it was also delisted in 2020, fans were clamouring for a follow-up and, just ten years later, Team Ninja stepped in to work alongside Marvel in reviving the franchise. Seeking to place additional emphasis on combat, the developers explored the cosmic scope of the Marvel universe by including the Infinity Stones and lesser-known characters and chose to make the title a Nintendo Switch exclusive after developing a close relationship with Nintendo. Although Marvel: Ultimate Alliance 3: The Black Order was the sixth best-selling game in its first week and was later bolstered by extensive downloadable content (DLC), it was met with mixed reviews that praised the colourful action but criticised its lack of innovation.

The Plot:
While battling Nebula and Ronan the Accuser, the Guardians of the Galaxy stumble upon a plot by the mad titan, Thanos, to collect the six Infinity Stones. Although they scatter the Stones, Thanos’s acolytes, the Black Order, pursue the gems, prompting an alliance of Earth’s mightiest heroes to retrieve them first.

Gameplay and Power-Ups:
Like its predecessors, Marvel: Ultimate Alliance 3: The Black Order is a team-based action role-playing game in which players assemble a squad of four heroes from across the Marvel universe to battle various nefarious baddies, primarily the titular Black Order, who are hunting the six all-powerful Infinity Stones on behalf of their master, Thanos. The game offers five save slots, two initial difficulty levels, and a base roster of thirty-six playable characters, with many being encountered as you play through the story and joining your alliance either after fighting alongside you or being freed from some kind of mind control. Marvel: Ultimate Alliance 3 offers three controller configurations, thankfully none of which involve motion controls, and allows you to toggle overlays, notifications, tips, and other onscreen elements from the “Settings” menu. These include altering the camera placement, which enables a lock-on feature by pressing in the right stick, though the camera generally remains more focused on whichever character you’re controlling rather than offering a bird’s eye view as in the last two games. Although you can fight alongside friends either locally or online, you switch between your teammates with the directional pad (D-pad) when playing alone and your computer-controlled partners are very useful in a fight, attacking, enabling team attacks, and reviving defeated characters without any input from you. Pressing A sees you interact with the environment to activate consoles, pick up or move certain objects, and talk to other characters. You jump with B, executing a double jump, swinging from webs, or flying depending on which character you’re playing as, and throw light attacks with X and heavy attacks with Y. These can be strung together to perform basic combos and you can also perform a mid-air attack and throw objects (like bombs and missiles) by pressing Y. You block incoming attacks by holding the Z trigger and tap it to dodge, and collect glowing red orbs from defeated enemies or smashed crates to restore health, blue orbs to refill your Energy Point (EP) gauge, and credits to spend on upgrades.

Combat is thick, fast, chaotic, and constant thanks to loads of enemies and character abilities.

As in the last two games, each character has specific abilities tied to their superpowers or superhero traits. You activate these by holding the Right trigger and selecting an icon using the D-pad; using Abilities drains your EP, however, and each Ability comes with a different cost. However, these attacks allow you to stun, stagger or deal elemental damage to enemies using Peter Parker/Spider-Man’s webs, Thor Odinson’s lightning, and Doctor Robert Bruce Banner/The Hulk’s incredible strength. Many characters have projectile attacks in their arsenal, such as Wade Wilson/Deadpool firing guns and Scott “Slim” Summers/Cyclops blasting his eye beams, while others cause splash damage or specific buffs, like Piotr Rasputin/Colossus being able to reflect projectiles and Wanda Maximoff/The Scarlet Witch healing her allies. Some, like James “Logan” Howlett/Wolverine, have passive abilities that allow them to automatically regenerate health as they walk around; others, like Johnny Blaze/Ghost Rider and Ororo Munroe/Storm, specifically deal in elemental damage. Character’s Abilities can also be mixed and matched by holding ZR and pressing one of the face buttons (or pressing A when prompted); this sees two characters attack in a combo for additional damage. As you dish out and take damage, you’ll also build the Extreme (EX) Gauge). Once full, you can press L and R up to three times to have two to four of your teammates perform a devastating combination attack that’s great against bosses. While the various cannon fodder you fight are easily dispatched, larger commanders and bosses need their “stun” meter drained before you can really put a beating on them and others (and certain treasure chests) require specific combination attacks to breach their shields. Defeating enemies sees your characters gain experience points (XP) to level-up, increasing their statistics (attack, defence, etc), though you can also use the various Orbs you find to manually level-up. Each character’s special Abilities can also be further enhanced using Ability Orbs and credits, reducing the EP cost and increasing their damage, among other benefits. You can also earn “Team Bonuses” depending on your team selection: pick a group of X-Men, for example, and your strength or resistance stat will increase, while picking characters of royalty ups your maximum energy stat.

Search for chests to gain currency and other expendables to upgrade and buff your alliance.

Although you can’t equip gear to your characters, the boss battle against the Destroyer armour sees you temporarily empowered by Asgardian magic and you can eventually equip your team with “ISO-8” crystals, coloured stones that enhance their attack power, resistance to elements, or critical hit ratio, among others. You can further upgrade these with credits and ISO-8 capsules, though some of the rarer ones will also debuff you (for example, your attack my increase but your defence will decrease accordingly). You’ll also inevitably gain access to the Strategic Hazard Intervention Espionage Logistics Directorate (S.H.I.E.L.D.) Lab, which acts as the game’s skill tree. By spending credits and Enhancement Points (EP), you can further increase your team’s overall attack, defence, resistance, vitality, and such and even unlock additional ISO-8 slots (with more being earned by levelling-up). You can also enter the S.H.I.E.L.D. Depot from the main menu to purchase additional costumes and social icons by spending S.H.I.E.L.D. Tokens. Marvel: Ultimate Alliance 3 is pretty forgiving (on the “Friendly” difficulty, at least), with multiple checkpoints in each area. When you activate a S.H.I.E.L.D. checkpoint, your team is fully healed, and you can swap or enhance them if you wish. If a teammate is defeated, you can hold A to revive them, but I wouldn’t recommend it unless you absolutely have to. Not only are revives limited, but downed characters will eventually return to full health even before you reach a checkpoint so it’s not worth risking another character taking damage by healing a partner. Exploration generally leads you to treasure chests or special walls that require a special combination attack to open, or to a “Rift” challenge that takes you away from the main game to tackle a special challenge (usually a boss rematch or enemy gauntlet) for extra rewards. Your path is incredibly linear most of the time, hence why there’s no map, and the game’s primary focus is on chaotic combat and visually manic team-based attacks. Unlike in the last two games, you can no longer grapple or throw enemies (though you can still send them flying off certain platforms) and there are no character-specific team-up moves, meaning the action can quickly get quite tiresome.

Sadly, puzzles are practically non-existent, with only Rifts offering additional challenges.

Because of its focus on hectic combat, there’s even less room for puzzles than there is for exploration in Marvel: Ultimate Alliance 3. Puzzles boil down to activating a console to open a door or making a platform move and that’s it. Sometimes, you’ll hold A to move a block and avoid lasers or cannons, but mostly you’ll be timing jumps between said lasers to progress and simply hurling missiles at those cannons. Sometimes, you’ll rotate statues or press switches to progress; others, you’ll be avoiding toxic ooze in Hel or solving door puzzles at the Raft or in Avengers Tower. After hopping across the rooftops of New York City, you’ll infiltrate the heavily fortified fortress of the Hand, dealing with ninjas that drop from the sky and hidden arrow hazards. When in Wakanda, Advanced Idea Mechanics (A.I.M.) corrupt T’Challa/The Black Panther’s defences, leading to an exasperating section where you must avoid snipers and being roasted by a giant panther statue’s energy blast. When transported to the Dark Dimension, you must use portals to reach new areas and defeat waves of demonic enemies to lower magical barriers and progress. Some attacks also screw up your controls or temporarily freeze you; some enemies are best defeated by tossing explosives at them; and many missions have an additional character fighting alongside you who’s often unlocked afterwards. However, a lot of the additional features of the previous games are missing; you can talk to other characters, but there are no dialogue options or character-specific interactions. There are no trivia quizzes, no optional side missions beyond the Rifts, and no character specific challenges to unlock extra stuff for each character. There aren’t even hub areas, in the traditional sense, with characters just appearing around S.H.I.E.L.D. checkpoints at times, though you can destroy a fair bit of the environment, and some encounters have you fleeing towards the camera as bosses chase you or present you with unwinnable battles.

Presentation:
Whereas the last two games primarily based their aesthetics on the comics books, especially the Ultimate comic line, Marvel: Ultimate Alliance 3 adheres very closely to the Marvel Cinematic Universe (MCU), especially in the visuals of its locations. I was hard pressed, for example, to tell the difference between Asgard here and the Asgard to the MCU, with both the golden city and the rainbow bridge, the Bifrost, appearing almost exactly as they’re depicted in the films. The same is true for Wakanda, the Dark Dimension, and Knowhere, all of which are virtually indistinguishable from how they appear in the MCU. There are some differences, of course: Taneleer Tivan/The Collector’s museum, for example, uses coloured cube cages and Wakanda leans much more into traditional architecture than the pseudo-futuristic science of the films (likely because Black Panther (Coogler, 2018) released a year before this game was made). Xavier’s School for the Gifted is lifted almost exactly from the 20th Century Fox X-Men movies (Various, 2000 to 2020), however, including a hedge maze, 1:1 Cerebro room, and basketball court that doubles as a landing pad for the Blackbird. While the Dark Dimension and the cosmic mind trip that is Sanctuary also heavily borrow from the bizarre cosmic imagery of the MCU, the Raft and Avengers Tower are much more akin to their comic book counterparts, though they’re comparatively bland locations, lacking fun areas like the Danger Room or Wakanda’s Necropolis (though you do pass through Anthony “Tony” Stark/Iron Man’s Hall of Armours in the tower). Although you only make a brief stop in Attilan to try and get help from the Inhumans, the architecture is far more visually interesting than that awful television show, seemingly being comprised of Celestial technology, and I enjoyed the ominous gothic presentation of Hel, with its restless Viking warriors and damaging sludge. Unfortunately, Marvel: Ultimate Alliance 3 continues the trend of having disappointingly bland and forgettable music, opting for generic themes for each location, event, and character that are lost amidst the constant fighting.

A visually impressive brawler that takes obvious inspiration from the MCU films.

The game also opts for an almost cel-shaded, action figure-like aesthetic for its colourful cast of characters. While many again both look and sound like their MCU counterparts, there are some exceptions: Peter Quill/Star-Lord, for example, looks nothing like Chris Pratt and the X-Men are far closer to the comic books than Fox’s films. Despite you assembling a custom team of heroes, cutscenes depict either everyone or characters specific to the location you’re in (the corrupted Doctor Stephen Strange in the Dark Dimension, for example) as they’re better suited to advance the plot against the local baddies. With the game shifting to a more third-person perspective, you’re closer than ever to the action and can see more of the environment than in the previous games. However, this comes with some drawbacks: mainly, there are far less opportunities or incentives to explore. Second, environments are painfully linear, with dead ends or locked doors barring your progress. Third, and most frustrating, is the camera, which easily loses track of your opponent/s and often lumbers you with wireframe representations when the foreground blocks the view. Thankfully, you won’t be falling down pits and rarely have to worry about onscreen hazards, but it can be aggravating trying to figure out which platforms and crates can be jumped on and which can’t. Marvel: Ultimate Alliance 3 offers a diverse cast of characters, each with their own idle poses and quips, though these do inevitably repeat. The game’s also surprisingly light on Easter Eggs: you’ll spot Deadpool singing away as he makes tacos in the X-Mansion, but not much else, and there are no optional missions or choices to encourage replaying missions. It’s a far cry from the first game, where there was always something to collect or an additional character to help out. Instead, it’s basically all combat, all the time in Marvel: Ultimate Alliance 3. Luckily, the game looks pretty good (everything’s very colourful and true to its inspirations) and performs really well, though there are some long load screens and it is annoying being forced to continue your game every time you challenge a Rift.

Enemies and Bosses:
All the usual suspects appear here as disposable cannon fodder for you to endlessly beat up, with many of the game’s goons sharing traits across the various locations. You’ll encounter Kree, Ultron Drones, agents of A.I.M., and Doombats who all pack various energy blasters. Ultron’s clones are the worst for this, relentlessly firing energy blasts and crashing through windows. The Raft’s unscrupulous prisoners attack in large groups, as do the restless Viking warriors who populate Hel, tossing axes from afar and luring you into toxic goop. Gargoyle-like Fire Demons also dwell here, offering a greater challenge with their swoop attack and fire breath, not unlike the monstrous Outriders and Mindless Ones who make up Thanos and the dread Dormammu’s forces, respectively. Alpha Primitives, Hydra goons, and towering Sentinels also appear, with the latter firing huge energy blasts from the palms and best attacked by throwing their explosive energy cores back at them. No matter where you are and what enemies you fight, more powerful commanders will also appear. Larger, tougher, and sporting a stun meter, these commanders should be your top priority as they’ll charge across the screen, cause shockwaves, and generally offer a far greater challenge even when you’re at a higher level. These minions often fight alongside their masters, generally so you can recover some health and EP to better damage the bosses, and will endlessly spawn in one of the additional modes unless you destroy their teleporters. Some of the game’s challenges or story-based missions charge you with defeating a certain number of enemies to progress. Other times, bosses appear in these waves, and you must occasionally flee or purposely lose some fights. This happens when Cain Marko/The Juggernaut comes tearing through the X-Mansion, for example, and in early encounters with the Black Order, who cannot be beaten or will chase you, raining lightning or other attacks from the sky and across the ground.

Few bosses require more than just hit-and-run tactics, even when augmented by an Infinity Stone.

There are loads of bosses to fight in Marvel: Ultimate Alliance 3, with some returning from the previous games, some teaming up, some having a couple of phases, and all boiling down to whittling down their stun bar, unleashing an EX attack and/or your most powerful Abilities, and avoiding damage until you can repeat this. The first ones you’ll face are Nebula and Ronan the Accuser, who often appear as a duo in optional challenges. Nebula is faster and more nimble, wielding blades where Ronan uses a massive warhammer. Both set a standard all bosses follow, which is that they’ll use either a jumping slam or an explosion of energy (or both) to send you flying. While quelling the riot in the Raft, you’ll encounter a version of the Sinister Six, with some unique variations to each battle. Flint Marko/The Sandman, for example, flings waves of sand and erupts his big sand fist from the ground as a large sand creature. You must use A to mount the nearby cannons and unload on him to chip away at his stun meter. Maxwell “Max” Dillon fights alongside Eddie Brock/Venom, raining lighting and electrocuting you with bursts of electricity, before he’s eaten by Venom and starts busting out electrically-enhanced symbiote powers. Venom joins the team after this fight and is tested against Quentin Beck, who first brainwashes Mile Morales/Spider-Man, Gwen Stacy/Spider-Woman, and Kamala Khan/Ms. Marvel to fight you and then unleashes a poisonous mist, teleports about, and confuses you with duplicates, Doctor Otto Octavious/Dr. Octopus is fought in a two-stage fight where you must first avoid his tentacles and scurry charge and then attack each arm to stun him. Finally, you’ll battle Norman Osborn/The Green Goblin for the Time Stone. The Green Goblin swoops overhead and lingers slightly out of reach, peppering the arena with his pumpkin bombs, charging at you, and freezing time to bombard you. He’s noticeably weak to his pumpkin bombs, however, so try and toss them at him before they explode in your face! After battling into the Hand’s fortress, you must first free Elektra Natchios from the Hand’s influence and then face Lester/Bullseye and Wilson Fisk/The Kingpin in separate fights. You must take out the ninjas feeding Elektra power, avoid Bulleye’s spread of razor sharp and explosive cards, and dodge the furniture and massive energy beam thrown by the Power Stone-enhanced Kingpin. The Kingpin also charges like a rhino, leaps at you to cause shockwaves, and even rips up stone columns to use as melee weapons!

Gigantic bosses and the quirkier villains help mix-up the otherwise tedious combat.

Avengers Tower is then attacked by Ultron and his drones, who assist him in battle. Not that he needs it as the Mind Stone allows Ultron to mess up your controls, to say nothing of his signature face and palm beams. Ultron then grows to gigantic proportions, sweeping the area with his eyebeams before Clint Barton/Hawkeye intervenes and Ultron merges with Ultimo. This is the first giant boss battle in the game and sees you blasting Ultimo with cannons and avoiding his massive swipes. The Infinity Sentinel is comparatively smaller, but no less dangerous thanks to its own face beam and missiles. Though you can damage it with Sentinel cores, it’s finished in a cutscene by Erik “Magnus” Lehnsherr/Magneto, who then tosses debris and throws you off balance with magnetic pulses while Juggernaut pummels you and Raven Darkholme/Mystique tosses daggers. After surviving Mystique’s Danger Room trials, you face Magneto, now even tougher thanks to the Power Stone, before being chased away and banished to the Dark Dimension by the Black Order. There, you battle past Loki Laufeyson (who boasts elemental attacks and duplication tricks) to eventually face the dread Dormammu, who wields the Reality Stone and is the second giant boss. You must subdue his minions and avoid his flame bursts, whittling down his magical barrier either directly or be destroying three nearby orbs, all while dodging his giant fists and ground spikes. The brief fight with Maximus Boltagon is far easier, even though the mad Inhuman carries a massive energy cannon and you must take cover in Thane’s energy bubble to avoid Maximus’s barrage of lasers. Ulysses Klaue/Klaw awaits in Wakanda and his sound-based energy blasts and waves must be overcome to rescue and recruit James Buchanan “Bucky” Barnes/The Winter Soldier. You then fight past A.I.M. to confront their master, George Tarleton/Mental Organism Designed Only for Killing (MODOK), who uses the Soul Stone to turn the Dora Milaje against you and attacks with a slew of appendages, from buzzsaw arms, poison gas, failing tentacles, and his signature forehead blast.

Battles with the empowered Black Order, Thanos, and Thane offer some of the most enjoyable challenges.

Though your goal in Hel is to confront Hela, you’ll actually battle the fire demon, Surtur, in another giant boss battle. This was a bit of a difficulty spike for me as Surtur’s flaming sword has a long reach and he causes the ground to erupt in flames, to say nothing of stun locking you with repeat sword strikes! Best him and Hela sets Johann Schmidt/The Red Skull on you, with the Nazi madman firing a powerful revolver and sapping your health with his “Dust of Death”. Hela gives the Red Skull a boost, protecting him with a shield and allowing him to fire a Bifrost-like laser, before placing his consciousness into the Destroyer armour. Though bolstered by Hydra forces and boasting a sweeping face beam, you can get a power-up from glowing crystals to overcome this destructive force. Finally, you venture to Knowhere and must run the Black Order gauntlet to retrieve the Infinity Stones, with checkpoints between each fight. Ebony Maw is first, firing a spread of projectiles and rocks and using the Soul Stone to create portals to trip you up. Supergiant tosses dark spheres and a golden homing shot that messes up your controls, though you can toss explosive cores from her minions to deal big damage. Cull Obsidian infuses his battleaxe with the Power Stone, sending out waves of purple energy and massive purple shockwaves, though he’s far slower and also susceptible to the nearby bombs. Corvus Glaive is much faster, landing multiple hits with his lance and using the Reality Stone to spring spikes form the ground and conjure duplicates who fill the arena with energy waves that can stun lock you. Finally, Proxima Midnight takes her fellow’s teleportation trick to the next level with the Space Stone and fills the arena with lightning bolts and strikes. All these powers are then recycled when you face Thanos, who gathers the six Infinity Stones into the Infinity Gauntlet to rain meteors, teleport, mess up your controls, freeze time, and fire his signature eyebeams. Thanos then joins you to battle Thane, who usurps him and boasts similar powers, though also upgraded by the Infinity Armour. Thane exhibits superhuman speed, traps you in a cube, fills the arena with portals and flames, and explodes in fury, though both battles were fun challenges rather than impossible tasks.

Additional Features:
Unlike in the previous two games, you won’t be finding data logs, action figures, or meeting certain requirements to unlock new attacks or costumes. You just fight over and over, earning whatever you need to unlock, buy, or upgrade whatever you wish and finding some concept art in treasure chests. A far harder (but more rewarding) “Superior” difficulty unlocks upon clearing the game alongside an additional “Nightmare” mode, accessible via the “Curse of the Vampire” campaign. You also unlock Thanos and can freely replay any mission on any difficulty (though you must start a new save to play on “Superior”) to grind and enhance your characters and ISO-8. Dimensional Rifts transport you to special challenges (not unlike the S.H.I.E.L.D. Simulator discs from the first game) that are often rematches with bosses or gauntlet challenges, though far tougher and gifting better rewards if you succeed. There are also three additional modes; however, though you can play a taster of each, you must purchase the expansion pass to fully unlock them. “Curse of the Vampire” adds vampiric enemies to the main story in “Nightmare” mode and offers a “Gauntlet” mode where you battle waves of enemies and bosses against both a time limit and a range of debuffs (including limited health restoration and draining EP). You can also tackle an “Endless” mode that’s pretty self-explanatory, and unlock additional characters like Frank Castle/The Punisher and Eric Brooks/Bladeif you buy the DLC. “Rise of the Phoenix” sees you form a four-person team and go head-to-head with a friend or the computer in three-round Danger Room scenarios. These see you tackling bosses again or wiping out hordes of enemies, awarding additional buffs and effects if you meet certain criteria (such as using any Ability or Synergy attack four times). You can only tackle the first challenge without the DLC, so I didn’t get very far, but this could be a fun distraction for those looking to test their skills against a friend. “Shadow of Doom” adds an epilogue story campaign that sees you return to Wakanda to oppose Doctor Victor Von Doom’s invasion. Dr. Doom’s Doombots endlessly spawn unless you destroy their teleporters, and you even battle the arrogant dictator in the recycled Necropolis, with him teleporting, firing lasers form his palms, and having his health restored by his Doombots. You’ll add Marvel’s First Family to your roster (alongside an alternative Thanos and other characters) by buying the expansion pass and battle Annihilus, a gigantic Celestial, and even “God Emperor” Doom!

The Summary:
I quite enjoyed the first two Ultimate Alliance games. They were mindless and largely repetitive, but I liked the large cast of characters and all the different references and locations from the comic books. Still, I put off Marvel: Ultimate Alliance 3: The Black Order for some time, mainly because I was annoyed by it being a Nintendo Switch exclusive; however it turned out to be a decent enough brawler. Despite the different development team, a few tweaks, and an apparent disconnection from the previous games, Marvel: Ultimate Alliance 3 offers a lot of the same gameplay and enjoyment as its predecessors, which is great for long-time fans of the franchise. Unfortunately, it doesn’t improve on these elements in a meaningful way and actually removes some content that I found enjoyable from the last two. There are no optional missions, for example, no alternative endings, no choices, and no character-specific challenges beyond fighting and levelling-up. I found this made the tedious combat even more aggravating after a while as I wasn’t being rewarded with gear or costumes or anything other than stat boosts. Even the skill tree was limited since you must grind to acquire enough credits and expendables to enhance your team, and I found the ISO-8 mode to be more confusing than engaging. The game also does little to improve the boss battles. Very few were very innovative or required more of you than to strike fast, avoid shockwaves and projectiles, and unleash your Extreme attack. The giant bosses were more of a challenge and I liked the final fight against Thanos and Thane, but I was hoping for a bit more complexity, especially given the possibilities offered by the Infinity Stones. There is a fun selection of characters, but they don’t offer much more than what we saw in the last two games and actually offer less as there are no character-specific team-up moves. While I enjoyed the visual influence from the MCU and the variety, I feel like Marvel: Ultimate Alliance 3 played things a little too safe by relying so heavily on combat and not mixing up the gameplay with a few other puzzles and challenges. Overall, it’s a good enough game and a worthy entry in the series, but it’s a shame that the developers didn’t try to be a bit more innovative and offer some more incentive to keep slogging away in endless fights.

My Rating:

Rating: 3 out of 5.

Pretty Good

Did you enjoy Marvel: Ultimate Alliance 3: The Black Order? How do you think it holds up against the previous two games? Which characters did you choose for your team? Were you disappointed that the combat was so similar to the last two games and the bosses so repetitive? Did you ever conquer all the Rift challenges? What did you think to the MCU influences and the final battle with Thanos and Thane? Did you ever play through the DLC? Would you like to see another Ultimate Alliance game? Whatever your thoughts, leave a comment below, support me on Ko-Fi, and go check out my other superhero content across the site.

Game Corner [Mario Month]: Super Mario Bros. Wonder (Nintendo Switch)


So, for no better reason than “Mar.10” resembling Mario’s name, March 10th is widely regarded as being “Mario Day”, a day to celebrate Nintendo’s portly plumber, an overalls-wearing mascot who literally changed the videogame industry forever and shaped the home console market of the nineties.


Released: 20 October 2023
Developer: Nintendo EPD

The Background:
Following the collapse of the videogame industry from a slew of overpriced consoles and mediocre titles, Nintendo revitalised the landscape with Super Mario Bros. (Nintendo EAD, 1985). Once the “Console Wars” of the mid-nineties ended, Nintendo and their famous mascot became an innovative and reliable staple of the videogame industry. After successfully transitioning into 3D gaming, Nintendo continued to pay homage to Mario’s 2D roots with hit 2.5D titles. Shiro Mouri, director of New Super Mario Bros. U Deluxe (Nintendo EAD, 2012), returned to develop Super Mario Bros. Wonder and he and his team worked without a deadline, allowing them far more freedom to develop new ideas. Producer Takashi Tezuka suggested implementing a gimmick that would alter the game’s locations in fun and wacky ways, birthing the “Wonder Flower” mechanic, and features and accessibility options were implemented to make the game appealing to players of all ages. A live commentary feature was scrapped early on, long-time Mario voice actor Charles Martinet was replaced for the first time following his retirement, and Mouri also personally lobbied for Princess Daisy to be included so girls (specifically his daughters) would have more playable options. Super Mario Bros. Wonder was met with widespread acclaim; critics adored the gameplay innovations and responsive controls, and it sold 4.3 million units in its first two weeks alone.

The Plot:
While visiting the Flower Kingdom, Mario and his friends are stunned when Bowser, King of the Koopas, steals the Wonder Flower, turns himself into a giant flying fortress, and wreaks havoc throughout the kingdom. Our heroes thus travel across this new land to gather the Royal Seeds and stop their nemesis.

Gameplay and Power-Ups:
Like its 2- and 2.5D predecessors, Super Mario Bros. Wonder is a 2.5D action platformer, albeit one that gives players twelve characters to pick from and offers four player co-op, both on- and offline. Players journey across the Flower Kingdom collecting golden Coins (100 of which will grant a 1-Up), stomping on Goombas, and leaping to flagpoles to clear the six main stages (known as “Worlds”) alongside Prince Florian, a caterpillar-like character who pops out when you’re idle and chimes in during cutscenes. Regardless of which character you select, they all control the same with the exception of Yoshi, who can flutter jump by holding A (giving you a bit more airtime to clear gaps) and eats enemies and spits them back out with B. Otherwise, you can pick from two control schemes and choose to play with or without motion controls. The setup I chose saw me jumping or swimming with A (holding it to jump higher), running and picking up certain objects (like Koopa shells) by holding B (releasing it to launch my item upwards or straight ahead), and ground pounding by pressing ZL in mid-air to squash enemies and break blocks. Y brought up an emoji wheel to communicate to other players and X either placed a standee (used to revive players in co-op) or spawned an item balloon when I had one saved up. Pressing R performed a spin jump and jumping against walls and vertical surfaces performed a wall jump. You can also hold down when on slopes to slide into enemies, and pressing the L and R triggers together in co-op sees you become a ghost to float around stages. Also, you can jump atop and ride Yoshi players in multiplayer and press B to perform your special attacks when you have a power-up item.

Mario and friends utilise new power-ups and the Wonder Flowers to explore this new kingdom.

As you might expect, grabbing a Super Mushroom allows your character to grow and take an extra hit and break certain blocks. Get hit when in your small form and you’ll lose a life, respawning either at the beginning of the stage or from the last checkpoint you touched. Touching a checkpoint automatically causes you to grow if you’re small, rare green mushrooms grant extra lives and Fire Flowers let you toss fireballs to defeat enemies and melt ice blocks. Blue Coins appear when you hit P Switches, POW blocks defeat all onscreen enemies and break all visible blocks, and Super Stars make you invincible for a short time and add a somersault to your jump. This is all very familiar but Super Mario Bros. Wonder does add in three new power-ups. The Bubble Flower sees you throw bubbles to trap and defeat enemies and make temporary platforms, the Drill Mushroom lets you dig into floors and ceilings to reach new areas, and the Elephant Fruit transforms you into a rotund elephant that smacks enemies with its trunk and sprays water to cause various effects whenever you enter a fountain. If you have one power-up active, you’ll store the next one as a bubble, which is very useful as an extra chance to bypass tricky areas, and you can even commandeer Lakitu’s cloud or ride Missile Megs and Ancient Dragons to clear gaps. Wonder Flowers are the game’s biggest new feature and temporarily alter the game’s environments or your character’s appearance to mix things up. You’ll see Warp Pipes come to life, adopt a top-down perspective, float around in zero gravity, race to collect Wonder Tokens, ride along stampeding enemies, get chased by King Boo, and even explore in near darkness when the Wonder Flower is collected. These also transform you into new forms, such as a Goomba (stunting your jump but allowing you to safely cross spikes), a Biyon (stretching your character considerably), a Hoppycat (increasing your jump height), a floating balloon, granting you the Metal Cap power-up, and allowing you to stick to walls and ceilings as a Wubba, amongst other effects. These effects are sometimes timed but will last until you find a Wonder Seed or clear the stage and really add to the visual variety and mix up the gameplay as you never know what effect the Wonder Flower will have.

You’ll need all your skills and the game’s Badges to find all the collectibles and stop Bowser.

Sadly, this variety doesn’t extend to the playable characters as much as I’d like. Luigi jumps higher and has less traction than the others, Toad seems to have floatier jumps, and the Yoshis and Nabbit are invulnerable to damage (but can still lose lives), but Princess “Peach” Toadstool doesn’t have her glide ability and I question the logic behind having three Toads and four Yoshis rather than putting in Wario and Waluigi. Still, the game does allow for some character customisation in the form of “Badges”, which are either bought using the new purple Flower Coins (with three 10-Flower Coins hidden in most stages) and by conquering bite-sized Badge Challenge levels. You can equip one Badge at a time and each one grants different buffs or abilities, such as allowing you to glide by holding R, adding to your wall jump, increasing your running or swimming speed, and allowing you to snag platforms with a vine. Other abilities are more passive, such as allowing you to sense nearby collectibles, giving you a one-time save from instant-death traps like pits and lava, or turning every power-up into a specific item. You can also earn “Expert” Badges that further increase your running speed and add a limited double jump, turn you invisible (actually more trouble than it’s worth), add a spring to your step for added jump height, or allow you to hear strange voices. While it’s fun challenging for and collecting the Badges, I stuck with the Parachute Cap for my entire playthrough bar one or two exceptions as it was far more useful to add a short glide to my arsenal than anything else. You can also spend your Flower Coins on new standees (which are randomised), 1-Ups, Wonder Seeds, and paying off the local Poplins to repair bridges or smash rocks to create shortcuts and open new areas on the overworld. Furthermore, if you search hard enough, you’ll not only uncover new stages to challenge but also meet Captain Toad, who’ll gift you some Flower Coins, alongside visiting the locals to get Wonder Seeds or be told of regional issues caused by Bowser’s influence.

There’s a lot of challenge and variety on offer thanks to the Wonder Flowers.

While Super Mario Bros. Wonder contains many of the same gimmicks and mechanics you’d expect from a Super Mario title (platforming, taking Warp Pipes, smashing blocks, climbing vines, sliding on ice, and dodging fireballs are all common tropes recreated here), the game is structured more like an obstacle course than ever before. You’ll be taking Warp Pipes to the foreground and background, pushing pipes and blocks to clear paths, entering doors and taking leaps of faith, hopping to moving, spinning, and temporary platforms, and dashing across zip lines to reach new areas. Like many Super Mario games, there are often hidden exits to find (generally by collecting or avoiding Wonder Flowers), you’ll need to face Boos to stop them in their tracks or lure them into the light to destroy them, and bottomless pits, boiling lava, and toxic gunk will instantly end your run if you’re not careful. You must also avoid giant spiked balls, lure Bulrushes and Konks into smashing through blocks, outrun shadowy enemies who relentlessly chase you, time your jumps to avoid being hit by Hoppycats, stay out of reach of Maw-Maws so they eat enemies instead of you, and hold B to unzip the background, unwrap Mumsys, and send Revvers dashing. Sometimes, you’ll grab keys to open doors; others, you’ll be climbing or shimmying across striped poles. Often, you’ll touch Wow Buds to spawn Coins or cause platforms to appear, move, or sway. Balloons must be popped, balloon-like enemies need to be carefully bounced across to clear gaps, and rhythm platforms and mushroom trampolines will have you timing your jumps to progress higher. You’ll also cross hazards in rolling wheels or on rafts made from dinosaur fossils, and transport to the clouds using Propeller Flowers. Timer Switches activate block platforms for a short time, Bowser’s ship fires from the background, you’ll ride an out-of-control avalanche, race against Wiggler, and battle through autoscrolling sections on Bower’s battleships, dodging Bullet Bills and flame bursts that’ll test your reaction times. The difficulty spike is pretty fair, and each stage has a star difficulty to alert you to the challenge on offer. Things never get too tricky and you can always purchase additional lives from the shop, though the game does ramp up as you progress and offer incredibly tough missions up in the Special World.

Presentation:
Super Mario Bros. Wonder is, in a word, gorgeous. 2.5D Mario has never looked or played better than here, with the game performing incredibly well throughout and the action never slowing down. It helps that most stages are bite-sized obstacle courses and that there’s a lot happening in every stage. Talking Flowers are everywhere, offering encouragement, calling for help, or commenting on the effects of Wonder Flowers. These, as mentioned, alter the stages so drastically that it’s almost like having two versions of most stages at times. They’ll be plunged into darkness, surreal colours bombard the player, and a kaleidoscope of bizarre and amusing effects spawn once you touch them, making for an enjoyable twist on the tried-and-tested formula. Mario and his friends might not play as differently as I’d like but they’re full of life and personality. Chattering through gibberish and pantomime movements, they hop and explore like never before, with caps flying off as you jump or fall or being swiped when you enter pipes. Your Elephant form squeezes through narrow passageways and Prince Florian pops out whenever you’re left idle or finish a stage. The game takes into account which character you’re playing as, too, with character-specific hidden blocks appearing in stages, personalised flags appearing at checkpoints and end goals, and the in-game text referring to whomever you’re controlling at that time. The music is as catchy and whimsical as ever; classic Super Mario tunes return, as you’d expect, as end of stage and power-up jingles but also for bonus stages and boss battles. The story is light-hearted and secondary to the action, for the most part, but just different enough to be unique. Peach isn’t a damsel in distress, for example, Bowser’s ominous ship form looms in the centre of the overworld, and you’re even actively searching for lost Poppins when you explore the Fungi Mines.

Mario has never looked better in this colourful, quirky adventure.

While Super Mario Bros. Wonder doesn’t break the mould that much when it comes to its stage designs, everything looks great and there are a lot of stages on offer in each World, with each sporting a unique and interconnected overworld. Things start relatively familiar in Pipe-Rock Plateau, where Warp Pipes are prevalent and you’ll be bouncing from Hoppos, before taking a turn for the surreal in Fluff-Puff Peaks. With the action mostly up in the clouds, you’ll be adding to your temporary platform in “Cruising with Linking Lifts” and slipping on icy platforms as you make way for Pokipedes on their set paths. Shining Falls adds an isometric aesthetic to its overworld and offers unique platforming challenges as the Hoppycats copy your jumps, the Anglefish fly from different directions, and you race along at high speeds on Zip Tracks. The Sunbaked Desert sees new stages appear from the arid sands as you explore or open by performing tasks on the overworld, and its stages have a tangible Arabian theme. You’ll be exploring a door maze in the Shova Mansion, gatecrashing the Ninji’s jump party, and exploring pyramid-like tombs for goodies. Things take an ominous turn in the Fungi Mines, where toxic clouds and goop lurk amongst haunted mansions and destructive rifts in the fabric of reality. The Deep Magma Bog overworld is not only the most menacing yet but also a maze of tunnels and paths. Its stages are volcano themed and feature dinosaur bones, fireballs, and flaming enemies who rush from the walls. As you explore the overworld, Kamek occasionally spawns huge Bowser-themed battleships not unlike those seen in Super Mario Bros. 3 (Nintendo EAD, 1988). Here, the game becomes an autoscrollers and you’re forced to avoid numerous hazards and destroy the central core, which doubles as a baddy maker. Finally, simple cutscenes and interactions with the locals pepper the action, with the game concluding with an all-out frenzy to get the highest score during the credits as recycled (now non-lethal) hazards fly past.

Enemies and Bosses:
Many of Mario’s most recognisable enemies make a return in Super Mario Bros. Wonder. Goombas will snooze in stages and wander or float about, Piranha Plants of various sizes pop up from pipes to bite you or spit fireballs, green and red Koopas trot about or flutter in the air, Bullet Bills blast across the screen, Boos shy away from your gaze, and Hammer Bros toss hammers in an annoying arc, as ever. Mechakoopas patrol Bowser’s battleships and castles, Pokeys wander the desert, Lakitus drop Spinys, Thwomps try to crush you, and Cheep Cheeps swim about underwater to get in your way. These are joined by some new enemies, with some offering different mechanics. The Babooms, for example, shoot fireworks that can be used to defeat enemies above you. Blewbirds fire their beaks, which then become platforms, Bloomps can be bounced on to clear gaps, Bulrushes can be ridden, and Wonder Hoppins can be tricked into smashing through the stage to make new paths. Mumsys must be unwrapped by grabbing their handle, Noknoks masquerade as doors, Renketsu Search Killers offer themselves as temporary, explosive platforms, and Skedaddlers spit seeds and run off with collectibles. Shovas push pipes and blocks about, Smogrins lurk near tricky jumps, you can swing across gaps by grabbing Tailys, and Wubbas will cut through sticky goo that slows you down. Spikes, flame bursts, electrical sparks, giant balls, toxic gunk, and crushing pistons are persistent hazards, with you often bouncing from enemies to avoid them or luring nearby foes into unwittingly aiding you.

The game’s disappointingly light on bosses but goes all-out for the finale.

Sadly, Super Mario. Bros Wonder is disappointingly light on unique boss battles, a trend I’ve noticed in a lot of 2- and 2.5D Mario adventures. While larger variants of certain enemies do exist (King Boo being the most memorable), they’re more like chase sections rather than boss battles. The Mecha Makers are close to a boss in that you have to avoid hazards on the conveyer belt and smash the big red button to down Bowser’s battleships, but that’s being generous. Since Bowser’s busy being a giant, living ship, you’ll instead battle Bowser Jr. to clear four of the six main Worlds and retrieve the Royal Seeds and remove Bowser’s defences. Each battle against Bowser Jr. is a two-stage affair, with the first simply having you avoid his shell spin, jumps, and occasional fireball. After one hit, he transforms into Wonder Bowser Jr. and alters the terrain and your abilities somewhat. In the first fight, either you or he will change size; in the second, the rising and falling platforms alternate between being ice or jelly; in the third, water floods the arena (either above or below); and, in the fourth, Wonder Bowser Jr. distracts you with clones and by having you fight in the dark. While these fights can be tricky without any power-ups on hand, it only takes a couple of hits to defeat Bowser’s kid and his attack pattern doesn’t change much. You never battle Kamek, which is a shame, and Bowser Jr. is ultimately done in for good in a cutscene, which is also disappointing. After braving Bowser’s Rage Stage, you’ll face off against Castle Bowser in a somewhat harrowing, multi-stage final fight. In each phase, Castle Bowser spawns more hands to rain flaming Piranha Plants or to try and slam you. You must time your jumps to gain a boost from the rhythm blocks to either dispose of the hands or smack the weak spot under his chin, which he shields with his extra hands. As the battle progresses, Castle Bowser retreats to the background and fires larger Piranha Plants that can be tricky to dodge, alternates the floor to screw up your jumps, and tosses big, spiked balls that bounce around the arena. Power-ups are occasionally deposited as well and, after enough hits, a big button appears on Castle Bowser’s head that you must propel up to to end to his latest mad scheme.

Additional Features:
As mentioned, there are three 10-Flower Coins to find the game’s main stages and you’re encouraged to snag the top of every flagpole. Like the collection of Wonder Seeds, these statistics are recorded on your save file, though they appear to have no other function other than bragging rights (and, in the case of Flower Coins, allowing you to buy items). You must search high and low for every Badge Challenge and hidden sage if you want to earn every Badge in the game and enough Wonder Seeds to progress through the story. You can easily review each stage from the main map and jump to any stage where it shows you’ve missed anything, though you’ll need a guide or to pay attention to the overworld to spot when stages have secret exits. Bonus levels appear that bombard you with Coins, you can take a break by searching for Flower Tokens or taking out enemies across various arenas, and you can hunt across each map in search of Captain Toad. Eventually, you’ll unlock the Special World, where ten additional, super tough stages await, each one themed after the main Worlds and remixing hazards and enemies in new, challenging ways. Clear them all and you’ll gain access to a new Poplin House and earn yourself a congratulatory message and the Sound Off? Badge, though personally I couldn’t even clear one of the Special World’s stage…so good luck to you! Finally, of course, you can tackle any of the game’s stages in multiplayer, vying for Coins, power-ups, and a high score at the end, though I wasn’t able to play this so I can’t say how good or bad it is.

The Summary:
While I usually prefer Mario’s 3D adventures due to his 2D outings being slippery and unfamiliar to my SEGA-hardened gaming skills, I’ve really enjoyed his 2.5D titles and was blown away by Super Mario Bros. Wonder. Visually, the game is such a treat to behold; I loved all the little, goofy details and the whimsical (yet familiar) nature of the Flower Kingdom. I loved the callbacks to Mario’s previous adventures, with some returning gimmicks and mechanics, and the new abilities were a real treat. While the Bubble and Elephant forms weren’t that special, the Wonder Flower mechanics really helped to inject new life into the tried-and-tested Mario formula. I loved how unpredictable it was, how it reimagined stages and decades old fixtures like Goombas and Warp Pipes in fun new ways, and how it bombarded you with such an array of visually interesting mechanics. The new Worlds were also very enjoyable; I liked how the stages were short obstacle courses that never outstayed their welcome. The level of challenge was just right, with the game being upfront about when things get trickier and the onus being on the player to have the right skills accumulated or Badges equipped. The Badge mechanic was a little wasted on me but may have more appeal in multiplayer, and I was disappointed by the poor variety of the boss battles. There really was no excuse not to have Kamek be a boss fight at least once and I do think the developers sell the franchise short by not doing more with the likes of King Boo. Similarly, the character selection could’ve been better; I don’t get why Wario and Waluigi are always shafted or why Peach and Princess Daisy don’t have unique attributes. These negatives are mere nit-picks, however, to the overall enjoyment and fun on offer in Super Mario Bros. Wonder. It really does feel like a brand-new addition to the classic games and I liked how it provided just enough of a spin on the usual formula to be a wholly unique and accessible experience.

My Rating:

Rating: 5 out of 5.

Fantastic

Did you enjoy Super Mario Bros. Wonder? How do you feel it compares to other Mario titles, specifically the previous 2.5D Super Mario games? Which of the playable characters was your go-to and were you disappointed that they didn’t have more unique playstyles? What did you think to the new power-ups and the Wonder Flower mechanic? Were you disappointed by the lack of variety in the boss battles? Did you ever conquer the Special World? How did you celebrate Mario’s birthday this year? Whatever your thoughts on Super Mario Bros. Wonder, feel free to share them below and be sure to check out my other Mario content!

Game Corner [Mario Month]: Super Mario World 2: Yoshi’s Island (Nintendo Switch)


So, for no better reason than “Mar.10” resembling Mario’s name, March 10th is widely regarded as being “Mario Day”, a day to celebrate Nintendo’s portly plumber, an overalls-wearing mascot who literally changed the videogame industry forever and shaped the home console market of the nineties.


Released: 26 May 2023
Originally Released: 5 August 1995
Developer: Nintendo
Original Developer: Nintendo EAD
Also Available For: Game Boy Advance, Nintendo 3DS, Nintendo Wii, Nintendo Wii U, Super Nintendo Entertainment System (SNES) Classic Edition, SNES

The Background:
When the videogame industry collapsed under the weight of overpriced consoles and disappointing titles, Nintendo swooped in and revitalised the industry with the runaway success of Super Mario Bros. (Nintendo EAD, 1985). Despite a bizarre development, Super Mario Bros. 2 (Nintendo R&D4, 1986) was also a much praised best-seller, and Mario’s star rose further following the unique marketing strategy behind Super Mario Bros. 3 (ibid, 1988). This culminated in what many have deemed Mario’s greatest 2D outing, Super Mario World (Nintendo EAD, 1990), a title specifically designed to showcase the processing power of the SNES. The game also introduced one of Mario’s most popular supporting characters, Yoshi, who took the spotlight in Super Mario World’s sequel thanks to designer Shigefumi Hino. For this not-inconsiderable-task, Hino and his team opted to produce a more relaxed gameplay experience, doing away with the timer and a traditional health system and emphasising exploration. To further distinguish the game, the team introduced an egg-throwing mechanic and focused on a linear story to make the game more accessible to younger players. Artist Hisashi Nogami came up with the game’s distinctive colouring-book aesthetic, which was painstakingly brought to life by hand drawing every aspect. The game’s late release for the SNES also allowed the team to utilise everything the machine had to offer, including enlarging and rotating sprites and backgrounds. Yoshi’s Island proved a hit, eventually selling over 4 million units and being met with widespread acclaim. Reviews raved about the colourful graphics, the innovative gameplay, and the surprising scale of the title, and the game was largely cemented Yoshi’s legacy in Super Mario canon. The game was followed by a divisive sequel for the Nintendo 64, a couple of spin-off games, follow-ups for the Nintendo DS and 3DS, and many other Yoshi-centric games before being ported to multiple virtual consoles, including being made available for the Nintendo Switch Online service in 2023.

The Plot:
Years ago, Kamek attacked a stork delivering baby brothers Mario and Luigi. While Baby Luigi was kidnapped, Baby Mario fell onto the back of Yoshi, whose friends helped deliver him across Yoshi’s Island, conquering Kamek’s enlarged minions and confronting the Magikoopa – and his diminutive master, Baby Bowser – to rescue Baby Luigi.

Gameplay and Power-Ups:
Essentially, Yoshi’s Island is a 2D, sidescrolling action/platformer like its predecessor, but it’s also a very different gameplay experience for a typical Super Mario title. For starters, you play as one of many different-coloured Yoshi’s, each sporting the same moves and abilities, and Mario is simply a baby on your back who acts as your life meter. After starting the game and picking a save file, you can pick between two control schemes, though the default is perfectly acceptable. Yoshi jumps with the B button and holding it performs a little “flutter” by kicking his legs, giving him more airtime to reach platforms. You can chain these together when falling to extend your jump and press down in mid-air to perform a butt stomp to pound down switches and stakes, smash through the environment, and defeat enemies. Enemies are also defeated by simply jumping on them, or gobbling them up with Yoshi’s tongue. Pressing Y sees him swallow them and you can either press it again to spit them out or press down to turn them into an egg. You can store up to six eggs at a time and throw them by pressing A to bring up an aiming reticle, hold either the Left or Right bumper to steady the ever-moving crosshair, and press A again. Some enemies can’t be swallowed or turned into eggs; in the latter case, you simply spit them out again but, in the former, you use other means to defeat them. Yoshi can also get eggs from hitting blocks and Egg Plants and find them scattered around the game’s many colourful environments. Green-spotted eggs are the standard, but you can also use yellow-spotted eggs that cause enemies to drop Yellow Coins, red-spotted eggs cause them to drop two health-replenishing Stars, and Flashing Eggs cause them to drop Red Coins. This can be a bit cumbersome at times; Yoshi can only aim in an arc, so you must pause the reticle or ricochet your shot to hit your targets. However, it’s easy to get distracted with the aiming system and either take damage or fall to your death. Some enemies can even steal your eggs and, while you’re never short on replacement eggs, it can leave you vulnerable and restricted when you exhaust your supply.

Toss eggs, eat melons, or transform into various forms to progress through colourful Worlds.

Yoshi also gobbles different-coloured watermelons to gain temporary additional attacks. Green watermelons let you spit seeds, red watermelons let you breathe fire, and blue watermelons let you freeze enemies, all of which are quite powerful and often more useful alternatives to throwing eggs. Yoshi can also, oddly, briefly transform into vehicular forms, the most common being his helicopter form that sees him awkwardly fly about, avoiding enemies and collecting Coins and passing over large gaps to a Yoshi Block. Another common transformation is Yoshi’s Mole Tank that lets him automatically dig through dirt, but you’ll also become a missile-firing submarine, a small train capable of riding tracks set into the background, and a car to plough through enemies. Similarly, Yoshi pushes Chomp Rocks to decimate anything in his path and reach higher areas, and Baby Mario even briefly takes centre stage when you find a Super Star. This turns Yoshi into a giant egg and lets you control “Powerful Mario”, who’s invincible, floats using his cape, and dashes across spike beds and up walls and ceilings with Y, though you must grab more Super Stars to maintain the form. Finally, Yoshi can jump on a pair of skis in certain snow-themed Worlds, dashing down snow at high speeds and turning into an uncontrollable snowball if he hits an object. Additionally, Special Items are won by playing the game’s Bonus Challenges. Here, you can earn extra lives and special one-use items you can select from the pause menu. These include POW Blocks that turn all onscreen enemies into Stars, instant refills for your eggs, instantly grant you one of the three watermelon power-ups, reveal hidden items in the level, grant you Stars to refill your health, and transform all onscreen enemies into Winged Clouds, though you can’t use Special Items in boss battles.

Watch out for your bawling companion when you’re going for those enticing collectibles.

As mentioned, Baby Mario is Yoshi’s life meter; when Yoshi’s hit, Baby Mario floats away in a bubble, screaming his head off, and you have a few seconds to retrieve him before he’s carried away. This meter slowly refills after you save him and is replenished and boosted by collecting Stars, usually by breaking crates or shooting Winged Clouds. Enemies like the annoying Bandits, Fishing Lakitu, and propeller-powered Green Toadies can also steal Baby Mario, so you must take them out or avoid them, and you’ll want to save him as quickly as possible because that scream gets really annoying! Like previous Super Mario titles, Yoshi’s Island features a map system, but one laid out more like a storybook. There are six Worlds with eight core levels, including a mini boss fort and a boss castle, alongside two bonus levels for each World. Levels are generally just a few screens but can be quite long. I really felt like my playthrough dragged quite a bit as things can be quite slow and the map progression isn’t very exciting. Throughout each level, you can find Yellow Coins (100 grant an extra life), extra lives, floating 1-Ups, giant eggs to defeat all onscreen enemies, and Message Blocks for gameplay tips. There are thirty Stars to find, twenty red Coins, and five Flowers in each level. Sometimes these are carried by Fly Guys, sometimes you need a transformation, and sometimes Winged Clouds spawn them, but they’re often either out in the open, tucked away, or require some tricky platforming to snag. Getting them all nets you the best completion score for each level and unlocks the secret levels for each World. However, it’s not easy collecting everything as some stuff is cleverly hidden behind the foreground, requiring you to enter areas from different positions, or is just out of reach and requires some clever egg bouncing. Occasionally, you’ll find some helpful characters to give you an assist. The enthusiastic pup Poochy carries you over dangerous terrain, happily gobbling up any enemies in his path, Huffin Puffin’s chicks substitute for eggs, and large, amorphous ghosts indirectly aid you by carrying platforms through spiked passageways.

Despite its whimsical appearance, the game can be surprisingly long and challenging.

Considering it’s his home turf, Yoshi’s Island is a hazardous place for the friendly dinosaurs; areas are filled with bottomless pits, instant-death spikes and lava, haunted ruins, and small, but dangerous, enemies. While the game isn’t especially difficult, the challenge ramps up as the Worlds slowly become more like dangerous obstacle courses that will test your jumping, egg-shooting, and reaction times. Like Mario, Yoshi can be a little slippery; he makes for quite a big target and is completely vulnerable when aiming, too. Thus, it’s easy to get blindsided by enemies, especially those hiding in the background or constantly spawning from pipes. Yoshi uses hills, slopes, and hidden tunnels to get around, as well as various platforms; these rise, fall, move along a track, or require you to jump on each in turn, rotating in a wheel to progress. Sometimes you’ll be locked into a maze-like loop and need to find a key; sometimes you’ll hit Winged Clouds to create bridges or spawn vines to get higher. Other times, you’ll knock buckets into water or lava to progress, quickly hop between platforms while a Shark Chomp chases you, or be forced to stay on the move in autoscrolling sections (with some even forcing you to the left!) You’ll ride balloons, run and jump to timed destructible platforms, be flung across the screen by spinning logs, play Breakout (Atari, Inc., 1976) to destroy coloured blocks with your eggs, watch for Chomps flying from the background and creating bottomless pits, spring to higher areas, ride circles that change direction when you jump off them, and cross a chasm on a deflating giant balloon. Thankfully, you can pass through sparkling rings to create a checkpoint and lives are quite easy to build up, but things do get surprisingly challenging as the game progresses. Flipping spiked platforms, mazes of dark sewers and pipes, and claustrophobic quartz caves are juxtaposed with bright, cheery exteriors that also hide many dangers, the most annoying being the Fuzzies. These fluffy puffs fill the screen when they appear and touching them sends everything into a psychedelic haze and messes with your controls for a few seconds, meaning it’s even easier to slip or run off a platform to your doom.

Presentation:
Yoshi’s Island not only plays very differently to other Super Mario games, it also looks very different. The entire game is styled after a children’s colouring book, with pastels and crayon effects used in place of traditional coloured backgrounds, giving the entire game a whimsical feel that’s perfectly in keeping with the baby-centred focus and its status as a more child-friendly gameplay experience. The Yoshis are all very fun sprites; they do a little dance when idle and react comically when hurt or performing their flutter jump. Baby Mario is very animated when separated from Yoshi, bawling his head off in his bubble and encouraging you to retrieve him as quickly as possible, and the game’s cutscenes utilise a storybook aesthetic that makes it feel like you’re playing through a bedtime picture book. Every level pops with colour and environmental effects; sometimes it’s a bright sunny day, sometimes it’s the red hue of dusk, sometimes it’s a starry night, and you’ll see birds, mountains, giant flowers, waterfalls (and lavafalls), giant mushrooms, and thin trees in the foreground. There’s a lot of depth to each area; I particularly liked levels where Chomps fly at the screen and destroy the ground, and the many caves where little details are hidden way back, and you’ll often open up tunnels by leaping at walls or avoid leaping fish and water jets when paddling through or jumping over water. Blizzards are commonplace in World 5, often blanketing the screen as you ride ski lifts and melt ice blocks, and you’re forced to navigate labyrinthine forts and castles, taking different paths to find keys or get past spike beds. It’s all very colourful and playful, which is reflected in the infectious soundtrack and amusing Yoshi sounds peppered throughout the game. This lulls you into thinking it’s a simple kid’s platformer, making the sudden challenging sections even more jarring.

The game’s visual presentation is incredible, emphasising a vivid storybook aesthetic.

Yoshi’s Island was a late release for the SNES and, as such, effectively uses all the machine’s vaulted power. Parallax scrolling and sprite manipulation are abundant, with Kamek enlarging regular enemies and inanimate objects into large bosses and huge, amorphous enemies stretching and filling the screen at times. This is equally reflected in the giant eggs and transformation sequences, and the scaling all works beautifully to add to the depth of each level. Typically, levels will consist of some common themes, such as a grassy starting area, a cavernous second area, and a final area that takes place in the skies or over a pit. You’ll venture into many dark caves, where things are far more claustrophobic and maze-like, as well as sewers or areas were it’s so dark Yoshi is lit by a single light source. While the forts and castles can be quite samey, they do mix things up a bit by featuring dilapidated backgrounds and a spooky ambiance further emphasised by the resident Boos and ghosts. The grassier areas are where the game shines for me; I love seeing fields and mountains in the background and hopping to the precarious log platforms, or taking the smaller platforms on tracks, or interacting with the environment using Yoshi’s transformations. Everything’s so lively that it’s easy to be surprised by enemies that pop up from pipes, fly from above, or sneak in from the background. I also enjoyed how the time of day changed, when the game leaned into its dinosaur theme to show skeletal remains and tar-like dirt, and the impressive quasi-3D rotating map that wasn’t utilised enough for my liking.

Enemies and Bosses:
Although it takes a while to encounter them, some of Mario’s most famous enemies make an appearance in Yoshi’s Island. You’ll come across Koopa Troopers and their flying variants, the Para-Koopa, shy Boos who cover their faces when you look at them, disposable Goombas, the ever-annoying Lakitu (who tosses Spin Eggs at you), and ravenous piranha plants. The most prominent returning enemy are the Shy-Guys, who come in an assortment of colours and variations, such as hovering overhead and dropping bombs, turning giant spiked maces, fatter ones, and ones that run around on fire. Yoshi’s Island is home to some unique and annoying new enemies, too, such as Frog Pirates who’ll steal Baby Mario, somewhat familiar blue hedgehogs who defend themselves with their quills, tiny Mousers who steal your eggs, and large lava, ghost, and aquatic enemies who pop up from liquid or the walls. Some enemies are more annoying, like the inedible Ravens and the spiky Tap-Taps, while others are more tricky. Spookies can be ridden but can’t be defeated by jumping on them and will steal Baby Mario if they’re hiding a Bandit, one of the most annoying enemies in the game. Equally frustrating are the Grunts, whose spiked helmets must be knocked off to make them vulnerable, the Sluggers that deflect your projectiles, and the karate-and-ki-throwing Zeus Guys. Many enemies are small are relatively harmless, but there’s so many and they pop up so frequently that it’s easy to take a hit. Others, like the piranha plants and Blow Hards either pop up at the worst moments or are placed on walls, ceilings, and platforms when you’re trying to jump about or ride platforms. Others are very large and must be pelted with eggs to whittle them down or fend them off, and you’ll even get attacked by an enemy masquerading as a collectable Flower!

The gigantic bosses look intimidating but they’re mostly a cakewalk.

With the exception of World 6, each World boasts two bosses: a mini boss hiding in the World’s fort and the actual boss holed up in the World’s castle. Each time, Kamek enlarges a regular enemy or inanimate object, kicking off the fight, which typically involves a large but cumbersome and surprisingly limited enemy filling the screen and must be hit with eggs to defeat, with other smaller enemies or Egg Plants providing ammo. World 1 sees you battling Burt the Bashful and Salvo the Slime, which are both ridiculously easy. Simply hide in the ditches and fire eggs as Burt slowly bounces around, then pelt Salvo with eggs, shrinking him with each hit and gobbling his minions, easily avoiding the lava below. World 2 features fights against ghosts, the Bigger Boo and Roger the Potted Ghost, with the Bigger Boo requiring you to ricochet your eggs to damage him, becoming intangible, and accompanied by bat-like Fangs who act as ammo. Roger tries to push you back and spits homing blue flames but is super easy to defeat as you just need to push his plant pot until he topples over the edge. In World 3, you’ll be swallowed by a gigantic Frog Pirate and need to fire eggs at his dangling uvula, dodging his gastric acid and the gigantic enemies that also drop in, which is quite a visually fun fight. Afterwards, you battle the Naval Piranha, who’s a little tricker. You must jump when it lunges and eat the Nipper Spores, then quickly ricochet eggs to hit the target at its base, though you can apparently one-shot it before the fight even starts. World 4 sees you encounter a massive Milde who wanders back and forth, requiring you to butt stomp from above, splitting her into smaller Puchipuchi L and, finally, regular Mildes. Hookbill the Koopa had me confused for a bit; this enlarged Koopa slowly lumbers around and performs a belly flop, spitting out eggs whenever you jump on his shell, but is invulnerable until you hit his head. Hit him enough times and he’ll topple onto his shell, exposing his stomach for a butt stomp, which took me a while to figure out.

The final bosses require a little more strategy and offer a bit more challenge.

World 5’s Sluggy the Unshaven was also a bit troublesome. This ghost-like blob’s gelatinous skin sags when you shoot eggs at it, and it slowly tries to force you over the edge. However, if you target the same spot, you’ll deal damage and eventually defeat it by striking its heart. Raphael the Raven was also quite unique as he flings you to a small moon where he relentlessly chases you in a rotating circle and creates shockwaves. To damage him, you must butt stomp the wooden stakes so the opposite one pops out as he’s passing over it, which can be difficult to time due to the nauseating rotation. Finally, in World 7, the invincible Tap-Tap the Red Nose hops about until you destroy the coloured blocks and drop him in lava. Kamek then chases you through the castle, firing magical bolts and teleporting away, and you eventually battle his cantankerous master, Baby Bowser. Baby Bowser was a bit difficult to figure out, too. He toddles about in his playroom, causes big shockwaves with a belly flop, and swats Baby Mario away so he can ride Yoshi, but is completely invulnerable. Instead, you must cause your own shockwaves with a butt stomp, though Kamek embiggens the enraged turtle king for the true final battle. This takes place on the castle roof during a nighttime storm and sees Big Baby Bowser slowly stomp towards you from the background. You must dodge the rocks he rains down and his massive fireballs while simultaneously avoiding the gaps he creates in the ground and swallowing Baron von Zeppelins. You must use your eggs to blast him in the face, which can be tricky due to how far away he is. If he gets too close, he’ll instantly kill you so you must frantically target just the right place to deal damage and force him back. Repeat this seven times, being mindful of the crumbling ground as the fight progresses, and Baby Bowser finally goes down, allowing the Mario brothers to be safely delivered to their parents.

Additional Features:
When you complete each level, you can tackle a Bonus Challenge if the goal ring lands on a Flower or a Mini Battle by finding a hidden key and entering a locked shack. These see you tossing or popping balloons, matching cards, uncovering matching pairs, gathering Coins against a time limit, attacking enemies with watermelon seeds, and playing roulette and a slot machine. It’s a nice distraction to play these mini games and they award Special Items and a load of extra lives, especially by abusing the Nintendo Switch Online’s rewind and save state features, which make the game a breeze even with its lengthy playtime. Each World also contains two bonus levels, with the Extra levels unlocked when you score a perfect 100 on all the regular levels. These extra levels are shorter, contain no checkpoints, and generally revolve around a gimmick, such as Poochy, traversing Grinder-infested vines, tackling a confusing maze, and a ski run down a mountain in pursuit of Kamek. The game has three save files for multiple playthroughs and you can replay all previous levels with the exception of the opening tutorial-esque stage, though I’m not sure when or how the game saves (I assume it’s after you beat each level). There are no rewards for 100% completion, so you can’t pick which coloured Yoshi you ride or choose to carry Baby Luigi or anything, and there are no two-player options here beyond players taking turns to play.

The Summary:
This isn’t my first time playing Super Mario World 2: Yoshi’s Island. I’ve played it on emulators in the past as part of my fascination with the SNES library, but this is the first time I’ve completed the game. Yoshi’s Island definitely makes a strong visual impression; the story is at the forefront here, as are cute, colouring book graphics and whimsical, charming music. The sprites and environments are absolutely gorgeous and some of the best the SNES had to offer, boasting vivid areas, a greater level of detail and depth, and bundles of charm and life to every sprite. As annoying as Baby Mario’s screaming is, I liked the mechanic as a health meter and an incentive not to get hit, though it can be a mad scramble to rescue him that costs you life anyway. Unfortunately, I didn’t feel the same about Yoshi’s egg throwing; while he’s versatile enough, if as slippery as Mario, his egg-aiming and throwing gameplay can be cumbersome, especially when you’re on moving platforms or surrounded by enemies, making it difficult to make split second decisions. It worked in the boss battles, which were fun, and I really liked the enlarged sprites and technical tricks on show, though the bosses were generally a complete joke and I only really struggled with a few. The levels beforehand, though, can become surprisingly challenging. Bottomless pits and instant death traps increase, as do the moving and confusing gimmicks, and it’s often tempting to risk death to grab those elusive collectibles. Overall, this was enjoyable, but Yoshi’s Island is more fun to look at than play at times. It’s a bit slow and clunky, the levels can outlive their stay quite quickly, and there wasn’t as much variety in the Worlds as I would’ve liked or expected from a Super Mario title. Still, it’s something a little different and provides a unique, colourful twist on the usual Super Mario formula so I’d say it’s worth checking out, but I’d much rather play Super Mario World again than this.

My Rating:

Rating: 3 out of 5.

Pretty Good

Was Super Mario World 2: Yoshi’s Island in your SNES library back in the day? What did you think to the new gameplay mechanics and how do you think it compares to Super Mario World? Did you enjoy the colourful, colouring book presentation and the egg-based mechanics? Were you annoyed by Baby Mario’s screaming, and did you ever score 100 on every stage? Are you a fan of Yoshi and, if so, which of his games is your favourite? How are you celebrating Mario’s birthday this year? Whatever your thoughts on Super Mario World 2: Yoshi’s Island, feel free to share them below and be sure to check out my other Mario content!

Game Corner: Mario & Sonic at the Olympic Games Tokyo 2020 (Nintendo Switch)

Released: 1 September 2019
Developer: 
SEGA
Also Available For: Arcade and Mobile

The Background:
Super Mario and Sonic the Hedgehog engaged in a fierce “Console War” during the nineties as Nintendo and SEGA battled to be the top dog of the videogame industry. In the end, thanks largely to wasting money on expensive peripherals and the pressures of an ever-changing marketplace, SEGA withdrew from the home console market. On the plus side, their supersonic mascot appeared on his rival’s consoles, prompting discussions of a long-awaited crossover began between their respective creators, Shigeru Miyamoto and Yuji Naka. Surprisingly, the two came together in the spirit of friendly competition once SEGA obtained the 2008 Beijing Olympic licence. Essentially a collection of Olympic-themed mini games, Mario & Sonic at the Olympic Games (SEGA Sports R&D, 2007) saw Mario and Sonic characters co-existing for the first time and its commercial success led to subsequent titles releasing annually to promote different Olympic events across the world. This year, to coincide with the Special Olympics World Winter Games, I’m looking at the 2020 iteration (and currently last) of the series. Released following a significant gap between entries and the first to appear on the Nintendo Switch, the game including story elements and events that incorporated sprites from both franchise’s classic 2D games. Retaining its branding despite the delay to the Olympic games, Mario & Sonic at the Olympic Games Tokyo 2020 attracted mixed reviews that praised the nostalgic feel of the 2D mini games but criticised the tedious story mode and limited options.

The Plot:
When Bowser, King of the Koopas, and Doctor Eggman are trapped inside an 8-bit videogame console alongside Super Mario and Sonic the Hedgehog, Luigi, Miles “Tails” Prower, and all their extended supporting characters must compete in the Tokyo 2020 Olympic games to free them.

Gameplay and Power-Ups:
If you’re familiar with the Mario & Sonic series of Olympic game tie-ins, you probably won’t be surprised to learn that Mario & Sonic at the Olympic Games Tokyo 2020 is a collection of Olympic-themed minigames starring the biggest names from both franchises. As ever, Mario and Sonic’s worlds are mashed together with our own, allowing these anthropomorphic and comical characters to wander around real-world locations (courtesy of not one but two overworld maps) and learn interesting facts about both franchises, the Olympic games, and Tokyo. You start the game by selecting your region, being bombarded by pop-up notifications that tell you basic stuff like what the sound settings do, and customising your player profile, assigning icons and such. From there, you have a few gameplay choices: you can jump into a quick game solo or against other players, picking from every event as they’re all unlocked from the start and setting the difficulty of each, or tackle the game’s story mode. Regardless of which option you pick, your gameplay experience will change depending on which character you play as. While the Story Mode forces you to play as certain characters, you can pick almost any character for any event in Quick Match, but you’ll need to consider their capabilities. These are pretty simple: some characters are faster, some are all-rounders, some do better with Super Moves. It doesn’t get more complicated than that and I’m not sure how much of a factor they are as basically every game comes down to how fast you can tap buttons or work the various controls. There are thirty-two characters to choose from, though twelve are only selectable in certain events (like Jet for Football and Ludwig for Fencing) and, when playing the 2D-styled “Dream Events”, your choices are limited to just eight characters.

Up to four players can tackle the game’s 3D, nostalgic 2D, and chaotic “Dream” events.

There are twenty-one Olympic events to play, ten 2D Events set during the 1964 Olympic games, and three special challenge “Dream Events”. You’ll get a chance to review the controls and success criteria prior to each event, though it’s worth pressing X during one of the many introductory scenes or after pausing to review any additional controls. Players can choose from three different ways to play, including flailing around with the motion controls or using the buttons like a normal person, though some events (like the Discus Throw and Javelin Throw) force you to use motion controls to angle your shot, making them some of the more aggravating events. Generally, you can hold the Right trigger or A at the start of an event to build power and must tap A to run or move. B is usually reserved for jumping while R or A execute a Super Move (such as a burst of speed or dancing flourish). The simplest events, like the 100m Race and 110m Hurdles, have you tapping A to run to the finish line, with players hitting B at the right time to clear hurdles and gain a boost in the latter. Most events have a foul line that will disqualify you if you cross it, some of the trickier ones have an optional practice mode beforehand, and your objective is to win every event to set a best time (or break a World Record) and earn gold medals or the top spot on the podium. If you fail an event three times in the Story Mode, you can choose to skip the event, progressing the story with no consequences, something I eventually did quite often when the events became too laborious or finnicky. I was fine with the challenge offered by, say, the Long Jump where you tap A to run, hold B to adjust your jump angle, and complete a series of button presses akin to a quick-time event (QTE), even if it took some practice. Similarly, Sport Climbing was tricky but not too taxing. You press the Left trigger and R at the start to latch on, aim your jump with the left and right control sticks, and hop to hand-holds against a time limit, avoiding spiked balls and replenishing your stamina with hearts. I also had a fair bit of fun in Boxing and Fencing, where you must time button presses and build combos, guarding against incoming attacks and frantically tapping A (in the latter) to avoid being counted out.

Skill and character choices can help with the game’s harder events, which include team-based sports.

Things took a turn whenever the events became a bit more complicated, however. It’s not too difficult timing your button presses in the Triple Jump event or pulling off gnarly tricks in the Surfing – Shortboard and Skateboarding – Park events, but you need to be on point to win those gold medals as a poor score will cost you and you often have to complete a few rounds to win, making it even more annoying. Archery was a similar issue; here, you have to think about the wind direction, the distance of the targets, and the angle of your shot. It’s a far cry from Shooting – Trap, where you just pick a square and hit a button to shoot clay discs. The Judo event also caused me a lot of headaches; you have to mess about trying to keep your balance to toss the opponent, which I just couldn’t figure out. I didn’t mind completing increasing difficult QTEs in the 10m Platform and Vault events, but tilting the left stick to match your partner’s strokes in Canoe Double (C-2) 1000m and frantically rotating the control stick to chase to the goal in Kayak (K-1) 1000m was a pain in the ass. You even play team games, like Volleyball, Football, and Rugby Sevens. I couldn’t figure out the Volleyball event; no matter how well I timed my presses of A and B and how often I hit the ball over the net, I couldn’t score a point. Rugby Sevens was a touch more enjoyable; here, you press A to pass and score a try, B to evade, and race around a pitch tackling other players and scoring a conversion by timing a press of X as a meter goes back and forth. And then there’s the aforementioned Discus Throw and Javelin, where I could just about figure out the motion controls in practice and then kept screwing up my throws when it came time to compete. If the option had been there to just use the left stick to direct my shot, it would’ve been far more enjoyable!

The minigames are some of the best parts of the game, often outshining the main Olympic events!

When playing Story Mode, you’ll alternate between moving Luigi around the 3D world of the 2020 Olympic games and Mario around the 2D world of the 1964 Olympic games, with Tails and Sonic following each. You’ll chat with other characters and non-playable characters (NPCs) like Toads and Omachao to obtain passes to other areas and compete in additional events and find glowing tickets to learn fun facts. For such small overworld maps, there’s a hell of a lot of backtracking and dialogue to skip through, and it quickly gets a bit tedious slogging through the twenty-chapter story to reunite the two groups. Occasionally, characters will ask you to complete one of ten minigames to advance the plot; these are then unlocked for free play in the Game Room. These minigames are some of the best parts of Mario & Sonic at the Olympic Games Tokyo 2020 and see you flying through the Tokyo skies in a sidescrolling shooter like in Sky Chase Zone, chasing down a bullet train, painstakingly searching Shibuya’s Hachiko Square for specific characters in a game of Where’s Wally?, and chasing down (and attacking) Dr. Eggman’s taxi in what’s somewhat similar to Rad Racer (Square, 1987). You’ll be bouncing on Cheep-Cheeps as you chase after Bowser’s river boat, sneaking through a museum, avoiding Koopas and other Mario enemies as you collect keys, and desperately trying not to fall as you scale Tokyo Tower. Other times, you’ll be beating up waves of Shy Guys or shooting Egg Pawns before they throw spiked balls at you, both options that are far more enjoyable than the game’s odd depiction of Badminton that’s essentially just a rhythm game, just press the button when prompted, using the left stick to aim your shot, and your character moves by themselves (though I found the doubles partner screwed up more than I did). You’ll also dash around an obstacle course in Equestrian – Jumping, building speed to jump fences and puddles, knock a ball back and forth in table tennis until you can hit your Super Shot, and throw hands and feet in Karate – Kumite, toppling your opponent to earn extra points. Most of the events are pretty fun but some of them are way too short and others outstay their welcome very quickly. It’s also pointless trying to master the difficult ones as you can just skip them in Story Mode, unless you’re aiming for 100% completion.

Presentation:
In keeping with the tradition of this spin-off series, Mario & Sonic at the Olympic Games Tokyo 2020 is a bit of a mixed bag in this area. None of the familiar tunes from either franchise appear, leaving the game to plod along on the strength of a weak-ass, generic soundtrack that barely eases the pain of a failure. Things start off strong with a beautiful pre-rendered cutscene that showcases many of the new and returning events and shows these two franchises co-existing side y side, a visual that never gets old even if I’ll never forgive either company for not doing a more suitable crossover. It’s a bit downhill from there, though, as prerendered cutscenes are eschewed in favour of partially animated 2.5D models, endless dialogue boxes, and a parade of pop-ups. The 2D sprites and environments ease this pain a bit, but the developers limited themselves by using the sprites from Mario’s debut title, meaning he and his fellow characters have very few frames of animation. Sonic and his cohorts fare slightly better in this regard but the aesthetic is all over the place since Knuckles the Echidna’s sprites are obviously more detailed than Sonics, leading to some weird moments when the sprites are awkwardly depicted holding items. It even looks weird when they celebrate their victories or react to their failures since the developers didn’t create any new animations, so you’re left with Sonic looking annoyed and Mario flipping on his ass. Overall, I did enjoy the 2D environments and events, though; they reminded me of the many 8-bit sports games on the Nintendo Entertainment System (NES). I would’ve liked to see some 16-bit ones thrown in, even if just as additional “Dream Events”, but these retro-styled sections were the best parts of the game, despite my complaints.

The limited 3D visuals are decent but it’s the retro-styled aesthetic that really impresses.

The 3D sections hold up well, for the most part, but aren’t that dissimilar from what we’ve seen in the previous Mario & Sonic titles. You can hold B to run and characters are far more animated in 3D, spouting gibberish and sound bites and even wearing different outfits for every event. Strangely, every area felt very bland and empty, despite often being populated by at least a handful of NPCs. Eventually, larger crowds of Sonic’s Animal Friends, Chao, Shy Guys, and Toads fill certain areas and populate the stands, but they don’t help to make the areas feel very lively. Still, you’ll see NPCs like Charmy Bee and Lakitu serving as referees and other side characters operating cameras; these NPCs even get in on the action in the atrocious Marathon event. The 2D sections sported an announcer I either missed or ignored in the 3D parts and characters all gain a suitably dramatic glow and flourish when executing Super Moves. However, while event locations and interiors are far more interesting to look at, the game’s let down by its painfully bland overworlds. You can visit many real-world locations in 1964 and 2020, seeing planes fly overhead and learning their history, but it’s all stuck on a rather uninspired overworld map. This is especially disappointing considering how interactive and varied previous overworlds in the series have been, and the fact that you visit these areas time and again to find passes or charge this magical battery created by Doctor Eggman Nega. Many of the minigames again steal the show in terms of visuals, incorporating additional sprites to serve their needs and being visually akin to lost titles from Nintendo’s 8-bit heyday, which only adds to their replay factor. The game also performs really well; I noticed no slowdown or texture warping or anything like that. However, there are a lot of menus to navigate, lots of instructional text to read, and replaying events after a loss can be tedious as you have to skip a bunch of introductory scenes.

Enemies and Bosses:
As you might imagine, every character in Mario & Sonic at the Olympic Games Tokyo 2020 is your enemy at some point though, luckily for you, there’s very little to distinguish them. Computer-controlled opponents have the same abilities as you, charging power, getting a starting boost, and attacking and defending just as you would. Their individual classes do become a factor, however (you may struggle to win a race against Shadow the Hedgehog when playing as Wario, for example), though you can certainly overcome these if you mash buttons faster enough or don’t screw up when playing the event. I did notice some characters seemed to be unfairly good at some events; Vector the Crocodile never struggled to toss his discus, for example, and I could never hope to match Bowser Jr. in the Javelin Throw. Admittedly, the fact that I struggled with these events probably has a lot to do with that. however, I did notice my opponents would charge their Power Gauge much faster than me, or would sprint past me at the last minute even if I had a commanding lead. The general advice here is to simply do better the next time around, something that’s easier said than done when you have to restart a Table Tennis match after playing to deuce and match point for God-knows how many rounds! Unlike in some of the previous Mario & Sonic titles, there are few examples of what could loosely be called “boss battles” here. It’s generally seen as a big deal when you challenge Dr. Eggman or Bowser, but then a lot of those events aren’t that difficult to win…to start with… Bosses (and Badniks) do appear in the Tokyo Sky Flight minigame, however, including Mecha Sonic and a variation on the classic Egg Wrecker fight, which were fun inclusions.

A handful of quasi-boss battles and harder events test your skills…and patience…

There are some exceptions, however. The Metropolitan Goal Kick minigame, for example, has you tackling Egg Pawns to grab a rugby ball and then timing a button press to kick it up the length of the Metropolitan Government Building and deal damage to Metal Sonic. As far as I could see, Eggrobos only appear in the Volleyball event, while you must tackle Boom Booms in Rugby Sevens and score penalties against Egg Pawns in Football. The twelve guest characters can only be challenged or controlled in specific events, as well, and you must best them (or skip the event) in Story Mode to unlock them. This means you’ll only see Zavok and Zazz of the Deadly Six in Boxing and Table Tennis, respectively, Diddy Kong only appears in Rugby Sevens, while Eggman Nega and Rosalina must be challenged in games of Karate – Kumite and Surfing, respectively. Depending on your level of skill, these can be difficult events; it took me a couple of tries to clear the Sport Climbing event and unlock Rouge the Bat, for example. When playing Story Mode, other playable characters challenge you to events before helping you or joining your team, meaning you must best Knuckles and Shadow in a game of Badminton (Doubles) and win a canoe race against Wario and Waluigi to gain their help. You must also defeat Bowser’s Koopalings to charge up that stupid battery and deal with Bowser, Dr. Eggman, and their minions stealing your gold medals in 1964. Both baddies challenge you to various events, with Dr. Eggman easily being overtaking in a straight-up race or in the Vault event. Once you reach the final chapter, you must pick to play as either Mario or Sonic and race Bowser in the dread Marathon. In this event, you must tap A to run, which depletes your stamina. Hitting other runners, the walls, swarms of bees, or puddles also depletes your stamina and will eventually knock you over, costing you valuable time. You can grab water with B and ride slipstreams to regain stamina, charging up for a boost or using boost pads, but this is a hell of a final ask that I ended up skipping as I never had enough stamina to beat Bowser to the finish.

Additional Features:
There are 122 pieces of trivia to find in Mario & Sonic at the Olympic Games Tokyo 2020, spread out across both 1964 and 2020. You’ll get trivia by inspecting glowing tickets and talking to other characters, who’ll either ask a question or offer titbits about the characters, the Olympic games, and Tokyo. These are all saved in the Trivia section so you can re-read them if you wish or see which ones you’re missing. There are also eighty hidden “Challenges” to complete, with the obscured list available from the main menu. These are mainly tied to setting new World Records, finishing events on the hardest difficulty, scoring a set number of points, and clearing Story Mode. Finishing the Story Mode, you’re returned to the overworld upon loading your file, now able to replay all previous events and take on additional challenges in the “Dream Events”. Though there are only three of these, they’re pretty enjoyable and interesting, featuring additional power-ups and gameplay mechanics that make them perfect for multiplayer games. Dream Racing sees you racing through a mainly half-pipe-like course, performing tricks and hopping rails not unlike in the Sonic Riders series (Sonic Team/Now Production, 2006 to 2010) and attacking with items similar to the Mario Kart series (Various, 1992 to present). Dream Shooting sees you running around, awkwardly aiming your weapon with motion controls, and blasting targets, grabbing multi-shots and shooting down gliders in an arena shooter that reminds me of the Splatoon games (Various, 2015 to 2022). Finally, in Dream Karate, you attack with combos, kicks, and throws to toss your foes around and colour the floor panels, grabbing springs and Super Stars for temporary buffs. Beyond that, you can challenge the computer on harder difficulties, aim to get gold medals and break World Records, and play alongside up to four players…if you can find anyone to play with.

The Summary:
As a lifelong Sonic fan (and a pretty big fan of the Super Mario games), I’m basically obligated to pick up the Mario & Sonic games whenever they release. I believe I’ve played all of them, but only on portable devices, which I think made the already aggravating gameplay all the more vexing. Free from the restrictions of the small size of Nintendo DS and 3DS screens, Mario & Sonic at the Olympic Games Tokyo 2020 is easily the most visually impressive of all the Mario & Sonic games I’ve played, offering relatively attractive 3D models and worlds that show a decent amount of personality. I can never shake the feeling like these games are just soulless cash grabs, however, and that’s reflected in how empty a lot of the arenas seem, despite the NPC crowds. Mario & Sonic at the Olympic Games Tokyo 2020 impresses with its nostalgic 2D sections, which harken back to the NES days and capture a lot of the magic of Nintendo’s 8-bit glory days. While the sprites are fun to see, they’re extremely limited and a bit difficult on the eyes because of the mishmash of 8- and 16-bit sprites. I was glad to see the game allowed for traditional controls, though the forced motion controls for some events were more jarring as a result; however, it’s a bit disappointing that so many of the events play the same. Thankfully, the various minigames offered a great distraction from the main events, which were either too short or too annoying. I honestly could’ve done with a few more of these minigames, and the “Dream Events”, as there wasn’t enough of these to offset the more annoying Olympic events. With a half-assed approach to cutscenes and some of the dullest unlockables in all of videogaming, Mario & Sonic at the Olympic Games Tokyo 2020 does little to shake the franchise’s stigma of being a collection of nonsense minigames, even with its few good points. It’s easily the best of the series I’ve played, but that’s not a very high bar and I remain bitter that we never got a more traditional crossover between the two nineties icons.

My Rating:

Rating: 3 out of 5.

Pretty Good

Did you enjoy Mario & Sonic at the Olympic Games Tokyo 2020? Did you also play without the motion controls? What did you think to the 2D sections and events? Were the minigames also the best part for you, or did you prefer a different Olympic event? Would you like to see more games in the series, or a proper crossover between Mario and Sonic? Which country are you rooting for in the Special Olympics World Winter Games this year? Whatever your thoughts, leave a comment below, support me on Ko-Fi, and go check out my other content for both franchises!

Game Corner [Zelda Month]: The Legend of Zelda: Tears of the Kingdom (Nintendo Switch)


On 21 February 1986, The Legend of Zelda (Nintendo EAD, 1986) was first released in Japan. The creation of legendary game designer Shigeru Miyamoto and Takashi Tezuka, The Legend of Zelda launched one of Nintendo’s most popular franchises. This year, I’ve been dedicating every Friday to Nintendo’s most famous silent protagonist, Link and his vast and enduring fantasy world of sword and sorcery.


Released: 12 May 2023
Developer: Nintendo EPD

The Background:
Selling over 6.5 million copiesThe Legend of Zelda was a big hit for the Nintendo Entertainment System (NES) and kickstarted one of Nintendo’s most lucrative and popular franchises of all time. After a successful jump to 3D with The Legend of Zelda: Ocarina of Time (ibid, 1998), Zelda titles have only gotten more ambitious with each successive entry, though none were more ambitious than the critical and commercial success of The Legend of Zelda: Breath of the Wild (Nintendo EPD, 2017). While producing the downloadable content for Breath of the Wild, the developers had so many ideas that they were inspired to create a follow-up title and sought to expand upon the existing world and game engine with new areas. The Dungeons were revised to be more visually unique compared to the last game and the developers added a building mechanic to allow players to craft new vehicles and expand their exploration potential, with Link’s new abilities presenting new challenges for the developers to overcome. Like its predecessor, The Legend of Zelda: Tears of the Kingdom was met with universal acclaim; reviews praised the expanded map, the implementation of Link’s new abilities, and the expansive story. While the Dungeon design and performance was criticised, the game still sold 21.04 million copies worldwide and won numerous awards.

The Plot:
Years after Breath of the Wild, Link and Zelda discover the rancid “Gloom” seeping from the depths beneath Hyrule, heralding Ganondorf’s return. When Zelda disappears and the Master Sword is shattered, Link turns to an ancient race to combat the Dark King once more.

Gameplay and Power-Ups:
Like its predecessor, The Legend of Zelda: Tears of the Kingdom is an open-world action/adventure game in which players control Link (in one of the rare instances of him not only having that name but being the same incarnation) and explore the vast wilds of Hyrule, a diverse and treacherous land of sword and sorcery. Fundamentally, the controls and basic gameplay mechanics remain unchanged from Breath of the Wild, for better or worse. You press A to talk to Hyrule’s many and varied non-playable characters (NPCs), interact with the environment or pick up objects (stones, weapons, etc), and open treasure chests. To run, simply hold B but keep an eye on your stamina wheel as Link will quickly get exhausted unless you expand it by conquering the returning mini Dungeons (again dubbed “Shrines”). Y swings your currently equipped weapon in a simple combo; hold it to charge up a spin but, again, watch your stamina as you don’t want to end up dizzy and vulnerable. X jumps, with Link deftly hopping over most low objects or executing a jumping attack; you’ll also use this to clamber up walls and surfaces (again, stamina willing). When in combat, press ZR to target the nearest enemy and raise your currently equipped shield to fend off attacks. Successfully tap A while raising your shield to perform a “Perfect Guard” that reflects certain attacks and leaves enemies stunned (though I still can’t get the timing right). Similarly, pressing X at just the right time to dodge an attack allows you to hit a powerful “Flurry Rush” to whittle down their health. Pressing in the left stick sees Link crouch and stealthily sneak around, allowing for one-hit strikes, and you can hold down R when at full health to unleash a Sword Beam.

Link’s returning abilities are bolstered by bizarre building and fusing mechanics.

As before, Link can utilise almost anything as a weapon; sticks, skeletal arms, various swords, clubs, and axes are all acquired by defeating enemies or exploring your surroundings. Each has a different power rating that determines not just how much damage it does, but also how durable it is. The lower the rating, the more likely your weapon will shatter after a few hits. Wooden weapons also catch fire and metal weapons attract lightning, so you must swap them out or drop them to avoid taking damage or being caught short. Similarly, items like pot lids, wooden circles, and iron shields can defend against incoming attacks and have the same elemental issues to consider. Link also acquires various bows, with some firing more shots at the cost of their durability and others hitting harder; similar effects are also applied to weapons and shields. Link can also throw items and attach them to his arrows for additional effects, such as blowing up rock walls and enemy hoards with Bomb Flowers, freezing them with Ice Fruit, or setting vines and baddies alight with Fire Fruit. In Tears of the Kingdom, this comes courtesy of Link’s new Purah Pad, and upgrade to the previous game’s Sheikah Slate, which quickly allows him to “Fuse” objects to his arsenal. This is a versatile ability, allowing you to Fuse items to your swords (and even combine weapons) for added effects and damage. Fuse makes shields more durable or rocket you into the air with…well, an attached rocket…and is also essential for solving puzzles since you must cobble together wooden boards to create bridges, rafts, or more complex vehicles. You can manipulate almost anything with the “Ultrahand” ability, which telekinetically picks up objects to be awkwardly rotated to solve puzzles or piece together your creations. Eventually, you learn the “Autobuild” ability that makes this much easier but at the cost of “Zonaite”, a new mineral that powers your creations and allows your gliders to fly, your fans to blow, and your carts to roll along. Perhaps Link’s most useful new ability is “Ascend”, which sees him clip upwards through the environment when able, eliminating the need to expend stamina climbing rugged mountains and sheer walls. Link can also rewind time, to a limited degree, with “Recall”, allowing him to dart into the sky by reversing the direction of falling debris and bypass raging lava flows on makeshift rafts.

Cook meals and earn Light of Blessings to increase your maximum health and stamina.

As before, Link’s weapon inventory is painfully limited. It can be expanded by finding Korok seeds, but only one slot at a time and the cost increases as you progress. Link’s defensive options are also tied to his outfits, which are found in chests, tied to tricky side quests, or bought from various shops for ridiculous prices. Instead of relying on gathering Rupees, you’re better off selling the precious gems you find by smashing rocks with rock-Fused weapons. You’ll need to do this as Link won’t last long in extreme heat or cold without the right outfits, and some offer additional perks such as speeding up your swimming rate, rocketing you up waterfalls, resisting elements, and upping your attack and defence. Rather than collecting hearts from defeated enemies, Link can either spend Rupees at an inn, collect a “Light of Blessing” from Shrines, or cook meals. This time, any meals you cook are recorded for easy reference; meals can also have added effects, such as temporarily increasing your maximum hearts and stamina wheel. To permanently extend these, you must trade four Light of Blessings at prayer statues dotted around Hyrule to gain either a new heart container or an extra slither to your stamina wheel, a process that remains as tedious as before. Similarly, you can still sneak up on and tame wild horses, adding them to stables and calling them with a whistle. If you have a Breath of the Wild save file, your horses will even be carried over, which is nice. There is a generous fast track mechanic, as before, but you must again activate towers (revealing more of the map in the process) or beat Shrines to utilise this. Finally, you can jump from high places and glide using your Paraglider and, though you can’t drop bombs like before, you can whip out your bow and use the slowdown effect to pick enemies off and, eventually, speed up your gliding with a gust of wind.

The Sages fight alongside you, though it takes all your strength to retrieve the Master Sword.

Like in Breath of the Wild, Link is aided in his journey by reincarnations of the ancient Sages. Following the main story quest (something easily done from the extensive “Adventure Log”) sees you conquer five ancient “Temples” and encounter these allies, who then join your quest, in spirit. Tulin blasts a gust of wind that speeds up your gliding and blows over enemies; Yunobo cannonballs ahead, setting fire to grass and smashing rocks; Sidon protects you with a water shield and blasts foes with a burst of water; Riju adds a lightning bolt to your arrows; and you can pilot Mineru’s mech, attaching various accessories to essentially make a Rock ’Em Sock ’Em Robot. Each ability has a cooldown element (with Mineru’s abilities tied to Zonite) and each Saga follows you on the overworld unless dismissed, battling enemies and bosses alongside you to take some of the heat off you. Mineru is especially usefully when explore the “Depths”, a vast, pitch-black, incredible dangerous environment found beneath Hyrule and accessed via chasms. Down here, you’ll activate Lightroots and toss Brightbulbs to brighten up the area and encounter vast deposits of “Gloom”, a Malice-like substance that permanently saps your maximum health unless you recharge at Lightroots or cook special food. Mineru walks through Gloom and lava without fear, but you must watch for Gloom-infected enemies and the horrific Gloom Spawn, which essentially act as this game’s second counterpart to the Guardians (the first being the various Zonai Constructs). While it’s not necessary to explore the entirety of the Depths, you will visit there many times throughout the story, and it can be beneficial to venture down there to collect powerful weapons or Poes to obtain new clothing. Additionally, you can blast up to the skies to explore various disparate floating ruins not a million miles away from the floating islands of Skyloft. Up here, you’ll find mine carts, caves, and the remnants of the Zonai people, alongside additional Shrines and rewards. The skies are also great for scoping out points of interest on the surface, such as Shrines, towns, or the various geoglyphs that dot Hyrule’s landscape. If you’re really lucky, you’ll spot one of four elemental dragons who can be farmed for precious minerals, with one in particular (the Light Dragon) awarding the legendary Master Sword if you have enough stamina to retrieve it.

Puzzles and traversal are made more challenging with the building mechanics and spiteful Gloom.

Hyrule’s surface remains relatively unchanged from Breath of the Wild; many of the same towns, locations, and landmarks can still be found, though with some alterations. Lurelin Village has been infested with ruffians who need to be fought off, for example; the Rito Village has been beset by a blizzard; and the Gorons have become obsessed with Marbled Rock Roast. The Korok Forest and eerie Lost Woods are shrouded by an impassable mist, Hyrule Castle floats above a chasm of Gloom thanks to the “Upheaval” caused by Ganondorf’s awakening, and Zora’s Domain is polluted by sludge. You must clear out these issues with both your items and by completing Temples, which are thankfully far more visually distinct this time around. Rather than every Temple relying on a clunky rotating gimmick and a repetitive Sheikah aesthetic, they’re much more traditional in their depiction and use of elemental themes. You’ll solve a primary puzzle in each, from activating propellers to unlock giant locks, hitting gongs to release padlocks, powering up water wheels and ancient batteries, and collecting Mineru’s parts. While you do collect keys, this element is downplayed, though you still activate levers and switches (albeit with Ultrahand). Typically, you’re more likely to be moving or combining items, rolling giant balls into targets, and either using Ascend or fans to progress upwards. The Water Temple has a unique gravity gimmick that sees you float around in bubbles, you’ll get a prelude to the Lightning Temple’s boss battle before entering, and the Fire Temple is full of mine carts that require you to switch tracks by firing Yunobo at targets. Just getting to the Temples is a feat in itself, with you forced to venture higher and higher into the skies and cross flying ships to reach the Wind Temple and explore the murky Depths to find the Spirit Temple. Hyrule Castle again acts as a Temple, one guarded by powerful enemies and covering Gloom, and you must venture deep into the hazardous, Gloom-filled chasm beneath it to confront the Demon King. Shrines are far more challenging and diverse this time around, ranging from combat challenges to logic puzzles that’ll have you using Link’s Purah Pad abilities in unexpected ways or battling enemies with makeshift items.

You’ll search high and low and build all sorts to help out Hyrule’s inhabitants.

Like Breath of the Wild, Tears of the Kingdom is an unforgiving experience. Link begins with three hearts and acquiring more is a chore since you’re forced to seek out Shrines (something made much easier by completing a side quest to add the Sensor to your Purah Pad). Even then, having more health can be detrimental since it means consuming more food to replenish your health and Link is frustratingly weak at times. Even simple encounters can end in a game over, meaning it’s often better to just sprint past enemies to preserve your weapons, health, and sanity. To make matters worse, all enemies and treasure respawn when the “Blood Moon” rises, meaning the environment never gets any less dangerous. This remains a frustrating experience for me as I enjoy the combat in the Zelda games but the risk/reward of battling even simple enemies often isn’t worth it. Add to that the frustrating weather effects, which see you slip down mountains, tumble about like a ragdoll from a lightning strike, and collapse from heat exhaustion and you have a game that can be a chore to play. While the Gloom and the Depths can largely be avoided, you’ll endure both eventually and they’re a major headache as it’s not fun to stumble about in the darkness, have your hearts sapped away, and then be surprised by a Gloom-infected rematch with a boss! It seems like every NPC has a story to tell and a mission for you, be it reuniting lost Koroks, exploring wells, seeking out evidence of Zelda sightings, or bringing musicians to the Great Fairies so you can upgrade your clothing (for a small free…) Sometimes, you’re forced to battle waves of enemies or NPCs will turn out to be the aggravating Yiga Clan in disguise. Other times, you’re performing glorified fetch quests for minimal rewards or cobbling together constructs to help Addison campaign for President Hudson. Some Shrines only reveal themselves after you retrieve their crystal, either by battling a mini boss or solving some tedious nearby puzzle; others offer no challenge at all, making for a nice change of pace. Link’s building abilities can result in some remarkable craft, from boats to full-blown planes, but it can be annoying rotating pieces into position, and you’ll expend a lot of your resources to get all the pieces you need and power everything.

Presentation:
Link’s model, like all the character models, appears essentially unchanged from Breath of the Wild save for some different attire and his new monster arm. When in sweltering heat, he pants and sweats; when in blistering cold, he shivers; and when standing too close to an explosion, he catches fire. Although he doesn’t speak save for some grunts, there are dialogue options here and there that show is does communicate with those around him. Other NPCs communicate through traditional text boxes or voice acting, which is generally saved for the more dramatic cutscenes and the various memories. Link’s companions have a fair bit of personality, with Yunobo being a standout for me since he’s brainwashed into turning against his people and then determined to make up for it with an enthusiastic gusto! Tears of the Kingdom takes the expansive overworld from Breath of the Wild and expands upon it considerably. The surface is largely the same from what I remember, featuring towns, swamps, mountains, a massive volcano, and rushing waters. Settlements like Kakariko Village and Hateno Village remain, with Link now having a home and encountering many of the same NPCs (some of whom recognise him and others who strangely don’t). The landscape is altered by the presence of chasms leading to the Depths but still contains hidden caves, stables, the ruins of the old world, and recognisable landmarks like the Temple of Time. Hyrule is gigantic and full of different cultures, from the distrustful Gerudo in the arid desert to the proud Zora in their waterfall kingdom. Each area has different weather effects to worry about, from stifling heat to bitter cold, something exacerbated by random thunderstorms and the titanic elemental Gleeoks. There’s also a day/night cycle present, some mist and fog effects here and there, and a real sense of the world having changed both between games and from the fallout of the Upheaval, which sees debris rain from the skies and uncovers long-forgotten ruins that you must explore and decipher.

Hyrule is bigger and more varied (and dangerous) than ever.

By their very nature, the Depths aren’t as immediately impressive simply because they’re seeped in darkness. It’s an oppressive, bleak, and dangerous environment with no inhabitants save for Ganondrof’s minions, the remains of a Zonai outpost, and Robbie’s tentative efforts to explore the Gloom-infested environment. Still, there is a lot to see here once you illuminate your surroundings; Zonai depots, lava flows, and Gloom-versions of the game’s bosses all dwell alongside Bargainer statues where you trade your Poes and rusted weapons you can take. The skies aren’t much better, being a fragmented series of ruins, tracks, and Zonai deposits that you must often glide between. The Shrines have been redesigned (for the worst, in my opinion) and returning areas like Hyrule’s labyrinths and even the elegant castle have an added danger thanks to being infested by Gloom. Shrine interiors are very similar to what we saw in Breath of the Wild, favouring substance over style and restricting your abilities so you can’t just glide to the exit. They retain the ancient mixture of science and magic from Breath of the Wild, but I remain unimpressed by how tedious it gets searching for Shrines just to get enough Light of Blessings to gain one extra heart that’s immediately shattered by Gloom. Still, as mentioned, the Temples are much improved this time around. They not only have a better visual identity but contain more interesting puzzles and a greater enemy variety. The standout for me was the Lightning Temple, which sits within a vast pyramid in the storm-swept Gerudo Desert and is home to the mummified Gibdos. I felt like a proper tomb raider shifting blocks and riding wind currents in here, though the Fire Temple also impressed by being an abandoned mine within a volcano. The Spirit Temple was the most disappointing since it simply hosts a boss battle, but the journey to it through the Construct Factory in the murky Depths was challenge enough.

The world and story have been expanded and changed by the recent, cataclysmic events.

Tears of the Kingdom makes great use of ambient sound for the most part. There’s no sweeping Zelda theme when galloping across the overworld here; just the sounds of enemies approaching or light piano tunes. This changes once you get into battles, ramping up the anxiety when you’re suddenly attacked by a spear-wielding Moblin and battling the finnicky controls as you tumble down a mountainside. Music really only plays a role in the game’s cutscenes, however, which can be replayed from the Adventure Log. Like its predecessor, Tears of the Kingdom invites you to challenge yourself; if you’re brave (or stupid), you can head right to the final confrontation (and win!) and you’re free to explore every area out of sequence, for the most part. The map and Adventure Log can quickly become cluttered with waypoints and primary and optional quests, making it difficult to remember where you’re going and what’s happening next. However, I never experienced any performance issues save for one terrifying moment where the game crashed during the Yunobo fight. The environment renders well; wild animals and NPCs roam freely with no slowdown or noticeable pop-up, though the weather effects do help mask this at times, I feel. Traversing the surface is far less hazardous thanks to the absence of Guardians but the Gloom Hands definitely get your blood pumping when they slither to life and relentlessly chase you across walls and ceilings. Long-time Zelda fans should also enjoy the various nods to previous games in the names of certain locations and NPCs, as in the last game, and Tears of the Kingdom definitely feels like a celebration of the franchise’s rich history as much as anything else. Probably the best callback for me was exploring Hyrule Castle again; though much more restricted thanks to the Gloom and the damage, it was fun revisiting the library and royal rooms. Unfortunately, the plot lost me a bit; I still don’t understand why no one makes a connection between Ganondorf and Calamity Ganon and I must have been distracted when the game explained why Zelda’s been sighted across Hyrule when she’s actually flying through the skies as the Light Dragon.

Enemies and Bosses:
As far as I could tell and remember, every enemy encountered in Breath of the Wild reappears here, sporting the same strengths and weaknesses and dropping the same items upon defeat. Hyrule is full of sentient trees, jelly-like Chuchus, odd Pebblits, bat-like Keese, and rock-spitting Octoroks. These common enemies aren’t much to shout about, popping up as you explore and generally being more a nuisance than a threat, but the land is also patrolled by Ganondorf’s more organised and formidable forces. The most commonly encountered are the squawking Bokoblins, often found around campfires, guarding towers, or riding Battle Talus’s. They’re often subordinate to their more challenging silver-clad commanders, trailing behind bulbous Boss Bokoblins, or taking orders from large, goblin-like Moblin. Skeletal variants of these are also encountered, some ride horses on the overworld, and Gloom-infested variants swarm the Depths, but they’re also echoed in the cave-dwelling, ape-like Horriblins. Exploring deserts, swamps, and water-rich areas sees you surprised by the lizard-like Lizalfos, who spit water and turn invisible, and you’ll often face a double threat as Aerocudas patrol the skies. Bokoblins, Moblins, and Lizalfos wield various weapons, from swords to lances and bows, and will call for backup upon spotting you, making even a handful of them a significant threat. Various Wizzrobes are also encountered, often skipping and teleporting about and firing different elemental magic, and the Yiga Clan will jump you when you least expect it, disappearing in a puff of smoke and charging you with their blades. You’ll also contend with mummified Gibdos both on the ground and in the air, though fire- and lightning-based attacks make short work of them. Various armed Zonai Constructs test your combat prowess, acting as smaller but no less threatening counterparts to Breath of the Wild’s Guardians.  

Formidable and horrific mini bosses roam Hyrule and launch surprise attacks!

Hyrule is also populated by various mini bosses. Boss Bokoblins are larger versions of regular Bokoblins that wield big clubs and can take quite a beating, caves house different elemental Like-Likes, and giant stone Talus’ assemble from the environment to catch you by surprise, with their only real weak point being the Ore Deposit on their heads. If you’re really unlucky, a massive cyclopean Hinox will wake up and chase you (though targeting the eye turns the tide in your favour), mutated crocodile-like Molduga burrow through the Gerudo Desert and in the sands of the Depths, and a combination of the two, the Frox, also appears down there, sporting the same weaknesses as both. Flux Constructs are usually found in the skies; these sentient Zonai cubes are controlled by a central cube that must be targeted before they pummel you into the stone. Master Kohga also returns, having dropped to the Depths and mastered the Autobuild ability to fashion giant trucks, flying machines, and even a mech to rival Mineru. Though he’s more troublesome this time around, he’s quite susceptible to arrows in each encounter. Before he joins your cause, you must fight the brainwashed Yunobo, dodging his cannonball-like roll in a prelude to one of Ganondorf’s devastating charge attacks. Though far less prominent (at least in my playthrough), powerful, centaur-like Lynels still exist in Hyrule, with a silver variant encountered in the Gloom-filled Depths prior to battling Ganondorf. They’re joined by the various elemental Gleeoks, massive, three-headed dragons that breathe fire, frost, and lightning and are lorded over by an even tougher king. I’m gonna be honest and say I never fought these; I saw them flying around or standing atop mountains and felt their power in the intense weather effects they emit, but didn’t dare test myself against them (or the Lynels, for that matter). Similarly, I simply fled from every Gloom Swarm so I wouldn’t be decimated by Phantom Ganon, though you’re forced to fight this terrifying foe at least twice, once when exploring Hyrule Castle and again to free the Great Deku Tree. Phantom Ganon acts as an appetiser for Ganondrof’s battle, charging with a sword, striking with a lance, causing massive shockwaves with a club, duplicating himself, and spreading Gloom everywhere in easily some of the toughest battles in the game.

The five Scourges are visually distinct and range from simple to frustratingly challenging.

Each Temple houses at least one boss, a “Scourge”, that is, thankfully, not simply a variant of Ganon this time around. You can tackle these in any order but I first battled Colgera, Scourge of the Wind Temple, a gigantic insectoid creature that flies up from within the Wind Temple and forces you to battle it in mid-air (not unlike the game’s final challenge). Colgera emerges from portals and fires ice shards from its body, unwittingly exposing its weak spot, which you must target with Fire Arrows (using Keese eyeballs to help aid your aim). Tornados keep you in the air and Tulin gives you a speed boost, but this wasn’t an especially taxing boss, even when its weak spot switches to its underbelly in the second phase. Next, I battled the Water Temple’s Mucktorok (after getting to grips with Sidon’s abilities in battle with the Sludge Like), a cackling little imp who rides a Molduga-like sludge shark. You must blast this with Sidon’s water wave, clearing a path through the sludge, avoiding its spit attack and shockwaves and chasing the slippery devil down to give it a good thrashing. To enter the Fire Temple, you first dispatch the volcanic dragon, Moragia, that’s attached to Death Mountain by flying around on a nearby Zonai flyer and firing Yunobo at it. Inside, you’ll face the Marbled Gohma, a spider-like rock beast that tries to stomp you and fires explosive chunks of rock. You must fire Yunobo at its legs, crippling it so you can pummel its eye, then send Yunobo rolling up to smack it when it retreats to the ceiling. The difficulty noticeably spikes when you face Queen Gibdo in the Lightning Temple, mainly because you’re so reliant upon Riju’s lightning attacks and lightning-adjacent attachments to your bow. The battle’s further complicated by the Gibdos she spawns in, distracting you and making things very frustrating and difficult near the end. In comparison, the Seized Construct is much easier. Fought in an electrified boxing ring with you controlling Mineru, this thing’s a breeze with the right attachments as you stun it with your arm cannon and smash it into the electrified ropes using a wrecking ball.

Ganondorf throws his forces at you, decimates your health, and then becomes a titanic dragon!

These bosses return in the Depths, if you fancy testing your skills further, and are fought as part of the final battle, much like in the last game. If you best them prior to confronting Ganondorf, however, you obviously won’t need to worry about them. The King of Evil is no joke, however, and is fought in an aggravating multi-stage battle. First, you and the Sages face four waves of Gloom-infested enemies, collecting their loot and hoping you have enough Gloom-resistant armour or food to survive the next stage. Here, you face Ganondorf one-on-one in a fight functionally identical to those against Phantom Ganon. Ganondorf switches between a sword, spear, club, and bow, inflicting Gloom damage with each hit and both parrying and perfect-dodging your attacks. With the right timing, you can whittle him down with the Master Sword; attack-boosting gear and food is a must here, as is Gloom food, but you can also fire Bomb Flowers, Rubies, and Gibdo Bones to take chunks off his health. Victory sees Ganondrof duplicate himself, gaining a ridiculously long health bar in the process. Though the Sages help you, they mostly end up cluttering the screen so it’s advisable to take to the air however you can (Fusing a rocket or Autobuilding something) to litter the battlefield with Rubies and Bomb Flowers. After many deaths, I finally got lucky and got Ganondorf back to half health, which returns the fight to a one-on-one contest. Unfortunately, the Demon King is faster and stronger than ever, sending waves of Gloom and Gloom projectiles, causing Gloom shockwaves, and charging at you, leaving a trail of Gloom in his wake. Luckily, you can strike his projectiles to stun him and, with the right food and a little luck, he’ll eventually be bested. In his rage, Ganondorf consumes his Secret Stone and transforms into a gigantic dragon! Zelda, as the Light Dragon, swoops in to save you, keeping you from falling to your doom, and giving you a boost to reach the Demon Dragon’s back. This stage is mostly a formality, however; just avoid the Gloom scales and target the Gloom pustules on the Demon Dragon’s back. When you get the chance to target the Sacred Stone on his forehead, hold Y to deliver the killing blow and then dive through the sky to rescue Zelda in freefall!

Additional Features:
There are 152 Shrines to find across the skies and surface of Hyrule. Each one houses a chest that contains a weapon or some kind of treasure and also awards a Light of Blessing. With four of them, you can trade for an extra heart or an extra sliver of your stamina wheel, which can make combat and exploration much less of a headache. There are also 120 Lightroots in the Depths which, like the Skyview Towers, simply exist as fast travel points (though Lightroots also restore your Gloom-shattered hearts). There are now a whopping 1000 Koroks to find; some are under rocks, some require transporting to their friends, and some task you with solving puzzles. Finding them all expands your inventory and again awards you with a useless (but golden) piece of poop. You’ll also find loads of treasure chests in every area of Hyrule; some house Rupees or rare materials, some gift weapons, and some have clothing. Collecting all three pieces of an armour set can award additional buffs both by default and courtesy of a Great Fairy, and you can dress Link up as his dark counterpart, an enraged God, and even to resemble various enemies. Some materials can be dyed to further customise them and you can further bolster your stats by cooking food, with recipes being saved for further use. Your horses can also be upgraded and customised; by discovering stables and boarding your horse, you’ll earn “Pony Points” to trade in for harnesses and accessories to complete side quests.

Hundreds of treasures, collectibles, and side quests await in this sprawling adventure.

Speaking of, there are loads of optional missions in Tears of the Kingdom. Some are pretty simple, like liberating villages from enemy hordes or retrieving Shrine stones. Others see you gathering materials, photographing enemies and objects, investigating Zelda sightings, and recovering lost or stolen items. Completing side quests earns you Rupees and other rewards, such as food, additional shops, and even armour. Helping Robbie with his research not only upgrades the Purah Pad to detect Shrines and other targets, it also adds the “Hero’s Path” mode to the tablet so you can see where you’ve travelled and gifts you “Travel Medallions” that are essential when fighting your way to Ganondorf. Misko will mark the locations of rare treasure on your map, allowing you to find new armour sets, dogs can be befriended to dig up treasure chests, shop prices can be reduced, and the truth about Zelda’s draconification can be discovered if you explore high and low. Completing the game adds a star to your save file but returns you to your last manual save before battling Ganondorf, meaning you never get to see peace returned to the land on your save file. You can go back and finish any tasks remaining, however, exploring Hyrule Castle docks for the powerful Hylian Shield and collecting Poes to collect new gear. Tears of the Kingdom is also compatible with Amiibos, allowing you to scan in entire armour sets quickly and easily. Sadly, the Master Cycle from Breath of the Wild’s downloadable content isn’t available (though you can build a close approximation) and there is currently no additional content available for the game, but it’s not as if there aren’t hours of content to return to once you’ve completed the main story.

The Summary:
Since I struggled with The Legend of Zelda: Breath of the Wild, I was hesitant to get into the sequel, and these fears were entirely justified. The weapon durability mechanic is as tedious as ever, forcing me to run from most encounters when I’d rather be fighting like in the Nintendo 64 games. Link is frustratingly fragile, easily being killed by even the weakest of enemies, and the entire game is an uphill battle to learn and improve. Link’s new abilities do mitigate these issues somewhat; you can effectively double your weapon inventory by Fusing swords and shields together, though often at the cost of holding a shield. I was also very pleased by how much easier the five main bosses were compared to Breath of the Wild’s and how much more visually unique the Temples were. Getting to them was a chore at times but it was much closer to a traditional Zelda experience once I was inside. The Shrine mechanic is as annoying as before, though, and I wish there was a “Novice” option to give you at least one set of weapons that don’t break and that allocated hearts to one set of Shrines and stamina to the other. I didn’t really like the focus on building; it was finnicky to rotate and Fuse things together to solve puzzles and the vehicles weren’t very fun to control. The mechanic didn’t work for Banjo-Kazooie so I don’t see why Nintendo thought it’d work for Zelda, and it just got in the way most of the time. I liked seeing how Hyrule had changed, with familiar areas altered from the passage of time, and how much bigger the world was, but I hated the Gloom mechanic, the sky islands were dull, and battling Ganondorf was like chewing nails. The story was convoluted and somewhat lost amidst all the hundreds of other sub-plots and side quests, though I enjoyed seeing bigger, more ferocious optional bosses patrolling the overworld. Despite all the changes, though, The Legend of Zelda: Tears of the Kingdom still feels like a glorified expansion pack of its predecessor. I had the same issues as before, if not more thanks to the new inclusions, but remain impressed by the scope and sheer scale of the world, so I think it’s fair to give it the same rating as Breath of the Wild and stay in the minority of people who just don’t click with this approach to the Zelda franchise.

My Rating:

Rating: 3 out of 5.

Pretty Good

What did you think to The Legend of Zelda: Tears of the Kingdom? How do you think it holds up against its predecessor and were you excited to revisit this world? What did you think to Link’s new abilities, specifically the building and Fusing mechanics? Were you also frustrated by the Depths and the dangerous Gloom? Did you also find the main bosses easier than Breath of the Wild’s only to struggle against Ganondorf? Did you ever complete all the side quests and find all the Koroks? Which Zelda game is your favourite and how did you celebrate the franchise this month? Whatever your thoughts on Tears of the Kingdom, drop a comment down below and go check out my other Zelda reviews.

Game Corner [Zelda Month]: Hyrule Warriors: Definitive Edition (Nintendo Switch)


On 21 February 1986, The Legend of Zelda (Nintendo EAD, 1986) was first released in Japan. The creation of legendary game designer Shigeru Miyamoto and Takashi Tezuka, The Legend of Zelda launched one of Nintendo’s most popular franchises. This year, I’ve been dedicating every Friday to Nintendo’s most famous silent protagonist, Link and his vast and enduring fantasy world of sword and sorcery.


Released: 18 May 2018
Originally Released: 14 August 2014
Developer: Omega Force / Team Ninja
Also Available For: Nintendo Wii U (Original Version), Nintendo 3DS (Legends Version)

The Background:
The Legend of Zelda has consistently been one of Nintendo’s most popular, celebrated, and successful franchises and one of the reasons for this is the consistent quality of its games. While Zelda titles have often included unique gimmicks to separate them from each other, the tried-and-true sword and sorcery formula has remained present throughout the series. Indeed, Nintendo’s few attempts at veering away from this formula have resulted in mediocrity, at best, and ridicule, at worst. It was therefore surprisingly (to me, at least) when Nintendo joined forces with Koei Tecmo to produce a spin-off game, one that incorporated the chaotic hack-and-slash action of Koei Tecmo’s popular Dynasty Warriors series (Omega Force, 1997 to 2018). Long-time Zelda producer, Eiji Aonuma jumped at the chance to do something new with the franchise and the game pulled inspirations from across the entire Zelda series and eventually achieved Koei Tecmo’s president Yoichi Erikawa’s dream of selling of a million copies. Initially released on the Wii U and bolstered by a slew of downloadable content (including a previously cut female version of Link), Hyrule Warriors garnered positive reviews, with critics praising the merging of the two franchises while criticising the repetitive gameplay. In 2016, the game was ported to the Nintendo 3DS as Hyrule Warriors Legends; it included all previous downloadable content, a new Fairy system, and new gear for existing characters as well as a code to upload these additions to the Wii U version. Although reviews still praised the port, the limitations of the 3DS hardware (even when playing on the more powerful New Nintendo 3DS) were highlighted as negatives. Regardless, a newer port later came to the Nintendo Switch; billed as the Definitive Edition, this version included everything from the previous games alongside some new costumes. It was also received much more favourably, perhaps contributing to the release of a sequel title in 2020.

The Plot:
In an alternative timeline, the sorceress Cia seeks to resurrect the King of Evil, Ganon, by waging war against the kingdom of Hyrule. To defend her kingdom, Princess Zelda recruits lowly knight Link, the bearer of the Triforce of Courage, to amass an army of familiar faces against Ganon’s dark forces.

Gameplay and Power-Ups:
This is the Definitive Edition of Hyrule Warriors, a third-person hack-and-slash action//adventure in which players take control of Link (and many other new and familiar faces from across the Legend of Zelda franchise) to plough their way through seemingly endless hordes of enemies, many of them also series staples. Although each character has their own strengths and weaknesses, they share similar attributes, abilities, and control methods, with a couple of exceptions. Players can fully customise their control scheme but, by default, you’ll throw a regular attack with Y, a combo attack with X, a special attack (when your Special Attack Gauge is full) with A, and dodge with B. You can string together presses of Y and end them with X to pull off combos and character-specific special attacks (such as Link’s trademark sword spin), with more being unlocked as you defeat enemies, earn Materials, and level-up. I preferred to mix these buttons up, assigning B to the regular attack, special to Y, combo to X, and dodge to A but it’s entirely up to you. L targets nearby enemies (an occasionally finnicky system that can keep you from targeting the right enemy if larger bosses are around), ZL guards, R unleashes a powerful “Focus Spirit” attack when the Magic Power meter is full, and ZR lets you use sub-items, such as bombs, arrows, or bottles to restore or buff your character. Later on, if you have a Fairy in a bottle, you can press in the right stick to activate Fairy Magic. You can also switch items by pressing left and right on the directional buttons, or switch characters by pressing up and down. Characters are largely differentiated by their stats; Darunia and Impa, for example, are slower but more powerful characters compared to Sheik and Ruto. Their weapons are also a factor, with Wizzro favouring blasts of dark energy, Midna riding and attacking with Link’s wolf form and her malleable hand, and Young Link having a unique Focus Spirit ability that allows him to potentially retain an empowered state indefinitely.

Cut through endless waves of enemies with special attacks and sub-weapons.

As you defeat the game’s near-infinite enemies, your Special Attack gauge will fill; you can also collect Force Fragments from enemies or pots to fill it faster, and increase its length by levelling-up. Similarly, the Magic Power meter fills by collecting Magic Jars, with these collectibles being as abundant as the hearts and Rupees that enemies, pots, and chests drop all over the map. When these meters are full, you can pull off more powerful special, character-specific attacks that change depending on which weapon you have equipped and any elemental effects associated with that weapon. For example, Lana can equip a spell book or a spear and Link can equip both a Magic Rod with fire properties and swords (including the legendary Master Sword), with each weapon unleashing different special attacks (often with cameos by other Zelda staples, such as Dark Link or the Great Deku Tree). Focus Spirit is a little different and more universal; activating it empowers you for a short time, negating any knockback and instantly exposing an enemy’s “Weak Point Gauge” if you perform a special attack. The Weak Point Gauge appears on tougher enemies and bosses; draining this lets you perform a bigger, more devastating attack to dramatically reduce or completely destroy your target. Other enemies, mini boss types like enemy commanders and such, are susceptible to specific sub-weapons. Bombs against shield Moblins, arrows against the Deku Babas, the hammer against the Blins; whatever the case, an onscreen indicator shows which sub-weapon is most effective against your target. Sub-weapons can also be temporarily powered up from random pick-ups and to activate switches, cross gaps, or stun giant bosses. When equipped with a bottle, your character can drink various potions for buffs and restorative effects, or utilise Fairy Magic in much the same way. Finally, activating Owl Statues across each map sets up warp points so you can quickly teleport to different areas using the ocarina.

The sheer amount of objectives and notifications means it’s probably best to play with a friend.

The game’s onscreen map shows the locations of allies, enemies, bosses, and other notable objectives and items. It’ll display which of your allies are talking, flash when Keeps are in danger, and show the many different objectives that pop up throughout each mission. Pressing + pauses the action and accesses a more comprehensive map. From here, you can check mission dialogue and objectives, review the controls, create a manual save point (though checkpoints occur during most missions), and issue orders to your allies. This is crucial as the game progresses and more objectives appear in each mission; ideally, you want four playable characters in each mission, each powerful enough to hold their own in battle, and to order them to different objectives. The AI attacks enemies and bosses, with allies reducing a boss’s health and defence, but they do tend to wander about or stay in place and I often found it difficult to select a specific target from the map. Ideally, you want to play Hyrule Warriors with a friend as the game can get very chaotic; tutorials, dialogue, objectives, and notifications swamp the already messy battlefield. While you can turn some of these and other onscreen effects off to clear things up, it can make it easy to fail missions if you miss an objective. Luckily, mission success is often malleable; you can lose a Keep or have captains and commanders flee and not fail the mission, and you can fail side missions (usually escorting an ally, defending a Mama Cucco, or defeating Messenger enemies) and still continue. However, if a primary ally (usually Princess Zelda) or your main Allied Base falls, you’ll restart from the last save, checkpoint, or the start of the mission.

Combat is fun and satisfying, if chaotic and often repetitive.

“Chaotic” is definitely the best word to describe Hyrule Warriors; enemies spawn (or pop) in constantly, swarming from Outposts and Keeps that must be captured to secure your position on each map. Mission objectives usually always boil down to capturing as many as four Keeps or strategic locations, such as the Fairy Fountain (which you activate with B to weaken bosses or otherwise aid your allies). Sometimes, you’ll intercept giant Bombchus to keep them from damaging or destroying Keeps. Other times, you’ll defend against enemy commanders, searching for allies or the correct enemy in a swarm of doubles, or taking out Transport troops and Keep Saboteurs. Generally, it’s not a massive issue if a Keep falls, but it is inconvenient. To secure a Keep, you must drain its energy bar by defeating the enemies housed there. This spawns the Keep Boss, who’s easily defeated, and secures the Keep for yourself, occasionally spawning a treasure chest containing Rupees, a weapon, a Heart Piece, or other item. If a Keep or Outpost is captured by the enemy, simply retake it in the same manner. Other times, allies will call for aid; you must rush to them and enter the glowing circle around them to rescue them and restore their health, and you must do this for certain allies (again, Zelda, but often Darunia or Impa and the like) for the mission to continue. Often, enemy Keeps are locked, forcing you to find alternative routes or, you guessed it, search for and destroy specific enemies to open the doors. Combat is satisfying and fun; you plough through hundreds and thousands of enemy troops with relative ease when playing on “Easy” mode, especially with a higher level character. However, it can become frustrating and repetitive; when there are four or five different objectives and you’re bombarded by notifications, it can be hard to know what you should prioritise. Things can get very frantic when playing alone as you’re constantly switching characters and warping across the map to put out fires, so to speak.

You’re encouraged to battle over and over to level-up and buff your weapons and skills.

Defeating enemies earns you experience points (EXP), which allow you to level-up and become stronger. It also earns you power-ups, Materials, and Rupees. Outside of battle, Materials and Rupees are used to further improve your character. They unlock “Badges” that gift additional combos, attacks, and increase their stats and meters in the attack skill tree. You can unlock additional bottles and improve their defence against elemental attacks, reduce knockback and stun, and other defensive buffs; or you can speed up how fast your meters fill or how quickly you take Keeps. You can also spend Rupees to quickly level-up any characters you haven’t used much (since AI-controlled characters don’t appear to level-up) or new characters you’ve unlocked, or spend them in the Smithy. Here, you sell or fuse weapons to reduce your inventory and add extra buffs to weapons. Weapons will either have no “slots” or as many as three, allowing them to be empowered to strengthen your regular or special attacks, earn extra EXP, spawn extra Rupees, deal elemental damage, and so forth. Initially, your inventory is quite limited, but it expands as you progress through the story, though I found it easier to stick with the most powerful weapon and sell the weaker ones and rarely saw a benefit of fusing weapons. There’s also an apothecary, where you mix new potions and elixirs, and you’ll gain new items and sub-weapons from treasure chests. After clearing each mission in “Legend Mode”, you can replay it either in this mode or with any character in “Free Mode”. You can play on a harder difficulty to earn more rewards, or search for the elusive and skittish Gold Skulltulas, which add to various portraits and unlocks additional maps and bonuses. On the whole, Hyrule Warriors is quite easy; if you stick to one or two characters as I did (usually Link), you can become very powerful very quickly. However, it’s easy to get caught off-guard when stronger enemies or multiple objectives pop-up. The game obviously gets tougher on harder difficulties as enemies are stronger and deal more damage, and some missions add additional hazards, such as lightning strikes, bombardments, and health-sapping auras.

Presentation:
I first played Hyrule Warriors on the 3DS, where the game was serviceable but the hardware struggled with all the enemies and action, causing some slowdown an pop-up. I specifically bought the Definitive Edition to mitigate these issues and, for the most part, the upgrade is immediate and welcome. The game still suffers from a bit of pop-up and occasional slowdown when there’s a lot happening onscreen or when you’ve completed a mission (meaning many battles abruptly end). There are also noticeable loading times between missions (though tips, fun 8-bit graphics, and story dialogue help to speed them up), but the game performs really well otherwise. Hyrule Warriors mostly pulls its locations and characters from Zelda’s 3D adventures, recreating and reimagining areas such as Hyrule Field and Hyrule Castle, the Twilight Realm, and Skyloft as restrictive sandbox battlefields populated by Keeps, pots, and occasional bridges, dips, and alternate paths. These locations are rather hit and miss; later, you’ll battle in cel-shaded arenas like Windfall Island, which are far more vibrant and fun than the dense, confusing forest or the apocalyptic wastelands ruled by Ganon or the relatively sparse Gerudo Desert. One enjoyable exception was Lake Hylia, which includes not just the lakeside area but the labyrinthine catacombs of the Water Temple. Indeed, with the game’s emphasis on fast-paced, chaotic combat, it’s no surprise that the locations are rather bland. Sometimes, bridges will crumble and you’ll hookshot over gaps, or lightning and other bombardments will fall, or there’ll be plumes of lava or some limited scenery to see (fortifications, usually, or ruins). However, the environments are there to contain you, not distract you, and are largely fun, if limited, nostalgia trips to Zelda’s 3D games.

The game redesigns classic Zelda characters and locations into a new style.

Character models far much better, despite constantly being in motion, attacking, or being bashed about. While I’m not a big fan of Link’s weird scarf, he’s well represented, pulling off all his signature attacks with the same gusto I’d expect from his first 3D adventure. This extends to other playable characters, who all exude their own personalities and fighting styles (helped by intro and outro cutscenes): Darunia is a mighty Goron warrior swinging a giant hammer, Fi gracefully flies and dances about, and Ruto conjures water geysers as she attacks. New characters like Agatha, Volga, and Cia also impress, spawning large magical allies, transforming into dragons, and conjuring dark minions, respectively. Each character has a few costumes to unlock and is fully voiced, with the exception of Link (who talks via a fairy appropriately named “Proxie”) and certain cutscenes, furthering the convoluted plot and alerting you to objectives. Outside of battle, the narrative is told through impressive, high-quality pre-rendered cutscenes that show these heroes coming from across all the Zelda timelines to combat Cia’s threat and Ganon’s return, and they were a joy to watch for how lovingly they recreated the 3D Zelda games. Similarly, the game’s soundtrack includes orchestral remixes of classic Zelda tunes, especially those associated with each of the environments, and collecting Materials and weapons plays a remix of the “Get Item” Zelda jingle. The character selection is impressive, with each having different weapons and attack animations, some more elaborate than others to include cameos and references from across the franchise, and I was really impressed by the stability and options offered, alongside the presentation. Things can get very cluttered and frantic, but Hyrule Warriors is a great homage to the entire Zelda franchise, even with its restrictive environments.

Enemies and Bosses:
There are seemingly infinite enemies in Hyrule Warriors, technically speaking, with maps being flooded by monstrous beings recognisable to long-time Zelda fans, most of them being simple cannon fodder to up your combo, EXP, Rupee, and KO count. You’ll cut through swarms of relatively harmless Bokoblins, Miniblins, and Stalchilds (and even Gorons and Hyrulian Soldiers when playing as bad guys or they’re turned against you), which offer only a token resistance. Amongst them, you’ll encounter more formidable commanders, captains, summoners (who quickly become a priority to keep enemy forces down), and the like who target your allies or Keeps and must be prioritised. From there, it only escalates: Dinolfos, Lizalfos, and elemental Poes appear spewing fire, welding stronger weapons, or teleporting and firing elemental or dark projectiles, respectively. Darknuts, Shield Moblins, and Big/Stone Blins put up a tougher fight thanks to their greater armour and more powerful attacks, Gibdos and ReDeads can freeze you in your tracks and spew a heart-sapping poisonous aura, and Aeralfos hover overhead, swopping down and spewing fire. Deku Babas also emit a poisonous aura and are only vulnerable to arrows; Beamos status will blast away unless you explode them with bombs; Cuccos will turn against you if their mother is defeated; Manhandla Stalks burst from the ground to take a bite out of you; and elemental Chuchus need a good whack with your hammer. You’ll also contend with traitorous or mind-controlled forces, restless spirits of dead soldiers, and dark doppelgängers of all the game’s playable characters, with Dark Link being especially notable as numerous versions of him spawn in across maps and must be taken down.

You’ll battle the same boss enemies again and again in a bid to control each map.

These dark doppelgängers often serve as the primary target of a mission, but you’ll also battle the real versions of these on more than one occasion, especially in “Legend Mode”. You’ll battle the likes of Volga, Wizzro, Ghirahim, and Zant more than once, with boss encounters against these often taking place multiple times across a mission. Often, you encounter the boss early on, causing them to flee to the fortified Keep. Defeating enemies or activating a Fairy Fountain draws them out or weakens them, kicking off a rematch, though sometimes you’ll battle two at once or at different times in a mission. One may appear as an ally and then turn against you, adding more enemies to your path, or they’ll summon a Giant Boss to distract you so they can increase their power and send more troops against you, your allies, and your Allied Base. Often, you’ll also battle traditionally heroic characters like Lana, Impa, and Darunia, either because they’ve been corrupted or you’re playing one of Cia’s missions. Either way, these battles aren’t much different than facing regular enemies or their commanders: simply lock on and pummel away, dodging and blocking as needed and unleashing your special attacks whenever possible. Sure, Ghirahim is pretty swift, Volga becomes a gigantic fire-breathing dragon, Wizzro can be a pain in the ass, and Zant can crush you with totem poles, but I never had any issues battling the playable characters when they appeared as bosses. Cia and Ganondorf put up a bit more of a fight, but this was mainly due to them being invulnerable, magically empowered, or hidden behind dark forcefields or fortified Keeps. In these instances, you must cut off the dark power protecting them by, you guessed it, capturing Keeps, defeating enemies, and activating Fairy Fountains. It’s advisable to order your allies to target these bosses to whittle them down and reduce their defences, but I actually had more trouble against Phantom Ganon than regular Ganondorf since the phantom conjured duplicates and did a bit more than aggressively swipe with his swords.

Your allies and sub-weapons are instrumental in besting the game’s Giant Bosses.

As mentioned, these bosses are often joined by Giant Bosses, with multiple sometimes spawning across the map and causing a real headache on the harder missions. These include series staples such as the massive, armoured spider queen Gohma, the fire-breathing dragon King Dodongo, and the monstrous plant-creature Manhandla. These can be some of the most annoying encounters due to having to whittle down their Weak Point Gauge, their high health pool, and the ways you must attack them. Gohma, for example, shields itself from all regular attacks and is only vulnerable when you shoot its laser-blasting eye with an arrow. Similarly, the rolling, rampaging King Dodongo can only be stunned by tossing bombs into its mouth, the Argorok can only be brought down by hookshotting its tail when it glows blue, and you’ll only get to go nuts on the Helmaroc King after whacking its head with your hammer. By far the worst of these for me was the Manhandla, which can only be stunned with the boomerang and, even then, there’s a small window where you can do this. The rest of the time, it spits seeds and bombs about the place completely impervious, making it the most aggravating of the Giant Bosses, especially when it teams up with the others! Another Giant Boss you face (and even control in one mode) is Ganondorf’s true form: the Dark Beast, Ganon. Accompanied by a perpetual lightning storm and attacking with claw and tail swipes, Ganon incorporates the attacks and the associated weaknesses of the other Giant Bosses, meaning you toss bombs when he’s charging a fireball, fire arrows when he charges a laser blast, hookshot his tail when it glows blue, and throw your boomerang after a seed bombardment. You must gather all your allies around Ganon to weaken him, but you’ll only defeat him once Zelda gifts you the Light Arrows in a cutscene. When playing as Ganon in “Ganon’s Fury”, you’ll battle the other Giant Bosses in kaiju fights. However, despite Ganon’s vast size and incredible power, he struggles against these (and, strangely, even regular enemies and commanders) in a straight up fight. Finally, you’ll also contend with the Imprisoned and its smaller minions; this aggravating walking slug can only be brought down by attacking its toes and can send you flying or stun you with paralyzing stomps and a big slam.

Additional Features:
There are 100 Gold Skulltulas to find in Hyrule Warriors, with one appearing for a short time in each mission. Collecting them uncovers a picture; there are thirteen of these to uncover, and completing them adds to the game’s options and maps. Completing each mission in “Legend Mode” unlocks it in “Free Play” mode, allowing you to tackle any mission with any character and grind up their level. Since this is the Definitive Edition of Hyrule Warriors, the DLC missions are available as you play through “Legend Mode”. These see you playing a side mission as Linkle, utilising her unique dual crossbows to prove her worth in recycled maps against recycled enemies and bosses, and secondary side missions as Cia and Ganondorf. These act as a prequel and midquel to the main story and see you cutting down Gorons and Hyrule’s finest and recruiting (or outright controlling) dark allies like Wizzro, Volga, and Ghirahim. Finally, there’s an epilogue to the main story where the cel-shaded world of The Legend of Zelda: The Wind Waker (Nintendo EAD, 2002) bleeds into that of Hyrule Warriors, resulting in you teaming up with Tetra and battling the Helmaroc King and Phantom Ganon to stave off the incursion. As mentioned, there are three difficulty settings (“Easy”, “Normal”, and “Hard”), with the even harder “Hero Mode” unlocked after beating “Legend Mode”. The game can be played with another player as well, which I think I would recommend given how chaotic battles can get, and you can test your mettle in the game’s “Challenge Mode”. Here, you’ll be tasked with defeating set numbers of enemies against a time limit, though this is easier said than done as not only are the enemies far stronger, but you also often have to content with multiple, far tougher Giant Bosses stomping about the place. You can also customise your fairy setup in “My Fairy” mode, but I couldn’t access this despite acquiring fairies in “Adventure Mode” (I think you may need an empty bottle on hand for this to activate).

Play Linkle’s story, rampage as Ganon, or test your mettle in the comprehensive “Adventure Mode”.

There’s also the aforementioned “Ganon’s Fury” mode, where you rampage as Ganon, wiping out hordes of enemies and battling other Giant Bosses, sometimes without the ability to restore your health or against a time limit. Sadly, I found this mode wasn’t as enjoyable as it could’ve been as Ganon is surprisingly weak. The major source of replayability in Hyrule Warriors, though is “Adventure Mode”. Unlocked after you clear “Legend Mode”, “Adventure Mode” is a series of additional maps and challenges all themed around different games from the Zelda series. There are two maps based on the first game, one for Link’s first Game Boy adventure, a Wind Waker map, and others themed around his other 3D adventures. Generally, these boil down to the same gameplay loop of taking Keeps and defeating enemies, but they carry a few more modifiers. Manual saves appear to be deactivated, for example, as the missions are much shorter. You’re more likely to be fighting against a time limit, for example, or encountering heart-sapping Keeps. Fun new additions include competing with other forces for KOs or Rupees or taking quizzes where you must defeat the right enemy. Map items acquired in this mode allow you to search for and uncover secrets using bombs, candles, and the like, unlocking new Heart Pieces, costumes, and even characters like the Skull Kid and Marin. These maps can get very difficult thanks to additional concerns: the “Master Quest” map includes stronger enemies, for example; the Wind Waker map includes wind elements, the Majora’s Mask (Nintendo EAD, 2000) map resets with a devastating moon strike after you’ve exhausted your turns; and you must watch out for Nightmare’s influence and portals to Lorule on the Link’s Awakening (ibid, 1993) and A Link Between Worlds (ibid, 2013) maps, respectively. As fun as these maps are, though, it’s the same repetitive gameplay loop over and over and you’ll need a decent guide to unlock all the extras, and even need to find all the Skulltulas to unlock all the maps!

The Summary:
I knew that Hyrule Warriors wasn’t optimised for the 3DS when I bought it, but I got it anyway as I’m a big fan of the Zelda series and the gameplay looked fast-paced and hectic. Given I didn’t own a Wii U, this was my only way of playing the game and I remember enjoying it at the time as a bit of mindless fun, so I jumped at the chance to upgrade to this Definitive Edition of the game. The upgrade is readily apparent; the game shines on the Nintendo Switch, performing leagues better and packing all the extra content into one convenient package but still leaving plenty of stuff for you to unlock and discover. The character roster is great, as are the references to the franchise in their appearances, moves, and interactions. While the locations aren’t as impressive, they do what they’re made to do, which is provide a limited, recognisable sandbox for you to plough through thousands of disposable pawns with ease, and the music is absolutely on point. Sadly, the gameplay loop can be very mind-numbing and, at times, aggravating. As the game progresses, the action becomes a chaotic assault on your senses as you desperately try to spread yourself across the map and solve every problem to reap the best regards. This means Hyrule Warriors is probably best played with a friend so you can share the anxiety of having multiple objectives at once, but it’s perfectly do-able alone as long as you know what missions can be prioritised over others. This also means that Hyrule Warriors is probably best enjoyed in short bursts rather than one long session. Missions can get repetitive and annoying as enemies disappear and reappear and the goal posts constantly move, but it’s endlessly satisfying cutting them down with your powered-up character, taking out those annoying Giant Bosses, and snagging new rewards. The sheer variety and content packed into the “Adventure Mode” is daunting, to say the least, and I don’t know if I’ll ever 100% even a single map, much less the entire game, but it’s good to know it’s always there to pick up and bash out a few missions when I need to wind down.

My Rating:

Rating: 4 out of 5.

Great Stuff

Have you ever played Hyrule Warriors? If so, what did you think to this definitive Edition of the game? Which character was your favourite? What did you think to the chaotic gameplay and playable roster? Have you ever played the Dynasty Warriors games and, if so, do you think the formula translated well into the Zelda series? Did you ever find all the Gold Skulltulas? Which of the “Adventure Mode” maps was your favourite? Would you like to see more Zelda spin-off titles? How are you celebrating the Zelda franchise today? Whatever your thoughts on Hyrule Warriors and the Zelda games, feel free to leave them below or on my social media, and be sure to check out my other Zelda content across the site!