February 1991 marked the debut of Wade W. Wilson, the wise-cracking, fourth-wall-breaking Merc With a Mouth, one of Marvel’s most popular anti-heroes. Sideshow even rechristened April 1st as “Deadpool Day” to give fans an excuse to celebrate all things Deadpool.

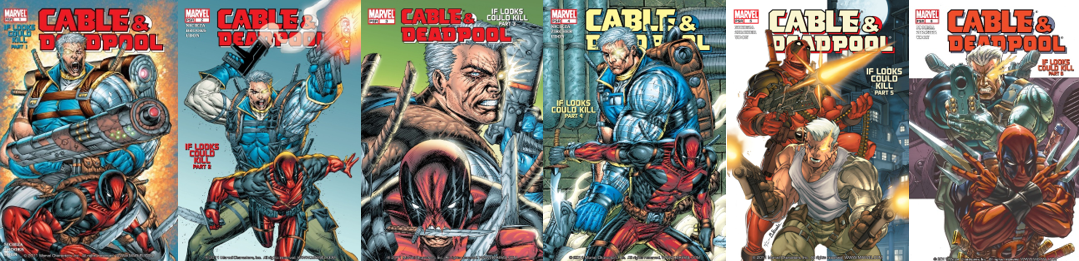
Published: 19 May 2004 (cover-dated: July 2004)
Writer: Fabian Nicieza
Artist: Mark Brooks
Published: 21 April 2004 (cover-dated: June 2004)
Writer: Fabian Nicieza
Artist: Mark Brooks
Published: 19 May 2004 (cover-dated: July 2004)
Writer: Fabian Nicieza
Artist: Patrick Zircher
Published: 16 June 2004 (cover-dated: August 2004)
Writer: Fabian Nicieza
Artist: Patrick Zircher
Published: 21 July 2004 (cover-dated: September 2004)
Writer: Fabian Nicieza
Artist: Patrick Zircher
Published: 18 August 2004 (cover-dated: October 2004)
Writer: Fabian Nicieza
Artist: Patrick Zircher
Quick Facts:
As instructed by then-chief editor Jim Shooter, Chris Claremont and Bob McLeod create the New Mutants, Mutant youngsters tutored by time travelling Mutant Nathan Summers/Cable as (eventually) X-Force. This also saw the debut of Fabian Nicieza and Rob Liefeld’s Deadpool, a composite of James “Logan” Howlett/Wolverine, Peter Parker/Spider-Man, and (most infamously) DC Comics’ Slade Wilson/Deathstroke the Terminator. Years after establishing himself, Deadpool famously partnered with his frenemy, Cable, in team-ups that would define them as one of Marvel’s most entertaining and chaotic duos.
The Review:
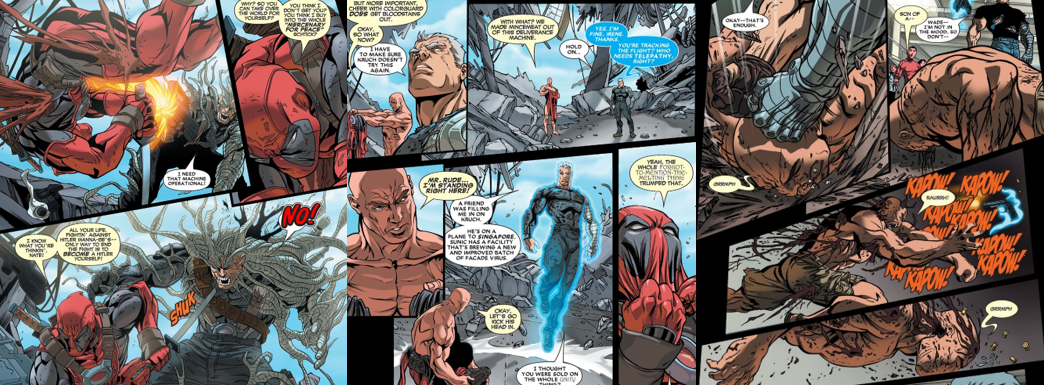
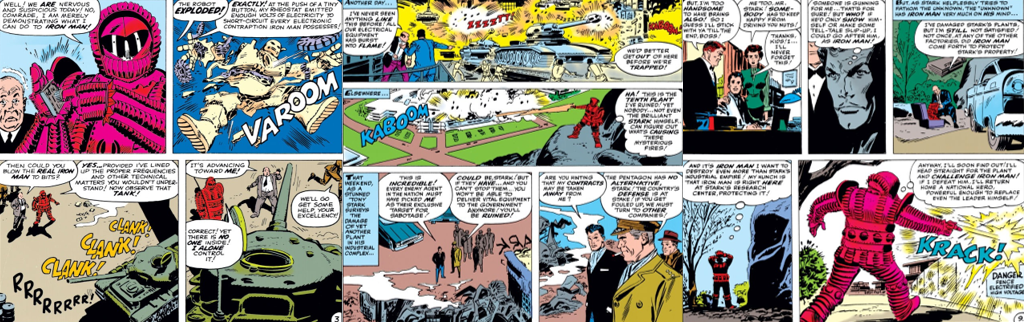
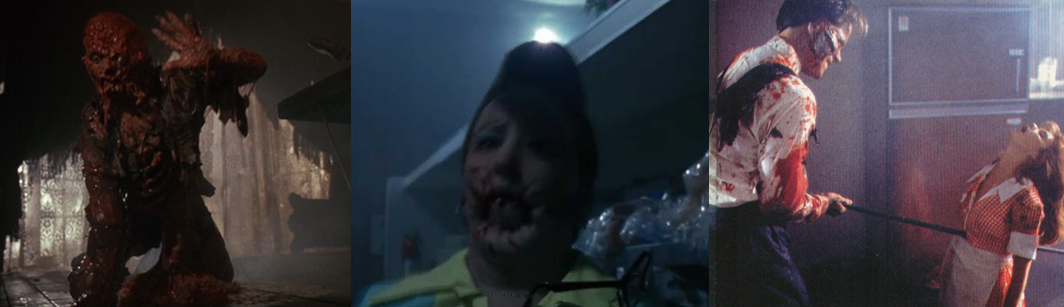
Our story begins with Wade lounging around his apartment, aimlessly flicking through channels until called about a job. Although Wade’s initially reluctant as his client, the One World Church, is based in France as he mistakenly believes the United States is at war with France, he soon dons some synthetic skin and jets over there with the promise of a big payday. He’s met by the less-than-inconspicuous robed representatives of the church, who accept Wade’s gruesome, scarified visage as they’ve been “cleansed” of their identities and rendered androgynous, blue-skinned monks by their order. Though Wade warns them about preaching to him, he meets with their Prime Minister, Anton Kruch, at their colony and, though dubious, learns that the order has purged themselves of all material goods and societal boundaries. Inside the church’s high-tech mansion, Deadpool learns that Sunic Pharmacopoeia created a synthetic virus that could destroy or greatly benefit mankind, and that his mission is to retrieve the “Façade Virus” from their German facility. The toxin was created by Hans Beimer, a scientist currently being mind scanned by Cable. After advising a Mutant bellboy to reach out to Professor Charles Xavier/Professor X, Cable asks Irene Merryweather at the Daily Bugle to fill him in on Sunic, whom he suspects are up to no good. However, he finds the facility in chaos as Deadpool is cutting, shooting, and blasting through the security. Disturbed to find his old nemesis ransacking the place, Cable takes Wade’s advice and “[blows his] mind” with his telekinetic powers but is concerned to find the Façade Virus has been stolen and Beimer has been exposed to it, rendering him a blubbering mess of tumours, and realising too late that the fear he detected in three of the staff was actually guilt from the thieves. These “Spammers” experience different side effects from the virus, with Gunther Herschein/Sour Kraut being violently sick, Asahiri Aoki/Go-Go finding her skin extremely malleable, and Tuatola T’Tuana Timōn/T-5 seemingly unaffected.
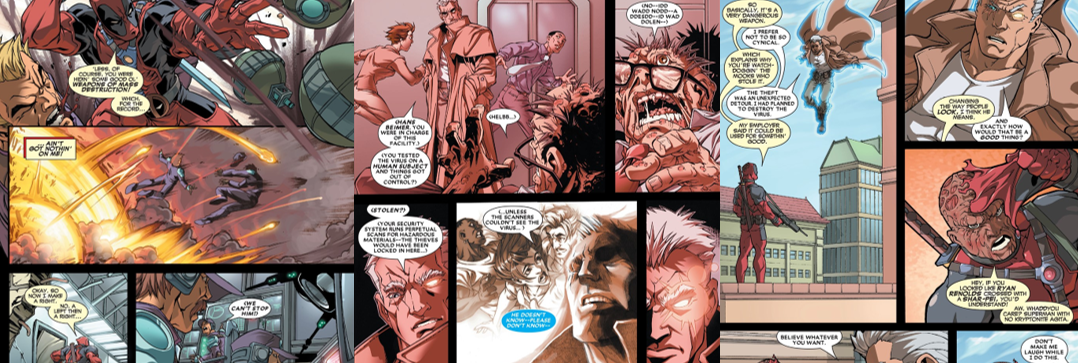
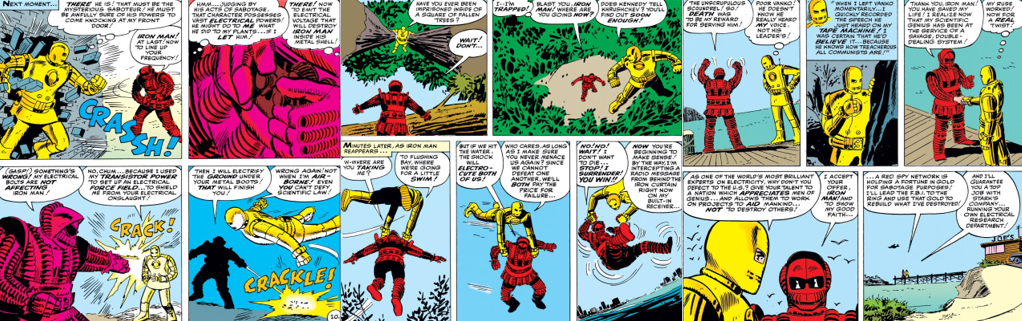
When his telepathic, city-wave search for the three proves futile, Cable calls Irene to learn their real names before running into Deadpool again. As Wade’s been contracted to steal the virus and hopefully help disfigured people like himself and Cable’s made it his mission to destroy it, the two seem destined for a conflict, only for Cable to blow Deadpool’s brains out again. By the time Cable reaches Sour Kraut, he’s literally melting from the virus after using it to masquerade as a movie star in a misguided attempt to cause anarchy. Despite his dismissive attitude towards Sour Kraut, Cable permits him a swift death and then confronts T-5 as he’s gunning down civilians and shouting about government hypocrisy. Chastising T-5’s hypocrisy, Cable easily brings him down and then evaporates Go-Go’s bazooka before extracting the virus from her as she did the others. The effort leaves Cable physically and mentally drained, allowing Deadpool to get the drop on him and bring the sample back to the church so its disciples can forgo the agony associated with their physical transformation. However, the church betrays him and harvests his unique accelerated healing factor to stabilise the virus, allowing them to quickly and efficiently transform everyone into their followers with a simple injection. Luckily, Cable’s ridiculously overpowered telekinetic abilities kept him from being killed and he takes some time to heal from the mental strain in Switzerland with a fully healed Professor X. Since Cable has purged his body of the “techno-organic virus” that held back his powers, Professor X worries that he’s overexerting himself, especially as he’s easily able to hold the returning virus at bay and push himself beyond his previous limits. Brushing these concerns aide, Cable asks for advice about how to best utilise his incredible powers while he still has control and Professor X warns him against employing them in a God-like manner to “fix” society’s ills.
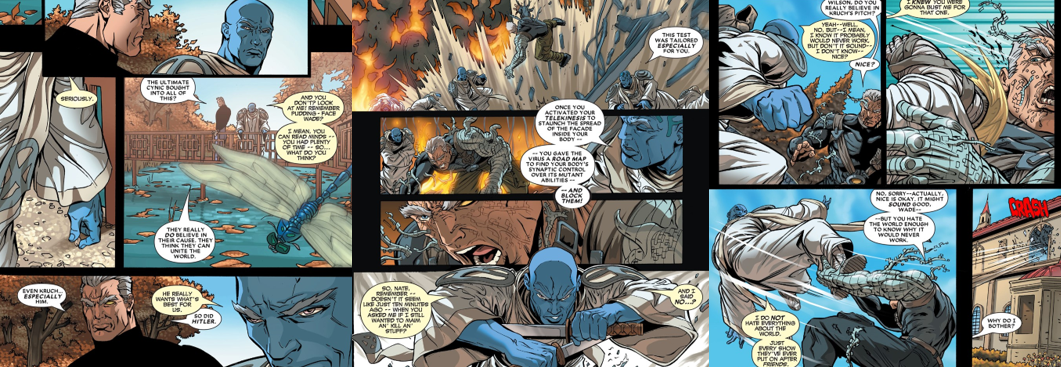
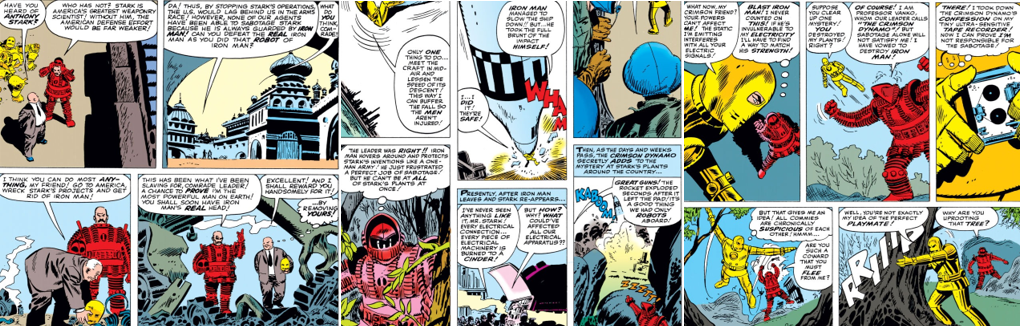
While infiltrating the church, Cable reluctantly apologies for the position the delirious and helpless Deadpool has found himself in and the two bury the hatchet through a psychic rapport, though Cable postpones rescuing him to scope out Kruch’s operation while functionally invisible. Kruch preaches of eliminating strife and bigotry by remaking everyone in their image and presents a fully transformed and brainwashed Deadpool to his congregation, who immediately exposes Cable, though Kruch insists that the church is no threat. Cable is amazed to see that Deadpool’s been cured of his mania and anger, though he’s sceptical about Kruch’s vision of world peace. Invited to witness the first test of the “Deliverance”, Cable and Deadpool witness Kruch’s plan to “infect” the world using electrical transmissions beamed into the eyes, afflicting Cable with the Façade Virus. When Cable decides to use it for himself, he unwittingly allows the virus to run rampant within him, sending his Mutant and technological abilities haywire and leaving him wide open for Deadpool’s sudden attack. After fending Wade off, Cable threatens Kruch was castration if he doesn’t tell him how to stop the virus. When Deadpool redoubles his attack, he ends up tossed into his dorm room, his healing factor struggling with the virus as he struggles with his sanity, slipping back into his costume to attack Cable. Stunned to learn that there is no cure for the Façade Virus, Cable’s easily overwhelmed by Deadpool since the infection is causing his techno-organic virus to spread like wildfire. Conveniently, Cable crash-lands into the church’s armoury, allowing him to blast his way into the facility, only for Deadpool to attack again, convinced that Cable’s become the very thing he claimed to fight against.
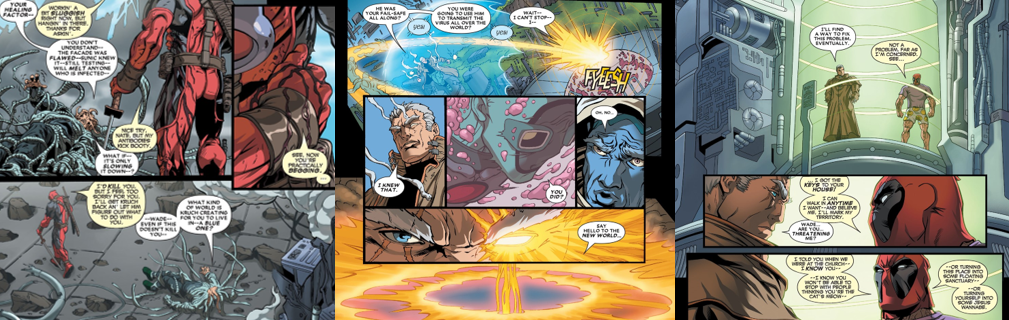
Upon seeing Cable transformed into a bizarre, tentacled grotesque as the combined Façade and the techno-organic virus partially melts and ruins his body and his cyborg parts, Deadpool briefly takes pity on him but refuses to use his blood to cure Cable. Although Deadpool believes that Kruch can eliminate xenophobia, which justifies taking away people’s opinions, he’s stopped in his tracks when his body also begins to melt from the Façade Virus. Though he keeps talking nonsense even as he melts into a pile of goop, Deadpool cannot drag himself to Cable’s paralysed form to cure them both. Luckily, Cable uses his telekinetic powers to draw Deadpool’s liquified remains to him, restoring him and literally puking up the restored Deadpool. Pissed at being deceived by Kruch, Deadpool insists on accompanying Cable to Sunic’s Singapore office, where Merryweather tells him the church has fled, though Cable leaves the visibly cured Wade to find his own way there. Although Cable arrives first, he’s intercepted by Doctor Edward Lansky/Lightmaster, who attacks with blades at blinding speed and ends up teleported into the Moon’s orbit. While Cable agrees with Kruch’s philosophy for world peace and anticipated that he planned to spread the Façade Virus through Lightmaster, he redirects Dr. Lansky’s counterattack into the Singapore Deliverance Device, spreading a modified version of the virus across the world and turning them pink instead of blue. Cable then flies over the world reassembling his old space station and worrying Merryweather so much that she asks him to visit her in person. Knowing he’d use his teleporter, and that the incident has genetically bonded Cable with Deadpool, Merryweather leads Cable into a confrontation with Wade, one Cable easily ends by repeatedly tearing Deadpool apart with teleporters. Cable then restores everyone to normal and proclaims himself a saviour, unwittingly restoring Deadpool’s gruesome visage. Deadpool then vows to abuse their biological link to keep tabs on Cable and ensure he doesn’t let his God complex go to his head, a sentiment shared by the X-Men.
Final Thoughts:
I was expecting a lot more from Cable and Deadpool’s first team-up. On the plus side, the art is pretty much flawless. While I prefer Cable as a man-mountain and it was jarring to see him so trim, lacking in ostentatious accessories, and relying on his awesome psychic powers, the art had a very kinetic and colourful style to it. The few fight and action scenes we get are frantic and detailed and I particularly enjoyed how expressive Mark Brooks and Patrick Zircher make Deadpool, despite his disappointing lack of time in his costume. This is Deadpool at his most self-referential and wacky, with him constantly chattering nonsense and making timely pop culture references to Dennis the Menace and Brigitte Nielsen. I liked that Deadpool is haunted by his ghastly appearance, which leaves him a cross between “Ryan Renolds [sic] and a shar-pei”, and that this seems to inform his defence of the One World Church. Sadly, this isn’t as developed as I’d like. Indeed, when Deadpool hears Kruch’s pitch, he’s sceptical and only in it for the money, then he’s suddenly fighting Cable to the death over the Façade Virus even before he’s pumped full of it and seemingly indoctrinated into the order. It seems Deadpool is only half-heartedly on Kruch’s side, with him finally achieving inner peace thanks to his restored visage (even if he is blue) and believing there’s a small chance the church can end conflict and bigotry. However, this isn’t as explicit as I would’ve liked. It seems Deadpool’s been brainwashed, then he seemingly denies that. Then, he makes amends with Cable a couple of times and then turns on him, suddenly convinced Cable wants to conquer the world by perverting the Façade Virus, which kind of comes out of nowhere, and Wade turns against Kruch when he suffers the horrendous side effects of the virus.
This is much more of a Cable story, one centred on his conflicting morality regarding his incredible powers, which are stronger than ever. Having witnessed apocalyptic futures and a lifetime of conflict and suffering, Cable is obsessed with saving the world and is tempted to use his almost God-like powers for the greater good even if it means putting himself on a pedestal. Indeed, Cable is ridiculously powerful here, forgoing any weapons but his telekinetic abilities and easily rendering himself invisible or having psychic conversations from half a world away. Cable sees a logic in Kruch’s twisted vision for the world, which would make “all as one” as a homogenised, placid species. Although Cable believes Kruch is taking away people’s opinions, it’s not clear to me how Cable’s plan for the Façade Virus is any different beyond making people pink instead of blue. He spreads the virus and worries friends and foes alike by reconstructing his space station, but seemingly does nothing despite claiming to have full control of the virus. He then restores everyone and is apparently heralded as a hero, though I’m not sure how or why, inspiring Deadpool, the X-Men, and others to believe he’s gone “too far”. I can just about understand Deadpool’s behaviour being all over the place as he’s nuts, but I don’t get why Cable’s characterisation is so radically different panel to panel and issue to issue. I can only assume it was part of an ongoing story arc, but it made this first six-part story unnecessarily difficult to read. The dialogue bounces around so much I had trouble keeping track of what was going on or why the two were fighting and I was left disappointed that this wasn’t a more action-packed, unhinged team-up between the titular Mutants.
My Rating:
Could Be Better
Did you enjoy the first story arc of Cable and Deadpool’s team-up comic? Were you also disappointed that it wasn’t a more action-packed story? Can you explain why Deadpool was so devoted to the One World Church and what the hell was going on with Cable? What are some of your favourite moments between Cable and Deadpool and how are you celebrating Deadpool Day today? Let me know what you thought down in the comments and donate to my Ko-Fi to suggest other, better Cable and/or Deadpool content for the site.


You must be logged in to post a comment.