
Released: 22 November 2023
Originally Released: November 1994 (SNES), February 1995 (Game Boy)
Developer: Carbon Engine
Original Developers Ocean Software
Also Available For: Game Boy, Nintendo Switch, PlayStation 4, PlayStation 5, Super Nintendo Entertainment System (SNES), Xbox One, Xbox Series S
The Plot:
When BioSyn (or a power outage) cause trouble on Isla Nubar, the island site of Jurassic Park, palaeontologist Doctor Alan Grant either goes it alone or teams up with tactical sergeant Michael Wolfskin to subdue the genetically engineered dinosaurs and escape alive.
The Background:
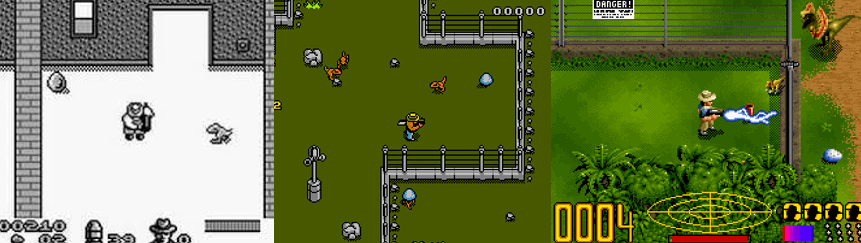
Michael Crichton’s bestselling 1993 cautionary tale about a chaotic dinosaur theme became a blockbuster critical and commercial hit that spearheaded many now-standard CGI techniques. Alongside an aggressive merchandising campaign, Jurassic Park (Spielberg, 1993) was accompanied by toys, comics, and multiple videogame adaptations released on different consoles. While BlueSky Software developed the Mega Drive adaptations, Ocean Software handled Nintendo’s efforts after securing the license for an undisclosed six-figure sum. Their three releases received widespread praise and, while readers and audiences had to wait two years for Crichton and Spielberg to produce a sequel, gamers got a far faster turnaround when Ocean produced a standalone sequel just one year later. The Game Boy and SNES titles had slightly different stories and mechanics, and both received mixed reviews. While the SNES obviously had better graphics and sound, the simplicity of the Game Boy version was praised, especially compared to the high difficulty and awkward controls of the SNES version. Both games were basically lost media for decades until they were included in a modern re-release to celebrate the movie’s 30th anniversary, alongside modern quality of life features, to largely thankful and positive reviews.
Gameplay and Power-Ups:
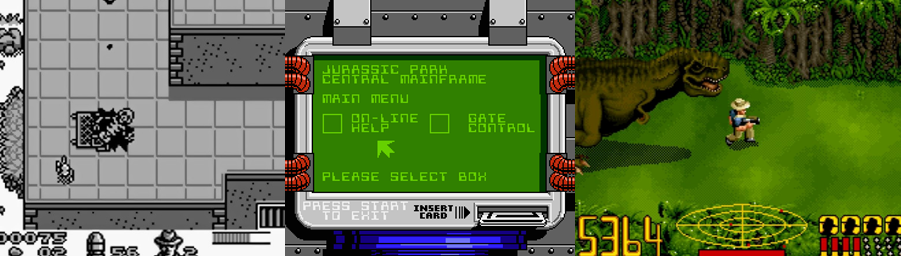
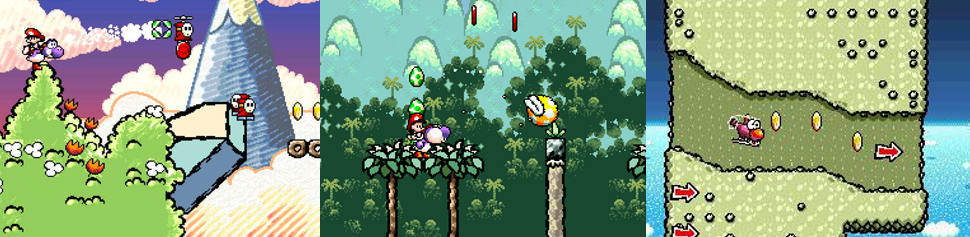
Jurassic Park 2: The Chaos Continues is a sidescrolling shoot-‘em-up that acts as a non-canon continuation of the original movie and its videogame adaptations. While the SNES version is more obviously framed as a return to Isla Nubar thanks to the presence of Biosyn, both can be seen as re-dos of the movie and its videogames since they don’t stray too far from the gameplay mechanics previously seen. While only the SNES version offers different difficulty modes, both see you jumping with A (defying gravity with a higher jump the longer you press the button in the Game Boy version) and shooting with X. Y and B also shoot in the Game Boy version and both versions allow you to rapid fire by holding the button, though this will charge your cattle prod in the SNES version and deplete most of your ammo here, too, save for your weakest lethal weapon and cattle prod. In the Game Boy version, you can switch to grenades by pressing the ‘View’ button; you can’t move and throw them but you have an unlimited supply. You switch weapons with the Left and Right Bumpers in the SNES version, LB cycles through lethal ammo types (such as a machine gun and shotgun spread) while RB cycles through non-lethal options, like tranquilizer darts. All enemies disappear regardless of which ammo you use but there’s a counter that ticks down when you kill any dinosaur that’s not a Velociraptor or what could loosely be described as a boss. Kill too many dinosaurs and your game ends, so be sure to cycle back and forth between lethal and non-lethal options. This crutch isn’t present in the Game Boy version; it’s an all-out platform shooter as Dr. Grant blasts dinosaurs with his unlimited shotgun! Both games also allow you to crouch and shoot, shoot while jumping, and shoot upwards and diagonally, though you must collect ammo in the SNES version by pressing down on the ammo item. This is also how you’ll collect the rare first-aid kits lying about Isla Nublar. These, and the odd 1-up, are automatically collected in the Game Boy version, which also incorporates a scoring system, though only the SNES version allows for a two-player co-op mode.
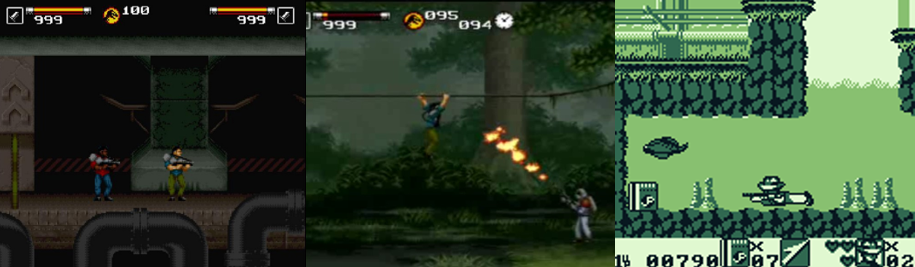
While the Game Boy version uses a lives system, you only get one shot to beat the SNES version. If you’re killed, you restart the mission from the beginning, with no checkpoints or continues or passwords to help. Although the Game Boy version follows a linear narrative, tasking players with guiding Dr. Grant through four stages (called “Zones”) with two levels and a boss battle each, the SNES version lets you freely pick a mission. Each mission has two screens of action and ends in an “Emergency” mission, where you must run around the maze-like environment disarming bombs, tracking down a spy, powering up a generator, and similar tasks against a very tight time limit. The labyrinthine nature of the levels doesn’t help with this. You’ll climb up ladders and jump between them, desperately pressing up and down (when you can even see the arrows!) to enter doors or change screens, with no idea of where you’re going or where you’ve been. These timed missions were some of the worst parts of the SNES version as the enemies respawn when you switch screens and the human enemies can be particularly aggravating, meaning it’s very easy to get lost and then be pummelled to death by grenades. While some of the Game Boy version’s Zones have multiple paths, reached by either hopping up branches or platforms or taking moving platforms, the levels are understandably much smaller and far more linear. Sometimes, you’ll venture underwater, tapping A to swim and attacking prehistoric fish with your harpoon; others, you’ll jump between conveyor belts or over spiked pits. Thankfully, these and other pits aren’t typically insta-death hazards in either version, though your character takes fall damage in 16-bit and must deal with a rather large hit box in monochrome. While you use overhead vines and poles to cross gaps in the SNES version, you can’t move and shoot when up there. Conversely, the Game Boy version requires you to search for a set number of JP Magnetic Cards. The exit will only open when you find them all, as indicated on the heads-up display, so you may need to backtrack to find them. Most of them are just out in the open; others fall from the sky. Zone 3-2 has you searching for 54 cards, but they’re helpfully collected in groups so it’s not as intimidating as it first seems.
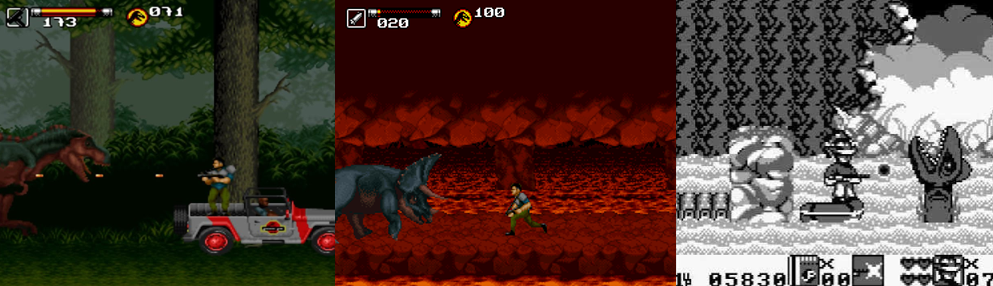
Stage hazards are also a concern in both versions. Flame bursts, loose electrical wires, steam vents, miniature exploding volcanoes, and falling boulders can sap your health if you’re not careful. Platforming is more of a priority in the Game Boy version and much simpler thanks to the chunky sprites and Dr. Grant’s floaty jump. On the SNES, it’s easy to fall through the environment, miss ladders, and drop into lava thanks to the annoying enemy hoards. You must navigate a volcanic maze to place a bomb then out-run the explosion, locate a wounded ally, shoot switches, and defend Gallimimus in the SNES version. When faced with a time limit, you’re better off eschewing non-lethal ammo and avoiding enemies wherever possible, especially if you’re not consulting a guide to navigate the looping mazes. The Game Boy version offers two bonus areas where you’re pursued by a Tyrannosaurs rex. It’s instant death if the T. rex touches you, so you must waddle away from her, hopping to platforms and structures and collecting the JP Magnetic Cards for an extra life. You’ll also be back on the rapids in the Game Boy version, where the water instantly kills you if you fall while jumping to wooden bridges but is no concern when you’re on a raft and blasting prehistoric fish. While you do race away from a T. rex at one point in the SNES version and the game also culminates in a vehicle section, this latter mechanic only appears if you’re playing on “Medium” or higher. This means that you’re stuck in a continuous loop of run-and-gun action and frantic races against the clock, desperately hoping the poisonous gas doesn’t sap your remaining health or you don’t miss any power supplies. At one point, you’re destroying giant fans to avoid being skewered; in another mission, you’re scaling a cliffside to repair an antenna. Other times, the ground crumbles beneath your feet, mines explode when you least expect it, or you must destroy boulders to progress, all while frantically hoping you haven’t doubled-back on yourself!
Presentation:
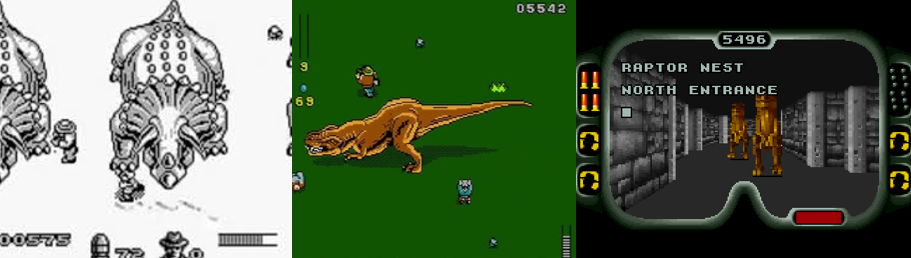
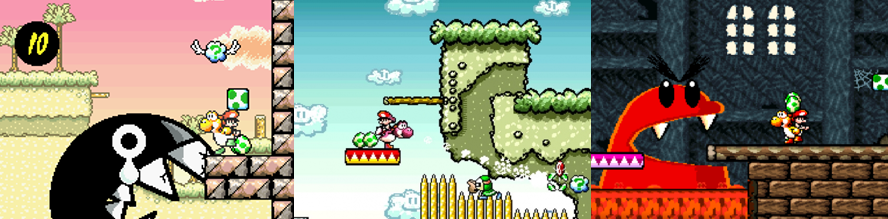
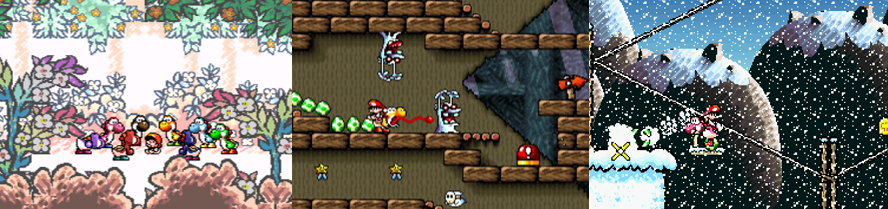
It’ll be no secret that the SNES version wins in this regard. However, the Game Boy version is pretty impressive considering the hardware, especially compared to the previous Jurassic Park game on the system. It begins with a nice pixel-art recreation of the big gates, the first Zone features Dr. Grant’s vehicle in the background, and there’s some decent sprite art introducing each Zone. Dr. Grant is a big, surprisingly animated sprite. While this means he has a large hit box, I enjoyed seeing him pump his shotgun with every shot and look around warily when left idle. Sadly, only the bosses match Dr. Grant’s quality in the Game Boy version, with regular enemies appearing disappointingly gaunt and basic. While the Game Boy version’s backgrounds and environments are obviously much more basic, they do a decent job of recreating the visuals from the film. I recognised the electrical fences, towers, and dinosaur paddocks and it was at least easy to see where I was and what I was doing. The SNES version nicely trumps the Mega Drive’s two sidescrolling run-and-gun efforts, featuring dense jungles, a touch of parallax scrolling in the valley, and more appealing sprite work. While the art direction does make Dr. Grant completely unrecognisable and I’m not sure what the purpose of mapping a dramatic pose to the Y button was, he has a lot of fun animations, particularly when climbing ladders or crossing vines. The dinosaurs also fare a lot better, making it even more of a shame that there isn’t a large variety of them and we simply get palette swaps of ‘raptors for the most part. While neither game uses the iconic Jurassic Park score, the Game Boy version includes some awesome arcade-style music and the SNES incorporates the dinosaur’s roars and noises from the movie. The bigger ones, like the T. rex and Triceratops, are also beautifully detailed (if off colour). The Game Boy version does okay when bringing to life larger dinosaurs for its boss battles, but its T. rex is incredibly ugly and its ‘raptors are strangely stretched.
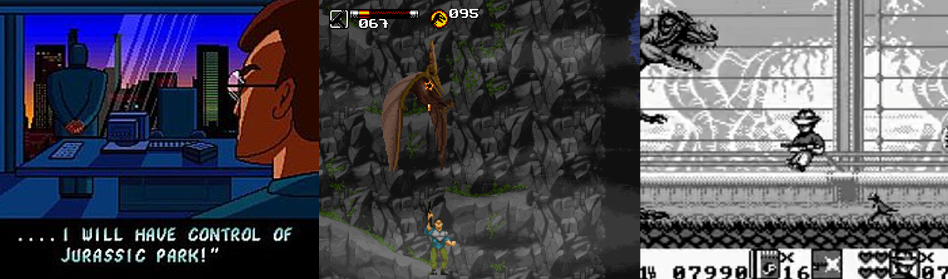
While larger dinosaurs simply blink out of existence or explode in the SNES version, they feature defeated poses in the Game Boy version, which is a fun touch, alongside a health bar so you can actually tell that you’re hitting them, which is a real issue on the SNES. Unfortunately, both games suffer when it comes to their environments. Sticking very close to the same ideas as the previous 8- and 16-bit games, both versions see you exploring the jungle (with various parts of the park, such as the gigantic electric fences, in the background), caves, a valley, and various InGen facilities. These are painfully generic in both games but even more so in the Game Boy version, where the hardware can’t do much beyond render some giant trees. There are some unique aspects to this game, such as algae-infested waters and the aforementioned rapids, but even this latter inclusion is similar to what we saw in the previous games (including hungry Brachiosaurs). While the SNES obviously benefits from greater processing power, sporting none of the admittedly rare sprite flickering seen in its handheld counterpart, it does force you to venture through the same jungle environment again and again. The interior locations are also recycled far too often, becoming indistinguishable from each other no matter how many pipes and vats and generators the developers sneak in. I like the incubators and Jurassic Park signage seen in the backgrounds, and that we get to revisit the Gallimimus valley. However, this is a strictly on-foot section and lacks the fast-paced action of the same area in Jurassic Park: Rampage Edition (BlueSky Software, 1994). I’m not sure why every Jurassic Park game has to feature a volcano, but this might be the worse one yet. The lava seems very disconnected, and it lacks the detail of the misty jungle. The cliffsides were okay, especially when they sported snow and you could see into the horizon, but they were very samey, just like the interiors, with little indication of where you need to go. The SNES version is bolstered by an animated introduction that also features voice acting, though this detail is strangely missing from the ending.
Enemies and Bosses:
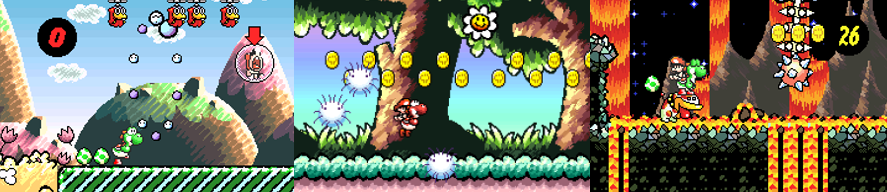
As I mentioned above, neither version of Jurassic Park 2 impresses with its dinosaur selection. Dilophosaurus returns as a common enemy, standing stationary and spitting in all directions, while giant wasps, Pterodactylus, Dimorphodon, and Pteranodon fill the skies across each game. The Pteranodons are particularly aggravating on the SNES, endlessly spawning around the cliffsides, while their larger mothers simply flap around near their nests posing little threat. While you can take out the Gallimimus on the SNES, you’re meant to avoid them and off BioSyn’s soldiers to save the creatures. While Compsognathus are a constant headache on the SNES, you’ll find weird-looking Archaeopteryx, Hypsilophodon, and Parasaurolophus on the Game Boy, with the former jumping at you for extra annoyance. The underwater sections see you blasting prehistoric fish, trilobites, and anemone while baby Triceratops occasionally appear on land. On the SNES, you’re primarily faced with Velociraptors and Oviraptors, which leap at you and often attack in groups. Coming in different colours and proving quite durable, the ‘raptors fiercely defend their nest, but I found it best to jump over them and keep the fire button held down. The SNES version features exclusive human enemies to contend with. Not only will workers toss wrenches at you, scientists whip out pistols, and suited BioSyn executives dog your progress, their soldiers will be a greater threat than the dinosaurs most times. While the basic grunts just run about or stand in place, others can shoot in all directions or toss grenades, which are a bitch to avoid! Their bazooka soldiers are easily dispatched by crouching and shooting, a tactic that will serve you well against their flamethrower units. However, these bastards have a long reach and can roast you when you’re on ladders or hanging from pipes, meaning it’s always a pain in the ass when humans show up.
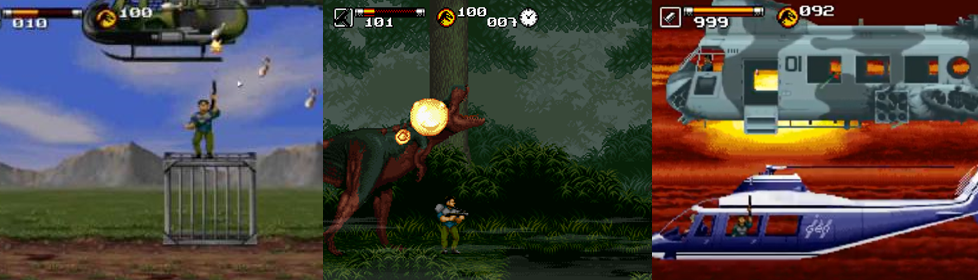
While BioSyn’s armoured troops only pack a pistol, they can move, fire in all directions, and crouch and shoot, which can be annoying. You’ll also have to battle a larger enemy commander twice; this muscle-bound boss packs a flamethrower/machine gun combo and tanks even your best shots. Your best bet is to lure him in, blast him with your strongest shots, and back away, chasing him when he retreats. BioSyn’s attack chopper carpet bombs the Gallimimus valley, eventually swinging a dinosaur cage at you and peppering the screen with bullets and bombs. If you’re playing on “Medium” or higher, you’ll attack BioSyn’s bomber from an Ingen helicopter, firing in different directions with the face buttons and targeting the plane’s mini gun and launchers. True to its name, the bomber drops bombs but also fires homing shots, two projectiles that are extremely hard to avoid since your chopper is such a large, unwieldy target. The SNES version mainly throws bigger or more aggressive regular dinosaurs at you as pseudo-bosses, such as the Triceratops that guards the final explosive and must be lured in to charge and fend off, preferably with your shotgun. The T. rex chases you at one point, with you only able to force her back with your shots and jump to safety at the end. If you play on at least “Medium”, you’ll battle the T. rex in a fight to the death. Though big and slow and limited to a simple bite, it takes a shit load of your strongest shots to put her down. She chases you to a precipice, which will sap your health if you drop, and you’re also battling a tight timer. You must switch to your strongest shot and target her head, either by jumping or shooting diagonally, forcing her back to create space and jumping away to avoid being eaten. Since the T. rex doesn’t register damage, you’ll only know you’ve won when she explodes (naturally), which took me a fair few tries.
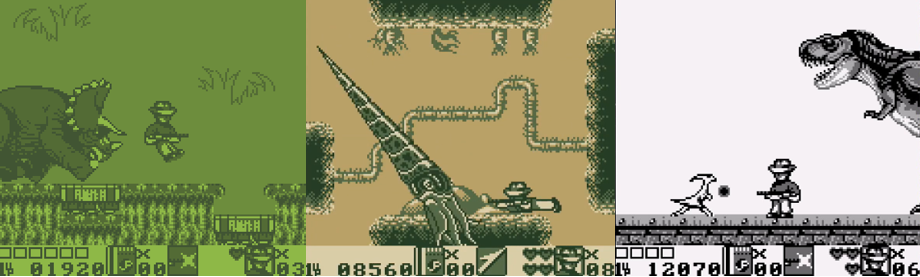
The Game Boy version features far more traditional boss battles, with you battling a larger dinosaur at the end of each Zone. The first boss you face is a mummy Triceratops that stomps back and forth across the screen. You must dive into one of the nearby holes, duck down, and toss grenades at her. When the platform in the hole rises, you must dash to the other one to continue the assault, easily avoiding damage for the most part if you keep your head down. The Pteranodon is a bit more of a threat. This giant, bat-like dinosaur swoops down from either side of the top of the screen, dropping a boulder that’s a pain to avoid unless you race to the opposite side of the screen. Her smaller minions will attack after, though they’re easily taken out as you’ve been blasting them since Zone 1-1. The Game Boy version does offer one unique boss battle, one that takes place underwater and sees you attacked by a “Cephalosaure”. This giant, spike-headed squid darts in like an arrow from each corner of the screen, proving a large target that can be difficult to avoid because of the awkward swimming controls. Smaller, snail-like enemies will swim down after each pass but this is quite easy to hit, especially if you stay away from the centre of the screen. Oddly, the Velociraptor is fought between Zone 4-1 and 4-2, charging, hopping, or prancing in from either side of the screen. You can use the small block platforms to jump over them and they’ll try and bite you up close, but they’re not too difficult to avoid. On two occasions, you’ll be pursued by the T. rex, which cannot be killed and will instantly kill you if you so much as graze her. You must run from her, hopping between wooden scaffolding and taking out Compys, but you get to face her one-on-one in a painfully bland final battle. The T. rex stomps back and forth, occasionally charging, and takes a bite out of you up close. Dimorphodon come in to distract you, but this is actually your opening to pummel away at the T. rex’s head until she collapses in defeat.
Additional Features:
While the Game Boy version is the only one with a score system and final score, there is no high score table and the SNES version is the only one with a two-player mode and different difficulty options. Both games end with lacklustre congratulatory text, but you’ll only battle the T. rex and BioSyn’s bomber by playing the SNES version of at least “Medium”. The Jurassic Park: Classic Game Collection includes fun extras like each game’s soundtrack, different filters and borders, and the life-saving rewind and save state feature that greatly eases the pain of the SNES version’s difficulty. This version of the collection also has fourteen Achievements for you to earn, with two earned for these games, specifically. You’ll get an Achievement for beating the SNES version on any difficulty, and another for being it on “Hard”, so I advise just playing on “Hard” to snag them both. You got one Achievement on the Game Boy version for defeating the Velociraptors and another for clearing the game, which is a touch disappointing as there’s no incentive to shoot every enemy or play with a friend.
The Summary:
I was optimistic about Jurassic Park 2: The Chaos Continues, especially the SNES version, as it was developed after five other videogame adaptations of the movie so surely the developers would’ve learned a few things about what works and what doesn’t. Technically, that is true as the game focuses much more on run-and-gun action, allowing you to blast dinosaurs and humans to your heart’s content while also encouraging you to merely stun most dinosaurs to maintain some semblance of preservation for the resurrected creatures. Visually, the game may be the best looking of the 16-bit Jurassic Park titles, but for some of the lacklustre backgrounds and the lack of originality in the locations. The gameplay loop does get frustrating very quickly, however. Even before mentioning the aggravating timed sections, including looping doors and paths without a map or any clear indication of where you need to go was a baffling and frustrating decision. Combined with the timed sections and you only getting one chance to beat the mission, this makes for a shameless handicap to force kids obsessed with the blockbuster movie to rent the game again and again. While the Game Boy version is more basic, smaller, and very less visually impressive, the music is fantastic and the simpler shoot-’em-up gameplay was far more appealing. I quite enjoyed searching for the JP Magnetic Cards and blasting the butt-ugly dinosaurs, though the hit boxes and mediocre levels did let it down, especially as the sprite work on the boss was pretty impressive. While there is a lot to like in each game, and some technical improvements that make them better than their predecessors, I think Jurassic Park 2 still misses the mark no matter which version you play. Neither offer anything new, especially compared to their predecessors or other similar games, and again just make me wish we’d had one ultimate 16-bit Jurassic Park release that had combined all the best elements from each game instead of leaving us with average tie-in games where we have to cherry pick the best parts.
Game Boy Rating:
Could Be Better
SNES Rating:
Pretty Good
What did you think to the Nintendo-exclusive Jurassic Park sequels? How do you think they compare to each other, and the previous Jurassic Park titles? Which of the two was your favourite and were you glad that they were ported to modern consoles? Were you also annoyed by the SNES version’s maze-like environments and the large hit boxes in the Game Boy version? What did you think to the Game Boy version’s bosses and the timed missions of the SNES version? Which Jurassic-inspired videogame is your favourite? How are you celebrating Dinosaur Day this year? Whatever your thoughts on these Jurassic Park videogame sequels, or dinosaurs in general, leave them below, support me on Ko-Fi, and check out my other dinosaur content!


You must be logged in to post a comment.