

Released: 22 November 2023
Originally Released: June 1993 (NES), August 1993 (Game Boy), October 1993 (SNES)
Developer: Carbon Engine
Original Developers: Ocean Software (Game Boy / NES); Ocean of America (SNES)
Also Available For: Game Boy, Nintendo Entertainment System (NES), Nintendo Switch, PlayStation 4, PlayStation 5, Super Nintendo Entertainment System (SNES), Xbox One, Xbox Series S
The Plot:
When an act of sabotage releases the genetically engineered dinosaurs of theme park Jurassic Park, palaeontologist Doctor Alan Grant must fight to curb the outbreak and escape the island.
The Background:
In 1993, director Steven Spielberg took Michael Crichton’s bestselling cautionary tale about a dinosaur theme park thrown into chaos and gave us Jurassic Park, a critical and commercial blockbuster that pioneered many of the CGI techniques we still see in Hollywood. Bolstered by an aggressive merchandising campaign, Jurassic Park inspired a wave of toys, comics, and numerous videogames, with multiple adaptations releasing alongside the film. Although games were also published for SEGA’s consoles, having made a name for themselves with their arcade tie-ins to other film releases, Ocean Software made the Jurassic Park games for Nintendo’s consoles after securing the license for an undisclosed six-figure sum. The developers were provided with numerous resources from Universal Pictures to recreate the visuals and likenesses of the film, utilising the Super Nintendo’s “Super FX” chip and ambitious texture mapping techniques to create first-person sequences on the 16-bit console. All three versions received widespread praise for their graphics, with the SNES version impressing with its large scope, though its first-person sections were criticised and the Game Boy’s more simplistic nature was noted. After decades of being essentially lost media, these three games (and four others) finally came to modern gamers in celebration of the movie’s 30th anniversary, courtesy of Limited Run Games, alongside modern quality of life features, to largely thankful and positive reviews.
Gameplay and Power-Ups:
These three Jurassic Park adaptations have a lot in common. They’re all top-down adventures set on Isla Nublar during the events of the film; they all have you control Dr. Grant; and they all centre around a mad search for numerous Velociraptor eggs. The only thing that really separates them, on paper, is the hardware they’re on, hence why I’m lumping all three into one review. Unlike in the movie, where Dr. Grant can only run and use his dinosaur expertise to outthink the reborn creatures, players are armed in these games. Dr. Grant carries a firearm that fires an electrical taser shot to stun smaller dinosaurs in the Game Boy and NES titles but is largely ineffective against bigger dinosaurs. In the SNES version, this weapon pushes back and eventually subdues the Dilophosaurus but it’s far too weak against the hyper-aggressive Velociraptors. However, you must also use it to power-up gears to create bridges and open the park’s electrified fences. Dr. Grant can also jump but he’s hardly an athlete. He can barely hop over Compsognathus’, brambles, and electrified flooring but you won’t be jumping to platforms or anything. The controls change between games, but all three see you switching your shot with the Xbox’s ‘View’ button. Dr. Grant can pick up more formidable, but limited, ammunition strewn around the park, including a bola shot, near useless smoke grenades, a shotgun, and a grenade launcher. In the SNES version, you can carry two of these shots at once alongside your taser shot, and the ammo respawns when you enter the park’s buildings. Search hard enough and you’ll also find health kits and extra lives and, exclusive to the NES version, a temporary invincibility. Be cautious when collecting items in the Game Boy and NES versions, however, as many of them are boobytrapped to blow up in your face. Players get points for every dinosaur they dispatch and earn extra lives with enough points, and you’re also given a handful of continues should you lose all your lives, though each game must be beaten in one sitting.
Dr. Grant’s goal is to search the island for numerous ‘raptor eggs. These are essential in the Game Boy and NES versions, to the point where you can’t access buildings or progress until you’ve found all in each area. Collecting them all in these versions spawns a key card, though it’s not always clear which door you need to take so you’ll need to experiment a bit, which is tricky as the enemies respawn in these versions. Enemies don’t respawn in the SNES version, but the map is far bigger and you’ll be backtracking more. The only consolation is that you don’t need the eggs to access buildings, but you will be hunting high and low for identification cards to access computer terminals and locked doors. These terminals appear in each version but they’re far more detailed and prominent on the SNES, where you need the correct access to reboot the park’s security systems, unlock specific gates, radio the boat and the mainland, and access the ‘raptor pen and infested nest. Each game tasks you with destroying this nest using a nerve gas bomb; there are three bombs and three nests in the Game Boy and NES version and one aggravating labyrinth and one bomb on the SNES, found on the lowest level of the docked ship. When playing on the Game Boy and NES, players also control a life raft, dodging Dilophosaurus spit and swimming Brachiosaurus, while SNES players must dodge stampeding Gallimimus and dash into alcoves to avoid being trampled by a gigantic Triceratops. The Game Boy and NES versions also task you with rescuing Lex and Tim Murphy from a herd of Triceratops and a voracious Tyrannosaurus rex, with the Lizard King popping up on the main map on the SNES and the kids reduced to mere cameos as just two of many annoying pop-ups that completely obscure the screen. If you lose a life, you thankfully respawn right where you fell with all your ammo and inventory intact, which is useful, though the lack of passwords makes me wonder how anyone beat the SNES version without save states.

While the Game Boy and NES versions are essentially mission-based games that task you with collecting eggs and key cards and surviving each location, they also include some maze-like elements. The buildings and caves loop and turn you about, throwing miniature volcanoes and electrical pylons in your way and timing your escape from the ‘raptor nests before your bomb takes you out. Though the SNES version encourages you to exit the nest as quickly as possible, you appear to have unlimited time to escape, which is good as the nest is easily the most confusing area in the game. And that’s saying a lot considering all the interior locations are frustrating mazes that, surprisingly, switch the game to a first-person shooter (FPS). Clearly designed to showcase the SNES’s Mode 7 feature, these sections are slow, tedious slogs around repetitive locations with no clear indication where you need to go. You’ll be hunting for batteries to power your night vision goggles, grabbing ID cards to open doors and access terminals, powering up a generator and fiddling with the park’s systems, and taking elevators to sub-levels to explore further. Eventually, you’ll activate the park’s motion sensors, finally giving that obnoxious circular sprite on the heads-up display a purpose, and gain additional security clearance. This means you go back and forth between utility sheds, the visitor’s centre, the ship, and the ‘raptor pen desperately trying to remember where you couldn’t access the first time around. One mission sees you either wiping out the Velociraptors or blocking their entry with a wooden box, while another tasks you with destroying all the dinosaurs that’ve infested the ship. You must clear each mission in the SNES version to proceed; even if you have the right ID card, the game blocks you if you haven’t finished a mission. Of course, there’s no way to track your progress; the computer terminals help to a degree, but it’s limited to listing your ID card inventory and security clearance level.
Presentation:
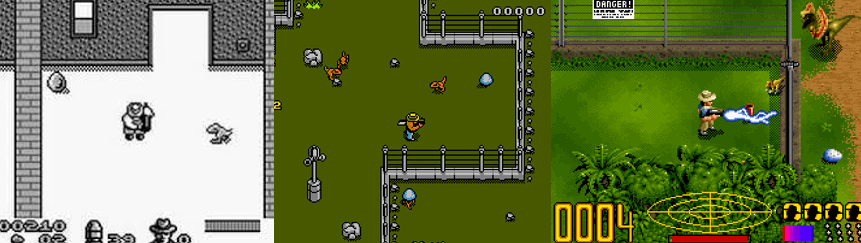
Obviously, we’re working on a sliding scale between these three games. The SNES version is going to look the best, the NES version is passable, and the Game Boy version is…let’s say “quaint”. The NES version doesn’t make the best first impression; you can argue that the large T. rex sprite art is ambitious, but it just looks ugly. Ironically, it fares better on the Game Boy, where my expectations are much lower, though only the SNES version includes a detailed title screen of the film’s logo. In the Game Boy and NES versions, Mr. D.N.A. gives you an overview of your objectives. This is absent in the SNES version, but large, annoying text boxes regularly pop up to give you hints and the game’s bookended by Mode 7 effects applied to the island. The Game Boy and NES versions have extremely jaunty and fun chip tune soundtracks that remind me of Ocean’s arcade efforts. The SNES version opts for more subdued, ambient tunes, the ominous sounds of dinosaurs, and a handful of sound bites, though none of the games use the film’s iconic soundtrack or dinosaur roars. The SNES also performs far better; unlike its inferior cousins, I saw no instances of screen tearing, sprite flickering, or slowdown. These issues were rife on the NES version and also cropped up on the Game Boy version when too much was happening at once, though all three have a problem with the sprites having large hit boxes.
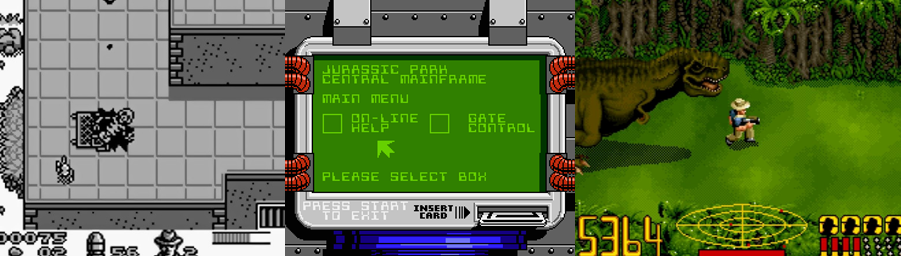
Isla Nubar is represented on a reduced scale in all three games but is still surprisingly recognisable in the Game Boy and NES versions. You’ll start outside the iconic park gates in all three and explore the lush grasslands and forests surrounding the visitor’s centre, venture into the ‘raptor pen, and explore the nearby caves. Unlike its cousins, the SNES version portrays Isla Nubar as one big world map, with forests, streams, buildings, and recognisable locations all on one big, interconnected map rather being separated by missions as in the other two games. On the NES, the landscape changes colour and layout with each mission, introducing different buildings, forests you can pass through, containment fences, and rugged, hazardous mountain peaks. On the SNES, you venture up a cliffside many times as you revisit the docked ship again and again, will drown if you fall in the water, and must power up gears to progress. The helipad is your goal in all three games, though it’s only a separate region on the SNES and this version is the only game to accurately recreate the visuals of the film. Without a doubt, the overworld graphics are the best part of this version, featuring lush vegetation and detailed and colourful sprites, though the Game Boy version does boast surprisingly detailed sprite art recreating events from the movie. The SNES banks heavily on its FPS sections which, in my opinion, was a mistake as the game slows to a crawl and the visuals look pixelated, ugly, and repetitive. While the game recreates recognisable interiors from the film, every corridor looks the same. Some are ugly and grey, some are bronze and have nautical trappings, some are a light blue, and others are pitch-black, but everything looks the same so it’s easy to get lost. The sub-levels of the ‘raptor pen were the best parts, though, as you can see foliage through the windows, but these sections were a chore to play through. I really wish the developers had limited themselves to two or three FPS sections and used a traditional sidescrolling platformer perspective, like the Mega Drive titles, for the others, just for some variety.
Enemies and Bosses:
Jurassic Park is as disappointingly light on dinosaurs, though most of the creatures showcased in the movie make an appearance in all three games and you can even view an encyclopaedia of the creatures on the Game Boy. As you collect eggs, you’ll be relentlessly attacked by tiny Compsognathus. These aren’t much of a threat, but they do get annoying, so it was satisfying turning them into puffs of smoke with the cattle prod in the SNES version. Meganeura, prehistoric dragonflies, also appear in the SNES version alongside the easily spooked Gallimimus, who stampede and whittle your health to nothing if you’re not careful. Pachycephalosaurus also appear exclusively in the SNES version, attacking with an annoying headbutt if you get too close, though you’ll only see the gigantic, swimming Brachiosaurus, wandering Dimetrodon, and leaping Ichthyosaurus in the Game Boy and NES versions. One of the most common enemies you’ll face across all three games is the Dilophosaurus, rancid creatures who spit from afar and lurk in the game’s butt-ugly FPS sections (where they, like the ‘raptors, explode when shot, no matter what ammo you use). Equally, you’ll battle more than a few Velociraptors in all three games. Incredibly aggressive and often striking in twos, these creatures burst from trees and bushes and stalk the corridors of the SNES’s FPS sections. While enemies respawn seemingly endlessly in the Game Boy and NES versions, they’ll be down for the count on the SNES, especially in the FPS sections, except for the Velociraptors. You must also be wary of brambles, rushing streams, electrical bolts, falling boulders, and erupting volcanos. Those annoying explosive boxes will be your biggest enemy in the Game Boy and NES versions, though, and really got to be a pain in the ass after the first few caught me off-guard.
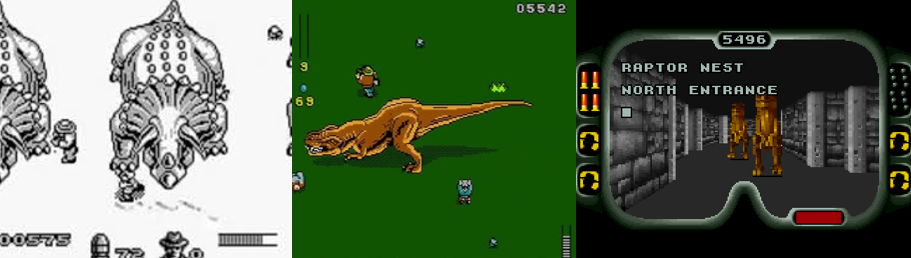
Oddly, considering the Super Nintendo’s greater processing power and the impressive nature of its sprite work, bosses only appear in the Game Boy and NES versions and, even then, they’re not that impressive. You must rescue Tim from the stampeding Triceratops in both versions, weaving between the gigantic beasts and trying to avoid their huge hit boxes in sections that I have no idea how anyone beat back in the day. You must endure this section twice in both versions, with Tim’s lagging speed often costing you and the creatures appearing in specific, much more manageable sections on the SNES. When the T. rex appears here, your only option is to run or momentarily stun her with tranquilizer darts, though you’re more likely to be left squirming in her jaws if you try and fight her. In the NES version, you battle the T. rex directly twice. The first time, you must rescue Lex from her, and the second time you must rescue Lex and Tim, with both being rooted to the spot by fear and easily chomped by the Lizard King if you don’t catch her attention. The T. rex is impervious to damage unless her head is lowered, but you must be quick as she’ll stomp over and eat you (or one of the kids) whole otherwise, and her hit box is predicably large, so you’ll have a hard to avoiding being hit. In the Game Boy version, this fight is turned into a desperate dash to the left-side of the screen, though thankfully there’s no risk of being trampled and her bite is easy to avoid. You must push the T. rex back with some shots and then usher Lex towards the exit, desperately trying to not get caught on the boulders scattered across the path. There is no final battle against the T. rex in the Game Boy version, making the finale disappointingly anti-climactic compared to the NES version, and no bosses at all in the SNES version. The closest you get are the many encounters with the Velociraptors, who pounce from the bushes and prowl around the corridors of the game’s interiors, which is a shame as I would’ve loved to see a proper rendition of the T. rex fight.
Additional Features:
The NES version is the only one of the three to offer a two-player option (presumably with players taking it in turns between lives), though all three offer a high score table for you to try and get your name on. Each game ends in the most lacklustre way possible, with simple text congratulating you, though you get to wander around the credits in the lesser versions. The Jurassic Park: Classic Game Collection offers a few fun extras, such as each game’s soundtrack, various filters and borders, and a rewind and save state feature that makes each game, but especially the SNES game, much easier. Each game also comes with a map, which is super helpful until you play the SNES version, where the developers didn’t include maps for the FPS sections! The collection naturally has some Achievements for you to earn; fourteen in total, with two earned for each game included. While you obviously get an Achievement for beating each game, an additional Achievement is assigned to each and tied to different objectives. You get an Achievement for starting the generator in the Game Boy version, saving Lex from the T. Rex in the NES version, and finding all eighteen ‘raptor eggs in the SNES version.
The Summary:
I’ve long admired the SNES version of Jurassic Park. I believe I played a port of it on the Amiga as a kid and I’ve always been captivated by the overworld graphics. Truly, the game is gorgeous to behold, and the 16-bit recreation of the film’s visuals is incredibly impressive. The foliage, the buildings, and the dinosaur sprites, especially, are all visually appealing, let down only by the lack of John Williams’ iconic score. Well, that and the awful FPS sequences. Believe me, I get the appeal of showcasing the Super Nintendo’s processing power, but these sections are slow, ugly, and a chore to play. It might not’ve been so bad if you didn’t have to keep backtracking to these areas again and again, each time getting more confused about where you’ve been and where you’re going. The Game Boy and NES titles are much simpler in this regard, being simple mission-based games rather than an odd mixture of action and adventure like their SNES counterpart. Yet, while the NES version tries, the Game Boy struggles to replicate its cousins. Sprite flickering and screen tearing are real problems in both, but this genre didn’t translate well to the Game Boy. Perhaps switching to a sidescroller would’ve been better, though I did like the subtle differences in the T. rex boss fight and the sprite art between missions. The tedious collecting wore out its welcome very quickly in both versions and is only marginally better on the SNES, where you still need to find them all but have a bigger map to explore. The SNES version is let down by those annoying pop-up boxes, a lack of boss battles, and no password feature, meaning the sprawling adventure must be beaten in one sitting. This is a laborious task even with the Classic Game Collection’s save state feature, so I have no idea how players managed it back in the day. In the end, I’d say the only one worth playing is the SNES version based on the overworld’s eye-catching visuals but, realistically, the NES version is probably the easiest for repeat playthroughs. What we really needed was one version that incorporated the best of all three games but, as is, there’s some fun and frustration to be had regardless son which game you play.
Game Boy Rating:
Terrible
NES Rating:
Could Be Better
SNES Rating:
Pretty Good
What did you think to the Jurassic Park videogames released for Nintendo’s consoles? How do you think they compare to SEGA’s releases, and to each other? Which of the three was your favourite to play and were you pleased to see them made available for modern consoles? What did you think to the FPS sections and the tedious egg hunting? Did you ever beat the SNES version back in the day and, if so, how? Which Jurassic-adjacent videogame is your favourite? How are you celebrating Dinosaur Day this year? Whatever your thoughts on Nintendo’s Jurassic Park videogames, and dinosaurs in general, leave them below, support me on Ko-Fi, and check out my other dinosaur content!


You must be logged in to post a comment.