Back Issues [Brightest Day]: Green Lantern #48-50


Although February 2014 was dubbed “Green Lantern Day” (because, by the American calendar, the date read as “2814”, the sector of space assigned to Earth in DC Comics), the significance of this date has passed as the years have changed. Instead, I’m choosing to celebrate the debut of perhaps the most popular iteration of the character, Hal Jordan, who first appeared in October of 1959.


Writer: Ron Marz – Artists: Bill Willingham, Fred Haynes, and Darryl Banks

Story Title: “Emerald Twilight, Part One: The Past”
Published: January 1994

Story Title: “Emerald Twilight, Part Two: The Present”
Published: February 1994

Story Title: “Emerald Twilight, Part Three: The Future”
Published: March 1994

The Background:
The character of Green Lantern, in the form of Alan Scott, first appeared in All-American Publications’ (a precursor of DC Comics) All-American Comics #16 in July 1940. In 1959, DC Comics editor Julius Schwartz enlisted writer John Broome and artist Gil Kane to reinvent the character as Hal Jordan and, in the process, created countless other Green Lanterns through the establishment of an intergalactic police force. Although Jordan became one of DC Comics’ most prominent superheroes, the company decided to make some major changes to the character in the mid-nineties, a period of time often referred to as the “Dark Age” of comics that saw stories such as “The Death of Superman” (Jurgens, et al, 1992 to 1993) make headline news and Bruce Wayne/Batman left crippled at the hands of a superhuman foe. Although Batman later recovered and Clark Kent/Superman soon returned to life, Hal Jordan’s home town of Coast City was destroyed during the Man of Steel’s resurrection, leaving Hal devastated and driving him to near madness in his attempt to rebuild his home. The story’s primary purpose was to depict Hal’s downfall into a maniacal, reality-destroying villain known as Parallax and to introduce a new, young, sexy Green Lantern (my favourite of the Emerald Warriors, Kyle Rayner). Eventually, of course, DC backpedalled on this decision and went out of their way to redeem the “greatest Green Lantern” but, for a while there, things were definitely exciting and different in DC Comics as they introduced new legacy characters and fundamentally altered their predecessors in startling ways.

The Review:
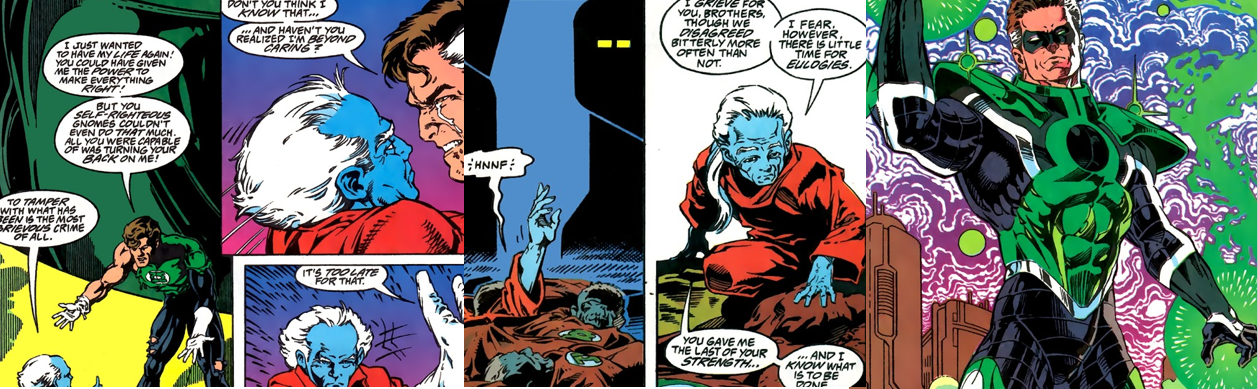
“Emerald Twilight” begins pretty much immediately after the conclusion of the “Return of Superman” story arc (Stern, et al, 1993) with an injured and emotionally shattered Hal Jordan kneeling amidst the still-smouldering crater that is all that remains of his hometown, Coast City. Burdened by his grief at arriving too late to stop Mongul and Hank Henshaw/Cyborg-Superman from obliterating the city, Hal uses the vast powers of his power ring to heal his broken arm and conjure a construct of his father, Martin, for a bit of a heart-to-heart. Primarily, Hal wants to address his resentment towards his late father for favouring his older, more successful brothers and never telling Hal that he was proud of him and all he had accomplished. However, as Martin is simply a manifestation of Hal’s memories of him, and his guilt and unresolved issues, Martin simply tells Hall that he just never measured up to his brothers, guilt-trips him for not being there for Coast City, and then forces Hal to relive the traumatic experience of watching him die in a plane crash. A construct of Hal’s mother, Jessica, then arrives to comfort her son, pointing out Martin’s many faults as a husband and a father and encouraging Hal to hold on to the happier memories and move on from the pain and loss. Despite her encouragement, however, Hal isn’t satisfied with just having memories; they’re not enough to quell his guilt or his anger or his pain and, in his vehement refusal to let go of his anguish, he focuses his willpower in a wholly selfish way.

Grief-stricken, his anguish turned to rage, Hal carves a path of destruction to confront the Guardians.

Hal uses his willpower to create a living, breathing, emerald-hued recreation of Coast City, including all of its buildings and inhabitants. The temptation to right those wrongs, to “be a God”, is overwhelming and even brings back a manifestation of his first love, Jennifer. Reminiscing about the past and what could have been between them, Hal laments how he screwed up his relationship with Jennifer even after she helped him through the trauma of his father’s death. Jennifer, however, assures Hal that she was happy after him, settled in Coast City, and that the end came quickly for her and the others; she also says that “nobody blames [Hal]” and that they’re just happy that he’s keeping their memories alive. Jennifer walks Hal to his childhood home, where he again meets the “ghost” of his father; Martin echoes Jennifer’s sentiments, stating that every appreciates that he’s “restored” Coast City, but falters when he is about to finally say the words Hal is longing to hear (that he’s proud of him) and promptly vanishes, along with the entire Coast City illusion, when Hal’s ring exhausts its charge. Hal’s anger and bitterness at being denied his desire, and the limits of his power ring, are soon interrupted when one of the Guardians of the Universe manifests before him. The Guardian reprimands Hal for using his power ring for personal gain and violating the rules and regulations of the Green Lantern Corps, and demands that he return to Oa for disciplinary action. Hal, however, lashes out in anger absorbs the residual energy from the Guardian’s projection to give himself a charge and, blasts off to Oa to confront his masters, appearing as little more than a green shooting star to lovers Kyle Rayner and Alex DeWitt. Overcome by his grief, and incensed at the losses and injustice he feels, Hal blasts his way through space and is met by opposition from his fellow Corpsmen, Ke’Haan of Varva and Laira of Jayd, two Lanterns who, while experienced, are no match for Hal’s experience and newfound rage.

Hal’s crusade sees him cutting down some of his most trusted comrades.

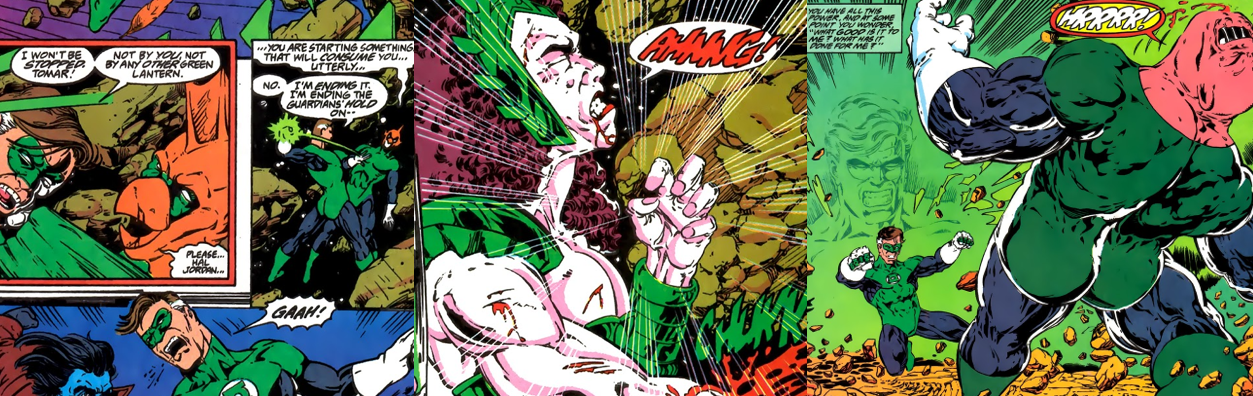
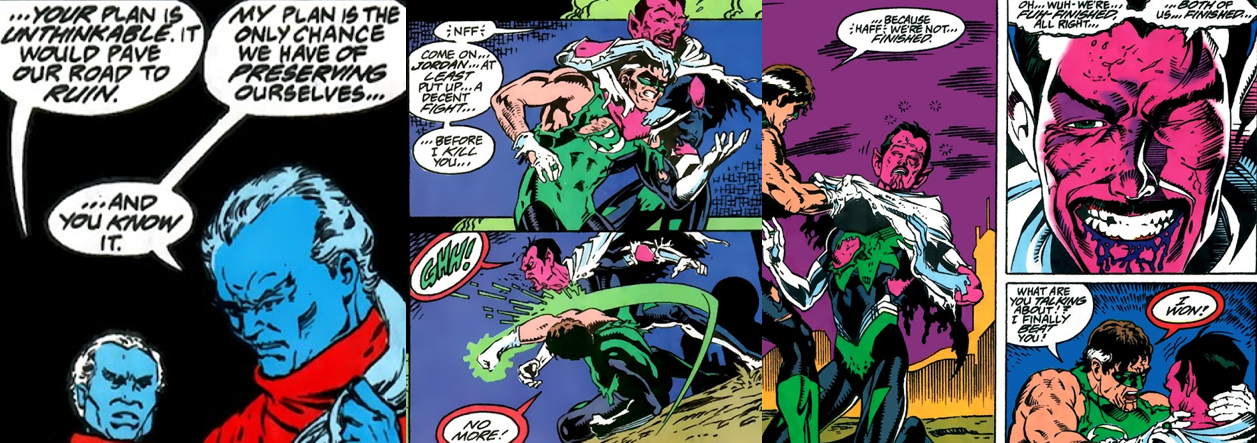
Furious at being used as a puppet by the Guardians for so long, Hal incapacitates the two and steals their power rings, leaving them for dead in the void of space and adding more power to his arsenal. While the Guardians of the Universe are concerned at Hal’s trail of destruction, they have faith that the entirety of their Corps, and their near-limitless power, will be enough to stop him; after all, he’s just one rogue Lantern, right? Well Tomar Tu learns the hard way that Hal is not so easily subdued; although he tries to shackle Hal using a parasite not unlike the Black Mercy creature, Hal’s willpower is so strong, and his rage so out of control, that he easily overpowers his former comrade and friend. Jack T. Chance meets a similar end as, while he is far more willing to fight dirty, his inexperience leaves him adrift in space like so many other Corpsmen. Hal is even forced to battle Boodikka, a warrior female he personally recruited into the Corps, but the loyalty of his brothers and sisters now sickens Hal and he’s so obsessed with making them pay for their hubris that he slices Boodikka’s hand off to claim her ring as his own. One by one, both on-panel and off, Hal bests the Guardian’s Lanterns and, with each victory, he becomes increasingly brutal. Upon reaching Oa, Hal is met by the Corps drill instructor, the surly Kilowog, easily the proudest and most loyal member of the Green Lantern Corps. However, while he lasts longer than any of the other Green Lanterns, Kilowog also falls before Hal’s newfound might and rage.

Sinestro is sent to stop Hal, leading to an epic clash between the two with their roles almost reversed.

Even the stoic Guardians, so self-righteous in their power and position, begin to fear Hal’s crusade and, in their desperation, turn to Ganthet’s final solution to Hal’s rampage: releasing the renegade Green Lantern, Thaal Sinestro, from his captivity within the Central Power Battery. And so it is that Hal is pitted against his former mentor, the very man who he stood up to when Sinestro perverted the power and privilege of the power ring for his own ends. The irony is not lost on Sinestro, who finds himself as the last hope of his former masters, beings he has almost as much reason to despise as Hal, and delights in Hal’s torment. Sinestro manages to goad Hal into relinquishing all of his stolen power rings and battling him on equal ground, something Hal is only too happy to agree to just so that Sinestro has no doubt that he was finally, truly, bested by his superior. Eager to have his revenge against Hal for having him imprisoned, Sinestro presses his attack but Hal matches him blow for blow, theorising that the Guardians must have lost their minds to turn to someone as vindictive as Sinestro and seeing his rival’s return as the final proof of the Guardians’ hypocrisy and fallibility. Sinestro taunts Hal by telling him that, years ago, the Guardians asked him, their greatest warrior, to mould Hal into his image but, despite being flattered by their trust, he never thought that Hal would be able to live up to those expectations. When they come to a penultimate clash, Sinestro is almost admiring of Hal’s newfound bloodlust, but maintains that the difference between the two has always been that Hal is unwilling to kill, whereas Sinestro is only held back from killing by the promise of his freedom to subdue Hal non-lethally.

Hal kills Sinestro, and the entire Corps, becoming Parallax and leaving Kyle as the sole Green Lantern.

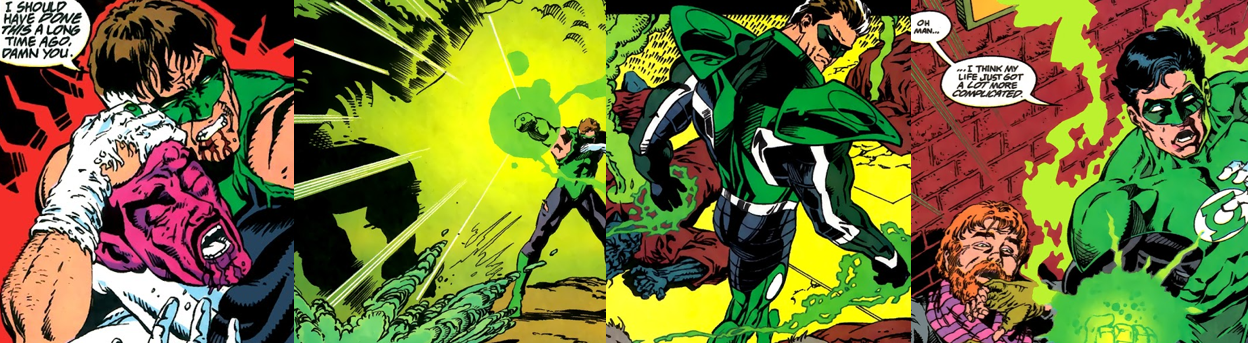
Ultimately, their battle descends into a wild brawl; as the Guardians impassively watch on, Hal mercilessly beats Sinestro to a pulp. Hal claims victory, having finally bested his long-time rival with his bare hands, but Sinestro continues to taunt him, claiming that he has lost himself in his brutality. Hal’s response? To break Sinestro’s neck, finally killing him and crossing that forbidden line. His attempt to absorb the full power of the Central Power Battery is interrupted by Kilowog, who makes one last desperate plea for Hal to stop before he strips all of the Corpsmen of their powers and leaves them in mortal danger, but Hal simply cannot look past his grief, his pain, and his lust to obtain the power to correct those mistakes. In an instant, he reduces Kilowog to a charred skeleton, tearfully discards his power ring, and has one last heated confrontation with the Guardians before entering the Central Power Battery. As he absorbs the Central Power Battery into himself, the Guardians channel all of their remaining powers into one last power ring; Hal emerges, forever changed, crushing his power ring and fleeing to the stars to begin enacting his grand plan for the universe, and only Ganthet is left alive. He teleports to Earth and stumbles upon struggling artist Kyle Rayner, seemingly at random, and bequeaths him the last power ring, birthing an all-new Green Lantern, the last in the entire universe, in the process.

The Summary:
It’s definitely not recommended to go into “Emerald Twilight” without at least some understanding of Hal Jordan, or having read some of the “Return of Superman” arc, but it’s not absolutely necessary. The text boxes and dialogue help to bring you up to speed with how Hal got his power ring, his reputation, and how Coast City was destroyed, but it definitely adds even more emotional weight to the story if it’s not your first exposure to the character. Compared to “The Death of Superman” and “Knightfall” (Dixon, et al, 1993 to 1994), it’s also a much shorter and far more condensed story. Hal literally ploughs through seemingly the entire Green Lantern Corps (or most of them) off-panel or in a few panels in the middle chapter of the story, and much of Hal’s downfall is set up subtly in previous issues and stories rather than being this big, headline event. That’s not to say that “Emerald Twilight” didn’t shake things up, though, but it definitely acts as more of an epilogue to “The Return of Superman” rather than an event of equal proportions. I fully believe that, if this story was done today, it would probably be a six to twelve-issue miniseries that also included Hal fighting his Justice League teammates as well.

Hal wishes only to have what he has lost and is devastated when he is denied even that.

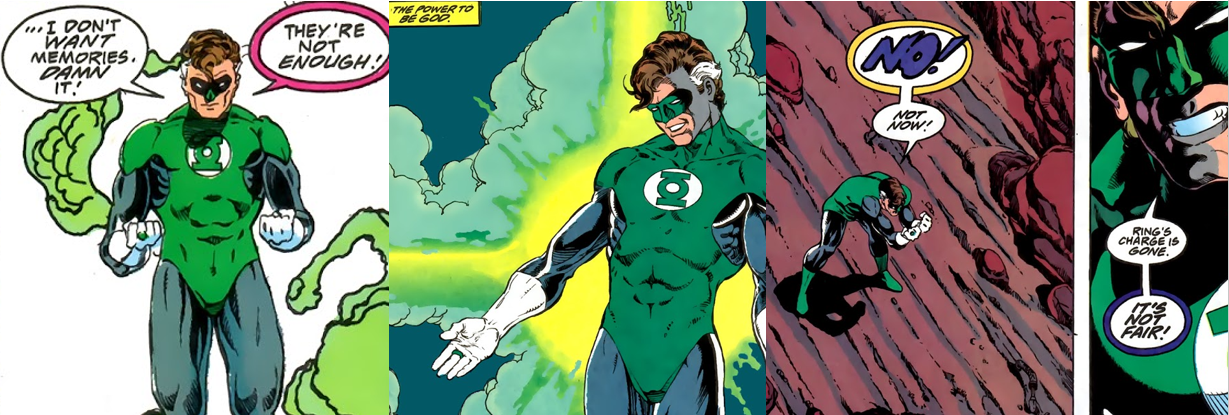
The more intimate nature of the story actually helps it to stand out in some ways, though. The focus here is on Hal’s grief and despair; he’s a man who has literally lost everything, his hometown and all his loved ones, and has been driven right to the edge and it all happened seemingly on a whim. There was no way he could have known what Mongul and Cyborg-Superman were planning, and he was in no position to stop them, so all he’s left with his survivor’s guilt coupled with his unresolved issues with his father. This is beautifully realised in Hal’s desperate attempts to hear his father say he’s proud of him, but being denied even that simple luxury because of his grief screwing with his constructs and the limitations of his power ring. Martin’s appearance here works doubly as a representation of Hal’s own insecurities; he can’t say he’s proud of Hal because Hal knows he would never say that, and even the small comforts brought by his mother and former lover offer Hal no peace or solace. The closest he comes to being happy is when he recreates Coast City; even though it’s clearly an illusion, a facsimile created by his ring, he’d much rather live in that fantasy world than have to endure with the painful and brutal reality that he’s lost everything.

Hal’s brutality forces the Guardians to release Sinestro, culminating in violent final confrontation.

Consequently, it’s entirely understandable that he lashes out at the Guardians when they come along to reprimand him. After giving his body and soul to the ideals of the Green Lantern Corps, he is denied having what he truly desires, and his grief turns to rage; this anger is directed purely at the hypocritical and self-righteous Guardians but also extends to the ideals Hal once embodied, meaning he has to fight off his own kind in order to confront his masters. Believed to be the greatest Green Lantern ever, Hal’s indomitable willpower is only augmented by his rage; this, coupled with his experience and the added power of more and more stolen power rings, make him a dangerous and formidable foe who threatens the lives of even the near-God-like Guardians. At first, Hal has no desire to fight his fellow Lanterns; he constantly rants about the Guardians’ manipulative and deceitful ways and tries to convince the others to side with him, but they’re as blinded by their loyalties as he is by his anguish and the result is a lot of Green Lanterns being left beaten, helpless, or maimed simply to fuel Hal’s newfound crusade. This culminates in easily the best part of the comic, beyond Hal’s descent into gibbering madness, the long-awaited final battle between Hal Jordan and Sinestro. This brutal fight is a fantastically realised clash that is just dripping with irony and fate. When he was just an upstart rookie, Hal saw that Sinestro was abusing his power and opposed him, forever tarnishing the reputation of the once-mightiest Green Lantern and, for years, the two were cast as moral and ethical opposites. Sinestro hungered for power and longed to rule through force and fear, and was more than willing to kill or maim those who opposed him, whereas Hal was the very embodiment of the righteous justice and heroism of the Green Lantern Corps. Now, the tables have turned; Hal is the rogue, power-mad Green Lantern and Sinestro is the last line of defence, and I find that so much more interesting than just watching Superman being beaten to death by a mindless monster. Even better is that Sinestro still underestimates Hal; he is arrogant in his belief that, despite Hal’s recent brush with darkness, he is still the same good-natured and moral individual deep down and therefore doesn’t have it within him to kill, and this proves to be Sinestro’s downfall.

“Emerald Twilight” changed Green Lantern’s status quo for a time and marked a turning point for DC.

Hal’s crossing of that line and descent into a tragic villain was so unexpected at the time. The state of DC Comics was radically upended in the early-to-mid-nineties and Hal’s transformation into the reality-warping Parallax soon became a big part of that as he sought to rewrite time itself in a desperate attempt to set right all the tragedies and mishaps that had befallen himself and his friends. Parallax was quite the intriguing villain in that he fully believed what he was doing was right, and for the greater good, and couldn’t understand why his friends kept opposing him as he had no wish to harm them. This also spelt the end for the Green Lantern Corps as we knew them…for a time. Kyle Rayner became the sole Green Lantern for a while, and was afforded slightly different abilities (he didn’t need to charge his ring and had no weakness to yellow) as well as a cool new costume, which really helped breath new life into the character and comic. DC never quite let Hal go, though, and soon enough they started to undo pretty much everything that had happened here: many of Hal’s victims were shown to have survived or were resurrected, Sinestro was revealed to have been a construct all along, and Hal both sacrificed himself to save the world and became the Spectre before being reborn, alongside the entire Green Lantern Corps, with all of his actions and time as Parallax revealed to have been due to the manipulations of a malevolent space bug. Yet, at the time, this was the status quo: The Green Lantern Corps were dead, Hal was a crazed lunatic, and we had a fun new Green Lantern, and it all kicked off here. It’s maybe not as long or as in-depth as other Dark Age tales from this time, but “Emerald Twilight” is still a significant chapter in the character’s life and well worth checking out if you fancy seeing a hero take a dramatic and tragic turn to the dark side.

My Rating:

Rating: 4 out of 5.

Great Stuff

Are you a fan of “Emerald Twilight”? If you read the story when it first published, what did you think to the dramatic change in Hal’s status quo and were you happy about it? Do you think that the story should have been expanded into a few more issues or did you prefer the more concise format? What did you think to Hal’s turn to the dark side? Do you think it was justified, and were you disappointed at how easily he dispatched the other Green Lanterns? What did you think to Hal’s turn as Parallax and were you a fan of Kyle Rayner? Did you enjoy the Dark Age of comics or were you happy to see the status quo restored? Which Green Lantern character, villain, or story is your favourite and why? How are you celebrating this pseudo-Green Lantern day today? Whatever you think about “Emerald Twilight”, and Green Lantern in general, sign up to leave your thoughts below or drop a comment on my social media.

Talking Movies: V/H/S

Talking Movies

Released: 5 October 2012
Directors: Adam Wingard, David Bruckner, Ti West, Glenn McQuaid, Joe Swanberg, and Radio Silence
Distributor:
Lionsgate
Budget: $15 million
Stars:
Kentucker Audley, Calvin Reeder, Hannah Fierman, Drew Sawyer, Joe Swanberg, Sophia Takal, Norma C. Quinones, Bryce Burke, Helen Rogers, Daniel Kaufman, Tyler Gillett, and Nicole Erb

The Plot:
A gang of criminals is paid to ransack and old man’s (Frank Stack) house and finds a stack of VHS tapes, each one containing a gruesome horror story in the form of found footage. These depict a group of friends looking to make an amateur porn video and crossing paths with a demonic succubus, a couple on a road trip who encounter a strange girl, a group of friends lured into the woods to confront a supernatural entity, a university student who experiences paranormal activity in her flat, and four friends who run afoul of a cult performing an exorcism.

The Background:
Since I grew up watching The Outer Limits (1995 to 2002) and am a big fan of movies like Creepshow (Romero, 1982) and Tales from the Darkside: The Movie (Harrison, 1990), I have quite a soft spot for anthology films, especially those involving science-fiction and horror. V/H/S was the brainchild of Brad Miska, the creator of Bloody Disgusting, who reached out to the directors and creative minds he had met through his website about contributing to a horror anthology. Capitalising on the success of the found footage genre, the creators were given complete reign to submit whatever proposals they have for the project. V/H/S premiered at the 2012 Sundance Film Festival, where it was positively received, and even got a limited theatrical release. Generally, V/H/S received mixed reviews; while some praised the film’s consistently high quality, others took issue with the concept’s execution, though its $1.9 million gross was enough to finance two sequels, a spin-off, and an eventual reboot of sorts.

The Reviews:
Like Tales from the Darkside: The Movie, V/H/S is an anthology film made up of a framing narrative and several short horror stories so it only makes sense to review each one individually before talking about the overall film, which means that this review will be structured a little differently from my usual ones.

A gang of miscreants are stalked by a zombie while they view macabre videotapes.

“Tape 56” (Wingard) is probably the weakest of all the short stories included in V/H/S but there’s a reason for that; it’s merely the frame narrative that follows a gang of criminals as they record themselves doing stupid shit around the city while dressed like “gangsters”. They drive around at high speeds, accost a couple and forcibly pull a girl’s top up, smash windows and damage and deface property, try to make amateur sex tapes, and generally act like a bunch of complete douchebags. They get a bit more than they bargained for, however, when Gary (Bruckner) says they can get huge score but simply breaking into an old man’s house and stealing a VHS tape, only to find a dead body in the house and stacks upon stacks of the defunct media cassettes. While the others search the house looking for the objective, Brad (Adam Wingard) stays behind and watches the short films that make up the rest of the film; between each story, the film cuts back to Brad to see his reaction and, as the film progresses, Brad mysteriously disappears, leaving Rox (Audley) to take over the viewing. Although the thugs eventually decide to simply take all of the tapes, the old man’s corpse disappears from the background and the shit-kicking assholes are left to be are torn apart by the zombified homeowner.

Three friends are horrified to find they’ve brought a ravenous succubus back to their hotel room!

“Amateur Night” (Bruckner) is easily the stand-out short of the film since it went on to inspire a spin-off movie; however, while I do consider it to be a great opening story for the movie, I wouldn’t necessarily say that it was the best of them. Shane (Mike Donlan), Patrick (Joe Sykes), and Clint (Sawyer) are three friends who have rented a hotel room and plan to hit the nightclubs and brings girls back there to film a porno using special video glasses worn by Clint. While Clint is unsure about the deception, his two loudmouth frat-boy friends are insistent on going through with the plan and waste no time in hitting up Lisa (Jas Sams) and successfully convincing her to go back to their hotel room while Clint catches the attention of shy Lily (Fierman), a timid, mousy girl who approaches him and says that she “likes [him]”. The four head back to the hotel room, with the three fiends completely rat-assed; Lisa is so out of it that she passes out soon after they get back and, though she continues trying to awkwardly seduce Clint, Lily soon finds herself the target of Shane and Patrick. Hurt and disgusted that his friends would take advantage of a girl he was interested in, Clint locks himself in the bathroom so he doesn’t have to watch and record the threesome but his shock at Lily’s cat-like demeanour and her clawed feet soon turns to terror when Patrick bursts in with a huge chunk taken out of his hand and Lily suddenly sprouts fangs and rips Shane to shreds! When Patrick tires to fight her, she shrugs off the attack and pounces on him with superhuman ferocity, drinking his blood and ripping off his genitals! Terrified, Clint flees into the stairwell, where he trips and falls and breaks his wrist; the blood-soaked succubus, her face split down the middle, approaches Clint and is so distraught at his fear of her that she unleashes a diabolical roar and transforms into a demonic winged creature and carries him off into the night to an unknown fate.

A couple are toyed with by a mysterious masked stalker while on a road trip.

“Second Honeymoon” (West) is probably the creepiest of all the short films if only because it seems like a plausible scenario that could happen in reality. Sam (Swanberg) and Stephanie (Takal) are a young married couple on a road trip to Arizona for their honeymoon; Stephanie is documenting the trip on her camera, which features such exciting stuff as getting “gas”, spotting bullet-riddled car husks, petting donkeys, and staying is dirty hotel rooms thanks to Sam not reserving better lodgings. When they visit a Wild West-themed resort, Stephanie is told by an animatronic that she’ll soon be reunited with a loved one, but Sam is disheartened when she later asks him not to record them doing sexual stuff in the hotel room. While trying to put him off, they are interrupted when a strange young girl (Kate Lyn Sheil) knocks on their door and asks them for a ride in the morning. Creeped out by the incident (and the girl, whom Sam found weirdly intimidating), Sam chooses to worry about it in the morning; while they’re sleeping, however, a masked stranger enters the room without them noticing, caresses Stephanie with a switchblade, steals $100 from Sam’s wallet, and washes his toothbrush in the toilet bowl in an incredibly unsettling scene. The next day, after brushing his teeth with the soiled toothbrush (!), the girl is nowhere to be seen and the couple get into an argument when Sam accuses Stephanie of taking the money; Sam insinuates that it’s not the first time she’s done something like that but, though this creates some tension, they are still able to enjoy themselves when they visit the Grand Canyon. Back at the hotel room, Sam suggests stopping off in Las Vegas the next day but, unfortunately for him, he never gets that far as he’s stabbed through the neck with the switchblade and chokes on his own blood when the stranger returns to the room that night. The short then ends with a shot of Stephanie making out with the stranger, revealed to be the young girl from the previous night, and then continuing on her journey with her lover.

Wendy lures her friends to the woods to bring out a supernatural killer.

In “Tuesday the 17th” (McQuaid), Wendy (Quinones) takes her new friends Joey Brenner (Drew Moerlein), Samantha (Jeannine Yoder), and Spider (Jason Yachanin) on her annual trip to a lake in a nearby secluded forest. Each of her friends are confused by Wendy’s traditional excursion out to the woodlands, and the fact that she has told each one a different story to get them up there. As they explore the woods, the camera sporadically glitches out and images of mutilated corpses are flashed onto the screen, which are made all the more disturbing by Wendy’s increasingly unsettling behaviour; she becomes stoic and morose, sullenly regards areas where the images appear, and promises Joey that they’re all going to die. As they relax with some weed by the lake, Wendy tells them that she experienced a series of gruesome murders there a few years ago and the culprit was never caught; though they laugh it off as a joke, Samantha is soon killed when a supernatural entity (Burke) that resembles a screen glitch kills her with a knife to the back of the head and then stabs Spider repeatedly in the forehead. After Joey turns down Wendy’s advances, she callously reveals that she lured them all there as bait for the entity, who slices Joey’s throat and relentlessly pursues Wendy through the woods. Determined to trap, kill, and identify the killer, Wendy lures it into a bear trap but the camera cannot register it as anything other than a glitched series of tracking errors; the entity escapes Wendy’s death traps, beats and eviscerates her, and as she lies quivering she too begins to glitch out.

Emily finds herself unwittingly manipulated by James into being an alien incubator.

“The Sick Thing That Happened to Emily When She Was Younger” (Swanberg) mixes things up a bit by being framed entirely as a video chat between Emily (Rogers) and her boyfriend James (Kaufman), who is training to be a doctor. Initially, she’s mainly concerned about a strange bump on her arm but her troubles escalate after she moves into her new apartment and begins experiencing strange noises and disturbances. James is sceptical and believes that she was merely dreaming but, when she calls him in the dead of night, he sees a child-like entity rush in and slam the door shut. Although he dismisses this in the morning, Emily shares how she had a similar haunting experienced as a child that left her needing surgery and complains that the pain in her arm is worsening. The next night, James watches and guides as Emily tries to confront the entity, which appears as a small, neon green creature and the experiences only distress her more when she learns from her landlord that no children have ever lived in the building and no one has ever died in there either. James is distressed to find Emily digging at the lump on her arm with a meat fork similar to how she permanently scarred herself cutting into her leg as a child and promises to check it out in person as soon as possible. Ashamed and increasingly horrified, Emily agrees to stop and wash it off and then asks James to be her eyes while she tries to communicate with the ghosts, but when she’s knocked unconscious by the children he rushes into the room and slices open her torso to extract an alien embryo! Revealed to have been working with the aliens and harming Emily for years in order to incubate their alien/human hybrids, James promises to stand by Emily even after she’s been diagnosed as schizoaffective but is also shown to be having similar manipulative talks with another female incubator (Liz Harvey).

Four friends save a girl from a cult but find themselves beset by all manner of restless spirits.

Finally, “10/31/98” (Radio Silence) follows friends Tyler (Gillett), Chad (Chad Villella), Matt (Matt Bettinelli-Olpin), and Paul (Paul Natonek) as they head to a Halloween party at a friend’s house while dressed in ridiculous costumes. Unbeknownst to them, they end up at the wrong house but simply believe that they’re the first ones to arrive; after sneaking inside, they soon experience paranormal events (such as flickering lights, ghostly reflections, and hands reaching out of the walls to grab them) but foolishly believe that it’s all part of the experience and that the party has been themed around a haunted house. When they head up into the attic in search of the party, though, they find a girl (Erb) suspended from the rafters and at the mercy of a group of men performing an exorcism by chanting “Cast him down”. The friends join in, believing that it’s all part of the fun, and anger the cult’s leader (John Walcutt) in the process; the interruption causes the cult members to be brutally manhandled by an unseen force and, though the friends initially flee, Tyler convinces them to go back to help the girl. After freeing the girl from her bonds, they are beset by all manner of terrifying phenomena as ghostly arms try to grab them, objects are tossed around at them, handprints appear on the walls, and the very house itself closes up in an attempt to trap them. While they manage to escape through the basement as the demonic poltergeists rampage through the house, their car suddenly stops across a set of train tracks and the girl teleports out into the road, walking away surrounded by crows as a train races towards the car and its trapped inhabitants.

The Nitty-Gritty:
If you’re not really a fan of found footage films then V/H/S probably isn’t going to be the movie for you; the entire film is shot using handheld, low quality cameras, meaning that there’s a lot of shaky camera movements, wild sweeping panning, film jumps and visual glitches, and scratchy, low quality sound permeating the whole movie. Additionally, this isn’t really a film where you learn a great deal about the characters; each short has a few minutes to show a snapshot of its characters lives and set up the scenario they’ve been placed in, so it’s not really an in-depth character study or with any goal other than to disturb and unsettle its audience.

V/H/S uses the found footage genre to put an intense twist on well-known horror tropes.

In this regard, V/H/S/ largely succeeds; each of the shorts is distinct enough so that there’s something here for even the most hardened horror fans. From a bloodthirsty succubus to a glitchy phantasm and demonic poltergeists, there’s plenty of variety on offer in V/H/S and even if you don’t like one or more of the stories there’s probably going to be at least one that leaves you a little intrigued. Personally, I enjoy elements from all of the stories; I like seeing the asshole gang in the framing story get beheaded and picked off by the old man, the design of the succubus is downright disturbing and it’s easy to see how the concept was expanded upon into its own movie, and the glitch ghost is a terrifying concept that puts a unique spin on the cliché “haunted woods” setting. The idea of a wife conspiring against their husband is a palpable horror, as is that of aliens taking the form of disquieting child ghosts, and coercing a human into helping them breed disgusting hybrids is as disturbing as it is sickening for James’ wilful manipulation of the girls he influences. Similarly, while “10/31/98” is probably the most cliché of all the shorts, it’s a suitably tense and discomforting end to the film.

One of the most memorable parts of the film is how bleak and brutal its stories are.

Indeed, one of the things I really enjoy about V/H/S is how spectacularly bleak it is; basically every character dies and each short ends with the suggestion that a greater evil, be it supernatural or extraterrestrial, exists to threaten humanity in some way. “Tape 56” has startling implications in that it suggests that all of these events happened in this fictional world and I enjoy how each short leaves a lot of questions and loose ends for audience interpretation; like, who was that girl and what was the deal with her relationship with Samantha? Where did the glitch ghost come from and how did Wendy escape from it? How long have those aliens been implanting their hybrids into unassuming young women? For me, it’s all very imaginative and leads to some fun speculation; additionally, the entire film is like a series of short, sharp nightmares that set up a simple premise with realistic characters and then goes out of its way to be as unsettling and disturbing as possible. In this regard, the shaky camera really helps escalate the tension and the horror, as does the low camera quality; everything feels as it would if we were experiencing it first-hand and not being able to properly make out things being seen or heard onscreen just makes things more chaotic and horrific.

The Summary:
V/H/S is quite the bold experiment; by roping in a bunch of amateur filmmakers can giving them free reign to craft short, sharp snippets of horror, Brad Miska delivered quite the macabre collection that would be a treat for any horror fan. Sure, found footage films and shaky cam filming is an overdone cliché in this day and age as it seemed like everyone was doing it at one point, and it can be a nauseating and confusing filmmaking method but, in certain situations, it’s appropriate, especially when it’s done well. For my money, V/H/S uses the technique to great effect; anthology films aren’t too common these days, potentially because it can be difficult crafting the individual stories and for audiences to properly connect with the ever-changing narratives, but I find them endlessly entertaining. The short horror stories on show here provide just enough to unsettle, terrify, and inspire personal interpretation and imagination regarding each scenario and the greater world on show, and I found even the film’s rougher edges to be all part of its charm so I definitely feel like V/H/S has been unfairly overlooked in the pantheon of independent horror.

My Rating:

Rating: 3 out of 5.

Pretty Good

Have you ever seen V/H/S? What did you think of it and which of the short stories was your favourite? How did you interpret the worlds presented in the short stories and which of them would you have liked to see expanded upon? Are you a fan of anthology narratives? If so, would you like to see more and which anthology show is your favourite? What horror films are you watching this month in preparation for Halloween? Whatever you think about V/H/S, feel free to leave a comment by signing up or visiting my social media and pop back next Monday for my review of the sequel!

Game Corner: Luigi’s Mansion 3 (Nintendo Switch)

Released: 31 October 2019
Developer: Next Level Games

The Background:
In 1996, following their success in the “Console Wars” of the nineties, Nintendo entered the third dimension with Nintendo 64, a console that stood out against its competitors by continuing to use cartridges, coming readymade for multi-player player, and featuring a unique controller design. Having lost out to Sony’s new-fangled PlayStation, Nintendo sought to recoup their once-vaulted position as the premier entertainment option with the Nintendo GameCube, which finally saw the company switch to discs (albeit with a suitably “Nintendo” flair) and was also notable for Mario’s younger brother, Luigi, finally receiving his time in the spotlight with Luigi’s Mansion (Nintendo EAD, 2001), a game that focused more on exploration and puzzle solving as Luigi channelled his inner Ghostbuster to suck up ghosts infesting a hotel and rescue his brother. Although the game sold extremely well and was a critical success, it took twelve years for the game to get a sequel. Luigi’s Mansion: Dark Moon (Next Level Hames, 2013) released for the Nintendo 3DS and was also a best-selling title for the system and met with largely unanimous praise. After development of a third game for the Wii U was delayed, Next Level Games finally returned to the franchise six years after the release of the second game; developed for the Nintendo Switch, Luigi’s Mansion 3 saw the setting expand from a mansion to a high-rise hotel and also increased the game’s accessibility by including on- and offline multiplayer modes. Considering the success of its predecessors, it’s perhaps no surprise that Luigi’s Mansion 3 became one of the Switch’s best-selling titles and was regarded as Luigi’s best adventure yet.

The Plot:
Luigi, his pet ghost dog Polterpup, Mario, Princess Peach, and three Toads are invited to the luxurious Last Resort hotel for a vacation. Soon after arriving, Luigi awakens to find the hotel transformed into a haunted building and the others imprisoned in pictures by the hotel’s ghostly owner, Hellen Gravely, as part of a trap set by the nefarious King Boo. Arming himself with Professor E. Gadd’s newest Poltergust vacuum, Luigi hesitantly sets out to rescue his friends and suck up the hotel’s ghost infestation.

Gameplay:
Like its predecessors, Luigi’s Mansion 3 as an action/adventure game with a strong emphasis on exploration and puzzle solving. Players are played into the shoes of Mario’s younger, often unfairly overlooked brother, Luigi, who is robbed of his usual athletic abilities and must rely on a vacuum-cleaner like device, the Poltergust G-00, rather than his jumping prowess to dispose of the many ghosts that have infested the hotel. As you explore the many dark hallways and various themed floors of the hotel, you’ll need to use Luigi’s torch (or “flashlight” for any Americans out there) to stun nearby ghosts; you can do this by tapping or holding A, which will freeze most ghosts on the spot for a few seconds so you can suck them up by holding down ZR and filling up an onscreen circle by holding back on the left analogue stick. Once this is full, you can press A to perform a slam move that will deal greater damage to the ghost and speed up the process, but just sucking them up is enough to whittle down their health.

Stun ghosts and suck them up with your trusty Poltergust G-00.

You can also use ZL to send out a gust of air to push enemies back or fire certain items at ghosts as projectiles, or press ZR and ZL together to perform a quick burst akin to a jump that won’t let you reach higher platforms but will knock back enemies. All of these Poltergust functions are also useful for interacting with your environment; you can suck up curtains and sheets, blast furniture and chandeliers, and affect almost everything in every room either with the vacuum or by pressing X. This will reward you with loot, such as Golden Coins, gold bars, bills of money, and pieces of heart to refill your health, but can also uncover hidden ghosts. Some of these, such as shiny gold and blue-coloured variants, will reward you with additional loot and collectibles, so it’s well worth exploring every room you enter to see what you can uncover. You can use the left-hand circle pad (or directional pad, depending on which Switch you have) to call for Mario with left, right, and down, or enlarge the onscreen map by pressing up. The map can also eventually be accessed from the + menu, which allows you to view the floor you’re on, review your current objectives, and chat with E. Gadd for hints, though it’s generally pretty clear where you need to go and not only will Polterpup occasionally pop up to show you where you need to go but E. Gadd will communicate hints to you through the “Virtual Boo” if you struggle to solve puzzles.

Luigi can use his plunger or his gooey doppelgänger to solve puzzles.

As the story progresses, E. Gadd will furnish you with these additional upgrades, and others; eventually, you’ll gain the ability to fire plungers with Y, which you can suck up to destroy chests and other parts of the environment, activate switches and such, and remove protective items from certain ghosts. You’ll also acquire the “Dark-Light Device”, another torch-like appendage that lets you uncover hidden chests, doors, and other secrets, track Polterpup and the mischievous Polterkitty, and even defeat certain enemies by holding X to shine the dark-light around the environment. Your most useful ability, and the game’s big new gameplay mechanic, is “Gooigi”, a protoplasmic double of Luigi that E. Gadd eventually supplies you with and which you can send out of the Poltergust but pressing in the right stick. Doing so switches your control to the gooey double, who can slip through bars, vents, and grates and allow you to clear rooms and puzzles by activating switches or opening doors as one character and progressing as the other. Gooigi is quite fragile, having only twenty-five hearts to his name, and immediately dissolves upon touching water, and many of the game’s puzzles and bosses that involve him are geared specifically towards having a second player on hand. If you don’t have one, you’re forced to switch between the two on the fly using the right analogue stick, which can be tricky and frustrating at times and leaves Luigi vulnerable to attack while playing as Gooigi. Still, it’s an interesting mechanic and make you think a little harder about approaching each room, as your exploration may uncover a hidden vent that leads to a key or other loot.

You’ll need to make innovative use of Gooigi and the Poltergust to find the keys needed to progress.

Your primary objective in Luigi’s Mansion 3 is to rescue the three Toads, Mario, and Princess Peach from the magical paintings they’ve been trapped in. To do this, you’ll need to defeat a number of bosses to acquire the missing buttons for the hotel’s elevator; each boss you defeat awards a button, giving you access to another floor of the hotel, and many of the floors contain a specific theme that help them to stand out. Most of the time, you need to navigate through rooms clearing out all of the ghosts you encounter and exploring any hidden areas; other times, you’ll need to find a key to open doors, or find another way around if doors are blocked or barred, or use the two Luigis to activate switches and fans with their weight or Poltergusts. The game’s puzzles eventually become a bit more complex, and it’s not always immediately clear what you need to do: in one area, you need to roll and unroll carpets according to how they appear in a mirror; in another, you need to use the jump burst to uncover dangerous and painful laser traps; and other times, you need to blast Toad at breakable walls or use your plunger to pull down weights to activate lifts. Quite a few puzzles require you to shut off water streams so that Gooigi can reach a switch, or have you creating shortcuts using ladders, or blowing on windmills to rotate rooms and access hidden switches or keys. Probably the most complex puzzle is found on the eighth floor, which is a television studio; here, you need to warp between four different film sets using television sets and activate a film camera as one character while the other fends off ghosts to acquire an item, which must be then taken to another set and so on until you’re able to get the key item you require.

Graphics and Sound:
Luigi’s Mansion 3 retains both the charming, cartoony aesthetic of its iconic characters and also the gloomy, ominous surroundings of its predecessors. Luigi’s character model is fantastically expressive; his body shivers and his teeth chatter as he cautiously wanders the hotel’s hallways, and he jumps with fright at any sudden movements or sounds. I find it endlessly amusing that the developers continue to implement a specific button to have him call out for Mario in a terrified voice, and it’s a continual source of amusement to see how he comically reacts to scares, rooms, and even damage. Of all the other Mario characters seen in the game, the one you’ll interact with the most on a gameplay level is Toad; you have to rescue three of these little blighters, and they’ll follow you around, squealing with fear at every opportunity, and you can give them a little high-five or even shoot them as a projectile to progress further. You’ll also spend a great deal of time interacting with Professor E. Gadd, who sets up a laboratory in the hotel basement that you can quick travel to for upgrades, hints, and to view bonus materials, and all of these familiar characters are brought to life wonderfully using the power of the Nintendo Switch.

The Last Resort is full of rooms both bizarre and expected, and carries a comical horror throughout.

The Last Resort is quite a large and versatile environment; although it’s a hotel, it contains many areas and rooms that you might not expect. At first, you’ll explore such traditional areas as the basement, laundry room, and various bedrooms and dining rooms you would expect to find in a hotel. Each of these are infested with ghosts, of course, and filled with interactable objects, but things start to get incredibly bizarre as you explore the upper floors of the hotel. Here, you’ll enter the aforementioned television studio, a floor littered with magician’s tricks and apparel (including mirrors and upside-down rooms), a gymnasium, and an Egyptian-themed floor full of hieroglyphics, sand, and even a pyramid. You’ll also find a pirate-themed cavern, a beach, and explore rat-infested sewers and a boiler room, and scale a crumbling, wrecked staircase in the overgrown gardens. There are fifteen floors to visit and two basement levels to explore, with secrets and enemies increasing the further you progress; areas start to become more and more overrun with ghosts and different combinations of enemies, which constantly keeps you on your toes, and it’s continuously amusing to see what new surprises await you on the next floor as the hotel is crammed full of both surreal areas like the Unnatural History Museum and the comparatively normal master suite at the top floor.

The game’s presentation shines through, but especially in the pantomime-like cutscenes.

While the graphics and environments are impressive and full of a decent amount of variety, the music isn’t really all that interesting. The iconic Luigi’s Mansion theme plays sporadically throughout the game, and areas are mostly accompanied by bursts of lightning, skittering rats, chattering ghosts, and the sounds of Luigi’s terrified footsteps and whimpers. Ambient sounds and subdued musical cues help add to the game’s comical terror, and Polterpup’s inexhaustible enthusiasm is a welcome addition and, as is the standard for Mario games, characters speak using text boxes, gibberish, and a few choice voice clips, so you won’t have to worry about sitting through any overblown cutscenes here and can simply enjoy the characters employing amusing pantomime-like motions and spouting nonsense when they interact.

Enemies and Bosses:
As you might expect, given the franchise, your primary enemies in Luigi’s Mansion 3 are a series of ghosts who have taken residence in the hotel. These range from the standard blue-coloured Goobs (who are easily mopped up but sometimes shield themselves with shades and wield melee weapons like baseball bats), the yellow-coloured Oozers (who pop up from hiding spots to throw projectiles at you), and miniature versions of these enemies. You’ll also have to fend off rats, bats, and spiders (though these little critters can be easily dispatched with a burst of your flashlight), and possessed chests and bins that need to be blasted with projectiles or subjected to your dark-light. Soon enough, you’ll come across more formidable ghosts, however: the Hammers will try to crush you with their cube-like bodies and must be sucked up from behind, Slinkers will scare you and leave you vulnerable and also try to kidnap Toads, and Trappers require both Luigi and Gooigi to suck on their tongues to dispatch them. When in the Tomb Suites, you’ll have to knock over mummified ghosts with your jump burst and unravel their bandages to expose their ectoplasmic bodies, and larger and more diverse groups of enemies will eventually populate the hotel’s higher floors, causing you to mix and match your attack strategies.

The first few bosses slowly introduce mechanics that prove extremely useful for later battles.

Seventeen bosses must be fought in the game’s story, with fifteen of them being required to beat in order to access every floor in the mansion; while their attacks differ from each other and you’ll generally have to employ different strategies in each battle, they all mostly boil down to finding a way to stun the boss and then suck them up with the Poltergust. The first boss you’ll encounter is a ghostly steward, who shields himself from your flashlight with suitcases and then tosses them at you in the hotel’s basement. On the fifth floor, you’ll counter a particularly malevolent maid who disappears through the bedrooms of the RIP Suites and will cause Luigi to sneeze with her feather duster, and can only be sucked up after using your plunger to slam the briefcase stuck in her stomach. In the hotel’s mall, you’ll need to find a number of different keys to confront Kruller, a bulbous security guard who dissolves Gooigi with a water pistol and must have his shades sucked off so that he can be stunned, but also strikes with a rolling attack. While in the second floor kitchen, you’ll battle the first formidable boss of the game, Chef Soulfflé, who shields himself with a frying pan and unleashes a spinning attack with his knives. To defeat him, you’ll need to avoid the fishes he throws at you and stun him by firing melons at him to leave him vulnerable to your torch and Poltergust.

Soon, you’ll need to use your Poltergust in innovative ways to outwit and defeat the bosses.

Things start getting a little more complicated when you battle Amadeus Wolfgeist, a pianist who remains safely out of reach on the stage and causes chairs to fly at you, distracts you with ballerina ghosts, and then possesses his piano. In this form, he is invulnerable and hops around the theatre, but can be stunned when Amadeus pops out of the piano; you then need to try and shoot bombs into the piano lid to collapse it and drag Amadeus out with your plunger, which gives you the chance to properly damage him but you’ll also have to watch out for his flaming attacks and the piano keys he tosses at you. Another troublesome boss is King MacFrights, who’s fought in a medieval coliseum and can only be stunned when he charges at you for a lance attack while archers shoot arrows at you. After slamming him a few times, his armour will break and you’ll have to dodge his spinning attack and strike while he’s left dizzy and vulnerable. Just reaching Doctor Potter can be a chore as you have to weave through the wild gardens to get to him and, when you do, he sends his Venus flytrap at chomp away at you; avoid this, however, and it’ll get stuck on the environment, allowing you to cut it using a convenient buzzsaw, which leaves him vulnerable to your Poltergust. After helping Morty the ghostly director find his megaphone, he’ll force you to star in his latest production and battle a Goob inside a Godzilla-like costume; you must use the Poltergust, in conjunction with Gooigi, to force the monster’s fireballs back into its face in order to damage it. Once you destroy the suit, the Goob is easily sucked up, and you can also choose to suck up Morty as well by going into his office in you fancy it.

Later bosses make use of their environment to defend themselves and attack you!

In the Unnatural History Museum, you’ll be attacked by another monstrous enemy as the caveman-like Ug possesses a giant Tyrannosaurus rex skeleton, which can only be damaged by firing eggs first into its mouth and then into the glowing red orb in its rib cage. Once the T. rex is destroyed, Ug himself will come out to fight; while he’s a bit of a bruiser, as long as you stay away from his club and burst-jump over his shockwaves, you can stun and suck him when his club gets stuck in the floor. Clem awaits you in the boiler for a battle in a reservoir of water lined with spikes; he’ll attack you with a fan and send out landmines, which you must direct towards him to blast him out of the water and leave him vulnerable, meaning it’s best to leave Luigi floating in the water and have Gooigi on the outside ready to attack. After conquering the Tomb Suits’ puzzles and traps, you’ll battle Serpci, a pharaoh-like entity that protects herself with a mound of sand and strikes at you with cobras. Sucking at her sand and snakes will cause her to become exposed, then you must dodge the projectiles she fires to stun her, though her speed and unpredictability make her a particularly aggravating boss. A trio of magician ghosts, Nikki, Lindsey, and Ginny, await you in the Twisted Suites; this is actually good preparation for the final boss as the three fire playing cards at you from their magician’s hats and must be stunned with a jump-burst when they try and grind you up at close range and you must attack each ghost in turn, with decoy ghosts taking the place of each of the triplets as they’re captures.

After chasing down Polterkitty, you’ll need to make use of Gooigi to defeat the game’s later bosses.

One of the most recurring enemies you’ll face is Poltergkitty, a mini boss who steals a couple of the elevator keys and forces you to chase after it across the floors of the hotel. When you finally confront it, you need to face away from it and wait for it to creep up behind you; right as it’s rearing to strike, at the very last minute, you must turn around and stun it so you can suck it up and remove one of its tails until it’s defeated. Captain Fishook awaits you in the Spectral Catch; at first, you need to avoid his charge and the swing of his hook, stunning and sucking him up when he gets stuck in the deck of the ship, but things get much more harrowing when the shark possesses the ship itself, turning the wooden decking into a gnashing mouth that you must fire bombs into and avoid being tipped into it by the ship’s wild dipping. Johnny Deepend absolutely requires the use of both Luigi and Gooigi and is best fought with another player; Luigi must take cover and distract the boss so that Gooigi can slip around behind it and drain the water from the pool. After that, simply avoid his fists, remove his shades, and stun him with a water polo ball to suck him up, and you’ll then have to contend with DJ Phantasmagloria. First, you have to deal with the dancing Goobs, stunning the one who has the elevator button you need with a jump-burst, before the boss officially joins the battle. DJ Phantasmagloria teleports around the dance floor tossing vinyl records at you and you need to use the burst-jump to knock off her afro and leave her vulnerable to your flashlight so you can suck her up.

Fittingly, thanks get extremely challenging and chaotic for the final showdown with Hellen and King Boo.

When you finally reach the fifteenth floor of the hotel, you’ll have to face off against the hotel owner, Hellen Gravely, in another boss battle that is absolutely built to be conquered by two players. While Luigi must avoid the spinning lasers and coloured laser walls, Gooigi must head down into the lower levels to deactivate the aforementioned laser walls by pulling four switches. Removing all four walls makes trying to suck her up much easier but realistically you can probably do just as good a job of avoiding her attacks and going after her with one or two of the walls deactivated. As the battle progresses, you’ll have to avoid more lasers by either frantically running around the arena or jump-bursting over them, and water will flood the lower level, restricting which switches you can pull, though you can flash the green lights on the walls and the insects to replenish your health if necessary. Afterwards, you must head to the roof to do battle with King Boo, who tries to squash and rattle you by dropping down from above and causing shockwaves, spits a bunch of fireballs at you, tries to slam and swipe at you with his tongue, electrifies the roof tiles, and tosses bombs into the arena. You must quickly suck one of these up and fire them into his mouth, which is easier said than done given how tricky the aiming mechanics can be, and this only makes the battle harder as King Boo spawns first one and then two duplicates and vastly increases the aggression and number of its attacks. You’ll only gain victory by firing bombs into the right King Boo, but it’s actually easier to just blast as many bombs as possible at all the targets and hope for the best as things get very chaotic very quickly thanks to the time limit in the final phase.

Power-Ups and Bonuses:
At the start of the game, your options are limited to your flashlight but it doesn’t take long before you acquire the Poltergust G-00. However, once you have this, you’ve basically got everything you’ll need for the remainder of the game; sure, you get the dark-light, the plungers, and the Virtual Boo but there’s only really one prominent upgrade to the Poltergust, the Super Suction, and it’s only used once in the game, which is a little disappointing. You can earn additional upgrades for the device by meeting certain requirements, such as collecting all of the game’s gems or defeating all of the optional Boos, but none of the money you earn is used to upgrade your repertoire or even your health. When Professor E. Gadd sets up his shop, however, you can buy some helpful items, such as Gold Bones to have Polterpuppy resurrect you when your health is drained and sensors to alert you to nearby Gems and Boos, but that’s about it in terms of items and power-ups beyond the temporary use of a buzzsaw in the gardens.

Additional Features:
As alluded to, there are some rewards you can earn for meeting specific requirements, referred to as “Achievements”; these are directly tied to repetitive actions, such as riding the elevator, defeating specific numbers of ghosts, and interacting with certain objects in each environment. They’re also tied the game’s few collectibles; every floor has six hidden gems to find, with many requiring quite a bit of exploration and ingenuity to track down, and you’ll also be given the optional task of hunting down sixteen hidden Boos, who require a little more strategy than just stunning and sucking up as they like to play hide-and-seek, must be stunned with the dark-light, and can be difficult to pin down. When you complete the story, you’ll receive a letter grade and get to see a rebuilt version of the hotel that reflects how much money you have but, unlike in the first game, you don’t get to play through a mirrored version of the game on a new save file.

Hunt down hidden gems and Boos, and battle against friends in the game’s multiplayer modes.

You can view the ghosts you’ve defeated and the gems you’ve collected at Professor E. Gadd’s lab, but the majority of your additional playtime will probably be taken up with the game’s extra modes, which can be played either solo or alongside fellow players. The ScreamPark challenges you to collect Coins, defeat ghosts, or shoot at targets to score points for your team; the ScareScraper sees you defeating ghosts, rescuing Toads, and fulfilling other objects either alone or in teams while avoiding traps. At the end of those mode, you’ll battle the Boolossus, an even more formidable version of King Boo that adds a phasing attack to its arsenal and splits into a number of regular Boos after eating a bomb. If you fancy putting your hand in your pocket, you can also purchase some additional content (such as costumes, games, and ghosts) for these modes, though I have to say that I remain unimpressed with the lack of post-game content.

The Summary:
I remember enjoying the original Luigi’s Mansion back when I borrowed it for the GameCube when it came out, but being disappointed by the post-game content; there wasn’t too much on offer beyond the main game, despite there being a lot to see and do as you explore, and I can’t say that I was too interested in revisiting the franchise after that experience but I was won over by the game’s visual style and charm. Luigi’s Mansion 3 is basically more of the same; the gameplay and mechanics haven’t really changed all that much as far as I can tell, and the developers haven’t really complicated the premise with too many different mechanics. The addition of Gooigi is an interesting one that is tailor-made for two players (specifically an older and younger player) but perfectly acceptable to play solo as long as you can properly manage your characters thanks to the puzzles and areas being quite restricted to closed off areas. As visually impressive as the game is, and as expansive and diverse as the hotel is, however, there’s really not too much to occupy your time in the main game outside of bustin’ ghosts and ransacking the hotel for loot. There’s still no option to play as any other character, which I find endlessly disappointing, and while you suck up a lot of currency, there’s very few opportunities to really spend your money on anything beyond a few minor additions to your arsenal, and beyond the hidden gems and Boos there’s not really much incentive to explore or search around the hotel’s rooms. I imagine that the additional modes offer a lot of replay value, and that the game is more enjoyable in co-op mode, but I put all of my time into the single player story and, while I had a good time, I was hoping for a little more from it. A mirrored mode, purchasable upgrades and skins, and maybe the option to utilise Polterpup and/or Toad would have been nice but there’s definitely enough content and gameplay on offer to keep players (especially younger players) invested and challenged, I just think there could have been a little more spice added to the mix.

My Rating:

Rating: 3 out of 5.

Pretty Good

Have you played Luigi’s Mansion3? What did you think of it compared to the previous two games, and which was your introduction to the franchise? Are you a fan of the series and how different it is from the traditional Mario formula? Do you agree that there could have been a little more in-game content or were you satisfied with what was on offer? Which of the floors and bosses was your most, or least, favourite and did you ever play the game in co-op? What games are you playing this Halloween season? Whatever you think about Luigi’s Mansion, sign up to leave your thoughts or let me know on my social media.

Back Issues: Werewolf by Night #32/33

Writer: Doug Moench – Artist: Don Perlin

Story Title: “..The Stalker Called Moon Knight”
Published:
27 May 1975 (cover-dated August 1975)

Story Title: “Wolf-Beast vs. Moon Knight”
Published:
24 June 1975 (cover-dated September 1975)

The Background:
In February 1972, Roy Thomas, Jeanie Thomas, Gerry Conway, and Mike Ploog came together under the watchful eye of the legendary Stan Lee to bring Jack Russell/Werewolf by Night to readers in the pages of Marvel Spotlight. After years of being banned from publishing stories involving werewolves and other supernatural creatures, the writers enjoyed exploring these elements with characters like Werewolf by Night, who graduated to his own self-titled series in 1972. Jack Russell came from a long line of lycanthropes thanks to a complex history involving Count Dracula and a cursed tome known as the Darkhold; under the light of a full moon, Jack would become a feral, bloodthirsty beast who attracted the attention of a nefarious cabal known as the Committee. It was the Committee who were responsible for Moon Knight’s first appearance in Marvel Comics, though the silver-clad mercenary was created by Doug Moench, Don Perlin, and Al Milgrom. Inspired by pulp heroes from the 1930s like Lamont Cranston/The Shadow, Moon Knight was initially the alias of Mark Spector, a cloaked hired gun who sported weaponry in the shape of crescent moons, but his personality and background was later greatly expanded upon by the likes of Bill Mantlo, Gregg Hurwitz, and Warren Ellis. One of Marvel’s more obscure superheroes, Moon Knight has often been unfairly compared to the likes of Bruce Wayne/Batman but is actually one of their more complex and adaptable characters thanks to him suffering from Dissociative Identity Disorder, which means he exhibits a range of different, often conflicting, personality traits that lend the character towards constant reinvention. Given the darker nature of the character, and the success of his Disney+ show in 2022, and the recent live-action debut of the Werewolf, this seemed like a good time to take a look at his debut appearance and help bring the character into the spotlight a little more.

The Review:
“..The Stalker Called Moon Knight” opens with a suitably dramatic full-page spread of the titular Werewolf by Night being smashed in the face by a double-handed uppercut from the mysterious Moon Knight. I’ve never read or even encountered anything with Werewolf by Night in it before so it’s refreshing to see Jack’s internal monologue is very different from the usual diatribe from Marvel Comics; Jack speaks in conjunctions, is quite lazy with his terminology, and has a twang to his language that conjures up a Brooklyn accent. It also turns out that he’s more of a man-wolf than literally transforming into a four-legged fiend; in this regard, he’s visually more akin to Lawrence “Larry” Talbot (Lon Chaney Jr.) from The Wolf Man (Waggner, 1941) than David Kessler (David Naughton) from An American Werewolf in London (Landis, 1981). However, while Jack is able to provide coherent narration while in his feral state, when transformed into a werewolf he seems to be incapable of speech, understanding complex sentences, or any intelligence at all beyond savage instinct. Of course, anyone who’s familiar with the character probably already knows all this (and more) but this is literally the first time I’m encountering him so it’s interesting to me to understand the mechanics of his transformation. As vicious as Werewolf by Night can be when transformed, all his ferocity and augmented strength is meaningless against Moon Knight since the cloaked mercenary is garbed head-to-toe in a silver outfit that burns the Werewolf on contact (and the beast is also struggling with a broken hand when the story opens). Though enraged by Moon Knight’s tone, the Werewolf only receives further punishment when he takes a blow from the merc’s spiked gauntlet, which drives silver right into the beast’s face. Moon Knight expresses disgust and hatred towards the ferocious Werewolf, easily putting him down with a “savate kick” and then riddling his chest with silver, moon-shaped blades, and Werewolf by Night is left a beaten, confused creature unable to fight back against Moon Knight’s silver tricks or physical prowess and feeling betrayed that an emissary of the same Moon that grants him his powers should be beating him so thoroughly.

Already reeling from attacking his best friend, Jack is attacked by a ruthless, silver-clad mercenary.

So, right away Moon Knight makes an immediate impression; he’s an uncompromisingly brutal foe who attacks Werewolf by Night without mercy or hesitation. He regards the beast as nothing more than a bloodthirsty freak and his sheer merciless assault of the creature earns him the awe of the terrified onlookers (who see nothing more than another garishly-garbed vigilante attacking a fierce man-wolf) and even the begrudging kudos of Jack, who has little choice but to acknowledge Moon Knight’s skill and prowess. Hurt and struggling against his pitiless silver foe, Jack’s mind wanders back to the previous issue and the recent events that lead him to the dingy alley where he’s currently getting his furry ass kicked. Out in a blizzard in Northern California, the Werewolf had been stopped from murdering a young child by his best friend, Buck Cowan. Unfortunately, while this spared the girl, Buck was severely mauled by the Werewolf, who then reverted back to his human form after sheltering from the snowstorm. Retrieving his clothes and stumbling his way back home, Jack is distraught by his actions, which have left Buck in a coma from which he may never awaken, and he angrily lashes out at a wall (breaking his hand in the process) in shame and anguish. Tormented by the curse that transforms him into a primal beast under the light of the Moon and causes him to be a threat to friends and loved ones and innocent lives everywhere, Jack vows that his days of living as a ravenous werewolf are over but is stunned when he returns home to find Moon Knight there, ready and waiting to deliver Werewolf by Night to the malevolent Committee.

The Werewolf and Moon Knight’s brutal conflict takes them up into the sky and across the pier.

Moon Knight reveals to Jack that he is Mark Spector, a veteran of numerous conflicts, former prize-fighter and a Marine commando who now works as a soldier of fortune and mercenary. Interestingly, in Moon Knight’s recounting of the job offer from the Committee, his face is left in shadow and it’s the Committee who provide him with his trademark outfit and Moon Knight moniker (a codename Spector admits is “pretty stupid”). The Committee furnished Spector with everything he needed to subdue Werewolf by Night and promised to pay him ten-thousand dollary-doos on receipt of the Werewolf’s beaten (but still living) form. Thanks to Jack’s father holding Moon Knight off, Jack was able to beat a hasty retreat, but Moon Knight easily tracked him down using his friend Frenchie’s helicopter, which led to the brawl between Spector and the freshly-transformed Werewolf by Night in a nearby alley. The startled onlookers eventually snap out of their fugue state long enough to alert the cops, and the Werewolf finally manages to grit through his pain to land a stunning blow to his attacker; however, Spector’s assault has left the creature wounded and unable to capitalise on this brief advantage, which allows Moon Knight to bludgeon the Werewolf with a silver baton and finally knock the beast unconscious just as Frenchie hovers overhead for the pick-up (with Jack’s friend, Topaz, and sister, Lissa, as hostages for good measure). The second part of the story, “Wolf-Beast vs. Moon Knight”, picks up with Moon Knight escaping from the cops with Werewolf by Night’s prone body by use of a ladder dangling from the chopper; an errant shot from the cops wounds Spector’s shoulder, but Frenchie’s able to get them away from the gunfire and the startled crowds. Unfortunately for Moon Knight, the Werewolf regains consciousness just over the city pier and attacks Spector in a blind rage, causing them to plummet five-hundred feet to the water below. Hurt and frustrated by the Werewolf’s tenacity and refusal to go quietly, Moon Knight doubles down on his attack, landing huge haymakers to the beast’s jaw and wrestling with the lycanthrope in and out of the water.

Moon Knight is so stunned by Jack’s predicament that he has a change of heart and sets the beast free!

Eventually, however, the strain of the fight begins to take its toll and Spector starts to tire but, just as the Werewolf is about to land a killing blow, the first light of dawn hits and he painfully reverts back to his human form right before Moon Knight’s startled eyes. Moon Knight wastes no time in taking advantage of this and knocks Jack out with a boot to the face, before removing his crescent darts from the cursed man’s body and airlifting him away to his promised payday. However, despite delivering Jack, Lissa, and Topaz to the Committee, Spector is infuriated when the organisation’s head honcho insists that they wait for the next full moon to verify that Spector’s quarry is actually legitimate. When he awakens, Jack is equally incensed to find he’s been caged like an animal and that his loved ones are being held hostage by the Committee’s “emetic” head man, who reveals that he went to all this trouble to use the Werewolf’s feral nature for his own nefarious ends like a pet. Jack delivers an impassioned condemnation of all of them, especially Moon Knight, for treating him like some wild animal that needs to be locked up and vows to make them all pay right before transforming into the Werewolf, much to the glee of the Committee. Their leader finally gives Moon Knight his cash reward, much to the scathing disgust of Lissa, and everything Spector has seen and heard has been enough for him to have a change of heart. He releases Werewolf by Night from his cage and joins the beast in attacking the Committee; Moon Knight frees Topax and Lissa and then tosses the Committee’s head man to the Werewolf to get his brutal comeuppance. With all of the Committee members present presumably slaughtered and Jack’s loved ones free, Moon Knight makes a swift exit when the feral beast turns on him. However, as the Werewolf by Night stalks into the darkness once more, forever doomed to his cursed fate, Moon Knight watches on with a newfound respect for Jack and his torment and wishes his newfound (if tentative) ally well.

The Summary:
I enjoyed this a lot more than I thought I would, to be honest. With absolutely no idea who either Werewolf by Night or Moon Knight are, I really wasn’t sure what to expect; in many ways, the Werewolf has a similar situation to Doctor Bruce Banner/The Hulk in that he is powerless to resist transforming into a ravenous beast under certain conditions, but Jack’s curse is also notably different as he only undergoes the transformation when there’s a full moon and the Werewolf exhibits absolutely no intelligence beyond basic, primal instinct. Similarly, while I’ve briefly researched Moon Knight here and there, his characterisation was nothing like I expected and his first appearance paints him as more of a highly skilled and enthusiastic mercenary and, in that regard, his debut is very much in the same vein as the likes of Frank Castle/The Punisher and even Wade W. Wilson/Deadpool in that he shows up with an awesome look, spouts some witty barbs and absolutely wrecks a formidable character, but is revealed to have a strong moral code by the conclusion of the story. For those who are more familiar with the show or Moon Knight’s more recent portrayals, there are no hints towards his multiple personalities or ties to Egyptian deities; instead, he’s just a very dangerous mercenary who’s asked to don a garish costume to give him the edge against a supernatural foe. Moon Knight’s debut is at its best when the character is on the page, and especially when he’s throwing down with Werewolf by Night. This brutal clash is, unfortunately, interrupted with side stories regarding the Werewolf’s supporting cast, which is fine and I’m sure all part of a bigger pay-off for the character in the overall context of his ongoing comics, but, for me, this got in the way of the main appeal of the story. This isn’t an uncommon trick in comics books from this era (and before, and even now, to be fair) but I felt like it’s worth pointing out as both Moon Knight and the Werewolf made a visual impression on me and I was just naturally more interested to see what they were up to rather than the Raymond Coker and Victor Northrup side stories.

While depicting Jack as a tortured character, the story is at its best when the two are going at it!

Moon Knight is quite the physically gifted foe; he’s an expert in multiple martial arts and more than capable of matching the Werewolf’s feral strength blow-for-blow. Thanks to the hooded silver costume furnished by the Committee, he’s ideally placed to subdue the Werewolf, who is consistently unable to really deal much damage to Spector as just touching him causes him agonising pain, to say nothing of Moon Knight’s spiked gauntlets and crescent darts. In fairness, the core narrative on show here is nothing we haven’t seen before in multiple Hulk stories (and one I’m gonna assume crops up a lot in the pages of Werewolf by Night), which is the cliché one-two-punch of a clandestine organisation wanted to exploit a mindless creature for their own ends and a cursed individual being prejudiced against because of his monstrous alter ego. The execution is a little different, however, as, while Moon Knight is stunned to find that the Werewolf is actually a man afflicted by a devastating curse, he delivers his quarry to his employees regardless since his primary motivation is to get his ten-grand payday. It’s pretty clear, even without seeing Spector’s face, that Moon Knight is rattled by this revelation, though, and his stoic silence during Jack’s tirade against the Committee and their leader’s shameful disregard for human lives speaks volumes considering Moon Knight hasn’t been able to keep his trap shut up until that point. Ultimately, it would’ve been easy for Spector to take the money and go, or free the Werewolf and then get out of there, but he chooses not only to free the beast but also to cut Topaz and Lissa loose and then join the Werewolf in brutalising the Committee to somewhat make amends for his misguided actions. Even better, Spector keeps the blood money he earned from the Committee (which I find hilarious, for some reason), and also ends the story far more comfortable with his newfound persona as Moon Knight. Overall, this was a fun, action-packed two-part tale that cast Jack as a sympathetic figure tormented by his bestial alter ego; he’s a man who has no control over that side of himself and who just wishes to be free from his curse, but won’t back down from a fight when forced into a corner. The story also gets high praise for its fantastic introduction of a visually unique and complex new character to comicdom in Moon Knight; seeing him absolutely dominate the Werewolf in all of their encounters was a great way to sell Spector as a force to be reckoned with and depicting him as both a ruthless mercenary and a man of honour really helped to make him make an impression beyond his striking costume.

My Rating:

Rating: 4 out of 5.

Great Stuff

What did you think to Moon Knight’s debut in the pages of Werewolf by Night? Are you a fan of the titular Werewolf or, like me, did you only recently become fully aware of him because of Moon Knight’s live-action debut? What did you think to Moon Knight’s depiction here, his costume and gadgets and characterisation? Are you a fan of the character and, if so, what are some of your favourite Moon Knight stories and moments? Whatever you think about Moon Knight, feel free to sign up to leave your thoughts below or drop a comment on my social media, and be sure to check out my review of his Disney+ show!

Movie Night [Global James Bond Day]: You Only Live Twice


To celebrate the release of Dr. No (Young, 1962), the first film in the long-running series of James Bond movies (Various, 1962 to present), October 5th is officially recognised as “Global James Bond Day”. Today, this franchise stands as the longest-running franchise ever and the character is one of the most recognised and popular movie icons of all time.


Released: 13 June 1967
Director: Lewis Gilbert
Distributor: United Artists
Budget: $9.5 million
Stars: Sean Connery, Tetsurō Tamba, Akiko Wakabayashi, Karin Dor, Teru Shimada, Mie Hama/Nikki van der Zyl, and Donald Pleasence

The Plot:
A disaster in space threatens all-out war between American and the Soviet Union. When renowned super spy James Bond/007 (Connery) is dispatched to Japan to investigate, he uncovers a plot that finally brings him face-to-face with Ernst Stavro Blofeld (Pleasence), the head of the terrorist organisation known as the Special Executive for Counter-intelligence, Terrorism, Revenge and Extortion (SPECTRE).

The Background:
James Bond, Agent 007 of MI6, was created by writer Ian Fleming in 1953 and was heavily based upon his time and experiences as a navy intelligence officer. Following a very strange, comedic adaptation of his first book, James Bond was brought to life through Sean Connery’s immortal and iconic portrayal of the character, which kick-started an unparalleled cinematic franchise with the box office success of Dr. No. This led to Eon Productions producing annual James Bond films, each of which out-performed the last at the box office and was based, however loosely, on Fleming’s books. While Thunderball’s (Young, 1965) $141.2 million box office made it the most successful Bond film at the time, the production was fraught by legal disputes and, initially, the filmmakers planned to produce an adaptation of On Her Majesty’s Secret Service (Fleming, 1963) but switched to adapting Fleming’s eleventh Bond novel and drafted Fleming’s war-buddy and noted children’s writer Roald Dahl to pen the script. Though Dahl ended up making numerous changes to the original story, You Only Live Twice retained the Japanese setting of the book, which led to some uncomfortable issues of cultural representation. The film included one of the most expensive and elaborate sets in the series’ history, a massive volcano lair designed by the legendary Ken Adam, but star Sean Connery was beginning to become jaded with the super spy and, while an increased salary returned him to the role, he would bow out after this film. You Only Live Twice’s $11.6 million worldwide gross meant it underperformed compared to Thunderball and critics bemoaned the preposterous gadgets and plot and the oversaturation of the franchise. These days, the film’s reputation is slightly more positive and Pleasence’s turn as the villainous Blofeld is regarded as an iconic aspect of the franchise. While Connery left the series after this film, he would eventually return after On Her Majesty’s Secret Service (Hunt, 1969) was a critical and financial disappointment and the franchise soon bounced back into prominence with the fresh-faced Roger Moore taking the role, and the series, into further success.

The Review:
You Only Live Twice begins in one of the most surprisingly oft-used locations for a Bond film, in orbit around the Earth. The Jupiter 16 spacecraft is minding its own business circling the globe as its astronauts test a new probe when an unidentified, missile-like spacecraft comes along and hijacks the ship, swallowing it up and sending astronaut Chris (Norman Jones) floating off into the infinite void. As you might expect, given that tensions between the United States and Soviet Russia were somewhat frosty at the time, accusations are thrown around at the United Nations, though the United Kingdom’s government offers a more level-headed point of view after tracking the craft’s crash-landing off the coast of Japan. This is where we catch up with James Bond…and where he’s suddenly and brutally gunned to death while sharing a bed with Ling (Tsai Chin).

After faking his death, Bond’s investigation into a crashed spacecraft takes him to Japan.

Given his status as a navy commander, Bond is buried at sea; however, upon drifting to the sea floor, his body is recovered by scuba divers and brought onboard a naval submarine. Of course, Bond isn’t really dead; the entire sequence, as explained by M (Bernard Lee), was an elaborate ruse to fake his death in order to shake off some of his old enemies (presumably SPECTRE, but it’s never really made explicit; still, it’s understandable that Bond would have made many enemies out in the field, especially with his tendency to forgo false identities and cause a ruckus). With the Americans and Soviets both planning missions into orbit and ready to launch a full-scale war unless the true culprits behind the hijacking are discovered, M stresses that time is not on Bond’s side, and 007 immediately begins his investigation. Ever the overconfident and suave ladies’ man, Bond has no need for Miss Moneypenny’s (Lois Maxwell) “instant Japanese” dictionary and walks the bustling streets of Tokyo with an assertive and polite demeanour. Because Bond films are all about spectacle, 007 of course meets with local liaison and fellow secret agent Aki (Wakabayashi) at a sumo wrestling match, where as much of the film’s focus is on depicting the pre-match rituals and the clash between the competitors as it is Bond’s suspicions at going through a middle man (or, in this case, woman) to get to his true contact, MI6 operative Dikko Henderson (Charles Gray). Aki is one of those sultry Bond Girls who appears distrustful and playful to begin with but soon reveals herself to be a capable and assertive agent in her own right; indeed, she is pivotal in getting Bond out of numerous scrapes throughout the film, and even unknowingly gives her life to save his.  

Bond makes new allies and enemies along the way, some of whom are just as won over by his charms.

Though a loquacious and accommodating host, Henderson does amusingly mix up Bond’s iconic vodka Martini (“That’s stirred, not shaken. That was right, wasn’t it?”) and is abruptly killed in mid-sentence by a knife in the back; fortunately, he was able to point Bond in the direction of Tiger Tanaka (Tamba) before his untimely death. Bond chases down and dispatches the killer and, thinking on his feet, steals his coat, hat, and mask in order to infiltrate Osato Chemicals. After obtaining documents from Mr. Osato’s (Teru Shimada) safe, Bond is rescued by the coy Aki and finds himself blundering into what appears to be a trap but turns out to be an elaborate meeting with Tanaka, a wealthy and influential figure who travels exclusively by use of his own personal subway train and discovers that Osato has been buying large quantities of rocket fuel. Furthermore, Osato appears to have ordered the death of an innocent tourist for taking pictures of a ship, the Ning-Po, which is enough to convince Bond to masquerade as a potential buyer (“Mister Fisher”) to meet with Osako. This leads to one of those traditional games of subterfuge between Bond and one of his villains where both are aware of each other’s identity or unscrupulous nature but play along with the ruse simply to keep up appearances. Realising that Bond knows too much (or, at least, is close to stumbling upon the truth), Osato orders his secretary, Helga Brandt (Dor), to have him killed. Of course, both are agents of SPECTRE, the true organisation behind the mysterious spacecraft, but their half-hearted attempts to gun Bond down in a simple drive-by naturally end in failure. When they’re attacked by a bunch of trigger-happy henchman at the docks, Bond has Aki flee in order to contact Tanaka and is left helpless and at the mercy of Brandt (or “Agent 11”) on the Ning-Po; interrogated by Brandt, Bond maintains his cover and answers with only glib remarks even when she threatens him with a number of sharp blades. With very little effort, Bond is able to seduce her but, rather than simply killing him while she has him tied to a chair, she decides to parachute out of a small aircraft and leave him to die in suitably dramatic fashion. Of course, Bond is able to pull the plane out of its nosedive, land it, and escape before it explodes with barely a wrinkle on his suit. For her failure, Brandt meets a most gruesome fate at the hands of her superior after Osato places the blame squarely on her shoulders and she ends up being dropped into a piranha pool!

Bond finally comes face-to-face with the warped director of SPECTRE, perhaps his greatest nemesis.

Having determined that the true culprit behind the mysterious spacecraft is hiding somewhere on one of Japan’s islands, Bond concocts an outrageous plan to pose as a simple fisherman and investigate further; he manages to infiltrate the elaborate volcano lair of SPECTRE’s elusive head-honcho, Ernst Stavro Blofeld, an enigmatic and ruthless villain whose appearance had been obscured up until this point. Constantly stroking a beautiful, long-haired white cat, Blofeld is a merciless and callous man whose sole aim is to incite and profit from global discord. It was common for Bond villains to have some kind of physical deformity or tell, be it mechanical hands or an eye patch, but few have been iconic as Pleasance’s bald-headed, squinty-eyed Blofeld. Sporting a vicious scar down his right eye and dressed in a plain, grey suit, the character is the antithesis of not only Bond but also his literary counterpart (who was known for his ever-changing appearance but was also a far bigger and more imposing foe). However, Blofeld doesn’t need to be a physical challenge for Bond and is the definition of the quintessential puppet master; a genius criminal mastermind, Blofeld is both incredibly perceptive (he’s easily able to see through Bond’s disguise by recognising that he isn’t following proper astronaut procedure) and stoically ruthless in his actions as he doesn’t hesitate to punish those who fail him with death. However, like basically every Bond villain, Blofeld’s weakness is his need to boast of his superior intellect and plot to an audience, in this case Bond, which leads to him keeping 007 alive to witness his plot unfold and thus allows Bond the opportunity to defeat his plans.

The Nitty-Gritty:
One of the most entertaining aspects of any James Bond film is the elaborate title sequence and song choice; Nancy Sinatra’s rendition of John Barry and Leslie Bricusse’s title track may not be one of my favourites, but its soft-spoken melodies certainly make it a memorable and haunting theme that recurs throughout the entire film. The sequence itself seems geared around establishing that the vast majority of the film will have an oriental flavour as well, which is perfectly in keeping with the themes and locations of the film, but I have to say that few of these early Bond title sequences managed to impress me and this is probably one of the weaker ones.

The film showcases Japanese society and then uncomfortably “transforms” Bond so he can “blend in”.

It’s unusual for a Bond film to be largely based in just one country and location, but Japan certainly makes for a visually interesting meshing of styles; Tokyo is a huge, bustling city full of neon lights and cloud-tickling skyscrapers and the interiors are a quaint mixture of then-modern aesthetics and traditional Japanese trappings, such as low tables, sliding doors, and an abundance of wood. I can’t really comment much on the depiction of Japanese society as I’ve never been there but it seems maybe a little uncomfortable now to see Tanaka relate his patriarchal Japanese society is; men are the undisputed authority in Japan and women are little more than their obedient servants, who not only clean their men with hot, soapy sponges and willingly massage them without question, but are also driven to distraction by Bond’s body hair and his natural allure. Additionally, Tanaka trains and employs an army of ninjas years before the kung fu craze of the early-to-late seventies, and naturally Bond is quickly able to learn their ways. Of course, it’s difficult to talk about this and You Only Live Twice without mentioning the frankly ridiculous “procedure” that Bond goes through in order to make himself Japanese; this involves dying his body, slapping a terrible wig on him, sticking ridiculous eyebrows to his face, and dressing him in a kimono. Honestly, he looks more like a second-rate Mister Spock (Leonard Nimoy) than a Japanese man and all the make-up and prosthetics of the time would never be enough to convince anyone with half a brain that a six-foot-two man with broad shoulders, covered in body hair, and oh yes sporting a thick Scottish accent could ever be mistaken for a Japanese man. Thankfully, we’re not forced to endure this absurd attempt at subterfuge for long, and it does result in the visual oddity of Bond marrying an unassuming Japanese girl, Kissy Suzuki (Hama/van der Zy) as part of his cover.  

The fights and rear projection might be a bit iffy but Little Nelly stole the show in her brief appearance.

While the film suffers from terrible, absolutely dreadful rear projection in the driving scenes, it was ahead of its time with the depiction of some of Bond’s gadgets; Aki has a video screen in her car that allows Bond to communicate with Tanaka using a transmitter but it’s nothing compared to “Little Nelly”, a speedy one-man portable aircraft that has a variety of weaponry built into it. As always, you can tell that Q (Desmond Llewelyn) is very proud of the machine by the way he talks about it and runs Bond and Tanaka through its many capabilities and, while the rear projection is still pretty terrible for Connery’s close-ups, Little Nelly is definitely a fun highlight of the film that allows for some dynamic and beautiful sweeping shots of Japan’s islands and volcanic regions. Of course, we also get to see Little Nelly’s many armaments in action when Bond is set upon by attack helicopters; the spritely ‘copter is capable of firing flame jets from its rear exhaust, boasts a machine gun and rocket launchers, and is easily nimble enough to run rings around Bond’s attackers and blast them out of the sky. Sean Connery always was a bit of a clunky, awkward brawler; he’s much better at conveying Bond’s unshakable charisma and confidence than he is at handling himself in a fist fight, but there’s something very entertaining about how his Bond can be so commanding and assertive at everything and then be forced to think on his feet and adapt to his surroundings when fighting off assailants. The result is a series of brutal, if clunky, brawls between opponents who are clearly Bond’s better yet the script demands that Bond find a way to overcome them, and he does so through a variety of means. This actually adds a layer of vulnerability to the stereotypically indestructible super spy as he’s left visibly shaken and sweaty following these brawls, but there’s no doubt that he’s far better in a shootout or in bursts of sudden, aggressive energy. One thing that’s definitely true about Connery’s Bond is that he set the standard for the character’s overwhelming arrogance; Bond is a connoisseur of foods and drink and can identify brands, makes, and even the vintage of his sustenance by taste and smell and he uses this ability to both lord his expertise and refinement above others and to impress hosts such as Tanaka with his cultivated tastes.   

After destroying Blofeld’s impressive volcano lair, Bond wins the day but fails to catch the SPECTRE head.

While the film’s model shots and miniatures are quaint and much-appreciated, they haven’t aged too well; however, thanks to some impressive and dynamic camera work, they work fantastically well when incorporated into the film’s expansive and heavily-detailed volcano lair set piece. Honestly, I feel that You Only Live Twice set the standard for elaborate villain lairs and that every single Bond film since has tried to emulate or out-do this simply overwhelming technical achievement; built into a hollowed out volcano, Blofeld’s lair has a fully functional monorail, a piranha pool, a slick, futuristic sheen, gantries, stairs, and walkways for days, and is fully capable of capturing and launching rocket ships from its launch pad. The sheer size and scope of this lair alone is worth the price of admission and it’s only bolstered by Pleasance’s chilling portrayal of Bond’s most persistent and sadistic villain and the massive firefight at the film’s conclusion that sees Japanese agents rappelling into the lair, explosions rocking the environment, and bedlam running wild across every square inch of what remains one of the most impressive sets in all of cinema. The film culminates with Bond being captured by Blofeld and meeting SPECTRE’s main man face-to-face for the first time; while the United States prepares to go to war against Soviet Russia, Bond seems helpless to stop Blofeld’s plot. However, because Blofeld doesn’t just kill Bond while he has the chance, 007 is able to see the entire workings of the madman’s control room and thus knows exactly which buttons and switches to activate to let Tanaka’s ninjas in once he gets the opportunity after using his trick cigarettes to cause a small explosion in the control room. This is all the chance Bond needs to fend off Blofeld’s men and cause a massive firefight to break out across the lair; with his base falling apart around him, Blofeld activates a self-destruct sequence and decides to shoot Tanaka dead rather than Bond. By the time Blofeld finally decides to shoot Bond, Tanaka stops him with a well-placed shuriken but, while the base is eventually destroyed and his plan foiled, Blofeld manages to elude capture. Still, a nuclear conflict between the world’s superpowers is averted (with five seconds left to go). Bond, Kissy, Tanaka, and a number of his ninjas emerge from the erupting volcano victorious and are soon picked up by a submarine, and Bond’s mission would subsequently switch to tracking down and eliminating Blofeld.

The Summary:
When I was a kid and first getting into the James Bond franchise, You Only Live Twice was an elusive film for me; all of the Bond movies were shown on television as part of a huge marathon and, somehow, I missed this one and had to pick it up on VHS later down the line. I always felt like it must be one of the best Bond films because of how often the volcano lair and Blofeld’s design and mannerisms have been parodied, and it does stand out as one of the more visually impressive and iconic of Connery’s time as the character. As much as I respect the standard he set, I’ve never been a massive fan of his films, which tend to be a bit slower and suffer from not aging too well, but You Only Live Twice is one of his that I do rate quite highly. Obviously, it’s probably the most culturally insensitive of all the Bond films; even arguing that it’s a product of its time doesn’t quite excuse Bond’s awful “transformation” into a humble Japanese fisherman, but the film has plenty of highlights that make up for this. First, there’s Little Nelly, then Blofeld’s incredible volcano lair, and finally the reveal and long-awaited confrontation between Blofeld and Bond. Their meeting is one more of tension and mutual respect and hatred rather than a massive fist fight but it’s not hard to see why the villain and his lair have become so iconic and synonymous with the franchise. Sadly, subsequent Bond films kind of made a mess on capitalising on the rivalry between the two and legal issues meant that Blofeld and SPECTRE were all but erased for nearly fifty years but that doesn’t take away from how impactful both were at the time and they really help to add an extra level of spice to an otherwise mundane Bond adventure.

My Rating:

Rating: 4 out of 5.

Great Stuff

Are you a fan of You Only Live Twice? Where does it rank against the other James Bond films for you? What did you think to the long-awaited reveal of Blofeld? Do you find the cultural insensitivities of the film awkward and what did you think to Bond’s transformation into a Japanese man? Are you as awestruck by the volcano lair as I and many others or did you find that making bigger and more elaborate sets dragged the series down a rabbit hole of ridiculousness? Which Bond actor, film, story, villain, or moment is your favourite? How are you celebrating Global James Bond Day today? Whatever you think about You Only Live Twice, or James Bond in general, feel free to leave a comment on my social media and sign up and drop your thoughts down below.

Wrestling Recap: Kane vs. X-Pac (Armageddon ’99)

The Date: 12 December 1999
The Venue: National Car Rental Center; Sunrise, Florida
The Commentary: Jim “J.R.” Ross and Jerry “The King” Lawler
The Referee: Tim White
The Stakes: Steel cage match, personal rivalry between for tag team partners

The Build-Up:
After the relationship between Paul Bearer and the Undertaker broke down, Kane made a dramatic debut in the World Wrestling Federation (WWF) on October 5th, 1997 (the day after my twelfth birthday, and which sadly clashes with Global James Bond Day) at Badd Blood: In Your House. In an effort to goad his older brother into a confrontation, Kane went on a rampage, attacking and disrupting WWF programming at every opportunity until the two finally clashed at WrestleMania XIV. Having made an instant impression of the WWF audience, Kane was quickly booked more as a no-nonsense “tweener” who attacked bad guys (“heels”) and good guys (“faces”) alike, to the point where he simply did what he wanted, setting stagehands on fire and even briefly capturing the WWF Championship from white-hot champion “Stone Cold” Steve Austin as part of an alliance with WWF Chairman Vince McMahon’s super stable, the Corporation. After being betrayed by his brother following a short-lived alliance between the two, Kane found himself at odds with the Corporation and allied with D-Generation X, a stable of reprobates whose childish antics clashed with McMahon’s sensibilities. Although D-X soon parted ways, Kane formed a tag team with D-X’s scrappy underdog, X-Pac, who helped him to open up, speak without the aid of his voice box, and even secured him a girlfriend in the form of Tori. However, despite the two winning the WWF Tag Team Championships twice, their partnership tragically dissolved when X-Pac turned on Kane to re-join D-X. Kane turned into a sympathetic face in the process and this not only led to a series of escalating matches between the two (with this match being the second after Kane won by disqualification at the previous month’s Survivor Series) but also earned X-Pac a lifetime of hatred from the WWF fans for his actions.

The Match:
Prior to the match actually kicking off, X-Pac laid down a few additional stipulations for the bout in an interview with Michael Cole: basically, Kane’s only method of winning would be via pinfall, whereas X-Pac arranged it so that the cage door would be chained and padlocked shut and that he could either climb out of the cage or pin his opponent to win, and he also ended the interview by mocking Kane and asking him to get Tori to stop badgering him for sex. The crowd was emphatically pro-Kane as he made his trademark dramatic entrance alongside Tori and garbed in one of my favourite outfits of his (where it’s more black than red); Tori remained outside of the cage and at ringside, where she distracted the lecherous Jerry Lawler from his commentary throughout the match. Ever the embodiment of arrogance and smugness, X-Pac sauntered to the ring with all the confidence in the world, but the crowd was having none of it; their hatred towards him, as J.R. elaborated during his entrance, was only exacerbated by the fact that X-Pac had struck Tori a few times in the build up to the match, which went a long way to destroying his previous persona of a plucky underdog.

Kane dominated the early going until X-Pac crotched him on the top rope!

Rather than get into the ring and put his money where his mouth is, X-Pac lingered on the outside and made lewd advances towards Tori, so Kane clambered up the cage and went outside to put a beating on his former friend and tag team partner. Though initially overwhelmed by Kane’s size and strength, X-Pac briefly turned the tables by blasting Kane in the face with the ring bell but Kane quickly recovered with his patented zombie sit-up and chased X-Pac into the ring by once again climbing up the cage wall. Interestingly, J.R. pointed out that X-Pac could actually use his lead to his advantage and simply clamber up the other side of the cage before Kane even made it back into the ring; however, the match wouldn’t officially start until both men were inside of the ring and X-Pac decided to rush right into Kane’s trademark uppercut rather than try and escape. Once the match was officially underway, Kane manhandled X-Pac and no-sold X-Pac’s punches to his masked face; although X-Pac was quick enough to avoid Kane’s clotheslines and big shots, it backfired massively when he flew off the ropes looking for a spinning heel kick and got caught with a big slam. Kane followed this up with a military press and, naturally, J.R. began to relate the story of the match being that X-Pac is at a huge disadvantage and needs to think of some way to incapacitate his larger opponent and get the hell out of there, while Lawler simply cracked jokes about the size of Kane’s penis.

Kane overpowered X-Pac at every turn, leading to his D-X team mates coming down to interfere.

After weathering a methodical attack in the ring corners, X-Pac delivered a boot to Kane’s face and tried to hit a cross body off the top rope but Kane caught him and tried to ram his head into the steel mesh; however, X-Pac managed to slip off, push Kane into the cage wall, and finally downed the Big Red Machine with a spinning heel kick. X-Pac clambered up to the top of the cage and desperately fought off his pursuer with his “educated feet” and only managed to save himself from being hit with a big Chokeslam from the top by causing Kane to slip and land crotch-first on the ring ropes. X-Pac pressed his advantage by repeatedly slamming Kane’s head into the cage and then landed a big leg drop from the top rope, but Kane powered out and sat up once again. X-Pac was able to shut down Kane’s attempts to take control of the match with a stiff-looking tornado DDT but, while X-Pac was again able to weasel his way out of a Chokeslam, Kane finally shut the little bastard down with a big tilt-a-whirl backbreaker and then repeatedly tossed his former friend into the cage walls. Kane looked to be in firm control and prime position to hit his signature top-rope clothesline when the New Age Outlaws (“Road Dogg” Jesse James and “Mr. Ass” Billy Gunn, the WWF Tag Team Champions) ran down to the ring with a pair of bolt cutters; despite Kane’s best efforts (which amounted to pathetically reaching through the gap between the cage door and the cage wall), Road Dogg was able to break open the door, which Mr. Ass then slammed into Kane’s head and then tossed a steel chair into the ring to his D-X comrade.

Kane survived the X-Factor, hit a huge clothesline from the top of the cage, and won with a Tombstone.

Both men scrambled to their feet at around about the same time but X-Pac was able to surprise Kane with an X-Factor right onto the steel chair! Rather than go for the cover, though, X-Pac used a pair of handcuffs that the Outlaws also tossed into the ring to cuff Kane to the cage’s wire mesh and deliver two unprotected chair shots right to the Big Red Machine’s head! As X-Pac moved to climb out of the cage (why he didn’t use the door is beyond me), Tori rushed into the ring to stop him and also got hit with an X-Factor for her troubles. Kane managed to avoid another brain-scrambling chair shot by kicking the steel chair back into X-Pac’s face and then ripped his handcuff off, slipped out through the cage door, and intercepted X-Pac as he was making his way out of the cage! Kane then manhandled X-Pac back into the ring, slammed the cage door right in his face, and then clambered up to the very top of the cage to hit a massive diving clothesline! Kane then scooped up X-Pac, hit a Tombstone Piledriver, and scored the three count for the victory. Triumphant, and with the crowd finally woken up, Kane then left the ring alongside his girlfriend. Overall, this was an okay match; the crowd started hot but soon became a bit restless and bored with the slow pace and lack of excitement. The story of Kane dominating X-Pac and X-Pac having to use his quickness and wiles to counter Kane’s strength wasn’t told very well; Kane would go down pretty easily from a kick or a trip into the cage wall, which seemed to contradict how easily he shrugged off X-Pac’s other attacks. The highlight was clearly seeing Kane break his handcuffs and then perform that massive dive from the top of the cage but I think their follow-up match at No Way Out was probably a better overall contest.

The Aftermath:
Following Armageddon, the landscape of the WWF changed quite considerably; Triple H and his wife, Stephanie McMahon-Helmsley, were revealed to have been in cahoots to usurp Vince McMahon’s control over the WWF and, together, they started a reign of terror that saw Triple H capture the WWF Championship and matches being booked in favour of himself and his D-X comrades. X-Pac’s issues with Kane only escalated following their match; Tori dramatically turned on Kane and sided with X-Pac, becoming his valet and lover in the process, and Kane was so heartbroken by the betrayal that he returned to the mental hospital where he had spent much of his youth. Kane made a dramatic return in the build up to No Way Out, however; once again accompanied by his father, Paul Bearer, Kane furiously attacked X-Pac and his D-X cohorts. Although Kane was able to exact a measure of revenge against Tori by Tombstoning her, he lost to X-Pac in a No Holds Barred match at No Way Out. The feud between the former friends was finally put to anti-climatic rest at WrestleMania 2000, where Kane teamed with Rikishi to defeat X-Pac and Road Dogg in a tag team match. However, their rivalry was shortly reignited in 2002 when X-Pac joined the briefly resurrected New World Order (nWo); alongside the nWo, X-Pac attacked Kane and stole his mask, which he would often wear to the ring, though it appears as though this was merely a way to write Kane off of television following an injury and X-Pac left the company before their issues could be properly resolved upon the Big Red Machine’s dramatic return.

My Rating:

Rating: 2 out of 5.

Could Be Better

What did you think to the contest between Kane and X-Pac at Armageddon 1999? How would you rate it compared to their other bouts and which of their feuds, matches, and moments is your favourite? Were you a fan of the team and friendship between Kane and X-Pac back in the day? Did X-Pac turning on Kane sour you on the plucky underdog as it did so many other fans? How are you celebrating Kane’s debut this year, what are some of your favourite matches and moments from Kane’s long and complex career, and what dream match would you have liked to see him involved in? Whatever your thoughts about the Big Red Machine, leave a comment below.

Movie Night: Tales from the Darkside: The Movie

Released: 4 May 1990
Director: John Harrison
Distributor:
Paramount Pictures
Budget: $3.5 million
Stars:
Deborah Harry, Matthew Lawrence, Steve Buscemi, Christian Slater, William Hickey, David Johansen, James Remar, and Rae Dawn Chong

The Plot:
Timmy (Lawrence) has been imprisoned by a suburban witch (Harry) who plans to cook and eat him; his only hope is to stall her with three stories from a horror book that depict a graduate student who uses a mummy to avenge himself on those who have wronged him, a wealthy old man who hires a hitman to kill a cat he believes is haunting him, and a struggling artist who finds fame and fortune but at terrible cost!

The Background:
In 1982, the grandfather of zombie horror himself, George A. Romero, joined forces with my favourite writer of all time, Stephen King, to write and direct Creepshow (Romero, 1982), a horror anthology movie that won over critics with its blend of comedy and horror, becoming a cult classic in the process. Having grossed $21 million against an $8 million budget, Creepshow was successful enough to raise interest in a potential television series; however, distribution issues led to Laurel Entertainment (Creepshow’s producers) opting to create the similar show, Tales from the Darkside, instead. Following a pilot episode in 1983, Tales from the Darkside ran for four seasons and produced eighty-nine official episodes between 1984 and 1988, and featured works or adaptations from the likes of Stephen King and Clive Barker. Since the show had also achieved cult status, and given that horror and sci-fi anthologies were still relatively popular back in the late-eighties and early-nineties, its perhaps not too surprising that the show was succeeded by a big-screen feature film. Largely regarded as the true successor to Creepshow, Tales from the Darkside: The Movie’s $16.3 million gross made it a modest success. Reviews were mixed, however, and plans for a sequel were scrapped and writer Joe Hill was equally unsuccessful when he tried to get a reboot off the ground.

The Reviews:
Since Tales from the Darkside: The Movie is an anthology film compiled of a framing narrative and three short horror stories, it only makes sense to review each one individually and then discuss the overall film, so this review will be structured a little differently from my usual ones. The film’s framing narrative, “The Wraparound Story”, is easily the weakest part of the film, though even this has its simple charms; Betty is an affluent suburban housewife whose pleasant and polite demeanour hides the amusingly horrific truth that she is actually a witch. Some time prior to the film, she kidnapped young Timmy and has had him chained up in a dungeon in her kitchen, where she has been feeding him cookies and other snacks to fatten him up for a big dinner party for her other friends (presumably also witches). Although Timmy desperately cries for help, Betty nonchalantly prepares her oven and her evisceration implements; desperate to delay his impending death, Timmy reads her stories from her favourite childhood book, Tales from the Darkside. Once each of the short films has finished, Timmy continues to read from the book and, thanks to Betty’s fondness for the stories and her desire to hear a love story, she is suitably distracted but remains undeterred in her wish to gut him and cook him. Thankfully, Timmy’s efforts buy him the time to think of an escape plan and, as Betty moves to get him, he tosses some marbles onto the floor that cause her to slip and impale herself on her own butcher’s block! Timmy then frees himself, shoves her into the oven originally meant for him, and rewards himself with a well-deserved cookie.

Bellingham uses an ancient scroll to avenge himself using reanimated mummies.

The first story, “Lot 249”, is an adaptation of Sir Arthur Conan Doyle’s short story of the same name; the short follows two rich college students, Andy Smith (Slater) and his best friend Lee Monkton (Robert Sedgwick), who is not only dating Andy’s sister, Susan (Julianne Moore), but has also succeeded in conning the administration into awarding him an all-expenses trip to Europe thanks to Susan writing his scholarship proposal for him. While Andy disapproves of Lee’s moral deception, it is of particular aggravation to Edward Bellingham (Buscemi), a much poorer student who pays his way through college by selling antiquities and other artefacts. Though friendly enough with Andy, who lives in dormitory above him, Bellingham’s introduction to Lee is met with tension; still, Bellingham delights in showing them his latest acquisition, the titular Lot 249, which he believes will make up for him being cheated out of the scholarship by an anonymous tip accusing him of theft. Lot 249 is a massive sarcophagus that contains a dried out, ancient mummy with a scroll in its stomach which, despite his claims to the contrary, Bellingham is fully capable of reading. Aware that Lee screwed him out of his scholarship, Bellingham wastes no time in reading from the scroll to bring the mummy to unlife and promptly sending it after Lee. The rich jock is completely blindsided by the superhumanly strong mummy, who violently pulls Lee’s brains out through his nose and leaves them in a fruit bowl. Susan has little time to process Lee’s death as Bellingham sends his mummy after her next since he knows that she framed him; although she attempts to fight back, the mummy rips open her back with a pair of scissors and stuffs her full of chrysanthemums! Andy’s suspicions about Bellingham’s involvement are only further confirmed at the sight of his sister’s bandage-wrapped corpse; he attacks Bellingham and ties him to a chair, easily dispatching the mummy using a battery-powered saw to cut off its leg and then slice its head in half. Threatening to burn Bellingham alive using his Master’s thesis for kindling, Andy settles for setting fire to the scroll and sends Bellingham packing. However, the maniacal Bellingham gets the last laugh, having tricked Andy with a fake scroll; he uses the real one to resurrect Lee and Susan as mummified corpses and sends them after Andy in the story’s finale.

A supernatural cat haunts an old man and drives him to hire a hitman to dispose of it.

Next is “Cat from Hell”, which is an adaptation of a Stephen King short story of the same name and was written for the film by Romero. Drogan (Hickey) is an incredibly wealthy, incredibly fail old man who is bound to a wheelchair but wields considerable power and influence thanks to having amassed a bountiful fortune in pharmaceuticals. Drogan lives alone in a vast mansion furnished with “everything you could want; everything you could ever want” but all the money in the world can’t quell his fear and paranoia regarding a particular black cat that haunts his house. Drogan hires hitman Halston (Johansen), a grim and professional man, to take care of his feline stalker; at first, Halston is incredulous and dismissive of the job but is convinced by the old man’s down payment of $50,000 to learn the story behind the cat. Drogan reveals that his company’s wonder drug was created by experimenting on and killing over fifty-thousand cats and he believes that the black cat is a supernatural form of karmic revenge sent to address the balance; his sister, Amanda (Dolores Sutton), was tripped by the cat and broke her neck falling down the stairs, the cat then suffocated Amanda’s friend, Carolyn (Alice Drummond), with its body while she slept, and then attacked the butler, Richard Gage (Mark Margolis), as he was driving to dispose of it, with each victim dying at precisely midnight. Though believing the old man is delusional, Halston takes his money, and the job, but finds that killing the cat isn’t as easy as he initially believes. The cat scratches him when he tries to break its neck, continually eludes and swipes at him throughout the night (clawing at his crotch at one point), and even appears to be immune to Halston’s high-powered bullet when he tries to shoot it. Having been driven into a near frenzy by the cat, Halston fires blindly but is terrified out of his mind when the cat leaps at him and forces its way down his throat and into his body! The next morning, Drogan arrives home to find Halston dead on the floor; then, as the damaged grandfather clock strikes twelve midnight, the cat emerges from Halston’s bloodied corpse and leaps onto Drogan’s lap, causing the hold man to literally die from fright.

A struggling artist is wracked with guilt after making a promise to a fearsome gargoyle

The final segment, and quite possibly my favourite, is “Lover’s Vow”; Preston (Remar) is a struggling artist living in New York whose work is proving to be so unprofitable and unpopular that even his agent, Wyatt (Robert Klein) dumps him. Dejected and frustrated, he drowns his sorrows at his local bar; however, when the bar’s owner, Jer (Ashton Wise), offers to walk him home, the two are suddenly attacked in the alley outside the bar. Preston is horrified when he witnesses a large, winged gargoyle-like grotesque rip Jer’s hand off and then behead the bartender but, rather than kill Preston, it inexplicably offers him a deal: his life for his solemn vow that he will never speak of the horrors he has seen that night. Terrified out of his mind, Preston agrees and the creature leaves after clawing at his chest to seal the deal; disgusted at the gargoyle’s gruesome appearance, Preston comes across a stranger, Carola (Chong), in the aftermath and encourages her to get off the streets and go to his apartment to keep her safe from the beast. Enthralled by Preston’s artwork, Carola warms to him and cleans his wound and the two have a romantic tryst that leads to ten years of success and happiness for Preston thanks to Carola having connections that help his work take off. While a doting father to two young children and devoted husband, Preston is nonetheless haunted by memories of that night, and the creature, and tormented at having kept the truth from his beloved all these years. On the eve of the ten year anniversary of the night they met, Preston breaks down and confesses the truth, even showing Carola a statue and drawings of the creature but his guilt soon turns to horror as Carola transforms before his eyes into the same gargoyle that attacked him, her body splitting and tearing apart as the creature breaks free from its human form! To make matters worse, their children also transform into pint-sized gargoyles before Preston’s terrified eyes; heartbroken and distraught, Preston begs Carola to change back and professes his love but it’s not enough to undo his broken vow and the gargoyle rips his throat out with an anguished cry and flies off into the night, where it turns back into a stone statue with its two children.

The Nitty-Gritty:
The Twilight Zone (1959 to 1964; 1985 to 1989) was a bit before my time (and wasn’t even on television when I was a kid, as far as I know) so I grew up watching The Outer Limits (1995 to 2001) instead; while I can’t recall right now when I first saw Tales from the Darkside: The Movie, I distinctly remember it being one of the key influences in my subsequent appreciation for anthology stories. The idea of having such wildly different short stories all in one movie was fascinating to me and it still is, as a storyteller myself. Each story has only a short amount of time to give a sense of who its characters are and make us care about them and I think Tales from the Darkside: The Movie does a pretty good job with that thanks to casting some young up-and-comers, noted character actors, and even a distinguished actor of stage and screen in William Hickey. Not only that, the film is bolstered by some pretty decent practical effects; while the mummy is a little stiff, the puppet cat looks a little fake, and the gargoyle is notably seeped in darkness to hide its flaws, each remains a frightening and startling monster thanks to how well the shorts tell their stories.

“Lot 249” more than makes up for the frame narrative’s lack of monsters and raw horror.

It’s not surprising that “The Wraparound Story” is the weakest part of the film; to be fair, it’s not really designed to anything more than provide a basic setup for why we’re being shown the other, superior short stories and in that regard it succeeds at being mildly entertaining, at least. However, while lacking the monsters, blood, and unsettling visuals of the other tales, the framing story seems much more geared towards youngsters than the rest of the film. I suppose the idea of a witch hiding in plain sight could be considered scary but Betty is so nice and the threat against Timmy is left implied rather than explicit, meaning the horror of the framing narrative is noticeably diminished for me compared to the other stories. While I consider “Lot 249” the weakest of the three main tales, even that proves to be an entertaining little horror romp thanks, largely, to the gory methods employed by Bellingham’s mummy. It’s pretty horrific to see it jam a twisted coat hanger up Lee’s nose and jerk his brains out, to say nothing of the graphic depiction of Susan’s back being violently cut open! Not only that but the short is bolstered by enjoyable performances by a young Christian Slater, Steve Buscemi, and Julianne Moore; Slater, especially, shows so much charisma and likeability as Andy, who is easily able to cut up and subdue the mummy thanks to his being prepared, which only adds to the shocking twist of the short’s ending.

The film is bolstered by some disturbing visuals and gruesome (and practical) special effects.

“Cat from Hell” is easily the most traditionally terrifying story of the film; for some reason, this short always reminds me of “The Raven” (Poe, 1845) in the simplicity of its gothic horror and the way the short builds tension is incredibly effective as a lot of shots are from the cat’s point of view and yet the story doesn’t hold back in depicting the supernatural feline’s horrific nature. Watching Halston’s unshakable arrogance crack be replaced by a fanatical obsession is very unsettling but the true highlight of the piece is obviously in the disturbing and grotesque way Halston meets his end. Yes, the puppets and dummies are pretty obvious but the darkness helps hide a lot of the effects and it’s still very grotesque not only to see the cat force its way down his throat but also crawl out through his mouth in a burst of blood. The way it simply leaps onto Drogan’s lap and hisses at him as the old man succumbs to his terror is particularly ghastly and is only augmented by the haunting sound of the clock striking twelve, the intense score, and the slanted angle of the camera. It’s a bit of a tie between “Cat from Hell” and “Lover’s Vow” for which story is my favourite but “Lover’s Vow” is definitely the most tragic and distressing of the stories; while you can argue that the twist ending is somewhat predictable, for me it’s easily the most memorable and impactful part of the film and helped make it a truly nightmarish horror story. The short is made all the more memorable by some fantastically ambitious animatronics and puppet work on the gargoyle; Carola’s visceral transformation into the beast is right up there with the disgusting body horror seen in The Fly (Cronenberg, 1986) and is made all the more heart-wrenching by Preston’s anguished scream at seeing his children turned into little monsters as a result of him just being honest with his wife.

The Summary:
It’s probably just the nostalgia talking but I have a real soft spot for Tales from the Darkside: The Movie. I remember being fascinated by it as a kid because I had only seen anthology narratives done in TV shows like The Outer Limits (or potentially this was my introduction to the concept, I honestly forget which is which) and I found the idea to be incredibly unique and substantial (it’s like getting four movies for the price of one!) Years later, and some time ago now, I got around to seeing Creepshow and don’t remember it resonating me in the same way as this film (though, to be fair, I really do need to give Creepshow another watch sometime), which had a profound influence on me as a horror fan and writer. The stories are incredibly bleak and intense considering their short length, and bolstered by some fun performances and gruesome use of both gore and ambitious practical effects. While there are other, better films and examples of these effects out there (and even from the same time period), Tales from the Darkside: The Movie does a pretty good job and standing the test of time not just through remarkably well shot animatronics and puppets but also in how raw and powerful its stories can be. While “The Wraparound Story” is easily skipped, even that helps to add a breather between each tale so you can catch your breath and prepare for the next gruesome tale, and I never fail to be haunted, moved, and disturbed by the stories on offer here, in particular “Cat from Hell” and “Lover’s Vow”, which are more than reason enough for you to give this one a try sometime.

My Rating:

Rating: 4 out of 5.

Great Stuff

Have you ever seen Tales from the Darkside: The Movie? Which of its short stories was your favourite and what did you think to the practical effects used to bring the horrors to life? Did you see the twist endings coming and which of the stories could you see expanded out into their own feature? Did you ever watch the television show? How would you rate this feature-length version of the show against other horror anthologies like Creepshow? Are you a fan of anthologies and would you like to see more? What horror films are you watching this month in preparation for Halloween? Whatever you think about Tales from the Darkside: The Movie, leave a comment and check out my other horror anthology reviews!

Game Corner: Doom (1993; Xbox Series X)

GameCorner

Released: 26 July 2019
Originally Released: 10 December 1993
Developer: Bethesda Softworks
Original Developer: id Software
Also Available For: 3DO, Amiga, Android/iOS, Atari Jaguar, Game Boy Advance, Linux, MS-DOS, Nintendo Switch, PC/Mac, PlayStation, PlayStation 3, PlayStation 4, RISC, SEGA Saturn, SEGA-32X/Mega-32X, Solaris, Super Nintendo Entertainment System (SNES), Xbox 360, Xbox One, Xbox Series S

The Background:
First-person shooter (FPS) videogames existed before Doom but, thanks to having been ported to every console and format available, the genre was pretty much defined by Doom, which inspired a wave of FPS titles on the PC and home consoles, as well as popularising online “Deathmatches” against other human players. Doom owes its existence to its forefather, Wolfenstein 3D (id Software, 1992), and id co-founder and lead programmer John Carmack. Inspired by classic science-fiction and horror films and board games, Carmack joined forces with designer John Romero and lead artist Adrian Carmack to create Doom, though the process wasn’t all plain sailing. The small, five-person team disagreed about the importance of story to the game and certain gameplay features, such as a score tally and the expansive nature Carmack envisioned, and the limitations of the hardware available to them. Carmack wanted the game to be faster and more brutal than its predecessor, and to have more abstract level designs to separate it from Wolfenstein 3D, which upset designer Tom Hall and saw him replaced late into the game’s development.

Doom64Ports
Doom has been run on nearly every device, including in Doom itself!

Largely programmed in ANSI C, Doom was released as “shareware”; the first episode was distributed for free and gamers were encouraged to play it, share it around, and purchase the full game if they liked it. Although it was a late addition to the game, Doom’s deathmatches were so popular that the game caused servers to crash, and the game was such a success that it was said to have been installed on more computers than Windows 95! Accordingly, id Software were making $100,000 a day (!) from sales of the game as Doom topped 3.5 million physical copies sold and was banned from workplaces after employees kept clogging the networks with deathmatches! Doom was met with widespread critical acclaim; despite some criticisms regarding the presentation and difficulty, critics lauded the game’s addictive gameplay, and it has cemented its legacy by being regarded as one of the greatest games of all time. Naturally, Doom was the subject of much controversy due its graphic violence and Satanic imagery, but its success led to a slew of expansions, sequels, ports, ancillary media, and even movie adaptations, which more than speaks to the popularity and longevity of the franchise.

The Plot:
In the future, an unnamed marine (popularly known as the “Doomguy”) is posted to a Union Aerospace Corporation (UAC) outpost on Mars, where a secret teleportation experiment opens a portal to Hell!

Gameplay:
Surprising absolutely nobody, Doom is the quintessential classic FPS gameplay experience that eschews the modern gameplay mechanics we’ve become so accustomed to and is as basic as you can get. There’s no options here for strafing, no quick-turn, and you can’t aim the crosshair anywhere but left and right but, on the plus side, your shots will generally always hit your target no matter where they are as long as you’re shooting in their general vicinity. The Right Trigger fires your current weapon at a steady rate, with no worries about reload times or the amount of weapons you can carry at any one time; you can use the Right and Left bumpers and the directional pad to quickly switch between your available arsenal, though its important to remember that you’ll lose everything but the basic pistol and your trusty fists when progressing between the game’s four chapters.

Blast through the demonic hordes to find coloured keys and make your way to the exit.

You can either hold down the Left Trigger to sprint or turn auto-run on from the options (I recommend the latter) and, while there’s no awkward first-person jumping or platforming to worry about, you can interact with switches, levels, and doors by pressing A. Y will bring up a useful wire-frame map of the current level, but this can be a bit disorientating as it takes up the entire screen and I always found it difficult to figure out which direction I was heading. Your ammo, health, and armour, are all helpfully displayed in the heads-up display (HUD), and this is where you’ll keep track of the coloured key cards and skulls you’ve collected in each level. These are necessary to open the appropriately-coloured doors or activate coloured barriers, and function as the primary puzzle/objective of each area: wade in, dispose of demons, grab keys, and get to the exit, snagging new weapons, ammo, and power-ups along the way. While you don’t need to worry about submerging or swimming through water or hopping from columns, you will have to keep an eye out for poison, lava, and crushing traps and getting all turned around from teleporters. On the plus side, you can lure enemies into attacking and killing each other, which is a nice touch, and destroy explosive barrels to take out larger groups of enemies.

While levels quickly become bizarre hellscapes, it’s easy to get lost in the samey environments.

And make no mistake, the hordes of Hell are out for your blood. The game has five different difficulty levels, with the enemies increasing in number and aggression depending on how difficult you set the game, and enemies will skulk around in the dark, fly at you from the shadows, and teleport in to take shots at you. You can also take advantage of these teleporters to be instantly transported around the level, and the further you progress into the game’s story, the more prominent such puzzles will be. Equally, things start off quite linear and it’s not too difficult to make your way from the start to the exit and find secret areas and rooms hidden behind seemingly innocuous walls. However, it isn’t long before the levels get a bit bigger, a bit more open, and start to take on a maze-like quality; walls, rooms, and textures start to look the same and it’s easy to find yourself running around in circles, desperately trying to figure out how to get to the next key and open up the next door. Sometimes, this requires you to pull a series of levels to active a bridge, open a door, or open up an area and it’s not always entirely clear what you’ve done or changed in a level, making exploration that much more confusing at times.

Graphics and Sound:
I mean it’s classic Doom so you know exactly what to expect. I have to say that Doom has probably never looked better than in this high-definition version for the Xbox Series X; environments are as dark and foreboding and gothic as ever, and there’s some impressive and ominous use of flickering lights and darkness to help add to the claustrophobia and horror. While enemies are comprised of 2D sprites, giving the game something of a 2.5D look that’s often like blasting through a diorama at times, I’m not going to dump on the visuals because they speak to the nostalgia in my veins and add to the game’s charm. The game’s iconic soundtrack only bolsters the experience; while areas might be strewn with bloodied corpses, flickering candles, crucified souls, and Satanic imagery, a number of memorable beats help to keep the adrenaline up.

While the graphics are nothing special now, the nostalgia is strong, the gore is brilliant, and the soundtrack is fantastic.

Demons and other enemies growl and snort at you from the dark, exacerbating the constant feeling of dread at work in the game, but all the sound work in the world can’t change the fact that many of the game’s areas look the same and only add to Doom’s confusing, maze-like nature. You’ll explore space facilities and outposts, cargo holds full of UAC crates, and journey to gothic castles and medieval structures sitting amidst the burning lava of Hell, but it can be difficult to distinguish one area from the next after a while. Some odd colour effects also make some mountains look like they’re glitching out, though neat touches like pentagrams, drawbridges, blood fountains, and lava waterfalls help to make some areas more memorable. One of the most entertaining aspects of Doom is the HUD, which features a pixelated representation of the Doomguy reacting in pain when hurt or grin sadistically when acquiring new weapons, and there’s some really fun, gory death animations included to make blasting demons (and your friends) endlessly enjoyable. After completing each chapter, you’ll be presented with some small, very difficult to read text that gives you the low-down on the story, but I didn’t really pay much attention to this, and a cool little map screen shows where you are in each chapter between levels, which helps to make up for the limitations of the game’s graphics.

Enemies and Bosses:
As you make your way through UAC’s Mars outposts and into the fiery depths of Hell, you’ll come up against a handful of macabre enemies that are all out for your blood. There’s not much in the way of enemy variety, and you’ll encounter the same enemies in ever chapter, but they can take a few good shots to put down and often attack you from the shadows, from afar, or randomly spawn in to swarm over you. The weakest enemies in the game are the zombified marines, who shuffle about firing at you with either a pistol or a shotgun, and these are often found alongside or near to fireball-throwing Imps, the most common demon you’ll encounter. Things progressively get more harrowing when you’re attacked by the gorilla-like Pinky, which can also be invisible for added annoyance, and the bulbous, disgusting Cacodemon, but by far the most annoying enemies are the Lost Souls, flaming skulls that float about and fly at you in a suicide run!

Some huge, monstrous demons await you at the end of each chapter and double as sub-bosses!

Each of the game’s four chapters ends with a boss battle to wrap up the action. The first of these is the Baron of Hell, a huge demonic Satyr that plods around throwing balls of green, flaming energy at you and swiping at you when you get in close. You’ll actually battle two of these at once at the conclusion of “Knee-Deep in the Dead” and they tend to crop up at the worst time in the game’s later chapters as sub-bosses, of sorts, usually guarding keys, doors, or the level’s exit. The Barons are succeeded by the Cyberdemon, a gigantic devil-like monster that lumbers around a wide open arena firing rockets at you. Luckily, there’s loads of rocket launcher ammo nearby and columns to run behind for cover, meaning you can easily hit and run and stay on the move, but when the Cyberdemon randomly appears in later chapters as a sub-boss, your options for weapons and cover are severely limited! The game’s final boss is the Spiderdemon, a massive brain-like ghoul trapped in a mechanized, spider-like body that jerks around the place rapidly firing its chaingun at you and accompanied by Cacodemons. The first time you fight it, you can take cover behind loads of columns and structures, but then it randomly reappears in the last level of the fourth and final chapter, “Thy Flesh Consumed”, it’s proceeded by Barons of Hell, Cyberdemons, accompanied by far more enemies, and lurking out in the open. However, focus your fire on the cybernetic arachnid and you’ll be awarded with the final victory over Hell’s minions.

Power-Ups and Bonuses:
Doomguy starts out with nothing more than a pistol and his bare fists, but it’s not long before you get your hands on my go-to weapon of choice, the shotgun. There’s no Super Shotgun available here, but get up close to most of the game’s enemies with this bad boy and you’ll put the majority of them down in one hit. When surrounded by enemies, it’s best to bust out the chaingun or plasma cannon for some rapid fire action, or whip out the chainsaw to chew up demon meat into bloody chunks, but I would save the rocket launcher for the game’s bigger enemies and bosses. Of course, if you look hard enough, you’ll get your hands on Doom’s signature weapon, the BFG-9000, which will unleash a powerful green energy blast that obliterates any onscreen enemies and makes short work of the game’s bosses.

Grab some ordinance, protect yourself with armour, and power-up to make short work of demon scum!

As you explore your environments, you’ll find stimpacks and medikits to restore your health and pick up various armours to increase your resistance to attack. While your maximum health and armour is defaulted to 100%, you can increase it further with health and armour bonuses, and shrug off the damage dealt by lava or poison with radiation shielding suits. Poorly lit or darkened areas are a worry of the past with the light amplification visor, and you can unlock the entirety of the map, including seeing all the secret areas, with the computer area map. You can also pick up temporary powerups like the Berserk, Invulnerability, Invisibility, and Supercharge to help you dish out additional damage against enemies, full heal yourself, and shrug off any dangers you might encounter for a short time.

Additional Features:
There are nineteen Achievements to earn in Doom, with four of these popping after successfully completing every level of the game’s four chapters, others popping for killing a certain number of enemies in certain ways, and others awarded for beating every level of the game’s highest difficulty setting. There are a number of secret areas to find, and you’ll get an Achievement for finding one and then all of them, and you can also earn a few by finishing every level in co-op mode or getting first twenty-five and then a hundred kills in the game’s deathmatch mode. Although the game is severely cropped in this mode and your options are limited to setting how many kills equate to victory and the time limit of each match, it remains a fun and frantic little extra that can make or break friendships, and it’s nice to see a co-op feature included as I don’t think I’ve seen that in Doom before. You can also input a number of push-button codes to activate cheats, though being able to select every level right from the off and having a quick-save function makes this a little bit of overkill, and sign up to Bethesda.net to download some additional add-ons to add a little more to your Doom experience.

The Summary:
Unlike so many other gamers, I didn’t grow up playing Doom; I was playing Duke Nukem 3D (3D Realms, 1996) instead and the closest I got to playing Doom was my tumultuous relationship with the Nintendo 64 version of Quake (id Software, 1998). Still, I have played Doom before, specifically the port included in Doom3’s (ibid, 2004) BFG Edition on the PlayStation 3, but I jumped at the chance to pick up the Doom: Slayers Collection (ibid, 2019) for Xbox One when I saw it going cheap so I could experience the game once more. I have to say, even some thirty years after it first released, Doom remains an almost timeless gaming experience. Sure, your control options are limited, the game quickly becomes quite repetitive as there’s little to do but collect keys and mow through enemies, and the game isn’t the prettiest thing you’ll ever play, but nostalgia is a powerful thing and there’s something very powerful about the simplicity of Doom. It’s such a fun game to play in short bursts or one quick-fire playthrough, and the feeling of blowing demon scum into bloody chunks never gets old. The game is tight as a drum and controls very well even all these years later; while the maze-like construction of some areas is annoying and really not my thing, I enjoyed having some bad-ass beats to nod along to, discovering secrets or bloody Easter Eggs, and the rush of adrenaline from a Baron of Hell suddenly emerging from behind a door! Obviously, Doom’s sequels and successors would tweak and improve upon the presentation, mechanics, and options but, in terms of the FPS genre, it all began here and it remains a rollicking good time even after all this time and a must-play for fans of horror, shooters, and videogames in general.

My Rating:

Rating: 4 out of 5.

Great Stuff

Are you a fan of the original Doom? When did you first play it? Do you have fond memories of playing deathmatches with your friends? Which of the game’s chapters and weapons was your favourite? Which boss was the toughest for you? How highly do you rate this version of the game? Whatever your thoughts on Doom, or FPS games in general, sign up to drop a comment below or let me know on my social media.

Game Corner [Bat-Month]: Batman: Arkham Knight (Xbox Series X)


In the decades since his first dramatic appearance in the pages of Detective Comics, Bruce Wayne/Batman has become a mainstream, worldwide, pop culture icon. The brainchild of writer Bob Kane, Batman was brought to life by artist Bill Finger and has been a popular staple of DC Comics and countless movies, videogames, and cartoons over the years. Accordingly, September celebrates “Batman Day” and is just another perfect excuse to celebrate comic’s grim and broody vigilante and, this year, I’ve been dedicating every Wednesday to Gotham’s Dark Knight Detective.


Released: 23 June 2015
Developer: Rocksteady Studios
Also Available For: PC, PlayStation 4, PlayStation 5, Xbox One, Xbox Series S

The Background:
After a rocky relationship with videogame adaptations, Eidos Interactive and Rocksteady Studios turned the Dark Knight’s fortunes around with the critically and commercially successful Batman: Arkham Asylum (ibid, 2009) and the bigger and better sequel, Batman: Arkham City (ibid, 2011). Eager to capitalise on this success, and to allow Rocksteady Studios the time to craft a suitable third entry, Warner Bros. Interactive Entertainment turned to WB Games Montréal to develop a prequel set during Batman’s early days that, while criticised as somewhat derivative, still sold incredibly well and helped keep the franchise alive while Rocksteady worked on their next game. Development of Batman: Arkham Knight began shortly after the completion of Arkham City and took four years to complete; utilising the greater graphical and processing power of then-current consoles, this new game would allow of five times the number of enemies to be present onscreen at any time, cutscenes to be rendered in real time, and have items like cloth react realistically to movement and wind. The game’s story was designed to be the concluding chapter in Rocksteady’s Arkham saga and the developers chose to expand upon the game world by implementing Batman’s famous Batmobile and redesigned the city to incorporate the car’s unique gameplay mechanics. Arkham Knight was met with generally favourable reviews; reviews praised the game’s puzzles and expansion of Batman’s gameplay and repertoire but also criticised the game’s big narrative twist and the over-reliance on Batmobile sections. Still, Arkham Knight was the fastest-selling game of 2015 and, as with its predecessors, was expanded upon through the release of downloadable content (DLC) that served as both pre- and post-game content that was met with mixed to negative reviews.

The Plot:
On Halloween, Doctor Jonathan Crane/The Scarecrow forces everyone but the very worst of Gotham City’s inhabitants to leave the city when he threatens to swamp the streets with his fear toxin. With the city under lockdown and some of his worst rogues at large, Batman is faced with his greatest challenge yet when he encounters the mysterious “Arkham Knight”, who not only commands a well-armed militia but also has a personal vendetta against the Dark Knight.

Gameplay:
For Batman: Arkham Knight, the game developers once again returned to the formula that worked so well in Arkham City and, by expanding upon them exponentially and even infusing a few mechanics inspired by Arkham Origins, sought to create the biggest and most definitive Batman videogame to date. Consequently, the stakes are much higher, the city is larger than ever, and Batman’s repertoire has been refined, improved, and expanded upon but, most crucially, the game’s central control scheme remains as fluid and familiar as ever. The basic control mechanics remain largely unchanged from the previous games: you hold A to run and glide when running from a ledge or tap it to perform a dodge, press B to perform a stun with a swoosh of Batman’s iconic cape, and tap X to attack and counter incoming attacks (indicated by a helpful Bat symbol over their heads) with Y and string these moves together to build up a combo attack that increases your multiplier, speed, and damage output. Pressing the Right Trigger allows you to crouch to soften your steps and sneak up on enemies, and you can select a gadget by pressing down on the directional pad (D-Pad), aim it with the Left Trigger, and fire off Batman’s patented grapple with the Right Bumper.

Batman’s stealth options are bolstered by the new Fear Takedown mechanic.

Rocksteady’s trademark “freeflow combat” system remains as fluid and intuitive as ever; you can make use of any of Batman’s gadgets by holding LT and pressing buttons like X and Y to add to his combo multiplayer and must stun, evade, and utilise split-second timing to avoid, counter, and counterattack the game’s various distinct, yet familiar, enemies. You can, as before, also utilise Batman’s gliding mechanics to take out enemies by performing a dive bomb or even by firing off certain gadgets mid-flight and, as is also the standard by this point, stealth is just as important as Batman’s combat prowess. Consequently, you’ll still be grappling up to higher levels to scope out large groups of armed and unarmed enemies in order to pick them off undetected. Vents, smoke pellets, and various parts of the environment can also be used to disorientate or take out enemies and to allow you to get the drop on unsuspecting thugs, which allows you to silently choke them out or perform an instant “Knockout Smash” but at the cost of alerting other enemies. Arkham Knight introduces a new “Fear Takedown” mechanic that allows Batman to subdue up to five enemies in one move as long as he remains undetected, with time slowling down to allow you to easily focus on your next target.

Batman’s Detective Vision allows him to recreate crime scenes and navigation is as intuitive as ever.

Batman’s ever-useful “Detective Vision” is now mapped to the D-Pad; pressing up bathes the world in an x-ray-like filter that highlights nearby enemies, secrets, and points of interest. Similar to how this was a crucial part of progressing the story in Arkham Origins, Batman’s Detective Vision can be utilised to reconstruct crime scenes and review evidence from various angles by use of his Evidence Scanner. This allows you to hold X to scan in any evidence and then cycle through a holographic reconstruction of the incident to find clues, progress the story, and solve crimes. You’ll also once again find yourself using your Detective Vision to isolate Edward Nashton/Edward Nygma/The Riddler’s informants in order to get clues to track down the Riddler’s trophies and challenges; these tugs are highlighted in green and should be left until last so you can press Y to squeeze information out of them. The game map is noticeably larger than ever before, with many new and familiar areas of the city to explore, but thankfully Rocksteady’s ever-useful map and compass system remain intact to help you to navigate; you can place waymarkers on the main map to guide you to your destination and a Batsignal will shine into the sky to direct you towards your next objective, whether mandatory or otherwise.

Though a bit clunky, the Batmobile allows for fast, explosive travel and hard-hitting combat.

Unfortunately, there is no fast travel system like in Arkham Origins and still no way to fast exit interiors; Batman still has his gadgets (particularly his cape and grapnel gun) to help him traverse the city but, if you really want to get somewhere fast, you’re heavily encouraged to press the Left Bumper to summon the Batmobile! This armoured vehicle is very similar to the Tumbler and allows you to rocket through the grimy city streets, through destructible parts of the environments, and across rooftops by holding down RT. You can boost with Y, brake and reverse with X, dodge and slide with A and the control stick, and will conveniently and non-fatally automatically repel any nearby enemies with the car’s electrified defences. The Batmobile can even be remote piloted but, while its “Pursuit Mode” is extremely responsive (unless you’re attempting sharp turns or driving up tunnels without enough speed) and helpful arrows guide you towards your intended destination, the controls get a bit clunky when you hold down LT and enter “Battle Mode”. This transforms the Batmobile it into a mini tank and allows you to fire a missile barrage, send out a sonar signal to detect nearby enemies, and blast at the Arkham Knight’s automated tanks using a high-impact cannon or a rapid-fire gun. The Batmobile is absolutely essential to clearing the game’s main story and side missions, with many puzzles specifically tailored to have you flying over ramps, utilising a winch, or blasting at weakened walls in order to progress and complete side quests. The most notable of these sees you forced to take on the Riddler’s many hazard-filled race tracks hidden all over the city, which will test your skill as much as your patience, and the numerous instances where you must either pursue a foe at high speed or engage with wave upon wave of conveniently unmanned tanks.

You’ll get to tag in, or briefly play as, other supporting characters throughout the main campaign.

Gameplay in Arkham City is further mixed up through the return of similar puzzles from previous games that see you hacking or locating radio signals, activating machinery or crossing gaps with your various Bat-gadgets, making extensive use of the Batmobile’s versatile winch, and utilising the new (if brief) team-based mechanics. While you won’t get to switch to Selina Kyle/Catwoman this time around, you can control her during various Riddler challenges and there are instances where you’ll get to either tag in or briefly play as either Tim Drake/Robin, Dick Grayson/Nightwing, and even Commissioner Jim Gordon in a short flashback. Unfortunately, just like in Arkham City, there is no option to play as either of these characters on the main story outside of these instances, which I continue to find both confusing and disappointing. Similarly, there’s a section right at the end of the main story where you’ll take control of the Joker, who not only gets to wield a shotgun in a first-person sequence that sees him desperately trying to take control of Batman’s mind but also has his own “Jokermobile”. Despite being unequivocally dead, the Joker continues to play a pivotal role in the story; thanks to being infected with the Joker’s blood, Batman is continually haunted and tormented by visions of the Joker throughout the main campaign, which include a recreation of his crippling of Barbara Gordon and Joker’s torture of Jason Todd, and eventually leads to Robin questioning Batman’s sanity and stability.

You’ll need all of Batman’s upgrades to lock his villains up in the G.C.P.D. cells.

Although you can no longer travel to the Batcave, Batman has set up a makeshift laboratory in the city and you can enter the Gotham City Police Department to converse with non-playable characters (NPCs) and the cells will fill up with his various rogues as you defeat and capture them in the main story. As always, defeating enemies, scanning objects of interest, finding Riddler Trophies, and completing missions earns you experience points (XP) that allow you to not only level-up to upgrade Batman’s suit and gadgets but also augment the Batmobile’s capabilities. As the game gets progressively harder as you complete story objectives, with more and more varied enemies appearing all over the city and in larger numbers than ever before, you’ll definitely need to make the most of these upgrades if you want to increase your chances at succeeding. The game has different difficulty settings that can be changed at any time if you’re struggling but you’ll be forced to utilise all of Batman’s skills and gadgets as the story progresses; this means chaining combos using the Batmobile, taking on small encampments of enemies, and (as is also the standard) tackling the game’s “New Game +” mode that starts you off with all of your upgrades and XP but removes counter indicators and increases enemy aggressiveness.

Graphics and Sound:
You probably won’t be surprised to hear that Arkham Knight is the most graphically impressive of all the Batman: Arkham videogames; bathed in the perpetual blanket of a dark and ominous night, Gotham City has never looked better and is awash with filthy streets, high-rise industrial areas, and abandoned docks and dingy alleyways. Rain will occasionally wash over the city, giving everything a sleek and suitably menacing look, and it’s genuinely impressive how the game utilises these effects, lighting, and shadows to craft one of the most gorgeous looking titles I’ve ever played. Batman, in particular, looks spectacular; now sporting a far more futuristic suit that emphasis the “Knight” of the game’s title, he again accumulates battle damage as the game progresses and remains a fearsome and impressive character model. Unfortunately, while I have many positives to say about Rocksteady’s interpretation of Robin, I can’t say I care too much for Nightwing’s new suit, which includes an odd and uncomfortable looking headpiece.

Gotham is huge and full of large, detailed locations both old and new.

Gotham City is nothing short of spectacular; as I mentioned before, it’s super fun to see Batman’s enemies end up populating the cells at the G.C.P.D. and you can also revisit notable areas from the previous games and even Barbara Gordon/Oracle’s church tower. While it’s disappointing to find the city is once again abandoned and largely devoid of life except for criminal scum, Gotham City is almost too big this time around and it does baffle me a little bit that the developers didn’t include the Batwing fast travel system but there’s a great deal of fun to be had gliding or grappling through the air or blasting through the streets in the Batmobile. One of the game’s most prominent missions sees you infiltrating the blimp-like airship of industrialist Simon Stagg, which introduces a bit of an aggravating tilting mechanic to the game that can be a bit tricky to get past. Another mission that is a personal favourite of mine sees Batman willing to give his life when the ACE Chemicals reactor goes critical. This has you very carefully placing big tubes into slots to contain the reaction, which can be a bit finnicky but the section is made all the more poignant thanks to the dialogue between Batman and his butler and father-figure, Alfred Pennyworth, and the touching orchestral score.

Not only is the city bigger than ever, but the locations are large, detailed, and more dangerous and garish.

It’s actually pretty amazing how the developers tweaked the city to be both believable in its construction and also conveniently tailored to suit the new features offered by the Batmobile. All too often, this means forcing you to use the Batmobile to solve a puzzle to open up a new area or speed through a tunnel or race track but, while these can be aggravating moments, there’s an exhilaration to be had in using the Batmobile and there’s nothing stopping you not using it outside of mandatory sections. Gotham City is comprised of three large islands (Miagami, Founders’, and Bleake), each with their own distinctive areas that include Wayne Tower, a dilapidated sewer system, and large bridges connecting them to each other. The Riddler’s challenges are more elaborate than ever; bathed in a garish neon glow, you’ll race through massively impractical sewer tunnels avoiding his many hazards or use Batman and Catwoman’s various skills to solve the Riddler’s death traps. Many of the interiors you visit are pretty much the same fair from previous games an are comprised of industrial facilities, rundown buildings, and an abandoned movie theatre repurposed for the villain’s purposes but all of them are perfectly in keeping with this world and they’re so much bigger, more detailed, and more impressively realised than before; you rally feel it when buildings explode or you bomb around the city in the Batmobile.

There’s a lot to see in the city, including jump scares from Man-Bat and a flood of fear gas!

As in the other Batman: Arkham games, a number of Batman’s other rogues are at large in the city and must be taken down in side missions. One of the most prominent is Doctor Kurt Langstrom/Man-Bat, who will randomly pop up to give you the fright of your life when you’re casually traversing around the city. Thanks to the Scarecrow’s fear toxin, you can expect things to get a bit twisted here and there as well; indeed, the game begins with you controlling a Gotham cop using a first-person perspective and forced to watch as the city descends into chaos. Thanks to the Joker’s influence, Batman will see various hallucinations of his foe across the city, a PlayStation-exclusive piece of DLC sees you racing through a nightmarish version of Gotham City transformed by the Scarecrow’s fear gas, and the city is shrouded in this same gas thanks to the release of Cloudburst. This bathes the game world in a thick, copper-tinted fog, drives enemies intro a manic frenzy, and you’ll even find the city being torn to shreds when Pamela Isley/Poison Ivy helps you out in this section.

Arkham Knight features some powerful, poignant performances from series staples Hamill and Conroy.

Even now, Batman: Arkham Knight is one of the most impressive videogames I’ve ever played; the game runs so smoothly, with quick loading times and a consistent frame rate. Textures, assets, and parts of the environment are just there onscreen, with no pop-up or distortion, and the sheer amount and variety of enemies onscreen at any one time really helps to add to the stakes and pressure Batman feels in this final outing. While it is a bit disappointing that the developers felt the need to include the Joker again, even after he has been killed, I’ll never complain about hearing Mark Hamill in his iconic role and matching wits with the immortal Kevin Conroy one last time. As always, Gotham’s thugs are extremely chatty and full of amusing sound bites and exclamations; Batman stays in constant contact with Oracle, Alfred, Lucius Fox, and Gordon throughout the story (with Alfred basically telling you “Go do some side missions” when the main story takes an awkward break) and, as if the Scarecrow’s constant taunting threats aren’t bad enough, Batman also finds his communications hacked by the Arkham Knight.

Enemies and Bosses:
If you’ve played any of the previous Batman: Arkham games, you’ll know what to except from Arkham Knight’s goons; a slew of vagrants and scumbags can be found all over the city in various groups and they’ll rush at you with knives, baseball bats, and even grab car doors to use as rudimentary shields or wield stun batons. Gun-toting enemies remain an obvious threat since Batman won’t last long against sustained gunfire or sniper shots so you should either disable, disarm or take down these enemies first or as quickly as possible. Thanks to the Arkham Knight’s technology and knowledge of Batman’s methods, thugs will also place booby traps, destroy vantage points, and even jam Batman’s Detective Vision to make things more difficult. As you might expect, there are a number of different enemies on offer in Arkham Knight: Combat Experts resemble Arkham City’s ninjas and can teleport away from your attacks and attack with swords, medics revive their fallen comrades, and Brutes must be stunned and subjected to a beatdown or lured to environmental takedown points to dispatch (or, in the case of the minigun variants, snuck up on and taken down with a quick-time event ). You’ll also have to contend with the Arkham Knight’s more heavily armed and capable forces; in “Predator” sections, this means picking armed thugs off one at a time but, out in the city, you’ll battle against unmanned Drone Tanks that can either be quickly destroyed in one hit or with a well-timed shot to their turret. When battling the Drone Tanks, you must be careful not to leave the designated area and make use of the Batmobile’s turning circle and dodge mechanic to avoid damage, which can be a bit clunky thanks to the way the controls are implemented.

Though dead, the Joker continues to haunt Batman and must be fought in his mind and by proxy.

Although the Joker is not an actual, tangible threat in this game, he does have a consistent presence; notably, when Batman is exposed to the Scarecrow’s fear gas, he sees enemies as the Joker and even becomes briefly possessed by him, skewing his perception of reality at certain key points in the story. The Joker also infected five Gotham citizens with his blood (with one of them being Batman) and, as part of the story, you’ll have to try and find and rescue these victims in a bid to save them. Two of them, however, serve as boss battles; the first of these, Albert King, you’ll battle alongside Robin. It’s best to stay out of King’s reach, take out the goons that accompany him, and utilise team attacks and beatdowns to defeat the Jokerised boxer. When you track down Johnny Charisma, Batman hallucinates him as the Joker, who sings a mocking song while strapped to a bomb. Rather than fighting Charisma, you must take control of Robin and sneak around to disarm the bombs as Batman stares down his adversary on a rotating stage. Other Joker infected are also encountered, though they’re generally hidden behind standard combat and stealth sections; you’ll also encounter Doctor Harleen Quinzel/Harley Quinn during these sections of the game, but defeating her simply amounts to performing a Team Takedown with Batman and Robin and then fending off her goons.

The Batmobile is instrumental in dispatching the Arkham Knight’s militia.

The Arkham Knight’s forces extend to a number of Armoured Personnel Carrier (A.P.C.) vehicles that pose a significant threat; when these appear on the map, you’ll need to chase them down in the Batmobile, side-swiping their support vehicles as you desperately try to hack them with Batman’s tech. The Arkham Knight will battle you four times during the course of the story, with the first seeing him take the controls of an attack helicopter. The Arkham Knight will bombard you with missiles while his forces try to distract you, so be sure to take out his Drone Tanks first before blasting at it his helicopter with the Batmobile’s cannon. In the second encounter, the Arkham Knight roams the fear gas-covered city in the heavily-armed Cloudburst Tank while being flanked by a number of Cobra Tanks. Rather than tackling these tank-like vehicles head-on, you’ll need to utilise stealth (while in the Batmobile) to sneak around behind the tanks to damage their weak spot on the back until only the Cloudburst remains. You must then scan it to identity its weak spots and then creep up on the Cloudburst Tank to land a hit on one of its four cooling systems before blasting away as fast as possible to avoid being blasted to smithereens by the tank’s high-powered weaponry. Once its central core is exposed, position yourself into a wide open space so that you can avoid his missiles and finally put an end to this absolute bitch of a boss fight that dragged on way too long and was far too finnicky to be enjoyable.

While Deathstroke is reduced to a tank battle, Pyg and Firefly prove formidable, if repetitive, villains.

However, don’t think it’s over yet as, after clearing the main story, Slade Wilson/Deathstroke takes control of the remnants of the Arkham Knight’s militia and you basically get to do a variation of this tedious battle all over again! As many have mentioned, it’s a shame that Deathstroke is reduced to such an insignificant and tiresome boss fight; the battle against him in Arkham Origins was brutally tough, yes, but it was a far better representation of the mercenary’s skills and actually put your combat prowess to the test. Another notable boss encounter in the game is a side mission that sees you investigating mutilated corpses that culminates in a battle against the ruthless butcher Lazlo Valentin/Professor Pyg. This sees Pyg’s zombie-like patients attack you relentlessly and these can only be put down for good with a ground takedown. Pyg himself spends most of his time tossing meat cleavers at you, which you can send back at him with a well-timed press of Y; once his minions are finally disposed of, stun him by smacking a cleaver at him and perform a takedown to end his threat but be warned as I found it oddly difficult to get the game to trigger the takedown in this fight. Other notable Batman enemies also crop up in side missions; as mentioned, Man-Bat will randomly appear flying through the city skies. When you spot him, you must try and get to high ground in order to land on his back and retrieve a blood sample in order to synthesise a cure at Langstrom’s lab using a simple mini game. Afterwards, you’ll need to wait for Man-Bat to appear a couple more times in order to administer this cure. Similarly, you’ll often get notified of fire stations that have been set ablaze; when you reach one of these, you’ll need to use the Batmobile to extinguish the flames and then chase the man responsible, Garfield Lynns/Firefly, across the city until the fuel in his jetpack runs out, allowing you to blast out of the Batmobile and bring him down. Like many of the side missions in the game, these occur randomly and the main campaign often grinds to a halt as you’re left trying to seek one of them out in order to reach 100% completion.

After taking out his drill machine, Batman goes head-to-head with his former protégé.

Later in the story, you’ll encounter the Arkham Knight one last time in the city tunnels; this time, he’s in a massive drilling machine that cannot be damaged by any of the Batmobile’s arsenal. Instead, you must flee from it to avoid being chewed up into scrap, boosting through a tunnel to avoid various unbreakable obstacles and luring the drill to a series of explosives in order to damage it. Afterwards, you’ll confront the Arkham Knight (who, by this point, has obviously been revealed to be Jason Todd) using Batman’s more familiar skills; you must avoid being spotted by the Arkham Knight’s red targeting sight, stay out of sight of his drone while taking out his goons, and escape from a room filled with poison gas within thirty seconds in repeated phases in order to grapple up to his vantage point and damage, and ultimately defeat, him. Rather than actually get to fight against the Scarecrow, the finale of the game sees Batman overcoming the Joker’s influence and finally putting the Clown Prince of Crime to rest and, thanks to surprising assistance from Jason, defeating the Scarecrow once and for all (but at the cost of his true identity being revealed to the world).

Power-Ups and Bonuses:
Just like the previous games, you’ll be able to use XP to upgrade Batman’s armour to improve his resistance to melee attacks and gunfire, add additional takedowns to his arsenal, and upgrade his many gadgets to improve their range and efficiency. If you’ve played the previous games then you’ll be immediately familiar with the vast majority of Batman’s gadgets: he’s got his patented Batarangs his Batclaws, explosive gel, smoke pellets, a tightrope-creating Line Launcher, a Remote Hacking Device to hack control panels, the Disruptor to render weapons inert, and the Remote Electrical Charge to activate certain electronic puzzles.

In addition to his many returning gadgets, Batman has some new toys and, of course, his tank car!

One of the most useful new gadgets is the Voice Synthesizer, which allows Batman to mimic the voices of his enemies and other NPCs to gain access to new areas and lure goons into a takedown. The Freeze Blast also makes a return, though it can be easily missed as it’s not necessary to finish the main campaign, but the most useful gadget in Batman’s arsenal is easily his Batmobile, whose weaponry can also be upgraded to increase your accuracy, reload speed, and weapon energy and efficiency as well as giving you the ability to hack the Drone Tanks to turn them against each other.

Additional Features:
Batman: Arkham Knight has sixty-nine Achievements for you to earn, many of which pop simply for playing through the main campaign and taking down Batman’s rogues. You’ll also get Achievements for using a hundred Quick Gadgets in combat, gliding four-hundred meters while less than twenty meters from the ground, landing fifty critical shots on Drone Tanks, for performing twenty Fear Takedowns. Some are a little more tricky, requiring you to glide under three bridges, completing a series of jumps in the Batmobile, and avoiding damage against Drone Tanks, all for a measly 5G each.

Riddler, Two-Face, Azrael, and other Batman villains offer various side quests of varying quality.

As is to be expected, there are a number of side missions to occupy your time away from the main campaign and net you additional Achievements; these include completing Augmented Reality trials, destroying militia watchtowers, disarming a series of mines using the Batmobile, and (of course) collecting Riddler Trophies. This time around, the Riddler forces Batman and Catwoman to work together to both save a number of hostages from his death traps and overcome his deadly racetracks and puzzles. This culminates in a battle that pits the two against the Riddler, who first sends a swarm of robots after you (which are colour-coded so that only Batman can destroy the blue ones and Catwoman the red) before attacking you in a massive, steampunk-like mech! Batman will also have to team up with Nightwing to locate and destroy Oswald Cobblepot/The Penguin’s weapon caches, which culminates in Batman having to rescue Nightwing from the Penguin’s goons and subdue the mobster with a Team Takedown. Batman will also have to foil a series of robberies perpetrated by Harvey Dent/Two-Face, rescue firemen held hostage all over the city, and finally close the book on the case of Doctor Thomas Elliot/Hush and Michael Lane/Azrael. Both of these are quite anti-climatic considering that Arkham City seemed to be indicating that they would play a pivotal role in this game, though the Azrael side mission does result in some fun combat situations rather than simply culminating in a glorified quick-time event like the disappointing Hush side mission.

The DLC, while short, at least offers multiple different characters to play as.

Fans of the Arkham Challenge Mode will be glad to hear that it returns once more, again pitting you against a series of combat, stealth, and mini campaigns (many of which you can customise with different buffs and debuffs) to earn Medals, Achievements, and actually have an opportunity to play as other characters besides Batman. Arkham Knight was expanded upon with a decent amount of DLC, which added additional skins for Batman, his allies, and even his vehicles and brought the total Achievement count up to 113. While a lot of the DLC was comprised of yet more race tracks (with some based on the 1960s show and Tim Burton’s film), there were a few additional mini campaigns on offer. These included additional villains to encounter in the main campaign, a prelude in which you get to play as Barbara Gordon’s Batgirl, and post-game stories where you play as Nightwing, Catwoman, Harley Quinn and Jason Todd (now in the guise of the Red Hood). While none of these were as long as some of the additional DLC missions seen in Arkham City or Arkham Origins, they featured additional Achievements, new areas and villains, and it was nice to actually get to play as someone other than Batman if only for a short period of time and in an isolated narrative bubble.

The Summary:
I can totally understand why people would have been left a bit disappointed by Batman: Arkham Knight: the big twist regarding the titular character was incredibly predictable (especially for long-time Batman fans), the villains utilised in the story were a bit bland and uninspired (the game’s really missing those nightmarish Scarecrow sections from the first game), there was a certain amount of dismay inherent to the game since it was the last in the series, and the forced emphasis on the Batmobile definitely bogged down the usual combat and stealth-based mechanics of the previous games. Being as it was the third (well, fourth, technically) game in the series, a certain amount of predictability was to be expected; by this point, the series had done so much and included so many stories and side stories that it’s arguable that Rocksteady would have struggled to please everyone no matter how they told their finale. For me, the primary glaring flaw in the game is how the main campaign literally stops dead in its tracks on multiple occasions and you’re told to do some side quests, which can be difficult to accomplish as many of them are only playable when the game randomly loads them in. This noticeably interrupted the flow and the lack of checkpoints in some of the harder Batmobile sections (particularly against the Cloudburst Tank) and the sheer abundance of annoying Riddler racetracks and death traps, relying too much on Batmobile combat for certain scenarios (especially battling Deathstroke), offering lacklustre conclusions to Arkham City’s loose threads, and a disappointing assortment of DLC do weigh heavily on the overall experience. Yet, despite all of this, it cannot be denied that Batman: Arkham Knight is an abolsutely phenomenal experience. While Batman: Arkham City may be my favourite in the series, with Arkham Origins close behind, I have to make room in the ranking for Arkham Knight for its sheer scale alone. This is a Batman at the absolute top of his game and, accordingly, Arkham Knight may very well be the quintessential Batman experience. With a host of new combat mechanics, detective skills, and gadgets at you disposal, never has a game encapsulated what it means to be Batman better than Arkham Knight; there’s still loads to see and do, the story is intense and engaging and feels very raw, personal, and like a true finale for this version of the character.

My Rating:

Rating: 5 out of 5.

Fantastic

Were you a fan of Batman: Arkham Knight? How do you feel it holds up compared to the previous games in the series? What did you think to the larger, more open and varied game world? Were you a fan of the tag team mechanics and, like me, would you have liked to see these other characters actually playable in the open world this time around? Did you ever find all of the Riddler’s Trophies and what did you think to his racetracks? Were you a fan of the Batmobile? What did you think to the game’s DLC? How did you celebrate Batman Day this year and what is your favourite Batman videogame? Whatever you think about Batman: Arkham Knight, or Batman in general, drop a comment below!

Screen Time [Venom Day]: Spider-Man (1994): “The Alien Costume” (S1: E8-10)


To celebrate the release of Venom: Let There Be Carnage (Serkis, 2021), Sony Pictures declared September 27 “Venom Day”, a fitting date to shine the spotlight on one of my favourite anti-heroes, who made their first full debut in May 1988 and have gone on to become one of Marvel’s most iconic characters.


Season One, Episodes Eight to Ten:
The “Alien Costume” Saga

Air Date: 29 April 1995 to 13 May 1995
Network: Fox Kids Network
Stars:
Christopher Daniel Barnes, Hank Azaria, Roscoe Lee Browne, Don Stark, Jim Cummings, and Edward Asner

The Background:
Given that Marvel’s resident wall-crawling hero proved to be popular enough to receive his own self-titled comic book barely a year after his blockbuster debut, it’s perhaps no real surprise that Peter Parker/Spider-Man has featured in a number of cartoons over the years. Nowadays, it seems like Spidey gets a new cartoon every other day of the week but, when I was a kid, his 1994 to 1998 cartoon was a must-watch piece of weekly entertainment. Produced by Saban following their success with the X-Men animated series (1992 to 1997), Spider-Man (or Spider-Man: The Animated Series) was a fresh and fun adaptation of many of the web-head’s greatest adventures, even if it was a little hampered by some unnecessary censorship. Given that I was super into Venom at the time, it’s no surprise to me that the cartoon’s introduction and depiction of the character rank as some of its best episodes; so popular were Venom at the time that they were introduced in the first three-part saga of the series (and well before the creators adapted the “Secret Wars” comic) and even returned for a two-part follow-up a year later.

The Plot:
After rescuing astronaut Colonel John Jameson (Michael Horton) from a shuttle crash, Spider-Man (Barnes) finds his costume and abilities augmented by a mysterious black goo. When Wilson Fisk/The Kingpin (Browne) sends a number of super-powered goons to retrieve the “Promethium-X” Jameson brought back to Earth, Spidey finds his aggression and character altered by the suit, which is revealed to be a symbiotic organism! After ridding himself of it, Spidey is confronted with one of his worst foes imaginable with the symbiote bonds with disgruntled reporter Eddie Brock (Azaria) and transforms them into Venom!

The Review:
The “Alien Costume” arc begins with astronaut John Jameson digging up a mysterious black rock from the surface of the Moon; after narrowly escaping a Moonquake, he makes it back to the shuttle and his return to Earth with the newly-discovered isotope, Promethium-X, attracts the attention of the Kingpin since it promises to be more powerful and valuable than Plutonium. However, John’s return is hampered when the rock secretes a seemingly-sentiment, tar-like substance that attempts to consume the astronauts and leaves the shuttle on a collision course with New York City!

The shuttle crash and the acquisition of Promethium-X forms the central conflict of the arc.

Despite the imminent danger, Kingpin’s lead scientist, Alistair Smythe (Maxwell Caulfield), assures him that the shuttle will land without causing any damage to the city so he (as in the Kingpin) contacts Aleksei Sytsevich/The Rhino (Stark) to retrieve the Promethium-X once the shuttle makes its emergency landing on the George Washington Bridge. There, he comes into conflict with Spider-Man and, thanks to his superior size and strength and the shuttle’s precarious position, is able to best the wall-crawler and make off with the isotope. Although he saves John and his co-pilot, Peter is aghast when he is fingered as the one responsible for stealing the Promethium-X thanks to John’s incoherent rambling, his father J. Jonah Jameson’s (Asner) unrequited hatred for Spider-Man, and disgraced photographer Eddie Brock selling J. J. pictures that incriminate the web-head. Having been introduced in previous episodes as an embittered man desperate to regain his job at the Daily Bugle, Brock jumps at the chance to capitalise on Jameson’s hatred of Spider-Man with his photos.

The black suit overtakes Spider-Man and augments his strength and negative emotions.

This results in Jameson placing a $1 million bounty on Spider-Man’s head, forcing Peter to lay low. However, while he sleeps, the mysterious black substance from the shuttle is revealed to have attached itself to his costume and, following a harrowing nightmare, the goo overtakes Peter, who wakes to find himself garbed in a sleek black costume that dramatically augments his speed and strength. Overwhelmed at the suit’s capabilities, Spider-Man discovers he can now shoot organic webbing and change his appearance by simply thinking about it, but it quickly becomes apparent that the alien substance is also affecting his personality. Far more confident than ever before, even Spider-Man’s voice is slightly altered when he’s wearing the black suit, making him sound tougher and more aggressive than usual. Equally quick to anger, Peter threatens Eugene “Flash” Thompson (Patrick Labyorteaux), snaps at his doting Aunt May (Linda Gary), and comes close to killing destroying the Rhino after handily dominating their rematch. Although he manages to get a hold of himself, Peter’s demeanour continues to degrade into an enraged fury as he is hounded at every turn thanks to Jameson’s bounty; his overconfidence and anger causes him to become sloppy, however, and he learns the hard and painful way that the alien costume is vulnerable to high-intensity sonic waves. Spider-Man does himself few favours when he confronts Brock and Jameson, threatening them in the Daily Bugle and driving him to visit his friend, Doctor Curt Connors (Joseph Campanella), to find out more about the suit.

While Spidey disregards Connors’ advice about the symbiote, he uses to science to outwit the Kingpin.

As you might expect, Connors reveals that the suit is actually a living, alien symbiote that is seeking to permanently bond with Peter. Although he stresses the very real danger of the alien costume, Connors is unable to convince Spider-Man to remove to suit since he needs it to recover the Promethium-X. When John corroborates Spider-Man’s story of a guy in a rhino suit, Jameson angrily lays into Brock for lying to him, fires him, and is begrudgingly forced to withdraw his bounty on Spider-Man. Embittered by this development, Brock’s mood is further soured when he is also evicted from his apartment and when he is targeted by the Kingpin, who sends Herman Schultz/The Shocker (Cummings) after him to tie up the loose ends from the shuttle robbery. After saving Brock from being blasted into dust, Spider-Man tracks the Shocker to Smythe’s laboratory and finally recovers not only proof of his innocence from Brock’s apartment but the Promethium-X from Smythe. While the Kingpin was more concerned with selling the rock to the highest bidder, Spider-Man takes the time to properly investigate the Promethium-X and discovers that, while it is incredibly powerful and dangerous, its radioactive half-life is ridiculously small, which results in the Kingpin being left humiliated and with an inert rock in his possession.

After ridding himself of the symbiote, Spidey unknowingly births his greatest foe: Venom!

However, Spider-Man’s tumultuous emotions are driven to the edge when Smythe lures him to a bell tower by taking John hostage in order to recover the isotope; overcome with rage, Spider-Man destroys the Shocker’s gauntlets and is seconds away from doing the same to the mercenary before memories of his beloved Uncle Ben remind him that “with great power comes great responsibility”. Guilt-ridden and desperate to be rid of the alien suit, Spider-Man frantically tries to remove the symbiote but his efforts prove useless until he takes advantage of the church bell to cause the creature enough pain to separate itself from his body. However, Brock (who followed Spider-Man in a desperate attempt to extract a measure of revenge against the well-crawler), finds himself enveloped by the injured and enraged creature as he hangs helpless beneath the church bell. The result is a muscular, embittered, monstrous union of man and symbiote, Venom, who vows to destroy Spider-Man for ruining both of their lives. Venom makes their presence known as Spider-Man is settling the score with the Shocker and the Rhino on a rooftop; Venom actually saves Spider-Man just as he’s about to be destroyed simply to have the honour for themselves. In the process, Venom proves to be far stronger than Spider-Man, immune to his spider sense, privy to his secret identity, and possessing all of his physical and superhuman abilities but augmented thanks to Brock’s rage and workout routine.

Overwhelmed by Venom’s superior strength, Spidey is left relying on his wits to triumph.

Hopelessly outmatched, Spider-Man is left physically overpowered; his attempts to appeal to Brock’s better nature fall on deaf ears and Spidey finds himself at Venom’s mercy. Venom threatens to target, and reveal Spider-Man’s identity to, Peter’s loved ones and even leaves him dangling over a rooftop without his mask on at one point! Narrowly escaping with his identity intact, Peter is stalked by Brock at every turn and starts seeing Venom everywhere; with no choice but to take the fight to his foes, Spider-Man taunts Brock with newspaper clippings of his failures and baits Venom into following him across the city to the launch of another shuttle at a military base outside of New York. There, the two have a final confrontation up the support gantry that ultimately ends with the symbiote being driven from Brock’s body when the shuttle launches. Spider-Man then webs the writhing creature to the shuttle, sending it back into space, and leaves Brock in police custody, finally free of his alien nightmare… for the time being.

The Summary:
As much as I enjoyed, and still enjoy, the 1994 Spider-Man cartoon, there are some elements of it that obviously haven’t aged too well. The video transfer to DVD isn’t the best and the animation can be a little jerky at times. The editing is quite rushed here and there, meaning that episodes can quickly gloss over and bounce around certain scenes despite being fully capable of telling a well-paced story at other times, and there is a bit of dodgy CGI and the music gets very repetitive. Still, these concerns are largely minor and can be said of almost any cartoon produced in the nineties (or ever, for that matter) and, for the most part, the episodes are bright, action-packed, and well animated. Fittingly, the animation and presentation benefits Spider-Man the most of all the characters in the cartoon; vibrant and athletic, Spider-Man is a very dynamic character in the cartoon and capable of many superhuman feats despite not being allowed to throw a punch. Peter, despite closely resembling Nicholas Hammond, oddly looks bigger than his web-slinging counterpart but Spider-Man is expressive and vibrant throughout. The depiction of his black suit is equally top-notch; one of the arc’s stand-out scenes is Peter’s disturbing nightmare where Kaiju-sized versions of the black and classic costumes battle over Peter’s soul and he’s left hanging upside down in the middle of the city garbed in the sleek, sexy black suit. “The Alien Costume” may also be the first instance of the symbiote augmenting Spidey’s superhuman abilities and characteristics as this didn’t really happen in the original comics (at least not to the extent as it does in other media) and the three episodes definitely set the standard for Peter’s struggles with the symbiote going forward.

Spidey looks great, despite some dodgy animation, and Venom benefits from the multi-part arc.

Brock’s introduction is handled far better in the cartoon compared to the comic since he was actually introduced, and featured, in a handful of episodes prior to these three; angry and bitter, he’s been the victim of a string of bad luck and bad decisions that cause him to grow increasingly resentful of Spider-Man. Consequently, his transformation into Venom empowers him, driving him even more maniacal thanks to the symbiote’s power and abilities. Unlike in the comic books (at least at the time of these episodes), the symbiote is revealed to be incredibly old, well-travelled, and possessing knowledge of the wider universe and numerous worlds, indicating that it’s far more than just a near-insane parasitic lifeform. Venom looks fantastic in the cartoon, sporting their trademark fangs, talons, and long tongue as well as a hulking physique and a distorted, monstrous voice that, again, set the standard for how Venom are portrayed outside of comics. The episodes also do a pretty decent job of portraying C-grade villains like the Rhino and the Shocker as formidable threats; thanks to the influence of the black suit, Spider-Man’s anger and emotions are constantly in flux throughout the arc and are only exacerbated by the duo’s tenacity. Still, once Venom enters the picture, they make all other villains irrelevant; possessing knowledge and physical abilities that make them superior to Spider-Man in every way, Venom plays mind games with Peter, taunting and stalking him and overwhelming him both physically and emotionally. Just like in their first comic book encounter, Spider-Man is forced to use his initiative and wiles to outsmart his maniacal foes rather than trying to match them blow-for-blow. The end result is a far grander conclusion to their confrontation since Spidey utilises a shuttle launch rather than simply wielding a sonic blaster, which is a fittingly dramatic (if temporary) end to Venom’s threat as their story started in space and technically ends in space.

My Rating:

Rating: 4 out of 5.

Great Stuff

What did you think to the “Alien Costume” arc? Did you watch Spider-Man when it first aired or did you discover it later, perhaps on Disney+? What did you think to the depiction of Spider-Man’s black costume and how it influenced his powers and personality? What did you think to Venom’s depiction in the cartoon? What is your favourite Venom story or adaptation? How are you celebrating Venom’s dramatic debut today? Whatever your thoughts on Venom, feel free to sign up to leave them below or drop a reply on my social media.