Game Corner [Alien Day]: Aliens: Colonial Marines: Limited Edition (Xbox 360)


Audiences were first introduced to the horrific, biomechanical Xenomorphs in the classic science-fiction horror film Alien (Scott, 1979), a tense and suspense-filled monster film that kick-started an entire franchise. In that film, and much of the subsequent Alien media, an unsuspecting cargo crew investigates a beacon on the barren world of LV-426 and, as a result, the 26th of April is widely celebrated as “Alien Day”, a day to celebrate one of the greatest sci-fi/horror franchises ever created.


Released: 12 February 2013
Developer: Gearbox Software
Also Available For: PC and PlayStation 3

The Background:
Hooo boy, where to start with this one? So, if you’ve played games, follow games news, or watch online reviews or videos about games the chances are that, at some point, you’ve come across people talking about Aliens: Colonial Marines, a first-person shooter (FPS) that was heavily pushed as being the official, direct sequel to Aliens. Though originally conceived of by Gearbox Software, multiple development studios worked on the game between 2007 and its eventual release in 2013 since Gearbox was busy dividing their attentions between multiple other titles at the same time. This, perhaps inevitably, led to some disagreements regarding the design and direction of the game. Further compounding matters was the fact that Gearbox were dissatisfied with TimeGate Studio’s work on the PlayStation 3 version and, having already delayed the game significantly by this point, were forced to work against a strict deadline to finish the game for its intended release date. Interestingly, Aliens: Colonial Marines actually sold really well upon its release (perhaps because of the strength of the Aliens franchise) but was the subject of widespread scathing criticism; critics were unimpressed with the graphics, bugs and glitches, poor textures and lighting effects, and its lack of continuity to the Alien franchise. While there were some who praised the game’s aesthetics and features, others criticised the intelligence of the game’s enemies, which had been corrupted and neutered thanks to a simple typing error in the game’s code. For my part, I’d heard all the horror stories surrounding this game and was still intrigued; being a big Aliens fan, and considering the game is dirt cheap and easy to come by, I figured it couldn’t really be as bad as I was being told, especially since I’d heard similar stories about Aliens vs. Predator (Rebellion Developments, 2010) and found that to be nowhere near as bad as I had been led to believe. Not perfect, for sure, but then again I’m not the biggest fan of FPS games so my expectations are quite low by default.

The Plot:
Seventeen weeks after the events of Aliens, the Sephora receives a distress call from the Sulaco, which has inexplicably returned to orbit around LV-426. Corporal Christopher Winter is amongst the Colonial Marines sent to investigate the ship, discovering that it (and the planet below) is infested with Xenomorphs that have wiped out an entire regiment of Marines and that the malicious Weyland-Yutani corporation have once again secretly been plotting to acquire the creatures for their bio-weapons division.

Gameplay:
Aliens: Colonial Marines is, like many titles in the franchise, a first-person shooter that is, for the most part, very similar to the Marine portions seen in Aliens vs. Predator and other FPS games. In a refreshing change of pace, you play as a character who isn’t silent for a change; Winter, like many of his fellow Marines, may look and sound like your typical overly-macho jarhead but it’s nice to actually have an FPS protagonist who isn’t as silent as a graveyard and can actually, properly interact with the game’s other characters.

Blast those Xeno bugs to mush with your FPS skills.

As you might expect, all the typical FPS clichés are present and accounted for: you can carry two weapons at a time, changing between them with the Y button, in addition to a limited number of explosives (frag grenades, firebombs, and claymores, specifically) and a pistol with unlimited ammo, both of which can be accessed by pressing right or left on the directional paid (D-pad). You can jump with A (though, thankfully, there isn’t really much in the way of platforming sections), crouch with B (doing so behind boxes or other parts of the environment to avoid incoming fire), sprint for a short burst by pressing in the left analogue stick, and execute a melee attack (generally bashing enemies with the butt of your weapon) by pressing in the right analogue stick. If Xenomorphs or Facehuggers pin you down, you’ll have to mash X to fight them off and may be reduced to your pistol for a few moments as you struggle to your feet; you can also shoot at explosive canisters to take out multiple enemies at once, which is always handy.

Don’t use the weapon wheel in the middle of combat or you might end up skewered!

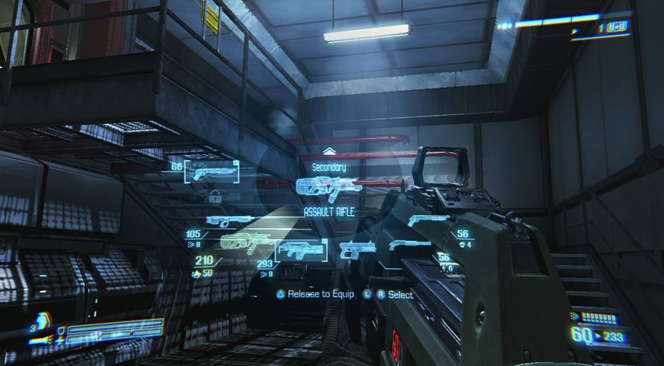
Holding down the Y button will bring up the game’s weapon wheel; from here, you can equip different weapons as you collect or unlock them, which is useful but this weapon wheel doesn’t pause the game so, if you need to switch out our Assault Rifle for the Pulse Rifle in the middle of a skirmish, the chances are that you’re going to get injured or killed so it’s best to switch your weapons in safe areas. Most weapons have a secondary fire function as well, ranging from an explosive short or flame burst to a paralysing effect to your shots, and you can toggle your torch (or “flashlight” for you Americans) by pressing down on the D-pad. You’ll want this flashlight activated at all times since Aliens: Colonial Marines is a very dark game and you’ll need all the light you can get in some areas. I knew about this ahead of time and also cranked up the in-game brightness but, honestly, I actually didn’t mind the game’s darker areas and moments as they are all highly reminiscent of the source material and really added to the game’s fidelity to the movies and the sense of mounting dread and tension since you can never really tell what’s lurking around the next corner. Thankfully, you can whip out the franchise’s iconic motion tracker by pressing LB and a mini tracker will beep and appear onscreen when enemies are near. Neither are massively accurate and you can’t shoot and use the main tracker at the same time but it’s a welcome addition and better than nothing since the tracker also points you in the direction of your objective and notable characters/objects.

Gameplay occassionally slows down to have you defending barricades or using stealth.

The game features a relatively simple heads-up display (HUD) which tracks your armour, health, ammo, and experience points (EXP). Each time you kill an enemy or find a collectable, you’ll gain EXP and can spend these points on a variety of upgrades for each of your weapons. Your health is measured in three sections and will automatically refill in each section; however, should you lose a section of health, the only way to refill it is to grab one of the Med-Packs scattered across the game’s locations. Ammo, new weapons, and armour are relatively plentiful, often found stashed in the game’s quieter rooms or dropped by human enemies. The game also features some pretty generous checkpoints and, upon reloading a save, you’ll be gifted with full armour and health, which is always appreciated. The bulk of Colonial Marines’ gameplay is centred around exploring familiar environments from the first two movies, blasting a variety of Xenomorphs and human enemies as they rush at you, and some very basic missions. You’ll be cutting open sealed doors with your blowtorch, interacting with switches and consoles, finding flight recorders, taking out Weyland-Yutani scientists before they can activate alarms and set off poisonous gas, rescuing other Marines and personnel, and generally trying to survive and get to the bottom of Weyland-Yutani’s questionable schemes. Despite the game’s dark areas and the repetitiveness of many of the corridors and locations you find yourself in, the game is quite linear so you won’t find yourself getting lost that often but you can always refresh yourself on your current objectives by pressing the ‘Back’ button and just follow nearby non-playable characters (NPCs) if you get a bit stuck.

Set up and disable sentry guns to help tip the odds in your favour.

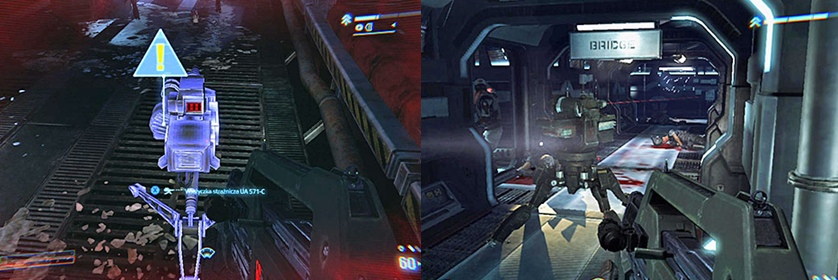
Occasionally, you’ll be charged with defending an NPC or holding out against wave upon wave of Xenomorphs as your fellow Marines attempt to cut through doors, signal for help, or start up the iconic Aliens dropship. These sections can be rather tense and frustrating since, while NPCs are helpful and will shoot at enemies (and make for great bait), they aren’t the most reliable computer-controlled allies I’ve ever had and it can be tricky to get a good shot at the agile and stealthy Xenomorphs. Often, you’ll also be tasked with grabbing and setting up an auto-turret in these situations, which can be extremely helpful, but you’ll also have to watch out for these turrets as Weyland-Yutani mercenaries have set them up to fire on you, requiring a bit of subterfuge as you take the long way around to disable the sentry guns. Aliens: Colonial Marines’ main campaign is divided into missions; as you complete each mission, you’ll be awarded with more EXP and given the option to continue or back out, allowing you to play in brief bursts if you desire. The game’s action is further broken up by a handful of instances where you must climb into the iconic Powerloader to open up a blast door and battle a particularly frustrating boss and, of course, numerous interruptions to the flow of the gameplay. These generally take the form of platforms collapsing beneath you, parts of the environment randomly exploding, or the risk of explosive decompression; in each instance, you’ll be forced to wait for the game to return control to you and then continue on though, thankfully, there are no disorientating moments where your senses are thrown off by concussive explosions.

I encountered few, if any, glitches in the A.I. of the bog standard enemies…

Overall, the game isn’t especially difficult; there are four difficulty options available and I finished a playthrough on “Soldier” (or “Normal” for us normal people) in about eight hours. As you might expect, the game lags a little thanks to its long loads times; many of these are unsubtly masked by long, drawn out periods of dialogue between characters or doors that need cutting open but you’ll also notice it whenever you die and reload a checkpoint. Considering all the horror stories I heard about the game’s buggy A.I., I found the enemies to be quite relentless and formidable; I never had any instance where enemies harmlessly ran against walls, got stuck against the environment, or passed right by me that weren’t intentional and I actually found myself dying quite a bit when the Xenomorphs attacked as a group (oddly, I found I accrued more deaths on the game’s easy mode…), though there were instances where the game’s dodgy coding could be exploited to my benefit.

Graphics and Sound:
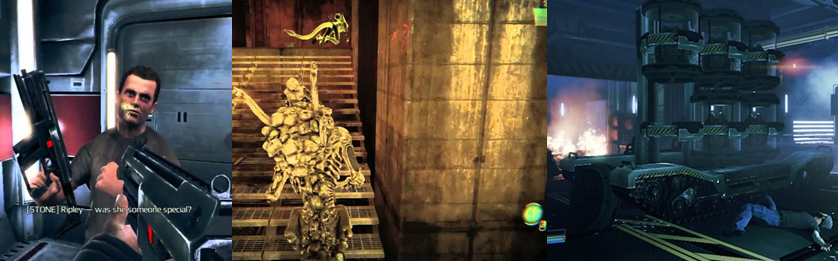
Aliens: Colonial Marines’ attention to detail is impressive, to be honest; every area looks and feels exactly as it did in Aliens or has been modelled to closely mimic James Cameron’s lived-in aesthetic. As you explore the Sulaco, you’ll find acid burns, claw marks, blood stains, and smashed lighting and other objects all over the place, which really adds to the immersion and the tension. You can even spot the lower half of Bishop (Lance Henriksen) in the Sulaco’s landing bay, alongside numerous Xenomorph husks, bloodied corpses, and dead Facehuggers. However, I will admit that I noticed some poorly-rendered textures, odd graphical hiccups, and that some of the voices would get cut off or be muted during dialogue.

The attention to detail is top notch but Hadley’s Hope is looking a little too intact…

In many ways, this attention to detail actually backfires somewhat as you progress through the game; as ridiculous as it is to conveniently be exploring the Sulaco, I can just about forgive it thanks to the very basic explanation the game provides. What I can’t quite forgive, though, is the fact that, after crash-landing on LV-426, you end up exploring Hadley’s Hope, the colony that was not only the primary setting for Aliens but was also completely obliterated by a nuclear explosion at the end of that film. Here, though, the colony is in exactly the same shape as it was at the start of Aliens; it looks exactly the same as it did when the Marines explored it in the movie, all the consoles work (to an extent) and all the movie’s locations are intact and recreated. You even come across Hudson’s (Bill Paxton) corpse, the medical bay, the area where the Marines set up their turrets, and explore the sewers, all of which show no signs of being vaporised as they surely would have been. This is great in terms of recreating the familiar locations of the movie but not so great when you stop and consider that the colony should have been reduced to a smouldering, highly radioactive crater. You also get to explore the derelict Engineer ship from Alien; similar to Alien Trilogy (Probe Entertainment, 1996), the ship has been quarantined by Weyland-Yutani and they have been investigating it, putting up floodlights and scaffolding and what-not in an attempt to harvest the Xenomorph eggs. This means, of course, that you also get to visit the massive egg chamber and the decaying remains of the Space Jockey from that film, which is always a delight, and I could have sworn that I spied the floating mapping device the protagonists used in Prometheus (Scott, 2012). Although all of the Marines resemble little more than action figures, the Xenomorphs come off looking much better; I always find it odd how games of this generation can render alien monstrosities so well but struggle with human likenesses.

Humans might look like garbage but the aliens look really good, at least.

While the game’s environments are dark, moody, and atmospheric, this all adds to the immersion and the tension since Xenomorphs can pop out from grates or smash through windows and doors at a moment’s notice, which really helps to keep you on your toes. Even the sewer section is made more exhilarating by the dank aesthetic, the presence of numerous, dried out Xenomorph husks, and the fact that you are stripped of all your weapons and must stealthy make your way through to avoid detection. Like many FPS titles, the majority of the game’s cutscenes are rendered using in-game graphics and without deviating from the first-person perspective, meaning full-motion cinematic cutscenes are few and far between. In terms of sound design, though, Aliens: Colonial Marines knocks it out of the park since everything is ripped straight out of Aliens; that means the familiar beep of the motion tracker, the recognisable bursts of the Pulse Rifle, the high-pitched squeals and growls of the Xenomorphs, and even the sounds of the computers and environment are all present and accounted for. Additionally, not only does Lance Henriksen return as Bishop but the developers somehow convinced Michael Biehn to return as Corporal Dwayne Hicks which, while welcome, makes absolutely no sense even in the game and seems to be based purely on the fact that the third movie is so unfairly hated.

Enemies and Bosses:
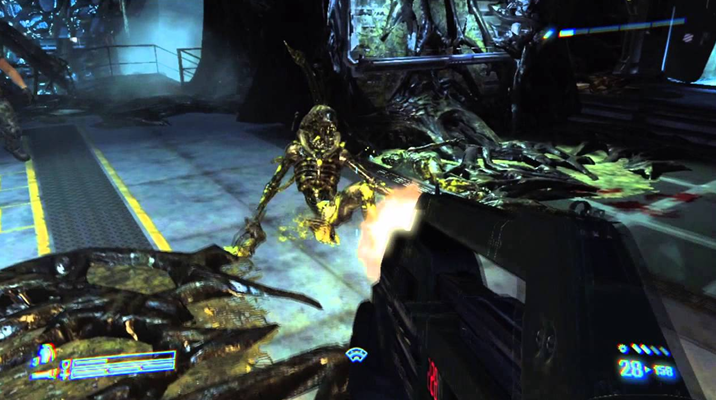
You’ll never believe this but the most common enemy you’ll encounter in Aliens: Colonial Marines are the Xenomorphs! The regular drones are modelled after those seen in Cameron’s film, sporting ridged skulls and clambering all over walls and ceilings. These guys will pop out from vents, grates, and even from behind doors, slashing and clawing at you, leaping at you, and trying to pin you down to take a bite out of you. Thankfully, though, like in Aliens, these bugs are easily dispatched (and will often blow into chunks) with a few shots and are most dangerous when attacking in groups or from the shadows; while they do bleed acid blood and melt away upon defeat, this doesn’t seem to damage you (or, if it does, I didn’t really notice).

You’ll come up against a few new types of Xenomorph in this game.

There are also a couple of Xenomorph variants to contend with as well, such as the Lurker Xenomorph, which is more akin to the one seen in Alien; this smooth-skulled bastard creeps around and attacks from the darkness before darting out of sight, making it a particularly bothersome enemy. You’ll also come across a number of eggs scattered throughout the game’s environments; you should shoot these on sight with your pistol and be aware of Facehuggers in the immediate area, which are small and particularly difficult to get a good shot at. In the sewers, you’ll encounter the Boiler variants; these are heavily-degraded husks whose senses have been dulled by radiation poisoning and remain completely still until they hear movement. You must sneak past them, stand completely still if they hobble near you, and then activate a series of switches to lure them towards noises, whereupon they explode in a shower of acid. You’ll also have to contend with the Spitter Xenomorphs, which spit acid at you from a distance to whittle down your armour and health, and combinations of each Xenomorph type at various points. You’ll also have to contend with some human opposition as Weyland-Yutani send in a bunch of heavily-armed mercenaries to take you out and secure their investment. These assholes dart around, use cover, and fire at you with the same weapons available to you, packing Pulse Rifles, shotguns, tossing grenades, and even wielding Smart Guns and heavier armour. Thankfully, they go down just as easily as the Xenomorphs and any nearby aliens will also attack these humans, which is helpful, but the mercenaries are a constant source of frustration as they tend to blast you with a shotgun from behind when you least expect it.

The Raven makes for a persistant and frustrating boss.

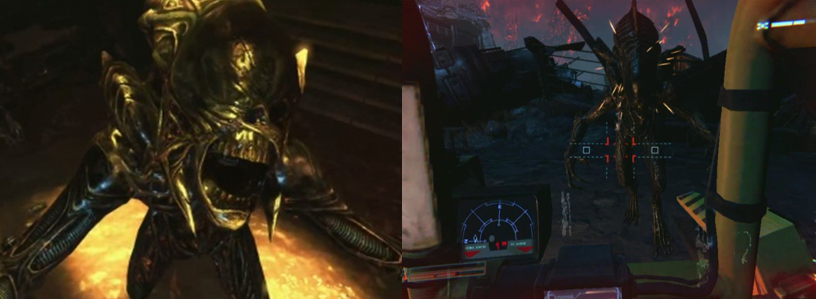
Aliens: Colonial Marines only features four boss encounters (each of these uses the term loosely since you aren’t given the luxury of a health bar to check your progress) but each one is a little different and frustrating in its own way. The first boss you’ll have to contend with is the Raven, a large, Praetorian-like alien that appears to have burst out of Hudson’s chest. This thing is all-but-invincible and must be evaded and ran from when you first encounter it as you don’t have any of your weapons. Eventually, after darting through the sewers, dodging its wild swipes from floor grates, and racing across the barren wasteland of LV-426 while numerous drones try to cut you to ribbons, you make a final stand against it in the iconic Powerloader for, perhaps, one of the worst and most annoying boss fights ever. The Powerloader is slow and clunky and it’s never made entirely clear what you have to do or if your hits are even landing, not to mention the fact that your turning circle is abysmal and Xenomorphs swarm at you to whittle your health down. In the end, the best thing to do is concentrate on the Raven, whacking it with your left claw repeatedly and try to get it to glitch against the environment in a corner; land a few hits and then try using your right claw to choke it until, eventually (seemingly randomly), a cutscene will play out where Winter breaks the fucking thing in two.

Work your way past the APC’s heavy artillery in order to take it out of commission.

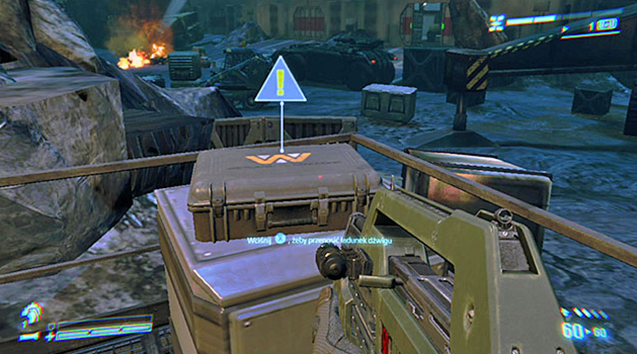
The next boss sees you taking on an Armoured Personnel Carrier (APC) that is manned, and protected, by Weyland-Yutani mercenaries. Like the Raven, this thing is completely bulletproof and will cut you in half, or blow you to pieces, in seconds with not only its heavy weaponry but also the firepower of the minions which protect it. I found this section particularly trying since you’re exposed in the open a lot, despite the abundance of cover (bullets and explosions can be seen to penetrate much of the cover anyway) and it’s really easy to get caught in a crossfire. It’s best to find a good vantage point, drive the APC back by shooting the nearby fuel tanks, and pick off the mercenaries (particularly the flamethrower and RPG-wielding assholes) to clear the way to the crane controls and crush the APC once and for all.

Luckily, you can use a game bug to make the Crusher far less threatening.

The third boss is the Crusher Xenomorph, a gigantic bull-like variant with a huge, armour-plated head that charges at everything head-first and will crush you under its elephantine feet. As if that wasn’t bad enough, swarms of Xenomorphs fill the area to distract you, making it hard to get a good shot at the Crusher but, luckily, you can again glitch the boss to make things a bit easier. When you enter the area where the boss spawns, head to the barricade on the left and hop on the crates and then on top of the barricade. The Crusher will stand completely still by the APC and no Xenomorphs will spawn in, allowing you to fire at it with your explosive shots and either significantly wound it or kill it outright to make the fight ten times easier.

It all ends with a game of hide and seek with the Alien Queen.

Finally, as you might expect, you must face off with a Xenomorph Queen. This gigantic bitch is completely bulletproof and you won’t be able to deal any damage to her at all; instead, you must use the conveniently-placed environment to hide and avoid her claws, tail, and sight, working your way around the hanger and towards a series of switches. You must then activate each switch to prime a cargo launcher, rushing back to cover and grabbing the respawning armour if she hits you and trying to not get sucked out into the atmosphere at the same time. Once the cargo launcher is fully primed, simply stand behind it and wait for her to get in front of it and activate it and that’s it. Of all the parts of the game, and the many battles I’ve had against Xenomorph Queens, this was by far the easiest and is simply a question of patience.

Power-Ups and Bonuses:
Naturally, as both a FPS title and an Aliens game, you can acquire numerous weapons and items to increase your odds against the Xenomorph hordes. When you spot a weapon, ammo, or item, though, it’s not enough to just walk over to it; you actually have to press X to pick them up so make sure you do this or you could enter the next fire fight shorthanded! Winter begins the game with a handy stock of frag grenades, the iconic Pulse Rifle, a service pistol, and a shotgun for close-quarters combat. You can also acquire a number of other weapons as well though, including the Assault Rifle and Submachine Gun, the sniper rifle-like Battle Rifle, and the tactical shotgun. Each one comes with different ammo capacities, firepower, and accessories to purchase and equip with your EXP. These include increasing your ammo capacity, adding laser sights, or underbarrel grenade launchers and flamethrowers. It’s a good idea to swap out for a different weapon when you find a quiet moment in order to preserve your more powerful weapons, though this can result in your shots being a bit less effective and a bit more haphazard depending on which weapon you select.

Grab the Smart Gun and dice those Xenos up with auto aiming and auto tracking!

You can also find three super weapons scattered throughout the campaign, generally right before a story-based objective; these include the Smart Gun (which automatically targets and tracks nearby enemies), the Incinerator Unit (a flamethrower perfect for setting alight groups of enemies), and the RPG Launcher to take out anti-aircraft guns. When you grab each of these weapons, you’ll still keep your existing weapons but won’t be able to use them unless you drop your current weapon; none of them can be reloaded either so choose your shots wisely. Finally, you can also pick up six Legendary Weapons throughout the campaign; once you find them, they are all added to your inventory for regular use (with two exceptions) and, while you can’t modify or upgrade them and they take their own unique ammo type, they generally tend to be a bit more powerful than the standard weapons. You’ll find such memorable weapons as Hicks’ shotgun, Scott Gorman’s (William Hope) pistol, Hudson’s Pulse Rifle, and Jenette Vasquez’s (Jenette Goldstein) Smart Gun; finding all six will net you a cheeky Achievement but, luckily, they’re all pretty much sitting out in the open so it’s not hard to miss them.

Additional Features:
Speaking of which, Aliens: Colonial Marines includes sixty Achievements, fifty of which in the main game and ten more made available through downloadable content (DLC). The majority of these are tied to story progression and the game’s multi-player but you’ll also net them for finding various goodies in the campaign (including a number of dog tags and audio files, the six Legendary Weapons, the head of Rebecca “Newt” Jordan’s (Carrie Henn) doll Casey, and even a stash of Xenomorph eggs painted up like literal Easter Eggs), completing missions under various time limits and restrictions, and for beating the game’s higher difficulty settings.

Pick up the game’s DLC for more multiplayer maps and a whole new solo campaign.

As alluded to above, Aliens: Colonial Marines features a multiplayer component; one allows for two players to play through the main campaign in co-op, which is achieved through a split screen, and the other is a typical deathmatch mode that, for some reason, cannot be played locally. Here, you can customise your Marine and Xenomorph’s appearance (unlocking additional attire, weapons, and attacks through successful play) and take part in various team-based missions across a variety of the game’s maps. Additionally, there’s a pretty decent amount of DLC available as well, including additional map packs for the multiplayer mode and an entirely new single player campaign, “Stasis Interrupted”, which explores the fourteen week gap between the end of Aliens and the start of Colonial Marines. This campaign sees you controlling a new Marine character, features a bunch of additional Achievements, and even has the player journeying to Fiorina “Fury” 161 in a desperate attempt to rescue Ellen Ripley (Sigourney Weaver). Finally, if you own the “Limited Edition” of the game as I (and, I’m sure, many) do, you’ll gain access to a number of classic characters and weapons from the Alien franchise, and some additional customisation options, to use in the multiplayer mode.

The Summary:
Once again, it turns out that all of the horror stories and negativity I’d heard about a game is nowhere  near the truth; sure, Aliens: Colonial Marines is by no means a perfect game but it’s far from the unplayable wreck I was led to believe it was. Instead, it’s a pretty by the numbers FPS title, offering little new or innovative from the genre, but elevated above much of its competition by a fantastic use of the Alien license. The game’s attention to detail is staggering and this very well may be the best one-to-one adaptation of Aliens ever; everything from the sounds, the weapons, and the environments is all ripped straight from Aliens and the game goes out of its way to recreate the look and feel of the film through the use of atmospheric lighting and almost slavish fidelity. It’s just a shame, then, that the developers didn’t think a little harder about the game’s narrative aspects in relation to its source material; as a midquel between the second and third movies, the game makes little sense, favouring fidelity and fan service over a coherent and consistent plot, which honestly drags the game down more than the minor graphical and A.I. bugs (of which I saw very little in the game’s basic enemies).

My Rating:

Rating: 2 out of 5.

Could Be Better

What did you think about Aliens: Colonial Marines? Did you find it to be a broken mess of the game like so many others or did you, like me, find it to be a perfectly serviceable FPS title? What did you think to the game’s story and the way it brought Hicks back? Did you encounter any odd glitches or game-breaking moments? If so, what were they and how often did they crop up? Which of the Alien movies or videogames is your favourite and why and how are you celebrating Alien Day this year? Whatever your thoughts, stay frosty and drop a comment below!

Game Corner: Taz in Escape from Mars (Mega Drive)

Released: August 1994
Developer: HeadGames
Also Available For: Game Gear and Master System

The Background:
Following his debut in “Devil May Hare” (McKimson, 1954) as a dim-witted and voracious foil to Bugs Bunny (Mel Blanc), my absolute favourite Looney Tunes (1930 to present) character, the Tasmanian Devil (or simply “Taz”), became a recurring character in subsequent Looney Tunes cartoons before graduating to his very own show, Taz-Mania (1991 to 1995), as part of the Looney Tunes renaissance of the nineties. Although technically not tied into that cartoon or a sequel to Taz-Mania (Recreational Brainware/Various, 1992), and a fundamentally very different game altogether, Taz in Escape from Mars is emblematic of the character’s enduring popularity. Unlike the previous title, which I was inspired to play after enjoying the Master System version, Taz in Escape from Mars has always been a daunting prospect for me; the game’s reputation is somewhat mixed and I remember it being a tough experience the few times I borrowed it as a kid. However, given my love for the character, I was looking forward to sitting down and actually putting some real time into the game and seeing if I could overcome it after all these years.

The Plot:
Having amassed a collection of strange and wondrous alien creatures, Marvin the Martian comes to Earth to kidnap the insatiable Taz and cage him in a special zoo on Mars. Unimpressed at his predicament, Taz breaks free and goes on a rampage in a desperate attempt to return home.

Gameplay:
Like its predecessor, Taz in Escape from Mars (or Escape from Mars Starring Taz, as the title screen states) is a 2D, sidescrolling action/platformer which places you in the role of Taz, the ravenous Tasmanian Devil of Looney Tunes fame. Despite sharing many of the same sprites and fundamental mechanics as that game, however, Escape from Mars is a much bigger and more entertaining adventure with more interesting and varied mechanics, a faster pace, and much more freedom of movement (you can now freely move the screen’s camera up and down, for example).

Taz’s spin is a lot more versatile this time around and allows him to reach new areas.

As before Taz can pick up and use objects and use levers and other mechanisms with A, spin like a tornado with B, and jump with C. Unlike in the last game, Taz cannot defeat enemies or damage bosses by jumping on them but his spin attack is much faster and more useful this time around as you can use it to bounce Taz up narrow walls to reach higher areas. You can also hold down the B button to race across certain surfaces, including walls and ceilings, and to break through certain walls to avoid attacks and progress further.

Taz can temporarily grow or shrink in size in order to force his way onwards.

Taz, though still lacking in jumping and walking frames, also moves much faster and the controls, in general, are much tighter and more responsive. Best of all, Escape from Mars appears to be completely free of bottomless pits and instant death traps and has far more variety in the presence of teleporters, grow rays, and shrinking potions. When temporarily super-sized, Taz loses his spin attack but is invulnerable and can stomp his enemies into dust and, while shrunk, he can fit through smaller passageways (though he cannot attack or pick up items of food). Taz can also use his spin attack to tunnel through the dirt in Moleworld and you’ll notice that the game’s worlds and enemies are much more vivid, wacky, and memorable this time around.

A number of new mechanics and gimmicks help make the game bigger and more varied.

Not only is there more depth to the game’s environments, there are more interesting gimmicks in place, such as moving and temporary platforms, floating platforms, using mushrooms to ascend around spiked mazes, and jumping from cow to cow in the Mexican desert to say nothing of encountering more Looney Tunes characters, such as the Roadrunner and Yosemite Sam. You can also use Taz’s spin to go up and down spiral staircases in the Haunted Castle, traverse environments on floating cubes, and there are even some gravity-based mechanics at work in Marvin’s House. Taz can even enter an alien device and be duplicated a few times in this level and you’ll need to hop onto the doppelgänger’s head to reach higher areas. Having said that, though, the game manages to balance out all the improvements it makes on its predecessor with some annoying enemy and hazard placements (there are now two types of bombs, for example, that Taz will happily gobble down and get blown up for his troubles); some enemies, like the aforementioned Yosemite Sam, can’t be defeated and will attack you relentlessly. It can also be frustrating to enter the background through doorways only to instantly get stuck or become lost as you either can’t see where you need to go or there is nowhere to go, making the mechanic a bit pointless. By far the most annoying gimmick in the game are the lasers that instantly turn you to ash in Marvin’s House; you’ll have to desperately float and flail about using the gravity mechanics and attacking the laser generators from precariously small platforms in the hopes of reaching (and eating) the coveted exit sign.

Graphics and Sound:
Taz in Escape from Mars takes the charming, cartoony aesthetic from the previous game and expands upon it in every way. Taz’s sprite remains mostly the same except for a new coat of paint, which is a little disappointing as his jump is still lacking in frames and the developers didn’t even program him a new idle animation. They seem to have tried to make up for this by expanding and shrinking him, which is pretty neat, but these mechanics aren’t seen very often (I only grew big once in the entire game) so it would have been nice to see Taz’s sprites and range of motion expanded a bit more alongside his speed and abilities.

Levels are packed full with details and wacky cameos from Looney Tunes characters.

Taking Taz off-world, though, vastly improves the appeal of the game’s environments; big, colourful, and full of wacky enemies and elements, Escape from Mars’ levels are far more unique and appealing as Taz hops from planet to planet in an effort to get home. Taz’s journey takes him from Marvin’s zoo on Mars, to the purple sands of Moleworld, where he’ll be pursued by a giant drilling machine in a desperate auto-scrolling chase that is easily one of the more frustrating and nerve-wracking parts of the game. Planet X is one of the game’s more distinct locations; an alien, mushroom-filled world that features spiked walls and more than a few of those never-ending water slides that require you to jump off at the right moment to progress further. Eventually, Taz makes it back to Earth, specifically Mexico, where he has to jump across a stampede and then navigate through the maze-like city while bandits shoot at him, before ending up in what initially appears to be a quite out of place castle but soon transforms into a mad scientist’s dungeon.

Cutscenes make far better use of the in-game sprites and graphics and fit the game’s aesthetic.

Unlike the previous game, Escape from Mars skips using dialogue and awkwardly-drawn panels for its story and, instead, relies far more on in-game graphics and pantomime, which is all of great benefit as everything has a more cohesive and appealing aesthetic as a result. The music and sound effects are also much improved but, while you’re no longer bombarded with annoying sounds and weirdly-composed tunes, neither are anything particularly catchy or memorable, which is a bit of a shame as that was another area that needed much improvement.

Enemies and Bosses:
Another area where Escape from Mars out-does Taz-Mania is in the variety and appeal of its enemies; while no characters from Taz’s cartoon appear apart from Taz himself, the game makes up for this by swapping out bats and weird rock monsters for a handful of crazy alien foes who explode in a swirl of smoke when hit with Taz’s spin.

Escape from Mars is full of wacky alien enemies to help mix things up.

Marvin’s zoo and house, especially, are populated by weird alien frog-like creatures, robots, and his oft-seen minions, the Instant Martians, and his dog, K-9. You’ll also battle a variety of bandits, weird alien snails, raging bulls, and come across Yosemite Sam both in a gun-firing rage and protected by suits of armour. Witch Hazel even makes an appearance in the Haunted Castle, and what appear to be semi-cybernetic moles will blast at you with electrical bolts on Moleworld, and even Roadrunner and Wile E. Coyote will damage you if you slip off your stampeding convoy.

Bosses are much bigger and more complex so you’ll need to use Taz’s new abilities to their fullest.

It’s all very surreal and this is reflected in the game’s bosses, which are much bigger and require a bit more that just spinning into (and jumping on to) them this time around. The first boss is a massive alien elephant thing that swings its trunk at you in a clockwise and anti-clockwise motion and spits spiked balls into the arena. Thankfully, as I mentioned, Taz’s spin will now carry him along walls and ceilings, which allows you to avoid damage and ricochet into the creature’s antenna-like eyes when they briefly appear in order to damage it. The second boss is a giant drilling machine which attacks you in free fall. Using small and otherwise precarious platforms, you must dodge its laser-like whip and missile attacks and spin into the pilot when he pops out from the cockpit. Thankfully, if you fall from your platform, the battle simply continues and I strongly recommend landing on a bigger platform to give yourself more freedom of movement.

It’s tricky to hit the worm’s tail but it’s even harder to time your jumps over Toto.

On Planet X, you’ll battle a gigantic worm-like creature than bursts out from the walls of the arena but sports a big, flashing weak spot on its rear end. Spin into this and you’ll destroy each segment of the worm, making it faster and more aggressive as the fight goes on until only the head remains for the final blow. Things take a bit of a turn for the worst in Mexico, however, where you’ll battle the posturing Toro the Bull; Toro charges at you in a rage and will send you flying into the air with its horns before stopping and posing but don’t think that this is your window to attack! Instead, you have to stand in place while Toro charges his attack and then dash away from him and jump over him right at the last minute so that he runs head-first into the walls of the arena, which can be really difficult to do as he moves very quickly and tends to simply stop right before the wall.

You’ll need to think outside the box and switch bodies with Gossamer to take it out!

Easily the most confusing and annoying boss comes at the end of the Haunted Castle, however. Here, you are charged at and punched by the big red furry monster Gossamer while a mad scientist blasts at you with laser bolts. Gossamer is completely invulnerable except for in the eyes; you must spin into its eyes a few times until it’s stunned and, hopefully, get it to collapse into one of the seats in the background. Once it’s sat down, dash over to the other seat and pull the lever and you’ll swap bodies with Gossamer, which will allow you to destroy the laser device and end this perplexing boss battle.

Marvin attacks in his giant mech and requires some tricky jumps to hit his weak spot.

The finale sees you taking on Marvin the Martian in a giant mech made in his image. The mech stamps around the arena and tries to kick at you but it also likes to stop and dance about with one of its massive feet. This is one of the trickier bosses as you must quickly jump up the platforms on its feet and legs and then launch a spin attack at the yellow plume on the “head” of the mech in order to damage it. Do this enough times and Marvin’s mech will collapse in a heap and Taz will finally be able to return to his peaceful life back in Tasmania.

Power-Ups and Bonuses:
As in Taz-Mania, Taz will automatically eat any items he comes across and you can blast them away with his spin attack. This means that he will explode if he eats bombs but will regain health if he eats junk food or first-aid kits and earn an extra life by chomping down on Taz icons. This time around, there seems to be a lot less health and far more bombs so, while there are a lot more opportunities to go blasting ahead, be sure to be mindful of your surroundings or you might miss some health when you need it the most. Also, don’t eat the cakes as they contain sticks of dynamite!

In addition to his fire breath, Taz can now spit rocks as well.

Taz can still breathe fire but, this time around, he has to gobble a can of gasoline rather than eating chili peppers. He can also eat boxes of rocks and spit a limited number of rocks at enemies as well, which is useful for taking out goofy aliens from afar and these projectile-based attacks are the only way of defeating some enemies, though there is no longer an invincibility star this time around.

Additional Features:
Unlike Taz-Mania, there are no difficulty options in Escape from Mars; what you see is what you get and you’ll just have to deal with it. However, like the last game, you can take advantage of a few cheats by holding A and B on controller one and B and C on controller two when on the SEGA logo screen. If you did it right, you’ll hear a bark and, when you pause the game and press A, a debug menu will appear that allows you to refill your health, skip to any level in the game, and activate “XY” mode that lets you move Taz around the level freely.

The Summary:
Taz in Escape from Mars is an improvement on its predecessor in almost every way; the core mechanics remain the same but expands upon them in just enough ways to make it a far more enjoyable experience. It’s funny because I distinctly remember this game being incredibly difficult back in the day but it was actually a lot more accessible than Taz-Mania, affording Taz a few new abilities and a greater range of movement and dramatically improving upon the level and enemy variety. Best of all, the game features no cheap deaths, bottomless pits, or instant death traps but it is populated by far more enemies and hazards. Sadly, a lot of the issues of the last game are still present and even made worse; sure, Taz is faster and more capable but he’s still a big, lumbering goof and levels might be more vibrant and interesting but they can still be frustrating and the music is still a let-down. Ultimately, Escape from Mars is a decent enough cartoony platformer to waste an hour or so on but it’s still a step behind other 16-bit games of the same genre and ends up being, in my opinion, about as enjoyable as its predecessor even with all the much-appreciated improvements.

My Rating:

Rating: 3 out of 5.

Pretty Good

Were you a fan of Taz in Escape from Mars? How do you think it compared to Taz-Mania and other 16-bit platformers? Were you a fan of Taz’s expanded moveset and the wackier levels and enemies of the game or were you disappointed to see the concept veer away from the Taz-Mania cartoon? Which Looney Tunes character and which of the old Looney Tunes videogames is your favourite? No matter what you think, leave a comment down below and let me know.

Game Corner: Taz-Mania (Mega Drive)

Released: July 1992
Developer: Recreational Brainware
Also Available For: Game Boy, Game Gear, Master System, Super Nintendo Entertainment System (SNES)

The Background:
My absolute favourite Looney Tunes (1930 to present) character, the Tasmanian Devil (or simply “Taz”) first debuted in “Devil May Hare” (McKimson, 1954) as a dim-witted and voracious foil to Bugs Bunny (Mel Blanc). In the early- to mid-nineties, the Warner Bros. cartoons were undergoing something of a renaissance thanks to shows like Tiny Toon Adventures (1990 to 1992) and Animaniacs (1995 to 1998) and Taz became part of this resurgence in popularity when he graduated to his very own cartoon, Taz-Mania (1991 to 1995). To tie into this, several videogame adaptations of the show were produced; while the SNES version, which was more of a pseudo-3D endless runner, was unfavourably received, the Mega Drive title (which, like the others, was a traditional 2D sidescroller) was received very well. Since the Master System version (Technical Wave, 1992) was one of the first videogame cartridges I ever owned and one of my favourite action/platformers, I decided to pick up the Mega Drive version and see how the technically superior title holds up against others of its genre.

The Plot:
After being told a tale of a giant seabird that laid massive eggs capable of feeding an entire family for over a year, the ravenous and greedy Taz sets out in search of the Lost Valley and its legendary giant bird in hopes of satisfying his endless appetite.

Gameplay:
Taz-Mania is a 2D, sidescrolling action/platformer which has you guiding Taz across a number of locations (though, primarily, through jungles and Aztec ruins). While a variety of enemies populate Taz-Mania’s levels, your biggest enemies will be the controls and the numerous bottomless pits and instant death traps. Taz, though big and colourful and occasionally full of life, is a slow and clumsy character to play as; his jump is awkward, he can’t crouch or look up or down, and his hit box is ridiculously large at times.

Taz spins like a tornado and spits fire but has a large hit box and tends to destroy his own power-ups.

Thankfully, you can get Taz to move his big, useless butt by sending him into his trademark tornado spin; however, while this is great for blasting away most enemies, it also knocks away health and other power-ups when they’re onscreen. You can use the spin in mid-air for a boost but it’s a bit finicky and the game is structured less around letting you blast ahead at full speed and more around awkwardly jumping to platforms, working your way up or across, and making blind jumps across bottomless pits. Taz also has an “Action” button that will let you carry certain items to reach higher areas, activate switches, and breathe fire after eating chilli pepeprs, and can also defeat some enemies and damage bosses by jumping on their heads. Unfortunately, you’ll be spending most of your time struggling with the game’s sluggish controls and annoying platforming elements; in the Badlands, for example, you have to jump from jets of water to reach the exit but, if your jump is a little off (which happens more often than not thanks to Taz’s jumping being a bit stilted and floaty), you’ll get damaged by the water and the knockback will most likely send you falling to your death. Similarly, when you reach the Jungle, you’ll have to make blind jumps to platforms you can’t even see in order to progress and either fall to your death or jump right onto an enemy for your trouble.

Gameplay is slowed to a crawl as you pull levers and try to figure out annoying lift puzzles.

Taz-Mania is much more of a thinking game than the Master System version, which I remember being more of a standard, cutesy platformer; in the Acme Factory, you have to jump up conveyor belts and dodge lasers to pull a series of switches and keep a deadly robot from being assembled. Pull the wrong switches, though, and you’ll be chargrilled as punishment, which is a pretty fast way to burn through your lives. Later, in the Mines, you’ll need to use similar levers to activate lifts to reach new areas; unfortunately, some of these are booby trapped and will send you falling to your death while others are suspended precariously over a bed of instant death spikes or missing entirely (which will also cause you to die immediately). In the Ruins level, you’ll have to make some very tricky and awkward jumps between platforms and if you’re not absolutely pixel-perfect, you’ll simply pass right through your intended target as though it were intangible!

While hopping from logs isn’t too bad, the mine cart section is an absolute nightmare!

More than once, you’ll be tasked with jumping from log to log to cross some rapids; thankfully, you won’t instantly die if you fall or land in the water but you will be bounced out at the cost of some health. These aren’t particularly difficult sections but they become more troublesome when you have to move Taz up and down to the foreground and background, which makes positioning his exact landing point difficult to judge, and when you have to struggle upstream and avoid flying over the edge of a waterfall. By far the most frustrating and unfair section of the game, though, is when you must jump into a runaway mine cart; you can speed up and slow down by pressing left or right and press A to raise the cart up and avoid crashing headfirst into a bumper, but you also have to be careful not to collide with the ceiling, enemies, or to fall off the broken tracks. One mistake and you instantly lose a life, which is ridiculously unreasonable and makes the presence of a life bar almost completely redundant.

Graphics and Sound:
If there’s one thing Taz-Mania has going for it, it’s the graphics; sprites are big, cartoony, and colourful and the entire game evokes the look and feel of the cartoon. While the music and sound effects are extremely grating and poorly realised, it’s fun seeing Taz fly into an impatient rage when left idle and the little quirks he has here and there, such as eating the “S” in the opening SEGA logo.

Levels are colourful but not very varied and lacking in depth and complexity.

Sadly, this doesn’t really shine through all of the time and, for the most part, Taz is a very static and awkward character sprite. Similarly, the game’s backgrounds and levels aren’t all that interesting to look at; this game released almost a year after Sonic the Hedgehog (Sonic Team, 1991) and in the same year as Sonic the Hedgehog 2 (SEGA Technical Institute, 1992) so there’s really no excuse for the environments being so bland and basic. Occasionally, you’ll see some foreground effects and have to pass through certain walls to reach new or secret areas but, for the most part, there’s not really a lot on offer in terms of variety as the game spends way too much time in barren wastelands and jungles.

Taz-Mania really should have relied on in-game sprites for its story and cutscenes.

By far the most visually interesting levels are the Acme Warehouse and the Iceland, a stage you only visit once yet you’re forced to endure the drab, dark mine and confusing mess of the Jungle for what feels like an eternity. Taz-Mania employs some very simple motion comic-like cutscenes and text to tell its story that, while featuring bigger sprites and including a handful of cameos from the show, featured extremely limited animation and it feels like they could have been swapped out for in-game graphics and sprites like the game’s ending.

Enemies and Bosses:
Taz’s journey is obstructed by a handful of enemies, such as bats, frogs, crabs, and anthropomorphic stone heads and man-eating plants that try to take a bite out of you. Your most persistent and annoying obstacle (apart from the controls) will be the abundance of instant death traps and hazards such as pistols, fans, jets of flame, and bombs that dog you at every turn. In Iceland, you’ll also want to avoid landing in the freezing water as you’ll be frozen into a block of ice that will slowly drain your health unless you mash buttons to escape.

A couple of Taz’s adversaries from the cartoon show up as bosses, which is nice to see.

Fans of the cartoon may be slightly disappointed by how few characters carry over into the videogame and, yet, a handful of them do appear. In many levels, you’ll encounter a number of spear-wielding Bushrats, for example, and the first boss you battle is against Bull Gator and Axl in their trademark jeep. If you’ve played Sonic 2, it’s basically the same thing as the Emerald Hill Zone boss; simply hop over it to avoid being crushed and bounce or spin into the truck a few times and they’ll be done. Similarly, at the end of the Jungle level, you’ll encounter Francis X. Bushlad, a red-headed archer who simply shoots arrows at you in a predictable pattern and is easily bested by hopping on his head or spinning into him after jumping over his projectiles.

Taz also battles a giant plant and a stone version of himself.

You’ll also battle against a giant, man-eating plant that the instruction manual encourages you to throw a bag of “No Weed” at but I’m pretty certain I defeated it by simply spinning into it without much trouble at all. In the Ruins stage, one of the many Taz statues will come to life and you’ll have to fight a stone doppelgänger of Taz, who has all the same moves and abilities as you and is thus ridiculously easy to take out by jumping over his spin attacks and hitting him with your own when he’s standing still.

A giant seabird fiercely protects her egg in the finale but a few smacks to the head will dissuade her.

The finale of the game sees you navigating through a stone maze of sorts and then walking, almost completely unopposed, to the giant egg that is Taz’s goal. The egg is, of course, guarded by a giant seabird that attacks you with its humongous wings and talons, both of which are surprisingly easy to avoid. When the bird’s head pops into frame, simply spin into it a few times and you’ll win the day…only to be denied your dinner as the egg hatches and the hatchling mistakes Taz for its mother and amusingly chases him back home.

Power-Ups and Bonuses:
One thing Taz is known for is his insatiable appetite and, as a result, he’ll automatically pick up and eat objects and enemies that he comes across. This, however, can be detrimental to your health as Taz will swallow bombs if you’re not careful and get blown up in classic Looney Tunes fashion.

Aside from the bombs, you should eat everything you come across for health, points, and power-ups.

However, the rest of the time, Taz will eat all kinds of food, such as roast chicken, fruit, and water bottles but he’ll also eat smaller enemies to refill his health; you can also eat Taz icons for an extra life and a Star for a brief period of invincibility, though I found very few of these in my playthrough. Furthermore, as mentioned, you can eat chilli peppers to spit fire by pressing A for a short time.

Additional Features:
Taz-Mania comes with three different difficulty settings, Practice, Easy, and Hard but you won’t get to experience the full game on Practice and will receive the greatest challenge on Hard. If the game is too easy for you (which, honestly, it probably won’t be given how frustrating and unfair some parts of the game are), you can activate a number of…somewhat useful cheats by holding A, B, and C on both controllers on the title screen and pressing Start. After that, you can pause the game at any time and press A to refill your health, B to become permanently invincible, and A, B, and C to skip to the next level. The invincibility isn’t actually that helpful, though, as you need to activate it every time you die or start a new level and certain hazards (such as ingesting bombs and landing in water) will still damage you and all the invincibility in the world won’t protect you from an instant death trap.

The Summary:
I really enjoyed the Master System version of Taz-Mania; it was bright, simple fun and I was excited to finally get my hands on the Mega Drive version after being won over by screenshots of the game for most of my life. Unfortunately, Taz-Mania definitely looks a lot better than it plays and shines much more in still shots than it does in motion. The sprites, especially Taz, are great, very fitting, and cartoony but are noticeably lacking in animation frames and just a sense of character. Taz is one of animation, and Looney Tunes’, most expressive and bombastic characters but he’s depressingly pedestrian here. The emphasis on platforming, blind jumps, and unfair deaths instead of fast-paced action and adventure in the style of Sonic also seems to have been a mistake and, for all its colourful, cartoony appeal, Taz-Mania was an underwhelming and disappointing experience for me, especially compared to the technically inferior Master System version.

My Rating:

Rating: 2 out of 5.

Could Be Better

Were you a fan of Taz-Mania? How do you think it holds up today? Did the game’s controls, difficulty, and more finicky moments turn you off or is it one of your favourite 16-bit titles? Are you a fan of Taz and his cartoon? If not, which Looney Tunes character is your favourite and, by the same token, which Looney Tunes videogame is your favourite? Whatever your thoughts on Taz-Mania, feel free to leave a comment down below and be sure to check out my review of the follow-up!

Game Corner [Mario Month]: Super Mario Galaxy (Nintendo Switch)


So, for no better reason than “Mar.10” resembling Mario’s name, March 10th is widely regarded as being “Mario Day”, a day to celebrate Nintendo’s portly plumber, an overalls-wearing mascot who literally changed the videogame industry forever and shaped the home console market of the nineties. To commemorate Mario Day this year, March has been “Mario Month” as I have celebrated everyone’s favourite Koopa-flattening plumber on each Wednesday of the month.


Released: 18 September 2020
Originally Released: 1 November 2007
Developer: Nintendo
Original Developer: Nintendo EAD Tokyo
Also Available For: Nintendo Wii and Nvidia Shield

The Background:
The concept of Super Mario Galaxy’s gameplay finds its genesis in Super Mario 128, a tech demo designed to showcase the power of Nintendo’s GameCube compared to the Nintendo 64 and other consoles at the time. Specifically, it was the concept of running, jumping, and exploring shifting, spherical bodies that caught Mario creator Shigeru Miyamoto’s imagination and many of the game’s concepts and ideas were thought up before Nintendo Wii was even developed, including new gameplay mechanics such as adding a spin attack to Mario’s arsenal to make it easier to attack enemies on spherical, 3D plane. After tweaking the gameplay to make things a bit more challenging for players, the team worked on implementing unique ways to take advantage of Mario’s space-based adventure, including gravity-based mechanics, new transformations and ways to play, and focusing on making the game fun to play rather than simply rushing to finish it. Super Mario Galaxy was a critical and commercial success, selling over 350,000 units in Japan during its first week alone and over 12.80 million copies worldwide by March 2020. The game also won, or was nominated for, numerous gaming awards and received an equally-well-received sequel in 2020. While that game wasn’t included in Super Mario 3D All-Stars (Nintendo, 2020) for the Nintendo Switch, Super Mario Galaxy was, meaning that I recently finally got the chance to play this game through, my to my delight.

The Plot:
All of the Mushroom Kingdom has gathered together for the centennial Star Festival. Unfortunately, the diabolical Bowser, King of the Koopas, gatecrashes the celebrations and kidnaps not just Princess Peach but her entire castle, hurtling them into outer space! Guided by Rosalina and the Lumas, Mario resolves to explore the entire galaxy, collecting both Power Stars and Grand Stars to power Rosalina’s Comet Observatory and rescue Princess Peach.

Gameplay:
Super Mario Galaxy is a 3D action/platformer that brings back many of Mario’s controls and abilities from Super Mario 64 (Nintendo EAD, 1996); not longer hampered by a water-spewing jetpack, Mario is, thankfully, once again able to backflip and long jump in addition to using his patented triple jump, side jump, and wall kicks to navigate the game’s many and varied Galaxies.

Mario has a few new tricks up his sleeve that change the way you play.

Mario can still hop on the heads of his enemies to dispatch them or use his ample rump to squash them flat but, in the absence of his punching attacks, players can now use the touch screen to gather and launch “Star Bits” at the screen to attack enemies, destroy certain objects, and reveal Yellow Coins. This allows a second player to work alongside Mario in a pretty lacklustre implementation of a two-player co-op mode but, thankfully, Mario is gifted with a new spin attack that allows him to take out enemies and helicopter his way across tricky gaps. As in the previous 3D Mario games, Super Mario Galaxy is structured around a central hub world (in this case Rosalina’s “Comet Observatory”) from which you can enter the game’s forty-two different stages (referred to as “Galaxies”) from different areas in the hub world. Each Galaxy has anywhere from one to six different missions, the completion of which awards you with a Power Star; once you collect sixty Power Stars, you’ll be able to access the game’s final Galaxy and battle Bowser, but you’ll need all 120 to see the game’s true ending.

There are many Galaxies and missions to complete, with additional challenges on offer.

It may seem, on the surface, that Super Mario Galaxy has far too many stages on offer but not all of the Galaxies are accessible right from the start or even while you’re visiting that Galaxy. Other areas of the Comet Observatory will open up as you collect Power Stars, with numerous small, more challenging Galaxies cropping up along the way and Mario’s skills being tested by a series of “Prankster Comets”. These see you return to previous Galaxies to earn a new Power Star with only one sliver of health, racing against Mario’s doppelgänger, “Cosmic Mario”, completing the Galaxy within a time limit, and contending with much faster enemies and obstacles. Furthermore, Galaxies are actually quite small in a lot of ways and tackled in sections; you’ll be dropped into a Galaxy and be tasked with navigating spheres, jumping to platforms, and blasting across the area using Launch Stars, with each mission allowing you, and tasking you, to access different areas of the Galaxy to mix up the stage each time you visit. Super Mario Galaxy’s main selling point is its use of gravity- and space-based stages; almost every planet, block, or platform you stand on has its own gravitational force, allowing you to run all around it without fear of falling to your death and you can easily jump to another traversable body and get sucked into its gravity to make platforming a simple but, eventually, challenging affair as you’ll have to use all of Mario’s skills to jump and navigate across Galaxies without being sucked into a black hole and to his death.

Ride the air currents with a Floaty Fluff or put Mario’s Olympic skills to good use when on ice.

Gravity also comes into play in other ways, such as hitting clock-like arrows to change its direction or navigating across walls, blocks, and platforms while the gravity shifts in different directions. You’ll also be required to perform specific tasks or do some extremely light puzzle solving to cross the Galaxy or access the Power Star. This includes pounding on switches, collecting five yellow Star Chips to assemble a Launch Star, directing Banzai Bills or tossing Bob-ombs to blow up cages, hopping up or across temporary platforms, collecting five Silver Stars, finding Star Bunnies, racing against certain enemies or a time limit, or using a Koopa shell or manta ray to dart through rings underwater or through a water slide. Other times, the environment will assemble itself around you or become intangible thanks to a ghostly light, which will test your reaction times as much as your patience, or Mario will have to run over flip switches to progress, collect a Key, or grab a ? Coin to spawn musical notes to collect. You’ll also have to grab on to a Floaty Fluff to float across air currents, rotate Bolt Lifts by running on them to reach platforms, hitch a ride in a bubble, awkwardly run across (or skate by pressing Y) icy platforms, smash coconuts to damage certain enemies, hit levers, or fling Mario across the arena using sticky Sling Pods.

Many classic Mario staples make a welcome return in Super Mario Galaxy.

Some of the game’s more troublesome sections come from the inclusion of blue Pull Stars; you need to tap the screen to draw Mario towards these little bastards, holding down to keep him hovering there and releasing it at the right moment to slingshot across the area, usually while in a race, against a time limit, or avoiding a load of obstacles. By far the most frustrating gameplay element, though, are the missions that require you to hop onto a Star Ball and navigate mini golf-like obstacle courses full of hazards and platforms to roll off. Though Mario can jump when on the Star Ball, you are forced to use the Nintendo Switch’s lousy gyroscopic controls to roll him about, which is needlessly annoying since I found it extremely difficult to hold the machine in a way that actually made Mario move where I wanted him to and, often, Mario simply rolled wherever he wanted, often to his death. Similar to its predecessors, Mario’s health is again measured with a pie chart but, this time around, Mario can only take three hits before he’ll lose a life. Mario can still replenish his health by collecting Yellow Coins, though, and a number of checkpoints appear in the game’s Galaxies (though I found there was no onscreen indication of when you had passed one of these checkpoints) which means you won’t always have to restart the Galaxy from the very beginning. Extra lives are extremely plentiful, however, with 1-Up Mushrooms placed helpfully in or near the game’s trickier sections and Mario can earn an extra life for every fifty Coins and/or Star Bits he collects and, later in the game, Princess Peach will gift you with five extra lives via a Toad courier.It’s highly advisable to collect every Star Bit you see as hungry Lumas will appear within the Galaxies and in the Comet Observatory and feeding them is the only way to unlock all of the game’s Galaxies. You can keep track of your progress by speaking to various non-playable characters (NPCs), such as Rosalina, the Toads, and the Lumas and a map of the Comet Observatory shows you which Galaxies you need to revisit by use of a little crown to indicate when a Galaxy has been completed. Finally, unlike its predecessor, Super Mario Galaxy not only returns to the kind of stage variety we saw in Super Mario 64 but also brings back classic 2D Mario staples such as warp pipes and ? Blocks.

Graphics and Sound:
If there’s one area that Super Mario Galaxy excels in it’s presentation; the game is absolutely gorgeous, popping with colour and variety and oozing a cartoonish charm at every turn. It retains the cute, cuddly, almost action figure aesthetic of Super Mario Sunshine but improves upon it immensely, with all of the game’s environments brought to life through a fantastic use of colour, lighting, music, and intractable elements. Each Galaxy is populated by a variety of NPCs, including Toads, Lumas, Honeybees, Gearmos, and Penguins, all of whom each talk to you through speech bubbles or can be spoken to for hints or more useful rewards like Power Stars. Toads and Lumas also begin to populate the Comet Observatory as you progress, which really helps to bring some life to the hub world, which disappointingly otherwise takes more inspiration from Princess Peach’s Castle in Super Mario 64 than the lively Delfino Plaza.

Super Mario Galaxy‘s stages are full of colour, challenge, and variety.

Thankfully, Super Mario Galaxy is almost the exact opposite of Super Mario Sunshine when it comes to level and gameplay variety. Each of the game’s Galaxies is unique in its presentation, with Mario visiting Galaxies of ice, lava, water, sand battleships, beachfronts, and toy-strewn bedrooms. In the Ghostly Galaxy, you’ll explore a haunted mansion that is reminiscent of both Big Boo’s Mansion from Super Mario 64 and the titular mansion of Luigi’s Mansion (ibid, 2001), explore sunken pirate ships, clamber up honey-drenched walls, race across stony platforms to avoid being sucked into deadly quicksand, and blast out from an active volcano, with every Galaxy and Star mission being an energetic and fun, yet challenging, burst of action and, at times, intensity. Perhaps best of all, Super Mario Galaxy brings back a lot of classic Mario tunes and sound effects to really bring the title back to its roots. Rather than using full blown voice acting, the game opts for speech bubbles, brief voice clips, and a heavy use of gibberish and pantomime for the few instances of dialogue. Cutscenes are also heavily reduced compared to its predecessor, with the opening cinematic split across a brief tutorial and the game opting to tell the story of Rosalina and the Luma’s through an adorable children’s book.

Enemies and Bosses:
Many of Mario’s recognisable enemies make their return in Super Mario Galaxy, with each one being slightly tweaked to accommodate Mario’s new mechanics. You can jump on Goombas to dispatch them, which will produce a Coin, but if you spin into them and kick them away you can get Star Bits, for example, adding a little strategy to how you play. Bullet Bills are often fired at you from the cannons of Bowser’s many battleships, you’ll need to toss Bob-ombs to destroy garbage or break open cages, Bloopers patrol beneath the waves, and Chomps freely roll around various Galaxies looking to take a bite out of you. Boos also make a return, now being completely immune to all of Mario’s attacks and only vulnerable to beams of light, and you’ll also encounter old favourites such as Koopas, Pokeys, Wrigglers, Twomps, Piranha Plants, and Magikoopas (who conjure fireballs your way and teleport to avoid your attacks).

Enemies old and new provide a minor nuisance to Mario’s galaxy-spanning quest.

New enemies include the bomb-throwing Cluckbooms, explosive Bomb Boos, electrified jellyfish, and easily-dispatched bugs. Just as Gombeetle’s protect themselves from your Star Bits and standard jump attacks with an armoured shell, Crabber’s can only be attacked from their exposed rear and you’ll need to use your spin attack to put out Lil’ Cinder’s flames before you can dispatch them. Mandibugs will charge at you with their pincer-like jaws, Micro Mecha-Bower’s try to roast your behind, and Monty Moles like to burrow under the dirt to catch you off guard but, while your butt stomp will serve you well in taking care of these enemies, you’ll need to use your spin attack to push the members of the Topman tribe into electrified walls to end their threat.

Run around the Dino Piranha to whack its tail but watch out for the flames!

You’ll battle sixteen bosses throughout the course of Super Mario Galaxy, with eight of them needing to be fought more than once. The first boss you’ll have to contend with is the Dino Piranha, a large, aggressive, and hungry variant of Petey Piranha. This boss stomps around a small sphere trying to trample you to death and can only be defeated by hitting its rock-encrusted tail with a spin attack. Later in the game you battle a far more formidable version of this boss, the Fiery Dino Piranha, in the Melting Molten Galaxy. Though the strategy remains the same, this battle is much more difficult by the fact that the Fiery Dino Piranha’s tail becomes engulfed in flames and the boss’s ability to spit fireballs out at you.

Use Mario’s spin attack to knock King Kaliente’s shots back at him.

Another boss you’ll go up against twice is King Kaliente, a gigantic octopus that emerges from lava to shoot flaming projectiles at you; unfortunately for him, though, he also spits out a coconut, which you can hit with your spin attack to damage him. He crops up again in Bower Jr’s Lava Reactor with the battle being made more difficult by the fact that you’re now stood on a series of small platforms that sink into lava and King Kaliente’s more frequent and aggressive attacks (though, again, the strategy remains the same; you should also be prepared to parry coconuts with the boss since it likes to knock them away as the fight progresses).

Major Burrows and Bouldergeist require a little more strategy on your part.

Major Burrows and Bouldergeist are also fought twice across the course of the game, with the battle being much tougher the second time around. Major Burrows is, basically, a giant Monty Mole and is only vulnerable when he pops up from the ground; once he does, you can perform a ground pound to scare him completely out of his hole and then attack him as he runs around the spherical stage. Bouldergeist is, by comparison, much tougher since the only way you can break off his rock-like hide is to trick Bomb Boos into colliding with him. Once his exterior is smashed, Mario must then swing a Bomb Boo into Bouldergeist’s exposed core using his spin attack but before it explodes in his face, all of which is made much more troublesome by Bouldergeist’s desire to pummel you with his hands, smash you with boulders, and erect destructible rocky walls to box you in.

Super Mario Galaxy features some big, colourful, and unique bosses battles.

Interestingly, the boss you’ll encounter the most isn’t Bowser; it’s Topmaniac, the gigantic leader of the Topman tribe who is easily disposed of by jumping on its head to get rid of its spikes and then using your spin attack to bash it into the electrified walls of the arena. The game’s bosses are all quite large, memorable affairs though: you’ll need to lure Bullet Bills over Megaleg’s legs to destroy the cages on its head; navigate icy platforms and use wall jumps to reach Baron Burr and thaw him out with Mario’s spin attack; dispatch waves of Mandibugs to ground pound the large Stink Bug Parent; you’ll need to use similar tactics (in conjunction with Banandelions and Mario’s Bee power-up) to defeat the bomb-dropping Bugaboom; fire yourself at Tarantox’s glowing red boils with Sling Pods; and fire Koopa shells at the skeletal remains of Kingfin as it swims through the dark waters.

You’ll face Bowser three times, with the final fight being a three stage boss battle.

Despite his prominence in the last game and frequent appearances throughout Super Mario Galaxy, you’ll only battle Bowser Jr the one time; Bowser Jr shoots cannonballs at you from his flying pirate ship and can only be damaged by throwing Koopa shells at him. This gets very intense during the final stages as Bowser Jr also starts firing Banzai Bills at you, meaning there are a lot of projectiles and hazards to watch out for at the same time. In comparison, you’ll fight Kamella three times, with each battle having a very similar strategy to fighting Bowser Jr; Kamella conjures both fireballs and green shells that you can throw at her, though she also summons Magikoopas, wandering fireballs, and teleports about the arena to make it harder for you to hit her. As in Super Mario 64,you’ll also battle Bowser three times throughout the game, with your strategy to defeating him remaining relatively unchanged in each bout. Bowser likes to generate shockwaves across the small spherical planet you fight him on and must be lured into pounding through a sheet of glass to set his tail on fire; as he flees in pain, you can hit him with your spin attack, which can be hard to do as Bowser slides all over the sphere in an erratic pattern on the back of his shell. When you encounter Bowser again, he’ll perform his own spinning attack and launch numerous fireballs your way but it’s the finale battle of the game where Bowser is at his most formidable. This is a three phase boss battle that first sees Mario having to time his spin attack just right to hit Bowser out of the rocky exterior he has protected himself with, desperately outrun Bowser’s powerful spinning attack, and puts your jumping and reaction skills to the test avoiding the many shockwaves and fireballs that Bowser fills the small arena with. As long as you keep your wits about you and watch Bowser’s frenzied spinning, charging, and jumping attacks, these battles mainly come down to a question of properly timing your spin attack to put en end to Bowser’s latest threat.

Power-Ups and Bonuses:
As in all Mario games, you can collect Yellow Coins in each Galaxy; you no longer need to worry about collecting a hundred of these for a hidden Power Star, or any Red Coins (which is a blessing after Super Mario Sunshine’s massive overuse of the concept), but you will get an extra life for every fifty Coins you collect. The game’s big, new feature is the Star Bit mechanic, which allows you to fire at enemies and objects on the screen; it’s advisable to frantically swipe at any and all Star Bits you see to add to your grand total and collect extra lives but don’t get so distracted to you lose focus on what you’re doing! At various points throughout the game, you’ll find or be given the opportunity to purchase a Life Mushroom, which will double Mario’s health meter; if you spot one of these, grab it as you’ll probably need it for an upcoming boss battle or tricky section. Mario also has a number of transformations this time around, some which are familiar, some which are new, but none of which are as prominent as you might expect. You can grab a Rainbow Star to briefly become invincible, allowing you to run through enemies and hazards without fear, for example, but this only lasts for a short period of time.

Grab a power-up to temporarily gain access to some new, and familiar, abilities.

Other temporary power-ups include the returning Fire Flower (which allows you to shoot fireballs and defrost snowmen), the Ice Flower (which allows you to walk across water and wall jump up waterfalls using ice platforms), and the Red Star (which allows Mario to fly unimpeded like an upgraded version of the Wing Cap). It’s a shame that these power-ups are so limited in their appearances and use, to be honest, as it would be fun to revisit the game’s Galaxies and explore them using Flying Mario or open new areas as Fire Mario, for example. Mario has other, less temporary power-ups at his disposal as well: the Bee Mushroom allows him to fly for a short time by tapping or holding A and to climb up honey-covered walls; the Boo Mushroom transforms Mario into a Boo, which allows him to float indefinitely and pass through certain walls by becoming temporarily incorporeal; and the Spring Mushroom allows Mario to bounce extremely high into the air with a well-timed press of the A button. Each of these transformations will be lost if Mario touches water or an enemy and, of the three, Bee Mario is the most often used and Spring Mario is easily the most unwieldy thanks to Mario bouncing all over the place, but none of them are as prominent as power-ups in previous Mario titles such as the Wing Cap and Raccoon Mario (which both feature on the front covers of their respective games).

Additional Features:
As in its predecessors, Super Mario Galaxy requires you to collect a number of special objects to progress further. There are 120 Power Stars to be found in the game, including Grand Stars to be won from boss battles, and rarer Green and Red Power Stars found in hidden Galaxies or from finding Mario’s brother, Luigi, in specific areas of each Galaxy. You only need sixty Power Stars to battle the final boss but, once you finish the game, a new Galaxy will appear and you’ll be tasked with collecting the remaining Power Stars to see the game’s true ending. This new Galaxy introduces you to the Purple Comet mechanic; when the Purple Comet is in orbit around a Galaxy, you’ll have to collect one hundred Purple Coins to earn a Power Star. This can be quite frustrating and troublesome as you’re often racing against a time limit, which continues to count down even after the Power Star spawns, with Luigi’s Purple Coin mission being easily the most maddening trial of them all since it forces you to run across disappearing and rotating platforms over an endless void and against a time limit. If you’ve missed any of the other Prankster Comet Stars, you’ll have to chat to a Luma in the Comet Observatory to put them in orbit and collect any you’re missing.

Collect all 120 Stars to play through the entire game again as Luigi and earn that elusive 121st Star.

Once you have all 120, you then have to go through the game’s gruelling final Galaxy and battle Bowser again in order to see an additional cutscene and unlock Luigi as a playable character! Yes, finally, after the lacklustre rewards of the last two games you actually get something substantial for all your hard work. You can switch to Luigi when accessing your saved file, which will begin a new game from the start as Luigi, who jumps higher and further than his stoutly brother. Sadly, though, you must then play through the entire game all over again, collecting the same 120 Power Stars as Luigi, in order to access the game’s final final Galaxy and claim the elusive 121st Power Star by collecting another one hundred Purple Coins during the Star Festival celebrations. I don’t mean to complain about this since I have been waiting to play as Luigi, and get a decent completion reward, since Super Mario 64 but, as much as I enjoyed the game, it’s a bit much to ask players to do everything all over again as Luigi since you’re pretty exhausted after getting the first 120 Stars.

The Summary:
Super Mario Galaxy was an incredibly enjoyable experience; right from the start, as soon as I experimented with Mario’s controls, I knew that I would prefer this game over Super Mario Sunshine. It plays much more like Super Mario 64, returning a lot of Mario’s abilities and controls from that game, which makes platforming and gameplay all the better. Add to that the game’s fantastic presentation, use of classic Mario elements, and unique setting and you have an extremely grandiose and accessible Mario adventure. While it was disappointing to see Mario still confined to a hub world and acquiring Power Stars on a mission-by-mission basis, and the game was maddeningly frustrating at times, Super Mario Galaxy does some pretty impressive things with its unique concept. Through clever use of its gravity mechanics, a rising level of challenge, and being packed full of bright, colourful environments, characters, and content, there’s certainly a lot more on offer in Super Mario Galaxy than in its predecessors and the game is presented in a way that encourages short bursts of gameplay, making it a perfect title to play on the go or in your down time.

My Rating:

Rating: 4 out of 5.

Great Stuff

What did you think of Super Mario Galaxy? Did you play the original Wii version and, if so, how do you find the Switch remaster holds up? Were you a fan of the game’s space- and gravity-orientated gameplay or do you feel like the concept was a bit outlandish even for Mario? What did you think to the game’s level of challenge? Which Power Star did you struggle the most with, which Galaxy was your favourite, and what did you think of the new characters the game introduced? Did you ever finish the game as Luigi and get all 121 Power Stars? Either way, I’d love to hear your thoughts and memories of Super Mario Galaxy, and your feedback regarding Mario Month, in the comments below.

Game Corner [Mario Month]: Super Mario Sunshine (Nintendo Switch)


So, for no better reason than “Mar.10” resembling Mario’s name, March 10th is widely regarded as being “Mario Day”, a day to celebrate Nintendo’s portly plumber, an overalls-wearing mascot who literally changed the videogame industry forever and shaped the home console market of the nineties. To commemorate Mario Day this year, I’ve made March “Mario Month” and am spending each Wednesday talking about everyone’s favourite Koopa-flattening plumber.


Released: 18 September 2020
Originally Released: 19 July 2002
Developer: Nintendo EAD
Also Available For: Nintendo GameCube

The Background:
After the success of Super Mario 64 (ibid, 1996), a sequel had been in development for several years; however, despite a title apparently in line to be released in the early days of the Nintendo GameCube’s release, Nintendo opted to focus on Mario’s brother, Luigi, for the GameCube’s launch. Beginning life as a tech demo tentatively titled Super Mario 128, Super Mario Sunshine was retooled to both expand upon the mechanics and gameplay of its predecessor and to have Mario utilise a water pump as both a weapon and to navigate his environment. Upon release, the game garnered widespread critical acclaim for its presentation, music, and gameplay, though some did criticise the game’s camera and more frustrating moments. For my part, I had been attempting to buy a copy of the game for many years, having only found it to be extortionately expensive for such an old title, so I was delighted when the title was included in Super Mario 3D All-Stars (Nintendo, 2020) for the Nintendo Switch, which is the version I’ll be looking at today.

The Plot:
Mario arrives at Isle Delfino for a vacation with Princess Peach, her long-time steward Toadsworth, and several other Toads. However, upon arrival, they find that the once-pristine island has been polluted and plastered with graffiti and Mario, as the prime suspect, is charged with cleaning up the graffiti, recovering the missing Shine Sprites, and uncovering the mystery of his shadowy doppelgänger.

Gameplay:
Like Super Mario 64, Super Mario Sunshine is a 3D action/platformer. However, while Super Mario 64 had you leaping through magical paintings inside of Princess Peach’s castle, Mario finds himself jumping and hopping around the tropical island resort of Isle Delfino and its surrounding areas. While, at first, it seems as though Mario retains all of his abilities from Super Mario 64, this isn’t actually the case; Mario can still run, jump, double-, and triple-jump, wall jump, and perform a sideways jump to reach higher areas but he can no longer duck, crawl, long jump, or perform a backwards somersault. This is massively problematic coming into this game right after playing Super Mario 64 as you don’t realise how helpful those abilities are until they’re missing.

Use F.L.U.D.D. to attack enemies and hover to out-of-reach areas.

Also, Mario can no longer punch or kick enemies. He can still perform a running dive (and can now use this to slide away like a rocket if he dives onto wet ground) and a ground pound, which is useful, but his primary mode of attack and manoeuvring is to utilise Professor E. Gadd’s Flash Liquidizer Ultra Dousing Device (“F.L.U.D.D.”), a water-blasting jetpack, of sorts, that not only allows Mario to clean up toxic waste, sludge, and graffiti but also to blast at enemies to stun them or topple them over and hover short distances. Mario gains a slight amount of height the longer you hold the jump button to help him reach higher areas but it’s an awkward and cumbersome system, one that makes platforming and jumping far more frustrating than it needs to be as Mario tends to spiral off like a madman, spewing water everywhere, or fall just short or reaching far away (or high up) platforms thanks to F.L.U.D.D.’s limited tank and the game’s bothersome controls.

Shadow Mario has framed Mario and spread goop and graffiti throughout Isle Delfino.

Since Isle Delfino has been polluted and graffitied by “Shadow Mario”, and the population holds Mario himself responsible, you’ll be spending a lot of your time spraying your environment with water. Entering any of the many (many) bodies of water allows Mario to not only swim and dive but also refill F.L.U.D.D. Even when F.L.U.D.D. is full, though, you can’t just spray until the tank is empty; instead, your water will sputter out after a short time whenever you try to spray stuff for a long time. If you get muck on you, you can wash it off in water or by wriggling the control stick, which can also double as a whirlwind-like jump that I, honestly, found little use for.

This time, there’s no reprieve in water or from Coins other than the common yellow variants.

As in Super Mario 64, Mario has a health meter, this time measured by a glowing sun. While health can be replenished by collecting Yellow Coins, you’ll no longer instantly regain health by entering water, though you can keep yourself from drowning by collecting Coins and sucking in air bubbles. Also, while you’ll still find Red and Blue Coins in the game’s various stages, these won’t refill your health, though Mario is far less likely to plummet to his doom this time around since there is always a massive body of water to break his fall. Rather than being confined to a castle, Mario has the run of Isle Delfino, a bright and lively seaside port town that is populated by Piantas (goofy little characters who offer vague hints and task you with bringing them fruit) and a few of Peach’s Toads. Still, the general premise is the same; explore a hub world and enter into one of the game’s eight stages, seven of which featuring eight missions (known as “Episodes”) that allow Mario to recover one of Isle Delfino’s 120 Shine Sprites.

Shine missions range from the easy, to the lazy, to the maddeningly annoying!

Mario can, again, also find Shines in the hub world and by collecting 100 Coins in each of the stages (and easily keep track of any missing Shines using the map/totals screen) but, unlike in Super Mario 64, each Shine can only be obtained in its corresponding Episode (the Red Coins, for example, don’t appear in every Episode) and you’re still unceremoniously spat out of the current stage every time you collect a Shine (even a 100 Coin Shine), all of which means that, while each stage changes in various ways from Episode to Episode, there’s a lot less freedom and choice to how you recover the Shines. To recover the Shines, you’ll be tasked with performing such familiar tasks as defeating bosses, collecting eight Red Coins, or racing against another character. Each Episode also has you chasing after Shadow Mario, spraying him as you go until he yields a Shine, while some have you collecting another eight Red Coins in a startling example of laziness on the developers’ part. Other times, you’ll be running around in circles desperately trying to figure out what you need to do; each Episode opens with a short cutscene to help guide you in how to obtain its Shine but a lot of the time it’s very difficult to figure out what you need to do. Other times, you’ll be racing or collecting Red Coins against a time limit, returning to previous stages with new upgrades and abilities to get missing Shines or be tasked with performing needlessly difficult tasks, such as rolling watermelons to a pier or surfing on a Blooper without touching anything as you’ll have to start all over again or lose a life, respectively!

The damn obstacle course stages can go burn in a fiery pit!

While the game is much prettier and far more aesthetically pleasing than Super Mario 64, the same blocky visuals make an unwelcome return in the game’s many obstacle course stages; these hidden areas are found in each stage and see Shadow Mario steal away F.L.U.D.D., leaving you to run and jump across various moving, rotating, and temporary platforms without the aid of your water jet or Mario’s more useful jumping skills from the previous game. Generally, you can find at least one, if not two, 1-Up Mushrooms in these secret stages and you are going to need them as, while the game’s camera allows for full 360 degree control and is much improved over the last game’s camera, it’s still sometimes painfully difficult to get a decent angle, to say nothing of Mario’s continued slipperiness and instability (seriously, it’s like he doesn’t even try to stay on or hang from ledges!) Add to that the fact that you’ll have to frantically run around long rotating platforms, try not to slide off of cog-like blocks, and be reliant on Piantas throwing you to far away or high up platforms in these stages and it all amounts to the game’s most frustrating moments by far.

While the game is gorgeous to look at, I wasn’t exactly blown away with the stage variety.

While Isle Delfino is a much livelier and visually interesting environment, with lots to see, do, and find compared to Peach’s Castle, the variety in the game’s stages leaves a lot to be desired. It sounds stupid but the game really does rely way too much on F.L.U.D.D. and its tropical island theme; this means that every stage is full of water and such clichés as beach fronts, theme parks, and ports. While it’s nice that you’re far less likely to fall down a bottomless pit and that you can see the other stages way off in the distance, it got pretty tiresome and boring quite quickly as all of the game’s stages felt far too visually similar. Super Mario 64 was full of stage variety; one minute you’d be exploring sunken depths or sliding about in an ice and snow world, the next you’d be flying through the clouds or exploring a gas-filled maze. While some Episodes in Super Mario Sunshine inject some variety, with a haunted hotel being the focus for most of Sirena Beach and Pianta Village featuring a distinct (if frustrating) cage maze beneath it, I never got the same feeling of diversity while playing through the game and, when it did try something new, it was often frustrating shit like clambering up temporary platforms, trying to not slide off of moving and twisting fairground rides, or shooting yourself into the air using spontaneous sandscastles.

Graphics and Sound:
If there’s one thing Super Mario Sunshine has going for it, it’s its bright, colourful, and attractive graphics and presentation. In keeping with the tropical theme of the game, Mario is wearing a short-sleeved shirt and will not only doze off when left idle but also wipe sweat from his brow when in the shade. He, and all of the game’s characters, also have a plastic, action figure-like quality to them and are far more expressive thanks to the game’s greater processing power. While I grew tired of the tropical theme pretty quickly, the developers definitely went all-in with it; the water effects are amazing, with waves rippling, rising, and falling in the many instances of sea, and the lighting effects really make it feel as though you’re caught in the unrelenting heat of tropical sunshine.

Some Episodes spice things up but the game’s aesthetic doesn’t really alter until the final stage!

Each of the game’s worlds, and the hub world, are populated by Pinatas, all of whom have funny little reactions to being squirted or jumping on and offer vague hints to your goal for that Episode, which really helps to make the place feel alive compared to Peach’s Castle, which was basically deserted. Though each stage doesn’t really deviate from the overall tropical theme, there are some distinctions to help them stand out; you’ll be traversing ropes and running up a hill in Bianco Hills, fly on the back of a stone bird through the skies of Gelato Beach, and dive into the polluted depths of Noki Bay, with different Episodes offering slightly different variations on each stage in an attempt to spice things up. Things don’t really become visually different until you reach the eighth and final stage, Corona Mountain, which is a volcano full of instant death spikes and lava and awkward boat steering sections. The game relates its incredibly basic story with beautiful, fully voiced cutscenes. While Mario still only communicates through pantomime and characters use the tried-and-tested speech bubbles outside of the cutscenes, it’s refreshing to see Mario embracing full motion cutscenes for a change. As for its soundtrack, long-time series composer Koji Kondo and Shinobu Tanaka largely eschew the traditional Mario themes for an appropriately tropical theme which, while fitting for the game’s aesthetic, wasn’t quite as memorable to me as Super Mario 64’s music.

Enemies and Bosses:
Despite taking place in an entirely new environment, Super Mario Sunshine sees the return of a number of Mario’s traditional enemies, though many have undergone a slight aesthetic change to better fit in with their tropical locations. This means you’ll be coming across Bob-ombs, Boos, Bullet Bills, and Piranha Plants but you won’t just be able to smack them or jump on the to take them out this time. Instead, you generally must make use of F.L.U.D.D. to clean them off, whittle them down, expose them, or stun them to toss them at other enemies. You’ll also come across a number of new enemies as you explore Isle Delfino’s sun-drenched locations, many of which are rather troublesome to take care of: Chain Chomplets must be doused with water until they cool off and then ricocheted into water to dispose of them; Cataquacks will fling you into the air when you get near and must be stunned with water so you can butt stomp them; and the Electrokoopas will throw their electrifying shell at you and are only vulnerable for a short time. By far one of the worst obstacles, though, are the swirling clouds that appear in various Episodes; these will dart at you and are very difficult to dodge, meaning you’ll probably be knocked out of the air mid-jump or sent plummeting off a high ledge to have to climb all the way back up again.

Petey Piranha and Glooper Blooper pop up for a couple of boss battles.

Super Mario Sunshine features far more bosses than its predecessor; some of these are more like mini bosses, such as the aforementioned chases against Shadow Mario, the Piranha Plants made of sludge that need water sprayed into their mouths until they are defeated in order to open up new areas, and the Monty Moles who incessantly shoot Bob-ombs and Bullet Bills at you from cannons. Twice in the game you’ll have to contend with Petey Piranha and Glooper Blooper in Bianco Hills and Rico Harbour, respectively. The first time you battle Petey, it’s in an enclosed area and he shoots gunk at you that spawns enemies or headbutts you if you get too close. The second time, he’s flying around Biano Hills and must be shot out of the sky but, in both battles, you must frantically squirt water into his mouth to make him reel over and vulnerable to a ground pound. Glooper Blooper, meanwhile, sits there spitting ink at you and trying to squash you with its tentacles; you must ground pound all (or most) of his tentacles to give yourself enough time to pull out the cork stuck in his mouth and send him flying away (though you can make this easier by pulling off his tentacles in the same way).

Wiggler and King Boo return, bigger and badder than ever!

As in Super Mario 64, you’ll also battle Wiggler and King Boo; this time around, Wiggler is a far more troublesome foe as he stomps around Gelato Beach in random patterns and can only be toppled over by causing sandcastles to spring up beneath his feet, leaving him open for a ground pound or three. King Boo is also far more formidable; this time, you have to content with three spinning rings and a roulette, which will see enemies, Coins, and fruit tossed into the arena. The only way to damage this King Boo is to grab a spicy red pepper, toss it at him, and then toss a different fruit at him three times, which isn’t immediately obvious when you first drop into the arena.

Phantamanta and Eely-Mouth can be frustrating boss battles.

Two of the game’s more unique, if frustrating and troublesome, bosses, for me, were Sirena Beach’s Phantamanta and Noki Bay’s Eely-Mouth. The Phantamanta is little more than a shadow that glides over the sandy beaches and resort leaving icky sludge in its wake; spraying it with water is the key to defeating it but, every time you do, it splits into smaller and smaller parts which, combined with the life-sapping sludge, can make this a tricky battle. Eely-Mouth is a giant eel fought in the dark depths of Noki Bay; Mario dons a diver’s suit for this battle, which means you are constantly fighting with the controls as Mario bops and hovers and darts all over the place seemingly at random, slowly drowning as time passing, and you’re desperately left trying to clean the eel’s foul, rotten teeth with F.L.U.D.D. to unearth a golden tooth that is your true goal without drowning or being eaten up.

Bowser might be gigantic but the biggest hazard is the precarious nature of the boss arena.

Though a prominent force throughout the game, you never actually battle Shadow Mario in a boss battle; after being revealed to be Bowser Jr in disguise, you take on a giant mechanical version of Bowser in Pinna Park. In this battle, you’re forced into a rollercoaster and must shoot rockets at Mecha Bowser while also blasting Bullet Bills out of the sky. While this is good practice for a particularly annoying timed Shine mission that has you shooting balloons with just as little control, the rollercoaster’s constant speed and spinning means getting a clear shot is easier said than done and that’s without factoring in Mecha Bowser’s fire breath. After finally getting through the treacherous Coronoa Mountain, you’ll go head-to-head with Bowser once more; this time, he’s grown to giant size and is sitting inside of a jacuzzi tub full of caustic water. Bowser tries to fry you with his fire breath and burn you with the acid-like sludge while Bowser Jr shoots homing Bullet Bills at you. The only way to win this battle is to use F.L.U.D.D.’s rocket nozzle to perform five rocket-powered ground pounds at the five spokes of the arena. However, while this eventually leads to Bowser’s defeat, it causes the already-unstable arena to further crumble and the two dragon-turtle’s attacks to increase in speed. Still, probably the hardest thing about this boss battle is not slipping or tumbling from the arena and to your death.

Power-Ups and Bonuses:
Although Mario can still collect 1-Up Mushrooms for extra lives, Yellow Coins for health, and both Red and Blue Coins for Shines, there are no invincibility power-ups to be found this time around and, after swapping flowers and capes for special caps in Super Mario 64, Super Mario Sunshine primarily revolves around you making good use of F.L.U.D.D. to traverse the game’s various tropical environments. Though versatile, F.L.U.D.D. is largely more of a pain in the ass than an asset thanks to some awkward controls and mechanics at times. However, you can acquire a couple of additional nozzles to make things a bit easier; the rocket nozzle allows you to charge up and release a burst of water to go flying high into the sky and the turbo nozzle allows you to blast away across both land and water, both of which are incredibly useful for reaching new areas and out of reach or temporary Blue Coins.

Yoshi finally gets his time in the sun (…literally) but be sure to keep him away from water!

After being relegated to an after-game cameo in Super Mario 64, clearing the fourth Episode of Pinna Park will see Yoshi eggs appear in each of Super Mario Sunshine’s stages (with the exception of Corona Mountain) and the hub world. If you bring the egg the fruit it asks for, it will hatch and you’ll finally be able to ride either a pink, orange, or purple Yoshi! Yoshi can eat up fruits and certain enemies with his long tongue, use his flutter jump to reach platforms, and each Yoshi can create goopy platforms of a different nature (ascending, stationary, and forward-moving, respectively). As great as it is to actually be able to ride on Yoshi, though, there are some drawbacks; the first is that you can’t ride the traditional green Yoshi, then there’s the fact that he can’t spit fireballs and his supply of fruit drains over time, and, of course, the glaring flaw that your Yoshi will explode when it comes into contact with water, which is particularly frustrating when trying to reach a secret Shine in Delfino Plaza.

Additional Features:
Similar to how Mario’s brother was left with a purely solo adventure for his GameCube outing, this is once again a solo adventure for Mario; even after clearing the game, you can’t unlock any additional characters to play as, which is a real shame considering we missed out on playing as Luigi in Super Mario 64. If you talk to the various Pinatas in the game’s Episodes after collecting enough Shines, they’ll eventually gift you a pair of sunglasses that slightly darken the game’s presentation. After clearing the game for the first time, you can pair these with a super snazzy Hawaiian shirt (though neither of these can be worn outside of the Episode you are playing, unfortunately). Clearing the game once also allows you to return to the Delfino Airstrip to collect eight Red Coins for another Shine. While that’s slightly more than in Super Mario 64, it’s still a bit disappointing; once again, you don’t need all 120 Shines to clear the game but having them all slightly changes the ending you get. However, obtaining them all is no mean feat; I finished the game with 90 Shines, which was all eight stage-based Shines, all 100 Coin Shines, and a handful found around the hub world but, to get them all, you’re going to need to find all of those Blue Coins and secret stages, which can be needlessly frustrating.

The Summary:
I was super excited to finally play Super Mario Sunshine; I missed out on it back when I was playing the GameCube on the regular and have been putting off getting it for ages (literally years). The bright, colourful graphics and my fond memories of Super Mario 64 really appealed to me and fuelled my desire to finally get my hands on this game. Yet, despite a promising start, I was left disappointed. There’s a lot to see and do and to like; the graphics are gorgeous, the F.L.U.D.D. concept is interesting (if flawed), and it’s great to be able to ride Yoshi again but there are so many frustrating elements to the game that really let it down. There’s very little stage variety, too many missions per stage (with too many repeating, such as the Red Coin challenges), too much water for my liking (no matter how fitting it is for the game’s setting), and just far too many instances where you slip or fall from platforms, ledges, or ceilings or fail to make jumps because of an awkward camera angle or Mario just deciding to miss or fall. The secret obstacle course stages are an absolute ball ache and, just as the game seems to be getting interesting, it’s over in uncharacteristically anticlimactic fashion, leaving me feeling disheartened and drained rather than encouraged to hunt down the last few Shines.

My Rating:

Rating: 2 out of 5.

Could Be Better

What are your thoughts on Super Mario Sunshine? Did you play it on the GameCube back in the day or, like me, did you first experience it on the Nintendo Switch? What did you think to F.L.U.D.D. and the game’s tropical island setting? Were you also frustrated by the controls, mechanics, and over-reliance on the setting or did you, perhaps, enjoy the different direction the game took and the challenge it offered? Were you glad to be riding Yoshi again and did you manage to find all 120 Shines? What other setting would you like to see Mario placed into? Whatever your thoughts, drop a comment below and pop back next Wednesday for the final instalment of Mario Month!

Game Corner: Star Wars Jedi: Fallen Order (Xbox One)

GameCorner

Released: 15 November 2019
Developer: Respawn Entertainment
Also Available For: PC, Playstation 4, PlayStation 5, Stadia, Xbox Series X

The Background:
In 2013, Disney paid a paltry $4 billion for Lucasfilm Ltd and thus added the influential and immensely popular Star Wars franchise (Various, 1977 to present) to their ever-growing itinerary of properties and licenses. In addition to producing numerous films and television projects to expand and continue the franchise, Disney also sought to cash in on their purchase through videogames and quickly struck up a collaboration with Electronic Arts (EA) in order to facilitate this. After their attempts to revive the Star Wars: Battlefront series (Pandemic Studios, 2004 to 2005) were met with criticism and controversy, the pressure was on the studio to repair their damaged reputation with fans and gamers. Thus, in collaboration with Lucasfilm and drawing inspiration from the “Metroidvania” style of exploration and combat, EA turned to Respawn Entertainment to further (and officially) expand on the twenty year gap between the end of Star Wars: Episode III: Revenge of the Sith (Lucas, 2005) and the beginning of Star Wars: Episode IV: A New Hope (ibid, 1977). This approach appears to have paid off as Star Wars Jedi: Fallen Order was largely praised and sold over ten million units by 31 March 2020 and a sequel is rumoured to be in development.

The Plot:
Five years after the Great Jedi Purge, former Jedi apprentice Cal Kestis is hunted by the Galactic Empire’s Inquisitors, led by the mysterious and malevolent Second Sister, and he soon finds himself travelling with a rag-tag crew of misfits to secure a Jedi Holocron that names potential Force-sensitive children.

Gameplay:
Star Wars Jedi: Fallen Order is an action/adventure videogame with a heavy emphasis on backtracking, story, and learning and upgrading Force abilities using Skill Points earned from battle and finding secrets, similar to a role-playing game. Players take control of former Jedi apprentice Cal Kestis, a young man who has suppressed his connection to the Force and must rediscover his abilities through the course of his journey. However, the emphasis on exploration and searching through long-defunct Jedi Temples and the general thrust of the gameplay reminded me much more of the likes of Tomb Raider (Crystal Dynamics, 2013) than the Star Wars: The Force Unleashed videogames (LucasArts/Various, 2008/2010).

Cal’s lightsaber combat is comprised of quick attacks and well-timed parries.

Cal has a range of abilities that are simple to learn but can take some time to master; he can jump with a press of the A button, evade with B, and sprint ahead by pressing in the left analogue stick. Although his Force abilities are quite light to begin with, they can be upgraded with Skill Points and you’ll be using the Force to push, pull, slow down, and freeze enemies and objects with the Right and Left Triggers. The Force also comes into play with your lightsaber attacks, allowing you to press Y to pull off stronger attacks in conjunction with mashing X as long as your Force Meter is full. Similar to the Force Unleashed games, lightsaber combat is pretty simple, for the most part; you simply hit X to unleash a number of combos and mix your attacks up with Force manoeuvres and evades to avoid taking damage and deliver a swift kick or counterattack. Key to lightsaber combat is the game’s block and parry system; you can hold down the Left Bumper to automatically block incoming attacks but, with a well-timed press of LB, you’ll reflect blaster bolts back at your enemies and parry incoming melee attacks. This will leave your foe vulnerable and allow you to follow up with an attack of your own in a system that reminded me of the Batman: Arkham games (Rocksteady Studios/Various, 2009 to 2015) but it’s not quite the same in that, despite being attuned to the Force, there’s much less indication of when to parry and combat can get a bit hectic.

Wall run, slide, and swing your way across the galaxy’s dingiest corridors and environments.

You can target an enemy by pressing in the right analogue stick but this only really helps in one-on-one situations; when groups of enemies attack you, you better be prepared to be attacked from behind and off-camera quite often even after acquiring a double-bladed lightsaber to help deal with multiple enemies. As you cut down enemies, you’ll build up your Force Meter but the only way to restore your health is to press up on the directional pad (D-Pad) to have your cute little droid companion, BD-1, administer you with a Stim Canister or find a special glowing meditation circle. Here, you can save your game, spend Skill Points, and choose to completely refill your health and Stim Canisters (though every enemy you’ve killed will respawn once you leave the circle). Like The Legend of Zelda: Breath of the Wild (Nintendo NPD, 2017), climbing is an important mechanic in Jedi: Fallen Order; however, unlike in that game, Cal isn’t hampered by a stamina meter and you can even set up the option to auto-climb climbable surfaces from the game’s settings. Anytime you see vines or serrated surfaces or a splash of white paint on a ledge, you can usually climb up it with LT, jumping up and across to cover a greater distance (though, thanks to the game’s janky camera and perspective, you’re just as likely to leap into the void). You can also run along walls, slide down…slides…and swing from ropes, chains, and vines, and you will also eventually learn to bring these to you with the Force to swing about like Peter Parker/Spider-Man but, again, the game’s camera and wonky physics often cause you to fly past your target or ragdoll down a bottomless pit. Jedi: Fallen Order takes Cal on a journey back and forth across a whole five planets (not counting the areas you can’t revisit from Cal’s ship, the Stinger Mantis). Once Cal leaves Bracca, the salvage planet he has been hiding out on, he travels to Zeffo and begins his quest to reconnect with the Force and recover a Jedi Holocron from a vault hidden on the planet. This quest takes him to recognisable worlds from the Star Wars saga, such as Dathomir and Kashyyyk, and worlds I’m unfamiliar with, each one with their own visual style and with secrets to uncover and enemies to fight.

Cal’s reawakened Force abilities will allow him to access new shortcuts and paths.

Unfortunately, the game loves to lock areas off from you and to send you all over the place to learn new abilities just to replay through entire sections all over again to progress further. Don’t get me wrong, I get it and I don’t mind a bit of backtracking and the “Metroidvania” style of videogames but Jedi: Fallen Order really takes the piss with it. So, you’ll visit, say, Dathomir and be able to progress to a certain point but you’ll have to come back once you’ve learned the Jedi Flip to jump further. Similarly, the Force Push will allow you to break through certain walls and doors to explore further but the problem is that, despite the planets each looking and feeling different, many of them are occupied by the Empire and have a lot of similar-looking grey corridors and areas and, despite an abundance of meditation rings, there’s no fast travel system on each world so it’s pretty easy to get lost and turned around. You can create shortcuts and are provided with a map but, honestly, it’s not that helpful as I found it really difficult to see how the different levels of each environment connected and could have really done with an onscreen mini map to help with this.

The game slows to a crawl whenever you’re forced to figure out its annoying puzzles.

Gameplay isn’t all combat or exploration; Jedi: Fallen Order is also very heavy on the puzzles, particularly involving giant spheres. Unlike in some Star Wars games, you can’t actually freely manipulate objects with the Force; you simply freeze them in place or push them forwards, which is not helpful at all when you’re moving spheres. At one point, Cal is captured by the bounty hunter Null Chance and stripped of his lightsaber and BD-1, meaning you have to rely on your awkward Force powers to power up generators and rescue your little droid pal. The game often encourages you to ask BD-1 for a hint but these are generally very vague and unhelpful; he does, however, help you out by “splicing” open doors and crates for you to create shortcuts and unlock additional items; you can also use him to travel across zip wires, which is especially useful once you upgrade him with a motor, and have him scan enemies so you can better prepare from future encounters. Occasionally, you’ll be asked to perform a couple of button mashing quick-time events (QTEs), usually in boss battles, but you can helpfully turn these off from the settings if you’re not into that and they’re nowhere near as abundant as in the Force Unleashed games. There are also four different difficulty levels to choose from, with each one altering the aggressiveness of enemies and the parry system, but there are no Achievements tied to them so you may as well play on the easiest mode. Finally, while you spend a lot of time on a ship, there’s no space combat in Jedi: Fallen Order but you do get to take the controls of an All-Terrain Armoured Transport (AT-AT). You might think this would be pretty cool but it’s not that great and all too brief; the controls are a bit clunky (which I guess makes sense given the AT-AT’s size) and all the weapons come with a cooldown period so you can’t just mindlessly blast away.

Graphics and Sound:
Heading into Jedi: Fallen Order, I’d heard that it was a highly detailed and photorealistic game and one of the best games of its generation and, at first, this definitely seemed to be the case; Cal looks startling like his voice actor and likeness, Cameron Monaghan, and all of the game’s worlds and environments are full of little details such as weather effects, ships and monsters in the background, and have that lived-in aesthetic that permeates a lot of Star Wars lore.

Worlds appear vast and full of details but it’s easy to get lost thanks to the bland colour scheme.

Ships, characters, and technology are startlingly close to the source material; the many different Stormtroopers and the new Inquisitors all look exactly as you’d expect and the Stormtroopers even share some amusing dialogue that helps to humanise them beyond being mere cannon fodder. Droids, especially, look fantastic, and the game does a decent job of distinguishing its different worlds…again, until the Empire’s influence creeps into the environment. Grey is the order of the day here and, while each of the Imperial outposts and locations differs, it’s easy to get them mixed up and to get a bit lost when revisiting worlds.

The high quality cutscees are not reflective of the in-game graphics or the game’s stability.

Sadly, outside of the high-quality cinematics, things start to take a bit of a drop; the in-game graphics see a significant dip in quality, resulting in character models becoming noticeably low resolution. The crew of the Mantis ends up being comprised of several different races and characters, each of whom are very distinct and well-rounded in their own way, but they end up just standing around like action figures outside of cutscenes. Worst of all, the game is plagued by long load times, graphical pop up, and a whole bevvy of glitches; characters and enemies will blink in and out of existence, slide along as if on ice, ragdoll all over the place, and I even had the game crash on me on more than one occasion (usually when planning my next hyperspace jump). Honestly, it might be the most bug-filled videogame I’ve ever played; textures sometimes take a long time to load, the frame rate stutters when there’s a lot happening onscreen, voices, music, and sound effects would frequently cut off or out entirely and, honestly, I expected a lot more from a triple-A title such as this and it really lets the game down and makes it almost unplayable at certain points.

Enemies and Bosses:
As is the case in pretty much every Star Wars videogame, your primary enemies will be the Empire’s finest Stormtroopers. Regular ‘Troopers will blast at you from afar and try to bash your head in with the butt of their rifles but are notoriously bad shots and easily offed with a single swing of your lightsaber (but you can’t dismember them, unfortunately). Very soon, you’ll encounter Scout Troopers wielding electrified staffs that will require you to parry their attacks, ‘Troopers with flamethrowers, and ‘Troopers with heavy machine guns and small shields, though it’s pretty simple to reflect their shots back at them despite their rapid fire. You’ll also come up against the much more competent Purge Troopers; these black-clad bastards make Jedi hunting their speciality and wield a variety of lightsaber-rebelling weaponry, including electrostaffs and electrohammers. Faster and much more aggressive, they’re also capable of negating or recovering from your Jedi attacks so you’ll have to weaken them a bit before tossing them off a cliff and breaking through their guard so you can deliver a swift finishing blow. Similarly, the Nightbrothers await you on Dathomir and will attack you with magically-charged clubs and arrows but the strategy remains, largely the same. Later, you’re attack by undead Nightsisters who swarm and grab at you but are easily cut down with your double-blade dlightsaber.

You’ll also have to contend with droids and bounty hunters as the game progresses.

Each world you visit is also home to a number of creatures; Bog Rats headbutt and charge at you, Scazz’s pop out of burrow holes to attack (often shoving you off a cliff in the process), Phillaks bash you with their horned heads and will kick you with their hooves; and Mykals will swoop at you from above. You’ll also encounter some larger, more formidable enemies, with even bigger and more aggressive variants of these popping up from time to time; Oggdos will try to suck you into their jaws with their sticky tongues, Wyyyschokks pounce out of nowhere and try to either bite your face off or tie you up in their webbing, and Nydaks will thrash at you with their powerful claws. With a lot of these creatures, it’s best to wait for them to glow red and dodge out of the way and then follow up with a quick combo or to hang back and let them attack any nearby Stormtroopers to level the playing field somewhat. Compounding matters are the presence of the Empire’s Security Droids; while the astromech droids can be simply sliced in two, you’ll need to dish out quite a bit of lightsaber damage to take out their bigger cousins but, with a later upgrade, you can have BD-01 hack the droids so that they’ll attack enemies on your behalf. You can also do this with the Probe Droids that hover throughout later areas of the game’s worlds; these little buggers float just out of reach until they’re damaged enough and then they’ll charge at you in a suicide run! Later, you’ll also find a number of bounty hunters are suddenly waiting for you when you revisit worlds; these range from jetpack-wearing Boba Fett wannabes, shield-wielding mercenaries, and large battle droids and will often attack in pairs but are, in actual fact, some of the more interesting and entertaining battles in the game.

AT-STs are ridiculously easy to take down compared to Dathomir’s resident giant bat.

Bosses are a bit of a mixed bag, to be honest. You’ll have to contend with a number of large ships and creatures but some are more like underwhelming mini bosses; an attack ship blasts at you at the beginning of the game and forces you to dash between cover to avoid being blasted to pieces and, later, you’ll trade shots with a shuttlecraft while piloting your AT-AT. You’ll also have to fight against All-Terrain Scout Transports (AT-STs) more than once but, unlike in most Star Wars games, these are stupidly easy to take down as you can reflect their blaster bolts, easily jump over or reflect back their electrical bombs, and just hack away at their legs or cockpit until they go down (but remember to kill the pilot afterwards or you’re likely to be shot in the back). On Dathomir, you’ll also have to fight a giant bat, the Gorgara, in the game’s most unique battle; this thing stamps around the arena to produce shockwaves and screeches at you as you attack its wings. It’s also stupidly persistent, cashing you up a wall as you frantically climb away, before you end up having to free fall through the air, cling on to it with LT, and smash it into a series of structures until it finally goes down.

You’ll fight with the Second Sister multiple times but can only defeat her in the finale.

The game’s primary antagonist, the Second Sister, is yet another Darth Vader wannabe, one who draws more than a little inspiration from Kylo Ren, and you’ll battle her on numerous occasions throughout the game’s story. However, in each battle, there’s no point in trying to defeat her as she’s not only more powerful than you and incredibly aggressive, but the game is programmed in such a way where the point is that you’re not supposed to win; you simply have to knock her health down enough until a cutscene plays, which gets really old after a while. Eventually, you will battle her in a proper, no-holds-barred boss battle right at the end of the game; she’s faster and more aggressive than ever, tossing flashbangs and dashing around the arena, but isn’t too difficult to best if you watch her attacks, dodge, and parry properly.

Jedi boss battles are few and far between and not too challenging if you dodge and parry properly.

You’ll also engage with the Ninth Sister, a ridiculous and cartoony-looking member of the Second Sister’s group; after quite an intense chase sequence on Kashyyyk, you’ll fight her one-on-one in a battle that sees you parrying her lightsaber attacks and leaping over the shockwaves she produces. The fight is also split into stages that are separated by QTEs and cutscenes, which can get a bit distracting. Later, on Dathomir, you’ll also have to battle the fallen Jedi, Taron Malicos; Malicos dual-wields his lightsabers, tosses boulders at you, and leaps in to attack. The gorgeous Nightsister Merrin helps even the odds in this battle, however, allowing you to easily break his block and cut him down with your more powerful attacks so neither of these battles are particularly difficult.

Darth Vader makes a surprise and mostly unwelcome appearance to usurp the game’s antagonist.

After defeating the Second Sister, Darth Vader comes in and kills her with absolutely no effort at all and completely robs her of any menace and steals the show for the last part of the game. You can battle with Vader but, again, it’s a fruitless endeavour and basically an interactive cutscene prior to you having to madly escape from the Fortress Inquisitorius as Vader tears it apart with his Force abilities. It’s an intense end to the game, one that sees you having to quickly jump across floating platforms and run across walls as Vader pursues you, but it’s a bit of a shame that the game spends so much time building up the backstory between the Second Sister and Cal’s crewmate, Cere, only to have Vader come in and undo it all with his presence.

Power-Ups and Bonuses:
As you defeat enemies and scan your environment, you’ll acquire Skill Points that can be used to purchase new Force abilities; you’ll unlock more as you play through the game’s story mode and also be able to upgrade existing ones to extend your health, Force Meter, increase the range and power of your push, and learn new combat moves that see you throwing your lightsaber or performing more powerful melee attacks. Be warned, though, as these will expend your Force Meter but you can extend this, and your health, by finding “essences” hidden throughout the game’s environments. Similarly, BD-1 can scan enemies, plants, and other notable parts of the environment to add to your various databases and earn you more Skill Points and Achievements so, if you see him hop off your shoulders, be sure to stop and let him scan whatever’s caught his attention. This will also allow you to grow plants in the Mantis’s terrarium and open up better crates to acquire more Stim Canisters and find new materials for your outfit, lightsaber, BD-1 himself, and ship. Each of these can be customised with a variety of colour schemes; for BD-1 and the Mantis, this is sadly just a series of palette swaps and, unlike the Force Unleashed games, Cal’s wardrobe is depressingly light on options. Cal’s under outfit can be customised with a handful of colours and you can choose to garb him in different poncho designs or a jacket but none of them are that interesting and this feature disappointingly lacks options for other skins or recognisable clothing from the saga. Similarly, the various elements of Cal’s lightsaber can be customised to your liking; you can change the blade’s colour (initially, you can only pick from three colours but you unlock more later, though the options are still surprisingly limited) and equip different materials for the hilt and switch and such but, honestly, you rarely notice these changes when playing the game and they add nothing to your attack power or prowess.

Additional Features:
Star Wars Jedi: Fallen Order has thirty-nine Achievements for you to earn; most of them are tied to the main story campaign and unlocking the Skill Tree and, as a result, are quite time consuming to achieve. You also get Achievements for parrying attacks, taking out certain monsters, offing enemies in certain ways, and scanning everything in sight and opening every chest. Others are slightly more obscure, requiring you to kick a Phillak after it’s kicked you, defeat a Stormtrooper with their own slowed blaster bolt, cut out an Oggdo’s tongue when it grabs you, and recruit an elusive animal on Zeffo to join your crew. After you finish the game, you’ll unlock “New Journey+” mode which, as you might expect, carries over most of your unlocks for your next playthrough; you also unlock a bad-ass Inquistor outfit and red lightsaber for Cal and gain access to “Meditation Training” from save points. These are kind of like the challenge maps in the Arkham games and allow you to take on a pre-set or customised series of challenges against a variety of enemies but, while you can use this as a good excuse to quickly mop up any combat-related Achievements you’re missing, there aren’t any Achievements specifically tied to these modes, which is a bit of a missed opportunity and, while you can return to your save file to mop up anything you’re missing, the New Journey+ cosmetics can’t be used in your old save file.

The Summary:
Star Wars Jedi: Fallen Order has a lot going for it; it may be, on many levels, the best and most impressive Star Wars game I’ve ever played thanks to how large and fitting its scope is compared to the movies. The attention to detail is impressive and the sense of immersion is fantastic; the decision to slowly integrate Cal into the ongoing battle against the Empire helps to keep things grounded and build up towards the more elaborate and intense moments as Cal’s skills in the Force are reawakened. Unfortunately, it’s also a glitchy, bug-filled mess of a game full of graphical errors, instabilities, and frustrating moments that, in just as many ways, place it on exactly the same level as the Force Unleashed games. Add to that the abundance of backtracking and how poor the map and level layouts are and Jedi: Fallen Order is a chore to get through sometimes. When the game shines, it shines brightly but, at the same time, the good moments only serve to highlight how disappointing the game’s flaws are. I feel like a bit more cohesion, a bit more focus on travelling to distinct worlds or ships, and a bit more time testing would have greatly benefitted the game but the lack of unlockables and customisation features, combined with the unpredictability of the game’s performance, result in an underwhelming experience overall.

My Rating:

Rating: 2 out of 5.

Could Be Better

Are you a fan of Star Wars Jedi: Fallen Order? Do you feel EA redeemed themselves or were you also put off by the amount of bugs and glitches in the game? Perhaps you played on an Xbox Series X or PlayStation 5 and never encountered these issues; if so, what are your thoughts on the game’s stability and performance? Were you a fan of the new characters introuced in the game and, if so, which was your favourite and why? What did you think to the Second Sister and Darth Vader’s sudden appearance at the end of the game? Were you also disappointed by the customisation options available or did you enjoy cobbling together your own unique lightsaber? Which Star Wars videogame is your favourite? No matter what you think about Star Wars Jedi: Fallen Order, and Star Wars videogames in general, drop a comment down below and check back in for more Star Wars content in the near future.

Game Corner [Mario Month]: Super Mario 64 (Nintendo Switch)


So, for no better reason than “Mar.10” resembling Mario’s name, March 10th is widely regarded as being “Mario Day”, a day to celebrate Nintendo’s portly plumber, an overalls-wearing mascot who literally changed the videogame industry forever and shaped the home console market of the nineties. To commemorate Mario Day this year, I’ve made March “Mario Month” and am spending each Wednesday talking about everyone’s favourite Koopa-flattening plumber.


Released: 18 September 2020
Originally Released: 23 June 1996
Developer: Nintendo
Original Developer: Nintendo EAD
Also Available For: Nintendo 64, Nintendo DS (Remake), Nintendo Wii (Virtual Console)

The Background:
By the end of 1983, the videogame industry was dead after crumbling under the weight of countless overpriced consoles and poor quality titles. From the ashes, Nintendo stepped in and pretty much single-handedly rebuilt the industry with the release of the Nintendo Family Computer (Famicom)/Nintendo Entertainment System (NES), a machine marketed not as another home videogame console but as a more market-friendly “Entertainment System”. The videogame industry was resurrected from the dead with the NES and the blockbuster success of Super Mario Bros. (Nintendo EAD, 1985) and given a massive kick into overdrive following the release of the SEGA Mega Drive and Sonic the Hedgehog (Sonic Team, 1991). The “Console Wars” of the mid-nineties resulted in some of the greatest 8- and 16-bit releases, a series of videogames that defined an entire generation, and ensured that videogames were big business once more. Very quickly, though, the story became about which developer could be the more innovative than the other and who would crack 3D gaming first. SEGA attempted to break into the 32-bit arena with a series of expensive add-ons for the Mega Drive while Nintendo played the long game, discussing various CD-based options with both Sony and Panasonic and inadvertently creating one of the industry’s biggest gaming powerhouses, the PlayStation, when talks with Sony fell apart. Initially developed as the “Ultra 64”, the Nintendo 64 was Nintendo’s first fully-3D home console and was officially announced to the world on 24 November 1995; although the console favoured more expensive and limited cartridges over CD-ROMS, this dramatically sped up the load times of its titles and helped to reduce piracy. The console also utilised a unique (and massively under-rated) controller that included an analogue stick for full 3600 movement and could be fitted with Rumble and Memory Paks, and the system launched a number of first- and third-party titles that would be exclusive to the console. One such title was, of course, Super Mario 64. Developed over the course of three years, Super Mario 64 sought to showcase exactly what the Nintendo 64 was capable of by offering large, open 3D worlds that allowed for exploration, experimentation, and offered a diverse field of view. The game was a massive critical and financial success and is still the best-selling Nintendo 64 videogame of all time; just as Super Mario Bros. had set the standard for 2D sidescrolling platformers back in the day, so too did Super Mario 64 set the standard for 3D platformers in this new era of gaming. The game was later ported to the Nintendo DS in what is, in my view, the definitive version of the game thanks to the additional elements it provides but it was also included in Super Mario 3D All-Stars (Nintendo, 2020) for the Nintendo Switch, which is the version I’ll be looking at today.

The Plot:
Princess Toadstool (finally referred to as “Peach” for the first time outside of Japan) invites Mario to her castle with the promise of cake but, when he arrives, he finds that the diabolical Bowser, King of the Koopas, has kidnapped the Princess and hidden the castle’s Power Stars within a series of paintings throughout the castle. Never one to back down from a challenge, and motivated by the promise of a sweet treat, Mario leaps into the castle’s magical paintings to retrieve the Stars and rescue Peach and the castle’s Toad guards from Bowser’s clutches.

Gameplay:
I think it’s safe to say that everyone who owned a Nintendo 64 back in the day also owned Super Mario 64; it was the first (and, for a long time, the only) Nintendo 64 title I had when I got the console and all of my friends had it, too. Thanks to the realities of life, it was also the first Nintendo home console I owned and the first main-line Mario game I had ever owned and, honestly, it was a pretty great way to experience of Mario’s unique world and cast of characters (not to mention mind-boggling through its crisp 3D models and tight controls). Super Mario 64 is a 3D action/platformer in which you play as the titular Mario. The game takes place entirely within Princess Peach’s Castle and the grounds outside of it; within the castle are a series of magical paintings that lead Mario to a total of fifteen Courses, each with six mission-based Power Stars to collect and one hidden Star. You can also find a number of additional secret Stars in other paintings and mini Courses scattered throughout the castle and you’ll need to collect a certain amount in order to open doors to more Courses. Once you have enough Stars, however, Courses can be attempted in any order you wish but you may be limited in what you can do if you haven’t unlocked the game’s three cap-based power-ups and you’ll need a boss key to access the castle’s upper and lower areas, plus at least seventy Power Stars to battle the final boss and all 120 to see the game through to 100% completion.

Peach’s Castle is the game’s hub world, with Stars hidden in paintings and needed to open doors.

When you enter a Course, you must select a Star Mission to tackle; at first, you’ll only be told of the first mission but, once you’re in the Course, you can generally attempt to obtain any Star you wish (with some exceptions). This means that you can free the Chain-Chomp instead of racing Koopa the Quick, for example. Each Star comes with a vague hint about how to acquire it (“Lil’ Penguin Lost” or “Shining Atop the Pyramid”) but it’s not always massively clear what you have to do to obtain these Stars, encouraging exploration and experimentation (or a quick Google search). Collecting one hundred Yellow Coins in every Course will also award you with a Power Star and, sometimes, you’ll have to revisit secret Courses to obtain another Star you may have missed but, generally, the Star Missions are quite similar across all courses (battle a boss, find five secret areas, utilise a cap, scale to the top, etc). As in his 2D outings, Mario’s primary form of traversal and attacking is his ability to jump but this ability has been expanded exponentially to allow for a far more diverse means of movement and to showcase the capabilities of the Nintendo 64. Pressing jump once will see Mario perform a hop; press it again and he will jump higher, and press it a third time while running and Mario will somersault even higher, allowing him to reach out-of-reach ledges with ease. If you press the R button while running and then press jump, Mario will throw himself forwards to cover faster distances in one dramatic leap, which is great for reaching faraway platforms or navigating Mario at a faster pace. It doesn’t end there, either; Mario gains momentum as he runs and jumps, meaning if you jump onto an enemy’s head while running, you’ll get a boost upwards and jump further.

You’re required to fulfil certain objectives to acquire each Course’s Stars.

Mario can also perform a wall kick to scale vertical shafts quickly but not, it has to be said, with a great deal of ease; as will come up numerous times in this review, the wall kick is somewhat hampered by the game’s janky camera and how difficult it can be to properly judge your perspective and alignment to certain walls and objects. When you can pull it off though (which, to be fair, is more often than not and can be perfected with practise), it’s a nifty little trick that you can combine with long jumps and triple jumps to move Mario’s pudgy behind at a break-neck pace. For what I believe is a first in the series, Mario can also perform a series of melee attacks to fend off his foes. Pressing the attack button once will see him perform a punch but press it twice more and he’ll perform another punch followed by a big ol’ kick to send enemies flying. You can also perform a sweep kick while crouching, a jump kick, and a diving attack by running, jumping, and hitting the attack button, a ground-pound (where Mario will flatten enemies with his butt), and also pick up certain blocks and even enemies to toss them at other enemies. It’s quite a deep control scheme, to be honest, offering a range of smooth and crisp combat and movement options; you can run Mario in any direction at full speed and, with a twitch of the analogue stick and a press of the jump button, side-flip around to get the drop on enemies, wall kick your way up to otherwise inaccessible areas, or backflip your way to another Power Star with ease.

Mario visibly shows the affects of low health but it’s easily replenished through a variety of means.

Mario can also grab onto ledges to save himself from accidental falls and pull himself up from tricky jumps; however, this isn’t as reliable as you might think and it’s just as easy to bounce head-first off of a platform or ledge and fall to your death or go careening down a bottomless pit or into a river of butt-burning lava. Similarly, the game’s camera can sometimes get stuck behind other objects, which can cause it (and Mario) to freak out a bit; Mario also stutters and jitters if positioned too close to an edge and will most likely fall to his death if you don’t quickly tap that jump button. Thankfully, Mario is far more durable than in the majority of Mario videogames; he has a life bar (represented be a colourful pie chart) that loses a segment each time he takes a hit or other damage. Once all segments are drained, Mario loses a life and is unceremoniously spat out of the Course he was in and will have to attempt the Course over from the beginning. Luckily, Mario can refill his health by running through spinning Hearts dotted around each Course, collecting Coins, or taking a dip in water and is only dependant on Mushrooms to gain an extra life. Take care when swimming, however, as Mario’s health will slowly deplete and he’ll eventually drown unless you collect Coins or suck in an air bubble and he’s also not capable of surviving being sucked into quicksand. Compounding matters is the fact that certain enemies and hazards will cause Mario’s iconic cap to fly off; if you lose your cap, be sure to collect it as quickly as possible as you’ll take double damage without it!

Graphics and Sound:
Even now, after the release of so many technically superior 3D action/platformers, Super Mario 64 holds up ridiculously well. It’s a testament to how diligently Shigeru Miyamoto and his team worked to showcase the power and capability of the Nintendo 64 as character models still look spot on to this day, seamlessly retaining their quality and stability (unless you move Mario too far away from the camera, of course), and the game is just as silky smooth as ever. Sure, Bowser doesn’t look so great these days (and he, along with all of the character models, were vastly improved in the DS remake) but it’s cute to see all of Mario’s eccentricities, from his enthusiastic shouts when he hops around, his triumphant cry of “Her-r-re we go-o-o!” whenever he grabs a Star, and the way he falls into a mumbling sleep when he’s left idle for a short time.

In most Courses, you’re only one stupid mistake away from plummeting to your death.

Having said that, though, there are some issues that are more noticeable with the benefit of hindsight. The game’s Courses vary wildly in their scope and quality; the first, Bob-omb Battlefield, is basically a tutorial area where you’ll quickly get to grips with the game’s controls and mechanics. As user friendly as you could like, Bob-omb Battlefield features some basic enemies and hazards and is completely devoid of bottomless pits, something the vast majority of the game’s other Course cannot say. Courses like Whomp’s Fortress, Cool, Cool Mountain, and Tall, Tall Mountain are all much more limited in their scope, substituting a quasi-sandbox arena for vertically-themed stages that hover over a bottomless pit, meaning you’re always one stupid mistake away from falling to your death. Things don’t get really frustrating, however, until you reach the game’s final Courses; Tick Tock Clock and Rainbow Ride suspend you over a vast, empty void that will truly test your skill and patience thanks to the game’s dodgy camera and some very tricky and frustrating platforming elements. Other stages, like Jolly Roger Bay and Hazy Maze Cave, also feature an abundance of water; this isn’t a massive issue as Mario is quite a capable swimmer but he’s not exactly a fast swimmer and the game’s controls noticeably lag when he’s under water. Combine this with the aforementioned camera troubles and how easy it is for the camera to get stuck behind objects and these Courses can be difficult to navigate. The camera is serviceable for the most part, to be fair, and automatically and diligently following Mario around to provide the optimal viewpoint but Nintendo really should have integrated full 3600 camera control into the Switch version to correct this one glaring flaw.

There’s both variety and a lack of variety in Super Mario 64‘s Courses…

Still, the game offers a fair amount of variety in its Courses; Big Boo’s Haunt and Lethal Lava Land are standouts for me thanks to their unique mechanics and visual presentation but, at the same time, it lacks variety in a number of other instances. For example, Jolly Roger Bay and Dire, Dire Docks are essentially the same stage with the same music and, as much as I like Snowman’s Land, did we really need two snow/ice-themed stages? Plus, playing the game now, it’s really hard not to notice how basic a lot of the stage geometry is; everything is very angular and blocky, which isn’t surprising given it was a Nintendo 64 launch title, but it’s one of the many reasons why I prefer Banjo-Kazooie (Rare, 1998) since it improved and expanded upon everything Super Mario 64 pioneered. The game only really has a handful of cutscenes, all of which are rendered using the in-game graphics and are simply there to establish the game’s simple plot, relay that you’ve opened up new areas or discovered a Star, and convey the game’s ending. These are accompanied by a few instances of voice acting from Peach as Mario, Bowser, and other enemies are limited to a few sound bites, grunts, and yelps, which adds to the game’s cartoonish charm. Finally, Super Mario 64 is bolstered by a bombastic and catchy soundtrack from long-time Mario and Nintendo composer Koji Kondo; a lot of the tracks are re-used on multiple Courses but they’re so fitting and memorable that I can forgive it and if you don’t find yourself humming along to the main castle theme then you honestly have no soul.

Enemies and Bosses:
If I’m being brutally honest, Super Mario 64 doesn’t feature much in the way of enemy variety; within the first handful of Courses, you’ll have encountered pretty much all of the enemies and hazards the game has to offer but, to be fair, these are all used sparingly and to great effect. They’re generally present to cause you some issues when trying to jump and clamber up to new areas rather than being formidable challenges in their own right; you’re far more likely to get bumped off a ledge and to your death rather than beaten to a pulp by these enemies. You’ll come up against classic Mario enemies such as Goombas (who now hop up in alarm and charge at you head-first when you cross their eye line), Bob-ombs (who chase you relentlessly as their fuse ominously burns down before exploding in a shower of Coins), Boos (who turn incorporeal when you face them so you’ll have to sneak up on them from behind or perform a backflip into a ground-pound), Koopas (give them a thump to ride their shell like a skateboard), and Shy Guys (annoying little bastards that buzz all around you shooting fireballs your way and send Mario into a whirlwind spin if he jumps on them). Each of these has been brought to life with a snazzy 3D makeover that imbues them with simple, but charming, attack and movement patterns and characteristics.

The strategy for beating these two will serve you well for the remainder of the game’s bosses.

You’ll also come up against some new enemies; Amps will spin around in a tight circle and electrocute Mario if he touches them, Bubba will swallow him whole if he enters the water while exploring the “Tiny” side of Tiny-Huge Island, three different varieties of Bullies will try to knock Mario off platforms and to his death, Chuckyas and Heave-Hos will also try to throw Mario to his doom, and Klepto and Ukkiki will steal Mario’s cap if given half a chance. You’ll also have to sneak up on the sleeping Piranha Plants to knock them out without getting bitten and watch out for that Goddamn piano in Big Boo’s Haunt as it’ll randomly spring to life to scare the piss out of you! Not every Course in Super Mario 64 has a boss battle but nine out of fourteen isn’t bad. The first one you come across, King Bob-omb, teaches you the fundamental mechanics Mario will need to defeat not only Chuckyas but also Bowser himself as you’ll have to run around the King to grab him from behind and then throw him three times without being thrown off the top of his mountain to defeat him. The second boss, the Whomp King, is even easier to defeat; simply run beneath him or dodge out of the way when he tries to squash you and ground-pound his back three times and he’ll burst into pieces to award you a Star.

Bosses might be big and talk a good game but they go down pretty easily.

In Big Boo’s Haunt, you’ll do battle with three Big Boos but, despite their intimidating size, they’re as easily dispatched as any other Boo with the only troublesome one being the Big Boo you battle on the balcony at the top of the haunted house because of the risk of falling. You’ll also encounter a large variant of the Mr. I enemy in this Course but, again, it’s defeated in exactly the same way as any other Mr. I (simply run around it until it gets dizzy and explodes). You’ll also encounter larger variants of existing enemies in Lethal Lava Land and Snowman’s Land, in this case the Bullies; again, though, the hardest thing about fighting these guys is making sure you don’t accidentally slip off the small platform you fight them on or let them push you into the molten lava or freezing water, respectively. Finally, you’ll have to do battle with the Eyerock inside the pyramid in Shifting Sand Land and a Wiggler on Tiny-Huge Island; the Eyerock is probably the most challenging boss before the final battle with Bowser as it constantly shields its one (well, two really) weak point (the eye) in its rock-like fists, tries to squash you at every opportunity, and can easily shove you off the platform and to your death (luckily, though, you’ll restart right before this battle if you immediately enter the painting again). The Wrigger is pretty much the same basic deal as the Whomp King; although he looks intimidating due to his size, he only looks big because you’re small and you simply ground-pound him three times to take him out, making sure to dodge him as he wriggles around the arena faster and faster with each hit.

Bowser isn’t messing around in the third and final fight and throws everything he has at Mario!

The game’s true boss is, of course, Bowser, Mario’s long-time enemy and most persistent foe. You’ll battle Bowser three times and each time you must have the correct number of Stars to access a troublesome mini Course that leads to the Warp Pipe into Bower’s arena. Each time you face Bowser, the general strategy is the same; avoid his attacks and run around him to grab his tail, then rotate the analogue stick to swing him around and then press the attack button to send him flying into one of the many bombs that line the outskirts of each arena. The first time you face Bowser, he’s pretty weak; he’ll stomp around in a circle, slowly spitting fireballs at you, and isn’t much of a threat as long as you don’t run into him, get hit by his burning flames, or fall off the platform and you’ll only have to toss him into a bomb once to take him out, making him functionally weaker than King Bob-omb. The second battle ramps things up a bit; Bowser can still be defeated with one bomb but he’ll now jump up and come crashing down on the platform, tilting it into a steep angle that will send you sliding into a bomb yourself or down to the fiery depths below. Bowser also now teleports across the arena if you get too close to him to prolong the battle and will tilt the stage each time he leaps up to the arena from a missed throw so make sure your accuracy is on point when you send him flying. The final battle is where Bowser really brings his A game; the music is far more ominous and foreboding and Bowser can now charge at you, spit a slew of fireballs onto the arena (including blue ones that bounce all over the place) and produce shockwaves that must be jumped over every time he lands from a jump. To make matters worse, Bowser must now be thrown three times before he is defeated and, after taking two hits, will stomp around the arena in a tantrum, causing parts of it break off until it resembles a Star and limiting your options for escape and movement. It’s not all bad, though; some of Bowser’s flames will produce Coins to replenish your health and, technically, the strategy remains the same; as with every Bowser battle, it’s just a question of patience and getting your shot lined up to throw him into the final bomb and finally get your cake!

Power-Ups and Bonuses:
Although Mario can still collect a 1-Up Mushroom for an instant extra life and three different types of Coins (Gold, Red, and Blue, each offering different increments to your total Coin count), no other traditional Mario power-ups are present and unlike in other Mario videogames where Mario would collect a Super Mushroom to grow bigger and gain an extra hit or a Fire Flower to throw fireballs at enemies, Super Mario 64 takes inspiration from Super Mario Land 2: 6 Golden Coins (Nintendo R&D1, 1992) and Wario Land: Super Mario Land 3 (ibid, 1994) by giving Mario access to three different caps to aid his progress.

Soar through the sky, pass through walls, or become invincible with Mario’s special caps.

The Wing Cap gives Mario the ability to fly after performing a triple jump or being shot out of a cannon; by diving and pulling up, you can fly higher and further but just make sure you land before it wears off or you’ll suffer a damaging fall. The Vanish Cap turns Mario invisible and incorporeal, allowing him to walk through enemies and wired cages and the Metal Cap allows Mario to walk underwater and renders him functionally invincible at the cost of his speed and more elaborate jumping mechanics. Each cap must be activated by ground-pounding giant switches inside three different hidden mini Courses and are essential to collecting all 120 Power Stars but, it has to be said, their use is surprisingly sparse and you’ll be relying on Mario’s base moveset for the vast majority of the castle’s challenges.

Additional Features:
As big and involving as Super Mario 64 is, there’s sadly not a whole lot of replay value to be had especially compared to the DS remake, which featured four playable characters, additional Courses and Stars, and mini games to pass the time. You can mess around with Mario’s big, goofy 3D face on the title screen, stretching and distorting it at your leisure, which is a nice touch, and the game also allows you to have four different save files and to erase or copy each one, allowing for multiple playthroughs. Additionally, while you only need seventy Stars to take on the final battle against Bowser and clear the game, you won’t get 100% completion unless you collect all 120 Stars. This is easier said than done, especially on Courses like Wet-Dry World, Tall, Tall Mountain, and Rainbow Ride which have lots of difficult platforming sections, bottomless pits, and barely enough Coins for you to get those hidden one hundred Stars. You’ll also need to search the castle thoroughly for hidden Courses (like the Princess’s secret slide), talk to the Toads scattered throughout the castle, and catch Mips the Rabbit to find some hidden Stars.

Find all 120 Stars and you’ll get…very little of value, to be honest…

Stars are also obtained by finding eight Red Coins in the cap and Bowser stages and other hidden Courses around the castle; luckily, you can track your progress from the pause menu and from the file selection screen so you always know where you might have missed a Star or two. Sadly, though, finding all 120 Stars doesn’t really offer much in terms of a reward. If you defeat Bowser with all 120, he’ll have some slightly different dialogue to acknowledge your efforts and, after reloading your completed save file, you’ll find you now have access to a cannon on the castle grounds. Use this to blast yourself onto the castle rooftop and you’ll find Yoshi, who has a special thank you message from the developers and awards you with one hundred lives before buggering off. Unfortunately, though, this is completely redundant as you’ve beaten the game and acquired every Star so there’s no real incentive to explore the completed Courses again with your abundance of lives. Perhaps it would have been better to have Yoshi be accessible from a new save file, or even placed within Courses to offer a new Star challenge. Hell, I would have even accepted a ‘New Game+’ mode where the entire game is mirrored but, instead, you get a tantalising cameo and a whole shit load of extra lives that are basically pointless as you’re more likely to just start a new game from scratch than to go back through stages you’ve already completed to 100%.

The Summary:
Super Mario 64 is still an absolutely gorgeous and incredibly fun gaming experience; even now, some twenty-three years after its release, it still holds up remarkable well as one of the tightest, slickest, and most engaging 3D platformers ever. While the likes of Banjo-Kazooie and Sonic Adventure (Sonic Team, 1998) are technically far superior games, Super Mario 64 set a standard for all 3D platformers to strive to achieve and which many failed to match. It cannot be denied, however, that the game does still have some lingering issues; the camera, for all its diversity, is the most glaring and Mario’s tendency to get a bit stuck on platform edges or to hug walls when standing too close to them as well as his willingness to just slip to his death can all lead to some frustratingly unfair deaths and game overs but, for the most part, all of the game’s shortcomings can be overcome with the right degree of patience, skill, and experience. Once you master the game’s simple controls and mechanics, you can perform all kinds of nifty tricks and feats to aid your progress and you’ll find that the game has given you more than enough tools to find all 120 Stars if you’re skilled enough. With its stunning, colourful visuals, tight and responsive controls, catchy music, and addictive gameplay that is easy to learn and master, Super Mario 64 is positively brimming with gameplay variety. There’s always a new area to unlock and explore, new Courses and hidden Stars to discover, and the attention to detail is staggering for a Nintendo 64 launch title. My only regret is that Nintendo didn’t add in a widescreen feature or patch in that two player co-op mode they had planned or even the ability to play as Luigi after finding all 120 Stars in the Switch version but none of that diminishes the fundamental appeal of Super Mario 64.

My Rating:

Rating: 5 out of 5.

Fantastic

Did you play Super Mario 64 back in the day? Was it your first game for the Nintendo 64 or did you pick it up later? Perhaps you first experienced it on the Nintendo DS; if so, which version of the game do you think is the best? Which of the game’s Power Stars, Courses, enemies, or bosses caused you the most (or the least) hassle? Do you think Yoshi and his one hundred lives was a good enough reward or would you have liked to see something else; if so, what? What are your fondest memories of the Nintendo 64? Perhaps you hated the system; if so, why (and what’s wrong with you?) Whatever you think, comment below and let me know and don’t forget to come back next week for more Mario content.

Game Corner: Scott Pilgrim vs. The World: The Game: Complete Edition (Xbox One)

Released: 14 January 2021
Originally Released: 10 August 2010
Developers: Ubisoft Montreal and Ubisoft Chengdu
Also Available For: PlayStation 3 and Xbox 360 (Original); Amazon Luna, Nintendo Switch, PC, PlayStation 4, PlayStation 5, Stadia, Xbox Series X (Complete)

The Background:
Like many people, I’m sure, I first became aware of Scott Pilgrim upon the release of the frankly incredible movie adaptation, Scott Pilgrim vs. The World (Wright, 2010), but this unique and surreal concept first began life as a series of graphic novels created by Brain Lee O’Malley and published between August 2004 and July 2010. Inspired by pop culture and, specifically, the Plumtree song “Scott Pilgrim”, O’Malley sought to create a shōnen-style comic book series and was surprised to find that his original run of black-and-white publications became an award-winning series and inspired a critically (if not financially) successful live-action adaptation. Although initially released around the same time as the movie, Scott Pilgrim vs. The World: The Game actually has more in common with the source material than the movie; boasting retro-style graphics, gameplay, and music, the game was developed in close collaboration with both O’Malley and director Edgar Wright and, despite being generally well received and one of my favourite titles on the PlayStation 3, the game was delisted from online stores due to licensing issues. However, to coincide with the game’s tenth anniversary, O’Malley and Wright appealed to Ubisoft to bring the game back and it was finally re-released, alongside all of the downloadable content (DLC) and some additional features, and a limited number of physical copies was even produced for the Switch version.

The Plot:
Scott Pilgrim is the lazy, selfish, and obnoxious bass player of the band Sex Bob-Omb. He’s also in love with a girl, Ramona Flowers. However, Ramona comes with some unique baggage: Her seven evil exes have joined forces and are gunning for Scott, who must team up with Ramona and a host of his other friends to battle their way through the snow-filled streets of Toronto and the surreal world beyond Canada’s borders in order to prove his love for her.

Gameplay:
Scott Pilgrim vs. The World: The Game: Complete Edition is a 2D, sidescrolling beat-‘em-up very much in the style of classic beat-‘em-ups like Double Dragon (Technōs Japan, 1987) and River City Ransom (ibid/Various, 1989). The basic thrust of the game has you picking from one of three different difficulty settings (‘Average Joe’, ‘Rough & Rough’, or ‘Supreme Master’) and six playable characters from the Scott Pilgrim comics (Scott himself, Ramona Flowers, Steven Stills, Kim Pine, Knives Chau, and Wallace Wells (the latter two who were originally only available as DLC)) and making your way from the left side of the screen to the right while beating up a variety of enemies and goons.

Each character shares basic attacks but has their own specials and unique animations.

Accordingly, Scott Pilgrim’s controls are pretty basic: you attack with fast punches with X, stronger kicks with Y, hold B to block, and press RB for a Super Attack and LB to call in a “striker” (one of three other characters who will perform an attack to help level the playing field when things get rough). These attacks and controls are standard across all of the playable characters but each has their own unique attacks and Super Attacks that can be learned by defeating enemies, gaining experience points (XP), and levelling up. This will allow you to perform dash and ground attacks, evade incoming attacks, grapple and throw enemies, and perform more versatile mid-air attacks using directional inputs in conjunction with button presses. You can also pick up weapons and objects (and enemies) with X and defeating enemies concurrently will eventually see your character glow gold and earn both increased speed and the ability to pull off a massive combo attack on multiple enemies by mashing X or Y. The game does include a level cap, however, meaning that I had unlocked the entirety of Scott’s moveset by the time I hit Level 16, but it does allow for two players or more to team up for a combined attack when playing in co-op mode.

Call upon strikers and purchase food to even the playing field and increase your stats.

Each character has set number of Hit Points (HP) and Gut Points (GP); as you take damage, your HP will drain and, when you perform Super Attacks and call in strikers, your GP will drain. When you lose all of your HP, you can mash the A button to trade in your remaining GP for additional HP and stay in the fight a little longer or have another player revive you at the cost of some coins. Every enemy you defeat will drop a number of coins that you can spend in a variety of shops and fast food joints to purchase items that increase your stats (such as your maximum HP and GP, attack and defence power, or provide an XP boost), earn you an extra life, or restore your HP and/or GP. Some food items can even be taken to go and will automatically restore a portion of your health once you’re defeated, which can be extremely useful when tackling the game’s tougher stages and bosses but you can only carry one item in your inventory at a time and some of these items carry a hefty price tag so you may have to replay some of the earlier and easier stages a few times to get the cash you need.

Take a trip through Subspace for a helpful shortcut and to stock up on coins.

Rather than following the plot of the movie, which was a truncated (if admirably faithful) version of the source material, Scott Pilgrim recreates the plot of the graphic novels as closely as is possible for a sidescrolling beat-‘em-up. The game’s stages are quite long and varied and feature at least two distinct sections that you can jump to at any time from the overworld map screen once you clear a stage, which can be easier said than done if you’re under-levelled and underpowered. Keep an eye out for portals to the mysterious Subspace, though; these are usually marked by star graffiti or symbols and will transport you to a weird, glitchy area full of flying piggy banks and curiously familiar blocks that can be smashed to stock up on coins and provide much needed shortcuts around tougher areas of the game. While mindless beat-em-up brawling is largely the aim of the game, there are a number of hazards and obstacles that you’ll have to watch out for as you play Scott Pilgrim: buses and traffic will occasionally pummel you in the streets; you can fall down holes and breakable floor boards; spiked pits and large rolling balls and boulders and bursts of flame are just begging to sap your HP; and you’ll even be asked to take part in a snowball fight or run for your life as a massive robot destroys the fire escape beneath your feet.

Scott Pilgrim‘s difficulty ramps up quite quickly and is notably inconsistent at times.

While you can change the game’s difficulty settings whenever you like and still continue with your existing progress for the character you’re playing as, each character represents a separate playthrough of the main campaign, meaning that if you clear the game with Scott, you have to start right from the beginning when you first select, say, Wallace. And make no mistake about it, Scott Pilgrim is an incredibly tough game even on the easiest setting. Once you’ve managed to level up and purchase all the upgrades to max out your stats, the game becomes much easier (almost too easy, in fact) but, especially in the early going, it can be a bit of a frustrating slog. Enemies dish out and take a fair amount of damage, often blocking or punching through your attacks, and will not only overwhelm you from every angle and pummel you with weapons, they also occasionally dog pile you when you’re knocked down and burst out of the environment for a surprise attack. Luckily, environmental hazards will damage your enemies as much as they do you and you should use this to your advantage but it can get incredibly frustrating when enemies get cheap hits in on you or when the game asks you to avoid seemingly endless waves of cannonballs.

Graphics and Sound:
Scott Pilgrim vs. The World: The Game: Complete Edition utilises a distinctly retro aesthetic that’s not quite 8- or 16-bit as you/we might remember it but is identifiably paying homage to games of that era in its presentation. The game is more concerned with bringing the art style of the graphic novels to life, resulting in some nice, big, cartoony graphics full of lively animations and some colourful, dynamic environments. Sadly, though, I did notice a couple of odd glitches; sometimes, you can’t enter doors and need to backtrack a bit before the game decides to let you enter and, similarly, I sometimes had trouble picking up weapons and, especially, the extra life you get after defeating the second boss.

Scott Pilgrim‘s stages mix the mundane with the surreal, just like the source material.

The game’s locations are ripped straight from the source material and feature such mundane environments as the snow-swept streets of Toronto, the energetic dance floors of a couple of clubs, and a particularly colourful Halloween party. However, Scott Pilgrim’s appeal has always been in its unique blending of the everyday with the surreal and, accordingly, you’ll visit a movie set and encounter both green screen effects and a temple clearly modelled after Indiana Jones and the Temple of Doom (Spielberg, 1984), battle a giant anime-style robot, and visit both a dojo full of ninjas and a graveyard populated by zombies.

The game features numerous references and homages to other videogames and franchises.

The homages don’t end there, either, as the game is full of references to the Super Mario series (Nintendo/Various, 1983 to present): the character select screen is ripped straight out of Super Mario Bros. 2 (Nintendo R&D4, 1988), the overworld is almost exactly like the one in Super Mario Bros. 3 (Nintendo EAD, 1988), and you’ll smash blocks and collect coins just like in the Mario games. There are also references to the Mega Man franchise (Capcom/Various, 1987 to present) in the way you exit each stage, how certain bosses die, and, especially, in the game’s finale. You’re also tasked with destroying a car like in Street Fighter II: The World Warrior (Capcom, 1991) for bonus coins at one point, attacking little gnomes like in Golden Axe (SEGA, 1989), the pause menu music sounds like it was ripped right out of Battletoads (Rare, 1991), and one of the final boss battles is more than a little similar to Safer-Sephiroth from Final Fantasy VII (Square, 1997).

Motion comic-like cutscenes emulate the source material and advance the plot.

Scott Pilgrim’s environments are full of life and little details; you’ll see snow, wind, and rain affect the background, a wide variety of non-playable characters (NPCs) populate each area and even react when you try and attack them, other characters from the graphic novels appear in supporting and background roles (usually in the game’s many different shops), and you’ll see many different animals and little details in the background to distract you. The game also forgoes relying on text or speech bubbles to convey its story and, instead, utilises little partially animated cutscenes modelled after the graphic novel to show story and stage progression. One of the most appealing aspects of the game, though, is its retro-inspired soundtrack; Anamanaguchi, a notable chip-tune pop/rock group, provided the game’s energetic and catchy tunes and they really help to sell the idea of the game being a throwback to retro beat-‘em-ups and arcade games.

Enemies and Bosses:
As you battle your way from the streets of Toronto and across town to defeat each of Ramona’s seven evil exes, you’ll also have to wade through a number of nameless, faceless street thugs. These guys like to attack as a group and are fully capable of grabbing, using, and throwing weapons and many of the bigger or more rotund of their number can absorb a great deal of punishment. Some even have an annoying tendency to burst out from the background or attack you from off-screen and hoards of their number can await you on your journey, making crowd control a key aspect to master when playing Scott Pilgrim.

Enemies quickly escalate to the bizarre, such as men in dinosaur suits, ninjas, zombies, and robots!

When fighting your way to Lucas Lee, you’ll have to content with some of the game’s most annoying enemies: paparazzi can stun you almost into a near-inescapable loop with their camera flashes, guys in alien costumes blast at you, and others dress up in dinosaur outfits to chargrill you and charge at you in a rage. Muggers await you on the tram and will cause you to drop coins when they hit you, ninjas teleport into battle wielding swords and tossing fireballs at you, bats and dogs will swarm you at the most inopportune moments, and you’ll even have to battle zombies and a number of robots as you continue to progress. Generally, it helps to have some kind of weapon (preferably a sword or baton) at hand to help even the odds as Scott Pilgrim’s enemies can be particularly frustrating and cheap at times.

While Matthew Patel can be a bit tricky, Lucas Lee was an absolute joke of a boss battle.

Of course, the aim of the game is to defeat Ramona’s seven evil exes, meaning that at least seven boss battles await you in the game. The first of her evil exes, Matthew Patel, launches fireballs at you and summons little Demon Hipster Chicks to distract you and fire at you, occasionally shielding himself in a beam of light while they rotate around him. Still, he’s not too difficult to defeat if you take the demons out with your jumping attacks, avoid or block his attacks, and keep the pressure on him. Lucas Lee is even easier, though; you can pummel him with almost no resistance for the first part of the fight before he calls in a couple of goons for support and starts attacking you with (and on) his skateboard.

Get past the tag team of Envy and Lynette and you face a tough, multi-stage fight against Todd Ingram.

Things take a dramatic left turn when you battle your way to Todd Ingram, though. Not only do you have to run a gruelling gauntlet through his club (watching out for screaming fans of his band, Clash at Demonhead, while you’re at it), but you’ll also have to fight the tag team of Envy Adams and Lynette Guycott first. While Lynette’s bionic arm and tendency to teleport about make her a pain, it’s Envy that will cause you the most trouble as she launches kicks and dives at you with a frustrating aggression. Defeat either one of them and you’ll be blasted through the walls by the power of Todd’s guitar; you then have to smash through walls before the sound wave hits you (which is really hard to do without being hurt or dying when you’re under-levelled), defeat him in the easiest recreation of Guitar Hero (Harmonix, 2005) ever (you literally just press one button), before battling him one-on-one in the alleyway all with no checkpoints. Todd is able to use his vegan powers to choke you in mid-air, telekinetically throw objects and debris at you, and erect a shield but his most powerful attack sees him transform into a bulging monstrosity like something out of Akira (Otomo, 1982 to 1990; 1988) that sees him stretch one muscular arm across the entire screen. Dodge this, though, and the vegan police will weaken Todd, leaving him vulnerable for your attacks, but this is undoubtedly where the game’s difficulty suddenly ramps up and you’ll probably be desperate for the extra life Todd leaves behind upon defeat.

Roxy and the Twins are easily bested with nearby weapons, though the mech can be troublesome.

The third boss, Roxy Richter, wields a particularly impressive and long-reaching whip-like sword and also favours teleporting about the screen when you battle her but, luckily, you can grab a large mallet right before this fight and pummel her into submission without her even landing a hit if you’re quick enough. Ramona’s fourth evil exes, Kyle and Ken Katayanagi, put up a bit more of a fight purely by being more annoying. First, you have to defeat their little robot minion (which is easy enough); then you have to frantically scale a fire escape while their giant robot attacks you, before battling their gigantic Voltron rip-off on a rooftop. The robot will try to smash and squeeze you with its hands, bombard you with missiles, burn you with flames, and zap you with a huge energy beam but it’s pretty easy to dodge and avoid all of these attacks and take out its hands one at a time. The Twins then flee to the Dragon’s Den, a short stage full of annoying hazards, and battle you two-on-one in the gothic basement of this level. However, if you grab a baton before entering the boss area and attack quickly enough, you can whittle them down before the fight has even begun and dispatch them easily enough before they can deal any real damage.

After overcoming Scott’s shadow, you’ll finally face Gideon Graves, the game’s toughest challenge yet.

After this, you’ll enter the park and fight through a zombie-filled graveyard; zombies are quite difficult to take out as they keep getting up from your attacks and swarm the screen but you can instantly defeat them by tossing or forcing them into the open graves that are dotted throughout the stage. At the end of the level, you’ll battle Nega Scott, a dark doppelgänger of Scott Pilgrim who throws fireballs at you and darts around the screen hitting hard and fast. Thanks to how quick, aggressive, and powerful Nega Scott is, this can be one of the more challenging boss battles as he actually puts up a worthy fight rather than being cheap or unfair. Defeat Nega Scott, and you face the game’s toughest challenge yet; a gruelling fight through the Chaos Theatre that sees you taking on waves of enemies on a descending elevator against a time limit before battling Ramona’s final evil ex and the mastermind behind the game’s events: Gideon Graves. Graves is a three stage boss battle: in his first form, he assumes a muscular form and attacks with punches, rains comets down upon you, or tries to crush you with a huge meteor. He can also become invulnerable for a short period of time but, if you grab a baton or similar weapon, you can easily catch him in a damage loop and whittle his health down.

Graves transforms into a gigantic eldritch horror before finally facing you one-on-one.

In his second form, Gideon transforms into a gigantic, Lovecraftian nightmare that you battle from a small rocky platform. Make sure you grab the Power of Love sword before this fight as it’ll deal heavy damage against Gideon and is instrumental in allowing you to actually overcome this monstrosity. Gideon attacks by punching you, electrocuting you, destroying the platform you’re on, and sending screaming skulls your way but I found the best strategy was to stay down at the bottom of the screen, just far enough away to avoid being electrocuted, and just frantically mash the X button to damage him with the sword’s energy beams. Once he’s defeated, you then have to fight through his underground lab, which is full of robots, turrets, laser traps, and clones of Ramona that wield electrical batons. Make sure you grab one of these before facing Gideon in his final form, which sees him swiping at you with a sword, creating pixelated waves that you must jump over, and dashing about the place in a frenzy. He can take a lot of damage but, again, you can trap him in a cycle with your weapon to help whittle his health down. Once defeated, it’ll turn out that this was merely a robot and you’ll be asked to deliver the final blow to the true Gideon before being treated to your character’s unique ending.

Power-Ups and Bonuses:
Unfortunately, if you want to recover your HP or GP in Scott Pilgrim, you’re going to have to pay for it; there are no health-restoring pick-ups or temporary power-ups to be found in the game’s stages and, instead, you’ll have to spend your hard-earned coins in the game’s money shops to heal up and improve your states. Prices vary across the board but it’s recommended that you save your cash up to pay off Scott’s late fees at the No Account video store in the first stage as this will allow you to buy extra lives much cheaper than in Wallace’s secret shop. You can buy a variety of junk food, drinks, and other food to restore HP, GP, or both; some of these can be taken to go to automatically restore some of your HP upon defeat and it’s definitely worth having at least one in your inventory for the game’s tougher bosses.

Buy items and food to increase your stats and health and wallop enemies with nearby weapons.

You should also take full advantage of the weapons the game has to offer; you can grab baseball bats, snowballs, batons, swords, and other items to even the odds stacked against you but be warned as these will break after a time and, if you throw them at an enemy, you can also be hurt when the weapon bounces back. Each character starts the game with the minimum amount of HP, GP, and some basic attacks and moves; as you earn XP, you’ll automatically unlock new moves to use, which you can view at any time from the pause menu. From here, you can also see your character’s current level and stats and it’s recommended that you purchase items (books, videos, clothes, and such) to boost these stats wherever possible as the game’s difficulty becomes much more manageable when your damage output, defensive abilities, and HP and GP are increased to maximum.

Additional Features:
Disappointingly, Scott Pilgrim vs. The World: The Game: Complete Edition has only nineteen Achievements on offer, all of which are exactly the same as those that were on offer in the original game. It’s a shame that the developers didn’t take the opportunity to add a few more to the game, meaning you’re left with Achievements that demand little from you than clearing it with Scott, Wallace, or on the hardest difficulty, eating every food item, or defeating two-hundred enemies with weapons. Some, such as the online-based Achievements, may cause you a bit of bother but you can make others easier to nab by inputting some cheeky codes to give you the Power of Love sword or award you fifty coins to stockpile coins easily.

There’s a fair amount of extra modes but few (if any) Achievements tied to them.

While you still need to put in a code to access the game’s blood mode and the sound test on the overworld map, you no longer need to do this to unlock the game’s other modes; there’s a boss rush, a survival mode, and you can play a bit of dodge ball and a battle royale if you like (though there are no Achievements tied to these modes). You can also play online with up to three other players, change the colour palette of your character, and even unlock Nega Scott as an additional character after beating the game with the four main characters. After you defeat Lucas Lee, you’ll also see Knives’ father, Mr. Chau, lingering around the world map; select him and you’ll battle him in a particularly annoying fight that sees you lose even if you have extra lives available to you. Defeat him, though, and he’ll be unlocked as a striker for your use, which is necessary to obtain all of the game’s Achievements.

The Summary:
I’m a big fan of Scott Pilgrim; I loved the movie and the graphic novels (particularly the swanky hardback, full colour versions that were released later on) and got a lot of enjoyment out of the game when I played it back on the PlayStation 3 and was very excited to see the game come back to modern consoles. More of these delisted titles need to make a comeback, in my opinion, as there’s some great games out there that are sadly no longer available. Scott Pilgrim vs. The World: The Game: Complete Edition is, without a doubt, the definitive version of the game; featuring all the DLC and much more stable online connectivity, the game continues to impress with its retro-style graphics and music and the versatility of its combat, which helps to keep the game fresh and interesting rather than monotonous. Sadly, it’s brought down somewhat by its more frustrating moments; the difficulty curve is a bit steep and inconsistent, wildly varying from stage to stage and boss to boss. It’s enjoyable and fun to keep playing but, until you level and power up, you may be struggling a bit and be forced to stock up on lives and health-restoring items in order to progress. It may also be a lot easier to get through with other players by your side but, either way, I would highly recommended this game and you should definitely get it before it disappears forever again (just be prepared to fight for your survival on more than one occasion).

My Rating:

Rating: 4 out of 5.

Great Stuff

Did you purchase Scott Pilgrim vs. The World: The Game: Complete Edition? If so, what did you think of it and how do you think it holds up after all this time? Did you ever play the original version of the game and, if so, were you excited to see it re-released? Which of the playable characters, stages, and bosses was your favourite? Did you also struggle a bit with the game’s difficulty curve? Would you have liked to see more content and Achievements included in the Complete Edition? Are you a fan of Scott Pilgrim; if so, what was your introduction to the story and which of the graphic novel’s adaptations do you like the most? Whatever you think about Scott Pilgrim vs. The World: The Game: Complete Edition, or Scott Pilgrim in general, drop a comment down below.

Game Corner: The Legend of Zelda: Breath of the Wild (Nintendo Switch)

Released: 3 March 2017
Developer: Nintendo EPD

The Background:
As I detailed in my review of the first game, The Legend of Zelda (Nintendo EAD, 1986) was an extremely popular title when it released on the Nintendo Entertainment System (NES) and sold over 6.5 million copies. This, of course, was only the beginning for the series, which has become one of Nintendo’s most lucrative and popular franchises of all time, which made a successful jump to 3D with The Legend of Zelda: Ocarina of Time (ibid, 1998) and has largely aimed to be bigger and better with each successive entry. Development of Breath of the Wild began sometime after the release of The Legend of Zelda: Skyward Sword (ibid, 2011), a commercial success that was easily the largest and most complex Zelda title released at that time. For the next title, though, series producer Eiji Aonuma wanted to completely rethink the conventions of the franchise and create a much bigger, more interconnected world. After developing an 8-bit prototype to experiment with physics-based puzzles, Aonuma encouraged his team to rethink the game’s approach to puzzles and to create a grand, open world adventure more akin to The Elder Scrolls V: Skyrim (Bethesda Game Studios, 2011). To further separate it from other entries in the franchise, it was also the first Zelda title to use voice acting in cutscenes (though Link remained unnervingly silent), the physics were purposely built to be the most realistic yet, and the game was specifically designed so that players were free to explore and experiment (they could even skip the story entirely, if skilled enough). Breath of the Wild proved immensely popular upon release; many reviewers considered the game to be a “masterpiece” and one of the most immersive videogames ever made. Breath of the Wild also won numerous awards, was the third-bestselling Zelda title at the time, and earned itself a direct sequel after Aonuma’s team found they had too many ideas for the game to be limited to downloadable content (DLC).

The Plot:
After a botched resurrection attempt leaves Ganon little more than a calamitous force of nature, Princess Zelda and Link, the warrior chosen to wield the legendary Master Sword, found their forces overwhelmed when Calamity Ganon corrupted the machines they built to repel him. After Link was gravely injured, Zelda placed him in suspended animation and magically sealed herself within Hyrule Castle to hold Calamity Ganon at bay. One hundred years later, Link awakens, his memories fragmented, and begins a quest to rediscover his destiny and end Calamity Ganon’s threat once and for all.

Gameplay:
The Legend of Zelda: Breath of the Wild is a massive open-world adventure game in which players are once again placed into the role of Link, the elf-like hero who continually finds himself resurrected and reborn time and time again throughout the ages to oppose Ganon’s evil. Unlike the vast majority of Zelda titles, players have no option to rename Link, making Breath of the Wild one of the few games in the series to actually use the name “Link” as the character’s name; similarly, Link forgoes his traditional Peter Pan garb of green tunic and hat in favour of a multitude of different clothing options and these are the first indicators that the game is very different from traditional Zelda games.

Link’s combat options are simple but quite varied and rely on timing and strategy.

If you’ve played a 3D Zelda title before, particular Ocarina of Time, you’ll be immediately familiar with most of Breath of the Wild’s controls: players can target nearby enemies by holding ZL (sadly, there’s no option to target without holding the bumper), which will cause Link to immediately raise whatever shield he is carrying to block enemy attacks or reflect certain attacks back by pressing A. Pressing Y will allow Link to attack with his equipped weapon and pressing ZR sees him whip out his bow and shoot arrows for a ranged attack. Returning from Skyward Sword is the stamina wheel, which depletes when you hold B to sprint or when swimming, gliding, or climbing one of the game’s many hills and mountains. In a major addition to the series, Link can now jump whenever he wants with a press of the Y button or charge up a spin attack by holding down X and perform some jumping strikes and dodges just like in the Nintendo 64 games; he can also throw his weapons and perform a flurry attack by dodging incoming attacks at just the right moment.

You can’t just rush into battle or areas as your weapons will break or burn up if you do.

The biggest addition to the combat is the inclusion of destructible weapons; every single melee weapon, shield, and bow you acquire in the game has a limited number of uses and, the more you use them, the more you’ll wear them out. Weapons that are made out of wood will also catch fire (causing Link to catch fire and take damage in the process) as well and many shatter in only a single use, meaning that Breath of the Wild’s combat is much more about strategy and it is often far better to simply avoid or run away from battles rather than break your more powerful weapons. Honestly, it’s an annoying and frustrating system that means you’re almost constantly worrying about the status of your weapons and being prepared for the game’s more challenging obstacles. I feel like there could have been a middle ground where there are some weapons (wooden ones, for example) that break and some situations where you lose them (enemies could knock your shield out of your hands with larger weapons, for example, and weaker steel swords could shatter on stronger rocks) but, instead, every single weapon has a finite number of uses, which made me very anxious and made combat more exasperating than enjoyable. Combat is made all the more troublesome by the fact that Link is the weakest he has ever been; as always, you begin the game with three hearts of health and, because the game is so big (even the relatively enclosed opening area), it’s very easy to be overwhelmed by even the bog standard Bokoblin enemies. Unlike in previous Zelda titles, defeated enemies will never drop health-restoring hearts, meaning the only way you can replenish your health is by picking up edible items (apples, acorns, meat, and so forth) and eating them. Indeed, the key to bolstering Link’s stamina, health, and attack prowess is to make use of the game’s cooking mechanic, whereby Link can toss up to five items into a cooking pot and brew up dishes or elixirs to increase his maximum hearts, his stamina, attack and/or defence, his stealth prowess, or resist certain elemental conditions. The only way to permanently increase your hearts is to conquer the game’s four dungeons (known as “Divine Beasts”) or acquire Spirit Orbs from the many Ancient Shrines scattered (and, often, hidden) throughout Hyrule.

Track down and complete Shrines to earn Spirit Orbs and increase your health and stamina.

You’ll want to hunt down and visit these Shrines on a regular basis as, since the game has only a handful of traditional dungeons, these make up the bulk of your concern and are the only way of increasing your maximum health and stamina and, thus, your chances of success. Each Shrine also acts as a fast travel point once activated, allowing you to quickly teleport all across the vast kingdom of Hyrule from the main menu, but their primary function is to bestow Link with four (technically five, I guess) Shiekah Runes that are used to conquer puzzles both in and outside of the Shrines. These puzzles may be simple things such as activating switches, creating ice platforms to cross water, lifting metallic objects, creating electrical currents, or floating along on updrafts but they can also be extremely challenging combat scenarios against spider-like Guardian Scouts. As you progress and explore further, you’ll come up against some truly head-scratching puzzles that force you to freeze objects and attack them to build up kinetic energy, navigate through mazes, retrieve orbs from dangerous environments, and make full use of your inventory and abilities in order to solve them. Thankfully, the Shrines don’t need to be beaten to activate them as fast travel points but it’s highly recommended that you beat as many as you possibly can as you’ll refill your health upon successful completion and move one step closer to increasing your maximum health and stamina. And you’ll definitely need to do this as, while you can head straight to Hyrule Castle to take on Calamity Ganon without tackling the game’s story, I really wouldn’t recommend it as I had a great deal of difficulty taking on even minor enemies and puzzles with the game’s mechanics. Breath of the Wild throws absolutely everything in your path to keep you from succeeding: at night, Stalfos and similarly-skeletal enemies will rise from the ground to chase you down; every so often, gameplay is rudely interrupted by the rising of the Blood Moon, which resurrects all enemies you’ve defeated since playing; and you’ll even be beset by a variety of environmental hazards.

Rupees are hard to come by and items have a steep cost, keeping you on the back foot.

When climbing higher, the air temperature will drop, causing Link to shiver uncontrollably; when exploring Death Mountain, the air becomes unbearably hot, causing his wooden items to combust; and Hyrule is plagued by wind, rain, and thunderstorms that will causing Link to be struck by lightning if he’s got anything metal equipped! In many of these situations, Link will steadily lose hearts and be at great risk, meaning that you need to cook up something to stave off these debilitating effects or acquire, or buy, clothing to resist the elements. As in all Zelda games, Link can purchase new items using Rupees; however, similar to how enemies don’t drop hearts, it’s very rare that defeated enemies will drop Rupees. As a result, the main way you’ll earn Rupees is by finding them in chests (usually after defeating an enemy encampment) or selling some of the many items and minerals you pick up along the way. Sadly, the best armour and more useful elixirs and weapons carry a high price tag, meaning it’s quite difficult to save up enough to buy what you want (it doesn’t help that the four Great Fairies, who will upgrade your clothing using monster parts, charge up to 10,000 Rupees just to “restore their power”). As a result, like with the combat, it feels like you’re constantly on the back foot as you never have enough money, never have enough ammo, and your weapons could break at any moment, all of which makes it a very stressful experience at times as you might spend Rupees to replenish your health at an Inn only to be decimated by a random Guardian out in the field.

Paragliding and climbing are two pivotal mechanics in the game and essential for traversal.

While Link can pick up a great many items, ingredients, and monster parts, his weapon inventory is extremely limited; sometimes, you may have to discard or use up a weapon to grab a better, more powerful one and the only way to increase your inventory slots is to randomly find Koroks hidden all over Hyrule. Each one you find gifts you with a Korok seed, which can be used to buy one extra slot at a time, with the cost of these inventory slots increasing each time. Two of the game’s more prolific mechanics are the paragliding (which I believe is a carry over from Skyward Sword) and climbing mechanics; once you acquire the paraglider, you can jump from higher areas or use air currents to glide along, covering vast distances (for as long as your stamina holds out), which is great for spotting Shrines or avoiding dangerous areas. Climbing is also heavily dependant on your stamina but it’s generally better to get to the high ground to find secrets and survey the area and you’ll have to climb up a number of Sheikah Towers in order to painstakingly map out the massive overworld map. Since Hyrule is the biggest it has ever been, Breath of the Wild can be extremely daunting; travel is helped not just by the fast travel system but also the inclusion of horses and other ridable animals. When you come across a horse, you should press the left analogue stick to make Link crouch and take slow steps to approach it undetected, then you can mount the animal and sooth it with L. Once you’ve calmed the horse, you can ride it to one of Hyrule’s many stables to register it (for a price, of course); while your horse can’t follow you everywhere (they can’t cross the Gerudo Desert, water, or rockier areas, for example), you can call it by pressing down on the directional pad (D-Pad) to whistle and recover them from a stable (so, if you’re in the far West but left your horse in the far East, you can visit a stable and they’ll bring your horse to you). Horses can be named and have different statistics that determine how tough and fast they are but there are a couple of things to consider: thanks to the game’s dodgy physics, it’s easy to fall into water with your horse, which will cause it to become trapped if there’s no way for it to return to shore, and horses can also be killed if they take too much damage (usually by Guardians), though a Great Fairy will resurrect them if this happens. Similarly, as I mentioned, you can’t take your horse into the desert, but you can temporarily commandeer a Sand Seal to quickly traverse the temperate sandstorms.

A number of NPCs have side quests and missions for you, which can earn you a few nifty rewards.

Link’s journey involves a great many side quests and interactions with the largest number of non-playable characters (NPCs) ever seen in a Zelda title; even when journeying from one town to another you may stumble across NPCs who have side quests and missions for you, ranging from collecting a number of items, photographic objects, defeating enemies, or bringing them something. In the game’s larger towns, you’ll find more substantial side quests, many of which are tied into the game’s main objectives; you can’t just climb up Death Mountain to reach the Divine Beast Vah Rudania, for example; you first have to cook up an elixir to resist the heat or complete a side quest to earn heat-resistant armour, rescue a Goron from captivity, and then make your way up the mountain shooting at the Divine Beast while defeating enemies and taking out drone-like Guardian Skywatchers first, all of which can take a good few hours. Every time you complete a main or side quest, you’ll be gifted with access to Rupees, weapons, or other items so it can be worth it to veer away from your main objective and help out the multitude of NPCs in their often strange and convoluted requests. There is, honestly, almost too much to do and see in Breath of the Wild: wild animals roam the countryside as often as enemies, many of which will randomly attack you but all of which can be killed off for ingredients; camp fires are scattered around, which allow you to advance time to avoid night-time attacks and weather; Beadle wanders around to give you the chance to buy supplies; NPCs randomly get attacked by monsters and will reward you with cooked dishes; towers can be climbed to find chests; enemies camp out all over the place; rafts often sit near bodies of water for you to sail to far off islands by using a Korok Leaf; chests must be magnetically pulled out from water, sand, and snow; and it’s super easy to stumble into ruins, small villages, and other areas of desolation or civilisation when trying to follow the main story. It can get a bit daunting at times: you’ve got the cooking, the breakable objects, and the Shrines to worry about, keeping you constantly on edge. Even when you conquer the Shrines, you need to travel to a town or village and find a Goddess Statue to pray at in order to receive your Heart or Stamina Container and, thanks to how easy it is for enemies to overwhelm you and defeat you, you’ll be seeing the “Game Over” screen over and over again without boosting your odds through food or clothing. Autosaves are frequent, however, and you can manually save whenever you like and it’s very easy to reload a previous save if you make a massive blunder along the way.

Graphics and Sound:
Full disclosure, the last 3D Zelda game I played with The Legend of Zelda: Twilight Princess (Nintendo EAD, 2005), which was the biggest Zelda adventure at the time so to say that Breath of the Wild blew my mind is an understatement. Without a doubt, the game is absolutely gorgeous to look at; the overworld is gigantic, ranging from wide, seemingly endless fields to the explosive, lava-filled region of Death Mountain, to the desolate wastelands of the Gerudo Desert and snowy mountain peaks, with some areas featuring more than one weather and seasonal effects to worry about (the Gerudo Desert, for example, can be boiling hot in the day and freezing cold at night).

Hyrule is full of the remnants of lost civilisations and the ruins of a time long forgotten.

As soon as you step out of the Shrine of Resurrection, you can see the vastness of Hyrule but it’s not until you paraglide down into Hyrule proper that you see just how huge Hyrule now is. Without a horse or fast travel, it can take many actual, real-world minutes just to travel from one point to another and you’ll be beset by all manner of dangers along the way. Winds blow, rain falls, lightning strikes trees (and you…), and day turns to night turns to day in a constant cycle, all of which brings Hyrule to life as, perhaps, the most lively and realistic gaming environment I’ve ever seen. The remnants of Hyrule’s past glory and iconic locations from the Zelda series are everywhere, including destroyed outposts, the overgrown wreckage of the Temple of Time, and scattered, destroyed Guardians (be cautious when approaching for loot, though, as they’re often playing possum).

Each race of Hyrule lives in a distinct environment, which only adds more life and depth to the game.

Like any good Zelda game, variety is the name of the game when it comes to Breath of the Wild; a degree of traditional society is retained throughout Hyrule thanks to places like Kakariko Village and Hateno Village but you can also visit the rock-eating Gorons, the sea-faring Zoras, the woodland imps known as Koroks, the desert-dwelling Gerudos (a society comprised entirely of women), and the man/bird hybrids the Ritos. Each one has their own visual style and a lives in a distinct area: the Gorons dwell in and around Death Mountain, working in mines nearby; the Zora’s live in the gorgeously ornate Zora’s Domain, which is full of water and waterfalls; the Rito are surrounded by snow and mountains; the Koroks are hidden deep within a dense, misty forest that will kick you out if you wander in unaided; and the Gerudo dwell within a desert town and set the guards on any males who dare intrude.

Dialogue is given through text boxes and voiced cutscenes, though Link stays eerily silent.

Character models are of equally high quality; they don’t necessarily move all that much but they are generally quite varied and full of life and personality. Each of Hyrule’s races can be found all over the land as well, with Gorons wandering around selling wares, Zora’s popping up in bodies of water, and Korok sprouting out of the most random of locations. Each one communicates using speech bubbles and text but, when the game switches to its higher quality cutscenes, characters will also talk as well. Link, however, remains silent which, to be honest, is a bit weird as the game’s story and script is often geared towards characters specifically addressing him or asking him questions, which makes his silence really stand out. Oddly, many conversations you have with NPCs give you the option of one or more answers, implying that Link can speak so it just feels like the game could have been tweaked a little to cover for his silence in speaking cutscenes. Cutscenes come in a variety of forms, from in-game graphics, higher quality cinematics, and distorted flashbacks to Link’s past as he uncovers more of his memories. Thankfully, you can speed up text scrolling with B and skip cutscenes if necessary and, often, the game skips over them for you (such as if you fall to a dungeon boss, for example). Musically, Breath of the Wild is the most elaborate of the series I’ve ever seen; a lot of the time, music gives way to ambient effects and slowly creeps in or suddenly kicks up to set the tone of an area or emphasise an enemy attack. It’s a grandiose, operatic score that escalates as you conquer the four Divine Beasts, defeat Ganon’s underlings, and take on the calamitous King of Evil himself in the finale, when the traditional Zelda theme kicks in with suitably dramatic impact.

Enemies and Bosses:
Hyrule is, as always, also populated by a wide variety of enemies, all of which freely roam its fields, mountains, and wastelands and will attack you on sight if they spot you, often calling for reinforcements if near an enemy camp, and all of which will drop weapons and monster items for your use. Some of the basic enemies include gelatinous Chuchus and bat-like Keese, which can be protected by elemental conditions, but, primarily, you’ll be fighting different varieties of Bokoblins. These goblin-like creatures like to set up camps, shoot at you from on high with arrows, and attack with spears and swords; they’re the most basic of enemies but are formidable through their sheer numbers and your comparative weakness and even rise from the grave to attack you in skeletal forms. They’re often accompanied by the much larger Moblins, which attack with kicks and bigger, longer weapons, but you’ll also have to contend with a variety of Lizalfos, who are often camouflaged or leap out at you from hiding, damn annoying Octorocs, who pop out from water to spit rocks at you that always seem to hit, and robe-clad Wizzrobes, who dance around mockingly shooting elemental magic at you and teleporting all over the place. Easily the most daunting of the regular enemies are the Lynels; these centaur-like creatures are basically like mini bosses and you won’t actually be able to defeat one for a long, long time as they’re just too tough. Once you get a healthy stock of hearts, food, and more powerful weapons (particularly the Master Sword), though, you’ll stand a much better chance of besting these ridiculously powerful enemies.

Guardians are a significant threat and extremely difficult to destroy or escape from.

However, there are only a handful of Lynels to worry about; the Guardians are far more frequent and troublesome as they often sit amongst the wrecked shells of their kind and fire what basically amounts to an instant-kill laser in your direction. At first, you have no chance of destroying these bastards and they’re only found in a handful of places but, once you conquer the Divine Beasts (and when you storm Hyrule Field on the way to Hyrule Castle), they’ll start to scuttle around the overworld in regular patrols. If they spot you, do everything you possibly can to avoid them, even if it means going far out of your way, and don’t even think about trying to outrun them without a horse! They can be defeated using special weapons and by targeting their limbs and eyes but, most of the time, it’s a fool’s errand and it’s simply easier to flee for your life! The flying variants are much easier to take out in comparison but once you see they’ve got a lock on, make sure you pace yourself to sprint away at the last second or else you (and your horse) will be toast.

The Divine Beasts need to be quelled before you can explore and restore them.

As there are only four dungeons in the game, Breath of the Wild is quite light on actual bosses; you will, however, have to do battle with Master Kohga of the desert-dwelling Yiga Clan in order to reach Vah Naboris, the Divine Beast of the Gerudo Desert. Kohga likes to hurl boulders your way but you can easily stun him with arrows and use Magnesis to repel his attacks in the brief windows of opportunity you get; honestly, sneaking through the clan’s hideout was more troublesome than the fight itself. The reverse is true of the dungeons, which focus on annoying puzzles and are largely devoid of enemies and populated mainly by “Malice”, a health-draining black/red goo that must be dispelled by shooting an eyeball. Just getting to the Divine Beasts and, thus, their bosses is like a boss battle in itself; each one can be tackled in any order and all of them must be quelled before you can enter them. I took on the Divine Beast Vah Ruta first, which spits ice projectiles at you that must be smashed with your Cryonis ability before using the bow and a special Zora outfit to swim up waterfalls and destroy the cannons on the Divine Beast. Similarly, Divine Beast Vah Rudania needs to be shot at by loading cannons with your bombs and a particularly hardy Goron. To bring down the Divine Beast Vah Medoh, you must protect yourself from the frigid cold and use the paraglider to destroy cannons on the Beast’s sides with Bomb Arrows while the Rito, Tiba, draws its fire away from you. Easily the most difficult of the Divine Beasts to bring down, though, was Vah Naboris, which forces you to stay within a protective field and surf, almost uncontrollably, across the sand using a Sand Seal while shooting a limited supply of Bomb Arrows at its feet.

Waterblight Ganon attacks from a distance with a deadly spear and ice blocks.

Inside each of the Divine Beasts, you must first rotate, tilt, and manipulate the gigantic structures to activate five terminals and then you’ll do battle with a “phantom” aspect of Ganon, each of which sports two attack phases that will truly test your mettle, especially in the early going and if you’re underequipped. I first took on Waterblight Ganon and it was like hitting a brick wall! Teleporting around the arena and attacking with a long spear, Waterblight Ganon can be hurt with Bomb Arrows but can end you pretty quickly with just a couple of hits. In the second phase, the arena floods and you’ll need to shatter Waterblight Ganon’s ice blocks with Cryonis and dodge its thrown spear, again using Bomb or Shock Arrows (or Ancient Arrows if you manage to get some) to deal the most damage. This was a tough hill to climb for me and the first time I had to go off and cook up some defensive food to give me an edge as its attacks were too much at the time. Next, I took on Thunderblight Ganon, who was also quite the formidable foe thanks to his incredible speed! Thunderblight Ganon throws a few electrical balls your way, which are easy to dodge while firing arrows at him, but you have to have your shield up pretty quick when he dashes in for the attack or else you’ll miss your best opportunity to strike him. In the second phase, he drops a number of metal pillars into the arena and then electrifies them; you need to stay the hell away from these, grab one with Magnesis, and move it near him so he shocks himself, all of which is really hard to do as the camera and controls really get in the way here. This only stuns him, though, and he then follows up with even faster, more frequent attacks and you absolutely must make sure that you don’t have any metal weapons or armour equipped or else you won’t last long at all and eat or drink some concoctions to increase your defence, attack, and resistance to electricity.

Fireblight Ganon wields a massive sword and tosses a huge fireball your way.

I then decided to give myself a break and tackle Fireblight Ganon next; this battle takes place in a much bigger arena, making it a bit easier to keep your distance and catch your breath, though Fireblight Ganon wields a massive sword so it helps to stay up close to him. In the second phase, he launches a massive fireball your way so be sure to hide behind the main terminal in the arena; you should also use this for cover if he busts out his Guardian laser and be sure to unequip any wooden weapons and utilise any Ice Arrows or ice-themed weapons you have to hand (though I also did some decent damage with Shock Arrows when I ran out of Ice Arrows). Finally, there’s Windblight Ganon which, again, takes place in a much bigger arena that is full or destructible columns that you can use for cover. Windblight Ganon hovers out of reach of your sword strikes and rapidly shoots at you with a laser pistol but you can bring him down using air currents to glide upwards and fire a few Bomb Arrows at him. In the second phase, he throws out tornados to wreck the arena and also sends out four drones to heavily magnify his laser attacks but I found it easier to simply concentrate on attacking him whenever possibly, scoffing down food as and when necessary, rather than be distracted by the drones.

Calamity Ganon is a massive, spider-like monstrosity that borrows attacks from other bosses.

With the four Divine Beasts restored and taking aim at Hyrule Castle, you must then storm the Malice-ridden castle itself, which acts as a quasi-dungeon of sorts and is full of Guardians, enemies, and treasure, with only one Shrine for fast travel. There is, however, a shortcut up the West-side waterfall that takes you to the inner sanctum, where Calamity Ganon dwells. A monstrous, nightmarish amalgamation of the four phantoms, Calamity Ganon is the most horrific form I’ve ever seen Ganon in but this fight can be tipped greatly in your favour by defeating the other bosses as the Divine Beasts will drain half of Calamity Canon’s health. If you are stupid enough to go straight to the final boss without conquering the dungeons, or with less than four beaten, you’ll have to fight Ganon’s phantom forms before you can even take on Calamity Ganon so I really wouldn’t recommend going into this with just a stick and your undies. Calamity Ganon mixes and matches attacks from the other bosses, swinging a gigantic, flaming sword at you, causing flames and fireballs the scatter across the arena, throwing a spear at you, and blasting at you with a Guardian laser. I rushed up close and went to town on him as quickly as possible with the Master Sword (which doesn’t lose its charge in Hyrule Castle), dodging and hitting flurry attacks if I was lucky enough, and shooting at him with Ancient Arrows when he scuttled up the walls. In the second phase, Calamity Ganon protects himself in an impenetrable, flaming shield and is completely immune to your attacks; he ups his fire game with Fireblight Ganon’s fireball and also conjures Windblight Ganon’s tornados.

Ganon transforms into a rampaging beast and must be put down with some well-placed arrows.

In this phase, you really need to have mastered the “Perfect Guard” move (hold ZL to target and, right before an attack hits, press A to knock it away/back with your shield) as the only way to stun Calamity Ganon and thus damage him is to reflect his Guardian lasers back at him, which I found to be incredibly difficult to get right. Once defeated, Calamity Ganon transforms into a gigantic, Malice-infused, boar-like creature, Dark Beast Ganon, and rampages across Hyrule Field! Similar to the final boss of Twilight Princess, this battle takes place on horseback and the hardest thing about it, really, is keeping control of your horse as the camera and controls make manoeuvring around Ganon troublesome at times; touching Dark Beast Ganon will hurt you and cause you to be knocked from your horse so keep your distance and stay away from his face to avoid his big laser attack. When Zelda gives you the nod, golden symbols will appear on Ganon’s body and you must shoot at them with the Bow of Light (which, thankfully, has infinite ammo). When Dark Beast Ganon’s health is down to one sliver, a glowing weak spot appears on his forehead; now you must use the updraft from Ganon’s laser attack to glide into the air and use your arrows to strike the Malice eyeball and finally defeat Ganon and be treated to the game’s anti-climatic ending.

Power-Ups and Bonuses:
Breath of the Wild has an abundance of items, weapons, pick-ups, and power-ups for you; an overabundance, it seems at times, as you can pick up a variety of monster parts, minerals, food, and weapons to be equipped, sold, or cooked for a variety of effects. With all the food, meat, and fish (thankfully there’s no fishing mini games this time around) in the game, you can either eat some of them for a quick health boost or cook them up in a variety of combinations for stat boosts and extra help. I may have missed something but it doesn’t seem like there’s a way to keep track of your recipes so I kind of just tossed them in a pan and hoped for the best. When around a Great Fairy Fountain, you can sneak up on fairies and grab them, which is super helpful as they’ll restore your health a bit when all your hearts are empty. As you explore, defeat enemies, and open chests, you’ll acquire different melee weapons; these come in all shapes and sizes, from simple branches and torches, to skeletal arms, to rusty swords, double-handed blades and axes, and even elemental weapons. You can also grab Magic Rods for limited elemental attacks and a lot of these weapons have buffs applied to them that increase their attack and durability. Each handles differently as well; bigger weapons will deal more damage and break tough rocks but are painfully slow and you can’t use your shield at the same time. Eventually, you’ll be able to acquire the legendary Master Sword but, to even pull it from its pedestal, you’ll need at least thirteen permanent hearts (temporary hearts are no good) to yank it free and, though it’s the only weapon in the game that doesn’t break and you can shoot beams of energy if you have full health, it does run out of energy and become unusable for a few minutes.

Sadly, no shield or bow is as durable as the Master Sword as they’ll all eventually break.

Still, it’s doing better than the game’s shields; again, these come in all shapes, sizes, materials, and with different buffs but the difference is that you can’t ever acquire a permanent shield. The best you can hope for is to liberate a powerful shield from Hyrule Castle but I found I was too afraid to equip it in case I wasted it defending against a regular Bokoblin attack. You can also acquire a number of different bows; some of these shoot further than others or even shoot multiple arrows at once, which I found to be more of a hinderance than a help as I was constantly running low on arrows. You can pick up elemental arrows (Fire, Ice, and Shock), which are super useful against water and fire enemies, Bomb Arrows (which are great for rock-based enemies and bosses), and the super powerful Ancient Arrows. Any Ancient gear is the most powerful in the game, especially against bosses and the Guardians, but they’re extremely rare and expensive. You’ll also acquire various items of clothing, each of which has different benefits; some protect you from extreme cold, heat, and lightning, some allow you to swim faster or up your defence, attack, or stealth, and others are more cosmetic or needed to enter specific areas. You can mix and match them, pay to dye them different colours (which is largely pointless), and upgrade and strengthen them at a Great fairy Fountain. Some are acquired through Shrines and side quests and the only way you’ll ever get Link’s trademark outfits is if you’re patient, skilled, and dedicated enough to conquer all one hundred and twenty Shrines (or fork out for special Amiibos).

The various Runes replace traditional magic and allow you to progress and solve puzzles.

Your first task at the start of the game is to power up your Shiekhah Slate (an obnoxious device that resembles a tablet or Nintendo Switch) with four Runes: the Remote Bomb allows you to throw or place either a spherical or square bomb; Magnesis allows you to push, pull, and move around magnetic metal objects; Stasis freezes certain objects in place and allows you to attack them to build up kinetic energy and move them about; and Cryonis allows you to form and shatter ice blocks. Later, you learn another Rune ability, Camera, which allows you to take photographs to solve side quests and such and each of these can be upgraded to make them more powerful or useful. Since Breath of the Wild is one of the few Zelda games to not give you a magic meter or other actual items (like the hookshot), these Runes take their place and the bombs are especially helpful for dealing some extra damage and saving your melee weapon from wearing out as you can throw an infinite supply and a limited only by a brief bit of cooldown.

Link earns helpful temporary abilities by taking down the Divine Beasts.

Similarly, every time you conquer a Divine Beast, you are awarded with a Heart Container and a key item that will greatly assist you in your quest: Mipha’s Grace is one of the best as it will completely restore your health and award you with additional temporary hearts upon death; Urbosa’s Fury allows your spin attack to unleash an electrical blast, which can be great for stunning enemies; Daruk’s Protection protects Link with a protective aura for as long as ZL is held down and will parry incoming attacks to give you a window to attack; and Revali’s Gale allows you to charge up a jump by holding down Y and blast you high into the air with an air current. You can activate and deactivate these at any time but, honestly, I don’t know why you would do that; each also comes with a limited number of uses and a cooldown period, meaning you have to wait about ten minutes before you can use them again.

Additional Features:
As I mentioned before, there are numerous side quests in Breath of the Wild and one hundred and twenty Shrines to find and conquer. The rewards for these vary from a few Rupees to new weapons and armour and, generally, it’s not always worth your time completing every single one of them unless you’re aiming for one hundred percent completion (which you thankfully don’t need to finish the game). However, the only way you’re going to see Link in his traditional outfit (or unlock the Dark Link outfit) is if you complete each of them; primarily, though, the side quests are there to emphasise how big and alive this version of Hyrule is and to strengthen your immersion in the game, so it’s entirely up to you, but it can lead to you acquire stronger weapons, armour, and some unique riding companions. Some of the Shrine challenges are very unique, though, like the one on Eventide Island that sees you stripped of all of your weapons and left to fend for yourself with whatever you can find as you strive to recover three orbs all without being able to save. Three others see you navigating labyrinths and one particularly long side quest sees you visiting specific areas of Hyrule to recover Link’s lost memories.

A number of sub-bosses and gigantic creatures can be found prowling around Hyrule.

Hyrule is also populated by a number of gigantic sub-bosses; be wary when you approach a big stone as it will probably come to life as a Stone Talus, which can only be felled by bringing it to its knees and climbing up it to attack the weak spot on its “head”. Far more frequently, you’ll come across the massive cyclopean Hinox; these are much easier to take on and defeat as you can stun them with a shot to the eye and attack them at will but they do have a tendency to rip up trees to swing at you and chase you almost relentlessly. Out in the desert, you’ll also encounter the Graboid-like Molduga, which burrow under the sand to attack you and are best tackled with your bombs. While you’ll also encounter three elemental dragons in your travels, these cannot be defeated and are simply there to cause destructive weather occurrences and to be mined for rare materials. I mentioned before that the ending is very anti-climatic and it’s true; it’s much more sombre and reflective than the massive celebration seen at the end of Ocarina of Time, for example, and it kind of felt like the developers either ran out of time or didn’t put much effort into the ending as the journey was the primary focus. When you finish the game, your save file gets a star marked on it but that’s it; you can return to your last save (which should be an autosave right before the final fight) so you can go after anything you’ve missed along the way but the only way you’re going to get additional content is if you shell out for the DLC. The expansion pass adds new gear, enemies, and challenges to the game and also includes an even harder story mode to play through but, since I struggled so much with the base game, I don’t think I’ll be paying for this any time soon.

The Summary:
There’s no denying that The Legend of Zelda: Breath of the Wild is a stunning achievement for the series, and in videogaming; the game is massive, full of life and variety and things to do, and will keep you busy for hours on end (it took me at least thirty days just to clear the main story objectives). Never has Hyrule been bigger and more immersive; just travelling a short distance can be an adventure in itself and you’ll find yourself fighting tooth and nail against even the most basic of enemies for the smallest rewards but even a bundle of five arrows can be a blessing when you’re running short on supplies. The graphics are more than impressive, bringing the Zelda concept truly to life in a way that titles like Ocarina of Time and Twilight Princess hoped for but could never quite achieve; it never feels like anywhere or anything is off limits and you can travel to the highest, furthest points as long as you’re properly equipped and prepared without worrying about barriers or invisible walls. And yet…Breath of the Wild is one of the most frustrating an inaccessible videogames I’ve ever experienced. There really is far too much going on, way too much to think and worry about, and the simplicity and accessibility of earlier Zelda titles has been lost in service of appealing to fans of games like Skyrim. I think if Breath of the Wild had focused on one or two mechanics, or tweaked some of them a bit, it would have been much more enjoyable for me; as I said, not having every weapon break would be a good start, as would putting less focus on cooking and eating food to survive. In many ways, it feels like the most Zelda game ever but also, paradoxically, the least Zelda game ever as all the recognisable elements are there but they’re so drastically different, and the game is so dramatically difficult at times, that it was actually a turn off. I was expecting an epic, sprawling, immersive adventure and Breath of the Wild delivers but every battle is a stress as you can easily die or break your coveted weapons in the smallest of skirmishes, some mechanics like jumping, the frustrating instances of forcing you to use motion controls, and climbing can be a bit janky, as can the in-game camera and physics, and I just felt like the game was punishing me over and over again. To make matters worse, I didn’t even feel a cathartic sense of accomplishment after beating the game since the ending was so anti-climatic; I just felt drained and relieved and I’m hoping that approaching the remainder of the game’s Shrines and side quests in a more casual manner will allow me to think more highly of the game in time.

My Rating:

Rating: 3 out of 5.

Pretty Good

What did you think to The Legend of Zelda: Breath of the Wild? Where would you rank it amongst all the other Zelda titles, specifically the 3D adventures? Were you a fan of the new elements introduced in this game, the breakable weapons, and the difficulty and challenge offered by the game? Did you every conquer all the Shrines and which was your most, or least, favourite? What order did you tackle the Divine Beasts in and which of Ganon’s phantoms was the most difficult for you? Which area and/or race of the game was your favourite and what was your preferred clothing and weapon load out? What did you name your horse? Which Zelda game is your favourite and why? Whatever your thoughts on Breath of the Wild, drop a comment down below.

Game Corner [National Pokémon Day]: Pokémon Shield (Nintendo Switch)


Upon the release of Pokémon: Blue Version and Pokémon: Red Version (Game Freak, 1996), a new craze swept through playgrounds across the world. An entire generation grew up either playing Pokémon, watching the anime, playing the trading card game, and watching the feature-length movies as clever marketing and a co-ordinated release and multimedia strategy saw Nintendo’s newest franchise become not just a successful videogame franchise but a massively lucrative and popular multimedia powerhouse that endures to this day. Accordingly, February 27th is now internationally recognised as “National Pokémon Day” and a day for fans of the long-running and beloved franchise to come together in celebration of all things Pokémon.


Released: 15 November 2019
Developer: Game Freak

The Background:
I’ve talked about Pokémon a few times but, until now, I haven’t actually sat down and done a proper review of one of the games; as I’ve indicated previously, Pokémon was an instant cultural phenomenon back when the games first dropped, taking playgrounds by storm and dominating almost every aspect of my generation through a slew of merchandise. I remember being so adamant about purchasing Pokémon: Blue Version that I bought it brand new rather than getting a cheaper copy of Pokémon: Red Version and my friends and I routinely played the game at break times at school or on the Nintendo 64 thanks to Pokémon Stadium (Nintendo EAD/HAL Laboratory, 1999). Although the developers originally intended my favourite games/generation of Pokémon, Pokémon: Gold Version and Pokémon: Silver Version (Game Freak, 1999) to be the final entries in the series, Pokémon videogames continued to be developed, with new features, improved graphics and mechanics, and a whole bunch of new Pokémon being introduced in each generation.

Pokémon‘s home consoles games largely diverted from the RPG formula of the main series.

However, in all that time, we never really got a proper version of Pokémon on home consoles; they were always spin-offs, battling games, or neutered versions of the main role-playing experience, which remained exclusive to Nintendo’s handhelds. Nintendo’s development of their Switch console changed that, however; thanks to the Switch’s unique ability to be both a handheld and a home console, players were finally able to experience a main series Pokémon game in glorious high definition with the release of Pokémon: Let’s Go, Pikachu! and Pokémon: Let’s Go, Eevee! (ibid, 2018) Though remakes of the first Pokémon games, the Let’s Go games (like pretty much all Pokémon games) proved both successful and popular and, eager to keep their unstoppable cash-cow afloat, Game Freak began developing an original main series Pokémon title for the Nintendo Switch. This time, much to my interest and appreciation, the games would be set in a new region that was heavily inspired by locations in the United Kingdom, featured the return of mechanics from previous Pokémon games alongside some all-new ones, and would later expand upon its limited roster of Pokémon through a number of expansion packs.

The Plot:
After years of waiting, the time has come for you and your childhood friend, Hop, to receive your very own Pokémon from Professor Magnolia. After Hop’s brother, Pokémon League Champion Leon, endorses your entry into the Gym Challenge, you prepare to journey across the region of Galar to earn a spot in the Pokémon League but, after a fateful encounter with the legendary Zamazenta, you also stumble upon a plot to use Galar’s precious Wishing Stars to cause Pokémon to enter a rampaging Dynamax state and bring about the apocalyptic “Darkest Day”!

Gameplay:
I had (have? It’s honestly hard to tell these days) a friend once who told me that the reason he fell out of playing Pokémon was that the games hadn’t really changed since the days of Blue and Red. Personally, I find that a comfort; it means that if you haven’t played a Pokémon game in some time, perhaps years, you can still pick up a title like Pokémon Shield and know exactly how to play as the core gameplay mechanics are basically identical to how you remember them. Accordingly, Pokémon Shield is a role-playing game (RPG) in which you play as a young, up-and-coming Pokémon Trainer; as you explore Galar with your chosen Pokémon, you’ll encounter wild Pokémon which must be fought and defeated (or captured to be added to your team) and other Pokémon Trainers.

Battle other Pokémon to level-up, learn new moves, and increase your Pokémon’s stats.

Battling other Pokémon earns your Pokémon both experience points (EXP) and effort value points (EVP); you can track your EXP using a handy gauge beneath your Pokémon’s hit point (HP) bar and, once it is full, your Pokémon will grow a level and its statistics (Attack, Defence, Speed, and the like) will grow depending on what sort of Pokémon you battled and the otherwise-hidden EVP you gained from each battle. When your Pokémon level-up, they may learn new moves; since each Pokémon can only know four moves at a time, it pays to think ahead about what moves you want your Pokémon to have. For example, you might have a Pokémon with a high Special Attack stat; if this is the case, it’s probably better to not load it up with Attack moves as it won’t deal as much damage. Conversely, your Pokémon may have a low Defence or Speed stat so you might want to invest in a few moves that raise these stats in battle (Iron Defence, Dragon Dance, etc). Through proper EVP training, though, you can tailor Pokémon to battle how you wish but it does take more effort; personally, I like my Pokémon to be proactive and aggressive, with a range of attacks suited to their strengths rather than worrying about raising stats. In the course of levelling-up, your Pokémon may also evolve; this process allows some Pokémon to assume an entirely new form, gaining significant stat boosts at the same time. Evolution is sometimes tied to other factors, such as using special stones, bonding with your Pokémon, having them hold a special item, the weather and time of day, or through trading them with a friend. Battling, capturing, and levelling-up Pokémon is essential not just to making your team stronger and earning Pokémon Dollars to spend on various items but also to complete the PokéDex. Each time you encounter a Pokémon, some of its data will be recorded so you know where to find it and what “Type” of Pokémon it is but you’ll only complete its PokéDex entry by capturing it yourself.

Always ensure that you have the type advantage and make full use of your Pokémon’s abilities.

I mentioned Pokémon “Types” just then so I’ll get into that now; each Pokémon can be either one or a combination of two types and using type advantage is key to becoming a stronger and more capable Pokémon Trainer. Because of the tried-and-tested type mechanic, Pokémon battling is, essentially, like a game of rock, paper, scissors: Fire-type Pokémon are super effective against Grass- and Ice-types, for example, while Grass-types have the edge over Water- and Rock-types, and Water-types will make short work of Fire- and Ground-types. It’s a simple system that you can usually gauge by considering the colour and location of the Pokémon you encounter (a blue-coloured Pokémon on or in water is probably going to be a Water-type, for example) but one neat addition to this game is that the next time you encounter a Pokémon, whether you’ve caught it or not, the game will tell you which of your moves are effective or ineffective against it, making battling much less a case of trial, error, and experience. Being that Game Freak love to mix things up with each new generation and region, familiar Pokémon have also been given new typings in Pokémon Shield (Rapidash, for example, is traditionally a Fire-type Pokémon but is now a duel Psychic/Fairy-type Pokémon so it’s better to use Ghost- or Dark-type attacks) and, as is the standard now, Pokémon also come with different “Natures” and “Abilities” which give them slightly different traits or abilities in battle (such as raising stats causing or removing weather effects, or powering up certain moves).

Inflate your Pokémon to giant size with the new “Dynamax” mechanic.

Pokémon Shield’s big new thing is the “Dynamax” mechanic and the game’s Wild Area; normally in Pokémon games, you travel from town to town using “Routes”, passing through caves and forests and such along the way and, while you still do that here, Pokémon Shield introduces a vast open area filled with a variety of wild Pokémon and shifting weather patterns. Here, you can catch and train up your team but you’ll also encounter glowing Pokémon Dens; if these have a shaft of red light coming from them, you can participate (alone or with computer-controlled or online players) in a “Max Raid Battle” against a Pokémon that has entered the Dynamax state and grown to gigantic size. In these battles, which also occur in each of the game’s Gym Leader battles, you have the opportunity to Dynamax one of your own Pokémon; essentially the same thing as “Mega Evolution” from the previous games, Dynamaxing may allow you to perform more elaborate moves but it only lasts a few turns and you can just as easily defeat a Dynamax Pokémon with a normal Pokémon. It adds a slight wrinkle to the usual gameplay, though, as you’ll earn better rewards from such battles, like Technical Machines (TMs) and Technical Records (TRs) to teach your Pokémon new moves, special stones and items, and Watts (which is, annoyingly, a separate form of currency).

It’s easier than ever to find, battle, and capture wild Pokémon.

I glossed over it earlier but, as always, one of the main aims of the game is to capture Pokémon; you won’t get very far without a diverse team of at least four different Pokémon types (though it is conceivable) so it’s highly advised that you catch a variety of Pokémon and teach them diverse moves to make things easier on yourself. Thankfully, you can now see wild Pokémon on the map, meaning random battles are a thing of the past; you can choose to avoid or run past wild Pokémon, sneak up on them to battle rarer ones, or whistle or ring your bike’s bell to attract them, which is all very helpful if you’re in a rush or want to grind for levels. Pokémon are caught in the usual way; you battle a wild Pokémon until its HP is low (preferably in the red and with a status effect (paralyse, sleep, etc) inflicted upon them) and then throw one of the game’s many different Poké Balls. The lower the level of the Pokémon, the easier it is to catch and you’ll be able to catch higher level Pokémon as you defeat the Galar Gym Leaders; however, it has to be said that capturing Pokémon has become pathetically easy over the years. Back in the day, I would waste my entire stock of Poke Balls on some Pokémon but, now, you can often capture a Pokémon with your first ball without even weakening it, which severely reduces the fun and challenge of the game.

There’s so much hand-holding that it’s almost insulting.

Speaking of which, Pokémon Shield has to include some of the most annoying and unnecessary hand-holding I’ve ever experienced; Pokémon games have often employed mini tutorials and hand-holding techniques but Pokémon Shield really takes the cake as you’ll be constantly lectured on how to battle, how to capture Pokémon, what each building is in a town, where to go, and what to do. There’s never any danger of you getting lost or not knowing where to go next as characters spell it out for you, force you where you need to go, block your exit until you’ve fulfilled an objective, and your handy-dandy map constantly displays your current objective and where you need to go. I’m sure it’s helpful for young or new players but I’ve been playing Pokémon since the start so it would have been nice to be able to turn this feature off.

Graphics and Sound:
Thanks to the power of the Nintendo Switch, Pokémon has never looked better; no longer forced into the classic top-down RPG perspective, the game makes full use of its engine to display a number of dynamic camera angles (even giving you full camera control in the Wild Area), and every time you visit a new town or area, you get a nice little look at what the location has to offer.

Locations draw heavily from the varied architecture and landscapes of the UK.

Locations are based on those from right here in the UK; accordingly, there’s a lot of beautiful countryside (most of it barraged by ever-changing weather conditions), farm land, little towns and villages, and large, industrial towns based on the likes of London. Like the UK, Galar is united through a comprehensive rail system that allows you to quickly travel between towns; the stations are reminiscent of those here in the UK and you’ll also see other similar landmarks and familiar elements, such as a clock tower, an ostentatious ferries wheel, red phone booths, and Victorian/Gothic architecture. I guess because of this UK-influence, there’s a heavy emphasis on football and football-inspired iconography, meaning you’ll take on the Gym Leaders in massive stadiums packed with cheering crowds which really helps up the scale of these battles. The whole game has the usual anime-inspired aesthetic that Pokémon has been known for only now it’s heavily infused with some steampunk influences because of the nature of the region as well as being sleek and modern when in Galar’s bigger towns and featuring crystalline mines and more fantastical locations like Glimwood Tangle. Characters are all well modelled and expressive; while the game still doesn’t use voice acting, their personalities are all expressed through their dialogue boxes (featuring an abundance of British slang which really appealed to me; characters often casually call each other “Mate” or “Luv” and speak with recognisable British quirks and expressions) and their body language.

We’ve got some funky Pokémon designs, as is to be expected at this point.

Though the base game “only” features four hundred of the eight hundred available Pokémon, each one has their own fully-rendered model with unique animations; add to that the various different regional forms, new evolutions, and the Dynamax and Gigantamax forms and you have plenty of little critters to choose from and keep you busy. As mentioned, they all appear on the overworld as well, making the Pokémon world finally feel large and alive, and they all have their own unique cries (with Pikachu still being the only one to speak its name, such is its popularity and appeal) and the new Pokémon and forms available here aren’t too bad. We’ve got such things as a football-loving rabbit, a bongo-drumming ape, fluffy sheep, cute little electric puppies, chubby chipmunks, and anthropomorphic lumps of glowing coal. Then there’s weird shit like a haunted teapot, an animated apple, and penguins with ice cubes on their heads! I have to say, though, that I remain unimpressed with a lot of the names for these new Pokémon; I mean, come on, a Fire-type rabbit and you call it “Cinderace” instead of “Hareblazer”!? The legendary Pokémon aren’t all that much to shout about either; the mascots, Zacian and Zamazenta, are okay, I guess, and Eternatus is pretty bad-ass but the majority of the other legendaries are locked behind the pay wall of the game’s expansion pass. In terms of sound, not much really jumped out at me; the classic Pokémon games were full of catchy little tunes that brought Routes, towns, and battles to life and while that is true of Pokémon Shield, none of it really stuck with me…with the exception of the Gym Leader battle theme! This rocking, energetic piece changes tempo depending on how well you are doing and ramps up once the Gym Leader busts out their Pokémon’s Dynamax form; this theme alone really got the blood pumping for those battles and worked with the stadium setting and roaring crowd to really make the stakes feel high for a change.

Enemies and Bosses:
As you explore Galar, you can choose to battle the various Wild Pokémon that are wandering throughout the overworld; these will hide in grass or underwater, run out into the street, chase you (or run from you), or more powerful variants may pop up in the Wild Area. In each instance, you have much more flexibility about engaging or fleeing from these battles; when you battle, you’ll still earn EXP even if you capture the Pokémon and, in a change that I’m sure irked many, all of your Pokémon will gain some EXP from every battle (but only those that actually participate will gain the most and the EVP from each battle). Like all Pokémon regions, Galar is also populated by other Pokémon Trainers; these days, the game clearly shows you a fellow Trainer’s line of sight so you can try to sneak past or avoid them but I recommend battling every one you come across to level-up your team faster and earn more money. Pokémon Trainers are generally armed with only one or two Pokémon in the early going but eventually have more (and far stronger) Pokémon in their team.

Team Yell are not Team Rocket, that’s for sure; they’re just a bunch of try-hard fanboys.

When battling, be sure to keep an eye on the Power Points (PP) of your Pokémon’s moves; each move has a certain amount of PP and, when it’s spent, you can’t use that move anymore and may be reduced to literally struggling to survive. Similarly, as with many Pokémon games, you may have to battle two trainers at once in a double battle either alone (with two of your Pokémon) or with a computer-controlled partner (usually Hop). In these battles, it’s important to consider the effect your attacks may have on your partner and the game encourages players to use moves like Helping Hand or Wide Guard to help protect or buff your partner (of course, because I adopt an aggressive approach to battling, I don’t do this). As in every other Pokémon game, you’ll also run afoul of a team; in this case, it’s the punk-rock-inspired Team Yell. Unlike other teams, though, Team Yell aren’t out to steal or manipulate Pokémon or to destroy the world; instead, they are the cheerleaders and groupies for one of your rivals, Marnie. Led by Marnie’s older brother (and Gym Leader), Piers, Team Yell generally cause a nuisance by blocking your path or forcing you into a single or double battle at various points but are little threat compared to the likes of Team Rocket or Team Magma/Aqua.

Hop, your childhood friend and rival, makes up for his lack of skill with enthusiasm.

As I alluded to above, the game also includes the standard rival mechanic; for the most part, your rival is Hop, your childhood friend, with whom you have a friendly rivalry with. Hop will accompany you into new locations and areas, often battling alongside you or while you’re battling someone else, and is extremely enthusiastic in following in his brother’s footsteps and besting the Gym Leaders before you. As a result, when you encounter Hop he will generally challenge you to a Pokémon battle but, as the plot eventually reveals, Hop is no Blue or Silver; hell, he isn’t even a good substitute for May! You’ll have no trouble at all wiping the floor with Hop each and every time you battle him and he actually drags you down in double battles since he’s so useless; the only time he’s a threat is right at the end of the post-game when he’s captured Zacian and, even then, it is that legendary Pokémon that causes you the most trouble as opposed to Hop himself. Marnie and Bede are also two of your rivals, though you encounter and battle them far more infrequently than Hop. Both share the same desire as you and Hop to conquer the Gym Challenge and, though Bede is disqualified from the Challenge after he steals a bunch of Wishing Stars, he returns to interrupt the finals of the Champion Cup to battle you once more. However, if you have a well-balanced team at a high level, neither of these rivals will really cause you much of a headache.

Before you can take on the Gym Leaders, you’ll have to complete their various missions…

That strategy also applies to the game’s Gym Leaders, who act, as always, as the closest thing Pokémon has to “bosses”. You must defeat each of the eight Gym Leaders to earn Badges and qualify for the Champion Cup; each time you defeat a Gym Leader, they award you with a TM, some clothes to wear, and you earn the right to capture and own Pokémon of a higher level. There’s a pretty big gap between the start of the game and your first battle against Milo, meaning that, if you’re anything like me, you run the risk of your Pokémon being over-levelled and thus ignoring your commands so, again, it’s best to have a diverse team at different levels to ensure that doesn’t happen until you have acquired the right badge. Before you can battle a Gym Leader, you’ll have to take on their Gym Mission; before, you used to just walk into the Pokémon Gym and battle the Gym Leader’s disciples, maybe solving a puzzle or two, but the games have increased the puzzles and requirements to reach the Gym Leader over the years and Pokémon Shield is the culmination of that. As a result, you’ll be herding Wooloo around, solving a water puzzle, earning points in double battles while your partner tries to scuttle you, navigate a maze, answering questions and battling a gauntlet of Trainers like it’s a stage audition, battle members of Team Yell down a dingy alleyway block by Mr. Mimes, and having to conquer three Trainers in double battles. The challenge of these missions varies and ranges from ridiculously easy to unnecessarily annoying but the end result is the same; eventually, you’ll get dressed into your special stadium attire and head out onto the Gym Leader’s stadium to challenge for a Gym Badge.

Even with their Gigantamax Pokémon, the Gym Leaders are easily bested.

When battling Gym Leaders, the battles are given more variety thanks to the use of more dynamic camera angles which alternate between shots of the battle and the crowd and include televised shots. Again, though, anyone who has played Pokémon before has a distinct advantage in these battles; if you’re anything like me, you’ll grind and train between Gym battles and ensure that your team is as strong as possible to take full advantage of each Gym Leader’s chosen type. Milo uses Grass-types, Nessa uses Water, Kabu uses Fire, Allister uses Ghost-types, Opal and Bede favour Fairy-types, Melony uses Ice-types, Piers and Marnie use Dark, and Raihan uses Dragon-types. You always know which type each Gym Leader uses before you challenge them and the game smartly places wild Pokémon in the nearby region that will give you an advantage in battle that, and your training, means that you can easily sweep through each of the Gym Leaders without breaking a sweat even when they bust out their Gigantamax Pokémon. Of course, it wouldn’t be a Pokémon game without some kind of nefarious deed going on; in this case, Rose, president of Macro Cosmos and the chairman of the Galar Pokémon League, has been gathering the Wishing Stars than enable Dynamaxing in order to bring about the fabled Darkest Day through mass Dynamaxing and the awakening of the legendary Pokémon, Eternatus. Before you can stop him, you’ll have to battle his co-conspirator and secretary, Oleana, who leads you on a wild goose chase that sees you battling corrupted League Staff in order to get a key to confront Rose; you’ll then have to battle Oleana herself who, despite the diversity of her team, is easily bested if your team is well-trained and varied enough to match her Pokémon.

When Rose awakens Eternatus, only you (and some Legendary Pokémon) can quell the beast.

When you finally confront Chairman Rose deep within the Hammerlocke Energy Plant, you won’t be faced with much of a challenge since all of his Pokémon are Steel-types; this means that he is easily decimated with a Fire-type Pokémon but, after he is defeated, you are forced to battle the enraged Eternatus after Leon fails to capture it. Eternatus appears in two forms, its regular form and its horrific Eternamax form; you can’t capture it in its base form or use Dynamax when battling either of its forms and you’re forced to team up with Hop, Zamazenta, and Zacian to whittle its HP down and capture it (with, again, a ridiculous amount of ease; time was that legendary Pokémon were nigh-on impossible to catch but modern Pokémon games make them a breeze!) After all that palaver is taken care of, you finally get to finish off the Champion Cup; in a change of pace, rather than tackling the Elite Four of the region and the regional champion, Pokémon Shield has you participate in a three round, single-elimination tournament against the other Gym Leaders to earn the right to face Leon. This is a bit disappointing as, rather than facing off with Galar’s best and brightest Trainers, you end up doing what is, essentially, a “boss rush”. On the plus side, Leon can actually be a tough battle thanks to the strength and variety of his Pokémon (though, to be fair, I only found this because I started with the wrong Pokémon in the lead of my team). Once you defeat Leon and become the Champion, the credits play pretty much right away (there’s no Hall of Fame ceremony here) and you move on to the post-game.

Some of the game’s toughest challenges await in the post-game.

In the post-game, you have to travel all around Galar revisiting the Pokémon Gyms to quell the anger of various out-of-control Dynamax Pokémon; for the first few battles, you’ll fight alongside Piers, Hop, and another Gym Leader but, for the rest, you go it alone. Luckily, though, by this point your team should be well in the late-level-fifty or early-sixties so these battles aren’t much of a hassle. You’re also introduced to two new antagonists, the ridiculously-named Sordward and Shielbert, who see themselves as the rightful kings of Galar and are actually pretty tough since their Pokémon are at level sixty. It’s actually beneficial, for the first time ever, when you battle them alongside Hop, and once you defeat them you’ll get to battle and capture Zamazenta. Unlike Eternatus, Zamazenta is not so easily caught in the usual assortment of Poké Balls but, luckily, you can just toss your Master Ball at it to snag it without any effort at all.

Power-Ups and Bonuses:
As you explore Galar, keep an eye out for red and yellow Poké Ball-like items on the ground and twinkles of light; picking these up will award you with items, TMs, ingredients, and other helpful pick-ups to aid you in your battles. You can also use for Pokémon Dollars and Watts to spend in various ways; Poké Marts are now a thing of the past, with these shops now being located inside of Pokémon Centers, but you can also spend your money at various travelling merchants across the map and in clothing stores. You can buy and pick up helpful items that will heal a certain amount (or all) of a chosen Pokémon’s HP, restore their PP, revive them from fainting, or heal them of any detrimental status effects. You can also acquire different types of Poké Balls; the standard variant is decent enough in the early going but you may need to utilise the Great and Ultra Balls to capture higher-level Pokémon or use special balls to increase your chances (Dive Balls for Pokémon caught while fishing, for example, or Net Balls for Bug-types). You can also get your hands on items that increase your Pokémon’s level, Dynamax level, stats, PP, and EXP or which can be used once in a battle to raise certain stats or increase certain abilities.

You have many different options for travelling around Galar.

These days, Hidden Machines (HMs) aren’t really a thing anymore so you don’t need to worry about wasting a move slot or a member of your team with moves like Surf or Fly. Instead, you can call upon a Flying Taxi to fly around the map and upgrade your Rotom Bike to cross over water; the Rotom Bike is far faster than your usual jog, as well, and can be further upgraded to go even faster. You can still get TMs, though, which can be used multiple times to teach new moves to your Pokémon. TRs are a new addition and are primarily earned through Max Raid Battles and spending Watts; these break after use, though, so be sure to spend your Watts wisely.

Dynamaxing is cool but somewhat limited and hardly a requirement.

Your biggest power-up in Pokémon Shield, besides the usual evolution mechanic, is the new Dynamax mechanic. However, Dynamaxing is quite limited; unlike Mega Evolution, you can only Dynamax at certain specific points in the game and it is, honestly, rather pointless. It’s impressive to see and fun to behold two giant, goofy-looking Pokémon butting heads but, as I mentioned, you can defeat Dynamax Pokémon with a regular Pokémon as long as you’re strong enough and have the type advantage. Some Dynamax Pokémon make things difficult by putting up a barrier that must be whittled down but, otherwise, it’s a fun and interesting new feature that, I feel, is a bit squandered and wasted because of its limitations.

Additional Features:
It’s a Pokémon game so, naturally, there is a lot to do; most of these additional features are holdovers from previous Pokémon games: battling, capturing, and evolving Pokémon; any Poké Ball having a random chance of capturing a Pokémon without fail; leaving Pokémon at the Day Care to breed new Pokémon; customising your avatar’s gender, hair style, and clothing at the start of the game and throughout by buying new clothing; meeting the game developers in a hotel; using the menu screen to save, view items and your map; and customising your Pokémon team placement, moves, and markings, and acquire various items through the online Mystery Gift function.

I must have skipped or missed the point of collecting League Cards…

There are, however, some changes, as you might expect; characters will award you with their League Cards (though I’m not sure of their purpose; it seems you can swap and trade them online, though) and you can also customise your own League Card using the PC in the Pokémon Center. You’ll also find the Name Rater, Move Deleter, and Move Reminder non-playable character (NPC) in the Pokémon Center; amalgamated into one character, you can change your Pokémon’s nickname and delete and relearn moves as often as you like with this NPC. Furthermore, you can press Y during battles to see what your moves will do and get a snapshot of any status and type ailments you need to be aware of and press X to throw a Poké Ball without having to access the in-game menu; your PokéDex even offers you recommendations for Pokémon to catch in the immediate area to help you take on upcoming Trainers and Gym Battles and every time you acquire an item for the first time, a little text box tells you what it is in another case of helpful hand-holding. Some of the game’s additional features are more fun and useful than others; when it’s your birthday, the Pokémon Centre NPCs will make a big fuss of you, which is a nice touch, but then you can also sit on chairs and benches for absolutely no reason or benefit other than immersion. You eventually acquire the ability to access your PC boxes remotely so you can swap your team out on the go, which is useful, and, while you can retake the Champion Cup over and over and even invite specific characters to compete against you in it, you still can’t rebattle previously defeated Pokémon Trainers.

Toss it all in a pan, whip up a curry, and get a fancy medal for your troubles.

There is a startling amount of online connectivity in Pokémon Shield; when connected to the internet and in the Wild Area, other players will spontaneously appear to join you in Max Raid Battles and offer helpful items. You can also battle and trade with others players online, as usual, but you’ll need to pay for the Switch’s online service to do any and all of these things, which is a real greedy move on Nintendo’s part as you never had to do that in the previous games! You can also set up a tent at any time, and may encounter other player’s Pokémon Camps; here, you can “speak to” and play with the Pokémon in your team to improve your bond with them. Doing this, and being a good, consistent trainer, means your Pokémon try harder in battle and will land more critical hits, keep themselves from fainting, or even shake off status effects to please you. In the Pokémon Camp, you can also take part in the game’s newest mini game: curry making. By exploring the overworld and shaking trees, you’ll acquire a variety of berries and other ingredients to throw into a cauldron and whip up a variety of curries. While camping gains your team some EXP by default, curry will provide them with a lot more EXP and also restore their HP; certain NPCs will also rate and reward your curry-making skills and you can make curry with other players if they join you in a camp. Furthermore, by accessing the PC, you can send your Pokémon off on jobs to earn them some EXP outside of battling (though I never actually bothered with this).

To get the most out of the post-game, you’ll need to pay for the expansion pass…

You can also acquire rewards by using the Lotto ID on any PC, which will randomly check the identification numbers of your Pokémon and award a prize if it matches, take part in the Rotom Rally to race through the Wild Area collecting balloons for boosts and time, or visit the various cafés across Galar once a day to compete in a double battle for additional rewards. As you conquer the Gym Leaders, you’ll also acquire fans; NPCs will cheer you on when you roll into the stadium and congratulate you after each victory, which is nice, and you are often given the choice of a couple of responses to in-game dialogue but it doesn’t really affect the story in any meaningful way so go nuts and tell that loser Hop what you really think about him! As mentioned, Pokémon Shield also continues the tradition of featuring some post-game content; this sees you revisiting the Galar Gyms to battle Dynamax Pokémon, opposing Sordward and Shielbert, and mainly exists to give you the chance to capture Zamazenta. While you can still use fossils to resurrect long-extinct Pokémon, there are no roaming legendaries to be found in the base game and the closest the game has to a powerful Super Boss is the aforementioned battles against Zamazenta and Hop. Once you clear the post-game, the Battle Tower opens up and you can take on its level-capped challenges to rise up the ranks, earn Battle Points (BP), and acquire rarer items but I’ve never liked the Battle Tower so I didn’t spend much time there. Honestly, Pokémon Shield’s post-game is severely lacking, especially compared to other Pokémon games; this may be because Nintendo are charging players £20 to expand the Galar region with new areas, Pokémon, forms, and challenges with their expansion passes, which is a bit of a piss-take and I am honestly shocked at how greedy Nintendo have become!

The Summary:
It’s been a while since I played a main series Pokémon game; I was pretty happy to be all but done with the franchise before I got my Nintendo Switch but revisiting the world of Pokémon is like meeting an old friend you’ve lost touch with. While there are a few new mechanics here and there to make things interesting for long-time players, Pokémon remains as accessible as ever thanks to the core gameplay mechanics staying largely the same even all these years later. All that’s really changed is the presentation and, to be fair, Pokémon Shield looks fantastic and really increases the scope and size of its world to make you finally feel totally immersed in a live, breathing environment. Unfortunately, for every good idea Pokémon Shield has, there are a few nitpicks that drag it down a bit: Dynamax is an interesting mechanic and I do prefer it to Mega Evolution in a lot of ways but it’s far too limited, there’s way too much hand-holding for my tastes, you still cannot have rematches with NPCs and, while you can encounter other players in the Wild Area, Nintendo still refuse to let you download an NPC of your friends into the game to act as a rival, and the game is maybe too helpful with all of its new features, meaning that there really isn’t much challenge for veterans of the franchise. Still, the presentation is great, especially in the way the game handles battles against Gym Leaders, and it is a top-class game in its own right…I just wish Nintendo hadn’t gotten so greedy and forced you to pay for the online features and post-game content.

My Rating:

Rating: 3 out of 5.

Pretty Good

What are your thoughts on Pokémon Shield? Perhaps you bought Pokémon Sword instead; if so, why was that and which of the two do you prefer? Which starter did you pick and why, and who made it on to your final team? What did you think to the Dynamax mechanic and the way the game presented Gym battles? What features did you like, or dislike, or would you like to see return to the series? Were you also annoyed at the hand-holding in the game or do you like always knowing exactly what to do and where to go? What did you think to Hop and the post-game content? Are you planning on buying the expansion pass? Which Pokémon game, generation, and creature is your favourite and why? How are you celebrating National Pokémon Day today? Whatever your thoughts, drop them in the comments below.