In 1995, Marvel Comics created “National Superhero Day” and, in the process, provided comics and superhero fans the world over with a great excuse to celebrate their favourite characters and publications.

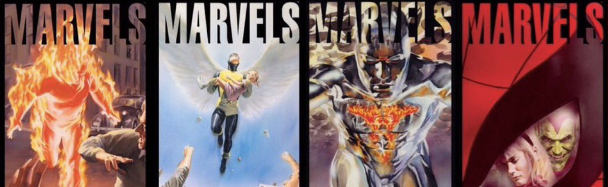
Story Titles: “A Time of Marvels”, “Monsters”, “Judgment Day”, and “The Day She Died”
Published: 9 November 1993 (cover-dated: January 1994) to 22 March 1994 (cover-dated: April 1994)
Writer: Kurt Busiek
Artist: Alex Ross
The Background:
In 1939, pulp-magazine publisher Martin Goodman created Timely Productions, expanding his reach into the increasingly popular medium of comic books. Timely’s first publication, Marvel Comics #1, was spearheaded by the first appearances of Jim Hammond/The Human Torch and Prince Namor McKenzie/The Sub-Mariner, and went on to sell over 900,000 copies. This success was followed by Captain America Comics #1 selling over a million copies just two years later, the same year that Goodman’s wife’s sixteen-year-old cousin, Stanley Lieber, was named interim editor under the pseudonym “Stan Lee”. Though superheroes declined in popularity after the Second World War, Goodman continued to publish Westerns, horror, and war comics under Atlas Comics before rebranding to Marvel Comics in 1961. Stan Lee and Jack Kirby then ushered in the “Marvel Age” of comics with the Fantastic Four, kick-starting a slew of costumed superheroes and Marvel’s distinct narrative style. These colourful heroes caught the eye of artist Alex Ross from an early age; known for his startlingly photorealistic artwork, Ross later cemented his position in the industry with Kingdom Come (Waid, et al, 1996). However, his big break came when he teamed with writer Kurt Busiek to produce this four-issue miniseries that reframed many of Marvel’s most iconic moments through the eyes of a common man. Marvels was an award-winning, widely praised miniseries that inspired a much grimmer counterpart story in 1995, a follow-up series in 2008 (though Alex Ross did not return), and a sister-series in 2021.
The Review:
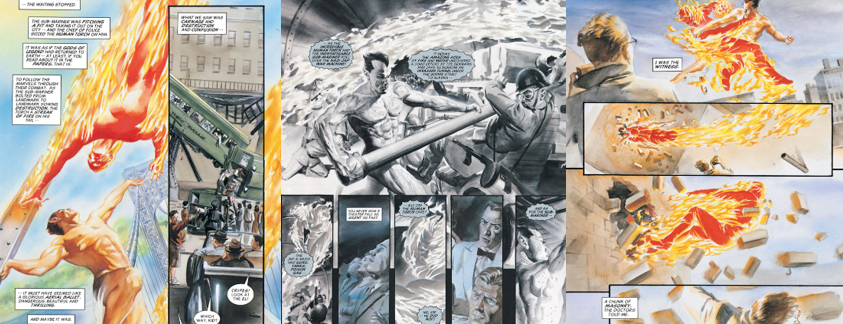
Marvels followers budding photographer Phil Sheldon who, at the beginning of the story in 1939, is eager to go to Europe and make a name for himself as a war photographer. While his friend and fellow cub reporter, a youthful J. Jonah Jameson, scoffs at the futility of the war, he shares his own lofty aspirations of one day owning the Daily Bugle and making his own headlines. While Jameson heads off to cover a labour dispute, Sheldon attends a press conference hosted by noted scientist Phineas T. Horton, who unveils his revolutionary “synthetic man”, a robotic creation indistinguishable from the real thing except that it bursts into flame when exposed to oxygen. While the reporters initially mock the demonstration as an elaborate hoax, they react in horror when this “Human Torch” moves and appears sentient. Subsequent sensationalist headlines – the “power of the press”, as Sheldon puts it – slander Professor Horton and see him bury his creation lest it prove to be a danger. While shopping for a gift for his betrothed, Doris Jacquet, Sheldon rushes to investigate a disturbance, hopeful for the big break that’ll get him shipped to Europe, only to the find the Human Torch running amok through the streets of New York City. While the ridiculously fickle New Yorkers brush the event off as an elaborate prank, Sheldon is shaken by his second sight of the flaming man and is therefore the only person to take reports of a “Sub-Mareener” seriously. Over the next few panels, both the Human Torch and the Sub-Mariner raise the ire of everyday folk with their antics, but they captivate Sheldon, who turns down the chance to cover to war to stay and follow these ever-prominent “Marvels”. As awe-struck as he is by such costumed super-men, Sheldon can’t help but question what their presence means for mankind, who suddenly seem secondary in the evolutionary chain. Thus, when the Human Torch and the Sub-Mariner inevitably come to blows in what’s likened to a battle between Gods, Sheldon shares the same fear as his fellow citizens, despite protests from the likes of officer Betty Dean, who vouches for Namor’s character.
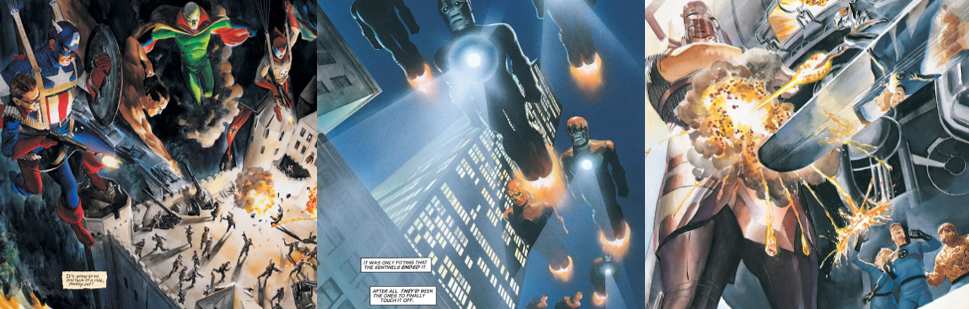
As the two titans battle, hijacking the airwaves and causing a great deal of property damage, Sheldon is angered at them for making humanity feel so helpless. The conflict is ultimately resolved by Officer Dean, who cools the differences between the two, though Sheldon echoes the same bitterness of his peers at both superhumans escaping any punishment for their actions. In the face of his helplessness, and intuiting that such occurrences will only escalate, Sheldon reluctantly suggests pushing back the wedding and, resenting him, Doris opts to call the whole thing off until he feels more like a “man”. By winter, the press was alive with reports of Captain Steve Rogers/Captain America’s colourful adventures; kids and adults alike revelled in his Axis-smashing antics. While at the cinema, Sheldon’s musings that Cap is so accepted because he’s not perceived as a threat are given further credence when the entire audience (him included) applaud news reports of the Human Torch and the Sub-Mariner teaming up to battle the Nazis. Just like that, the Marvels are celebrated, national heroes; the public debates which of them is better and stronger and Sheldon’s perspective has changed enough to rekindle his relationship with Doris. His elevation is short-lived, however, when it’s suddenly reported that Namor has turned on the Allies and waging his own war against America, a war that sees him flood New York with a catastrophic tidal wave! The Human Torch confronts him and Sheldon’s right there to snap some pix, now revelling in witnessing such a titanic clash, only to be injured by flying debris and lose an eye in the process. Surprisingly, he feels no ill will towards the Marvels and instead chooses to focus on the bigger picture – the war and his impending wedding, specifically. After the wedding, Sheldon finally gets to cover the war in Europe and is right there when Cap, the Human Torch, Namor, and the rest of their superpowered Invaders, storm a Nazi compound, noting in a letter to Doris that the Marvels aren’t some temporary fad; they’re here to stay.
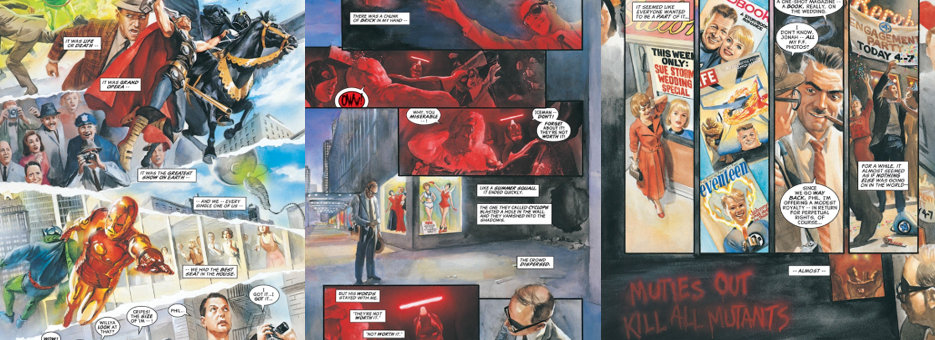
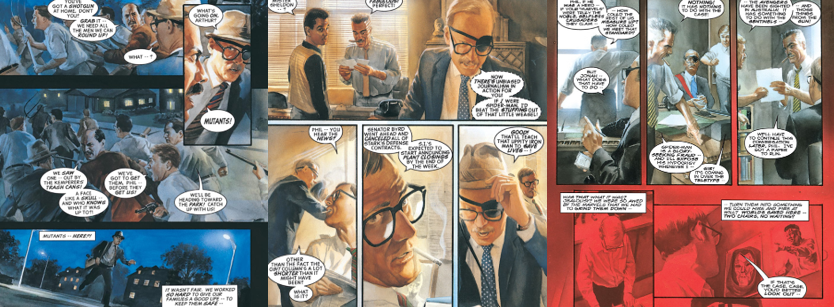
Some decades later, an older and more experienced Sheldon is convinced to cover a battle between the Avengers and the Masters of Evil. Cap has just returned from his icy sabbatical, inspiring the awe and admiration of Sheldon and the public. By this time, sights such as Anthony “Tony” Stark/Iron Man, Thor Odinson, and Doctor Hank Pym/Giant-Man cutting through the city skyline and dwarfing mere mortals are commonplace but no less impressive. Sheldon hopes to publish a book of his photos of their heroics, convincing his publisher to take a shot on the idea based on how inspirational Marvels like the Fantastic Four are. While mulling over his opening text, Sheldon’s swept up by an angry mob who descend upon the X-Men, convinced that the Mutant teenagers tried to kill an innocent construction worker. Sharing the sentiment that the Mutants are dangerous killers, Sheldon literally casts the first stone, left shaken by the words of Scott “Slim” Summers/Cyclops (“They’re not worth it”) and pondering why Mutants illicit such hatred and distrust compared to the other Marvels. He concludes it’s because Mutants are genetically predisposed to be the next step in human evolution, thereby conjuring fears of death and redundancy in everyday folk. Ruminating these matters at home with his kids (who idolise the Marvels), Sheldon is gifted a writing assignment covering an art exhibition hosted by blind sculptress Alicia Masters. He’s also right there for when Doctor Reed Richards/Mister Fantastic announces his engagement to Susan Storm/The Invisible Girl, landing Sheldon another book deal with Jameson for every photo he takes of the colourful couple and landing him on the guest list for the wedding. With major shake-ups occurring in the Avenger’s roster and the likes of Matt Murdock/Daredevil making a splash downtown, to say nothing of the wedding drama, Sheldon almost forgets about the Mutant problem…save for the abundance of anti-Mutant graffiti plastered around town.

Sheldon’s stunned when he returns to his quiet suburb and finds an angry mob literally grabbing pitchforks to hunt down a Mutant in the area. His first thought is his family but Sheldon’s shocked to come home and find his children sheltering a Mutant child, Maggie, a frightened little girl who’s the anthesis of everything Sheldon had so firmly believed about her species. Suddenly likening the persecution of the Mutants to the horrors of Auschwitz, Sheldon resolves to protect the girl from their friends and neighbours, who wouldn’t think twice to burn their house down to get to her. While his family keep Maggie safe, Sheldon reads up on Mutants and tries to find some way to help her, only to be met with dead ends and realise that the government wants to lock them up, at best, and execute them, at worst. Sheldon realises that the X-Men could help but falters, worrying they would remember him as another angry human, and meanders through even Reed and Sue’s wedding, his thoughts so preoccupied by Maggie’s fate. His concerns are only exacerbated when a television debate between Professor Charles Xavier/Professor X and Bolivar Trask sees the unveiling of his Mutant-hunting Sentinel machines and the outing of Professor X as a Mutant. Driven into a frenzy by fear, hated, and paranoia, an all-out riot breaks out. Sheldon’s right there, recording evidence of man’s inhumanity to man, as the monstrous Sentinels fly overhead, and is distraught to return home and find Maggie left to keep them safe and unable to comfort his kids when they worry about her safety. Within a mere two months, the fickle public begin to turn on the Marvels, holding them accountable for their actions and questioning their methods. Their primary target is Tony Stark, who bankrolls the Avengers and pays Iron Man to be his personal bodyguard, and the Avengers, who had recently been framed by evil doppelgängers. Disturbed by how sordid the Marvels have become, Sheldon throws himself into his work, determined to keep his family fed and sheltered, but unwittingly drives a wedge between him and Doris and the girls.
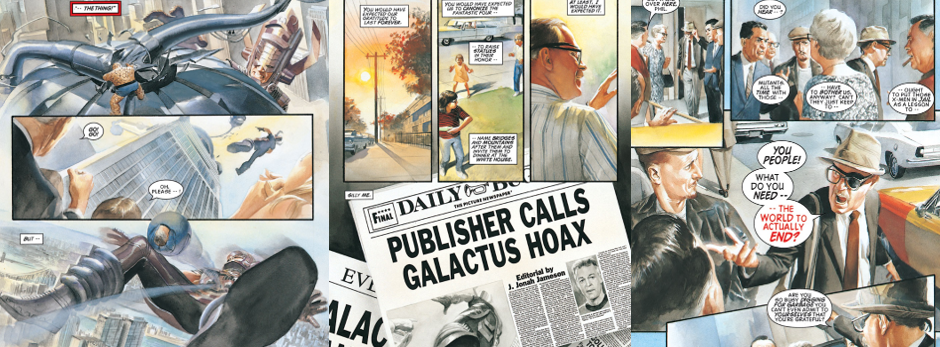
The Marvels’ bad press is only escalated by Jameson’s personal vendetta against Peter Parker/Spider-Man and Sheldon comes to question his perception of the Marvels once more. However, he and the entire city are horror-struck when the skies burst into flames, asteroids fill the horizon, and a mysterious “Silver Surfer” arrives, seemingly heralding the onset of judgement day. Once again, despite their distrust and slander, the people must put their faith in the Marvels and be mere spectators as the Fantastic Four raced to confront the Silver Surfer, only to be dwarfed by the might and terror of the titanic Galactus! To the stunned horror of the public, the Fantastic Four lose the battle and none of their other defenders appear to help, leaving them to contemplate their end and watch, helplessly, as Galactus constructs an elaborate device around the Baxter Building. The people celebrate as the Fantastic Four and the Silver Surfer attack Galactus in full force, but Sheldon decides to leave the scene and be with his family, realising that the Marvels could fail and that he would rather be with his loved ones at the end. Luckily for him, and everyone, the Fantastic Four fend Galactus off with the Ultimate Nullifier but, rather than being celebrated as heroes, the team – and all Marvels – are further slandered by Jameson’s derogatory headlines. Sheldon’s protests fall on deaf ears and even he’s disgusted to find teenage photographer Peter Parker gleefully selling incriminating photos of Spider-Man to Jameson. His contempt for the public reaches a boiling point as Sheldon heads to cover a battle between the X-Men and Count Luchino Nefaria, snapping at them for slandering the very people, even Mutants, who save their lives. Still, by the 1970s, the public turn to his book of photographs for comfort after the Avengers are stuck in another galaxy determining the fate of all reality, begrudgingly guilty for questioning their methods. Now feeling his age, Sheldon takes on an assistant, Marcia Hardesty, though even this can’t help lighten his increasingly sour mood as he repeatedly sees the Marvels questioned, persecuted, and smeared by the courts, the public, and Jameson.
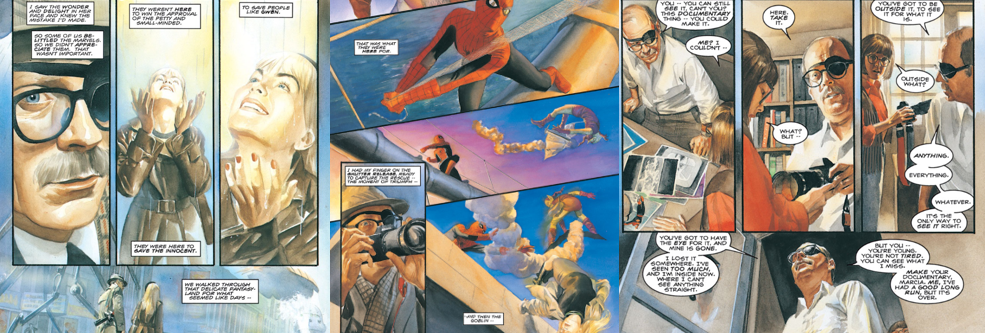
After the Fantastic Four again fend off Galactus, Sheldon desperately tries to turn opinion in favour of the Marvels, only to be dismissed as an overworked old man. Sheldon resolves to use his skills as a reporter to clear Spider-Man of Captain George Stacy’s death, interviewing a bystander who unashamedly blames Stacy’s death on Spider-Man. Sheldon’s as sceptical as the cops he meets with; however, while they have evidence that suggests Doctor Otto Octavius/Doctor Octopus caused Stacy’s death, they can’t prove anything without questioning Spidey. Confident that the underappreciated Marvels will handle a crisis happening at the Sun, Sheldon interviews some more people, all of whom believe Spidey’s a menace, and even questions Jameson, revealing the cantankerous publisher feels inadequate against such Marvels and is therefore determined to besmirch them, guilty or not. Jameson’s attitude makes Sheldon seriously consider an offer to write for the Daily Globe and he takes the first boat to Ryker’s Island to talk with the captive Dr. Octopus, only to find the stubborn scientist unwilling to co-operate with his inquiries. With no roads left, Sheldon visits Stacy’s daughter, Gwen, finding that, while she did initially blame Spider-Man, she no longer does. Reinvigorated, Sheldon regularly meets with Gwen; she’s with him when Namor invades New York with an army of mechanical attack craft. Rather than being terrified, Gwen marvels at their beauty and Sheldon realises that lives like hers are what the Marvels are fighting for and resolves to rework his new book into championing the heroes, flaws and all. Sheldon’s conviction turns to dread when he goes to Gwen’s to pick up some of her father’s journals and witnesses her being kidnapped by Norman Osborn/The Green Goblin. Sheldon follows in a taxi and witnesses the brutal battle between Spidey and the Goblin, sure that good would triumph over evil, and is crushed when Gwen’s knocked from the bridge and dies when Spidey tries to save her. Angered that Gwen’s death is buried under Jameson’s anti-Spidey campaign and left disillusioned by the Marvel’s failure, Sheldon loses interest in his book and grows resentful of the world moving on without a care. However, he realises that Marcia still sees the good in the Marvels and ultimately hands the assignment to her, retiring to be with his family and leaving the Marvels behind.
The Summary:
I’ve long criticised the hypocrisy of Marvel Comics’ everyday citizens. The people, especially New Yorkers, are a fickle and judgemental bunch, easily swayed by a few headlines and news reports. They can literally be dodging Galactus’ footsteps one day and then will laugh it off as a hoax the next. They can witness Spider-Man saving people from a burning building and yet fully believe Jameson’s claims that the wall-crawler started the blaze. They’ll come out in droves to cheer the wedding of Reed and Sue and applaud the star-spangled heroics of Captain America, but hurl bricks at Mutants and accuse them of all sorts in the same breath. They are a terrible, unappreciative, unreliable bunch of ingrates who don’t appreciate that these heroes put their lives on the line to save not just them, but the entire world and even the whole universe! Marvels is a perfect examination of this phenomena, with our equally culpable main character witnessing first-hand as Joe Public fear the likes of the Human Torch and the Sub-Mariner because they’re “different” and then cheer them on when they fight to defend America’s interests. Much of the public’s fickle nature isn’t just because of Jameson’s outrageous headlines, either; people, even Sheldon, feared the Marvels in the 1930s simply because of the existential threat they presented. This evolved and escalated once Mutants came along, with the species inarguably representing the next step in humanity’s inevitable extinction and thus causing the public to hate and fear them out of paranoia of being replaced (or the simple fear of death). Yet, Marvel’s civilians can never be appeased; they even turn on celebrated heroes like the Avengers for “abandoning” them and treat many of the Marvels as disposable celebrities. Their everyday, awesome feats lose their grandeur for many, who just become inconvenienced by their battles, and public opinion wildly fluctuates throughout the decades represented here as a result, even spilling over into paranoid violence when Mutants and shapeshifters become commonplace.
At the heart of it all is flawed photographer Phil Sheldon. Phil’s a complex character, for sure, echoing the awe and fear of his peers at the sight of the Marvels and feeling small, insignificant, against these God-like figures. His opinion regarding the Marvels fluctuates throughout the story, with him praising and celebrating them during their “Golden Age” and profiting from their antics, never losing his faith in their good deeds even when it costs him an eye. Yet, like the public, Sheldon hates and fears Mutants. Unlike the average Joe, Sheldon contemplates why this is and realises he doesn’t really know, beyond that aforementioned existential dread. When he discovers Maggie hiding in his house, fully accepted by his well-meaning kids, he finally realises that he’s as guilty of persecution as the Nazis he once so heartily rallied against and privately defends Mutantkind. His perception changed for the better, Sheldon comes to see the worst in humanity: while they accuse Mutants of being dangerous, he sees only heroes trying to defend the innocent and angry mobs tearing their neighbourhoods apart out of sheer paranoia. Haunted my Maggie’s unresolved fate, time and weariness with the public’s everchanging opinions takes its toll on Sheldon. He remains in awe of the Marvels but focuses on them so much that he neglects his family, desperate to figure out what it is about them that distracts him so much. When Galactus arrives and the end of the world seems nigh, Sheldon realises that none of that matters; all that matters is being with the ones you love. This attitude leads into him becoming very short-tempered when people question or slander the Marvels, snapping at the unappreciative public for not realising that they owe their lives to the same people they’re dragging over the coals. Unfortunately, Sheldon lives long enough to see the best and worst of both humanity and the Marvels, realising with gut-wrenching finality that these “Gods” are as flawed as the everyday man. He comes to put all his faith in Gwen’s innocence and is thus heartbroken when Spider-Man fails to save her, but comes to see that his time with the Marvels has come to an end and that it’s time to let those concerns go to focus on what really matters.
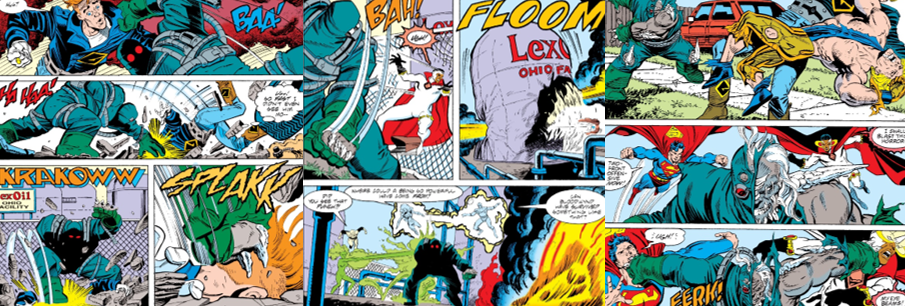
Of course, what really makes Marvels shine is Alex Ross’s frankly gorgeous artwork. Every panel is painstakingly hand-drawn and painted to bring these colourful, outlandish superheroes to life. Unlike many of his peers, especially later in life, Alex Ross doesn’t try to reinvent these characters or make them more “realistic”; he simply presents photorealistic interpretations of their classic costumes, with the sole exception that he depicts Namor as being completely naked. This can be hit and miss; Spider-Man, for example, looks phenomenal under Ross’s penmanship but Thor and Iron Man struggle somewhat with their more outlandish designs. Still, Ross delivers some gorgeous full-page spreads, recreating Reed and Sue’s wedding, showing the battles between Namor and the Human Torch, and bringing these incredible moments to life from a street level perspective. Nowhere is this represented better than in Galactus’s arrival. Despite being faithful to Jack Kirby’s original design, Galactus cuts an intimidating and awe-inspiring figure here, towering over skyscrapers and constantly framed as though a Titan has risen from the Earth. While the story primarily focuses on Sheldon’s family life during this bout, the glimpses of the Fantastic Four and the Silver Surfer’s battle against Galactus deliver a sense of scale and realism not often seen in comics. This is further echoed in the coming of the Sentinels and Spider-Man’s battle with the Green Goblin, events where Sheldon is merely a bystander amongst the faceless masses watching history unfold, powerless to intervene. Ross fills every panel with little cameos and an amazing attention to detail, basing many characters’ likenesses off real-world celebrities and figures, and his work really makes you appreciate the craft and effort put into every panel, no matter how small. Marvels is a dramatic and compelling distillation of the first thirty-years-or-so of Marvel Comics, linking major events on a realistic timeline and giving us a glimpse at how these heroes, Gods, and villains are perceived by the common man. It’s a startlingly bleak tale at times, criticising our hypocrisy and inclination towards hatred and violence, but also an uplifting story. Sheldon, and many characters, celebrate and are inspired by the Marvels, championing them even when a small, volatile minority try to slander them. It’s the perfect snapshot of what life in Marvel’s New York City can be like and a great way to witness such iconic moments from a street-level perspective.
My Rating:
Great Stuff
Have you ever read Marvels? If so, what did you think to it? Are you a fan of Alex Ross’s artwork? What did you think to the presentation of Marvel’s fickle public? Did you relate to Sheldon as a protagonist and enjoy his growth throughout the series? Which “Marvel” is your favourite? How are you celebrating National Superhero Day today? Whatever your thoughts, leave a comment below and be sure to check out my other superhero and comic book content.


You must be logged in to post a comment.