Game Corner [Zelda Day]: The Legend of Zelda: Skyward Sword HD (Nintendo Switch)


On 21 February 1986, The Legend of Zelda (Nintendo EAD, 1986) was first released in Japan. The creation of legendary game designer Shigeru Miyamoto and Takashi Tezuka, The Legend of Zelda launched one of Nintendo’s most popular franchises, with its silent protagonist, Link, and his vast fantasy world of sword and sorcery not only enduring over time but constantly evolving and improving as the series progressed.


Released: 16 July 2021
Originally Released: 18 November 2018
Developer: Tantalus Media
Original Developer: Nintendo EAD
Also Available For: Nintendo Wii

The Background:
I’d like to think that even Nintendo couldn’t have predicted just how impactful the Legend of Zelda series’ (Nintendo EAD/Various, 1986) first foray into 3D was going to be; their attempts to follow up on the unprecedented success of The Legend of Zelda: Ocarina of Time (Nintendo EAD, 1998) resulted in one of the franchise’s darkest and most underappreciated entries, and Nintendo were keen to appeal to a wider audience with Ocarina of Time’s spiritual successor, The Legend of Zelda: Twilight Princess (ibid, 2006), which proved to be an the incredible success for Nintendo’s fledgling GameCube. Having turned the videogame industry on its head with the Nintendo Wii, producer Eiji Aonuma aimed to build upon the expansive nature of Ocarina of Time and Twilight Princess to present the biggest and most detailed Zelda gameworld to date by offering something new through the Wii’s unique motion controls, more elaborate sword combat, a greater focus on exploration, and providing an origin story for the Master Sword. Since I struggle a bit with the Wii’s ridiculous motion controls, I missed out on Skyward Sword when it first released, but it was a massive critical success; considering how widely praised the game was, it was perhaps inevitable that Nintendo would produce a high definition remake for the Nintendo Switch as part of the 25th anniversary of the Legend of Zelda series. The long-rumoured upgrade of the lauded title was developed by Tantalus Media and the gameplay mechanics were redesigned so players could use either the Joy-Cons or a more traditional control scheme, alongside numerous other quality of life improvements to the graphics, frame rate, and save feature. Preorders for Skyward Sword HD sold out on Amazon, and the game sold over 3.6 million units worldwide; however, while it was met with largely positive reviews, it did score less than the original version. Still, reviews praised the more focused gameplay mechanics compared to other, larger Zelda games, and its technical achievements, though faced some criticism for the dated motion controls.

The Plot:
Positioned as the first adventure in the Legend of Zelda timeline, Skyward Sword details the origins of the powerful Master Sword as Link, resident of the floating island of Skyloft, embarks on a quest to rescue Zelda, his childhood friend, after she is kidnapped and taken to the Surface, an abandoned land below the clouds, by the malevolent Ghirahim as part of a plot to awaken an ages-old darkness upon the world.

Gameplay:
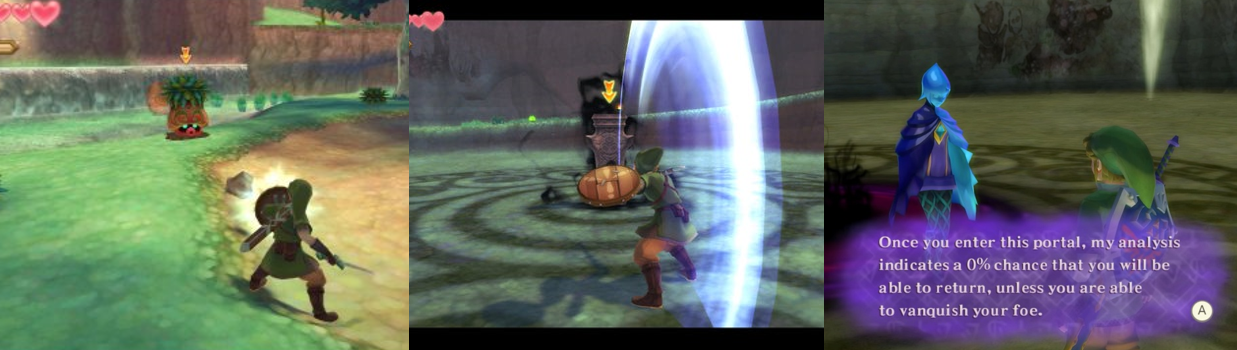
The Legend of Zelda: Skyward Sword is a partially open world action/adventure in which players once again assume the role of an incarnation of Link, here a knight-in-training on an island above the clouds. Right away, players have two control options available to them that allows them to utilise motion controls much like the original Nintendo Wii release or to use a more traditional control scheme; however, while this latter option is more comfortable for me, it’s very different from how a Zelda game traditionally plays. A is now an action button that allows you to open doors and chests, talk to non-playable characters (NPCs), and pick up items; B is used to put your weapons away or can be help down while running or otherwise moving for a burst of speed (though you can’t hold it down indefinitely or you’ll drain your stamina wheel and be left defenceless as Link tries to catch his breath), X is mainly used to charge ahead when on your Loftwing, and Y isn’t really used at all. Consequently, sword combat is mapped to the right analogue stick; you can hold ZL to target enemies or interactable objects and flick the stick to unleash a sword attack (perhaps because of this, Link is now right-handed, as opposed to the traditional left). This actually took me a bit of time to adapt to as Link seems to swing his sword in the opposite direction you flick (swinging left with you flick to the right, for example), which can make activating certain switches and attacking some enemies tricky as you need to swing where there’s an opening.

Use motion controls, or the analogue stick, to attack and deflect and consult Fi for advice.

If you knock an enemy down, they’ll sometimes be left open for a “Fatal Blow” that allows you to leap at them for an instant kill, and Link and both perform is signature spin attack, jump swing, and also stab at enemies with his sword. Eventually, you’ll also learn the “Skyward Strike” which sees Link hold his sword aloft to charge it and then sending out an energy wave to damage enemies from a distance, which is a handy feature. Link can also defend himself with his shield by holding ZL and perform a shield bash, which doubles as a parry, by pressing in the left analogue stick. Unfortunately, the vast majority of the game’s shields can be burnt or broken, meaning you’ll either need to upgrade them to toughen them up, buy now ones, or complete a side quest to get a more durable shield. Like many 3D Zelda games, Link automatically jumps from ledges; he can also hang down, shimmy along, and climb vines, all of which will drain your stamina meter. Link can also swing from ropes to reach new areas, which can be a bit tricky to perform as you need to aim yourself with the left stick and flick the right stick up and down in just the right motion to get the momentum you need. Chatting with some NPCs will also offer you a few dialogue options, which don’t really factor into the plot or change their perception of you, but they do help to give Link a little bit more characterisation this time around. Once Link acquires the Master Sword, he also gains one of the most annoying travelling companions I’ve ever had the misfortune of being lumbered with as Fi, the spirit of the sword, acts as a guide, navigator, and tutorial to the player very much in the same way as Navi did back in the day. You can call upon Fi at anytime using the directional pad (D-pad) to gain insight into targeted enemies, remind yourself of your current objective, or get some advice, but she also pops up uninvited at various points to hold your hand or point out the obvious. She also helps you to search for objectives, treasure, and other items by using the sword’s “Dowsing” ability, which puts you into a first-person mode and guides you towards your set target.

Link can sour through the clouds, burrow underground, and must brave trials without the aid of his gear.

You can bring up the map using the – menu and set markers to also help guide you in the right direction, which is very useful as it can be easy to get turned around a bit. One thing to keep in mind here is that there are no manual saves; you need to find a Bird Statue to manually save your progress to one of three save files, though there is an autosave feature that effectively adds as a checkpoint system. Similar to The Legend of Zelda: The Wind Waker (Nintendo EAD, 2002), the game’s overworld is a series of islands and set areas connected by a large void, in this case the open sky; Link can fly to new destinations using his Loftwing, which replaces the traditional horse, by tapping A to ascend and B to slow down or charge into enemies using X. You’ll be utilising the Loftwing a lot to travel back and forth between the three main areas of the game, as well as Skyloft and the smaller items as the story demands, but you can five down to any Bird Statue in any area and exit dungeons (or teleport to the Sky) from these same statues, though you can’t fast travel between destinations using this system. Though Link takes fall damage, you’ll soon acquire a Sailcloth that lets you glide to the ground from high falls by holding ZR (though you can’t actually manoeuvre him while he’s descending). This also allows you to ride air currents upwards and you’ll eventually gain the ability to swim and even twirl through and jump out of the water very much like Zora Link in The Legend of Zelda: Majora’s Mask (ibid, 2000). Link also later acquires the Digging Mitts, which allow him to burrow underground and crawl through narrow caves, smashing boulders and activating switches to progress further, and also gets his hands on the Goddess’s Harp that lets him open up new areas by strumming the stings with well-timed movements of the right stick, which is a far cry from the ocarina playing or wind conducting from previous games. Link will also have to complete four trials in the “Silent Realm”; here, he loses all of his equipment and items and must race around collecting fifteen Sacred Tears across the map while avoiding the ghost-like Watchers and making sure you don’t touch the Waking Water or your Spirit Vessel doesn’t deplete as this will awakens the Guardians, who will hunt you down and eject you from the dimension upon impact, forcing you to begin all over again.

You’ll constantly be travelling back and forth between three areas in search of key items.

Although Skyward Sword looks like the biggest Zelda experience ever seen at the time, it really doesn’t actually feel that way; I’d argue that Twilight Princess felt much bigger and more connected thanks to actually having a large overworld with different routes and areas all linked together. In Skyward Sword, you’ll be spending most of your time travelling back and forth between the three main regions on the Surface (Faron Woods, Eldin Volcano, and the Lanayru Desert), Skyloft, and the Thundercloud up in the Sky. Each area is an isolated environment; you won’t find any routes or means to travelling from Faron Woods to Eldin Volcano beyond flying there on your Loftwing, but each of those regions does have a few other areas that you’ll explore as the game progresses. The Lanayru Desert, for example, is home to a treacherous desert, the Temple of Time, and a mine, all of which you’ll need to explore at various points. The main quest of the game asks Link to travel to each area thee times and acquire one of three different key items or meet three different objectives each time. At first, you’ll need to find three stone fragments form each region to access the Thundercloud; then, you need to find three Sacred Flames to power up the Master Sword. Then, you need to travel back again and find three pieces of the Song of the Hero and access the game’s final dungeon, all of which can get a bit repetitive even though the enemies and the environments do change which each revisit. Faron Woods becomes flooded, for example, and Eldin Volcano erupts, and you’ll find new regions opening up with your new gear and completing story-based tasks, such as Lake Floria just off Faron Woods, the ghostly Sandship and Rickety Coaster in Lanayru Desert’s Sand Sea (both of which are accessed by piloting a boat armed with a cannon), and at one point you’ll find yourself relieved of your weapons and gear and having to escape (and retrieve them) from Eldin Volcano without being spotting in an expansion of the Gerudo Fortress section of Ocarina of Time.

There are many puzzles here, from hitting switches, to crossing lava, and rearranging the environment.

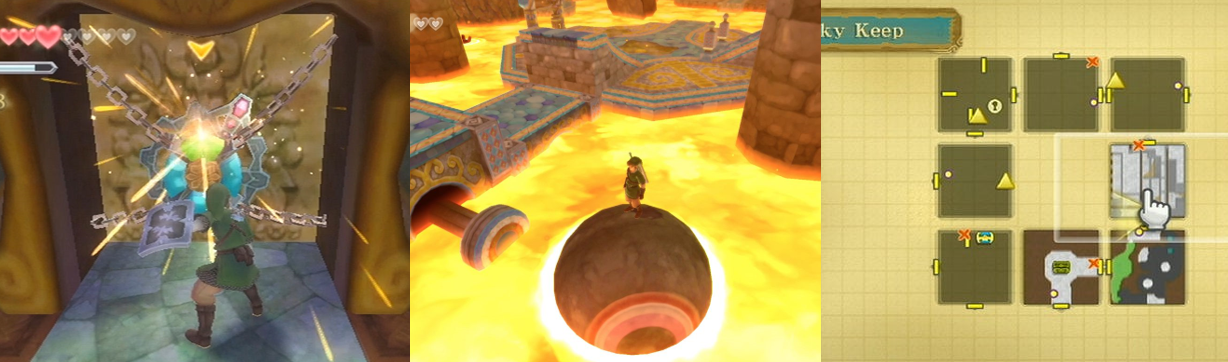
Naturally, you’ll visit a number of dungeons in your quest, which (as is tradition) are realised as elemental-themed temples. Inside, you’ll find small keys to opens doors and a Dungeon Map (which now reveals Bird Statues, chests, and points of interest by default to replace the Compass) to help you progress, and you’ll need to clear rooms of enemies, activate switches and pressure pads, and take on sub-bosses to acquire the temple’s new weapon, which will allow you to progress further and tackle the boss. Sometimes you’ll need to move a weighted block onto a switch or out of the way to climb a ladder; other times, you’ll need to hit switches to raise or lower water and lava, cut through cobwebs, send eyeballs spinning, and shoot or hit faraway switches to open doors. Link will also need to hit plant bulbs (or carry them on the tip of his sword) to create temporary platforms in lava, grapple to floating plants or specific targets with the Clawshots, toss or guide bombs into baskets to create platforms over quicksand, and sever ropes to lower drawbridges. In Lanayru Desert, the majority of the puzzles are based around the “Timeshift Stones” which, when struck, will turn part of the immediate area from a desolate desert into a vibrant landscape, causing enemies, switches, equipment, and even land formations to form so you can progress. Many puzzles require you to carry a Timeshift Stone around or placing it in a specific area to lower one barrier while activating another, which is quite a unique and creative mechanic that really makes you think about how to tackle puzzles. All of these puzzle gimmicks and mechanics are revisited in the game’s final area, Sky Keep, which also features a unique and annoying gimmick that sees you rearranging the different rooms of the temple to open up new paths and acquire the three pieces of the Triforce.

Graphics and Sound:
The Legend of Zelda: Skyward Sword certainly looks impressive; this HD version of the game has potentially upscaled the graphics to make everything very vibrant and moody, when necessary, and the game employs an aesthetic style that merges the fantastical realism of Twilight Princess with the cartoony presentation of The Wind Waker. In addition to having dialogue options during some conversations, Link continues to showcase a variety of facial expressions to help flesh out his otherwise silent character, and you’ll be hearing a lot of gibberish (mainly from Fi) when talking to others. Otherwise, there is no voice acting here, as is to be expected from a Zelda title; some dialogue can be sped up by pressing B and you can skip some cutscenes entirely by pressing the – button, but it can mean you’re left a bit clueless afterwards. Although each region is populated by unique NPCs, many of which are new to the series (such as the Ancient Robots but, while Parellas replace Zoras, Gorons are still present in the game), you’ll find the vast majority in Skyloft. Here, you can chat to Headmaster Gaepora, buy, sell, and upgrade items in the market, and will come across Link’s obnoxious rival, Groose, whose pratfalls and antagonism eventually turns into heroism as he helps aid Link’s quest to rescue Zelda.

Areas have a lot of see and do, and even change as the story progresses.

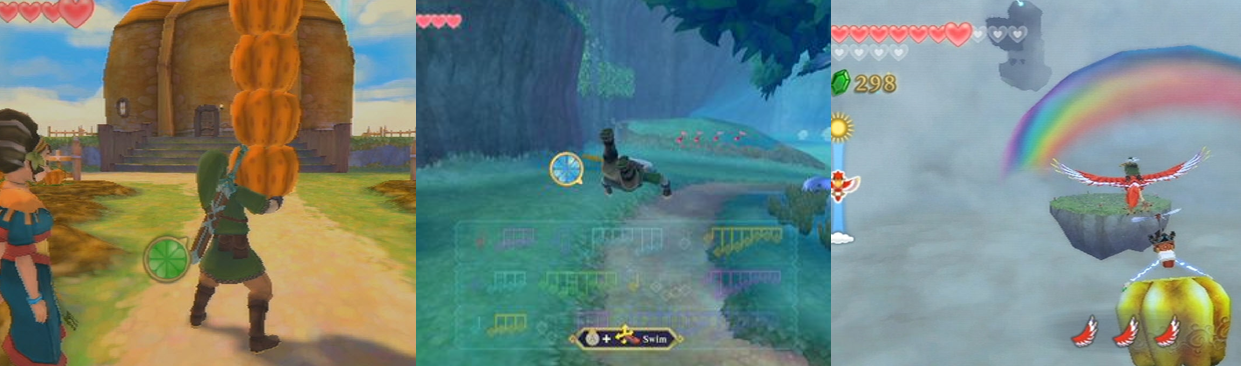
The game also features an appropriately operatic score that includes new renditions of the iconic Legend of Zelda main theme and versions of memorable tunes such as “Zelda’s Lullaby”; when you engage with enemies, successive strikes also speeds up the tempo of the battle music to help keep the adrenaline pumping and each area is nicely punctuated by both ambiant sounds and a fitting soundtrack. Skyloft is an impressive starting area and a pretty large central hub; you’ll find rooms to sleep in to pass the time and replenish your health, the market, a graveyard, and a practice hall to work on your sword techniques. While the Sky is basically just a barren void, there are small islands and rocks floating around that you can visit to find chests, mini games, and a prominent side quest centred around the Lumpy Pumpkin establishment. Shafts of red, yellow, green, and blue light will point you towards the three main regions and wherever you’ve placed a marker, and you’ll need to dodge Octoroks spitting rocks at you and tornados that will blow you off your Loftwing. The inside of the Thundercloud is initially best by storms and lightning and home to both one of the more annoying push puzzles in the game and the decidedly Wind Fish-like Levias, a gigantic whale that flies through the sky and clears the air after you free him from the parasite that has infected him. Although it’s possible to advance and alter the time of day by sleeping in beds, this rarely factors into the main plot, but it does turn Skyloft from a safe, vibrant location to a dangerous area as enemies spawn in under the cover of darkness. Similarly, when taking on the four Trial Gates, the immediate area takes on a darker, more ethereal quality as shadows become more prominent and glowing magical barriers bar your progress.

Areas are quite large and varied, but not as connected as in other Zelda videogames.

The game’s three main regions are based around classic Zelda tropes such as the forest, volcano, and desert, while also incorporating themes like water, wind, and time into their later areas. You can create shortcuts in each but pushing logs and mine carts, blowing up rocks, or grabbing levers to open gates (and also using your new weapons), but the areas will fundamentally change as the story progresses. Faron Woods start off as a kind of confusing wooded area that leads onto a cliffside leading to the Skyview Temple, a water and bug-infested cave or sorts, is home to a great tree, and also leads to a flowing river that takes you to Lake Florina (which later floods the woods) and the Ancient Cistern, a kind of steampunk-like Temple whose golden Oriental aesthetic hides a scary underground area. Eldin Volcano is full of lava and steep hills for you to run up while avoiding boulders tossed by enemies; enemies also wait atop wooden columns that you can knock over with bombs, and you’ll run around on a spherical rock, lobbing bombs are walls and trying to not burn your ass in the Earth Temple. Later, the whole area is covered in ash as the volcano erupts and you need to sneak around and recover your gear, avoiding spotlights, and douse face statues with water to gain access to the Fire Sanctuary, where you’ll be digging through the dirt with the Mogma Mitts. Lanayru Desert sees you racing across quicksand, using the map and markers to avoid sinking, activating three power generators to raise the Mining Facility, an area which springs to life with the Timeshift Stones to reveal conveyer belts, wind-powered platforms, and all manner of mechanical obstacles. You’ll also use one of these Timeshift Stones to safely cross the Sand Sea and ride the Rickety Coaster’s insane mine cart, and awaken the long-dead dragon that resides in the Lanayru Gorge.

Enemies and Bosses:
Longtime fans of the franchise will recognise many of the enemies that crop up in Skyward Sword, most of which are tailored to the game’s new combat system; Deku Babas and Bokoblins, for example, need specific horizontal or vertical swipes of your sword to dispatch, and this is carried through to tougher enemies like the Lizalfos and Stalfos. While you can easily mow down the bat-like Keese and Chuchus with reckless abandon, you’ll have to factor in elemental variants that will electrocute or burn you, you generally can’t just swipe away at enemies; you’ll need to either cut down Beamos columns and stab them in the “eye” or shoot an arrow at them from afar to destroy them, reflect back Sentrobe missiles with well-timed swings of your sword, run up and over Moblin shields to attack them from behind, drag Furnix to the ground with your Whip, blow the spinning magnets atop the Armos’ heads with the Gust Bellows to expose their weak spot, and toss water on Magmanos to turn it to stone and chip away with your sword. Enemies become tougher and more prevalent as the game progresses, causing less dangerous areas to become more hazardous as shield-carrying Moblins wander about and archer Bokoblins take shots at you from above; these latter can also call in reinforcements with horns, carry bombs, and even take on a zombie-like appearance to cause even more bother.

While you’ll fight some of the sub-bosses ore than once, nothing’s more persistent than the Imprisoned.

Naturally, each of the game’s Temples is home to a sub-boss as well as the main boss. These are often newer, tougher enemies that soon become part of the regular ensemble you encounter, such as the Lizalfos, Moblins, and Moldorms. Lizalfos can be tricky to defeat as they swipe at you with their tails, guard against your attacks with their armoured arms, and breath fire, but you can parry their attacks to leave them open to your attacks, which is a system that serves you well for other sub-bosses like the Stalfos and its four-armed cousin, the Stalmaster. You can use a similar tactic against the two skeletal pirates, LD-0016 Scervo and LD-003D Dreadfuse, who swipe at you with a sword and hook hand and try to force you back into a spiked wall as you try to sever their limbs and force them off a narrow walkway. Easily the most recurring (and frustrating) sub-boss is “The Imprisoned”, a gigantic beast who you must defeat three times, with each battle getting harder and adding new wrinkles. The Imprisoned can only be hurt by attacking its toes; slice off all eight and you then have to frantically run around it to attack the sealing spike in its head, but it causes shockwaves with each step, crawls around in an invulnerable state, tries to climb upwards, and even flies in later encounters. Groose is on hand to help you in the latter two battles; you can switch to him to catapult bombs at the creature to stun it, and will need to perfectly fire Link at the creature’s head to finish it off for good before it can reach the Sealed Temple, which will cause a game over and force you to begin the fight all over again.

You’ll fight Ghirahim three times, with the final battle somehow easier than the first.

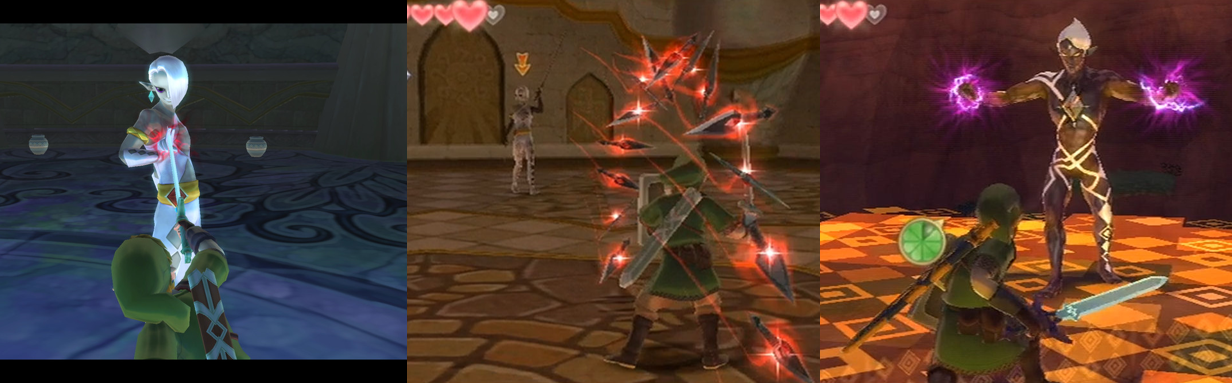
Another boss you’ll encounter numerous times throughout the main story is the game’s primary antagonist, Ghirahim the Demon Lord, who serves as the boss of the Skyview Temple, Fire Sanctuary, and the penultimate boss of the game. Ghirahim is perhaps one of the most frustrating boss characters I’ve ever fought as all of your weapons and tactics are useless and must be set aside for patience and well-timed strikes; Ghirahim can easily block, avoid, parry, and even steal your sword while tossing hard-to-avoid daggers at you, charging in for big damage, and teleporting all over the place. However, you’ll notice that he mirrors the position of your sword; so, if his hand is on the left, lure him in and strike from any direction other than left. When he teleports, roll or dash away and hell get stuck in the ground, leaving him open for a flurry, and you can utilise the same tactics as with Stalfos and the Stalmaster and strike at him wherever his swords aren’t positioned when he brings out his own blade. You can also interrupt his charging attack with a well-timed strike, but these can be pretty tough battles though, ironically, I actually found the final encounter with him to be the easiest of the three (potentially because I had actually figured out how to fight him by this point). This is a three-stage encounter against Ghirahim’s true form that you must wade through a hoard of enemies to even get to; you start off on a magical platform and must perform shield parries to expose the glowing jewel in his chest that can only be damaged with stabs. Hit a few to knock him down to the next platform and perform a Fatal Blow to deal damage and trigger the next phase, which sees him busting out his daggers, and his final phase where he shields himself with a gigantic sword. However, you can chop away at this with repeated swipes of the Master Sword to leave him defenceless and finally put him down for good soon after, which actually makes for a pretty exhilarating final battle against the so-called Demon Lord.

Bosses are large and quiet inventive, requiring interesting uses of your weapons to stun and defeat.

Outside of these fights with Ghirahim, you’ll also have to contend with some pretty inventive, if a bit aggravating, boss battles. The insectoid Scaldera awaits at the end of the Earth Temple and sees you rolling bombs into is rocky hide, and gaping mouth, while avoiding fireballs (and getting blown up yourself), to crack its outer shell and swipe at its exposed eye. Moldarch awaits in the Lanayru Mining Facility and Lanayru Shipyard; this giant scorpion clamps you in its pincers and swipes at you with its tail, but can be hurt by swiping at the eyes in its appendages. When it burrows under the sand, you’ll need to blow the sand away with the Gust Bellows to get it to emerge so you can stab it in the face. Koloktos guards the Ancient Cistern and is probably the first most visually interesting and mechanically engaging boss battle; you basically need to avoid the blades it tosses at you and dodge out of the way when it swings its swords at you, and then use your Whip to detach the arms and use one of the dropped swords to slash at its legs and main body. Eventually, it starts to attack more aggressively, meaning you’ll need to use the nearby columns for cover, and you’ll need to slash at its repeatedly with its own weapon to cut it down to size and finish it off. The Cthulu-like Tentalus attacks the Sandship, smashing its squid-like tentacles through the hull, flooding, and capsizing the boat and leading to a dramatic confrontation in the storm swept deck of the ship. You’ll need to run about avoiding the tentacles as they burst through the deck, or slice them in half with a Skyward Strike, then avoid being swatted by them to shoot an arrow into the beast’s eye to down it and slash at it with your sword. When Tentalus switches to the upper deck, it lashes at you with its Medusa-like hair, which you must wade through with sword slashes to get the final blow on the massive sea creature. After enticing out Levias with a massive cauldron of Pumpkin Soup, Link must chase after the gigantic whale on his Loftwing, charging into the eye-ball tentacles that sprout from its hide, before landing on its back and battling Bilocyte. This is easily the easiest boss battle in the entire game and simple requires you to reflect Bilocyte’s projectiles with swipes of your sword, then attack its head when it gets stunned.

Demise, a precursor to Ganon, challenges you to a relatively simple sword fight in the finale.

After defeating all of the game’s bosses, travelling back and forth, and collecting everything the plot requires you to get, Ghirahim kidnaps Zelda and flees through the Fate of Time to the past, where he sets a whole hoard of enemies against you that you must wade through before battling the Demon Lord for the last time. Even if you’re victorious though, the Imprisoned rises one last time and begins absorbing Zelda’s essence, allowing the demonic Demise to be reborn. After dispatching Ghirahim and reverting him to his natural form of a sword, the malevolent demon transports away to another dimension to await your final challenge. I recommend preparing yourself for this final battle, and saving your game, before following Demise and engaging with him in a one-on-one sword battle with two phase; first, you need to keep your guard up and parry Demise’s attacks to leave him momentarily vulnerable to a sword swipe. Demise will occasionally charge at you, but also keeps you on your toes with fake-out attacks, but the main issue you’ll have here is timing your parries properly and not letting your shield break. In the second phase, lightning strikes all around, charging both Demise’s sword and yours; holding the Master Sword aloft will let you charge it for a Skyward Strike, which will both counteract Demise’s own energy beam and stun him long enough for you to strike. Ultimately, it’s not a particularly difficult battle, but the atmosphere and music definitely help to make it quite engaging, it’s just a shame that it involves so much waiting and strategy. While there is no boss battle in the Sky Keep (beyond rematches with some of the sub-bosses), you can unlock a boss rush, of sorts, after resurrecting and restoring Lanayru the dragon. Lanayru allows you to battle every boss in the game (aside from Levias and Bilocyte) in succession, with only the items he held when he first fought them, or playthrough the Silent Realm challenges again in order to earn rewards such as Rupees, treasures, a Heart Piece, or the indestructible Hylian Shield.

Power-Ups and Bonuses:
As you embark on your epic quest, a wide variety of recognisable pick-ups and power-ups are at your disposal; slashing bushes, pots, rolling into trees, and defeating enemies will yield hearts to refill your health and Rupees, which can be spent buying new gear, potions, and upgrades for your gear. You’ll also find Stamina Fruit scattered all over the place, which will refill your stamina meter, and Goddess Cubes, which can be dispelled with a Skyward Strike and allow you to open special chests all over the place and gain more Rupees or treasures. I recommend scooping a fairy up in your bottle so you can restore six hearts upon defeat and you can buy potions for your empty bottles, which will replenish your health or stamina meter, but you can’t permanently upgrade the stamina meter, acquire new tunics, or learn any magic. Defeating bosses will yield a Heart Container, and you’ll occasionally find Heart Pieces all over the place, four of which will also increase your maximum health by one heart.

In addition to additional weapons and gear, you can also purchase upgrades for your items.

Each of the games dungeons includes a new weapon for you to add to your inventory: the Beetle allows you to pilot a little mechanical beetle to hit switches, defeat or stun enemies, and drop bombs; the Clawshots let you grapple to vines and specific targets (and even disarm enemies); the Whip lets you pull switches and swing from certain hooks; you can roll or toss bombs to blow upon certain rocks; the Digging and Mogma Mitts let you dig up collectibles or burrow underground; the Slingshot and Bow let you shoot at enemies and targets from a distance; and the Gust Bellows disorientates enemies and lets you move platforms or blow away sand. You can also buy new gear from the market, such as extra bomb bags and quivers to increase your maximum capacity, shields to defend yourself, and a Bug Net to capture bugs that can be sold in Skyloft. As you explore, you’ll find a variety of treasures that can be used to upgrade your gear in Skyloft to increase their damage or range. Furthermore, key items like the Water Dragon Scale and Fireshield Earrings allow you to swim and withstand extreme heat and you can also purchase expensive extras from Beedle to increase your adventure pouch, expand your wallet, and spawn additional health among other things.

Additional Features:
There are sixteen different treasures and twelve bugs to find throughout Skyward Sword, in addition to twenty-seven Goddess Cubes to activate, thus awarding yourself additional Rupees and gear. There are also twenty-four Heart Pieces to find, which will extend your maximum health to twenty hearts, and a number of side quests available to keep you busy. The owner of the Lumpy Pumpkin will have you ferrying hot soup, collecting pumpkins, and playing the harp with his daughter (both extremely tricky mini games) in order to make up for damaging his property, the Thrill Digger has you digging in specific spots for Rupees, and you can dive for Rupees after fixing up Fun Fun Island. You can also rapidly slice bamboo sticks with your upgraded sword and shoot arrows at pumpkins for additional awards, but the most prominent side quest is the pursuit of “Gratitude Crystals”. After finding a lost girl in Skyloft, the cursed   Batreaux asks you to help others to earn these crystals and bring them to him to receive big Rupee rewards, a Heart Piece, the biggest wallet available, and also restore him (as in Batreaux) to human. These crystals are earned from helping NPCs in various ways, such as bringing a scrap of paper to a mysterious man in a toilet, bringing medicine for a wounded Loftwing, and repairing the fortune teller’s crystal ball. After completing the game for the first time, you can create a new save file that allows you to play through in “Hero Mode” where the enemies are tougher and shuffled about and neither enemies or pots will drop hearts, making the game much more challenging (although the Skyward Strike does instantly charge).

The Summary:
After struggling to get to grips with, and properly enjoy, The Legend of Zelda: Breath of the Wild (Nintendo EPD, 2017), I was somewhat excited to finally get the chance to play Skyward Sword, a title I had long avoided as I have no desire to play any game, much less a Zelda game, using purely motion controls. Although it took me a little while to adjust to the analogue-based combat and camera controls, both of which are a little clunky due to the control mapping, I found a lot to enjoy in this game. The focus on using specific sword swipes to defeat enemies and bosses made this a very unique Zelda experience, but did make the combat a bit awkward at times, especially with the reversed controls. The visual presentation was very good, but I do feel like many of the areas are much too empty and restricted; since the game’s set in a world of disparate islands above the clouds and a surface accessible only from specific points, it didn’t really feel like a large, interconnected world and reminded me a little too much of the wide, largely empty ocean from The Wind Waker. Flying on the Loftwing was fun, and the boss battles were very engaging and inventive; even the battles against Ghirahim, despite being frustrating at times, were interesting as it required more than just slashing at them mindlessly but the game really lets itself down with the constant back and forth. I feel like it might’ve been better to have areas like Lake Floria as separate as the other regions, just so that the world felt a little bigger and had a bit more variety, but continuously having to revisit the three main regions again and again find something else in each area quickly became repetitive and disappointing, even when the areas visually changed. The lack of tunics and customisation options for Link was a shame, though I felt the game had a better balance between the stamina meter and destructible items compared to Breath of the Wild, which went way overboard in those aspects. Ultimately, there’s a lot to like here and it’s a perfectly enjoyable Zelda title, but, despite being visually superior, I think I still prefer Twilight Princess as it did a much better job of crafting a large, interconnected fantasy world with a lot of variety and a better mixture of new and old gameplay elements.

My Rating:

Rating: 3 out of 5.

Pretty Good

Have you played this HD version of The Legend of Zelda: Skyward Sword? How do you feel it compares to the original Wii release and were would you rank it amongst all the other Zelda titles? Were you a fan of the motion controls and the switch to a vast world above the clouds? Which of the dungeons and bosses was your most, or least, favourite? What did you think to the constant back and forth between the same areas? Which of the Silent Realm trials was the hardest for you? Were you able to find all of the bugs and treasures? Which Zelda game is your favourite and how are you celebrating the franchise today? Whatever your thoughts on Skyward Sword, sign up to leave a comment below, or let me know on my social media.

Game Corner [PokéMonth]: Pokémon: Crystal Version (Nintendo 3DS)


Upon the release of Pokémon: Blue Version and Pokémon: Red Version (Game Freak, 1996), a new craze swept through playgrounds across the world. An entire generation grew up either playing Pokémon, watching the anime, playing the trading card game, and watching the feature-length movies as clever marketing and a co-ordinated release and multimedia strategy saw Nintendo’s newest franchise become not just a successful videogame franchise but a massively lucrative and popular multimedia powerhouse that endures to this day. Accordingly, February 27th is now internationally recognised as “National Pokémon Day”, which I’m expanding to an entire month of Pokémon every Tuesday in February.


Released: 26 January 2018
Originally Released: 14 December 2000
Developer: Nintendo
Original Developer: Game Freak
Also Available For: GameBoy Color

The Background:
I’ve talked before not just about Pokémon but also about how Pokémon: Gold Version and Pokémon: Silver Version (Game Freak, 1999) are my favourite games in the franchise. Thanks to the success of not just the first Generation of Pokémon videogames but also an aggressive multimedia strategy, Pokémon became an instant cultural phenomenon across the world, and yet the developers originally intended for Pokémon: Gold and Silver to be the final entries in the series. The sequels immediately sought to improve upon the gameplay, graphics, and mechanics of the first games; developed exclusively for the GameBoy Color, the game would feature a greater colour palette, backwards compatibility with the previous games, a real-time internal clock, and one-hundred new Pokémon to collect and battle (in addition to two new Types, Dark and Steel). Although many of these Pokémon were dropped, or significantly redesigned, during the game’s development, Nintendo offered the otherwise-inaccessible Celebi as a promotional extra and Pokémon: Gold and Silver were highly anticipated by me, personally, thanks to the new Pokémon cropping up in the anime and movies.

Anticipation was high for all-new Pokémon videogames thanks to the anime and the franchise’s popularity.

This Generation stands out for me for including things like a day/night cycle, breeding, and including the entire region of Kanto as post-game content and, like Pokémon: Blue and Red, Pokémon: Gold and Silver were not only highly praised at the time but also soon followed by a third entry, Pokémon: Crystal. While essentially the same game, Pokémon: Crystal was a trend-setter for the franchise, allowing players to choose the gender of their avatar, including partially animated battle sprites, featuring a whole additional side-story revolving around Suicune and the Unown, and debuting the ever-popular Battle Tower for players to further test their mettle. Again, thanks to Pokémon’s popularity and including additional elements as an incentive for a further purchase, Pokémon: Crystal was well received upon release and has been noted as one of the best Pokémon games. Many elements from Pokémon: Crystal became series staples in subsequent releases, and featured prominently in the Gold and Silver remakes, and the game was later released on the 3DS Virtual Console with the Celebi event included as standard.

The Plot:
The time has come to receive your first Pokémon from Professor Elm and challenge the Gym Leaders and Pokémon of the Johto region. However, your journey is disrupted by your mysterious rival, who stole one of Professor Elm’s Pokémon, and the villainous Team Rocket, who seek to return the group to their former glory. Things are further complicated when you cross paths with Eusine, who has made it his life gal to earn the respect of the legendary beast Suicune.

Gameplay:
As I said, I regard the second generation of Pokémon games as my favourite in the franchise; I remember going out of my way to get Pokémon: Blue when it first came out, and then snapping up Pokémon Yellow Version: Special Pikachu Edition (ibid, 1998) simply because of how popular the franchise was, and me and my friends were so eager for new Pokémon games that we readily downloaded barely-translated ROMs of Gold and Silver just to experience them. I had Pokémon: Silver back in the day, but always wanted Pokémon: Gold and never had the chance to play Pokémon: Crystal as I was firmly into collecting for the Game Boy Advance by then, so I jumped at the chance to get it before the 3DS Virtual Console shut down for good simply because of how much I enjoyed Pokémon: Silver and Pokémon: HeartGold (ibid, 2009). Essentially, Pokémon: Crystal is the same Pokémon you know and love: the game is a top-down role-playing game (RPG) in which players get to first pick their gender, name their avatar, select from three starter Pokémon, and embark on a journey to raise a well-balanced team, challenge the Johto Gym Leaders, and take on the Pokémon League. As was the style at the time, Pokémon: Crystal isn’t prone to holding your hand; you can talk to non-playable characters (NPCs) for clues, tips, lore, and some instructions but you’re mostly left to your own devices, though the game often bars your progress behind impassable objects like trees, bodies of water, or battling trainers that can only be bypassed by defeating Gym Leaders or acquiring Hidden Machines (HMs). As before, Pokémon: Crystal utilises an extremely simple control scheme that lets you organise your party, equip and use items, and save your progress or alter settings quickly and easily, and the user interface is vastly improved over the last games, with your pack now divided into pockets for key items PokéBalls, and healing items and even lets you set an item to the ‘Select’ button for quick use.

Pick your Pokémon and head out into Johto to tackle a whole new crop of Trainers and challenges.

As ever, gameplay is divided into exploring the overworld and one-on-one battles against wild or trainer-owned Pokémon. On the overworld, you’ll chat to NPCs with A, activate switches and pressure pads, and pick up items; if you walk into grass, caves, or surf on water, you’ll soon encounter a wild Pokémon, which switches the game to a battle screen where you and your opponent take turns to inflict damage or status effects on each other, or use in-battle items to heal or relieve status effects or try and capture the Pokémon. You can also run from wild Pokémon (as long as you’re a higher level), but not from a Trainer battle, and many wild Pokémon can also now flee from battle, which can make capturing them trickier. Pokémon battles are dictated by a “Type” system that’s basically a version of Rock/Paper/Scissors; Water-Type Pokémon inflict greater damage against Fire-Type Pokémon, for example, while Grass-Types trump Water and are weak to Fire. There are now seventeen different Types of Pokémon in the game, with Dark- and Steel-Types adding an extra dimension to battle as the previously all-powerful Psychic-Type Pokémon now have a formidable weakness in Dark-Type Pokémon and moves. While some moves, like Bite, have changed Type to align with this new system, it’s all pretty simple to figure out thanks to battle text informing you when moves are “Super effective” or “Not very effective” and external factors like your location, wild Pokémon names, and their colouring and appearance cluing you in on the best attack strategy. If you’re fishing in the sea, for example, and hook a Qwilfish (which is blue, clearly identified as a fish), it’s pretty obvious that you need to use a Grass- and Electric-Type to inflict maximum damage. At the beginning, you can pick between three different Pokémon, a Fire-, Grass-, or Water-Type, and I recommend keeping them in your party and five to ten levels higher than the rest of your team simply because they are your first Pokémon. You can choose to give this Pokémon, and any others you catch (but not ones you acquire via trading) a nickname to personalise them, and you’ll you can swap around your Pokémon’s moves at any time either in-battle or from the pause menu, or swap or release them from the PCs found in Pokémon Centers.

Level-up to become stronger, and make use of the game’s new evolution methods to discover new Pokémon.

To ease you into the game, early wild Pokémon and Pokémon Trainers are all at low-levels and you’re usually always at an advantage because your Pokémon have higher stats. Winning Pokémon battles will award your Pokémon with experience points (EXP); earn enough, and your Pokémon will level-up, which will increase their Hit Points (HP), Attack, Defence, Speed, and Special stats (now split into Special Attack and Special Defense) and thus make them more powerful. One of the best quality of life improvements in Pokémon: Crystal is the addition of an in-battle EXP progress bar so you can easily keep track of your Pokémon’s progress, and you can swap out Pokémon in battles to share EXP and level them up faster, which you’ll want to do as it’s helpful (though not necessarily necessary by any means) to have a diverse team with decent Type coverage. Don’t level-up too fast, though, as your Pokémon will disobey you if they’re too high a level and you don’t have the appropriate Gym Badge. I like to circumvent this by grinding between Gym battles; by keeping my main Pokémon five to ten levels stronger, but a few levels below the level cap, it can ensure that I’m always stronger enough for the next battle, though I did notice that I was spending more time grinding between Gyms than in my Pokémon: Yellow playthrough. Pokémon will learn new moves from levelling-up, or from Technical Machines (TMs), and it’s recommended to give your Pokémon moves that play to their strengths (if they have a high Attack stat, for example, you don’t really want to have moves that are all Special Attacks) and go against their Type (teaching Poison-Type moves to Grass-Type Pokémon, for example) so they have greater Type coverage in battle. In addition to the untrackable Effort Value (EV) points (earned by consecutively battling certain Pokémon, so defeating a bunch of Hoothoot in a row will boost your HP stat by one point), Pokémon: Crystal also introduces a hidden “Happiness” stat. the more you travel with, use, and care for your Pokémon, the happier it will become; you can boost this stat by grooming them and feeding them Vitamins (which also boost individual stats) or equipping them with certain items in order to max out their Happiness and trigger their evolution.

You can shrug off status effects with Berries, and new HMs offer more exploration options.

As before, battles and gameplay are as hard as you make them; if you don’t bother levelling-up a diverse team, then battles will eventually become harder to win. You can avoid a Trainer battle by staying out of the sight line of Trainers, but I recommend battling every Trainer you come up against to strengthen your team and earn PokéDollars, and some Trainers will even give you their phone number and call you with tips or for a rematch. Trainers are much more capable this time around; not only do they have all the same options as you when it comes to swapping and healing their Pokémon, but they also don’t have to worry about running out of Power Points (PP). Pokémon can still only know four moves at a time, so you’ll have to either replace an existing move to learn a new one or visit the Move Deleter to do this outside of levelling-up or to forget HM moves, and each move has a certain number of PP. When you’re all out, you can’t use that move anymore and will eventually either have to use “struggle” (which inflicts recoil damage to you), replenish PP with a Berry or Elixir, or restore your Pokémon at a Pokémon Center. If you’re not careful in battle, your Pokémon will end up “fainting” when their HP is drained and, if all your Pokémon faint, you’ll “white out”, lose some money, and respawn at the last Pokémon Center you visited. As before, you also need to be wary of status effects, which can cause Pokémon to flinch (basically miss a turn), become confused (often resulting in them hurting themselves), miss their attacks, fall sleep or become paralysed or poisoned (which also drains HP when on the overworld), burned, or frozen. While some attacks and items will also boost your stats and your chance at inflicting greater damage with a “Critical Hit”, Pokémon: Crystal features far more moves that power up and negate certain Types, like Sunny Day and Rain Dance buffing Fire- and Water-Types, respectively. You can undo these status effects using certain items, and can have your Pokémon hold Berries that they’ll automatically eat when inflicted with a status effect or at low HP or PP to help them shake off these debilitating effects.

New mechanics and quality of life improvements make the game much more fun to play.

Victory in Trainer battles earns you PokéDollars to spend in PokéMarts and at vending machines on healing items, hold items, Vitamins, single-use power-ups, and other useful gear to help you in battle or with raising your Pokémon. Items and Pokémon can be stored in PCs when required (you can still only have six Pokémon at a time, so any additional Pokémon are automatically transferred to your PC) but you can choose to have your mother save some money for you, which will award you with extra items and toys to furnish your bedroom with. Although you still only get one save file, you can manually save your progress at any time on the overworld and I recommend saving frequently, and especially before Gym Leader battles or encounters with Legendary Pokémon so you can reset if you make a mistake. Just like before, you need to defeat eight Gym Leaders to earn their badges and challenge the Pokémon League while also working on completing Professor Oak’s PokéDex by capturing Pokémon. The PokéDex has also received an upgrade, making searching for and viewing Pokémon much easier, but you’ll still only be able to fully complete it by trading with Gold, Silver, and even the Generation One games using the “Time Machine” function and by evolving Pokémon through battle, raising their Happiness, using special stones, or by trading (often now with them holding a special item). You can manually cancel some evolutions, and even have Pokémon hold an Everstone to suppress their evolution, which is sometimes recommended as Pokémon learn moves faster in their weaker forms and some moves can only be learned prior to evolution. Another new feature in this game is breeding; each Pokémon is either male, female, or gender neutral and you can leave two Pokémon at the Day Care to be raised outside of battle or, if they’re compatible, breed either a pre-evolution like Pichu and Igglybuff or a slightly stronger version of an existing Pokémon with moves they wouldn’t normally learn. When Pokémon breed, you’re given an egg; these eggs will hatch after you’ve taken a certain number of steps or cycled a certain distance, and breeding can be a great way or filling up the PokéDex quickly alongside regular battling, though you won’t be able to breed Legendary Pokémon and some take longer to produce an egg than others.

Of all the side quests, the one involving Suicune is the most prominent.

A Pokémon’s gender is clearly visible next to their name in battle, and a further quality of life feature is that you’ll see a little PokéBall next to a wild Pokémon’s name to indicate that you’ve caught it, and the game is littered with similar helpful additions mainly tied to your PokéGear. This device houses your map, phone, and a radio which lets you listen to shows offering tips or music that will either wake up Pokémon or put them to sleep and allow you to track the mysterious goings-on at the Runs of Alph. Here, you’ll investigate strange symbols and encounter the useless Unown, though there are slide puzzles to play here and twenty-four different variations of this Pokémon to find and record for a nearby scientist. Your progress is again restricted by trees, water, and dark caves, but now you also have to content with waterfalls and whirlpools. You can again get past these obstacles with HMs, which again double as faster ways of traversing the map: Fly, for example, lets you fly to any Pokémon Center on the map, but you can also use Dig to quickly exit caves (especially useful when you’re out of Escape Ropes), Teleport to warp to exits, and acquire a bicycle (but, sadly, not a skateboard) to dramatically increase up your movement speed. Many of the same minor puzzles return from the last game, meaning you’ll be pressing switches or pushing boulders or using teleport pads to get around, though you’ll also encounter slippery ice, a strange plant that can only be moved using a special water bottle, and numerous instances where the local Gym Leader is either busy with another task or won’t battle you until you’ve complete a side quest. These primarily involve the returning Team Rocket, who have been cutting the tails off Slowpoke, take over the radio tower, and steal vital components from the Kanto power plant. When team Rocket is in town, you’ll need to clear them all out to make the Gym and other areas accessible, but you’re also hounded by your rival, a red-haired boy who stole a Pokémon from Professor Elm and is obsessed with power. Other side quests include searching for a Farfetch’d in Ilex Forest, competing in a bug-catching contest, fetching medicine for a sick Ampharos, feeding Berries to a poorly Miltank, exploring Dragon’s Den, and capturing a strange Gyarados at the Lake of Rage. This will most likely by your introduction to “Shiny” Pokémon, extremely rare palette swaps of Pokémon that occasionally appear in battle. Perhaps the most prominent side quest here involves the Legendary Beasts, specifically Suicune; the three beasts are released into the wild early into the game but, while you’ll randomly encounter Entei and Raikou while wandering around and be left tearing your hair out as they constantly flee from battle, you’ll come across Eusine in his search for Suicune as you journey around Johto and eventually be able to tackle the elusive beats one-on-one to add it to your collection.

Graphics and Sound:
Obviously, Pokémon: Crystal is still going to be noticeably limited compared to later games in the series, but the improvements between this game and not just the first generation but even Gold and Silver are pretty impressive. I never thought of the Game Boy Color as being an especially powerful device compared to the original Game Boy, but this game is huge compared to the first games, with a vibrant colour palette that is far more detailed than what we saw in the first games. Towns and routes are much more visually interesting, with grass and trees and plants swaying and bobbing as you explore, the town and route names popping up onscreen, and a distinctly Japanese aesthetic to the far more impressive interiors of buildings. All of the sprites have been given a complete makeover, meaning overworld sprites and battle sprites are far more diverse and detailed; there are new Trainer classes available in the game, new animations for the PokéBalls, and not only a bunch of new moves added to the game but much more interesting and visually exciting attack animations, with more frames and colours being utilised to really make the most of the Game Boy Color’s capabilities. Although you can’t have a Pokémon follow you around like in Pokémon: Yellow, Pokémon now have little animation frames when they appear onscreen, sparkle when they’re Shiny, and even their menu and HM sprites have been overhauled to make them more distinctive.

It’s amazing how much better Pokémon looks, sounds, and plays on the Game Boy Color hardware.

While Johto’s towns and areas aren’t really all that different from Kanto’s, and are probably a little less visually diverse than I’d like, there’s still some fun locations to explore here. Goldenrod City has a Game Corner and a large PokéMart like Celedon City, but also an underground passage, a radio tower, an ice cave, and the Magnet Train which can allow swift access to and from Johto to Kanto; structures like Bellsprout Tower, Burnt Tower, and Tin Tower are not only great places to train ut also key to catching the game’s Legendary Pokémon; and you can even explore a lighthouse (which is full of holes to fall down) and the entirety of Kanto! Perhaps the biggest new feature in this generation was the inclusion of a day/night cycle; at the start of the game, you set the date and time and, as day turns to night, the palette changes accordingly and this even affects the evolution and appearance of some Pokémon. Different NPCs and events will also happen on certain days, and noting the date and time is essential for completing the PokéDex and acquiring certain items. Although the game is bolstered by some jaunty, memorable little chip tunes and Pokémon cries are much improved, the sound is still a bit of a weak spot here; you can tune into different radio channels to change the music though, which is fun. While your pack is far easier to navigate, its capacity is still limited, but storing and retrieving items is much easier this time around, as is rearranging the order of items in your pack, and you can interact with far more on the overworld: Berry plants, Pokémon blocking your path, and even certain trees can all be interacted with to pick-up items or trigger a battle, and you can again use the Itemfinder to seek out hidden items. Like in Pokémon: Yellow, Pokémon: Crystal features an all-new intro sequence, this one focusing on Suicune and the Unown, and you can even choose to play as a girl if you like (though this has no impact on the gameplay other than changing your sprite).

Enemies and Bosses:
In your quest to conquer the Pokémon League, you’ll battle a wide variety of Pokémon both in the field and in use by various Pokémon Trainers. Wild and Trainer Pokémon begin at low levels, generally between three and six, but get progressively stronger as you advance to new areas and when you’re called for a rematch, which will help you to grow stronger on a rising curve. Your ability to weaken these Pokémon for capture or defeat them is directly tied to your Pokémon’s current level and moves; if your Pokémon is weak and only knows moves like Bubble and Leer or bring an Electric-Type into a forest or a Bug-Type into a cave you’ll struggle to advance. The same applies to Pokémon Trainers; they start off using one or two weak Pokémon like Sentret and Spinarak but eventually use more formidable and evolved Pokémon. They’ll also withdraw them, heal them, or buff them with items and, while you can exploit the enemy A.I. at times, Pokémon Trainers tend to use moves that have a Type advantage over your current Pokémon. Pokémon: Crystal introduces new moves that can prolong or frustrate battles as well; Protect will render your next attack useless, Spikes will damage any Pokémon you send into battle, and some moves, like Dynamic Punch, not only hit hard but also inflict confusion on their victim. Still, with enough grinding and a diverse team, you can easily overcome every opponent you face; simply take some time between Gym battles to level-up, develop specific stats if that’s your jam, and bringing your team as close to the level cap as possible, utilising moves that are super effective and sharing EXP wherever possible, and you can easily trample over the opposition once you’ve gotten past the uphill battle at the start of the game.

Team Rocket are back and you’re hounded by an arrogant rival with a superiority complex.

After being absent for a few years, Team Rocket has come back but they’re far less of a threat than in the first generation; these nefarious individuals are easily identified by their black attire and caps and will impede your progress until you’ve cleared them out of towns, towers, and buildings. When exploring their hidden base in Mahogany Town, you’ll be constantly beset by the gang when you walk in front of security cameras, though Pokémon League Champion Lance is on hand to help you out by healing your team. When you encounter them in the radio tower, you’ll have to battle a Rocket Executive posing as the tower’s director, and they’ve been cutting off Slowpoke tails to sell them earlier in the game, but Team Rocket’s grunts really aren’t much of a threat and tend to stick to common Pokémon like Rattata, Muk, and Zubat. In comparison, your rival is much more malicious than Blue from the last game; this guy (often dubbed “Silver”) is not just rude, arrogant, and obsessed with training only the most powerful Pokémon, but also a conceited bully, pushing you away and past you and refusing to help fend off Team Rocket since it doesn’t suit his goals. Unfortunately, the rivalry between you isn’t as big of a factor as in the last game; the rival pops up at various points throughout the game, but it’s easy to forget he even exists and he doesn’t even end up being the Pokémon League Champion, which is a shame as it would’ve been easy to have him be the mastermind behind Team Rocket’s return and maybe tie him into the Ruins of Alph and Suicune sub-plots. Your rival will steal whatever starter Pokémon has a Type advantage against yours (in my case, he took Chikorita) but eventually expands his team to include Sneasel, Golbat, Magneton, Alakazam, and Gengar to give him good Type coverage across the board. However, a diverse and high-levelled team can easily send him packing in every encounter; in my playthrough, I barely even needed to swap my Pokémon out between each round thanks to teaching my Feraligatr Bite, Ice Punch, Surf, and Dynamic Punch and going into every encounter at least ten levels higher than him, making him a visually interesting but hardly challenging successor to Blue.

You’ll occasionally need to complete some side quests or solve a puzzle to battle the Gym Leaders.

A whole new world to live in means eight all-new towns and eight new Gym Leaders to battle, each specialising in a specific Pokémon Type and often (but, oddly, not always) protected by a number of protégés and some light puzzles, such as a maze, obscured path, or the pushing of boulders. Other times, Gyms will be empty, locked, or otherwise barred and you’ll need to complete a side quest to gain entry. While you don’t have  to fight the Gym Leader’s minions, I recommend it so you don’t miss out on some EXP and cash, and it’s again recommended to have a diverse team on hand (though you can often helpfully find wild Pokémon nearby that can counteract the Gym’s specialty). Your first challenge is Falkner, who uses Flying-Type Pokémon; as long as you don’t have a Grass-Type on hand and, honestly, why would you?) this isn’t anything to worry about and you can improve your chances by taking a slight detour and catching a Ground-Type Phanpy. Bugsy is a walk in the park if you have a Fire-Type, though I felt the pinch against his Scyther’s Fury Cutter since I opted for Totodile instead of my usual Cyndaquil. Most players run into a brick wall when faced with Whitney and her Miltank, which can deal increasingly more devastating damage with its Rollout attack, but I honestly had no trouble besting it was a Level 28 Croconaw using Bite and Ice Punch (though a Fighting-Type Pokémon or moves are your best bet against her). Neither Morty or Chuck are much of a challenge either since you can take both out with Psychic-, Dark-, and Electric-Type moves, while Fire- and Water-Types are your best bet at taking out Jamsine’s Steelix. Electric- and Fire-Types will also allow you to make short work of Pryce’s Ice-Type Pokémon (indeed, the hardest thing about him is skidding about on the icy floor of his Gym) and, while Clair’s Dragon-Types can be intimidating and easily paralyse you, they’ll also fall pretty quickly if you have Ice-Type Pokémon or moves on hand. Defeating each Gym Leader awards you a badge that increases the game’s level cap, powers up certain stats, and allows you to use HMs outside of battle to reach new areas, and also awards you some useful TMs, like Dynamic Punch and Shadow Ball, but take care after defeating Whitney as you won’t immediately earn her badge and must talk to one of her underlings to convince her to hand it over.

The best of the best await at the Pokémon League…unless you’re levels ahead of them…

Once all of the Gym Leaders are defeated, you’re ready to take on the Pokémon League. To reach the League, you need to use your HMs to navigate through Tohjo Falls and the cavernous Victory Road, where you’ll battle your rival once more and encounter some high-level Pokémon to help push your levels higher. You’ll want to make use of the makeshift Pokémon Center and PokéMart right before the Elite Four to heal up and maybe stock up on restorative items since you again need to battle all four Trainers, and the champion, consecutively to become the champ. Each of the Elite Four has a full team of Pokémon, with a general speciality in mind but also Type coverage to keep you on your toes; your first challenge is Will, who uses Psychic-Type Pokémon but, thankfully, these are dual-Types so you can use Dark-, Ghost-, Electric-, and Fire-Type moves to easily cut through his Pokémon, though you could be caught off-guard by confusion or freezing if you’re not careful. Next up is Koga, upgraded from a Gym Leader to one of the Elite Four and still rocking the Poison-Types, making him easy pickings for your Ground- and Flying-Type attacks. The only member of Elite Four to return from the first generation is, ironically, one of the weakest of that game, Bruno. Though he’s got a bigger, more diverse team, he’s still a Fighting-Type specialist so you can easily best him with Psychic-Type moves. These are slightly negated against Karen, however, since she has Dark-Types on hand but, again, her Pokémon are dual-Types so you can balance things out with Fire- and Water-Type Pokémon. Your final challenge is against Lance, the Dragon-Type expert who’s now the Pokémon League Champion. Lance is easily the toughest Trainer battle so far…on paper, at least…since he has three Dragonites and even fan favourite Charizard on his team. However, but this point my Feraligatr was way overpowered and I managed to sweep his whole team using Bite, Surf, and Ice Punch without any issue. Toppling the Elite Four sees you and your team again entered into the Hall of Fame and declared Pokémon League Champion; you can battle the Elite Four again and again to earn more cash and level-up your team, but you’ll find challenge enough awaiting you in the post-League content.

Some of Kanto’s Gyms have undergone a bit of a reshuffle, with Blue installed as your final opponent.

Becoming the Pokémon League Champion earns you a ticket to board the S.S. Aqua and travel to Kanto, where you can not only explore the entirety of the region from the first game, battling new Pokémon Trainers with higher-level Pokémon, but also take on the eight Kanto Gym Leaders once more! Because you start in Vermillion City, the order you battle the Gym Leaders is mixed up; some are missing their puzzles and protégés as well, and all have bigger, more diverse teams and, though you’ll earn their Badges and they’ll be added to your total, you can’t view these on your Trainer Card and only two of them will award you TMs after you beat them. First up is Lieutenant Surge, now rocking two Electrode and an Electabuzz alongside his signature Raichu, but he was nothing compared to my overpowered Donphan. I got a bit mixed up and fought Misty next, which you can only do after fighting past the Nugget Trainers and interrupting her date; while her Water-Type Pokémon don’t stand much of a chance against a good Electric-Type Pokémon, this won’t help you against her Quagsire so maybe switch to a Grass-Type instead. I battled Erika next, who can be frustrating with her tendency to use Full restore, cast Sunny Day, and her ability to drain HP from your Pokémon, but at this point my Feraligatr’s Ice Punch and Suicune’s Aurora Beam were more than enough to topple her. Koga’s daughter, Janine, now resides in Fuschia City’s Gym but she uses Poison-Types just like her dad so you can get past her in much the same way you did him, and Brock and Sabrina are similarly easily taken out using Water- and Dark-Types, respectively. Since Cinnabar Island was wrecked by a volcanic eruption, you won’t find much of anything there except a Pokémon Center and Blue, the Viridian City Gym Leader, who directs you to the similarly barren Seafoam Islands to battle Blaine. Neither Blaine nor Blue have any underlings to worry about and, while Blue’s team is as diverse and powerful as ever, yours should be more than up to the task of matching him blow for blow and recapturing the Kanto Gym Badges.

As if Red wasn’t tough enough, the Legendary Beasts will flee from battle and the new Birds take a lot of Balls to snag!

With these in your possession, Professor Oak allows you access to Mount Silver and the game’s most taxing challenge of all: a battle against Red, the protagonist from the first game, who’s well-rounded team not only has great Type coverage but is also in the high-seventies (with his Pikachu being the highest-level Pokémon you’ll face in the game at a whopping Level 81). While battling Red is tough in and of itself, it’s made all the more difficult by the fact that you need all the GMs to even reach him, meaning you’re at a severe disadvantage since you’re either down a couple of Pokémon to make room for a HM slave or have had to substitute better moves for HMs. Aside from red, there are some one of a kind Pokémon to find in the wild, too: Sudowoodo block your paths and need triggering with the Squirtbottle, you’ll need to tune into Kanto’s radio stations to awaken the Snorlax blocking your path, a Shiny Gyarados waits in the Lake of Rage, and you’ll encounter a wild Lapras in Union Cave’s basement every Friday. Although Kanto’s Legendary Pokémon are entirely absent (the power plant is now up and running, Seafoam Islands is a simple cave, Victory Road has been rearranged, and Cerulean Cave is inaccessible), Johto’s are literally out and about to find. Entei and Raikou will randomly appear in different areas of Johto, fleeing immediately (or using Roar to scare your Pokémon off) and forcing you to use the PokéDex to track them down and use moves like Spider Web and Mean Look just to have a chance at catching them, damage and status attacks you inflict will carry over even if they flee, however, but these two are still a massive headache to get a hold of and Pokémon: Crystal makes things unnecessarily difficult by forcing you to have caught all three Legendary Beasts to even spawn an encounter with Legendary Bird, Ho-Oh, atop Tin Tower. Conversely, one of my favourite Pokémon, Lugia, can only be fought at Whirl Islands after reaching Pewter City and acquiring the Silver Wing, and all of these Legendary Pokémon (and some wild Pokémon) can be a chore to catch unless you inflict sleep or paralyse and whittle them down to a slither of health as they just love to break out of PokéBalls and, unlike the last games, where you obviously used the instant-catch Master Ball on Mewtwo, it can be tough to decide which Pokémon to use your Master Ball on here (though I’d recommend Ho-Oh).

Power-Ups and Bonuses:
Both Johto and Kanto are littered with pick-ups to be found, gifted from NPCs, or bought from PokéMarts. All the same healing and restorative items from the last games return, such was Potions, Revives, Awakenings, and Antidotes, though you can now find various Berries that have the same function and can be held and automatically used by Pokémon in battle. As you progress, PokéMarts will start to sell more advanced items, like Hyper Potions, Max Revive, Escape Ropes, PokéDolls to help you flee battles, and likes of X-Attack for a one-time stat boost. Vitamins and evolutionary stones a far harder to find on the overworld, but can be bought from Goldenrod and Celadon City’s Department Stores and are great for raising individual stats and quickly evolving Pokémon, and you’ll also find Nuggets to sell for cash (and sell most items you find) and key items like the Itemfinder, EXP All, and various rods. Another new addition to the game are held items that give your Pokémon certain boosts and buffs; Quick Claw can make them move faster, fr example, while Amulet Coin will double the cash you earn and Leftovers will see them restore a little bit of health between every move. Many of these will increase the power of certain Types, such as Charcoal powering-up Fire-Types, and some are even needed to be held for Pokémon to evolve.

There are more items than ever before, and even your radio can help you out in a pinch.

As ever, you’ll need a steady supply of PokéBalls if you want to catch ‘em all; these again come in three purchasable types (regular PokéBalls, slightly better Great Balls, and even better Ultra Balls), with the Master Ball being a one-of-a-kind, never-fail PokéBall that is best saved for a Legendary Pokémon. You can also find Acorns in trees and, when you give these to Kurt in Azalea Town, he’ll turn them into one of seven new PokéBalls after a day of waiting: Level Balls make catching lower level Pokémon easier, Friend Balls increase a Pokémon’s Happiness stat faster, Lure Balls make it easier to catch Pokémon encounter while fishing, Moon Balls make it easier to catch Pokémon that evolve using a Moon Stone, Heavy Balls are best used against heavier Pokémon, Fast Balls can be useful against Pokémon like Entei and Raikou who like to flee from battle, and Love Balls increase your chances of catching Pokémon of the opposite gender to your own. Like last time, TMs can only be used once, while HMs can only be unlearned using the Move Deleter, and different Pokémon level-up, breed, and hatch at different speeds and at different times of the day; some don’t learn useful moves for some time, others don’t learn any decent moves at all (I’m looking at you, Unown!) or moves that boost their stats, which is useless to me as I prefer to fill my move slots with offensive moves. Some Pokémon also don’t evolve at all, which can lower the incentive on using them as you don’t see as much progression when battling with them, while other Pokémon have abilities like Sweet Scent that can attract wild Pokémon, and you can also have Pokémon hold various mails to send messages to other Trainers you trade with.

Additional Features:
Although Generation two added one-hundred extra Pokémon to the original 151, “only” 223 are actually obtainable within the base Pokémon: Crystal game so you’ll need to trade with Gold, Silver, Red, Blue, and/or Yellow in order to complete the PokéDex and fulfil Professor Oak’s life dream and earn yourself a nifty little certificate for you efforts. A lot of your post-game time and energy will be spent catching, raising, trading, and breeding Pokémon to fulfil this objective, and the day/night cycle and new additions to the gameplay mean you are given far more options to evolve and acquire Pokémon. As mentioned, you can store a limited number of phone numbers on your PokéGear and battle Trainers again when they call you, or travel to Viridian City and make use of the Trainer House to battle either a random challenger or the last human player you fought against, which remains a fun addition, and battles and trades such as this are a great way to extend the life of the game and motivate you to getting your team up to the maximum level. Also, you’ll be spending a lot of time in the Game Corners trying to buy or earn the coins necessary to get those elusive Pokémon and traipsing around Johto trying to lure out the Legendary Beasts, but this generation of Pokémon remains my favourite for its unmatched post-Elite Four content.

Travel to Kanto in the post-game, tackle the Battle Tower, and spawn in a Celebi to catch!

As mentioned, you get to travel to Kanto after becoming the Pokémon League Champion! This, effectively, doubles the timespan of the game but, while Kanto is now populated with much tougher Trainers than before, your team should be more than capable of winning the day. Still, I’ve always loved this feature, and Kanto is notably different, too; towns, caves, and routes have been switched about, new Pokémon are included, and certain areas are either inaccessible or altered, which really shows the flow of time since the last games. You can talk to Red’s mother in Pallet Town, where you find out he took off and hasn’t been seen in years, get the power plant back up and running so you can hop on the Magnet Train, and pay a visit to the new radio tower in Lavender Town, which replaces the haunted Pokémon Tower. Viridian Forest is now gone, as is Cerulean Cave, and Mount Moon is much shorter than before, but I loved seeing Blue installed as the Viridian Gym Leader and just being able to explore this region again and really wish that subsequent Pokémon games had done something similar. Pokémon: Crystal is also notable for being the first game to include the Battle Tower; located just off the coast off Olivine City, this facility lets you battle other Trainers and awards you Vitamins for consecutive victories. Though never really something I’ve enjoyed, the Battle Tower is a fun extra inclusion, and even offers level and Pokémon restrictions to keep you from using Legendary Pokémon. Best of all, though, is that the 3DS version of the game includes the GS Ball event, meaning you can place the GS Ball in a shrine at Ilex Forest to spawn the elusive Celebi and finally, legitimately, catch the little blighter!

The Summary:
I’ll be the first to admit that, when it comes to the second generation of Pokémon games, I’m extremely biased when it comes to these games. For me, this was when Pokémon was at its peak of popularity; we were so desperate to play these new games and so captivated by the new Pokémon and mechanics, and while I’ve enjoyed Pokémon games since these, none of them have quite been able to recapture the magic of Johto. Consequently, it was an absolutely joy to finally play through Pokémon: Crystal; the game is such a massive step up from its predecessors, improving and refining basically everything from the first game and adding much-needed quality of life mechanics like the EXP bar, better item and Pokémon management, and vivid, impressively detailed graphics for such a basic handheld system. The new features offered in this generation were also fantastic; the day/night cycle was a fun little inclusion, one I missed from the Game Boy Advance titles, and adding breeding really helped to speed up PokéDex completion as you could raising Pokémon traditionally whilst also getting in the steps to hatch and egg and get Pokémon to breed all at the same time. Adding the ability to rebattle previous Trainers was great too, though the constant interruptions from phone calls does get annoying; while I love the aesthetic, detail, and colour of the game, I have to admit that Johto doesn’t really stand out all that much and is basically like a reskin of Kanto for the most part, but Pokémon: Crystal adds a few extra bells and whistles to compensate for that. Animating the Pokémon, for starters, really helps to make the game feel much more alive, as do all the additional attacks and battle animations that help the game feel faster, more action-packed, and less like a Tiger Electronics LCD game like in the first generation. Being able to play as a girl was a nice inclusion, as was the attempt to expand on the Legendary Beasts by giving Suicune a larger role, but ultimately these aspects and the rival system weren’t as prominent as they could’ve been. Thankfully, the new Pokémon more than make up for this, with some of my all-time favourites being found in Johto (Ampahros, Lugia, Houndoom, Typhlosion, and Marill, to name a handful), and I loved seeing how the world has changed since the last game. Of course, this is best seen in the still-unmatched post-game content; letting you travel to, explore, and challenge Kanto once more was an ingenious idea and makes the game feel so much bigger than even some of the Nintendo DS titles, which generally settled for the Battle Frontier and little else. Add to that the tough-as-nails battle against Red, the ability to trade to the previous generation, and the addition of Celebi to the game and you have what very well may be the definitive version of classic Pokémon for me.

My Rating:

Rating: 5 out of 5.

Fantastic

Are you a fan of Pokémon: Crystal Version:? How do you think it compares to the original games and which of the second generation titles was your favourite? What did you think to the new mechanics introduced here, like breeding, genders, and the day/night cycle? Did you struggle against Whitney and her Miltank? What did you think to the rival? Did you enjoy getting to revisit Kanto and did you ever capture Entei and Raikou? Which of the Pokémon games, and titular monsters, is your favourite? How are you planning to celebrate National Pokémon Day this year? Whatever your thoughts on Pokémon, sign up to leave them below or drop your comments on my social media and be sure to check in next week for more Pokémon content!

Game Corner [PokéMonth]: Pokémon Yellow Version: Special Pikachu Edition (Nintendo 3DS)


Upon the release of Pokémon: Blue Version and Pokémon: Red Version (Game Freak, 1996), a new craze swept through playgrounds across the world. An entire generation grew up either playing Pokémon, watching the anime, playing the trading card game, and watching the feature-length movies as clever marketing and a co-ordinated release and multimedia strategy saw Nintendo’s newest franchise become not just a successful videogame franchise but a massively lucrative and popular multimedia powerhouse that endures to this day. Accordingly, February 27th is now internationally recognised as “National Pokémon Day”, which I’m expanding to an entire month of Pokémon every Tuesday in February.


Released: 27 February 2016
Originally Released: 12 September 1998
Developer: Nintendo
Original Developer: Game Freak
Also Available For: Game Boy

The Background:
Although I’ve talked about Pokémon quite a bit in the past, a review of one of the classic titles is long overdue. Initially developed as Capsule Monsters, Pokémon was the brainchild of game designer Satoshi Tajiri, who spent his childhood collecting insects and sought to make a videogame around the same subject, one that emphasised exploration and collecting rather than needless violence. It was the legendary Shigeru Miyamoto who suggested producing two GameBoy cartridges to realise Tajiri’s dream of allowing players to trade and battle using the system’s Link Cables. Artist and long-time friend of Tajiri Ken Sugimori spearheaded the designs of the titular Pokémon alongside a handful of others (including Atsuko Nishida) than ten people who conceived the various designs for all 151 Pokémon, and the original Pocket Monsters: Red and Green proved an immediate hit in their native Japan and were soon followed by a third version, Pocket Monsters: Blue, which included upgraded sprites, alternative dialogue, and other gameplay tweaks. This was the version of the game that served as the basis for Pokémon: Blue and Red, which became an instant cultural phenomenon upon release in the West.

Just as Pokémon: Yellow was influenced by the anime, so too did it impact later Pokémon videogames.

For its international release, Pokémon was accompanied by an aggressive multimedia marketing strategy and ancillary merchandise; much of this revolved around franchise mascot Pikachu, who was at the forefront of the still-ongoing anime series, which served as the perfect accompaniment to the videogames. So popular was Pikachu, and the anime, that a fourth version of the game was produced to capitalise on both; Pokémon: Yellow Version not only featured all-new battle sprites and gameplay mechanics, but also contained characters, references, and alterations based on the anime. The game was made to coincide with the franchise’s first feature-length adventure, was the last Game Boy title released for the system outside of Japan, and became the fastest-selling handheld game of all time upon release. Because it was essentially the same highly praised videogame as before, Pokémon: Yellow Version was highly praised; while some questioned its release and viability considering all-new Pokémon games were set to be released, critics noted that the game offered just enough to keep fans and newcomers happy. Pokémon: Yellow Version was pretty influential; the gameplay mechanic of having a Pokémon following the player’s avatar around would return in later titles, the game received a manga adaptation, and it was eventually released on the 3DS Virtual Console with the ability to communicate with the then-current Pokémon titles.

The Plot:
The time has come for you and your childhood rival to receive your very own Pokémon from Professor Oak, However, you arrival too late and are lumbered with a disobedient Pikachu to accompany you as you challenge the eight Kanto Gym Leaders in a bid to become a Pokémon Master. Your journey is also fraught with danger as the vindictive Team Rocket seeks to steal Pokémon for their own nefarious ends, to say nothing of having genetically created the most powerful Pokémon of all!

Gameplay:
Just like its predecessors, Pokémon Yellow Version: Special Pikachu Edition is a top-down role-playing game (RPG) in which players are introduced to the wonderful world of Pokémon by the kindly, if forgetful, Professor Oak. After naming your avatar and your rival, you’re charged with heading out into the Kanto region, exploring fields, caves, and buildings in search of Pokémon, powerful native creatures that are used to trade, raise, and battle with other Pokémon Trainers. If you’ve played Pokémon: Red, Blue, or even Green before, you’ll be immediately familiar with the concept but, even though it lacks the influx of hand-holding and mandatory tutorials of the modern games, Pokémon: Yellow does a good job of introducing you to the context and mechanics of the game and then sending you on your way to figure things out for yourself or find clues by chatting to the many non-playable characters (NPCs) scattered throughout Kanto. Since it released on the Game Boy, Pokémon: Yellow has a very simply two-button control system and user interface; I say “simple” for this latter aspect as it’s both easy to navigate and incredibly restrictive. You can open your bag to view your inventory from the pause screen, and your items will be listed in the order you picked them up; you can shuffle them about using the ‘Select’ button but your inventory is limited, so you’ll need to deposit some items on your PC to make room. Your PC inventory is similarly arranged; everything’s in a list here and there’s no onscreen text to tell you what items do, so it can be a little tricky to navigate and figure things out at times. Gameplay is divided into two distinct modes: exploring towns and other areas, and battling Pokémon. In the former, you wander around on a four-way grid, chatting to NPCs with A, activating switches, and picking up items; if you enter grass, you’re very likely going to trigger an encounter with a wild Pokémon, who also spontaneously attack in caves and when traversing the sea. When this happens, the game switches to a battle screen in which you and your opponent take turns to inflict damage or status effects on each other, or use in-battle items to heal or relieve status effects or try and capture the Pokémon. You also have the option to run, however if the opposing Pokémon is at a higher level than yours or you’re in a Trainer battle this option is either limited or completely restricted.

A diverse team with wide Type coverage is key to besting your opposition and growing stronger.

Pokémon battles operate using a “Type” system that is, essentially, a version of Rock/Paper/Scissors; Water-Type Pokémon will be more effective against Fire-Type Pokémon, for example, while Grass-Types trump Water and are weak to Fire. There are fifteen different Types of Pokémon in the game and each has different capabilities against the other; Normal-Type Pokémon moves won’t have any effect against Ghost-Types and will barely touch Rock-Types, for example. It’s a pretty simple system to figure out and battle text will always tell you if moves are “Super effective” or “Not very effective” so you can figure out the best course of attack; location, Pokémon names, and their colouring and appearance can also clue you in on the best attack strategy, too. So, if you’re in a cave and encounter a Zubat, you’ll probably want to use an Electric- or Rock-Type attack to inflict maximum damage and if the opposing Pokémon is blue or encountered at sea, it’s mostly likely a Water-Type. Unlike in the previous games, you’re forced to start your journey with a Pikachu, one who refuses to stay in its PokéBall and who follows you around on the overworld. You can interact with Pikachu at any time and the game stresses treating it well so that it shows more affection towards you, though unlike in the modern games this has no real in-game benefits and you can just as easily deposit it in a PC and never use it. Having Pikachu is an issue in the early game as your first real challenge is Rock-Type Pokémon Gym Leader Brock, so you’ll need to explore the nearby towns and fields to catch a Fighting- or Grass-Type Pokémon to actually stand a chance against his Pokémon, but the game has a pretty consistent difficulty curve. Early wild Pokémon and Pokémon Trainers are all low-level Pokémon with limited moves, and you’re generally always at an advantage as your Pokémon usually always have higher stats. Pokémon battles will award you with experience points (EXP); earn enough, and your Pokémon will level-up, which will increase their Hit Points (HP), Attack, Defence, Speed, and Special stats and thus make them more powerful and more capable in battle. Unlike in later games, there’s no onscreen indication of your EXP progress unless you manually head into the menu screen, which can make levelling-up a bit of a chore.

Be mindful of the nearest Pokémon center as you’ll need them to heal from battles and status effects.

While you can get pretty far with just one or two powerful Pokémon, it’s recommended that you have a diverse team with decent Type coverage in their moves; many Pokémon can learn moves either from levelling-up or from Technical Machines (TMs) that are of a different Type, so you can have a Water-Type Pokémon bust out Ice- or Psychic-Type moves, which can make them more useful in battles, and you can both swap out your Pokémon to share the EXP gained from battles and earn hidden Effort Value (EV) points by consecutively battling certain Pokémon (so, for example, if you battle a bunch of Geodude in a row, you’ll gain an extra boost to your Defence when you level-up) and you can also find (or purchase, for an extortionate price) Vitamins that will boost individual stats. While it’s important to consider things like this in battle, and the moveset of your diverse team, it’s not always that necessary and is only as complicated as you make it; I usually settle for my starter Pokémon being about ten levels higher than my other Pokémon, then train up the rest in teams of two (usually Water/Fire, Electric/Psychic, and a wild card) to have a consistently strong team. If you walk in front of another Pokémon Trainer, they’ll initiate an inescapable battle with you; in a Trainer battle, you can’t run or catch the opposing Pokémon, and trainers have all the same options as you while not being limited by Power Points (PP). This means that they can swap out their Pokémon, heal or buff them, and they can attack without fear of running out of PP; each move has a different amount of PP, from five to thirty, which dictates how often you can use that move. When you run out of PP, you can’t use that attack anymore until you replenish it with an Elixir or restore your Pokémon at a Pokémon Center; if all your PP is drained, your only option is to “struggle”, which inflicts some serious recoil damage, so it’s wise to use your best moves sparingly. In battle, Pokémon will take damage; when their HP is drained, they’ll faint and need to be revived with a Revive or for free at a Pokémon Center but, if all of your Pokémon faint, you’ll “black out”, lose some money, and respawn at the last Pokémon Center you visited. You also need to be wary of status effects, however; some Pokémon attacks will cause you to flinch (essentially miss a turn) or become confused (which can cause your Pokémon to hurt themselves) and, in this version of the game, have a tendency to miss entirely or land “critical hits” for extra damage, but Pokémon can also be put to sleep, paralysed, poisoned, frozen, and burned, all of which will either drain your HP or leave you vulnerable to attack. You can undo these status effects using certain items, but even if you emerge victorious your Pokémon will still steadily lose health on the overworld if poisoned, so you’ll either need to keep your inventory well stocked or be mindful of the nearest Pokémon Center.

Level-up your Pokémon to evolve them, give them nicknames, or store them in Bill’s PC system.

Winning Trainer battles also nets you PokéDollars, which you can spent in PokéMarts and at vending machines on healing items and other useful gear to help you out in battle or in raising your Pokémon. Items and Pokémon are stored in PCs when you run out of room (you can only have six Pokémon at a time, so any additional Pokémon are automatically transferred to your PC, though you’ll need to heal them if you choose to use them) and the game allows you to manually save your progress at any time (though you only get one save file to use). I recommend saving frequently, and especially before Gym Leader battles or encounters with Legendary Pokémon as this allows you to reset the game on the off-chance that you’re defeated, thus sparing you from losing money. You’re given two primary goals in the game: Battle the eight Gym Leaders to earn their badges and challenge the Pokémon League and complete Professor Oak’s PokéDex, which you do by capturing every Pokémon in the game. When you encounter a Pokémon, its basic data is stored in this encyclopaedia so you can see where it appears on the overworld; you can then hunt it down and catch it and either try to capture its next form or “evolve” it by levelling-up, using special stones, or trading it. The majority of Pokémon will evolve into at least one extra form through levelling-up, which will add their new form’s data to the PokéDex and make them stronger; you can cancel evolution at any time by pressing B and this is sometimes recommended as Pokémon learn moves faster in their weaker forms and some moves can only be learned prior to evolution. Similarly, each Pokémon can only know four moves at a time; when it grows strong enough to learn a new move, you can choose to either replace an existing move or not learn the new one, but you’ll need to visit the Move Deleter to do this outside of levelling-up or to forget Hidden Machine (HM) moves. When you capture a Pokémon, you’re given the option of nicknaming it; again, this doesn’t really do anything beyond personalising them to your Trainer and your characters are limited, but it’s a nice touch for making your team unique.

Side quests, some basic puzzles, and some fun little mini games are on offer to spice things up.

Navigation in Pokémon: Yellow is pretty simple; you can get a town map early on (or view them in Pokémon Centers) that shows you the different towns, locations, and “Routes” you can travel, but your progress is constantly restricted by trees, bodies of water, dark caves, and patches of grass. You can climb ladders to reach different levels of caves, hop over ledges for shortcuts, and get past these obstacles with HMs but you’ll progressively earn more convenient ways to travel across the map. Pokémon like Abra can Teleport you back to the last Pokémon Center you visited, Escape Ropes will allow you to quickly exit any areas you’re in, you’ll acquire a bike that dramatically speeds up your movement speed, and you’ll eventually be able to fly and surf to quickly get around the overworld. Some areas will require some rudimentary puzzle solving, generally involving pressing switches (either hidden ones or by pushing boulders onto them) to open doors, teleporting using special pads, or spinning around in maze-like environments. You’ll also be given some fetch quests to complete that will open up new areas and gift you items, need to acquire keys and tickets to open doors or access locations, and be able to trade (or buy…) with NPCs to acquire new Pokémon. Trading can also be done in Pokémon Centers, which allows you to trade Pokémon with a friend (or battle them, if you like) to get Pokémon that aren’t in the game or evolve certain Pokémon, like Haunter/Gengar. Traded Pokémon level-up faster then regular Pokémon, though you can’t change their nicknames and they’ll always have the Trainer ID of their original Trainer. You also need to be mindful of levelling-up too quickly; if you’re Pokémon is too high a level, and you don’t have the appropriate Badge, they may disobey you by ignoring your commands or loafing around. In addition to the slot machines available to play in the Celadon City Game Corner and the Safari Zone in Fuchsia City (which gives you a time limit to catch rare Pokémonby baiting or angering them), Pokémon: Yellow also adds printer functionality for the Game Boy Printer and a cute little mini game that lets you net points by pulling of mad tricks with your surfing Pikachu!

Graphics and Sound:
Since it released on the original Game Boy, Pokémon: Yellow is pretty limited in terms of its graphics and visual presentation compared to later games in the series, but I think these early Pokémon games still did a really good job of making the most of their limited hardware. While most of the towns don’t really look that different, they vary in size and colour palette and all have a unique music track associated with them; some have larger buildings like the Celadon City Department Store, a science museum, and the haunted Pokémon Tower, while others are flanked by caves, bodies of water, or are literally islands in the middle of the ocean. Towns all contain a number of houses with NPCs to talk to, some of whom will give you hints, items, or side quests to progress further; Routes are sometimes blocked by trees or a sleeping Snorlax, and you’ll find fun elements to interact with, like a Super Nintendo Entertainment Systems (SNES) in your bedroom, Mr. Psychic, and Copycat. Routes are generally littered with Pokémon Trainers, grass, and items to find but some items are hidden from view; you can tap A to pick these up at random but an Itemfinder will help by emitting a beep whenever a hidden item is nearby, and HMs like Cut and Flash will make short work of trees, grass, and dark caves to help you progress.

Though essentially the same game, Pokémon: Yellow is bolstered by a new colour palette and new additions.

Sprites are all pretty adorable as well; while many NPCs all look the same, they have a lot of personality in the things they say and all have an appreciation or some kind of advice to give regarding Pokémon. Your avatar is clearly recognisable despite the limited graphics and colour palette, and you’ll always be able to spot your rival, Gym Leaders, and agents of team Rocket thanks to their unique sprites and accompanying themes. In Pokémon: Yellow, Pikachu is your constant companion, waddling around behind you on the overworld and spitting out a grainy, but ambitious, cry of “Pika!” when thrown into battle. Pikachu has unique entrance and exit animations in battle since it doesn’t use a PokéBall, but otherwise battles remain largely the same; limited animation frames are used to convey the impact of moves on Pokémon and the moves themselves are represented by the screen shaking, flashing lights, and partially animated sprite work that is largely reused over and over. You can actually turn battle animations off in the settings, which speeds the game up a bit, but takes away some of the fun in my opinion; still, the frame rate can struggle a bit at times both in and out of battle, and you’ll find the Pokémon cries are a little distorted because of the hardware. Pokémon: Yellow completely overhauls the in-battle sprites of the Pokémon and adds in numerous influences from the anime in the form of additional NPCs who gift you new Pokémon, Chansey’s being in Pokémon  Centers, and Jesse and James of Team Rocket fame, which helps add a little visual flair to the game but I really don’t care for many of the new battle sprite designs. Finally, all of the jaunty, memorable tunes are here to enjoy in all their chip-tune glory, and the game features a brand new intro video and theme tune as well.

Enemies and Bosses:
As you journey around Kanto, you’ll encounter a variety of wild Pokémon out in the field and in use by a number of different Pokémon Trainers. Wild Pokémon start off at a low level, usually between three and six, and stay at that level in each area; a level four Caterpie you encountered in Viridian Forest will stay level four when you return in the post-game, but wild Pokémon levels increase as you journey to new areas, meaning you’ll face progressively tougher opposition as you go on, which will help you to grow stronger on a rising curve. Your ability to weaken these Pokémon for capture or defeat them entirely is directly tied to your current level and the moves you know; if your Pokémon are under-levelled, you’ll face a tough time even with the Type advantage, but if you bring a Normal-Type into a cave or a Fire-Type to the sea then you may struggle even if you’re at a higher level. This is true of the Pokémon Trainers you encounter; while they start off pretty simple and use weak Pokémon like Rattata and Pidgey, they eventually use more formidable and evolved Pokémon and also have more on hand. They’ll also withdraw them, heal them, or buff them with items and, while the enemy A.I. can be janky and easily exploitable at times, Pokémon Trainers tend to use moves that have a Type advantage over your current Pokémon. Still, with the right training regime and a diverse team, you can easily overcome every opponent you face; simply take some time between Gym battles to level-up, maybe focus on developing certain stats, and bringing your team as close to the level cap as possible, utilising moves that are super effective and sharing EXP wherever you can, and you can easily trample over the opposition once you’ve gotten past the uphill battle at the start of the game.

As if Team Rocket wasn’t bad enough, your asshole rival constantly pops up to challenge you.

Your most persistent foes in the game are the nefarious Team Rocket; easily identifiable by their black attire and caps, this gang of Poké-nappers have taken over buildings and even entire towns in a bid to steal Pokémon for their own evil uses or to acquire technology like the Silph Scope and Master Ball. For the most part, Team Rocket grunts aren’t much different from other Pokémon Trainers you encounter and are actually fairly predictable as they stick to common Pokémon like Zubat and Ekans, but you’ll also have to battle the duo of Jesse and James a few times throughout the story as these buffoons have been added in as sub-boss battles in key areas of the game. Like their anime counterparts, Jesse and James use Koffing/Weezing, Ekans/Arbok, and Meowth in battle and even spout their famous catchphrase, though they’re basically just another grunt to fight past rather than being pivotal to the plot. Another recurring obstacle is your rival; this arrogant and rude little git will pop up at the worst times, challenging you to a battle to prove his superiority over you and changing up his team as the game progresses to show how he’s tried to amass the most powerful Pokémon team possible. Unlike in the previous games, your rival starts off with an Eevee, which he eventually evolves into either Flareon, Jolteon, or Vaporeon (in my case, it was Flareon), and your rival will be both the first Pokémon Trainer you battle and the last as he eventually manages to become the Pokémon League Champion in keeping with his annoying ability to always stay one step ahead of you. While your rival can be a tricky customer, a diverse and high-levelled team can easily fend him off; in my game, he ended up with a team of Sandslash, Alakazam, Exeggutor, Cloyster, Magneton, and Flareon so it’s simply a case of shuffling your team so that your Water-Type goes out first and then swapping out your Pokémon between each knock out so you can hit a super effective move or have a better chance to resisting his attacks. Probably his biggest advantage is speed, as he often has Pokémon that have higher Speed stats, his Type coverage, and his eventually use of Potions and buffs to keep his team going strong but you can overcome him at every turn if you just take the time to do some grinding.

Eight Gyms await you, some with puzzles to solve beforehand, but they’re easily bested with grinding.

In your quest to challenge the Elite Four, you’ll need to travel to at least eight different towns and battle the eight Kanto Gym Leaders. Each Gym Leader specialises in a specific Pokémon Type and is protected by a number of protégés, but some Gyms even include little puzzles that you have to solve. You’ll need to investigate the bins in Lieutenant Surge’s Gym to lower the electrical barrier protecting up, navigate an invisible maze in Koga’s Gym, take an optional quiz in Blane’s Gym, and travel along spinning pads in Giovanni’s Gym. Other times, Gyms will be closed, locked, or otherwise barred and you’ll need to go on a short (or long, in the case of the last Gym) side quest to gain access but, once inside, you can often choose to avoid fighting the minions if you don’t feel like it (but I don’t recommend this as you’ll miss out on some EXP and cash). Since each Gym specialises in a Pokémon Type, the game pushes you to have a diverse team on hand, but you can often find helpful Pokémon in the wild nearby that can counteract the Gym’s specialty. Things start off relatively easily; as long as you can grab a Mankey, you can easily take out Brock, and your Pikachu will absolutely trounce Misty, but things can get difficult when fighting Lt. Surge and his Raichu…unless you’ve been grinding or snagged a Diglett from the nearby cave. By the time you reach Koga, you should be powerful and varied enough to easily overcome every subsequent Gym, though he and Erika can cause issues by inflicting status effects with their Poison- and Grass-Type Pokémon. Blaine can also be tough because of his powerful Arcanine, but you can easily overpower him with a Water-Type if you’ve been training one for a while. Giovanni, the leader of team Rocket who you battle prior to tackling him in his Gym, is heralded as Kanto’s most powerful Gym Leader but, while he has some intimidating Pokémon on hand, his focus on Ground-Type moves means a Water- or Flying-Type can significantly neuter this threat (especially if you snagged Articuno earlier).

The Elite Four are a tough prospect, but bested with smart training, item use, and a diverse team.

Defeating the Gym Leaders nets you not just a big cash payout and their Gym badge, but also a TM that allows you to teach their favourite move to one of your team. You’ll need every one of these Gym Badges, and most of the HMs, to navigate through Victory Road, a cave full of high-level Pokémon (and a great place to level-up your team) that stands as your final challenge before the Elite Four, the most formidable Pokémon Trainers in all of Kanto but, before you can reach them. Thankfully, there’s a makeshift Pokémon Center and PokéMart right before the Elite Four, so you can heal up and buy some restorative items before tackling them, and you’ll probably need these as you have to face all four Trainers in a row, and the champion, without any healing breaks in between, so you’re left with your team and the items you have on you. Lorelei and Bruno don’t really pose much of a problem; focusing on Water- and Ice-Type and Fighting-Type Pokémon respectively, you’re in a great position to overwhelm them with your Pikachu, which should be about level sixty by this point, and an Ice- or Psychic-Type Pokémon like Kadabra or Poliwrath. Agatha is a bit of a hurdle, however; specialising in Ghost-Type Pokémon, her Gengar’s love to confuse you, put you to sleep, and drain your health with their moves, so again it’s helpful to have a strong Psychic-Type Pokémon on you. Lance is probably the most unique challenge in the whole game as he utilises Dragon-Type Pokémon, a Type that you really don’t encounter anywhere else in the game except in the safari Zone. Sporting powerful moves like Thunderbolt, Hyper Beam, Ice Beam, and Dragon Rage, his Dragonairs and Dragonite can be tough to get past unless you have Ice- or Dragon-Type Pokémon or moves of your own, which you definitely will if you snagged Articuno our taught Ice Beam to someone on your team. After you topple the,, and the champion, Professor Oak registers you and your team in the Hall of Champions and you can review this, and any subsequent victories, from your PC after the credits roll.

Four powerful, Legendary Pokémon await you in the game’s toughest areas.

Although you’re given a multitude of opportunities to catch the wild Pokémon encountered in the game, some are much rarer than others. In Mount Moon and the Fighting Dojo, you’ll be given the opportunity to pick from one of two Pokémon (with the former being fossilised and needing to be restored on Cinnabar Island), immediately meaning that you won’t be able to acquire the other without trading. You can win (or buy) Game Coins to purchase rare Pokémon in Celadon City, encounter unique Pokémon like Kangaskhan and Dratini in the Safari Zone, and, while you’ll battle an enraged Marowak, the only way to acquire one is to evolve a Cubone. Similarly, you’ll have just two chances to capture a Snorlax as the bulbous Pokémon block your path in two places, but you’ll only get one chance to catch the three Legendary birds, Articuno, Moltres, and Zapdos. These powerful elemental birds are found in Seafoam Islands, Victory Road, and the Power Plant, respectively, and you absolutely need to save before battling them as they won’t appear again if you knock them out and save after. You’ll also need a hefty supply of PokéBalls, Pokémon moves that inflict paralysis, freezing, or sleep, and a whole lot of luck and patience as the game’s annoying tendency to have balls “miss” can make these battles needlessly frustrating. When trying to catch the bird son this play through, I continuously ran out of Ultra Balls or kept knocking the birds out, but then random managed to catch each within five throws of a weaker Great Ball, so go figure. After besting the Elite Four, Cerulean Cave will open up; this cavernous area is a great place to level-up and find some new items, but is also home to the most powerful Pokémon in the entire game, Mewtwo. This genetically-engineered, Psychic-Type Pokémon can deliver massive damage with Psychic and even heal itself with recover but, while it’s entirely possible to capture it using status effects and Ultra Balls, it’s much easier to simply toss the never-miss, one-throw capture Master Ball at it and add it to your team to wipe out all subsequent challenges.

Power-Ups and Bonuses:
As you explore the wide land of Kanto, you’ll find plenty of pick-ups strewn around, be gifted them from NPCs, or will be able to buy a variety of items from PokéMarts. These include healing items like Potions, Super Potions, and Hyper Potions, restorative items like Revive and Max Revive, and status-healing items like Awakening and Antidote. These are relatively commonplace, though are not widely available across the region; the PokéMart in Pewter City will forever sell the basic PokéBalls and Potions, while only the more expensive items are available in Celadon City and at Victory Road. Other items can also be acquired that can aid you in battle; PokéDolls can help you flee from battle, the likes of X-Defend will boost your stats for that battle, and you can snag a PokéFlute that lets you wake up sleeping Pokémon without having to constantly buy Awakenings. Vitamins and evolutionary stones are far harder to find on the overworld, but can be bought from Celadon City’s Department Store and are great for raising individual stats and quickly evolving Pokémon to their more powerful forms, and you can also fend of random encounters with repels, find Nuggets to sell for cash (and sell most items you find), a Coin Case to play slot machines, and key items like the Itemfinder and EXP All if you capture enough Pokémon to appease Professor Oak’s aide.

Buy, find, or acquire items to boost your abilities, progress the story, and learn new moves.

One of the most common items you’ll need are PokéBalls; these come in three purchasable types (regular PokéBalls, slightly better Great Balls, and even better Ultra Balls) and you’ll need a lot of them to complete your PokéDex, especially as they often miss when tossed at their target. The Master Ball is a one-of-a-kind, never-fail PokéBall that is best saved for Mewtwo, and you’ll also need to plan out exactly how you want to use your TMs as these can only be used once. Some can be bought for Game Coins, but mostly you get one use and that’s it; conversely, HMs can be used multiple times but you’ll need to visit the Move Deleter to unlearn them. As you level-up, your Pokémon will learn new moves, with their most powerful moves becoming available if you put the effort into raising them. Some are harder to evolve than others as they level-up slower or don’t learn decent moves for some time, others mainly learn moves that boost their speed, attack, or defence, which doesn’t help me as I prefer to fill my move slots with attacking moves. Some Pokémon also don’t evolve at all, which can lower the incentive on using them as you don’t see as much progression when using them.

Additional Features:
Of the 151 Pokémon available in this generation, 137 are available to catch or own in Pokémon: Yellow either by evolving or trading in-game. As you play, you can consult with Professor Oak on your progress and he’ll offer feedback and tips for where to catch new Pokémon, and you’ll need the three fishing rods and the HMs to find all the Pokémon available in the game. Even if you catch or evolve everything available, you’ll still need to trade with a copy of Pokémon: Red and/or Blue to complete the PokéDex; although you unfortunately still have no legitimate way to acquire the elusive Mew, you don’t need it to complete the PokéDex and will be gifted with high praise from Professor Oak and even a certificate from the game’s developers. While many of the areas you visit are mandatory, some are optional; you can explore caves to find new Pokémon and shortcuts, bring water to checkpoint guards to make travelling a lot easier, and tackle the Fighting Dojo to earn either Hitmonchan or Hitmonlee. Although there’s no way to battle any of the Pokémon Trainers or Gym Leaders again after you’ve beaten them, the aforementioned Seafoam Islands, Victory Road, and the Power Plant all include diverging paths that lead to one of the Legendary Birds, and you can challenge the Elite Four and the champion over and over again to level your team up to the maximum level and earn big cash to spend in the Game Corner and snag those rare Pokémon and items. You can revisit the Safari Zone as often as you can afford the entry fee and search about for the rare Pokémon found there, and pull off a few glitches to both allow these Pokémon to appear in the overworld and duplicate your items (though you risk corrupting your save file if you do this). Post-game content is primarily focused on completing the PokéDex and travelling to the Cerulean Cave to capture Mewtwo; otherwise, you’ll probably be spending most of your time grinding, capturing, or trading and battling with other players using the online functionality.

The Summary:
It’s been a long time since I played the first generation of Pokémon and it is a little jarring returning to a simpler time before many of the gameplay mechanics and quality of life improvements that were introduced in subsequent games. The core gameplay is still there, and it’s just as simple to get to grips with the mechanics once you get going, but there’s no denying that things are much slower and more aggravating in Pokémon Yellow Version: Special Pikachu Edition. The lack on an in-battle EXP bar, the messy organisation of the PCs and inventory, and not being able to keep track of the Pokémon you’ve caught outside of viewing the PokéDex make things a bit tedious as you’re constantly going back and forth and scrolling between menus (you even need to manually activate HMs rather than the option simply appearing when you press A near objects). Battles are made incredibly frustrating due to the janky A.I. that sees critical hits, confused attacks, missed moves and missed PokéBalls dragging things down, and many of the new artwork for the Pokémon really is incredibly ugly. On the plus side, though, this remains a timeless gaming experience; everything you loved about the first generation of Pokémon is here, plus a little more thanks to the influences from the anime: while it’s annoying that you can’t evolve your Pikachu, it’s cute having it following you around and saying its name and playing the surfing mini game, and I loved seeing Jess and James pop up as opponents (I just wish they had played a bigger role in the narrative). Pokémon Yellow Version: Special Pikachu Edition is certainly the definitive game of the first generation, allowing you to acquire all three of the Kanto starters and offering a variety of Pokémon previously exclusive to its predecessors and even including new layouts for some areas. While subsequent sequels quickly made these first games irrelevant by improving every aspect of the presentation and gameplay, there’s still a lovely hit of nostalgia to be found here and Pokémon Yellow Version: Special Pikachu Edition remains as entertaining now, despite its flaws, as it was back in the day.

My Rating:

Rating: 3 out of 5.

Pretty Good

Did you enjoy Pokémon Yellow Version: Special Pikachu Edition? How do you think it compares to the original games, and which of the first generation titles was your favourite? Did you enjoy having Pikachu as your partner or did you just leave it in a box? Which of the Gym Leaders did you struggle against? Did you nickname your Pokémon and who made it into your final team? Did you ever complete the PokéDex? Which of the Pokémon games, and titular monsters, is your favourite? How are you planning to celebrate National Pokémon Day this year? Whatever your thoughts on Pokémon, sign up to leave them below or drop your comments on my social media and be sure to check in next week for more Pokémon content!

Game Corner: Nuclear Strike (PlayStation)

Released: 31 August 1997
Developer: Electronic Arts
Also Available For: PC and Nintendo 64

The Background:
After almost six months of conflict and thousands dead, the Gulf War had finally ended in March 1991 but the bloodshed proved as much of an influence on developer Mike Posehn as the air rescue mechanics of Choplifter (Dan Gorlin, 1982) in the creation of Desert Strike: Return to the Gulf (Electronic Arts, 1992). Opting to eschew typical videogame mechanics and focusing on nonlinear, mission-based gameplay, Desert Strike became one of the Mega Drive’s top titles; its 16-bit sequels introduced new vehicles and locations and were similarly praised, though reviews sound found the formula becoming stale. By 1996, the videogame industry moved on from traditional 2D graphics in favour of 3D polygons, and arena Sony’s PlayStation was purposely built for and which upended the battle for supremacy between SEGA and Nintendo. Following an aborted attempt to continue the series on the 3DO, Mike Posehn got the ball running on a far more lifelike and much praised fully-3D entry on the SEGA Saturn and PlayStation. Following the positive reception of Soviet Strike (Electronic Arts, 1996), the same development team (minus Posehn) got to work on the fifth (and, so far, final) entry; Nuclear Strike reportedly built upon its predecessor’s game engine, increasing the frame rate, lowering load times, including lasting environmental damage, and adding additional camera angles and an in-game radar. New vehicles and weapons were also added, as well as helpful clues to make the game more accessible and address the franchise’s notorious difficulty, though reviews found the story to be lacking. The graphics and destructible environments were widely praised, however, and it was largely seen as a fun, if repetitive and derivative, experience.

The Plot:
Former spy Colonel Beauford LeMonde has stolen a nuclear weapon and joined forced with Triad leader Napoleon Hwong to threaten the safety of the civilised world. The player character, who pilots a Super Apache helicopter as part of anti-terrorist strike force STRIKE, is ordered to pursue the warlord, who kidnaps the world leaders and prepares to unleash chaos upon the globe!

Gameplay:
In keeping with the new visual style introducing in Soviet Strike, Nuclear Strike ditches the illusion of 3D created by the isometric perspective of its predecessors and opts for a top-down perspective, with the camera sitting slightly above and behind the player’s vehicle. Like in the last game, you can change your viewpoint with the ‘Select’ button and this time I was actually able to notice the difference; one view kept the camera locked in place and the other saw it swing around with your movements, which I found quite disorientating. All of the movement and control options introduced in Soviet Strike make a welcome return here; there are five different controller layouts on offer, but I found the default button settings to be perfectly fine: X fires your rapid-fire chain gun, Square fires your Hydra Rockets, Circle the Hellfile Missiles, and Triangle will fire the super powerful sidewinders if they’re assigned to your wingtip. As before, you can “jink” (essentially a strafing option) with L1 and R1 to circle targets and avoid incoming fire more effectively, drop your cargo by pressing L2 and R2 together (though I only encountered one use for this, in the second campaign, where you can drop a powerful nitro-glycerine bomb to instantly destroy a fortified oil rig), remove the ammo, fuel, and armour and/or the compass from the heads-up display (HUD) with R2, and review the map and your mission status and objectives by pressing the Start button. A new feature added to Nuclear Strike is the ability to lock each weapon with L2; I thought this was some kind of targeting feature, or a way to restrict the use and wastage of your stronger weapons, but all it seemed to do was put a red border around the ammo box so I’m not entirely sure of the purpose of this function.

New vehicles and gameplay modes help to spice up the tried-and-try mechanics.

One way Nuclear Strike stands out not just from its predecessor but the last two games is the welcome return of additional vehicles; almost every campaign sees you commanding a different type of helicopter, and each one contains another craft you can switch to either by choice or at the behest of your mission objectives. You can hop back into a hovercraft, jump into a heavily-armoured harrier jet, and even roll around in a super tough tank or missile launcher, with the majority of your weapons still at your disposal (though the tank only has its main gun). When in one of these additional vehicles, you can hold L2 and R2 to initiate a self-destruct mode that will see it explode and your main chopper fly in to pick you up, which is handy when you’re stuck halfway across the map in the tank or hovercraft. All-in-all the game boasts it contains several playable vehicles, though as most are variations on the chopper this is a bit misleading but there are some key differences; your default chopper can only carry six passengers, for example, whereas the Huey (which also sports twin guns) can carry twelve. In campaign three, you’re placed at the controls of a smaller, feebler chopper than can only fire weak bullets and non-lethal rounds like smoke and tear gas and can only carry four passengers; you must use these limited options to flush out delegates and get them to safety and then blast parts of the environment (radio towers, petrol stations, and train barriers) to crush or destroy incoming enemy vehicles before switching to a more capable aircraft, which can be tricky as your little chopper is pretty pathetic. Two campaigns also introduce a degree of real-time strategy gameplay to the series; in one campaign, waves of enemies will come rolling across the map and you must fly to different bases to command ground forces to intercept them and form roadblocks. You can fly around trying to take them out yourself, but the sheer number makes this all-but impossible, though I found it equally difficult to find the bases and command my allies as you can’t do it remotely. This function pops up again in the final campaign, where you can direct some commandos to help you take out six radar towers, and your co-pilot will also help you to destroy a proto-nuclear missile and its launcher rig by jumping into her own chopper.

A variety of objectives and improvements help keep the game fun and engaging.

The game’s map system is exactly the same as the one seen in Soviet Strike but with some tweaks to the presentation; dialogue and onscreen notifications give information about your mission objectives, which you can read up on and cycle through from the map screen. I found that I was only able to tackle one mission at a time rather than reading ahead on a few of them as in previous games, though this might be because I played the game on the “Normal” difficult instead of the “Easy” setting. Either way, you can through your mission objectives, enemies, and notable resources and have each of these highlighted on the map to make it easier to plot an optimal route. Nuclear Strike also adds a helpful mini radar to the HUD and a green arrow to the compass that points you in the direction of whatever target you’ve selected on the map; the only thing to remember about the HUD is that enemy forces are highlighted in red and blue as blue indicates mission objectives so you might need to fire upon both. Even better is the fact that there’s finally a way to quick-exit a campaign if you fail or are in danger of failing; simply press Start and Select simultaneously and you’ll be returned to the main menu rather than having to slog all the way back to home base, though there’s still no option for analogue support. You are once again given a choice of a few loadouts for your chopper, though: you can balance out your ammo, focus on your missiles, or even fly into battle with just your chain gun; you can also customise the wingtip loadout to carry sidewinder missiles, additional fuel, or disrupt the enemy’s radar. As always, you get three lives (known as “attempts”) per campaign and will automatically winch up resources (fuel, ammo, and armour), targets (friendlies (your co-pilot and other agents), enemy commanders, dignitaries, and so forth), and cargo (nitro, cages) simply by flying over them and the new maps make it a little easier to accomplish this compared to the last game. Like Soviet Strike, you can no longer bash into buildings or mountains or parts of the environment, which is useful for reducing the damage you take, and you’re still awarded passwords after completing each campaign (though you must manually save your progress from the main menu) and at least one campaign even has a checkpoint, of sorts, that allows you to skip to a later point in the narrative after a nuclear device has exploded.

Escort missions, defensive objectives, and time-sensitive sections mix-up the usual gameplay.

While many of Nuclear Strike’s mission objectives are very similar to those of the previous games, it definitely felt like things were a lot more varied and far less tedious this time around. At first, your doing familiar actions like firing upon burning smoke pits, destroy enemy forces to recruit and rescue targets, and taking out radar sites but there’s often a twist: when you rescue one target, you’re surprised by an ambush; other friendlies you rescue will fly into battle with you in choppers to help root out three enemy generals, for example. There are far more escort missions this time around; your ally and co-pilot, Naja Han, will lead you to target sites by driving erratically across the map on a motorcycle and will also need covering as she rescues diplomats from buildings. This results in two of the tougher missions, one where she’s driving a busload of work leaders through heavily-defended streets while you just have your piddling little chopper and another where you need to protect her as she drives a train to safety. The former can be quite fun as you blast barriers to move her down safer routes, watch her jump a gap in the bus, and listen to her passenger’s bicker and ask for ice cream; the latter is a little more stressful as you must quickly destroy or redirect suicidal trains and take out the heavy ordinance that can quickly make mincemeat of the train. While the second campaign is primarily about large-scale destruction of the enemy’s sea forces, you’ll also need to bribe a local mercenary by dropping off a crate load of treasure, drop him off to uncover missile sites that need destroying, and take out a fleet of Chinese ships before they escape. The final mission includes a huge electromagnetic pulse (EMP)  in the middle of the map that disables all of your weapons except the chain gun and is heavily defended by cannons and massive tank-like Guardian Guns that can only be destroyed by having your co-pilot disable them first. You’ll need to take out the EMP by slipping inside and destroying the camouflaged trucks your co-pilot highlights and also investigate six Mongol-like structures trying to find and destroy three nuclear missiles. Overall, while the missions are very similar to its predecessors, there’s a lot less ferrying of passengers or repetitive tasks; the ability to command ground forces helps to mitigate a lot of the frantic flying about and there are lots of combat options available thanks to you and your co-pilot being able to command other vehicles.

Graphics and Sound:  
Nuclear Strike offers much of the same as its predecessor in terms of its presentation, bringing its varied and ambitiously detailed environments to life using only the finest polygonal graphics of the era, but goes a step further in a lot of little ways. While you mainly pilot variations of an attack chopper, just the fact that there are several vehicles to use is a step up from the last game; each is a fully functioning 3D model with differing speeds and handling, which starts to smoke when they take enough damage and explode in flames when shot down. Thanks to the game not being restricted to the Soviet Union and instead taking place around China and Korea and other such locations, the game maps are far more varied this time around; there’s a decent smattering of water to show off the new splash effects from weapons and explosions, fields and villages, and fully 3D models of buildings to recreate cities and Mongol temples in later campaigns. Probably the most diverse location in the game is Pyongyang, which starts out as a bustling city with functioning train tracks and ornate buildings to liberate dignitaries from and ends up a nuclear wasteland following an explosion; radioactive pits, wrecked buildings, and smouldering ruins scatter the landscape and really help to sell the gravity of the situation. Not only did I not notice any of the PlayStation’s trademark texture warping and screen tearing this time around, but any damage you cause to the environment was permanent this time around, meaning you’ll always see evidence of your firefights and the destruction caused from your conflicts.

The landscapes now change, sometimes drastically, from the game’s combat and events.

While the game is still limited to five campaigns, your missions are as varied as the environments this time around; the second and final campaigns probably offer the most visual and gameplay variety, with you flying across the map taking out missiles and fortified oil rigs in the former and both avoiding heavy artillery and trying to knock out the EMP in the latter. Campaign four is especially notable for showcasing just how powerful the PlayStation is compared to its 16-bit predecessors as the sheer number of enemy forces can be overwhelming at times; they’ll trickle down through narrow passes, burst out from holes, and come crashing into your bases disguised as supply drops and they all need fending off and obstructing with your ground forces. There’s even a bit of day and night action here as the mission progresses and it can get extremely chaotic if you don’t properly marshal your reinforcements. Like its predecessor, Nuclear Strike also includes some in-game music to keep the adrenaline pumping throughout your high-stakes missions; while it dips in and out more often that in the last game, you’ll get a bit more variety other than some thumping tracks with victory jingles and even “Ride of the Valkyries” playing at one point, which did make me chuckle. As before, there’s a lot of voice work on offer here, too; everyone from your commanding officer, your co-pilot, and those you’ve rescued will offer encouragement, reprimands, and reminders as you blast your way through enemy targets and the game’s story is once again told entirely through some of the cheesiest and overly-edited FMV sequences from this era of gaming.

Enemies and Bosses:
If you’ve played any of the Strike games before, particularly the previous game, then you know exactly what to expect in terms of enemies. Interestingly, I noticed that there seemed to be far less soldiers this time around; they’re still there, now sporting conical headwear and still shooting rifles and rockets from the ground and from trees, but they seemed less frequent than before. There are some variants here, too; after Pyongyang is devastated by a nuclear explosion, enemy soldiers wear haz-mat suits, and you’ll find a lot more armoured personnel carriers this time around. As is expect, tanks, jeeps, and anti-aircraft cannons are commonplace throughout Nuclear Strike; there seems to be a lot more missile launchers this time around as the stakes are much higher and enemies also barrel across the landscape of motorcycles to make for difficult targets. Occasionally, enemy helicopters will enter the fight and can also prove to be difficult to target; it’s therefore heavily advised that you destroy them while they’re grounded or make use of the “jink” feature toe strafe around them when they come flying in at high speeds. You’ll still need to check your fire as well; it’s all very well and good blasting away at enemy strongholds to free prisoners and such but you’ll screw up the mission if you kill or destroy the wrong targets and cost yourself some valuable resources if you’re too trigger happy, to say nothing of the greater number of enemy forces this time around.

Unload your arsenal onto heavily-armoured and fortified vehicles and missile launchers.

For all the improvements and new features included in Nuclear Strike, you still won’t encounter any traditional boss battles. For the most part, the closest you’ll get to this is being tasked with destroying fleets and waves of enemies; the second campaign sees you defending a satellite from a missile attack, taking out an airfield and nine Hell Ranger choppers, destroying a fleet of chips, tracking down and sinking missile boats before they can launch, and raiding an enemy base. There’s also a heavily-defended oil rig here which pops up again in the game’s hidden campaign; if you don’t drop the nitro onto it, this can be quite difficult to destroy as it takes quite a beating and the target you’re there to retrieve even makes a getaway in a boat afterwards! After Pyongyang’s left a radioactive hellscape from a nuclear explosion, you need to safeguard an armoured train; enemy trains will come up from behind and ahead to try and ram and destroy yours so you need to take them out quickly, but the enemy tanks and missile launchers can’t be ignored either. The sheer number of enemy forces in the fourth campaign cannot be tackled alone; you need to give orders to your various ground troops to help you out as tanks, missile launchers, and armoured carriers can easily swarm all over the map and spell disaster for you. In the final mission, you won’t be able to put a dent in those Guardian Guns without your co-pilot disabling them first, but you also need to distract them so they don’t shoot or run her over, which can be a death sentence in itself. Finally, when the proto-nuclear missile is prepped for launch, you and your co-pilot need to blast it to smithereens to safeguard the civilised world, but you’ll also need to destroy the super-tough carrier it’s on and keep an eye out for any cannons, choppers, and tanks still roaming around the base.

Power-Ups and Bonuses:
All the usual resources you’d expect from a Strike game are on offer here: you’ll find caches and crates of fuel, armour, and ammo scattered around the map, hidden inside buildings, and waiting at landing zones. Very rarely, you’ll also find an extra life that you can winch up and there are even some secret pick-ups to be found in certain campaigns, such as the aforementioned nitro, sea mines, night vision goggles, a faster winch, and a super cannon. Every campaign also has at least one vehicle you can switch to or drop your co-pilot off to use; there are often benefits to switching to a tank, such as being able to crash through buildings and obstacles, to say nothing of the additional and much appreciated power of the Harrier jet, though some, like the hovercraft, can be a little unwieldy to control.

Additional Features:
As it still lacks any unlockables or even a scoring system, the main reason to revisit Nuclear Strike is to test out different loadouts, maybe try the “Normal” difficulty if you beat the game on “Easy”, seek out the hidden vehicles and optional objectives in each campaign, and try to complete your missions in faster and more efficient ways. The only thing you gain upon completion is a teaser for the next game in the series, apparently titled Future Strike, which obviously we never got, though STRIKE files are once again available on the main menu to add some extra context to the story. You can also still use passwords to skip to later campaigns or make your playthrough far easier and more enjoyable with some useful cheats; you can gift yourself stronger weapons, speed yourself up, disable enemy fire, or reap the benefits of unlimited fuel, invincibility, infinite ammo, and armour to make even the toughest campaigns a little easier. These can be entered in conjunction with level passwords, which is even better, and there’s even a password to access a secret campaign that appears to be some kind of test or training mission; here, you’re given three objectives (destroy hostiles to liberate allies, commandeer a tank or Harrier, and destroy a fortified oil rig) and basically given a little sandbox to mess around in.

The Summary:
Without a doubt, Nuclear Strike is leaps and bounds the best in the series since the second game; where Soviet Strike was quite a stripped back experience that didn’t take advantage of the PlayStation’s greater power beyond the 3D paintjob and other aesthetic features, Nuclear Strike adds a whole bunch of variety to the presentation that makes it a truly worthwhile entry in the series. Everything that worked from the last game returns as reliable as ever but has been improved upon; the additional vehicles that reskins of choppers are great fun to use and actually give an incentive for exploration and I enjoyed how varied the campaigns were to create a nice balance between frantic combat, rescue, and escort missions. Unfortunately, the real-time strategy mechanics were more miss than hit with me; not being able to figure out how to highlight the bases or command the troops remotely made it more of a chore than it needed to be, but these mechanics were still better implemented than the awful on-foot sections from the third game. The twist of lumbering you with a non-lethal and ineffectual craft added an extra level of strategy to one campaign, though defending that train proved quite tricky thanks to how fragile the carriages are. The music wasn’t much to shout about but I enjoyed the visual variety on offer, the increased stakes, ad the new graphical features such as lasting damage and improved polygons and explosions. Although Nuclear Strike is a vast improvement over Soviet Strike in every way, though, there’s still a distinct lack of replayability to the title that keeps it for being a five-star experience; I’d definitely recommend this one of the two and it’s a game I can see myself revisiting, but the difficulty curve can still be a brick wall at times and it’s not always massively clear what you need to do to progress even with the improvements to the map system. Overall, Nuclear Strike is well worth a playthrough, and you can easily just skip to this one form the second game, but don’t be ashamed to take advantage of the cheat codes if you’re struggling.

My Rating:

Rating: 4 out of 5.

Great Stuff

Did you ever own Nuclear Strike back in the day? How do you think it compares to the previous game and the other games in the series? What did you think to the vehicles on offer, and which was your favourite? Were you a fan of the new environments and the altered mission objectives? How did you find the real-time strategy mechanics and which of the campaigns was the hardest for you to complete? Whatever your thoughts on Nuclear Strike, go ahead and share them below or comment on my social media and maybe check out my other Strike reviews.

Game Corner [Turtle Tuesday]: TMNT: Tournament Fighters (Xbox Series X)


Ever since Kevin Eastman and Peter Laird’s Teenage Mutant Ninja Turtles (TMNT) first debuted, the franchise has enjoyed worldwide mainstream success thanks to action figures, cartoons, and videogames. Since I found some free time this December, I’ve been spotlighting four such videogames every Tuesday of this festival season.


GameCorner

Released: 30 August 2022
Originally Released: 4 September 1993 (Mega Drive / SNES) / February 1994 (NES)
Developer: Digital Eclipse
Original Developer: Konami
Also Available For: Mega Drive, Nintendo Entertainment System (NES), Nintendo Switch, PC, PlayStation 4, PlayStation 5, Super Nintendo Entertainment System (SNES), Xbox One, and Xbox Series S

The Background:
There was only one franchise that dominated childhoods back in the late-eighties and early-nineties and that was the Teenage Mutant Ninja Turtles (or Teenage Mutant Hero Turtles for Brits like me); beginning life as a violent pastiche of comic book tropes, the TMNT’s popularity exploded into the massively successful cartoon and action figures, live-action movie adaptations, and many videogames. Spearheaded by Konami, the TMNT were equally successful with their arcade beat-‘em-ups and their home console ports, but this was also a time when Capcom had changed the face of both arcades and the competitive fighting scene with the many iterations of Street Fighter II: The World Warrior (Capcom, 1991), which was great success on home consoles and inspired a slew of knock-offs looking to cash in on Capcom’s success. The TMNT were amongst these with this one-on-one tournament fighter, which released in slightly different versions across three platforms at the time; the games took inspiration from the cartoons, movies, and the Archie spin-off comics but, while the 16-bit titles aped the combos and special moves of Street Fighter II, the 8-bit version had more in common with the likes of Yie Ar Kung-Fu (Konami, 1984) due to the NES’s limitations. Of the three, the SNES version was positively received despite being a Street Fighter II knock-off, the Mega Drive version was criticised for its sluggish controls and lacklustre presentation, while the NES version was seen as ambitious but unsurprisingly limited. All three games were lost to the midst of time, available only through emulators or extortionately expensive physical copies until they were included in this Cowabunga Collection alongside a host of other games and quality of life features.

The Plot:
The Turtles and their allies take part in a one-on-one tournament. In the Mega Drive version, the heroes battle across the alien worlds of Dimension X to rescue Splinter from their archnemesis, Oroku Saki/The Shredder, and their evil clones; in the NES version, the Shredder challenges them to defeat his latest plot for world domination; and in the SNES version, the heroes battle on a fighting game show to prove their mettle and earn some cold, hard cash.

Gameplay:
Regardless of which version of Teenage Mutant Ninja Turtles: Tournament Fighters you choose to play, the game is a standard 2D, one-on-one fighting game, with the 16-but versions of the game heavily borrowing their controls, combat, and presentation from Street Fighter II. Each game comes with a different roster of fighters, with ten fighters selectable in the SNES version, eleven available in the Mega Drive version, and seven in the NES version. Each version of the game allows you to customise the gameplay in some way, such as setting the difficulty level of the game (which directly impacts the ending and bosses you face), changing the time limit and amount of rounds to win (with the games defaulting to the standard best of three rounds), setting the speed of the game, setting the amount of credits you have to continue laying upon defeat, and eve setting the strength of your character and your opponent to establish any handicaps. These features don’t carry across to every version of the game, and some are slightly altered (the SNES version represents difficulty on a zero to seven scale, for example, while the NES uses a simple Easy, Normal, and Hard designation), but these options are generally consistent to those seen in Street Fighter II.

Each game sees you pummelling foes with a variety of moves and special attacks.

Combat, however, is a slightly different story and varies somewhat between each version; while the SNES version benefits from the additional buttons and mimics the directional input and button presses of Street Fighter II to pull off special moves, the Mega Drive and NES versions are limited by their control scheme layouts and the general presentation of the game. Indeed, the SNES version is more like Super Street Fighter II Turbo (Capcom, 1994), running much faster at its maximum speed and aping similar button combinations, while the Mega Drive version is far slower and reminds me more of the original, somewhat clunky first release of Street Fighter II. The NES version, as mentioned, is more like Yie Ar Kung-Fu and features little in the way of complex button combinations and special moves due to the limitation of the NES hardware. In the SNES version, you have two different types of punches and kicks; A and X launch a “normal” punch and kick while B and Y throw “fierce” variants. You can press up on the directional pad (D-pad) to jump and launch flying kicks and punches; when up close to an enemy, you’ll grab them and toss them in a unique throw move and you’ll use directional inputs and button presses (down, diagonal down-right, right, X, for example) to pull off each character’s special moves. When not playing in the game’s story mode, you’ll gradually fill up a gauge underneath your life bar; when this is full, you can use another simple button combination to unleash a devastating “Ultimate-Attack” that, unlike your regular attacks, actually damages the opponent through their block (though if they attack you during it you’ll fail and it’ll deplete if you don’t use it in time). Much of this is true of the Mega Drive version, but with some notable differences; there’s no special attack gauge, for starters, and no “fierce” attacks, you simply use X to punch and A to kick, and press Y to pull off a taunt (that seems to have no function). To pull off stronger attacks, you need to press the D-pad towards the opponent and then press X or A; you can still grab and throw your foe but special moves seem a lot harder to pull off (not least because the button inputs are missing from the strategy guide) and the game’s sluggish pace makes combat inconsistent and frustrating. It’s still more complex that the NES version, though; here, X punches and A kicks and that’s about it; you can use directional inputs and button presses to pull off special moves, but they’re extremely basic and the TMNT don’t even fight with their signature weapons in this game! Each game features a stun mechanic like in Street Fighter II, though; deal enough damage in a string of attacks and your opponent will be momentarily dazed and wide open for another combo or throw.

Although it lacks Nintendo’s bonus stages, the Mega Drive version has instant replays…

Some versions of the game do allow you to alter the button layout if you’re not happy with the default, and all three versions allow you to block by holding back on the D-pad (a mechanic I’ve always found awkward in fighting games; I much prefer a dedicated block button) but the SNES version also allows you to flip away from incoming attacks but only the NES version allows you to run towards your opponent by double tapping the D-pad. Each version also comes with a few gameplay options; you can take on the story mode (where you’re limited to playing as the TMNT), with cutscenes and a map screen (in the Mega Drive version) furthering the narrative between each bout, battle against a friend (or against the computer in the NES version), watch or practice the game in the SNES and Mega Drive versions, or take on a standard tournament mode. This also differs greatly between each version, with the SNES version taking the form of a broadcast and game show and featuring pre- and post-match dialogue and even tossing in a bonus stage where you rack up extra points and gold by smashing open safes in a bid to help break up the monotony. Although this is absent from the Mega Drive version, whose tournament simply goes from one fight to the next, every match is followed by an instant replay), bonus stages do appear in the NES version; here you have to smash through walls in the dojo for extra points, and all three will tally up certain criteria (health remaining, time left, whether you took damage or not) when you’re victorious to add to your score and this is the only version of the game to feature a high score table.

Each version offers a pretty tough challenge even on the easiest difficulty.

Each game comes with a natural, steady, and expected difficulty curve that I find is typical of most fighting games but synonymous with Street Fighter II; your ability to succeed will depend on how adept you are at pulling off the awkward special attacks and combos, especially as special attacks and throws deal way more damage than your regular attacks. The enemy AI, even on the easiest settings, is incredibly cheap in all three versions; your opponent will block almost constantly, is consistently able to attack and throw you through your attack animations, and they’re far more aggressive and skilled than I was, meaning I either had to fight hard and fast or be on the defensive. The difficulty and gameplay sliders can help with this, especially in the Mega Drive version, which allows you to reduce the rounds to win to one and set your speed and power to give you an advantage. Since the SNES version is the fastest of the three, combat can move at a breakneck speed, with rounds turning out of your favour in the blink of an eye, and you’ll be immediately at a disadvantage as you need to play on at least difficulty level three to even battle to true final boss and see the game’s best ending. This is even more demanding in the Mega Drive version, where you need to play on level eight to get the true ending; this version is so hampered by its plodding speed that it’s easy to get trapped in an unbreakable combo string and stunned into oblivion by your hyper-aggressive opponents. The NES version can be both paradoxically difficult and easy at the same time; there’s little benefit from picking one fighter over another as they’re all so limited but some, like Hothead, make for bigger targets while others, like Casey Jones, appear to be more agile. Either way, the limitations of the hardware make this a mundane back and forth affair that’s more about who can grab the power-up first rather than requiring any in-depth skill like the SNES version.

Graphics and Sound:  
Obviously, all three games look and sound very different. Of the three, the SNES version is the clear winner in terms of overall presentation; the game features more sound bites, big, bright, and well animated sprites and backgrounds, and the music is clearer and has more kick to it. The emphasis on story and cutscenes means there’s far more opportunities for big, partially animated sprite art here, with April O’Neil reporting on and interviewing characters before and after bouts and every fight in story mode being proceeded by dialogue between the fighters and the TMNT travelling to each location via their signature blimp. The characters in this version are clearly modelled more like the cartoon, with a hint of the live-action influence here and there, and they’re all large and full of attack and reaction frames. Sadly, the same isn’t true of the Mega Drive version; even the title screen and character select screen aren’t as impressive, though the game does include more palette swaps and some different fighters compared to its SNES counterpart. Sprites are smaller, however, duller, and seem to be missing some animation frames; everyone seems far meaner and more surly, as well, making this a very gritty and moody experience that seems to owe more to the original Mirage Comics, but it’s pretty obvious even to a die-hard SEGA fan like me which version has the better overall presentation. Naturally, the NES version is the most inferior in terms of graphics, character, and stage selection; however, while the TMNT don’t sport their signature weapons, they do have their own unique green palettes to separate them and the character designs seem to be drawing more from the first live-action movie than anything else. You won’t find much in the way of animation and variety here but it’s pretty ambitious, really; sprites have some decent details and special attacks, but the game suffers from black bars eating up a lot of the player’s screen.

Presentation varies between the three, with the SNES being the clear superior.

Naturally, the stages you’ll fight in follow very much the same format; the SNES version features a variety of large and detailed environments set largely on Earth, with some even featuring destructible elements to smash your opponents into like in Street Fighter II. Also like in that game, you’ll see background characters and elements and characters cheering and watching the fight, including TMNT staples like Bebop and Rocksteady, Baxter Stockman in his fly form, and various Foot Soldiers. There’s always something going on in the SNES version, whether it’s a giant octopus, a band performing on stage, or a news report recording the action, and this version also includes better, more detailed and varied story cutscenes and even character bios in its attract mode. Comparatively, the Mega Drive version is an immediate disappointment; cutscenes are smaller and less interesting and the backgrounds, while surreal and often disturbing, are far more muted and feature almost no animation and absolutely no interactable elements. As this version of the game features a planet-hopping narrative, there are some bizarre stages to choose from, from an ice world complete with a submarine to an ocean planet with a sinking ship in the background, to the bleakness of the cosmic abyss, but it’s all so dull and lifeless even when there’s giant cycloptic magma creatures and dinosaurs looming in the background. Again, the NES version is hampered by its hardware and includes only four stages: the sewers, a subway station, the galley of a pirate ship, and the rooftops of New York City. This latter is the most impressive stage, showing the city and the Statue of Liberty at night and in all its 8-bit glory, and is preceded by a rare cutscene to set the stage for the final battle against the Shredder.

Enemies and Bosses:
As with all fighting games, every available character will eventually be your enemy at some point; button codes and the Cowabunga Collection’s enhancements allow you to play as the boss characters in the 16-bit versions of the game and the Mega Drive version even includes and practise mode to help you get to grips with your favourite character. Essentially, however, there’s minimal benefit to picking a certain character in each version of the game; all of them sport special moves that can match each other, with every character sporting projectiles, grabs, and powerful rushing or slamming attacks to deal heavy damage. However, there are some notable exceptions; as mentioned, Hothead is a unique character in the NES version, sporting a chunkier sprite and breathing fire, meaning his hit box is a little larger and the character is a little slower. In the Mega Drive version, Casey Jones can set bombs as traps, while characters like Chrome Dome and Krang can cover distances from a standstill with their extending arms and legs. Even on the easiest setting, the SNES version puts up quite a fight; I struggled against War in the first battle simply because of his ridiculous rolling throw and large swiping claws, and the Shredder proved quite formidable here thanks to his dashing uppercut, his flurry of punches, and his cheap tactics of spamming low kicks. The Rat King also proved a unique foe in this version as he relied more on wrestling moves, snatching you out of the air and grabbing you midway through your attacks to slam you to the ground, and you’ll really get a sense of how good or bad you are when you face off against your character in a mirror match.

You’ll need to challenge the game’s highest difficulties to achieve the best endings.

These are spiced up a bit in the Mega Drive version through the inclusion of evil clones, who sport a purple palette swap and constantly dog your progress throughout the game. The Mega Drive version also includes a unique character, Sisyphus, an alien beetle who spits a blue projectile at you and unleashes a rapid-fire horn attack. He’s not the only unique character, however; Ray Fillet, April O’Neil, and a Triceraton are also included in this version of the game, while Wingnut, Aska, and Armaggon round out the SNES roster, with each one bringing their own strengths and weaknesses. April was a surprisingly decent character to use as she has a very cheap crouching spam attack that’s great four countering the game’s aggressive enemies, but you can never count out the titular turtles, who can send ground sparks, spinning cyclones, and twirling kicks your way at any moment even in the NES version. Krang only appears as a boss in the Mega Drive version of the game; naturally, you battle him in the Technodrome as the penultimate boss and he’s able to extended his arms, slide at you with a kick, and fire missiles high and low from his robot body but his sprite just isn’t large or intimidating enough to evoke a sense of danger. Both 16-bit versions include the same final boss, Karai, who can only be fought on higher difficulty settings; on the SNES, you fight her on top of a speeding train, whereas you battle her in a traditional dojo on the Mega Drive. In both, she’s easily the most formidable fighter, which is accentuated on the SNES thanks to her larger sprite; she’s capable of crossing the screen with a devastating cartwheel kick, tossing out projectiles, diving from high above with flying kicks, and is overall a pretty tough customer thanks to her martial arts kicks and overly aggressive AI. Thanks to its limited roster, the Shredder is your final foe in the NES version of the game; fought on a rooftop like in the movie and original comic, Shredder again has a dashing uppercut, a flaming flurry of punches, and can send a ground shot your way but goes down just as easily as every other enemy in this version of the game.

Power-Ups and Bonuses:
As Tournament Fighters is styled heavily after Street Fighter II, for the most part, there aren’t any in-game power-ups for you to utilise. The SNES version includes that special gauge outside of the story mode, which is good for a dramatic finish, but this is completely absent from the Mega Drive version. The NES version, however, does feature a power-up; at some point in every battle, Splinter will drop a red ball into the arena, which you can collect by pressing down and X. While the exact button inputs aren’t explained, and it seems incredibly temperamental, you can then launch this ball at your enemy to deal massive (and, usually, decisive) damage and this will be your key to victory in almost every bout. Be warned, though, as your foe is also able to pick up the ball and you’ll lose it if you take too much damage.

Additional Features:
The additional features on offer differ somewhat between each version of Tournament Fighters but there is some overlap; each version includes a story and a tournament mode and allows players to go head-to-head, selecting their character, stage, and handicap modifiers as you’d expect from a one-on-one fighter. Each game includes a variety of endings depending on which character you play as and the difficulty you set the game to, encouraging multiple playthroughs if you can stand to tackle this game again. Of course, the Cowabunga Collection adds even more features to these games; you’ll get a generous 100G Achievement for completing each game, however, you need to beat each one of the higher/highest difficulty level and battle Karai for this to pop. You can also use the Left Bumper to rewind the gameplay and bring up save states and display options with the Right Bumper, which also allows you to look through the strategy guide for tips and move inputs, which is much appreciated. In addition to viewing each game’s box art and manuals, exploring their soundtracks, and switching between the American and Japanese versions, you can enhance each game in various ways: you can choose to play as the 16-bit bosses, access additional stages, increase the game’s speed, and enable extra lives, remove sprite and slowdown from the NES version and allow for Hothead versus Hothead fights if you wish.

The Summary:
Teenage Mutant Ninja Turtles: Tournament Fighters is a tough one for me. I’m really not the best at Street Fighter II and similar knock-off fighters; the button inputs and aggressive opponents always throw me off and playing these games is often more frustrating than fun. The TMNT aesthetic certainly suits the format; all of the character have unique attacks and represent both the cartoons, comics, toys, and movies from the time and anyone who’s ever played Street Fighter II, especially on home consoles, will be immediately familiar with the 16-but versions of the game. For me, the SNES version is the clear winner; not only does it look and sound the best of the three, it plays a lot better and there are far better opportunities for combos and special attacks. The story and tournament modes are also presented in a much more visually impressive way, the stages are livelier and more interesting, and the game is bolstered by the faster combat and fluid gameplay. It pains me to say it being a big SEGA fan, but the Mega Drive version just can’t compete with its SNES counterpart; everything’s smaller, grimier, and so slow and clunky. I actually prefer some of the roster here, having read a lot of the TMNT’s Archie Comics as a kid, but the gameplay and presentation lets these additions down considerably. Naturally, the NES version is the inferior of the three but, even so, it does a decent job with the limitations of its hardware. One-on-one fighters are never a good option on inferior hardware and the TMNT definitely benefitted more from their 8-bit sidescrolling adventures and brawlers, but there’s some ambitious elements here that make it an interesting option, at least, though it’s hard to believe anyone choosing to downgrade or settle for the NES version of the far superior SNES version. Overall, if you’re a fan of one-on-one fighters and Street Fighter II, you could do a lot worse than to give the SNES version of Tournament Fighters a whirl; the other two are worth a quick playthrough for a boost to your gamer score but I can’t see myself picking the Mega Drive or NES version on future playthroughs since the SNES version just leaves both in the dust with its superior options, gameplay, combat, and presentation.

Mega Drive Rating:

NES Rating:

SNES Rating:

Rating: 2 out of 5.

Rating: 1 out of 5.

Rating: 3 out of 5.

Could Be Better

Terrible

Pretty Good

What did you think to Teenage Mutant Ninja Turtles: Tournament Fighters? Which of the three did you own back in the day, or is your favourite to play in this collection? How do you think it compares to other one-on-one fighters, especially Street Fighter II? Which character was your favourite to play as in each version? Were you disappointed by the dip in graphical quality in the Mega Drive version? What did you think to the NES version and how it utilised the system’s limitations? Would you like to see another one-on-one tournament fighter from the TMNT? What did you think to the additional features added to the Cowabunga Collection? Whatever your thoughts on Tournament Fighters, go ahead and share them in the comments below.

Game Corner: Soviet Strike (PlayStation)

Released: 31 October 1996
Developer: Electronic Arts
Also Available For: PlayStation Network and SEGA Saturn

The Background:
The Gulf War had finally ended by March 1991 after nearly six months of bloodshed that left thousands dead, though the conflict was clearly an influence on developer Mike Posehn when he built upon the air rescue mechanics of Choplifter (Dan Gorlin, 1982) to create Desert Strike: Return to the Gulf (Electronic Arts, 1992). Focusing on nonlinear, mission-based gameplay and eschewing typical videogame mechanics, Desert Strike became one of the Mega Drive’s top titles; its two sequels introduced new vehicles and environments while retaining the core gameplay mechanics but were similarly praised despite criticisms about the formula becoming stale. By 1996, the videogame industry was moving away from traditional 2D graphics and into the third dimension; the battle for supremacy between SEGA and Nintendo was upended by a new contender, Sony’s PlayStation, and the Strike series found a new home there after development of a 3DO continuation stalled. Reportedly, Mike Posehn assisted in the game’s early development before a larger team took over, redesigning the 16-bit graphics and environments into something altogether more lifelike by superimposing real-world topography onto polygonal maps. To better map out the game’s new perspective and approach, the team built replicas of their maps out of plywood and was the first game in the series to feature full motion video (FMV). Soviet Strike has been received rather fairly; reviews praise the graphical leap forward, the FMV sequences, and the gameplay and mechanics. While the difficulty, perspective, and some aspects of the presentation were also criticised, Soviet Strike was followed by a fifth and final entry the following year and even made it onto the PlayStation Store in 2009.

The Plot:
After the disintegration of the Soviet Union, former KGB Chairman Uri Vatsiznov (a.k.a. the Shadowman) seeks to fill the power vacuum and spark an international war. Only STRIKE, a special covert operations unit, has the weaponry and capability of opposing Shadowman, and the player must once again pilot an Apache helicopter to fight back against Shadowman and his nefarious comrades.

Gameplay:
Unlike its predecessors, which opted for an isometric perspective to create the illusion of being 3D in a largely 2D era of gaming, Soviet Strike switches to a top-down perspective, with the camera placed above and slightly behind the player’s fully armed chopper. The game does offer the option to switch your viewpoint using the ‘Select’ button, but all this seemed to do was swing the camera back around to its default position in the rare instances where it gets twisted around by the in-game action. Thanks to the additional buttons and movement options offered by the PlayStation’s graphical superiority, Soviet Strike both plays very similar to its predecessors but also expands the controls somewhat: the game offers four different button layouts, but the default is more than adequate, allowing you to fire your Hellfires with Circle, chaingun with X, and your Hydra Rockets with Square and adding a fourth, more powerful missile – one assigned to your wingtip – with Triangle. The previous games allowed you to “jink” but I found little use for this ability; here, it’s mapped to L1 and R1 and is very useful for “sidestepping” out of the way of incoming fire. L2 allows you to drop whatever cargo you’re carrying (though this was only necessary in one mission so could’ve just been an automatic function to discourage you from accidentally destroying vital cargo), R2 changes the heads-up display to remove the ammo, fuel, and armour so you just have the compass or remove everything entirely to more closely resemble the 16-bit games, and you can pause the game and review the map and current objectives with the Start button.

The PlayStation’s power offers a new perspective and enhanced presentation to the classic gameplay.

The map is now far more realistic than in the previous games and took me a little while to adjust to but is actually more useful than ever; at times, you’ll get onscreen notifications about mission objectives and can view these by pressing start, but you can also cycle through your mission objectives, enemies, and notable resources and have each highlighted on the map to make plotting an optimal route even easier. You can read up on each mission, enemy, and resource, review the status of your current objectives, and get a better sense of the story from this screen as well, though there’s still no way to manually quit the game without failing the mission and being forced back to home base. Although Soviet Strike doesn’t offer analogue support and you can’t select a co-pilot this time around, you can customise your chopper with a number of loadouts: you can balance your ammo across all weapons, focus on your missiles, or even head into battle with just your chaingun; you can also customise your wingtip loadout to give you the powerful sidewinder missiles, additional fuel, or disrupt the enemy’s radar. As ever, you’ll automatically winch up resources (fuel, ammo, and armour), targets (prisoners of war (POWs), enemy commanders, scientists, and the like), and cargo (nuclear cores and missiles) just by flying over them, though I found the new perspective made it a little tricky to properly target these, and the game completely goes away with the building collision seen in its predecessors; now, you’ll automatically fly over any structures in your way, which is helpful for maintaining your armour though at the cost of a level of realism. As ever, you’re given three lives (known as “attempts”) to complete each of the five campaigns and must complete a variety of missions within each campaign; the scoring system has been done away with, however, but, while the password system returns, you can manually save after completing each campaign.

Mission objectives are more of the same, though with a greater focus on action and destruction.

Strangely, considering the additional power of the PlayStation compared to 16-bit consoles, Soviet Strike doesn’t include any other vehicles or gameplay modes other than the main chopper, meaning that the variety on offer is more akin to Desert Strike than its sequels. Additionally, the missions you’re tasked with completing are extremely familiar to those from previous games and range from destroying radar sites to reduce the number of onscreen enemies, rescuing POWs and other targets and dropping them off at one of five different landing zones (necessitating a bit of back-and-forth traversal as you can only carry six passengers at a time), destroying enemy buildings and airfields, and disabling enemy ships. If you fail any one of these missions, either by being too trigger happy or not being fast enough to destroy or rescue certain targets, the entire campaign is scrubbed and you must return to base to try all over again from the beginning, though you’re often asked “only” to rescue a certain number of targets rather than all of them. As you progress through the game, some objectives will be hidden from you or unavailable until you complete others or pick up key intel, and the game maps are generally arranged in such a way to promote successive progression from one objective to the next. Things soon get quite nuanced as you must rescue an agent before he’s gunned down by a firing squad, drop him off and defend his position as he sets charges, enters a nuclear plant, or calls in an airstrike, dispose of nuclear missiles by dropping them into the sea, fend off a landing assault and, in the third campaign, destroy waves of different enemy tanks and vehicles as they move to converge on a number of different target sites. Enemies will now target friendlies this time around, destroying your resources and attacking villages and such, and you’ll sometimes be notified of additional side missions as you go, though you can ignore all of these without punishment if you wish. By the time you reach the fifth and final mission, things become extremely delicate; you must defend key targets from enemy attacks, rescue government officials before they’re killed, hunt down and destroy a number of bomb trucks before they destroy the city bridges, and defend your co-pilot as she races around the city to get a dignitary to an airport, all of which can get quite stressful as you have to redo the entire campaign from the start if you fail at any point.

Graphics and Sound:  
Naturally, Soviet Strike is a step up from its predecessors; almost everything is rendered in the finest polygonal graphics the PlayStation has to offer and given a gloss of realism that was ambitiously attempted in the 16-bit titles but not fully realised until the jump to 32-bits. Your helicopter is a fully functioning 3D model, one that easily and smoothly cuts through the air and can “jink” aside from incoming fire; it even starts to smoke when you take enough damage and will burst apart in a ball of fire when being shot down. Enemy vehicles are similarly rendered, appearing to be faster and more versatile as a result, and you’ll encounter the same level of fun detail applied to the various structure sin each environment; drilling rigs, chemical plants, power stations, and the glory of the Kremlin are all brought to life as well defined 3D models, most of which can be destroyed either as part of your mission, to uncover resources and targets, or to cost you your chance at completing the campaign. Although everything has been given a bit more substance and appeal through the shift to a fully 3D perspective, the overall presentation remains very similar to its predecessors, and you won’t really find anything new on offer here in terms of visual variety. Generally, though, everything runs very smoothly; the load times are pretty fast and I noticed very little slowdown during my playthrough, though there were instances of texture warping and screen tearing at times as was common in many PlayStation titles.

Soviet Strike is bolstered by in-game music, 3D models, and cheesy FMV sequences.

Despite the power of the PlayStation, however, the game is still limited to five campaigns and five locations, without any additional gameplay mechanics or options afforded to the player. Similar to how the first game was restricted to the desert, Soviet Strike sets all of its action in various locations in Soviet Russia, though there is some visual variety on offer; you start off in a rural area surrounded by snowy mountains, venture to a heavily fortified dock and sea, attack airfields in a frozen wasteland, and even venture into the desert once more, now far more interesting to look at thanks to the rocky terrain. You’ll also visit Transylvania, complete with wolf howls, radioactive dumping grounds, and suitably gothic aesthetics, and the bustling cityscape of the Kremlin for the final mission. There are a few fun things to spot here and there, from moose to people sunbathing on the beach and friendly villages, all of which can be destroyed. The game also includes in-game music for the first time; it’s nothing spectacular and simply comprised of thumping beats, but its greatly appreciated. There’s also a fair amount of voice work on offer as your co-pilot and passengers offer advice, praise, and reprimands, and the game’s story is entirely related through choppy, frantic FMV sequences that are full of the cheese and over-the-top acting you’d expect from this era of gaming.

Enemies and Bosses:
Although coated with a fancy new 3D coat of paint, most of the enemies you’ll encounter throughout Soviet Strike are largely and functionally the same as those from previous games. The game offers gun-toting soldiers and their rocket launcher variants, who can hide in towers, bunkers, and stream from armoured vehicles to attack the targets you’re trying to rescue, as well as various jeeps and tanks that roll around the map. Anti-aircraft turrets and cannons are also commonplace and should be targeted as soon as possible, though you’ll obviously want to avoid or take out the enemy’s larger missile-firing ordinance as soon as you can. Some campaigns see snowmobiles, jet skis, and Hind helicopters join the fray, as well as amphibious tanks and some enemy placements being hidden in buildings. It’s important not to fire away willy-nilly; not only to do risk expending your limited ammunition but you could also hit a vital target and cost yourself the mission if you’re not too careful, and the game’s new perspective can make hitting enemies a little tougher this time around so it’s always a good idea to make use of the “jink” function and to take cover behind buildings wherever possible.

Waves of enemies, armoured tanks, and escort/defense missions take the place of boss battles.

As before, Soviet Strike doesn’t feature any traditional boss battles; instead, you’ll need to do your fare share of retrieving, defending, and destroying targets. At first, this isn’t too much of a stretch as long as you don’t accidentally destroy the villa you need to be infiltrating in the first campaign but every time you need to defend a target you’ll be faced with waves of tanks. Enemies even spawn in to attack the scientists who are key to preparing a salt mine and deactivating a nuclear core in the Transylvania campaign, but the biggest test here is airlifting eleven of them out of an incoming blast zone with no onscreen time and the landing zone being a fair distance away, meaning it can be pretty hairy making the round trip to get everyone to safety. The second campaign sees you sinking enemy submarines, cargo ships, and a large, heavily defended carrier, some of which must be destroyed before they can escape which can be easier said than done if you’re running low on resources. Similarly, the third campaign can be quite the endurance as you must destroy waves of incoming enemy vehicles before they can destroy friendly settlements; ammo and other resources are scattered about but these are some of the game’s deadliest enemy vehicles and they advance in large groups, meaning it’s easy to cut get down by the crossfire. While flying about the Kremlin, you’ll need to be quick on the controls to keep the government officials from being killed and stop the bomber trucks from destroying the city bridges, but it’s the escort mission that can prove the most trying. Luckily, there’s a backup vehicle on hand if the enemy (or you, accidentally) destroys the limo, but the vehicle’s driving is so erratic, and the number of tanks and enemy vehicles so numerous, that it can be easy to lose track of your target and fail to protect it. Finally, you’ll need to be both aggressive and mindful when luring out and capturing the elusive Shadowman; you need to take him alive so you have to sink his escape boat and hold fire long enough to retrieve him, which can be difficult given how many hits some of these more heavily-armoured enemy vehicles can take.

Power-Ups and Bonuses:
Sadly, there really isn’t anything new on offer here that hasn’t been seen in previous Strike videogames. You start off with a set amount of ammo, fuel, and armour and these can all be replenished by finding various crates and resources across the game’s environments, all helpfully indicated on your map. You’ll very rarely find an extra life and maybe a brief upgrade to some of your arsenal, but what you see is basically what you get; beyond the different loadouts on offer, which basically amount to different difficulty settings for the game, there’s nothing different here at all and actually less than was seen in the last two games as you can’t switch to other vehicles this time around.

Additional Features:
Without a high score table, the only real reasons to play through Soviet Strike again would be to test out different loadouts, find faster and more efficient ways to complete each campaign, and maybe seek out some of the optional side missions to see how (or even if) they impact the story. There isn’t anything to unlock after finishing the game, though you can read STRIKE files on the main menu for some added context and make use to the passwords to jump ahead to later campaigns if you like. There are also, thankfully, some useful passwords on offer here; you can grant yourself stronger weapons, unlimited fuel, invincibility, extra lives, or even infinite ammo, fuel, and lives to make even the toughest campaigns a little easier. You can input these cheats in conjunction with level passwords as well, which is even more helpful, though none of these will help you if you kill or destroy the wrong target. Apparently, the SEGA Saturn version is actually superior in a number of ways and offers a few extra features so it might be worth checking that version of the game for a comparison.

The Summary:
If there’s one thing holding Soviet Strike back, it’s the sharp difficulty curve; for me, all of the Strike games have been pretty difficult and demand a lot from the player, giving such a small window for error and forcing you to return to base if you fail even one of your objectives. Thus, you’re forced to play perfectly right away, each and every time, and the game encourages trial and error and replaying each campaign until you find an optimal solution that allows you to make the best use of your resources to take out targets and rescue others without losing your pitiful number of lives. This is true of the Strike games I’ve played before but is somehow more palpable here, with the game throwing a whole mess of targets at you in the second campaign that will test the limits of your ammo conservation and patience in navigating the many onscreen hazards. Thankfully, the game’s passwords mean you can tip the odds in your favour, but even infinite fuel, ammo, and lives don’t amount to much if your allies are killed by enemy fire or your won trigger finger. Soviet Strike seems to veer more towards action than its predecessors; there’s far more resources available to you one each map and firefights and explosions are so much more action-packed and pronounced thanks to the 3D graphics, which makes the game very enjoyable, but it’s frustrating when you painstakingly airlift scientists to safety only to have them wiped out because you were busy with another objective and didn’t realise they were being picked off. The lack of additional vehicles and restricting the action to Russia, however varied the game’s maps may be, is also a shame but my overall experience with Soviet Strike was largely positive and I could see myself revisiting it for more polygonal action in the future.

My Rating:

Rating: 4 out of 5.

Great Stuff

Was Soviet Strike included in your PlayStation library back in the day? How do you think it compares to the previous games in the series? What did you think to the new perspective and 3D models? Were you disappointed by the lack of extra vehicles and being stuck in Russia or did you enjoy the new loadouts and combat options? Which of the campaigns and missions was the hardest for you to complete? Whatever you think about Soviet Strike, feel free share them below or comment on my social media and check in next Saturday for my review of the final entry in the series.

Game Corner [Turtle Tuesday]: TMNT II: Back from the Sewers (Xbox Series X)


Ever since Kevin Eastman and Peter Laird’s Teenage Mutant Ninja Turtles (TMNT) first debuted, the franchise has enjoyed worldwide mainstream success thanks to action figures, cartoons, and videogames. Since I found some free time this December, I decided to spotlight four such videogames every Tuesday of this festival season.


GameCorner

Released: 30 August 2022
Originally Released: 15 November 1991
Developer: Digital Eclipse
Original Developer: Konami
Also Available For: Game Boy, Nintendo Switch, PC, PlayStation 4, PlayStation 5, Xbox One, Xbox Series S

The Background:
In the late-eighties and early-nineties, you’d be hard pressed to find a franchise more popular than Teenage Mutant Ninja Turtles. Known as Teenage Mutant Hero Turtles here in the United Kingdom, the original dark and violent comic books exploded into an incredibly successful cartoon and extensive toy line, and a slew of videogame outings courtesy of developer Konami. Konami’s efforts helped to make the NES a household name here in the UK, produced two of the most beloved titles for arcades and home consoles, and also extended to three handheld titles for Nintendo’s super successful portable, the Game Boy. Building upon the standards set by its predecessor, Back from the Sewers improved upon the visuals despite the obvious limitations of the Game Boy hardware and expanded the gameplay options available to bring the sub-series more in line with its bigger, better 16-bit counterparts. Since a complete physical version of the game is still ridiculously expensive for the quality of the game, I was still glad to see Back from the Sewers included in the 2022 Cowabunga Collection alongside a host of other TMNT games and quality of life features.

The Plot:
The TMNT’s archnemesis, Oroku Saki/The Shredder, returns, now bolstered by the forces of the sinister Krang and kidnaps April O’Neil to get his revenge on the foursome.

Gameplay:
Like its predecessor, Back from the Sewers is a simple sidescrolling action game rather than a traditional arcade style beat-‘em-up. After selecting from three difficulty levels (Easy, Normal, or Hard), you pick one of the four turtles and battle your way from the left side of the screen to right across six stages (referred to as “Acts”). Again, the Game Boy’s limited colour palette means that the turtles are only distinguished by their individual weapons, but they again have different strengths and weaknesses: Leonardo is a bit of an all-rounder, for example, with Raphael having a fast attack but a terrible range. Sadly, the shuriken projectiles are gone; they’re replaced by a sliding kick that I only found a handful of uses for as it often leaves you open to enemy attacks, but you can toss shuriken when using ladders. The buttons have been remapped, with A allowing you to jump (holding it again allows you to get some extra height with a reanimated somersault) and X performing your attack; you can pull off a jumping attack by pressing X in mid-air and the game still allows you to hit back or destroy most incoming projectiles with your attack. Screen transitions are much more involved this time and initiated by climbing ladders but you’ll also clamber along pipes to cross gaps and there is a lot more emphasis on vertical traversal, with you hopping up and down girders and platforms using up and down on the directional pad and A.

The graphics and gameplay have been overhauled to more closely resemble the arcade titles.

The essential gameplay remains mostly unchanged; the screen and hardware limitations mean things are still very restrictive but there are far more influences from the TMNT’s arcade titles (the Foot jump up from manholes and you can fall down the holes, for example). The most obvious of these is in Act 2, which sees you racing along a bridge on a rocket-powered skateboard attacking enemies and dodging barrels, and Act 6, which recreates the classic Sewer Surfin’ level, to say nothing of the inclusion of not one but two traditional elevator sequences in Act 3 and 6. There are also some additional gameplay elements here, such as a race away from a rolling boulder in Act 4, mines being scattered across the ground, bursts of flames and machine gun fire, and jumping to a series of floating platforms in Act 5. Levels are a bit longer and more involved but the game loves to artificially up the difficulty by swarming you with an endless barrage of Mousers and bug ‘bots; these fuckers will pop out from holes in the caves and sewers and from mechanical ports and it can be extremely frustrating trying to fend them all off and back jumps in Act 3’s construction sites. Some stages seem to be on a loop as well, though I think this is just a consequence of the limited hardware, and you’ll still have to avoid the same obstacles like falling hazards and electrical bolts. As before, you can pick a different character between stages and if your health is drained; each turtle has their own health bar, any damage you take carries over to the next Act, and any captured turtle can be rescued in bonus games, with these now taking place upon completion of an Act and seeing you chasing around an enclosed arena to refill your health as much as possible in a short time limit.

Graphics and Sound:
Although Back from the Sewers is still handicapped by the Game Boy’s hardware, it’s an obvious graphic step up over its predecessor right from the start, where it ambitiously recreates the cartoon’s iconic opening sequence, and the game even includes some limited sound bites to punctuate the action. The game’s overall presentation is far more akin to the cartoon than many other TMNT titles as it not only basis its story art on the cartoon but even includes level intros and a pause screen that mimic the show’s episode titles. All of the sprites and environments have been overhauled and are all the better for it; the TMNT are bigger and more detailed, with Leonardo and Raphael now carrying two weapons each and all four having a more detailed idle animation. Although the sprites appear a bit stiffer and more clunky than other TMNT titles, they pull an amusing panic face when running from the aforementioned rock and will be left charred when caught in flames and explosions.

Sprites and environments have been greatly improved, despite the Game Boy’s limitations.

Similarly, the game’s environments are far more detailed than those seen in the previous game; this is evident from the opening Act, which actually provides a level of depth and visual interest to the sewers despite the lack of moving water. This extends to the streets as well, where vehicles and there’s an attempt to showcase some depth to the backgrounds can be seen, and in the overhauled Technodrome which now sports many of the same hazards and features as the arcade versions. While there are only a handful of unique environments, such as a cave and an overused construction site, there is much more to spot in the background, from Splinter working in a pizza parlour, Foot Soldiers hiding behind cover and sliding at you, chain link fences and cityscapes, and holes in the environment leading to sewers and such, though the caves can be a bit of a mess. There are far more enemies onscreen at any one time thanks to those damnable Mouser holes and turrets, and you’ll still get an annoying beep when your health is low, and the ending is even sparser than in the first game. On the plus side, the music is much more varied and there are some fun in-game cinematics, such as Splinter piloting the turtle blimp, and options to move around in a wider area like in the arcade titles once you’re descending down the stairwell.

Enemies and Bosses:
Surprising no one, you’ll primarily be battling against the Shredder’s inexhaustible army of robotic Foot Soldiers; they’ll jump in at you but actually managed to land a hit or two this time with their sliding kicks, dynamite, large projectiles, standing on each other’s shoulders, and firing bazookas at you. As indicated, the Mousers and bug ‘bots return; they might not bite your hand anymore but they are absolutely relentless, spawning so fast and so frequently that it’s hard to fend them off and progress through some stages. Roadkill Rodneys are also back, now firing laser bolts, and the game even includes a handful of mini bosses this time around; a swarm of Foot Soldiers, a Pizza Monster in the sewers, Baxter Stockman’s fly form on a rooftop, and the Game Boy debut of the Rock Warriors in General Traag and Granitor.

Boss are greater in number, strength, and visual appeal this time around.

Each Act naturally concludes with a boss battle; each sports a life bar but they’re all just variations on the boss battles we saw in the last game. Once again, your first test is against Rocksteady; this time, he jumps about while Foot Soldiers drop objects from the windows above and shoots deflectable bullets at you, pausing to laugh and leaving himself open for your attacks. Bebop (and his ridiculously disproportinate head) awaits at the end of the bridge stage, firing out a spread of diamond projectiles and knocking you silly with an uppercut when he’s not hopping all over the place. Krang makes a rare appearance in his little walker at the end of Act 3, stomping about firing rings and raining bombs on the arena, and leaping overhead to try and crush you in a nigh-unavoidable attack. You’ll have rematch with the Shredder at the end of Act 4; this time, he fires an energy wave at you that you can jump over but not duck under, dives at you with a flying kick, and runs from one side of the screen to the other, meaning you’re basically guaranteed to take damage as the window of opportunity to dodge and counterattack is so small. Granitor confronts you in Act 5, rolling about the place and roasting you with his flamethrower, but the additional movement options afforded in this arena help to make this more manageable. When you get to the Technodrome in Act 6, you’ll have to battle General Traag to get inside the machine in a conflict made more troublesome by the 2D pane and the treadmill under foot. The Shredder mutates into his Super Shredder form for the penultimate boss, plodding about and swiping at you, teleporting about the place, and confusing you with a bevvy of duplicates to try and land a sneak attack. Finally, you’ll take on Krang’s android body in the finale; this time, Krang is nice and big and is able to stun you with a ground-shaking stomp, however he’s far weaker than in the last game and much easier to defeat than either of the Shredder fights in this game since you can just jump kick him and run underneath him when he’s jumping in for an attack.

Power-Ups and Bonuses:
As in the last game, your only pick-ups are the odd slice of pizza; these are sometimes carried by enemies and sometimes found floating around the environment, generally before a boss battle, but are noticeably rare and still the only power-up available.

Additional Features:
Back from the Sewers trumps its Game Boy predecessor by including three difficult levels, but it’s still very limited in terms of in-game options. Luckily, the Cowabunga Collection awards a 70G Achievement for completing the game, offers a strategy guide to help with the game’s trickier sections, lets you view the game’s box art and manuals, includes both the Japanese and American versions, and offers various borders and display options (including an LCD display to recreate the Game Boy’s headache-inducing screen). The game also allows you to rewind the game with the Left Bumper and access save states using Right Bumper and you can take advantage of the enhancements to jump to any level you wish and enable infinite lives without fear of missing out on your Achievement.

The Summary:
Undoubtably,Teenage Mutant Ninja Turtles II: Back from the Sewers is a vast improvement over the TMNT’s previous Game Boy title. If the first one was a pretty basic proof of concept, this sequel takes the capabilities of the handheld system and uses them to its advantage to produce a title that’s still very restricted by its hardware but much more akin to a 2D version of its arcade counterparts. While the sprites and animations are still a bit stiff and limited, they’re far more detailed, as are the backgrounds, and I loved how the game included versions of the sidescrolling chase sequences from the arcade games. Placing the bonus game sat the end of Acts was a nice way to break up the monotony and I enjoyed the improved music, cutscenes, and the expanded length; tossing in a few mini bosses also helped and it was just great to have so much to se happening around you. Unfortunately, it’s still not perfect; I don’t mind the loss of a turtle as a life system but the endless swarm of Mousers and bug ‘bots was needlessly frustrating and some of the bosses were almost impossible without full health. The strange loop system and slide kick were also odd inclusions, but the overall presentation was much improved and far more fitting for the license and the standards set by its technically superior counterparts. There are still better games on the Game Boy, and better TMNT videogames, however, but this one is a little bit more worth your time compared to its predecessor.

My Rating:

Rating: 2 out of 5.

Could Be Better

Was Teenage Mutant Ninja Turtles II: Back from the Sewers included in your Game Boy library back in the day? How do you think it compares to the last TMNT Game Boy game? What did you think to the additional elements included from the arcade titles? Were you a fan of the overhauled sprites and backgrounds, and which character was your favourite? What did you think to those Mouser holes and the addition of mini bosses? Do you have any fond memories of the Game Boy? Whatever your thoughts, you can share the, in the comments section below or you can join the discussion on my social media.

Game Corner [Turtle Tuesday]: TMNT: Fall of the Foot Clan (Xbox Series X)


Ever since Kevin Eastman and Peter Laird’s Teenage Mutant Ninja Turtles (TMNT) first debuted, the franchise has enjoyed worldwide mainstream success thanks to action figures, cartoons, and videogames. Since I found some free time this December, I’ve decided to spotlight four such videogames every Tuesday of this festival season.


GameCorner

Released: 30 August 2022
Originally Released: 3 August 1990
Developer: Digital Eclipse
Original Developer: Konami
Also Available For: Game Boy, Nintendo Switch, PC, PlayStation 4, PlayStation 5, Xbox One, Xbox Series S

The Background:
Back in the late-eighties and early-nineties, it was tough to find a franchise more popular than Teenage Mutant Ninja Turtles (or Teenage Mutant Hero Turtles as we knew them in the UK); the Teenage Mutant Ninja Turtles (1987 to 1996) cartoon and extensive toy line saw the “Heroes in a Half-Shell” dominate an entire generation. The TMNT were also prominent videogame characters thanks to the efforts of Konami, which saw them help to make the NES a household name here in the UK and produce two of the most beloved arcade games that also impressed on home consoles back in the day. Not content with their arcade and 8- and 16-bit titles, Konami also produced three handheld titles for Nintendo’s ground-breaking portable console, the Game Boy. Limited by the Game Boy hardware, Fall of the Foot Clan was obviously lacking in many areas and struggled to live up to the standards of its technically superior predecessors, though it was still praised for its ambitious attempt to give fans a portable TMNT experience. With a complete version of the title being pretty expensive for what it is, it was very much appreciated to see it included in the 2022 Cowabunga Collection alongside a host of other TMNT games and quality of life features.

The Plot:
When their archnemesis, Oroku Saki/The Shredder, kidnaps April O’Neil, the TMNT emerge from the sewers to take on the Shredder’s Foot Clan once more.

Gameplay:
Unlike most TMNT videogames at the time, Fall of the Foot Clan is a pretty simplistic sidescrolling action game; you pick from one of the four turtles and travel from left to right across five stages attack enemies with their signature weapons. The TMNT are even more indistinguishable from each other thanks to the Game Boy’s non-existent limited colour palette but are, as ever, identified by their weapons and the reach offered to them. Raphael gets up close and personal with foes with his sai, for example, while Donatello is afforded a greater reach with his longer bo staff, however this is so far the only TMNT game I’ve played that allows you to throw shuriken by default (and an infinite number to boot), thereby affording even the most limited ninja turtle a projectile attack. The controls are as simple as you could want; you press X to jump (and holding the button sees you jumping higher into a somersault) and A to attack. You can attack in mid-air and press down and A to toss your shuriken, but a big mechanic in this game is the ability to swat away most incoming projectiles with your attack, which is almost mandatory given the much smaller screen size of the Game Boy.

A basic sidescroller that mixes up its gameplay with bonus games and mild platforming.

Gameplay is very restrictive and doesn’t really ask all that much of you other than to continue to the right, slashing at enemies as they jump at you, and avoiding the odd level hazard, such as falling blocks, bouncing balls, electrifying obstacles, and spiked ceilings. Here and there you’ll get the option to hop up to a higher level or wade through sewer water; you can destroy barriers to reach bosses, hop on and rush underneath pistons, jump over fire pits, and leap from log to log over a raging river. If your turtle runs out of health, they’ll be “captured” and you’ll have to pick another to tackle the stage again, though you’ll helpfully be placed at the start of the boss battle if you reached that point when you died. One mechanic Fall of the Foot Clan incorporates that separates it from pretty much all of the classic TMNT games is the presence of hidden bonus areas in every stage; these aren’t immediately obvious (though the strategy guide clearly highlights them for your benefit) and allow you to restore your health by guessing the number Master Splinter has in mind, fighting with Krang by eradicating as many stars as possible, or partaking in a bit of target shooting. You’re generally given a few chances to succeed at these but they’re not particularly inspired or fun or easy, though I appreciate the attempt to mix the simplistic gameplay up a bit with these little distractions.

Graphics and Sound:
Naturally, you need to keep expectations low here; not only is Fall of the Foot Clan a Game Boy title, it’s an early game Boy title so it plays things very safe and doesn’t try to throw too much at the player or tax the game engine. The result is enemies leaping at you largely one at a time and barely launching an attack before you take them out in one hit and keeping the amount of onscreen action to a minimum, but there are a surprising number of little details that certainly make it somewhat ambitious. The TMNT don’t have idle animations and Leonardo and Raphael only have one weapon each rather than the usual two, but their weapons move as they walk, and Raphael and Michelangelo even twirl theirs as they plod along. When ensnared by a Roadkill Rodney, you’ll even see your turtle’s skeleton as they’re shocked and they get crushed by pistons and weights as well, all of which are nice little touches I wouldn’t really expect from such a limited title.

Though basic, the graphics and presentation are ambitious at times.

Environments aren’t really anything to shout about; stages are pretty long, consisting of a few different screens and transitioning from different areas as you progress, but there isn’t a great deal of detail in the background in environments like the Technodrome. At the same time, the streets have a bit going on, with graffiti and posters on the walls behind you, and you’re even able to hit a parking meter to use it as a projectile at one point. I also liked seeing the mountains in the background of Stage 4 but easily the most visually interesting stage is Stage 3, which sees you jumping across the backs of trucks and vehicles down a speeding highway. Sprites are all nice and big and certainly capture the essence of the cartoon; the Foot even drive past in a jeep at one point and the classic TMNT theme plays, with the rest of the chip tune soundtrack being very fitting to the franchise and the action. The game’s story is as basic as you could want and is told using some basic text under pretty decent sprite art recreating scenes from the cartoon. Unfortunately, the ending falls a little flat, with the Technodrome just disappearing from frame and the epilogue consisting of a bunch of text, and you’ll be assaulted be an incessant beeping when your health is low, which is always a pain.

Enemies and Bosses:
You’ll never believe it but you’ll primarily be fighting off an endless supply of Foot Soldiers on your short journey; they’ll come jumping in and be reduced to a little explosion before even getting a chance to attack, but they’re capable of tossing darts and bricks at you but are largely disposable. Generic enemies like bats, fish, and anthropomorphic fireballs are also a problem, but the classic TMNT enemies like Mousers and Roadkill Rodneys are also present and capable of chomping on your hand and electrocuting you, respectively. Each stage naturally culminates in a boss battle against five of the TMNT’s most recognisable and popular villains, each of which is afforded a life bar.

Classic TMNT enemies are recreated in the Game Boy’s limited hardware.

The first boss you’ll battle is Rocksteady, who simply wanders across the screen blasting at you from his rifle; Bebop ups the ante by rushing at you in a charge, punching you up close, and firing rings from his pistol, but it’s not exactly a stretch to hop over them, swipe them with your weapon, or toss a shuriken their way. Baxter Stockman attacks in his fly form at the end of the all-too-brief Stage 4; he hovers overhead, firing projectiles at you, and swooping down in a dive, but again you can just jump over him and attack without too much difficulty. In a change of pace, the Shredder is encountered as a penultimate boss rather than the final battle; he can be a bit tricky if you go in with low health, advancing towards you and swiping with his katana before teleporting to safety after. This means that Krang is the game’s final challenge; he emerges in his android body from a transport wall and stomps about, completely immune to your shuriken and trying to kick you in the face. While he’s quite a large target and he likes to jump about, you can again jump over him and attack him and whittle his health down if you stay in a good rhythm.

Power-Ups and Bonuses:
As ever, the TMNT can restore their health by picking up the odd slice of pizza; these are sometimes dropped by enemies and sometimes found floating around the environment, occasionally before a boss battle, but are noticeably infrequent and are the only power-up you’ll find in the game.

Additional Features:
Unlike most TMNT videogames, there’s no two-player option here. In fact, there aren’t any options to speak of in the base game, not even a difficulty mode or any sound options. Thankfully, the Cowabunga Collection remedies that, awarding you a 70G Achievement for completing the game and allowing you to view the game’s box art and manuals, switch between the Japanese and American version, and apply various borders and display options (including an LCD display to recreate the feeling of playing on the Game Boy’s eye-watering screen). The enhancements not only allow you to remove slowdown and sprite flicker, rewind the game with the Left Bumper and access save states using Right Bumper, but you can also choose to practice the bonus games if you want to bump up your health in your next playthrough.

The Summary:
I don’t like to throw too much shade at Game Boy titles, especially early ones, but Teenage Mutant Ninja Turtles: Fall of the Foot Clan really isn’t all that impressive or fun to play through. There are some ambitious and admirable elements here and there, don’t get me wrong; the odd bit of animation, the ability to throw shuriken, the attempt at variety in the stages are all positives and I liked how it did the best it could with the hardware limitations to adapt the aesthetic of the cartoon. However, there’s no denying that this is a far too simple effort to really give it too high a score, especially compared not only to the obviously better arcade and home console TMNT games but also the later Game Boy titles. This feels like a proof of concept to show that a simple sidescrolling action game can be cobbled together with the license rather than an attempt to really try anything too innovative with the platform. Throwing in bonus games was a nice, if frustrating, touch and there was even some call-backs to the superior arcade titles here and there, but the TMNT would definitely be represented far better in subsequent Game Boy games and I can’t see myself going back to this one over the other TMNT games included in the Cowabunga Collection.

My Rating:

Rating: 1 out of 5.

Terrible

Did you have Teenage Mutant Ninja Turtles: Fall of the Foot Clan in your Game Boy library back in the day? What did you think to gameplay and presentation of the game, especially regarding its simple sidescrolling format? Which of the characters was your favourite to play as and which boss was the most exciting for you? Were you able to beat the bonus games? What did you think to the additional features added to the Cowabunga Collection? What’s your favourite Game Boy title? I have a comments section down below where you can share your opinions on the TMNT’s Game Boy debut, or you can start the discussion on my social media.

Game Corner: Jungle Strike: The Sequel to Desert Strike (Mega Drive)

Released: 16 December 1993
Developer: High Score Productions
Also Available For: Amiga, MS-DOS, Game Gear, Game Boy, Super Nintendo Entertainment System (SNES), PlayStation Portable

The Background:
Following the end of the the Gulf War, Mike Posehn expanded upon the air rescue mechanics of Choplifter (Dan Gorlin, 1982) to create Desert Strike: Return to the Gulf, a nonlinear, mission-based military title that took place in a sandbox environment and eschewed typical videogame mechanics like bosses and power-ups. Following that game’s success, producer Scott Berfield, game director John Manley, and associate producer Tony Barnes were tasked with creating the sequel, which retained the core mechanics of its predecessor alongside new locations and vehicles. The developers struggled to decode the graphics files and ensure that each version of the game ran smoothly, which was made much simpler thanks to Stuart Johnson’s map editor. Like its predecessor, Jungle Strike was well received upon release; the game has been praised for improving upon almost every aspect of the original, though the difficulty curve was again noted as a concern. Regardless, Jungle Strike his generally regarded as one of the top Mega Drive games of all time and was followed by a third entry on the same system in 1994 and two more titles across the next generation of home consoles.

The Plot:
General Kilbaba is dead but his son (…also named Kilbaba…) swears revenge against the United States of America for interfering in his father’s dreams of world domination. He teams up with notorious drug lord Carlos Ortega and establishes himself in South America, necessitating military intervention using a variety of well-armed vehicles.

Gameplay:
Just like the first game, Jungle Strike is an isometric action shooter in which you’re placed at the controls of a specialised Comanche helicopter and tasked with completing a variety of mission objectives, now across nine campaigns and taking place in a number of locations and maps rather than just out in the desert. Also as before, your Comanche has three types of weapons: a chain gun, rapid-fire Hydra missiles, and slow but powerful Hellfire missiles. You can change up the default buttons for these weapons and I absolutely recommend that you do since you don’t want to waste your more powerful rockets and, like last time, ammo and other resources are quite limited. You can choose between controlling “With Momentum” for a more realistic experience or “No Momentum” to make stopping easier, and can again pick between a number of different co-pilots, each with different strengths (some are better with the winch, which automatically picks up resources and people, while others are better shots), though the very best co-pilot is listed as missing in action (as are others) and needs to be rescued in a later mission. You also begin from the first campaign and are awarded a ridiculously long password after clearing each one so you can skip ahead. So far, so familiar.

In addition to the Comanche, there are new vehicles to control here, each with their own pros and cons.

Where the game differs, however, is not just in the variety of its locations but also in the new vehicles available to you; three additional vehicles can be found in three specific missions, with each controlling a little differently and offering new ways to traverse the maps and engage with the enemy. The first new vehicle is a hovercraft that can drop mines in the water and help you sink boats and submarines; it’s pretty decent to control, though the isometric angle can make it tricky to manoeuvre under bridges. Campaign five has you hop on a motorcycle, which is the only way of destroying the armoured trucks rolling around the map; small and spritely, the motorcycle can be a little difficult to control and isn’t really built for combat and feels a bit clunky. Finally, on the eighth campaign, you’ll uncover and control a stealth bomber; this thing is constantly moving, and your up and down inputs will cause it to descend and ascend, respectively. It has unlimited fuel and ammo, which is great for laying waste to targets, but it’s incredibly fragile, very difficult to manoeuvre (especially in tight corners), and you’re forced to both respawn at the landing strip where you first found it when downed and to successfully land it once your missions are complete. You get three lives to complete each campaign and, when they’re all lost, you have to start all over again with no checkpoints (though you can, very rarely find extra lives in the campaigns now). Pausing the game allows you to view a map of your current location and cycle through different points of interest, as well as review your mission objectives and status, which is super handy for when you want to plot an optimal route to pick up some supplies and take out some targets on the way to a certain objective. Your vehicle’s fuel, armour, and ammo are also all displayed here; you start with 100 units of fuel and 1000 units of armour, and will have your fuel replenished to 25 or 100 depending on how you’re shot down (if you’re shot down because of damaged, you won’t get full fuel, basically) but your ammo is extremely finite and can only be restored using ammo crates.

Many missions carry over from the first game and have you destroying or picking up targets.

You can also only carry six passengers at a time, so be sure to keep an eye on your current load and drop some off at a landing zone if need be, however it should be noted that you don’t need to rescue every prisoner of war (P.O.W.) or innocent you come across, nor do you have to engage with every enemy you see, either. In fact, since supplies can be so hard to come by, it’s actually advisable that you don’t waste resources destroying every enemy; indeed, I found a useful tactic was to position myself in such a way that enemies either couldn’t see and shoot at me or that caused their projectiles to attack and destroy buildings or other targets. As before, it’s generally advised to you complete missions in order and you usually have to do this as some campaigns only tell you what your other missions are once you’ve completed the ones available to you. In this regard, Jungle Strike is, like its predecessor, made to encourage multiple playthroughs; once you know where targets are and what your missions are, you can plan an optimal route, destroying targets like underground bunkers, power plants, and terrorist training grounds, rescuing agents, P.O.W. or capturing bad guys, and eliminating moving targets that are either difficult to trace, only show up with the right intel, or don’t show up at all. More than once, you’ll be tasked with protecting a Presidential escort (a limo in the first campaign and Air Force One in the last) from reprisals, which is quite fun; you’ll also need to find and sink nuclear submarines and stop the bad guys getting away with plutonium, destroy power transformer towers and uncover hidden nuclear chambers in the snowy wastes of campaign six, and rain fire on drug plantations and rocky outgrowths to uncover Tomahawk missiles. While many of Jungle Strike’s mission objectives aren’t much different to what we saw in Desert Strike, the variety is appreciated; sometimes you need to destroy up to thirteen different targets, often strewn all over the map, while others you don’t need to destroy or rescue everything and everyone, though you have to be careful to not be too trigger-happy and destroy vital targets as this’ll cause a complete mission failure. On the plus side, though, there’s rarely any timed tasks; you need to destroy four eighteen-wheelers carrying nuclear missions in the last campaign, and first capture and then eliminate the two antagonists before they can escape, but these come near the end of the game for an added challenge rather than being scattered throughout other campaigns.

Graphics and Sound:  
Graphically, not too much has changed or improved since Desert Strike beyond the title screen, which now uses a polygonal sprite for the Comanche, but the overall presentation of the game is vastly improved. Sprites, models, and environments are all very similar, with the same sound effects and use of text to convey mission completion, failure, the game’s story, and when you’re in a danger zone or running low on fuel or armour, but the maps are so much better this time around. Before, you just flew around the same area with a slight palette swap and some different structures here and there, with the most variety appearing in the final mission, but you instantly see how much more varied Jungle Strike is from the very first campaign, which sees you flying around an ambitious isometric recreation of Washington, D.C., complete with fully destructible White House and various other monuments (which also need protecting from enemy forces).

The graphics are much of the same, but overhauled and bolstered by a new vehicles and environments.

This carries through to the game’s other locations as well, which include an expanse of water with tiny islands dotted about and a large bridge running across it, and a couple of trips to the titular jungle (one at night, with low visibility, where explosions and gunfire light up the environment and two others in the day time, where rocky mountainsides, pyramid-like structures, and stone columns are plentiful). You’ll also fly through the frozen Soviet wastes and revisit the desert, both of which add to the visual variety of the game, and the pause menu and user interface have both been given a complete overhaul. Sadly, there’s still no in-game music, which can really make gameplay very monotonous, and it’s a shame as the title screen and story cutscenes are punctuated by some rocking tunes. These cutscenes are again made up of larger sprites and artwork, with some notable animation frames, but they do the job, as does the dialogue text; it’s fun seeing the Mad Man’s tanker truck explode in a blazing inferno and seeing your Comanche come in for a landing or launch a missile strike or your pilot character interrogate enemy agents helps to break up the gameplay a bit. It’s the 2.5D sprite work that steals the show, though; while the isometric perspective can make it a little difficult judge your precision and you can bonce off of buildings and rocks if you’re not careful, there’s a certain appeal to it and I always get a sense of satisfaction in seeing my missiles leave another enemy stronghold a flaming mess.

Enemies and Bosses:
While many of the enemy troops are functionally similar to the ones seen in Desert Strike, there’s been a few changes here; enemy soldiers still fire their guns and rockets at you, often masked by the foliage and environment, but you’ll also find seemingly innocuous civilian vehicles have been repurpose to either ferry bombs or fire at you and other targets. Guard towers, Gatling guns, and anti-aircraft placements are commonplace enemy targets, as are the smaller tanks and armour vehicles which patrol near to your mission objectives and fire bullets and missiles at you. You’ll also have to deal with a few more instances of gun boats and enemy helicopters, with these latter being able to be destroyed before they can take off, and stationary missile launchers which don’t pose a threat to you but are often heavily guarded. Thankfully, as mentioned, you can often strafe or position yourself in a way to avoid being damaged or have the enemy blast open jails and enemy stronghold son your behalf but be careful: destroyed buildings and targets are often as likely to hide an enemy unit as they are your object or some much-needed ammo. One of your more persistent and formidable enemies will be the Sheridan tanks and slow-moving mobile cannons, which can bring you down in just a few shots, and your own trigger finger; be sure to not just blast away at your targets in case you accidentally gun down someone you’re supposed to capture or destroy a nuclear warhead you’re meant to retrieve.

In place of traditional bosses, you’ll need to shoot down and destroy heavily armoured key targets.

As before, the game doesn’t really include any traditional boss battles, but there are a few instances that could be said to count for them. In the second campaign, for example, you need to use your hovercraft’s mines and rockets to destroy some heavily armoured nuclear submarines (though actually placing said mine, and avoiding their rockets, is easier said than done, especially as their sprite tends to vanish if you’re too far away). In campaign five, you need to flush out five armoured cars that can only be destroyed with the motorcycle’s mines, and you’ll also be tasked with defending your co-pilot as he sets explosives in the war room in this campaign but, as no heavy artillery appears, it’s not so difficult. In campaign eight, you need to blow up these stone pyramids and destroy the nuclear warheads, detonators, and scientists within, which can be tricky as they’re well-guarded and the stealth bomber is clumsy to move around without crashing, but you’ll also need to blow a hole in the Drug Lord’s fortified bunker, then land so your co-pilot can drive a drunk into it for you to explode, and then shoot down his escape chopper and pick him up for due processing. The most annoying campaign is the ninth and final one, which has you frantically flying all over Washington for thirteen enemy vehicles and then destroying a bus and a fuel tanker with the Drug Lord and Mad Man on, respectively, before safeguarding the White House once more. It’s not exactly difficult to take these out, as long as you’re smart about your ammo and supplies, but actually locating most of these targets is nigh-on impossible as they don’t appear on the map.

Power-Ups and Bonuses:
As in the first game, you can fly over ammo crates, fuel tanks, and armour to restore each to full capacity. On many of the maps this time around, though, these resources are hidden behind pyramids, buildings, vehicles, and other destructible targets, meaning they don’t always appear on your map screen and you often have to waste ammo to resupply something else. Occasionally, you’ll be able to pick up an extra life and a quick winch, which speeds up your winch motion, and it’s beneficial to try and rescue the M.I.A. co-pilots, such as Wild Bill, as it can dramatically increase your accuracy, fire rate, and winch speed.

Additional Features:
There’s not really much on offer here; Jungle Strike’s additional content is all contained within the gameplay, and there are no other difficulty settings, multiplayer options, or game modifiers to speak of. You can find passwords online, however, that let you not only skip to later campaigns but also award you twenty-three lives (more than enough to finish every campaign in the game since the count resets to twenty-three at the start of each new campaign). Otherwise, your main objective for replaying the game (beyond it being fun) is to try and accumulate a higher score; there isn’t a scoreboard, however, so you’ll just have to note these down yourself.

The Summary:
I played both Desert Strike and Jungle Strike quite a bit as a kid, either on the Amiga or after borrowing them from friends. Although I struggled with Desert Strike and could barely finish the first campaign in that game, Jungle Strike was much easier and more forgiving for me to play through; everything that was so appealing in the first game is still here, but the added variety in the campaign maps, enemy units, and available vehicles makes it vastly superior in every way. While I was disappointed that the other vehicles weren’t available in my campaigns (and they probably could’ve been), they made those campaigns even more memorable, and I can understand their limited usage since their controls and weapons were a bit clunky and there were plenty of drawbacks to even the most powerful jets. Mission objectives are immediately familiar to anyone who’s played the last game, but they’re pretty fun to tackle, with only a handful being tedious and forcing you to search all over or destroy multiple targets. Managing your fuel and ammo is key to succeeding at Jungle Strike, which means you’ll either need a guide to plan an optimal route or use a bit of trial and error to figure out the best ways to go to take out a few targets, pick up some resources, and drop off any passengers. While it’s still disappointing that there’s no in-game music, the sheer visual variety on offer more than makes up for it; just getting away from the dreary desert makes Jungle Strike instantly better than the original and I really enjoyed all the destructible objects, recognisable landmarks, and little touches like cows and desert springs being scattered across the map. Overall, I would say I much preferred Jungle Strike as it was far more accessible and rewarding to play since I was actually complete and experience the entire game this time around, so I would absolutely recommend this one over the original for all the improvements it makes to the formula.

My Rating:

Rating: 4 out of 5.

Great Stuff

Did you enjoy Jungle Strike: The Sequel to Desert Strike? How do you think it compares to the first game, and it successors? Which of the new vehicles was your favourite? Did you like that the game featured more diverse environments? Which of the campaigns and missions was your favourite, or the hardest for you to complete? Whatever your thoughts on Jungle Strike, sign up to share them below or comment on my social media and check in next Saturday for my thoughts on the third game in the series.

Game Corner [Turtle Tuesday]: Teenage Mutant Ninja Turtles (Xbox Series X)


Ever since Kevin Eastman and Peter Laird’s Teenage Mutant Ninja Turtles (TMNT) first debuted, the franchise has enjoyed worldwide mainstream success thanks to action figures, cartoons, and videogames. Since I found some free time this December, I’ve decided to spotlight four such videogames every Tuesday of this festival season.


GameCorner

Released: 30 August 2022
Originally Released: 12 May 1989
Developer: Digital Eclipse
Original Developer: Konami
Also Available For: Amiga, Amstrad CPC, Atari ST, Commodore 64, MS-DOS, MSX, Nintendo Entertainment System (NES), Nintendo Switch, Nintendo Wii, PC, PlayChoice-10, PlayStation 4, PlayStation 5, Xbox One, Xbox Series S, ZX Spectrum

The Background:
The Teenage Mutant Ninja Turtles (or Teenage Mutant Hero Turtles here in the UK) were the in thing for kids in the eighties or nineties thanks, largely, to the popularity of the Teenage Mutant Ninja Turtles (1987 to 1996) cartoon and an extensive toy line. A couple of years before Konami brought the “Heroes in a Half-Shell” to the arcades, the developers helped to make the NES a household name here in the UK with this adventure title, produced at a time when videogames (especially those on Nintendo’s ground-breaking platform) were built to last by ramping up their difficulty. Reportedly the first TMNT product to release in Japan, the game suffered from glitches and exploits across all its versions and is often cited as one of the hardest NES games of all time thanks, largely, to it featuring in an early episode of The Angry Video Game Nerd. regardless, the game was a huge success at the time and sold over four million copies worldwide despite mixed reviews, with some praising the controls and graphics and others flagged the lack of polish and recognisable elements from the franchise. Although readily available at the time on a variety of consoles, Teenage Mutant Ninja Turtles has been pretty difficult to come by after being removed from the Wii Shop Channel in 2012, that is until this Cowabunga Collection released for modern consoles alongside a host of other TMNT games and quality of life features.

The Plot:
The Turtles are on a mission to retrieve the Life Transformer Gun from their archnemesis, Oroku Saki/The Shredder, who has kidnapped their friends and is terrorising New York City with bombs, ninjas, and his army of robots.

Gameplay:
Unlike the vast majority of TMNT videogames, the original NES Teenage Mutant Ninja Turtles title is a 2D, sidescrolling action platformer that allows you to switch between the four titular turtles at any time via the pause screen. Being as it was an NES title, your controls and options are somewhat limited, but also effective; X sees you attacking with your turtle’s signature weapon and A allows you to jump, and you can both hold A for a higher and longer jump and attack while in mid-air or crouching. The TMNT are separated not only by the colour of their bandanas but by the range, speed, and power of their weapons; Donatello has the longest reach and is great for dispatching enemies above or below with his bo staff, for example. He and Raphael also seem to dish out more damage, destroying some enemies in one hit that would take Leonardo and Michelangelo two or three, however Leo and Mike have better options for attack with an arc or a swing. You’ll also comes across a number of secondary weapons with limited ammo, which you can switch to using the Xbox controller’s ‘View’ button and will find some pick-ups that activate automatically to carry you across gaps. Each turtle has their own health bar, and the game “helpfully” alerts you when you’re at low health by emitting a warning wound, so you’ll need to switch between them to get past trickier sections with fire pits and the like. If a turtle’s health is depleted, he’ll be captured and unplayable until found and rescued, though it’s game over if all four are captured.

Navigate through mazes, repetitive areas, and the infamous electric seaweed to rescue your allies.

The game is split into two very distinct sections; the first is a top down overworld, a recreation of New York City and the surrounding district, which is split into six areas that act as the stages of the game. Here, you can wander about, attacking enemies and avoiding larger vehicles such as Roller Cars, carpet-bombing fighter jets, and helicopters with search lights. At one point, you’ll hop into the turtles’ Party Wagon, which allows you to blast at Roller Cars and enemies on the overworld with X, though you’ll need to search for a handful of high-powered missiles to destroy barriers with X and progress further. The second part of the game is the 2D, sidescrolling action stages, which are accessed via manholes placed all over the overworld or by entering certain buildings. These drop you into claustrophobic sewers, aircraft hangers, enemy warehouses, and robot factories and see you navigating past enemies, hazards, and tricky jumps to small blocks or platforms to either progress, find health and pick-ups, rescue a comrade, or access new areas, like the rooftops and caves. Not only to enemies respawn when you leave the screen for just a second, but hazards are numerous; you’ll be stuck on conveyor belts, walking across some smaller gaps and trying to jump across others to tiny blocks, and hopping over spike and lava pits. At some points, you’ll be dumped back onto the outside if you fall while jumping across the rooftops or landing in the raging sewer waters, and you’ll also have to contend with spiked ceilings and instant-kill crushing spiked walls near the end of the game. Easily the game’s most infamous section is encountered pretty early on when, after reaching the damn, you’re given 2:20 to navigate an underwater section full of electrical bolts and electrifying seaweed in search of eight bombs to disarm. While it’s true that this is a difficult section thanks to the unfair hit boxes, the tight time limit, and the labyrinthine nature of the section, it’s made all the easier with the Cowabunga Collection’s rewind feature and you can tank through some of it using well-timed character swaps.

Graphics and Sound:  
Since it’s an NES title, the graphics are obviously somewhat dated; the top-down sections on the overworld aren’t great, with movement being noticeably clunky, and the game’s reliance on mazes and looping paths can get annoying when you’re stumbling around the airport trying to find the correct path or dodging searchlights in the dark to find the right manhole. The variety in these top-down locations is appreciated, though; you’re in the city, visit a dam, pop along the JFK Airport, and infiltrate the Shredder’s secret base under cover of darkness, and the game opens with a pretty ambitions character introduction screen and is accompanied by some fitting chip tunes to help ease even the most annoying sections, and each stage ends with a rendition of the TMNT theme to punctuate your victory. When you pause the game, you’ll get access to a pretty basic grid-like map that isn’t much help but it’s better than nothing; April O’Neil and Splinter will also offer some limited advice to give you an idea of what you’re looking for or how to defeat the game’s bosses, but these features are stripped from you in the final area as you’re “lost”.

Although limited by the hardware, the game’s fairly distinctive and graphically ambitious.

The 2D sections are where the game shines since you can actually see the TMNT in action, though the actual sprites obviously don’t emote or animate all that much unless they’re being swept away by the current. Mostly, the controls work just fine; you’re generally restricted in your horizontal and vertical movement so it’s rare that you have to make precise jumps but, when you do, they have to be pretty bang-on. Hit boxes are quite big, which is an issue in such close quarters, and backgrounds can be disappointingly bland and repetitive; all that separates one sewer section from another is the amount of brown and green, for example, so it can be easy to get lost, especially in sections that have to warping about trying to find the right exit. Things pick up a bit as you progress, with large background elements being used as static boss sprites, and you can avoid any slowdown or sprite flickering by turning them off with the Cowabunga Collection’s enhancements (though a fair amount still remains, perhaps unavoidably). The game’s story is primarily told through limited text and some art portraits, but the game doesn’t include any credits and it’s a bit cheap how the enemies constantly respawn but the health items and other pick-ups don’t, meaning you sometimes have to backtrack into dangerous areas to restock your health and ammo.

Enemies and Bosses:
Considering the source material has a near inexhaustible cast of characters to choose from, Teenage Mutant Ninja Turtles features some truly bizarre and misplaced enemies; I may not be able to remember every TMNT character but I could barely recognise any of the enemies encountered here, with the shuriken-throwing Foot Soldiers and the Mousers being the most familiar for me. There are some really weird baddies here, ones that are far too generic for a TMNT game and sadly symptomatic of this era of gaming; we’ve got robot bugs, spider-like jumpers, flaming men who spit out smaller minions, a large porcupine that shoots spines at you, a big bald asshole with a chainsaw, flying eye drones, this weird blank slate of a humanoid who becomes invulnerable when crouched down, another bald asshole who tosses boomerangs, crawling eyes, giant mutated frogs and fleas, and some truly aggravating Dimension X Troopers who hover about firing lasers right at you, no matter where you are, and always attack in groups! Some of these enemies will act as mini bosses, gaining a health bar and teaching you their attack patterns and such, but most of the time they’ll swarm the screen just to annoy you and screw up your jumps.

You’ll need to defeat TMNT mainstays and a robo-turtle to rescue April and Splinter.

Each stage of the game ends in a boss battle, generally with the life of one of the TMNT’s allies at stake; Bebop goes solo in this game as Rocksteady is holding April hostage, though he attacks in very much the same way as he always does, by charging at you with a head of steam, punching you when you get close, and jumping at you with a kick. It’s pretty simple to stay at the right side of the screen, jumping up to where Rocksteady and April are to avoid Bebop’s limited attacks, and smack him with your weapons. Rocksteady gets in on the action at the end of the warehouse stage and follows very much the same pattern; while April sits all tied up, Rocksteady charges at you with his horn, tries to jump at you, and fires bullets at you. However, you can destroy these projectiles, which is always helpful, and you can absolutely cheese this by hopping on top of the crates on the right-hand side and using Donatello’s crouch attack to defeat him without taking a single hit! When you finally figure out where the rope is and how to get across the rooftops, you’ll find Splinter held hostage by a dark version of Leonardo; this guy attacks exactly as Leo would when you play as him, with sword swipes and such, but draining his health reveals that he was the “Mecaturtle” (not to be confused with Metalhead…) all along. The Mecaturtle hovers about using its rocket boots and fires homing missiles at you, punching when up close, but there’s a lot of room to dodge and land hits.

Bosses get bigger and tougher near the end, though the Shredder’s a bit of a joke.

After fighting through the Shredder’s robot factory, you’ll battle one of the more visually impressive bosses of the game – a giant Mouser that’s rendered as a background element and reminds me of the titular war machine from the original Metal Gear (Konami, 1987). While it looks intimidating, its lack of movement and predictability make this a pretty easy boss; it fires twin laser beams from its eyes that are simple to avoid, the smaller Mousers it drops are easily defeated, and you can easily smash away at the weak point in its mouth using Donatello’s ridiculously long bo staff. Naturally, you’ll eventually make your way to the Technodrome, which also acts as a large, impressive, and formidable boss battle; the humongous machine idles along on its treadmill base, frying you with electrical currents from its front and back spokes and protected by two turrets and an endless supply of Foot Soldiers. You need to fight against the pull of the treadmill, fend off the ninjas, and attack the Technodrome’s giant eye to eventually blow open an entrance, but this is easily the toughest and cheapest boss battle in the game. Once you fight your way through the insanity of the Technodrome, the game ends with a one-on-one encounter with the Shredder; after teleporting in with a burst of lightning, he jumps about the enclosed arena trying to punch you and firing deadly shots from his one-hit-jill de-evolution pistol. However, it’s laughably easy to avoid this and stay out of his way, especially with Donatello, and you can even trap him in a corner using Leo’s rapid sword swings to make short work of the would-be-conqueror.

Power-Ups and Bonuses:
As ever, you’ll occasionally find pizza strewn about in the 2D sections to refill either two bars of your health with a slice, four with half a pizza, and the entire bar with a whole pizza. Like all of the game’s items, these are quite rare and hard to track down thanks to the maze-like nature of the levels, and you’ll need to remember to switch to a turtle with low health when you spot one to keep everyone in tip-top condition. You can also find a turtle-face icon that looks like its should be an extra life but actually grants your temporary invincibility and puts you into an awkward frenzy. In one specific area of the game, you’ll also need to track down missiles for the Party Wagon to destroy the barrier son the overworld, though you can just about get by with one load of ten if you plan your route and shots correctly. Areas three and four also hide the rope item, which you’ll need to automatically cross large gaps across rooftops in area four.You can also pick up additional weapons, which you can switch to with the ‘View’ button and which act as projectiles, with each having a limited amount of ammo. Sometimes enemies will drop additional ammo, but mostly you’ll just stumble upon the weapons out in the open in 2D sections and they’re extremely effective, killing many enemies in one hit. You can grab shurikens, tossing either one or a triple-shuriken spread for maximum coverage, a boomerang, and a “kaiai”, which fires out a powerful energy wave.

Additional Features:
In a change from most TMNT videogames, there’s no two-player option here; in fact, there aren’t any options to speak of in the base game, not even a difficulty mode or any sound options. Luckily, the Cowabunga Collection remedies that, awarding a 70G Achievement for completing the game and allowing you to view the game’s box art and manuals, switch between the Japanese and American version, and apply various borders and display options. While the enhancements only allow you to remove slowdown and sprite flicker, you can still rewind the game with the Left Bumper and access save states using Right Bumper, and choose to watch the game play itself if that’s your jam.

The Summary:
I was actually surprised by how much I enjoyed the TMNT’s first venture onto the NES. It helped that I knew all about some of its more frustrating and obscure moments thanks to watching the Angry Video Game Nerd and the reputation that game as earned over the years online as one of the most difficult NES titles. While the game’s presentation and execution are a bit janky, opting for a restrictive and confusing 2D sidescroller rather than a mindless beat-‘em-up, I liked that each turtle was selectable at any time and shared their own health and weapons. While they all control the same, they’re made unique by their individual weapons, which can be particularly game-breaking in certain situations, and I liked the top-down sections of the game, despite how confusing it can be to navigate at times. What lets the game down is the oddball nature of the enemies on show; it’s almost as if this could’ve been any NES action game as the enemies are decidedly off-brand for the TMNT, and the environments just aren’t detailed or distinctive enough to really make an impact or make best use of the license. The respawning enemies and labyrinthine gameplay certainly add to the game’s difficulty; some of the enemies are needlessly cheap and make it extremely difficult to not take damage. However, I enjoyed the boss battles, especially the presentation of the giant Mouser and the Technodrome, and it’s fun to add a little more depth to the TMNT beyond just repetitively pummelling enemies. Tense, frustrating, and head scratching at times, Teenage Mutant Ninja Turtles has a fair amount of action packed into it for such a limited title and it’s definitely worth checking out, especially with the enhancements offered by the Cowabunga Collection, which definitely reduce the challenge offered by this influential NES title.

My Rating:

Rating: 3 out of 5.

Pretty Good

Was Teenage Mutant Ninja Turtles a part of your NES library back in the day? What did you think to gameplay and presentation of the game, especially regarding its maze-like aspects? Which of the characters was your favourite to play as and which boss was the most exciting for you? Were you able to make it through the underwater section? What did you think to the additional features added to the Cowabunga Collection? What’s your favourite challenging game from the NES days? I have a comments section down below where you can share your opinions on this classic NES title, or you can start the discussion on my social media.