
Upon the release of Pokémon: Blue Version and Pokémon: Red Version (Game Freak, 1996), a new craze swept through playgrounds. An entire generation grew up with Pokémon, as clever marketing saw it become a massively lucrative and popular multimedia powerhouse. Accordingly, February 27th is recognised as “National Pokémon Day”, which I expanded to an entire month of Pokémon this February.


Released: 13 July 2002
Director: Kunihiko Yuyama
Distributor: Toho
Budget: Unknown
Stars: Veronica Taylor, Megan Hollingshead, Lisa Ortiz, Megumi Hayashibara, and Tara Sands
The Plot:
Ash Ketchum (Taylor) and his friends visit the beautiful Alto Mare and befriend its protectors, Latias and Latios (Hayashibara), just as the city is targeted by two formidable thieves, Annie (Hollingshead) and Oakley (Ortiz).
The Background:
Pokémon (Nintendo/Creatures/Game Freak, 1995 to present) became an instant phenomenon once it came over from Japan. It dominated playgrounds as kids played the videogames, collected the trading cards, and tuned in to the still-ongoing anime series (1997 to present). So successful was this multimedia marketing strategy that it led to the aptly-titled Pokémon: The First Movie: Mewtwo Strikes Back (Yuyama, 1998), a box office success that kicked off a slew of feature films. Despite earning less than the first film, Pokémon the Movie 2000: The Power of One (ibid, 1999) still made over $130 million against a $30 million budget; however, while Pokémon 3: The Movie: Spell of the Unown (ibid, 2000) had a far smaller budget, its $68.5 million box office made it the least successful Pokémon movie. When Miramax took over international distribution, the fourth movie, Pokémon 4Ever (Yuyama, 2001), went straight to video and garnered largely negative reviews. Still, its limited theatrical brought in around $40.8 million and a fifth movie followed in select theatres the following year. For Pokémon Heroes, Kunihiko Yuyama was inspired by Venice, Italy though the film was also met by negative reviews. Largely dismissed and slated for its unimaginative plot, Pokémon Heroes has surprisingly developed a small following over the years and was even referenced later in the anime’s life, and feature-length Pokémon films continued to be produced regardless.
The Review:
By the time of Pokémon Heroes, the Pokémon movies had well and truly established a formula and were sticking with it. After a brief introduction to “The World of Pokémon”, we find Ash and his friends – his trusted companion, Pikachu (Ikue Ōtani), and former Gym Leaders Misty (Rachael Lillis) and Brock (Eric Stuart) – visiting the distinctly Venice-inspired Alto Mare. Ash is primarily there to take part in the annual water race, where he’s rocketed through the narrow canals by Totodile (Kayzie Rogers) and competes against Misty (oddly wearing a lifejacket despite her status as a Water Pokémon expert) and other locals while Brock cheers on from the sidelines. It’s all fun and games and gives us a sweeping overview of the city, bolstered by some questionable CGI sequences, until Ash catches the eye of a mysterious, invisible Pokémon later revealed to by the smitten Latias. Though she tries to aid him in the race, Ash ends up being dragged away from the course and the race is ultimately won (by a gnat’s wing) by Misty. While taking a gondola tour of Alto Mare courtesy of former race winner Ross (Michael Sinterniklaas), Ash and the others learn that Latias and Latios are revered as the city’s enigmatic protectors and their image adorns statues and medals across the town, which is kept peaceful thanks to their presence. While Misty and Brock get ice cream, Pikachu is sidetracked by a nearby fountain and encounters a local girl who acts strangely around Ash. Although he shrugs off the encounter, Ash jumps to her defence when he later finds her being accosted by Annie and Oakley and their Espeon (Kayzie Rogers) and Ariados (Unknown). Ash also later races after her through the laneways and into a secluded spot hidden deep within the city. It’s here that Ash and Pikachu meet Bianca (Sands), a girl who looks exactly like the girl he’s been chasing, and her grandfather, Lorenzo (Wayne Grayson), and, crucially, the city’s legendary protectors. After being set upon by the overprotective Latias, cooler heads soon prevail and Ash is stunned to learn that the Eon duo can not only turn invisible but also assume human form. Since Latias and Bianca are best friends, the Pokémon likes to take her form and delights in playing with Ash, with the two soaring through the skies of their secret garden before long.

Ash learns the history of Alto Mare from Lorenzo, who relates how the city was once terrorized by an Aerodactyl (Unknown) and a Kabutops (Eric Stuart) before a Latios came to town and drowned the two beneath a torrent of water, giving his life to protect the inhabitants. Latias left behind its two babies, Latias and Latios, whom Lorenzo practically raised, and the “Soul Dew”, a glowing orb said to contain Latios’s spirit. The Soul Dew also powers an ancient machine, the Defense Mechanism of Alto Mare (DMA), a powerful amalgamation of ancient and modern technology that can both protect and destroy the city. Lorenzo and Bianca have dedicated themselves to keeping the Soul Dew, the Eon duo, and Alto Mare’s secret from falling into the wrong hands, a secret that Ash promises to guard to keep his newfound friends from harm. Ash also experiences the Eon duo’s other unique ability, “sight sharing”; using his psychic powers, Latios can share what he sees with his sister, who then projects it to those they trust, allowing for a unique and awesome view of the world. With the night drawing in, Ash leaves a sad Latias and her brother to their hidey-hole and heads back to his friends alongside Bianca, who’s stunned to learn that Latias was being pursued by Annie and Oakley. The duo, celebrated agents of the nefarious Team Rocket, are in town specifically to investigate its local legends but even they are stunned to learn of the DMA and the Soul Dew. Unlike the bungling Jessie (Rachael Lillis), James (Eric Stuart), and Meowth (Maddie Blaustein) – who pratfall their way through the feature as background players – Annie and Oakley are capable and formidable antagonists. Equipped with hi-tech gear like drones, zip wires, and even binoculars that let them see through Latias’s disguise, they run rings around the Rocket Trio and even manage to capture Latios. While the two weren’t affiliated with Team Rocket in the original version of the film, the dub positions them as two more far more competent members of the organisation. Their depiction as sisters delighting in mischief and mayhem directly parallels the Eon duo, where Latios takes a more protective and mature stance compared to his more curious and child-like sister.
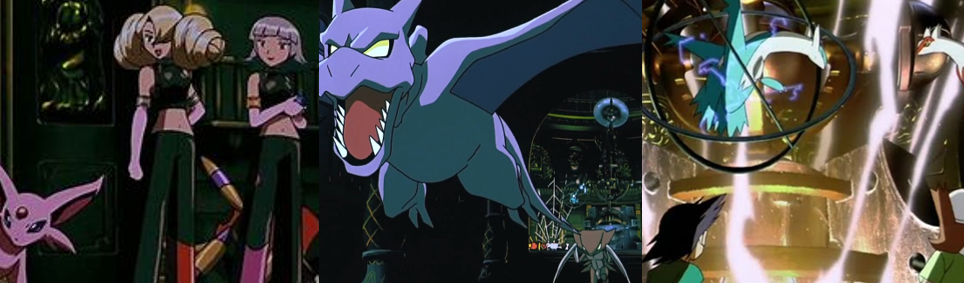
Alto Mare provides one of the more visually interesting locations for the Pokémon features thus far. Made up of stone buildings, bridges, and canals, the city certainly stands out, though it does little to make itself unique from its real-world inspiration beyond the Pokémon aesthetic. The city mixes traditional architecture with near-magical modern technology, one with a decidedly steampunk styling and represented by the DMA, a machine apparently capable of controlling water and enforcing a lockdown by sprouting impassable barriers and gates around the city. There’s a lot of history in Alto Mare, which was terrorised by prehistoric Pokémon and maintains its serenity thanks to Latias and Latios, a peace thrown into chaos when Annie and Oakley steal the Soul Dew, capture Latios, and activate the DMA. Oakley eagerly takes the controls of the ancient machine and immediately becomes obsessed by the near-limitless power it offers, believing she could conquer the entire world with its ridiculously vague abilities. The DMA allows Oakley to bring Aerodactyl and Kabutops back to life and order them to seek out Latias, cage the inhabitants behind magical barriers, and conjure tidal waves and even hurricanes. With her brother imprisoned and the city under siege, Latias races to Ash for help and he reveals his new friend to Misty and Brock, who end up trapped behind Oakley’s barriers, leaving the city’s fate in Ash’s hands. Ash is particularly aggrieved by Aerodactyl and forced to once again race through the city’s canals courtesy of Latias and a water chariot. Quite how Ash survives such an ordeal is beyond me, but Latias is a great help with her supersonic speed and psychic powers. While she’s younger and far weaker than her brother, Latias is capable of powerful feats when stressed or her friends are in danger, though using these abilities exhausts her. Her abilities are also volatile and potentially dangerous; when she shields Ash from harm, Latias accidentally deals critical damage to the DMA and causes it to go haywire. While Oakley’s brought to her senses, the entire city is threatened by the machine’s wild nature, forcing Latias and Latios to follow in their father’s footsteps and defend the town and its inhabitants.
The Nitty-Gritty:
The stakes are decidedly low in Pokémon Heroes, somewhat akin to the stakes in Pokémon 3. Annie, Oakley, and the DMA threaten Alto Mare first and foremost and, though Oakley boasts that the machine could allow her to control the entire world, there’s little evidence to suggest this is true. Like all good Team Rocket agents, Annie and Oakley’s main aim is pleasing their master, Giovanni (Ed Paul), and profiting from the city’s secrets. Unlike the bungling Rocket Trio, Annie and Oakley largely succeed in their goals; while Annie simply covets the beautiful Soul Dew, the two capture Latios and torment him with their electrified ring cage. Oakley then takes the pilot’s seat in the DMA and threatens to flood the town, even almost drowning Ash and Pikachu at one point before Latias intervenes. Pokémon Heroes is one of the few feature-length Pokémon productions to present Legendary Pokémon who cannot communicate, either verbally or through their psychic powers. Latias and Latios are powerful Psychic-Type Pokémon and Latias can assume human form, but neither communicate through words and instead use squeals, squeaks, and body language. It works really well and is a nice change of pace from the usually loquacious Legendary Pokémon and the dynamic between the two is unique, with Latios being the overprotective older brother and Latias being a shy, smitten child trying to make new friends. This does, however, lead to a strange relationship between her and Ash where she visibly blushes in his presence and seems to have a crush on him. Largely, this is presented as her need to make friends and play rather than hiding away, but it seemingly goes a step further in the finale when Latias appears to take Bianca’s form once more and gingerly peck Ash on the cheek (much to Brock’s dismay).

With Aerodactyl and Kabutops running wild and the city on lockdown, Ash desperately races to the museum alongside Latias to end the threat to the city. There, he and Latias push themselves to injury trying to free Latios, only for Latias to finally break her brother’s cage, at great strain to herself, and damage to DMA in the process. While Oakley was seemingly ready to lay waste to the entire city anyway, the DMA rages out of control without even her tentative influence, threatening to swamp the city with a destructive tidal wave after the Soul Dew is shattered. The waters recede and rear up in a massive tsunami and the Eon duo are left with no choice but to face it head-on, just as their father did years prior. As before, the threat is dispelled and the city is saved, but at great cost. Already injured from Annie and Oakley’s torture, the strain of dispersing the tsunami costs Latios his life and he bids an emotional farewell to his sister before turning into a beam of light. As the waters rush in and the city’s inhabitants are freed, Ash and the others take a gondola out to sea to look for the Eon duo and find only an exhausted and heartbroken Latias. However, they all receive one final gift as Latios’s disembodied spirit shares his sight with them one last time, allowing them to view the world from afar; his soul also crystallises into a new Soul Dew. A sombre and thankful Lorenzo and Biana place the new Soul Dew back in the secret garden and Ash and his friends say their final goodbyes as they leave to continue their journey across Johto. As they leave, they’re surprised by a strangely quiet Biana, who gifts Ash with a sketch of him and Pikachu and a kiss on the cheek, with it left ambiguous whether it was Bianca or Latias that flagged them down. The three then spot Latias proudly flying through the sky alongside the spirit of her brother and father, while the finale further reveals that Lorenzo is hard at work repairing the DMA and Annie and Oakley have been apprehended and imprisoned for their crimes.

The Summary:
Pokémon Heroes is a strange entry in the long-running franchise, one between generations and seemingly afraid to commit to focusing entirely on Hoenn as the anime wasn’t quite there yet. It’s a bit of a shame as we don’t get any new Pokémon featured here other than the titular Latias and Latios; even Annie and Oakley simply use Johto Pokémon rather than teasing use with more from the third-generation games. Latias and Latios are the highlights of the film, deviating from many of the other featured by being incapable of communicating beyond noises, but I feel their potential was squandered somewhat. I think more could’ve been made from Latias’s ability to change forms; like, why not have both assume human form and perhaps be unruly, cheeky teenagers who must learn to live up to their father’s legacy? Or perhaps more could’ve been made of Latias assuming Bianca’s visage, like her getting into trouble in town or the two being raised as sisters. Instead, it’s just an excuse for a lot of forced whimsy; Ash and friends must giggle and exclaim “Cool!” at things that really aren’t that impressive. Sure, Alto Mare is beautiful and visually unique but it’s grating seeing Ash and the others so enthusiastic about local traditions and such. I’m not saying they should disrespect them or anything; just act a bit more normal and leave the awe for things that deserve it, like the high-octane canal race. I quite liked Annie and Oakley, and their juxtaposition with Jessie and James and the Eon duo, but they weren’t really all that different from Domino/Agent 009 (Kerry Williams) and the Iron Masked Marauder (Dan Green) in that they were more capable and threatening agents of Team Rocket. In fact, one has to wonder why the film didn’t just re-use Butch (Eric Stuart) and Cassidy (Megan Hollingshead), though the answer is simply that them being associated with Team Rocket was a dub addition. Still, I liked Oakley’s descent into madness once she piloted the DMA, but it’s weird that this machine can do so much without any real explanation. It would’ve been nice to see the evil Pokémon it resurrects being something a bit more formidable, like Armaldo and Salamence, or to at least factor into the finale to up the ante a bit. The emotional gut punch of Latios’s sacrifice lands well, but it’s not enough to save the film, which meanders through a very predictable formula and offers very little not seen in the last two movies.
My Rating:
Pretty Good
Are you a fan of Pokémon Heroes? What did you think to Alto Mare and its Venetian aesthetic? Did you like the relationship between Latias and Latios? Do you think the film squandered the potential of the form change gimmick? What did you think to Annie and Oakley? Were you disappointed by the lack of third-generation Pokémon? Which Pokémon game, generation, and creature is your favourite and why? How did you celebrate National Pokémon Day this year? Whatever your thoughts, drop them in the comments below and go check out my other Pokémon content.


You must be logged in to post a comment.