Game Corner [National Pokémon Day]: Pokémon Shield (Nintendo Switch)


Upon the release of Pokémon: Blue Version and Pokémon: Red Version (Game Freak, 1996), a new craze swept through playgrounds across the world. An entire generation grew up either playing Pokémon, watching the anime, playing the trading card game, and watching the feature-length movies as clever marketing and a co-ordinated release and multimedia strategy saw Nintendo’s newest franchise become not just a successful videogame franchise but a massively lucrative and popular multimedia powerhouse that endures to this day. Accordingly, February 27th is now internationally recognised as “National Pokémon Day” and a day for fans of the long-running and beloved franchise to come together in celebration of all things Pokémon.


Released: 15 November 2019
Developer: Game Freak

The Background:
I’ve talked about Pokémon a few times but, until now, I haven’t actually sat down and done a proper review of one of the games; as I’ve indicated previously, Pokémon was an instant cultural phenomenon back when the games first dropped, taking playgrounds by storm and dominating almost every aspect of my generation through a slew of merchandise. I remember being so adamant about purchasing Pokémon: Blue Version that I bought it brand new rather than getting a cheaper copy of Pokémon: Red Version and my friends and I routinely played the game at break times at school or on the Nintendo 64 thanks to Pokémon Stadium (Nintendo EAD/HAL Laboratory, 1999). Although the developers originally intended my favourite games/generation of Pokémon, Pokémon: Gold Version and Pokémon: Silver Version (Game Freak, 1999) to be the final entries in the series, Pokémon videogames continued to be developed, with new features, improved graphics and mechanics, and a whole bunch of new Pokémon being introduced in each generation.

Pokémon‘s home consoles games largely diverted from the RPG formula of the main series.

However, in all that time, we never really got a proper version of Pokémon on home consoles; they were always spin-offs, battling games, or neutered versions of the main role-playing experience, which remained exclusive to Nintendo’s handhelds. Nintendo’s development of their Switch console changed that, however; thanks to the Switch’s unique ability to be both a handheld and a home console, players were finally able to experience a main series Pokémon game in glorious high definition with the release of Pokémon: Let’s Go, Pikachu! and Pokémon: Let’s Go, Eevee! (ibid, 2018) Though remakes of the first Pokémon games, the Let’s Go games (like pretty much all Pokémon games) proved both successful and popular and, eager to keep their unstoppable cash-cow afloat, Game Freak began developing an original main series Pokémon title for the Nintendo Switch. This time, much to my interest and appreciation, the games would be set in a new region that was heavily inspired by locations in the United Kingdom, featured the return of mechanics from previous Pokémon games alongside some all-new ones, and would later expand upon its limited roster of Pokémon through a number of expansion packs.

The Plot:
After years of waiting, the time has come for you and your childhood friend, Hop, to receive your very own Pokémon from Professor Magnolia. After Hop’s brother, Pokémon League Champion Leon, endorses your entry into the Gym Challenge, you prepare to journey across the region of Galar to earn a spot in the Pokémon League but, after a fateful encounter with the legendary Zamazenta, you also stumble upon a plot to use Galar’s precious Wishing Stars to cause Pokémon to enter a rampaging Dynamax state and bring about the apocalyptic “Darkest Day”!

Gameplay:
I had (have? It’s honestly hard to tell these days) a friend once who told me that the reason he fell out of playing Pokémon was that the games hadn’t really changed since the days of Blue and Red. Personally, I find that a comfort; it means that if you haven’t played a Pokémon game in some time, perhaps years, you can still pick up a title like Pokémon Shield and know exactly how to play as the core gameplay mechanics are basically identical to how you remember them. Accordingly, Pokémon Shield is a role-playing game (RPG) in which you play as a young, up-and-coming Pokémon Trainer; as you explore Galar with your chosen Pokémon, you’ll encounter wild Pokémon which must be fought and defeated (or captured to be added to your team) and other Pokémon Trainers.

Battle other Pokémon to level-up, learn new moves, and increase your Pokémon’s stats.

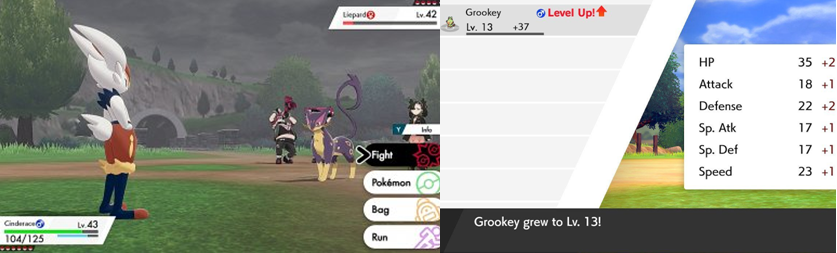
Battling other Pokémon earns your Pokémon both experience points (EXP) and effort value points (EVP); you can track your EXP using a handy gauge beneath your Pokémon’s hit point (HP) bar and, once it is full, your Pokémon will grow a level and its statistics (Attack, Defence, Speed, and the like) will grow depending on what sort of Pokémon you battled and the otherwise-hidden EVP you gained from each battle. When your Pokémon level-up, they may learn new moves; since each Pokémon can only know four moves at a time, it pays to think ahead about what moves you want your Pokémon to have. For example, you might have a Pokémon with a high Special Attack stat; if this is the case, it’s probably better to not load it up with Attack moves as it won’t deal as much damage. Conversely, your Pokémon may have a low Defence or Speed stat so you might want to invest in a few moves that raise these stats in battle (Iron Defence, Dragon Dance, etc). Through proper EVP training, though, you can tailor Pokémon to battle how you wish but it does take more effort; personally, I like my Pokémon to be proactive and aggressive, with a range of attacks suited to their strengths rather than worrying about raising stats. In the course of levelling-up, your Pokémon may also evolve; this process allows some Pokémon to assume an entirely new form, gaining significant stat boosts at the same time. Evolution is sometimes tied to other factors, such as using special stones, bonding with your Pokémon, having them hold a special item, the weather and time of day, or through trading them with a friend. Battling, capturing, and levelling-up Pokémon is essential not just to making your team stronger and earning Pokémon Dollars to spend on various items but also to complete the PokéDex. Each time you encounter a Pokémon, some of its data will be recorded so you know where to find it and what “Type” of Pokémon it is but you’ll only complete its PokéDex entry by capturing it yourself.

Always ensure that you have the type advantage and make full use of your Pokémon’s abilities.

I mentioned Pokémon “Types” just then so I’ll get into that now; each Pokémon can be either one or a combination of two types and using type advantage is key to becoming a stronger and more capable Pokémon Trainer. Because of the tried-and-tested type mechanic, Pokémon battling is, essentially, like a game of rock, paper, scissors: Fire-type Pokémon are super effective against Grass- and Ice-types, for example, while Grass-types have the edge over Water- and Rock-types, and Water-types will make short work of Fire- and Ground-types. It’s a simple system that you can usually gauge by considering the colour and location of the Pokémon you encounter (a blue-coloured Pokémon on or in water is probably going to be a Water-type, for example) but one neat addition to this game is that the next time you encounter a Pokémon, whether you’ve caught it or not, the game will tell you which of your moves are effective or ineffective against it, making battling much less a case of trial, error, and experience. Being that Game Freak love to mix things up with each new generation and region, familiar Pokémon have also been given new typings in Pokémon Shield (Rapidash, for example, is traditionally a Fire-type Pokémon but is now a duel Psychic/Fairy-type Pokémon so it’s better to use Ghost- or Dark-type attacks) and, as is the standard now, Pokémon also come with different “Natures” and “Abilities” which give them slightly different traits or abilities in battle (such as raising stats causing or removing weather effects, or powering up certain moves).

Inflate your Pokémon to giant size with the new “Dynamax” mechanic.

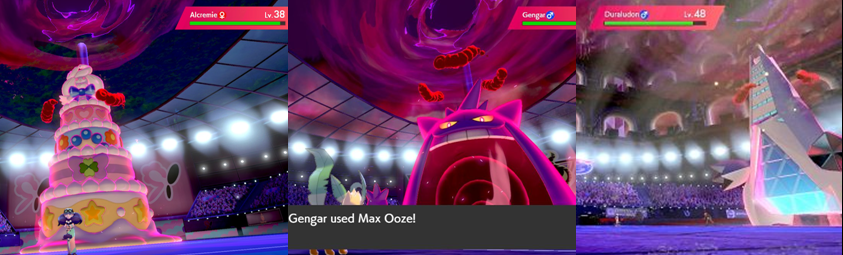
Pokémon Shield’s big new thing is the “Dynamax” mechanic and the game’s Wild Area; normally in Pokémon games, you travel from town to town using “Routes”, passing through caves and forests and such along the way and, while you still do that here, Pokémon Shield introduces a vast open area filled with a variety of wild Pokémon and shifting weather patterns. Here, you can catch and train up your team but you’ll also encounter glowing Pokémon Dens; if these have a shaft of red light coming from them, you can participate (alone or with computer-controlled or online players) in a “Max Raid Battle” against a Pokémon that has entered the Dynamax state and grown to gigantic size. In these battles, which also occur in each of the game’s Gym Leader battles, you have the opportunity to Dynamax one of your own Pokémon; essentially the same thing as “Mega Evolution” from the previous games, Dynamaxing may allow you to perform more elaborate moves but it only lasts a few turns and you can just as easily defeat a Dynamax Pokémon with a normal Pokémon. It adds a slight wrinkle to the usual gameplay, though, as you’ll earn better rewards from such battles, like Technical Machines (TMs) and Technical Records (TRs) to teach your Pokémon new moves, special stones and items, and Watts (which is, annoyingly, a separate form of currency).

It’s easier than ever to find, battle, and capture wild Pokémon.

I glossed over it earlier but, as always, one of the main aims of the game is to capture Pokémon; you won’t get very far without a diverse team of at least four different Pokémon types (though it is conceivable) so it’s highly advised that you catch a variety of Pokémon and teach them diverse moves to make things easier on yourself. Thankfully, you can now see wild Pokémon on the map, meaning random battles are a thing of the past; you can choose to avoid or run past wild Pokémon, sneak up on them to battle rarer ones, or whistle or ring your bike’s bell to attract them, which is all very helpful if you’re in a rush or want to grind for levels. Pokémon are caught in the usual way; you battle a wild Pokémon until its HP is low (preferably in the red and with a status effect (paralyse, sleep, etc) inflicted upon them) and then throw one of the game’s many different Poké Balls. The lower the level of the Pokémon, the easier it is to catch and you’ll be able to catch higher level Pokémon as you defeat the Galar Gym Leaders; however, it has to be said that capturing Pokémon has become pathetically easy over the years. Back in the day, I would waste my entire stock of Poke Balls on some Pokémon but, now, you can often capture a Pokémon with your first ball without even weakening it, which severely reduces the fun and challenge of the game.

There’s so much hand-holding that it’s almost insulting.

Speaking of which, Pokémon Shield has to include some of the most annoying and unnecessary hand-holding I’ve ever experienced; Pokémon games have often employed mini tutorials and hand-holding techniques but Pokémon Shield really takes the cake as you’ll be constantly lectured on how to battle, how to capture Pokémon, what each building is in a town, where to go, and what to do. There’s never any danger of you getting lost or not knowing where to go next as characters spell it out for you, force you where you need to go, block your exit until you’ve fulfilled an objective, and your handy-dandy map constantly displays your current objective and where you need to go. I’m sure it’s helpful for young or new players but I’ve been playing Pokémon since the start so it would have been nice to be able to turn this feature off.

Graphics and Sound:
Thanks to the power of the Nintendo Switch, Pokémon has never looked better; no longer forced into the classic top-down RPG perspective, the game makes full use of its engine to display a number of dynamic camera angles (even giving you full camera control in the Wild Area), and every time you visit a new town or area, you get a nice little look at what the location has to offer.

Locations draw heavily from the varied architecture and landscapes of the UK.

Locations are based on those from right here in the UK; accordingly, there’s a lot of beautiful countryside (most of it barraged by ever-changing weather conditions), farm land, little towns and villages, and large, industrial towns based on the likes of London. Like the UK, Galar is united through a comprehensive rail system that allows you to quickly travel between towns; the stations are reminiscent of those here in the UK and you’ll also see other similar landmarks and familiar elements, such as a clock tower, an ostentatious ferries wheel, red phone booths, and Victorian/Gothic architecture. I guess because of this UK-influence, there’s a heavy emphasis on football and football-inspired iconography, meaning you’ll take on the Gym Leaders in massive stadiums packed with cheering crowds which really helps up the scale of these battles. The whole game has the usual anime-inspired aesthetic that Pokémon has been known for only now it’s heavily infused with some steampunk influences because of the nature of the region as well as being sleek and modern when in Galar’s bigger towns and featuring crystalline mines and more fantastical locations like Glimwood Tangle. Characters are all well modelled and expressive; while the game still doesn’t use voice acting, their personalities are all expressed through their dialogue boxes (featuring an abundance of British slang which really appealed to me; characters often casually call each other “Mate” or “Luv” and speak with recognisable British quirks and expressions) and their body language.

We’ve got some funky Pokémon designs, as is to be expected at this point.

Though the base game “only” features four hundred of the eight hundred available Pokémon, each one has their own fully-rendered model with unique animations; add to that the various different regional forms, new evolutions, and the Dynamax and Gigantamax forms and you have plenty of little critters to choose from and keep you busy. As mentioned, they all appear on the overworld as well, making the Pokémon world finally feel large and alive, and they all have their own unique cries (with Pikachu still being the only one to speak its name, such is its popularity and appeal) and the new Pokémon and forms available here aren’t too bad. We’ve got such things as a football-loving rabbit, a bongo-drumming ape, fluffy sheep, cute little electric puppies, chubby chipmunks, and anthropomorphic lumps of glowing coal. Then there’s weird shit like a haunted teapot, an animated apple, and penguins with ice cubes on their heads! I have to say, though, that I remain unimpressed with a lot of the names for these new Pokémon; I mean, come on, a Fire-type rabbit and you call it “Cinderace” instead of “Hareblazer”!? The legendary Pokémon aren’t all that much to shout about either; the mascots, Zacian and Zamazenta, are okay, I guess, and Eternatus is pretty bad-ass but the majority of the other legendaries are locked behind the pay wall of the game’s expansion pass. In terms of sound, not much really jumped out at me; the classic Pokémon games were full of catchy little tunes that brought Routes, towns, and battles to life and while that is true of Pokémon Shield, none of it really stuck with me…with the exception of the Gym Leader battle theme! This rocking, energetic piece changes tempo depending on how well you are doing and ramps up once the Gym Leader busts out their Pokémon’s Dynamax form; this theme alone really got the blood pumping for those battles and worked with the stadium setting and roaring crowd to really make the stakes feel high for a change.

Enemies and Bosses:
As you explore Galar, you can choose to battle the various Wild Pokémon that are wandering throughout the overworld; these will hide in grass or underwater, run out into the street, chase you (or run from you), or more powerful variants may pop up in the Wild Area. In each instance, you have much more flexibility about engaging or fleeing from these battles; when you battle, you’ll still earn EXP even if you capture the Pokémon and, in a change that I’m sure irked many, all of your Pokémon will gain some EXP from every battle (but only those that actually participate will gain the most and the EVP from each battle). Like all Pokémon regions, Galar is also populated by other Pokémon Trainers; these days, the game clearly shows you a fellow Trainer’s line of sight so you can try to sneak past or avoid them but I recommend battling every one you come across to level-up your team faster and earn more money. Pokémon Trainers are generally armed with only one or two Pokémon in the early going but eventually have more (and far stronger) Pokémon in their team.

Team Yell are not Team Rocket, that’s for sure; they’re just a bunch of try-hard fanboys.

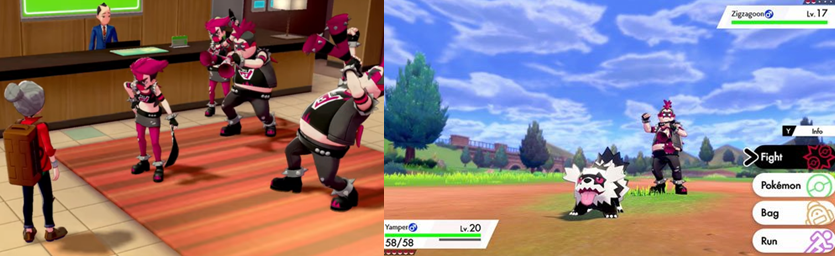
When battling, be sure to keep an eye on the Power Points (PP) of your Pokémon’s moves; each move has a certain amount of PP and, when it’s spent, you can’t use that move anymore and may be reduced to literally struggling to survive. Similarly, as with many Pokémon games, you may have to battle two trainers at once in a double battle either alone (with two of your Pokémon) or with a computer-controlled partner (usually Hop). In these battles, it’s important to consider the effect your attacks may have on your partner and the game encourages players to use moves like Helping Hand or Wide Guard to help protect or buff your partner (of course, because I adopt an aggressive approach to battling, I don’t do this). As in every other Pokémon game, you’ll also run afoul of a team; in this case, it’s the punk-rock-inspired Team Yell. Unlike other teams, though, Team Yell aren’t out to steal or manipulate Pokémon or to destroy the world; instead, they are the cheerleaders and groupies for one of your rivals, Marnie. Led by Marnie’s older brother (and Gym Leader), Piers, Team Yell generally cause a nuisance by blocking your path or forcing you into a single or double battle at various points but are little threat compared to the likes of Team Rocket or Team Magma/Aqua.

Hop, your childhood friend and rival, makes up for his lack of skill with enthusiasm.

As I alluded to above, the game also includes the standard rival mechanic; for the most part, your rival is Hop, your childhood friend, with whom you have a friendly rivalry with. Hop will accompany you into new locations and areas, often battling alongside you or while you’re battling someone else, and is extremely enthusiastic in following in his brother’s footsteps and besting the Gym Leaders before you. As a result, when you encounter Hop he will generally challenge you to a Pokémon battle but, as the plot eventually reveals, Hop is no Blue or Silver; hell, he isn’t even a good substitute for May! You’ll have no trouble at all wiping the floor with Hop each and every time you battle him and he actually drags you down in double battles since he’s so useless; the only time he’s a threat is right at the end of the post-game when he’s captured Zacian and, even then, it is that legendary Pokémon that causes you the most trouble as opposed to Hop himself. Marnie and Bede are also two of your rivals, though you encounter and battle them far more infrequently than Hop. Both share the same desire as you and Hop to conquer the Gym Challenge and, though Bede is disqualified from the Challenge after he steals a bunch of Wishing Stars, he returns to interrupt the finals of the Champion Cup to battle you once more. However, if you have a well-balanced team at a high level, neither of these rivals will really cause you much of a headache.

Before you can take on the Gym Leaders, you’ll have to complete their various missions…

That strategy also applies to the game’s Gym Leaders, who act, as always, as the closest thing Pokémon has to “bosses”. You must defeat each of the eight Gym Leaders to earn Badges and qualify for the Champion Cup; each time you defeat a Gym Leader, they award you with a TM, some clothes to wear, and you earn the right to capture and own Pokémon of a higher level. There’s a pretty big gap between the start of the game and your first battle against Milo, meaning that, if you’re anything like me, you run the risk of your Pokémon being over-levelled and thus ignoring your commands so, again, it’s best to have a diverse team at different levels to ensure that doesn’t happen until you have acquired the right badge. Before you can battle a Gym Leader, you’ll have to take on their Gym Mission; before, you used to just walk into the Pokémon Gym and battle the Gym Leader’s disciples, maybe solving a puzzle or two, but the games have increased the puzzles and requirements to reach the Gym Leader over the years and Pokémon Shield is the culmination of that. As a result, you’ll be herding Wooloo around, solving a water puzzle, earning points in double battles while your partner tries to scuttle you, navigate a maze, answering questions and battling a gauntlet of Trainers like it’s a stage audition, battle members of Team Yell down a dingy alleyway block by Mr. Mimes, and having to conquer three Trainers in double battles. The challenge of these missions varies and ranges from ridiculously easy to unnecessarily annoying but the end result is the same; eventually, you’ll get dressed into your special stadium attire and head out onto the Gym Leader’s stadium to challenge for a Gym Badge.

Even with their Gigantamax Pokémon, the Gym Leaders are easily bested.

When battling Gym Leaders, the battles are given more variety thanks to the use of more dynamic camera angles which alternate between shots of the battle and the crowd and include televised shots. Again, though, anyone who has played Pokémon before has a distinct advantage in these battles; if you’re anything like me, you’ll grind and train between Gym battles and ensure that your team is as strong as possible to take full advantage of each Gym Leader’s chosen type. Milo uses Grass-types, Nessa uses Water, Kabu uses Fire, Allister uses Ghost-types, Opal and Bede favour Fairy-types, Melony uses Ice-types, Piers and Marnie use Dark, and Raihan uses Dragon-types. You always know which type each Gym Leader uses before you challenge them and the game smartly places wild Pokémon in the nearby region that will give you an advantage in battle that, and your training, means that you can easily sweep through each of the Gym Leaders without breaking a sweat even when they bust out their Gigantamax Pokémon. Of course, it wouldn’t be a Pokémon game without some kind of nefarious deed going on; in this case, Rose, president of Macro Cosmos and the chairman of the Galar Pokémon League, has been gathering the Wishing Stars than enable Dynamaxing in order to bring about the fabled Darkest Day through mass Dynamaxing and the awakening of the legendary Pokémon, Eternatus. Before you can stop him, you’ll have to battle his co-conspirator and secretary, Oleana, who leads you on a wild goose chase that sees you battling corrupted League Staff in order to get a key to confront Rose; you’ll then have to battle Oleana herself who, despite the diversity of her team, is easily bested if your team is well-trained and varied enough to match her Pokémon.

When Rose awakens Eternatus, only you (and some Legendary Pokémon) can quell the beast.

When you finally confront Chairman Rose deep within the Hammerlocke Energy Plant, you won’t be faced with much of a challenge since all of his Pokémon are Steel-types; this means that he is easily decimated with a Fire-type Pokémon but, after he is defeated, you are forced to battle the enraged Eternatus after Leon fails to capture it. Eternatus appears in two forms, its regular form and its horrific Eternamax form; you can’t capture it in its base form or use Dynamax when battling either of its forms and you’re forced to team up with Hop, Zamazenta, and Zacian to whittle its HP down and capture it (with, again, a ridiculous amount of ease; time was that legendary Pokémon were nigh-on impossible to catch but modern Pokémon games make them a breeze!) After all that palaver is taken care of, you finally get to finish off the Champion Cup; in a change of pace, rather than tackling the Elite Four of the region and the regional champion, Pokémon Shield has you participate in a three round, single-elimination tournament against the other Gym Leaders to earn the right to face Leon. This is a bit disappointing as, rather than facing off with Galar’s best and brightest Trainers, you end up doing what is, essentially, a “boss rush”. On the plus side, Leon can actually be a tough battle thanks to the strength and variety of his Pokémon (though, to be fair, I only found this because I started with the wrong Pokémon in the lead of my team). Once you defeat Leon and become the Champion, the credits play pretty much right away (there’s no Hall of Fame ceremony here) and you move on to the post-game.

Some of the game’s toughest challenges await in the post-game.

In the post-game, you have to travel all around Galar revisiting the Pokémon Gyms to quell the anger of various out-of-control Dynamax Pokémon; for the first few battles, you’ll fight alongside Piers, Hop, and another Gym Leader but, for the rest, you go it alone. Luckily, though, by this point your team should be well in the late-level-fifty or early-sixties so these battles aren’t much of a hassle. You’re also introduced to two new antagonists, the ridiculously-named Sordward and Shielbert, who see themselves as the rightful kings of Galar and are actually pretty tough since their Pokémon are at level sixty. It’s actually beneficial, for the first time ever, when you battle them alongside Hop, and once you defeat them you’ll get to battle and capture Zamazenta. Unlike Eternatus, Zamazenta is not so easily caught in the usual assortment of Poké Balls but, luckily, you can just toss your Master Ball at it to snag it without any effort at all.

Power-Ups and Bonuses:
As you explore Galar, keep an eye out for red and yellow Poké Ball-like items on the ground and twinkles of light; picking these up will award you with items, TMs, ingredients, and other helpful pick-ups to aid you in your battles. You can also use for Pokémon Dollars and Watts to spend in various ways; Poké Marts are now a thing of the past, with these shops now being located inside of Pokémon Centers, but you can also spend your money at various travelling merchants across the map and in clothing stores. You can buy and pick up helpful items that will heal a certain amount (or all) of a chosen Pokémon’s HP, restore their PP, revive them from fainting, or heal them of any detrimental status effects. You can also acquire different types of Poké Balls; the standard variant is decent enough in the early going but you may need to utilise the Great and Ultra Balls to capture higher-level Pokémon or use special balls to increase your chances (Dive Balls for Pokémon caught while fishing, for example, or Net Balls for Bug-types). You can also get your hands on items that increase your Pokémon’s level, Dynamax level, stats, PP, and EXP or which can be used once in a battle to raise certain stats or increase certain abilities.

You have many different options for travelling around Galar.

These days, Hidden Machines (HMs) aren’t really a thing anymore so you don’t need to worry about wasting a move slot or a member of your team with moves like Surf or Fly. Instead, you can call upon a Flying Taxi to fly around the map and upgrade your Rotom Bike to cross over water; the Rotom Bike is far faster than your usual jog, as well, and can be further upgraded to go even faster. You can still get TMs, though, which can be used multiple times to teach new moves to your Pokémon. TRs are a new addition and are primarily earned through Max Raid Battles and spending Watts; these break after use, though, so be sure to spend your Watts wisely.

Dynamaxing is cool but somewhat limited and hardly a requirement.

Your biggest power-up in Pokémon Shield, besides the usual evolution mechanic, is the new Dynamax mechanic. However, Dynamaxing is quite limited; unlike Mega Evolution, you can only Dynamax at certain specific points in the game and it is, honestly, rather pointless. It’s impressive to see and fun to behold two giant, goofy-looking Pokémon butting heads but, as I mentioned, you can defeat Dynamax Pokémon with a regular Pokémon as long as you’re strong enough and have the type advantage. Some Dynamax Pokémon make things difficult by putting up a barrier that must be whittled down but, otherwise, it’s a fun and interesting new feature that, I feel, is a bit squandered and wasted because of its limitations.

Additional Features:
It’s a Pokémon game so, naturally, there is a lot to do; most of these additional features are holdovers from previous Pokémon games: battling, capturing, and evolving Pokémon; any Poké Ball having a random chance of capturing a Pokémon without fail; leaving Pokémon at the Day Care to breed new Pokémon; customising your avatar’s gender, hair style, and clothing at the start of the game and throughout by buying new clothing; meeting the game developers in a hotel; using the menu screen to save, view items and your map; and customising your Pokémon team placement, moves, and markings, and acquire various items through the online Mystery Gift function.

I must have skipped or missed the point of collecting League Cards…

There are, however, some changes, as you might expect; characters will award you with their League Cards (though I’m not sure of their purpose; it seems you can swap and trade them online, though) and you can also customise your own League Card using the PC in the Pokémon Center. You’ll also find the Name Rater, Move Deleter, and Move Reminder non-playable character (NPC) in the Pokémon Center; amalgamated into one character, you can change your Pokémon’s nickname and delete and relearn moves as often as you like with this NPC. Furthermore, you can press Y during battles to see what your moves will do and get a snapshot of any status and type ailments you need to be aware of and press X to throw a Poké Ball without having to access the in-game menu; your PokéDex even offers you recommendations for Pokémon to catch in the immediate area to help you take on upcoming Trainers and Gym Battles and every time you acquire an item for the first time, a little text box tells you what it is in another case of helpful hand-holding. Some of the game’s additional features are more fun and useful than others; when it’s your birthday, the Pokémon Centre NPCs will make a big fuss of you, which is a nice touch, but then you can also sit on chairs and benches for absolutely no reason or benefit other than immersion. You eventually acquire the ability to access your PC boxes remotely so you can swap your team out on the go, which is useful, and, while you can retake the Champion Cup over and over and even invite specific characters to compete against you in it, you still can’t rebattle previously defeated Pokémon Trainers.

Toss it all in a pan, whip up a curry, and get a fancy medal for your troubles.

There is a startling amount of online connectivity in Pokémon Shield; when connected to the internet and in the Wild Area, other players will spontaneously appear to join you in Max Raid Battles and offer helpful items. You can also battle and trade with others players online, as usual, but you’ll need to pay for the Switch’s online service to do any and all of these things, which is a real greedy move on Nintendo’s part as you never had to do that in the previous games! You can also set up a tent at any time, and may encounter other player’s Pokémon Camps; here, you can “speak to” and play with the Pokémon in your team to improve your bond with them. Doing this, and being a good, consistent trainer, means your Pokémon try harder in battle and will land more critical hits, keep themselves from fainting, or even shake off status effects to please you. In the Pokémon Camp, you can also take part in the game’s newest mini game: curry making. By exploring the overworld and shaking trees, you’ll acquire a variety of berries and other ingredients to throw into a cauldron and whip up a variety of curries. While camping gains your team some EXP by default, curry will provide them with a lot more EXP and also restore their HP; certain NPCs will also rate and reward your curry-making skills and you can make curry with other players if they join you in a camp. Furthermore, by accessing the PC, you can send your Pokémon off on jobs to earn them some EXP outside of battling (though I never actually bothered with this).

To get the most out of the post-game, you’ll need to pay for the expansion pass…

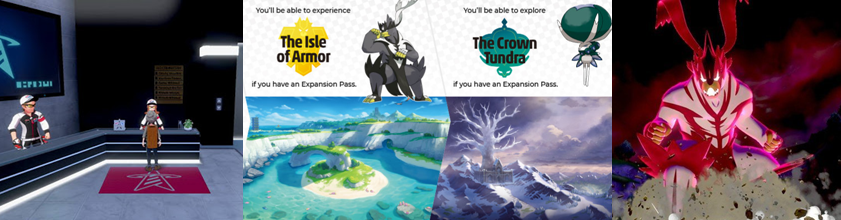
You can also acquire rewards by using the Lotto ID on any PC, which will randomly check the identification numbers of your Pokémon and award a prize if it matches, take part in the Rotom Rally to race through the Wild Area collecting balloons for boosts and time, or visit the various cafés across Galar once a day to compete in a double battle for additional rewards. As you conquer the Gym Leaders, you’ll also acquire fans; NPCs will cheer you on when you roll into the stadium and congratulate you after each victory, which is nice, and you are often given the choice of a couple of responses to in-game dialogue but it doesn’t really affect the story in any meaningful way so go nuts and tell that loser Hop what you really think about him! As mentioned, Pokémon Shield also continues the tradition of featuring some post-game content; this sees you revisiting the Galar Gyms to battle Dynamax Pokémon, opposing Sordward and Shielbert, and mainly exists to give you the chance to capture Zamazenta. While you can still use fossils to resurrect long-extinct Pokémon, there are no roaming legendaries to be found in the base game and the closest the game has to a powerful Super Boss is the aforementioned battles against Zamazenta and Hop. Once you clear the post-game, the Battle Tower opens up and you can take on its level-capped challenges to rise up the ranks, earn Battle Points (BP), and acquire rarer items but I’ve never liked the Battle Tower so I didn’t spend much time there. Honestly, Pokémon Shield’s post-game is severely lacking, especially compared to other Pokémon games; this may be because Nintendo are charging players £20 to expand the Galar region with new areas, Pokémon, forms, and challenges with their expansion passes, which is a bit of a piss-take and I am honestly shocked at how greedy Nintendo have become!

The Summary:
It’s been a while since I played a main series Pokémon game; I was pretty happy to be all but done with the franchise before I got my Nintendo Switch but revisiting the world of Pokémon is like meeting an old friend you’ve lost touch with. While there are a few new mechanics here and there to make things interesting for long-time players, Pokémon remains as accessible as ever thanks to the core gameplay mechanics staying largely the same even all these years later. All that’s really changed is the presentation and, to be fair, Pokémon Shield looks fantastic and really increases the scope and size of its world to make you finally feel totally immersed in a live, breathing environment. Unfortunately, for every good idea Pokémon Shield has, there are a few nitpicks that drag it down a bit: Dynamax is an interesting mechanic and I do prefer it to Mega Evolution in a lot of ways but it’s far too limited, there’s way too much hand-holding for my tastes, you still cannot have rematches with NPCs and, while you can encounter other players in the Wild Area, Nintendo still refuse to let you download an NPC of your friends into the game to act as a rival, and the game is maybe too helpful with all of its new features, meaning that there really isn’t much challenge for veterans of the franchise. Still, the presentation is great, especially in the way the game handles battles against Gym Leaders, and it is a top-class game in its own right…I just wish Nintendo hadn’t gotten so greedy and forced you to pay for the online features and post-game content.

My Rating:

Rating: 3 out of 5.

Pretty Good

What are your thoughts on Pokémon Shield? Perhaps you bought Pokémon Sword instead; if so, why was that and which of the two do you prefer? Which starter did you pick and why, and who made it on to your final team? What did you think to the Dynamax mechanic and the way the game presented Gym battles? What features did you like, or dislike, or would you like to see return to the series? Were you also annoyed at the hand-holding in the game or do you like always knowing exactly what to do and where to go? What did you think to Hop and the post-game content? Are you planning on buying the expansion pass? Which Pokémon game, generation, and creature is your favourite and why? How are you celebrating National Pokémon Day today? Whatever your thoughts, drop them in the comments below.

Game Corner [Zelda Day]: The Legend of Zelda (Nintendo 3DS)


On 21 February 1986, The Legend of Zelda (Nintendo EAD, 1986) was first released in Japan. The creation of legendary game designer Shigeru Miyamoto and Takashi Tezuka, The Legend of Zelda launched one of Nintendo’s most popular franchises, with its silent protagonist, Link, and his vast fantasy world of sword and sorcery not only enduring over time but constantly evolving and improving as the series progressed.


Released: 7 June 2011
Originally Released: 21 February 1986
Developer: Nintendo
Original Developer: Nintendo EAD
Also Available For: Family Computer Disk System (Famicom), Game Boy Advance, GameCube, Nintendo Entertainment System (NES), Nintendo Switch, Nintendo Wii, Nintendo Wii U

The Background:
The Legend of Zelda was created by designer Shigeru Miyamoto (the man responsible for Nintendo’s popular mascot, Super Mario) and Takashi Tezuka; in fact, Zelda and Super Mario Bros. (Nintendo EAD, 1985) were developed simultaneously and so, to separate the two games, Zelda was purposely made far less linear and based around both exploration and experimentation, with Miyamoto drawing inspiration from his childhood love of exploring forests and caves. Although players are free to name the game’s protagonist, he was dubbed “Link” to suggest an emotional “link” between the player and their avatar and his story was framed as a “coming of age” tale that would allow the player to grow alongside their silent, but by no means less iconic, game character. The Legend of Zelda was hugely successful for Nintendo, with the game selling well over 6.5 million copies and Nintendo even commissioned a special gold cartridge variant for its North American release. The game was met with universal praise during its release and is still regarded as one of the greatest adventure game of all time. Although I was aware of the franchise thanks to the much-maligned animated series, being a SEGA kid growing up I didn’t play a Zelda title from start to finish until I got The Legend of Zelda: Link’s Awakening (ibid, 1993). This was enough to hook me on the franchise, however, which grew to a deep affection thanks, of course, to The Legend of Zelda: Ocarina of Time (ibid, 1998). The original title, though, had always eluded me so, with this year marking the game’s thirty-fifth anniversary, I figured now was as good a time as any to sit down and give it a go.

The Plot:
The peaceful kingdom of Hyrule is suddenly invaded by the malevolent Ganon (or “Gannon”, as he’s referred to in-game) and his monstrous army. Having already stolen the Triforce of Power, one part of the legendary Triforce, he kidnaps Princess Zelda to acquire the Triforce of Wisdom. However, after she separates the Triforce of Wisdom into eight fragments, it’s up to Link, a plucky young boy from the forest, to journey across the land, recover the Triforce fragments, and put an end to Ganon’s dreams of world conquest.

Gameplay:
The Legend of Zelda is a 2D, top-down action/adventure game set in the fantasy land of Hyrule. One of the few NES titles to feature a battery back-up save feature, players can create one of three save files and save their progress whenever they die in the game, which is a necessary feature given how large the game is. Unlike the majority of Zelda games, though, the name you give to your save file isn’t reflected in-game; when you rescue Princess Zelda at the game’s conclusion, she refers to you as “Link” no matter what you title your save file, making this original adventure one of only a handful of Zelda titles to actually use that name to refer to its green-garbed protagonist.

Defeat enemies with your trusty sword, which shoots out beams when you’re at full health.

Once you’ve created your save file, you are immediately dropped into Hyrule and left to fend for yourself. Link moves in a grid-like pattern across the map and comes complete with a shield that will block most enemy projectiles as long as he is facing them. If you enter the cave at the top of the game’s first screen, you’ll acquire a sword, allowing you to dispatch most enemies in one of two ways: the first is a tried-and-tested sword swipe and the second is an energy bolt that fires from your sword as long as you are at full health, which really helps to clear the screen of enemies from a safe distance. Defeated enemies may occasionally drop hearts or fairies to refill your health, bombs to allow you to deal explosive damage to enemies and uncover secret passageways, or Rupees (or “Rupies”/”Rubies”), the in-game currency. Link can hold a maximum of 255 Rupees and will sporadically stumble across merchants hidden in dungeons or caves who will sell him a variety of items, weapons, and power-ups.

The majority of Hyrule and the game’s dungeons are accessible right from the start.

As you might expect from a Zelda title, the game’s overworld is pretty expansive, covering forests, mountains, and beachfronts. A mini map is present in the top-left of the game’s heads-up display (HUD) but, out in the overworld, is next to useless since all you can see is a little green dot (representing you) on a blank, grey background. In dungeons, you can collect a Dungeon Map to make navigation a lot easier but, again, it’s not as helpful as it could be since there’s no distinction between floors, meaning it’s very easy to get lost or turned around or to wander around Hyrule with no idea of where you are or need to go. Your goal in the game is to visit eight dungeons (referred to in the game as “Levels”) and retrieve the eight pieces of the Triforce of Wisdom; you can track your progress towards this goal from the game’s inventory menu and non-playable characters (NPCs) can offer you (extremely) vague hints about how to progress but, otherwise, much of the game’s adventure is in your hands. As a result, pretty much the entirety of Hyrule is available for you to explore and visit as long as you have, at least, some bombs available to you. This means that it’s very easy to wander around the overworld and stumble into the game’s harder dungeons before you’re ready, which can add an additional layer of challenge to the game if you’re brave enough to attempt to tackle these tougher levels out of sequence. It also means that you can acquire some of the game’s more powerful and useful weapons early, at the very least, though some can be useless without others (I, for example, acquired the Book of Magic long before I got the Magic Rod, making said book all but useless).

Zelda‘s dungeons are largely indistinguishable beyond their colour palette and enemy placements.

Given that I played through 90% of this game blind and without a guide, I have to say that that this is all-but-inevitable as, while the game’s first two dungeons are easily found almost right next to each other, it’s entirely up to you to explore your surroundings so it’s pretty easy to stumble into the harder levels when you only have three of four hearts in your health bar. As big as Hyrule is, though, many of the dungeons are actually quite small; inside, you’ll be tasked with defeating enemies and solving very (very) simple puzzles (generally as taxing as pushing a certain block or bombing a certain wall) to open doors, or collect keys to open doors, grabbing a new weapon or item, Dungeon Map and Compass to aid with your navigation within the dungeon, and then defeating a boss to extend your health bar and retrieve a piece of the Triforce of Wisdom. One interesting feature I was surprised to see was that you can carry keys from one dungeon to another, which can give you an edge with the game’s harder dungeons and allow you to take shortcuts here and there. Gameplay follows a very simple formula from start to finish: explore the immediate area, uncover secrets, find a dungeon, and retrieve a piece of the Triforce of Wisdom. The only time the gameplay is changed up is when you descend down hidden staircases inside the dungeons and enter a short 2D area where the level’s weapon or key item can be found. Otherwise, gameplay variety comes from utilising different weapons to battle enemies and bosses or factoring in the erratic patterns of the game’s enemies, who like to attack in something resembling a co-ordinated effort or en masse, requiring both some strategy on your part and a healthy supply of hearts in order to survive the damage put out by the game’s later enemies. As a result, Zelda’s difficulty is, largely, up to you; if you clear Level-1 and then stumble into Level-8, it’s probably best to leave that later dungeon and seek out Level-2 to 3 to give yourself a better chance of success.

Graphics and Sound:
The Legend of Zelda is a very basic 2D adventure; like Super Mario Bros. and many videogames of that era, the graphics are extremely simplistic and, largely, require quite a bit of imagination and suspension of disbelief on the part of the player. Link is immediately and instantly recognisable against the game’s many different backgrounds and compared to the enemy sprites thanks to his green tunic and cute little sword and shield but, obviously, you’re not going to see many frames of animation or layers of detail in this game. Additionally, I found that the game struggled a bit when there were a lot of sprites onscreen and/or sounds playing at the same time; the iconic Zelda theme plays constantly on the overworld and, when Link is low of health, the game emits a constant beeping to inform you and enemies make little noises when they shoot at you or are destroyed and all of these sounds can blend into each other and the game slows down noticeably when a hoard of Lynels incessantly shoot projectiles at you.

Though limited by the hardware of the time, Zelda is a vast and ambitious adventure.

Despite the game’s limited graphical capabilities, Hyrule is surprisingly vast, varied, and detailed at times; the entire land is surrounded by sea that you cannot cross and made up of forests, mountains, beaches, and icy regions. You’ll have to navigate a series of repeating, identical screens in a maze-like puzzle, dodge boulders as they rain down from Death Mountain, explore a haunted graveyard, cross the water using a raft, enter a waterfall, descend into caves, and cross beaches while Leevers randomly pop out at you as you explore looking for merchants, additional items and weapons, and the elusive dungeon entrances. Dungeons are generally recognisable in the overworld but, sometimes, you’ll enter what appears to be a dungeon only to find a merchant or other NCP. When you do find a dungeon, you’ll be treated to a different in-game tune, which is refreshing, but will find that most dungeons are aesthetically very similar just with a different colour palette. Dungeons get progressively bigger as you progress, though, and are filled with more enemies; you’ll also find that you’re required to visit different floors using staircases and bomb walls more frequently to access different areas and properly progress, which adds an additional layer of challenge to the game. Each dungeon also has its own unique layout and appearance as seen on the map screen to help distinguish them but, for the most part, they’re quite similar and not themed around elements like later Zelda dungeons would be.

Zelda uses text and (very) simple and vague dialogue to convey its plot and your objective.

For an adventure game, The Legend of Zelda is extremely light on story and dialogue; the game’s story is told through some text when you wait around on the title screen but, beyond that, you’ll need to read the game’s instruction manual to learn more about the plot and the lore of Hyrule since the NPCs offer only cryptic clues and vague statements. Dialogue and character interaction is practically non-existent in The Legend of Zelda, which I find a bit surprising given how prominent it would become in the series and how heavy it featured in more traditional role-playing games (RPGs) released around the same time, such as Final Fantasy (Square, 1987). However, given the amount of grammatical errors and incongruous dialogue contained within the first Zelda this is, perhaps, a good thing; it also means that the onus is on the player to explore every nook and cranny and to experiment with every weapon on every screen on the game to uncover secrets and new areas, placing an emphasis on exploration and player immersion rather than hand-holding.

Enemies and Bosses:
Link will have to contend with a wide variety of enemies on his grand quest; the overworld is alive with numerous enemies, some of which are specific to certain areas and each of which presents a different challenge thanks to their attack patterns and difficulty. It’s very rare that you’ll take on just one or two enemies at a time and, generally, you’ll have to battle about four or five at once and often a mixture of different enemies, requiring a certain amount of strategy on your part as you can’t always take the direct approach in battle. One of the most common enemies in the game are the Octorocs (octopus-like creatures that spit projectiles at you), Peahats (bulbous vegetation that hover in the air and can only be destroyed when briefly stationary), Tektites (spider-like enemies that hop around the screen), aforementioned Leevers (spiked globs that burrow in and out of sand), and the Keese (bats that flutter around the screen). While you’ll encounter different coloured variants of most of these (and other enemies) that are tougher, these are the most common enemies and are easily dispatched with one sword swing.

Zelda‘s tougher enemies can be a real headache thanks to their numbers and attack patterns.

As you progress, though, you’ll encounter far more formidable enemies: Moblins launch spears at you, Goriyas toss boomerangs your way, Ropes (why they’re not called “snakes” is beyond me) charge at you head-first, and Wallmasters will drag you back to the first screen of the dungeon you’re in if you’re not careful. Some of the game’s toughest and most annoying enemies include the Wizzrobes (who constantly teleport around the screen, often directly into where you’re walking, and fire energy bolts that can easily drain your health if you’re caught in a crossfire), Darknuts (who can only be attacked from behind and wander around in an unpredictable pattern), and the aforementioned Lynels. You’ll also have to be careful about getting too close to seemingly harmless Armos statues in case they spring to life, avoid getting eaten by a Like-Like lest it take away your shield upgrade, and make sure you have plenty of health or arrows to make battling the Poe’s Voice that much easier.

The Dodongo might be pretty pathetic but the Manhandla was a pain in my ass!

The game features nine dungeons to explore, which means nine bosses to contend with; make sure you familiarise yourself with each of these bosses, though, as you’ll encounter all of them on multiple occasions as sub-bosses in the game’s later dungeons. Technically, you can battle them in whatever order you like as long as you’re tough enough to survive the dungeon and their damage output but it’s best to try and take them on in sequential order to give yourself the best chance at success. This means that the first boss you fight should be Aquamentus, a horned dragon that spits out three projectiles that you must dodge between. This boss is fought in Level-1 and Level-7 and is made all the easier if you have the energy to use your sword beam or ammo enough to shoot arrows at it, which will make short work of it. The Dodongo, in comparison, is a pretty pathetic excuse for a boss; it lumbers around the screen doing little to nothing and is easily dispatched by placing bombs before its mouth. Later on, you’ll have to contend with three of these at once but, since they don’t make any effort to attack you, they’re easily the weakest of all the game’s bosses. Unfortunately, the same can’t be said for the Manhandla boss; this piranha-like bastard was the bane of my life since it popped up three times throughout the quest. It slowly bounces around the arena firing projectiles at you and is very tricky to hit thanks to the limited reach of Link’s depowered sword and Link’s restricted range of movement; it’s much faster and more efficient to use bombs to deal massive, successive damage to the Mandhandla but be wary as, the more parts of it you destroy, the faster its movements become.

Bosses range from frustratingly awkward to ridiculously easy depending on how equipped you are.

One of the toughest bosses in the game, for me, was the multi-headed dragon Gleeok; this monstrosity sports two, three, or four heads, spits projectiles towards you that are difficult to avoid, and is only able to be damaged by awkwardly slashing at its neck or, more effectively, shooting arrows at it. Be careful, though, as when the Gleeok’s heads are severed they will float around the arena shooting projectiles at you and cannot be harmed. Compared to Gleeok, Digdogger and Gohma are a walk in the park, especially once you have acquired the recorder and the bow; Digdogger is completely invulnerable until you play the recorder and reduce it down to its core but, once you do, you can just whack it until it’s defeated. Similarly, Gohma can be a bit of a pain with its sporadic movements and projectiles but a few well-timed shots to its exposed eye will put it away without any real issues; the most difficult thing about many of these bosses is having enough health, the right weapons, and being able to navigate the arena when projectiles are being fired at you from both the boss and the nearby statues.

Despite his fearsome appearance, Ganon is quite a pushover once he’s out in the open.

Of course, the main objective of the game is to assemble the eight pieces of the Triforce of Wisdom, battle through Level-9 (which is accessed by bombing a specific rock formation on Death Mountain and features swarms of the game’s toughest enemies and a new sub-boss, the Patra, which can only be destroyed after first taking care of the tiny little eyes it shields itself with), and confront the evil Ganon. For the final boss of the game, Ganon isn’t that much of a challenge; he turns invisible and fires a series of projectiles at you, forcing you to swipe somewhat blindly around the screen until you hit him. Land four this and he appears in all his monstrous glory…and is easily destroyed with one hit from a Silver Arrow for a disappointingly anticlimactic end to the game.

Power-Ups and Bonuses:
Link begins the game with three hearts’ worth of health which, very quickly proves to be far too little to get past the game’s tougher enemies and dungeons. Fortunately, every time you defeat a dungeon boss, you expand your maximum hearts by one and can find additional Heart Containers hidden on the overworld or for sale from certain merchants, which will increase it to twenty units. Certain weapons also have similar limitations; for the majority of the game, you can only carry six bombs at a time until stumbling across a merchant who will allow you to carry double that amount (…for a small fee), the only way to get arrows is to buy them, and your usage of the Red Candle is restricted. Thankfully, the Blue Candle and Magic Rod are not so restricted, allowing you to light up dark areas and deal damage to enemies (but watch out because the flame you conjure can also hurt you!)

A number of key items and upgrades will vastly improve your chances at success.

As you might expect from a Zelda title, Link has access to a decent variety of weapons and items: enemies sometimes drop a clock (which causes enemies to freeze in place and gifts Link with invincibility for a brief period), the boomerang allows him to attack from a distance, the stepladder lets him cross one tile of water, the raft allows him to drift across water at certain points on the map, and he can also find a Power Bracelet to move blocks and upgrades for his sword and shield to block more projectiles and deal additional damage. Eventually, you’ll also be able to purchase health-restoring medicines and other expensive items to aid your quest: one such item is a Magic Key that renders all other temporary keys redundant and a piece of food to get past Goriyas (though you’d never know that you need to use this item). You can also buy a Blue Ring and find a Red Ring, both of which significantly reduce the amount of damage you take while also changing Link’s tunic to blue and red, respectively.

Additional Features:
Whereas later Zelda titles placed significant emphasis on a variety of side quests, I only really came across one in this first title (barring the hidden Heart Containers on the overworld) which involved taking a letter from one NPC to another to be able to purchase medicines. After finishing the game, you will unlock the “Second Quest”, which replaces your save file sprite to one of Link holding his sword aloft and overwrites your save file from the beginning but mixes up the locations of dungeons, enemies, and items and also increases the difficulty of the game’s enemies. You can, however, jump straight into this mode by naming for save file “ZELDA” and also make frequent, fragrant, and continuous use of the 3DS version’s save state ability to make beating this difficult and finicky first Zelda title much less of a headache.

The Summary:
After years of hearing so much hype about how good The Legend of Zelda is and having experienced a number of 2D and 3D Zelda titles, I was excited to finally experience the first in the series and, for the most part, The Legend of Zelda lived up to the hype. It’s definitely a product of its time and suffer somewhat from the limitations of the NES hardware and the simplistic graphics, gameplay, and sound but it’s still an ambitious little action/adventure title that was both offering something unique at a time largely dominated by space shooters and platformers. Everything on offer in The Legend of Zelda was expanded upon and improved as the series progressed but, for this first entry, the player is required to utilise a lot of exploration, experimentation, and utilise the bare minimum of information to find the pieces of the Triforce of Wisdom. I went in mostly blind and did okay, for the most part, and only had to turn to a guide for the last two dungeons and to track down a couple of the game’s more elusive items so it’s definitely do-able but the game is handicapped somewhat by this format since it’s very easy to just get lost and end up wandering around in circles or being absolutely bludgeoned by the game’s tougher enemies. Honestly, I have nothing but respect for those who managed to get through this game back in the day without the benefit of save states since it’s a deceptively tough title, one that I’m sure kept many kids busy for many hours or even days with its vast landscape and tricky bosses.

My Rating:

Rating: 4 out of 5.

Great Stuff

What are your thoughts on The Legend of Zelda? Did you own this on the NES back in the day or did you, perhaps, discover it later on a different console? How do you feel it holds up these days, especially against later Zelda titles? Which Zelda game, character, or dungeon is your favourite and why? Would you like to see a return to the top-down style of gameplay for Zelda or do you prefer to more action-orientated, open world approach? How are you celebrating The Legend of Zelda’s debut today? Whatever your thoughts, memories, or opinions of The Legend of Zelda, and the Zelda franchise overall, feel free to drop a comment below and check in next Sunday for more Zelda content.

Screen Time: Pokémon Origins

Air Date: 2 October 2013
Worldwide Network: Pokémon TV 
Original Network: TV Tokyo
Stars: Bryce Papenbrook, Lucien Dodge, Jamieson Price, Kirk Thornton, and Kyle Hebert

The Background:
The brainchild of executive director Satoshi Tajiri, Pokémon began life as Capsule Monsters (later changed to Pocket Monsters and rebranded as Pokémon for the games’ worldwide release), a role-playing game inspired by Tajiri’s childhood days wandering through forests and collecting bugs. Thanks largely to the decision to produce two versions of the game, each with different Pokémon to collect and encouraging gamers to battle and trade with their friends to catch every Pokémon, the games sold very well in Japan and were soon localised for a worldwide audience. Fearing that American audiences would struggle to connect with the game’s cute concepts and creatures, Nintendo apparently spent well over $50 million localising, rebranding, and marketing the games for their international release. It turns out, however, that Nintendo were wrong to doubt Pokémon’s appeal; still, when Pokémon: Blue Version and Pokémon: Red Version released in 1998, they were accompanied by an anime, a trading card game, and more advertisements and media coverage than you could shake a stick it. Of course, history shows us that this aggressive strategy paid off; Blue and Red sold over 30 million copies worldwide, birthing one of Nintendo’s most popular and enduring videogame franchises ever, and the anime continues to air to this day, with feature-length movies and television specials being regularly produced.

Thanks to a co-ordinated marketing campaign, Pokémon dominated an entire generation.

In short, Pokémon was not just some short-lived fad of one generation but a multimedia blockbuster franchise that has spanned multiple generations and shows no signs of stopping. By 2013, there were over 720 Pokémon to be found, battled, and traded in comparison to the 150 regularly-obtainable Pokémon of the original videogames. The anime was well into its sixteenth season, having aired over 780 episodes, the sixteenth feature-length movie had just been released, the excellent ongoing Pokémon Adventures manga (Various, 1997 to present) was entering its eleventh chapter, and Pokémon was celebrating its fifteenth anniversary that year. This was also the year that Production I.G, Xebec, and OLM, Inc. produced a ninety-minute animated special, split into four parts, which retold the events of the original games in a way that was more faithful to the source material than the regular, ongoing anime. First broadcast on TV Tokyo ten days before the release of Pokémon X and Pokémon Y (Game Freak, 2013), the episodes were dubbed into English with a new voice cast and made available both on home media (in some countries) and to watch on various online platforms, including Pokémon TV.

The Plot:
Red (Papenbrook) and his childhood friend and rival, Blue (Dodge), have been chosen to select their first Pokémon from Professor Oak (Hebert). Tasked with completing Oak’s lifelong dream of capturing and recording data on all Pokémon, they set out into the region of Kanto, battling both Gym Leaders and the nefarious Team Rocket in a quest to not only capture every Pokémon but also become Pokémon League Champion.

The Review:
Pokémon: Origins is split into four parts, “File 1: Red” (Kawasaki, 2013), “File 2: Cubone” (Kuroda, ibid), “File 3: Giovanni (Takahashi, ibid), and “File 4: Charizard” (Tomiyasu, ibid). The animation style is quite different to that of the existing Pokémon series; for one thing, Origins looks much more professionally rendered and of a higher quality than even some of the Pokémon feature films. For another, many episodes feature music inspired directly from the videogames, with the classic Pokémon battle theme playing during Pokémon battles and the iconic, creepy Lavender Town theme playing when the story reaches the haunted Pokémon Tower. Of course, the anime did feature remixed versions of some recognisable Pokémon themes but nowhere to the degree of Origins; Origins also opens and closes each episode with a game save/load screen and includes dialogue boxes ripped right from the videogame.

Origins includes many aspects and mechanics from the videogames.

This closer fidelity to the source material brings Origins more in-line with Pokémon Adventures, which recreated many of the gameplay mechanics of the videogames with a surprising amount of detail and loyalty compared to the anime but also took the source material a bit more seriously as well, featuring blood, much higher stakes, and even Pokémon dying. While Origins doesn’t go fully down this path, it does go out of its way to stay closer to the source material than the anime: Red receives Technical Machines (TMs) and Hidden Machines (HMs) in the form of floppy discs, just like in the game; Pokémon battles (while generally much faster and glossed over thanks to Origins’ short runtime) are much more intense and closer to how they go down in the games (there’s no bullshit strategies like sprinkling water on an Onix to make it weak to electric attacks); and many of the items (such as the PokéFlute, the fishing rods, and the Silph Scope) from the videogame make an appearance, albeit a brief one.

Sadly, Origins glosses over many of the game’s important battles and plot points.

Something that lets Origins down, though, is the brevity of its narrative and the way it devotes the focus of each of its four episodes. “File 1: Red” begins in standard fashion, with Red and Blue beginning their Pokémon journey, establishing their rivalry (which is much friendlier than portrayed in the games or the early days of the anime), and Red learning the basics of Pokémon battling and capturing from Brock (Johnny Yong Bosch). However, from “File 2: Cubone”, each subsequent episode begins, and includes, a recap and a montage of sorts that glosses over what I consider to be some very important story beats: Red tells us about, and we briefly see, how he defeats the majority of the Gym Leaders (we only see him battle two in full throughout the course of the series), acquires the aforementioned fishing rods, captures the majority of his Pokémon (again, we only really see him capture a handful in any kind of detail), the evolution of his Charmander (Shin’ichirō Miki), and even his battles against the Elite Four and, most egregious of all, some of his most important encounters with the villainous Team Rocket.

Red and Blue begrudingly team up but Team Rocket are easily defeated despite their reputation.

Obviously, there are only four episodes of this mini series so the story cannot cover everything from the videogames but, for me, glossing over Red’s first meeting with Team Rocket and his eventual vendetta against them is a bit of a mistake. Take “File 2: Cubone”, for example; sure, it features Team Rocket having overtaken the Pokémon Tower, but it’s far more concerned with the trauma the group caused Cubone (Cristina Vee) and the ghost that haunts the tower. Red and Blue begrudgingly team up to solve both problems but Team Rocket is easily defeated first off-screen by Blue and then with a ridiculous amount of ease by Red, who successfully scares them off after defeating one of their Pokémon. Considering how the townsfolk were so afraid of Team Rocket’s power and threat earlier in this episode, this is more than a little disappointing and I would have preferred to see Red’s journey through Mt. Moon and his battle against Lieutenant Surge to help properly establish Team Rocket’s threat in this world. On the plus side, at least the group isn’t portrayed as largely ineffectual bunch of goofballs and Red takes his opposition to their plot a lot more seriously than Ash Ketchum (Veronica Taylor/Sarah Natochenny).

Although he stumbles in the first episode, Red quickly becomes a competent and capable trainer.

When comparing Red to Ash, it’s like comparing night to day or apples to oranges. There are some similarities but these are generally due to the fact that both characters are based on the avatar from the games and therefore follow the same path the player forges in the source material. While both are big Pokémon fans and excited to become Pokémon trainers and both start out knowing very little about the actual mechanics of Pokémon battling, capturing, and the scope of their journey, it takes Red a bit more time to learn that a close bond with his Pokémon is required to grow stronger and succeed in battle. While Brock does help to teach him these lessons, Red’s bond with Charmander is nowhere near as intense as Ash’s with Pikachu (Ikue Ōtani) yet he quickly becomes a far more competent trainer than Ash; in a surprising amount of restraint, Pikachu only appears in a brief cameo and, to separate Red from Ash even more, Red not only uses a far more competent Electric-Type Pokémon in Jolteon (Unknown) but only captures a Pikachu after he has become the Pokémon League Champion! Granted, most of this is implied, seen in montages, or takes place between episodes but Red captures way more Pokémon (mainly because he’s much more committed to completing the PokéDex than Ash), easily defeats pretty much every trainer and Gym Leader he comes up against, and has a far more well-balanced and well-trained team than Ash has ever had. Hell, Red even ends up with Articuno (ibid) in his squad and, generally speaking, has much more in common with his counterpart from Pokémon Adventures, who was also a far more competent and capable trainer compared to Ash.

Blue is humbled in defeat, realising Red’s bond with his Pokémon has made him superior.

One thing that helps separate Origins from the anime is the relationship between Red and Blue; in the games, and the anime, these two had a largely antagonistic relationship throughout the story until facing off in the Pokémon League. Here, though, while Blue is arrogant and a blowhard and determined to complete the PokéDex before Red and become a more powerful and capable trainer than him (he picks Squirtle (ibid) not because it matches his name but specifically because it will give him the type advantage over Red’s Charmander), he and Red have a much more friendly rivalry than one based on actual animosity. Blue sees himself as Red’s superior and seems to both be motivated to beat Red to the punch wherever possible and happy to walk away from confronting the likes of Team Rocket when it doesn’t suit him but the two are generally more about ribbing on each other and winding each other up about their progress and abilities than actually hating each other. Sadly, though, because of the brevity of the mini series, Red and Blue only battle head to head twice in this story; the first time, Red is soundly defeated as his strategy of mindlessly attacking without having properly developed trust and partnership with his Charmander prove his downfall. Brock specifically uses Blue as an example of a trainer who has established this bond and it is from both of them that Red learns to put his love and trust into his Pokémon, which are treated as his beloved partners and allies rather than mere tools. However, when they face-off again in “File 4: Charizard”, the tables have turned; though Blue has already become the Pokémon League Champion, he falls to Red despite having amassed a team powerful and diverse enough to conquer any and all opponents not because of his lack of strength but because he had failed to maintain the bonds of trust and friendship between himself and his partners. Humbled by his defeat, Blue nevertheless congratulates Red on his victory and accomplishments and the two retain a friendly rivalry for the final episode of the anime, one based on Blue’s desire to one-up Red at any opportunity while still acknowledging his skill and capability.

Battling with Red awakens a passion that Giovanni had long forgotten.

Despite much of Origins being reduced to quick montages, there is still a strong sense of Red’s capability throughout the anime; after learning valuable lessons from Blue and Brock, Red goes from strength to strength, easily defeating other trainers and Gym Leaders even when he has a massive type disadvantage. Not counting that initial battle against Blue, Red only runs into two roadblocks throughout his journey, the first being his showdown against Giovanni (Price). Though Red’s first meeting with the Team Rocket boss is glossed over in a recap, his battle against him for the Earth Badge is a significant part of the aptly-named “File 3: Giovanni”. The strength of Giovanni’s Rhyhorn (Unknown) alone is enough to wipe out all of Red’s team even when Red has the type advantage but Red’s determination and passion for both battling and towards his Pokémon awakens something in Giovanni he had long forgotten. Exhilarated by the thrill of the battle (even though it’s ridiculously one-sided in his favour for the majority of the time), Giovanni is impressed, humbled, and even grateful to have been defeated by such a zealous trainer. So touched is Giovanni that he disbands Team Rocket and wishes Red well on the remainder of his journey, urging Red to follow the path that he (Giovanni) strayed from long ago and pledging to carve a new path for himself going forward.

Mewtwo represents Red’s final, and greatest, challenge.

The second obstacle Red encounters is hinted at in “File 2: Cubone” and forms the central focus of “File 4: Charizard” and it is, of course, Mewtwo (ibid). Mewtwo’s threat is immediately established by how badly, and easily, it overwhelms Blue, leaving him badly injured and putting the wind up the usually arrogant trainer. Nevertheless, motivated by the desire to finally complete Oak’s PokéDex, Red heads to Cerulean Cave to confront the creature, which is still a genetic copy of the mythical Pokémon Mew (Christine Marie Cabanos) but, unlike in the anime and manga, it never speaks or communicates in any way other than brutal, aggressive battle. Far from the nuanced, tortured character in other media, Mewtwo is portrayed more as simply an extremely powerful Pokémon to be captured like any other, which is much more in-line with its position in the games as a “super boss” of sorts rather than a pivotal plot point. However, even Red is unable to match Mewtwo’s monstrous power; luckily, though, he was gifted two Mega Stones by the mysterious Mr. Fuji (Kirk Thornton) in “File 2: Cubone” and, even more helpfully, they just so happen to react to the close bond between Red and Charizard (Shin’ichirō Miki) and allow Charizard to mega evolve into Mega Charizard X (did I mention that Origins came out around the same time as Pokémon X and Y?) This is enough of a power boost to allow Red to overwhelm Mewtwo faster than it can react and capture it with a ridiculous amount of ease; seriously, Red throws two Ultra Balls and captures Mewtwo with the second, which is some serious bullshit when you think about how many damn balls it can take to snag Mewtwo in the games. I would have liked to see Red use a Master Ball but, sadly, he never acquires one in Origins as it’s merely an unfinished prototype in this story.

Origins ends with Red eager to find more Pokémon, starting with the mythical Mew.

Regardless, Red is successful and captures all 150 Pokémon but his mission is far from over as, while celebrating with Oak and Blue, he remembers that Mewtwo was created from Mew and rushes out a bundle of excitement and anticipation at the prospect of encountering and capturing still more Pokémon. It’s here, and in Red’s steadfast determination in battle, that we see the closest links between Red and Ash: both are stubborn in battle and endlessly excited about capturing and finding new Pokémon. However, Red ends Origins a far more accomplished and experienced trainer; he’s the Pokémon League Champion, for one thing, and now has numerous Legendary and incredibly powerful Pokémon in his possession. In this regard, Origins ends exactly as a standard game of Blue or Red would end, with the character having numerous Pokémon at their disposal and ridiculously overpowered. While Ash does also grow and become more accomplished as a trainer, this takes…what? A hundred episodes? Two hundred? And even then he still makes rookie mistakes; no such foibles befall Red but, to be fair, much of his growth as a trainer and a character is implied, rushed through in montages, or takes place between episodes and relies heavily on the viewer’s familiarity with the videogames to fill in the blanks whereas the anime is able to use many (many) episodes to show Ash’s numerous lessons and growth.

The Summary:
Pokémon: Origins is an extremely enjoyable, gorgeously-animated anime; everything from the character designs, Pokémon battles, and sounds is fantastic to look at and closely reminiscent of the source material. Unlike the anime (and a lot of Pokémon media), Pokémon do not constantly speak their names and instead have more realistic, animal sounds like in the games; Japanese text is also left unaltered, which is refreshing, and while many elements, mechanics, and important plot points from the games are glossed over, at least they’re actually included here rather than either being ignored or significantly altered. As much as I enjoy the anime (specifically the films because of their focus on Legendary Pokémon), it can be grating at times to follow a character as annoying and unreliable as Ash and, because of that, Red is a breath of fresh air. Like his manga counterpart, Red is competent, brave, and determined; he starts out as a rookie, knowing very little about the basics and nuances of Pokémon battling, and quickly matures to the point where he can defeat Gym Leaders with ease, single-handedly brings down Team Rocket (something Ash is still struggling to do), and not only captures Legendary Pokémon but casually uses them as part of his team just like the player would. His fidelity to the player’s character and journey is commendable; he learns the same lessons that the player does throughout the game while still being his own distinct character separate from the player’s avatar, Ash, and even his manga counterpart.

Origins‘s fidelity is impressive, though it rushes through many usually-important plot points.

It’s this fidelity to the source material that elevates Pokémon: Origins and makes up the majority of its appeal; the anime strayed too far from the gameplay mechanics and spirit of the games for my taste, as much as I enjoy it, so it’s refreshing to see such a well-crafted and well-animated series tell a very similar story to the anime but in a way that is so much closer to the source material. The only thing that lets Pokémon: Origins down is the brevity of its narrative; limiting its story to just four episodes means so much of the game’s story gets glossed over and the focus can be a bit skewed at times. While, at its core, it focuses on Red’s journey and his mission to complete the PokéDex and his ongoing rivalry with Blue and Team Rocket, I can’t help but feel like this would have benefitted from being more like ten episodes to spend a bit more time on Team Rocket, Red’s battles against the Kanto Gym Leaders, and, specifically, his battles against the Elite Four.

My Rating:

Rating: 4 out of 5.

Great Stuff

What did you think about Pokémon: Origins? How do you think it holds up when compared to the anime and numerous feature films? Did you enjoy how faithful it was to the source material or do you feel that it was weighed down by focusing on fidelity over telling a more unique story? Do you agree that certain parts were rushed or were you happy with the story it told? Which character, or Pokémon, is your favourite and why? How did you capture Mewtwo when you first played Pokémon? Whatever you think, do please leave a comment below and join me next Saturday for National Pokémon Day!

Movie Night: Pokémon: The First Movie: Mewtwo Strikes Back

Pokemon1stMovieLogo

Released: July 1998
Director: Kunihiko Yuyama
Distributor: Toho
Budget: $5 million
Stars: Veronica Taylor, Philip Bartlett, Rachael Lillis, Eric Stuart, Madeleine Blaustein, Ikue Ohtani, and Kouichi Yamadera

The Plot:
Cloned from the genetic material of the rarest Pokémon of all, Mew (Yamadera), and enraged at its mistreatment at the hands of humans, the Psychic Pokémon Mewtwo (Bartlett) lures Ash Ketchum (Taylor) and his friends to its island to witness its plan to enact revenge against all humanity.

The Background:
So, by now, you’re well aware of Pokémon (Nintendo/Creatures/Game Freak, 1995 to present), a role-playing videogame in which you capture, raise, and battle little monsters and which dominated playgrounds and friendships in the late nineties. After rushing out to purchase Pokémon: Blue Version or Pokémon: Red Version, kids soon became engrossed in every piece of Pokémon merchandise there was, and that included the still-ongoing Pokémon (1997 to present) anime series. Though somewhat removed from its videogame source material, the anime was popular enough to warrant the release of a feature-length animated movie that revolved around one of the most powerful and popular Pokémon, Mewtwo, and its ever-elusive biological counterpart, Mew. Mewtwo represented the ultimate challenge in the original videogames; capturing it meant you had easily the strongest Pokémon the game had to offer and the creature was seemingly tailor-made for the game’s Master Ball, which captured any Pokémon without fail. In comparison, Mew wasn’t actually available in the original videogames outside of Japan, resulting in a slew of wild theories on how to capture it and kids either breaking their games with glitches or buying a Game Genie to get their hands on the mysterious little critter. For me, Pokémon: The First Movie has never been matched by other Pokémon movies in terms of its spectacle and hype. This was peak Pokémon, when the games and anime were at their most popular for my generation (matched only by the release of the follow-up titles), and the appeal of Mewtwo and mystery surrounding Mew was at the forefront of my mind and the minds of my friends and peers. Best of all, hints and glimpses of Mewtwo had been peppered throughout the anime: Giovanni (Ted Lewis) had used it in a battle against Ash’s rival, Gary Oak (James Carter Cathcart), and we’d seen it escape from Giovanni’s headquarters in explosive fashion. Never again would the anime so explicitly tie into one of the movies and the hype for Pokémon: The First Movie was palpable as a result.

The Review:
Pokémon: The First Movie opens with Mewtwo questioning its memories, its identity, and the reason for its creation. These issues haunt Mewtwo throughout the film and are the reason for its rage against, and hatred of, humanity; cloned from a single cell of the mythical Pokémon Mew, Mewtwo is tormented by visions from a life it doesn’t remember and feelings it can’t reconcile. Add to that its “awesome Psychic powers” and Mewtwo doesn’t waste any time in breaking out of its containment tube and demanding answers from the Team Rocket scientists that created it. Incensed at the their lack of care for its feeling or condition, Mewtwo flies into a rage, destroying the lab and killing everyone within. This opening sequence effectively sets the tone for what is to follow; although the film is rated U for everybody, it’s a far darker and more sombre affair than the usually fun-loving anime series thanks, largely, to the changes made to Mewtwo’s motivations by producer Norman Grossfeld. This involved cutting an entire opening sequence which made Mewtwo a far more sympathetic figure and changing the Pokémon from a more ambiguous and tragic figure and into one that is clearly evil and motivated by anger.

Pokemon1stMovieHatred
Mewtwo’s hatred for humanity makes it an aggressive and dangerous foe.

However, this doesn’t make it any less a tragic figure; Mewtwo suffers nothing but abuse and betrayal in its short life and its outrage is completely understandable. Determined to take revenge against the human world, Mewtwo organises a Pokémon tournament on its island; after winning a Pokémon battle against a random trainer (in unbelievable fashion), Ash, Brock (Stuart), and Misty (Lillis) are invited to attend but soon find themselves opposed by a sudden storm. This world-covering tempest is actually a result of Mewtwo; in the dub, Mewtwo causes a storm that threatens all life on Earth rather than to simply cloak its island and, while debating how to brave the storm, Ash and his friends hear a story that is also exclusive to the dub. They are told of a time long ago when a storm wiped out countless lives; so heartbroken by the devastation, the surviving Pokémon’s tears “somehow restored the lives lost in the storm”. Though it obviously has many holes, this ridiculous premise actually works to help justify what happens at the end of the film and simplifies the film’s events for the younger viewers that made up the majority of its audience. Regardless, Ash and his friends manage to reach Mewtwo’s island thanks not only to their Pokémon (despite them being described as being “too weak” to brave the storm) and, partially, to assistance from their long-time enemies from Team Rocket, Jessie (Lillis), James (Stuart), and Meowth (Blaustein), all of whom largely fulfil their usual roles as comic relief.

Pokemon1stMovieClones
Mewtwo plans to replace life with its genetically superior clones.

Once they reach the island and encounter Mewtwo, Ash immediately opposes Mewtwo’s plot to wipe the planet clean of all life, human and Pokémon alike, and replace it with its genetically superior clone Pokémon. What follows is an inevitable conflict between the naturally born and trained Pokémon of the trainers present and Mewtwo’s clones and a debate about the merits of fighting and the difference between nature and nurture. Now, obviously, the dub makes these aspects so on the nose and in your face that you’d be hard-pressed to miss them; the characters literally have an entire conversation in the middle of a no holds barred fight between the clones and the originals where they simply repeat “fighting is wrong” over and over. As a kid, this was a frustrating experience as those who didn’t understand Pokémon or who thought it was stupid would criticise this moment as all Pokémon ever seem to do is fight but I would argue that there is a clear difference in the games, anime, and in this movie and its subsequent sequels between battling for sport and in the name of friendly competition and fighting to the death.

Pokemon1stMovieThemes
Both Pikachu and Meowth refuse to fight their clones.

No one exemplifies the refusal to take part in such a pointless fight more than Pikachu (Ohtani); seeing it pointedly refuse to fight its clone and getting smacked around as a result was utterly heartbreaking but it serves to drive the point home extremely well. Even Team Rocket come to realise the pointlessness of such conflict, with Meowth also refusing to fight its clone and musing that individuals have more in common than they might think. Of course, all this surprising character growth and development is then rendered completely mute when Mewtwo wipes all of their memories, meaning that the only one who really learns a lesson is Mewtwo but, given that it was hell-bent on destroying all life on Earth, I guess that’s preferable. Even after all this time, and despite some of its flaws, Pokémon: The First Movie is still a great film for me. Of all the Pokémon movies released, this, in my opinion, is still the best one; nostalgia obviously plays a large part in this but, while I enjoyed some of the later movies, none of them had quite the same appeal as this one. It introduced a few new Pokémon from the upcoming sequel games, showcased my favourite Pokémon (Mewtwo), and brought Mew into the spotlight for the first time. It’s telling that every single Pokémon movie that has followed has featured either a Psychic Pokémon or a Pokémon capable of speech/communicating and that they often have similar themes of an evil or misguided, stupidly powerful Pokémon having to be quelled. Pokémon: The First Movie did it first, and best, in my opinion, though.

The Nitty-Gritty:
I mentioned just now that the film has some flaws and, yeah, it would be ignorant not to address them. Compared to later movies in the series, Pokémon: The First Movie isn’t quite as crisp or as smoothly animated; indeed, the animation is clearly a step up from the regular anime but far from the gorgeously slick rendering of later films. While you could argue that the producers really didn’t need to replace certain aspects with computer-generated images (doors, some camera movements and effects and the like), I didn’t actually mind this; sure, it sticks out a bit but it’s harmless enough.

Pokemon1stMovieChanges
The dub changes Mewtwo’s motivations but it’s still a complex character.

Of course, the changes made to the script, specifically Mewtwo’s origin and motivations, irked many people but it was never really an issue for me; sure, I’d like to see it either redubbed or subtitled in the original Japanese format but I grew up with the dubbed anime and this version of the movie. It’s all I’ve ever known and I’ve always been happy with it despite how unapologetically the script hammers home its obvious themes. It is a bit weird, though, how the script makes a few errors in identifying Pokémon; it makes an ironic sense that lifetime bunglers like Team Rocket would mistake Sandshrew for Sandslash (even though they look very different) but it is a bit odd that a trainer would misidentify his own Pokémon. Mistakes like these are surprising but hardly a deal-breaker; it smacks of laziness and a lack of quality control but hardly derails the movie.

Pokemon1stMovieConflict
Mewtwo and Mew clash in a test of will and power.

Frankly, they could have screwed the names of all the Pokémon and I still would have been happy just to see the long-awaited fight between Mewtwo and Mew. Apparently evenly matched in terms of raw power, their fight disappointingly descends into them simply ramming into each other’s protective shields but it’s nonetheless quite brutal and exciting. It’s even quite surprising how vicious Mew is; it is portrayed the entire movie as this mischievous little pixie but, when push comes to shove, is more than happy to trade energy blasts with its monstrous counterpart and fight to prove its point.

Pokemon1stMovieDespair
Still a heartbreaking moment all these years later…

This, of course, brings me to one of the most heartbreaking moments you could experience as a kid; Ash, desperate to stop the fighting, leaps between the two and is inexplicably turned to stone. The moment is shocking (even for me…and I’ve never been that big a fan of Ash) but quickly becomes absolutely heartwrenching when Pikachu, confused and in despair, tries to rouse its master with little pushes and shock after shock. The fighting stops; friend and foe alike gaze in disbelief as Pikachu fails to awaken Ash and bursts into tears of grief. It’s absolutely heartbreaking even now just seeing Pikachu in such a desperate state. Luckily, that “tears of life” story pays off and the collective tears of all the Pokémon restore Ash but I never expected the movie to have this sudden, abrupt turn into the feels and it still gets me to this day. Pokémon: The First Movie was a rousing success, earning over $170 million at the box office and kick-starting a slew of movies to follow. The producers circled back around to Mewtwo a couple of times after this, first in the direct-to-DVD sequel, Pokémon: Mewtwo Returns (Sonoda, 2000), which answered a few lingering questions from this film, and then Mewtwo and Mew also appeared in Pokémon: The Mastermind of Mirage (Yuyama and Fujita, 2006). Mewtwo also featured in Pokémon the Movie: Genesect and the Legend Awakened (Yuyama, 2013), though that film inexplicably and quite ridiculously featured an entirely different Mewtwo, and Pokémon: The First Movie was remade entirely in CGI in 2019 around about in time for the first film’s twentieth anniversary and, of course, who else but Mewtwo would feature as the principal antagonist in Pokémon: Detective Pikachu (Letterman, 2019), a film that explicitly referenced Pokémon: The First Movie when discussing Mewtwo’s origins.

Pokemon1stMovieBanner

The Summary:
Never doubt the power of nostalgia; it can make even the crappiest polygonal graphics seem timeless and the most outlandish movies memorable. I still like Pokémon but I don’t really play the games anymore and am nowhere near as invested in the franchise as I was when Pokémon: The First Movie came out; I would scour magazines and comic books for glimpses of the film and the mysterious new Pokémon we knew nothing about and went out of my way to get a bootleg VHS of the movie just so I could watch it and see my favourite Pokémon in action. I admit that nostalgia plays a large part in my affection for Pokémon: The First Movie but it is still a really solid entry in the Pokémon movie series and a decent animated feature in its own right. It’s not as action-packed as the later entries and nowhere near as well animated or scripted but the hype was real and seeing Mewtwo and Mew go at it in this classic will never got old. It got me then and it still gets me now.

My Rating:

Rating: 5 out of 5.

Fantastic

What did you think of Pokémon: The First Movie? Where does it rank for you compared to the other Pokémon films? Do you think it still holds up to this day or do you think it’s seen better days? How are you celebrating Mewtwo’s birthday this year? Whatever you think about Pokémon: The First Movie, Mewtwo, and Pokémon in general, leave your thoughts in the comments below

Game Corner: Wario Land 3 (Nintendo 3DS)

Released: 2 May 2012
Originally Released: 21 March 2000
Developer: Nintendo R&D1
Also Available For: Game Boy Color

The Background:
After his debut in Super Mario Land 2: 6 Golden Coins (ibid, 1992) Mario’s dastardly doppelgänger, Wario, quickly usurped Nintendo’s portly plumber as the face of Mario’s handheld sub-series. After the critical and commercial success of Wario Land II (ibid, 1998), Wario’s adventures continued on the Game Boy Color, a long-awaited colour upgrade to Nintendo’s popular handheld console. Wario Land 3 continued the tradition of expanding upon its predecessors, featuring far more emphasis on backtracking, exploration, and experimentation and would be the last in the series to release before Nintendo released the technically-superior Game Boy Advance console. Still, Wario Land 3 was a much-lauded success upon release and was eventually brought to the Nintendo 3DS Virtual Console some twelve years after its debut, which is the version I’ll be looking at today.

The Plot:
After Wario’s plane crash lands in a dense forest, he stumbles upon a mysterious cave and is sucked into a magical music box . An enigmatic hidden figure beseeches Wario to find five other music boxes to free him from his imprisonment and, excited at the prospect of finding more rare treasure, Wario dutifully sets out to satiate his lust for riches.

Gameplay:
Like its predecessors, Wario Land 3 is a sidescrolling action/platformer in which players take control of Wario, Mario’s mischievous and greedy lookalike. As in Wario Land II, Wario is functionally immortal; though he takes significant knockback from enemy attacks, he cannot ever be killed and faces no consequences for being attacked except being knocked from a platform or into another hazard. As a result, the player never needs to worry about replenishing Wario’s health or lives or being penalised for being attacked as long as they are patient enough to climb back up to where they were when they were knocked back. Wario begins the game noticeably less capable than in previous titles; he can still jump (shocking, I know!) and can barge into enemies with a shoulder charge but he can no longer pick up enemies and throw them…at least, not from the start. Instead, Wario must find power-ups in coloured treasure chests hidden throughout the game’s many levels to reacquire many of his usual skills, such as the butt stomp and the ability to pick up and throw enemies. Wario can, however, still roll into a ball when pressing down on a slope or coming off a zip-line to pass through narrow passageways.

Wario needs to re-learn some of his patented and basic abilities from the last games.

The main objective of the game is to visit each of the twenty-five levels found at each compass point on the overworld; each one contains four coloured keys and four chests of the same colour which house treasures, power-ups, and key items. Wario must collect each one to open up new areas of the overworld and progress further; this means that each level must be revisited multiple times with Wario’s new abilities and new areas opened up with the treasures and each compass point will only be fully accessible once all treasures have been collected. This makes the game much bigger and more confusing than even its predecessor, which featured branching story paths depending on the choices you made during gameplay; here, you constantly have to backtrack to old levels in order to open up new ones and, someti s, key items will affect multiple levels at once. Thankfully, Wario can return to the mysterious figure in the Temple at any point for a hint on which level to go to, though it’s up to the player to figure out what’s changed in that level or which of Wario’s new abilities needs to be used to progress. The game’s overworld is split between the four compass points (North, South, East, and West) and Wario can quickly travel to each one by pressing the “Select” button on the overworld. From here you can also check on which treasures you have acquired, reactivate key items to remind yourself of where to go, and, eventually, trigger the game’s day and night cycle (which, otherwise, automatically switches to one or the other every time you finish a level, with the time of day also affecting the levels in certain ways).

You’ll need all the Coins you can find to beat the annoying golfing mini games.

Within each level, you can also find a number of Coins, including eight large Musical Coins; unlike previous games, though, the amount of Coins you have doesn’t affect the game’s ending and Wario’s capacity is capped at 999 Coins. Instead, Wario uses Coins to play a number of hidden golf mini games found in each level, which is necessary to open previously blocked paths and find more keys and chests. The golf mini games help to break up the gameplay a bit but is needlessly frustrating when you first play it since you’re not really given any direction on what to do. Basically, by moving the screen to the right, you can see where Wario’s shot will land on the field; you need to press A and then quickly press it again when the slider reaches a power level high enough to avoid getting stuck in water, lava, or the rough grass and then quickly press it again when it hits the blue area of the slider to take your shot. You get four shots at hitting the Para-Goom and, if you fail to sink it in the goal, you’ll have to pay some more Coins to try again. When I first played this, I was frustrated by the finicky controls and vague directions but, once you play it a couple of times, it’s not so hard to get the timing down and the 3DS’s save state feature really helps speed the process up.

Wario’s “Reactions” will allow him to find more treasure and reach new areas.

As in the previous game, Wario can still change forms when hit with certain attacks; these will briefly alter Wario in strange and amusing ways to help him break through previously impassable blocks, reach higher areas, or pass through small spaces and figuring out how to use these different transformations (or “Reactions”, as the game calls them) is key to finding all the keys, chests, and Musical Coins. When in a level, you can also save your progress at any time, see which keys you currently hold, which chests you’ve opened, how many Musical Coins you’ve collected, and even return to the overworld map all with an appreciated ease. Compared to the last two Wario Land games, Wario Land 3 is much more difficult and time consuming; thanks to the abundance of backtracking and vague hints, it can be very difficult to know where you need to go and what you need to do. Thus, you are encouraged to experiment; if you see something blocking your path, try using all of Wario’s abilities as some will affect the obstacle or possibly even destroy it. When exploring a level for the first time, try to take note of your surroundings and out of reach areas as you may need to return later with different abilities to access these parts of the level, and be sure to visit the Temple if you ever forget the levels your key items have affected or opened up. For the most part, though, I found Wario Land 3 best played in short bursts of about an hour or so tackling each level in turn as they opened up or changed rather than trying to slog through it in extended sittings, which may have contributed to my more annoying experiences with the game as it never seemed to end.

Graphics and Sound:
Wario Land 3 was easily the best looking entry in the series at that point; thanks to being made exclusively for the Game Boy Color, the game is full of bright, vibrant colours that really pop out at you. While Wario is actually a little more subdued in his colouration, appearing almost monochrome, this actually helps him to stand out against the colourful backgrounds and, as you’d expect, he’s full of life and character, falling asleep if left idle for too long and scratching his butt when left halfway up a ladder. There is a lot of level variety on offer in Wario Land 3; each compass point of the map is home to at least six different levels and, rather than each compass point having a fixed theme, every level looks different and has different gimmicks contained within.

Levels are more varied, detailed, and colourful than ever and change as you progress.

You’ll explore standard platforming levels such as forests, deserts, volcanoes, and ice levels but also explore ruins, swamps, towns, castles, and caves. Each one has at least two different colour palettes thanks to the day/night cycle and, though they start off relatively small and restrictive, each one is quite large, with many different layers and areas to explore as you gain new abilities and affect the overworld. Wario Land 3 has a bit more emphasis on story this time around, with short cutscenes playing whenever Wario acquires a new item to show how it has affected the overworld map. When you find new power-ups, a short tutorial will play showing you how to use Wario’s new ability (which can be revisited at any time from the pause menu) and there are a few instances of dialogue, primarily from the hidden figure, to relay the game’s simple plot. As you’d expect from a Mario/Wario title, the soundtrack is suitably chirpy and catchy, though I can’t say that it really made much of a lasting impression on me.

Enemies and Bosses:
Since the game’s plot does not involve the Black Sugar Gang this time around, you’re faced with a whole slew of all-new enemies, many of which behave very similar to those from the last two games. Accordingly, you’ll come across spear-wielding Spearhead’s who will prick you with their sharp weapons, Para-Gooms who descend from the air and shield themselves with spiked umbrellas, puffer fish-like Haridamas which sprout spikes when they get close, and annoying birds that fly across the screen and stun you but can make for a boost to higher areas if you can time your jump correctly. You’ll also come up against a bunch of enemies that will change Wario’s form with their attacks or abilities; Appleby and Doughnuteers throw delicious apples and doughnuts your way, Fire Robota’s spout flames, Hammer-bots relentlessly try to squash you with their giant hammers, floating jellyfish try to sting you, and Zombies constantly spring out when it’s most inconvenient to hurl their heads at you. For the most part, these enemies are placed in or near areas where you’ll need the accompanying Reaction to progress further but, equally as often, they’re simply placed to be annoying so if you don’t need a specific transformation be sure to avoid them.

Often, the direct approach is insufficient to defeat Wario Land 3‘s bosses.

Wario has a tough battle ahead of him this time around as he must battle eleven different bosses in his quest for the five magical boxes; because of the nature of the game, though, it’s entirely possible to battle these bosses out of order depending on what abilities you have and key items you’ve found, which can mix up subsequent playthroughs of the game. With the exception of the final boss, each of Wario Land 3’s bosses requires three hits to defeat and, like in the last game, each one will expel you from the boss arena if you get hit or mess up, changes up their attack patterns as the fight progresses, and requires quite a bit of skill on your part to defeat. The Doll Boy, for example, sits atop a totem pole tossing hammers at you; you must avoid these and destroy his totem pole to bring him down to ground level then frantically avoid his hammer swings to jump on his head and finish him off with a shoulder barge. Similarly, Wormwould pops out of the ground to spit rocks at you that will send you tumbling off the platform if they hit you so you need to use your ground pound on his head before he gets the chance. Each boss is unique and requires different strategies to get around their attacks; Wolfenboss has to be knocked out of the air by ricocheting a Kuri at the right angle, for example, while Mudee is fought while you’re clinging to a net and requires you to time a ground pound onto its body while avoiding its spiked tail. Anonster, meanwhile, can only be brought down to ground level by throwing its own web balls up at it, which can be tricky because it’s hard to judge the angle of your throw.

Wario’s final challenge is a gigantic, demonic clown that is actually capable of killing him.

Some bosses are more unique and frustrating than others, though: Jamano plunges the arena into darkness, forcing you to quickly navigate around the small area hitting four skulls to bring the exorcising light and Wario needs to avoid Helio’s infectious stings and ground pound a pump to inflate and explode the boss. Easily the two most frustrating bosses, for me, though were Pesce and Shoot; Pesce, a weird rat/piranha hybrid, can only be defeated by poisoning it with mouldy cheese but it’s really tricky to time the dropping of the cheese so the damn thing actually eats it. Shoot is similar to Dunk from Wario Land II in that you must beat him at a ball-based game, in this case football. You need to avoid being squashed by Shoot but it’s not made clear exactly how you’re supposed to smash him into the goal; the easiest way I found was to lure him near to the goal (but not too near) and then barge him when he’s bouncing in the air as I could never get him into the goal when the goalie was stunned by a ground pound. After finding all five musical boxes, Wario returns to the hidden figure, who reveals himself to be a demonic clown entity and the game’s final boss. This is the only time in the game that you can get a game over as Wario will instantly be defeated if the clown grabs a hold of him. You need to jump over, or duck under, his hands and stun his fists with a ground pound and then jump and throw the fist into the clown’s face four times to win. Honestly, the most difficult part of this boss was getting the timing of my attacks and jumps right as his fists swing at you pretty fast and it’s easy to lose your grip on the stunned hand if you’re not fast enough.

Power-Ups and Bonuses:
As mentioned before, Wario can acquire upgrades for his abilities and relearn classic skills from various treasure boxes. This includes an upgrade to his shoulder attack and ground pound to break through tougher blocks, being able to charge up an enemy before throwing it to throw it higher and further, the ability to swim (and then swim through currents), smashing objects from below, and performing a high jump by pressing up and jump at the same time.

Many of Wario’s Reactions return from Wario Land II and function in the same way.

Wario also assumes a number of different forms upon being hit with certain attacks or encountering certain hazards. Many of these return from Wario Land II, such as Fat Wario (who destroy enemies by touching them and can smash through special blocks), Fire Wario (who, after running around with his butt on fire for a while, eventfully becomes engulfed in flames to break through special blocks), Flat Wario (who is small enough to squeeze through tiny gaps but extremely difficult to control, with the game forcing you to desperately try and float him through gaps in vertical areas), Zombie Wario (who passes through thin platforms when jumping on them), and Puffy Wario (who relentlessly float upwards until he hits a ceiling or block). You can also become Ice Skatin’ Wario when frozen (more of a hindrance than a help), Snowball and Ball o’ String Wario to become an unstoppable ball and break through special blocks, Bouncy Wario (helpful to reach high areas but difficult to control), Bubble Wario (which can let you pass through directional currents to reach goodies but is often just an annoying hazard), Invisible Wario to get past Seeing-eye Doors, and Vampire Wario. This last one is pretty cool as you become a Dracula-type figure and can turn into a vampire bat by pressing B and fly up to new areas but, since this latter mechanic is the only useful thing about this Reaction, I’m not sure why Wario doesn’t just become a bat by default.

Additional Features:
There are one hundred treasures to find in Wario Land 3; you’ll need all of Wario’s abilities and certain key items to find them all as some are not only hidden in previous levels but also in hidden levels on the overworld map. Thankfully, you don’t need to find them all to complete the game and you don’t get a different ending for having them all but collecting all one hundred does unlock a time attack mode. There are also, as mentioned, eight large Musical Coins to be found in each level; collecting all of these opens up a fourth golf mini game if you just can’t get enough of that particular gem. Of course, if you’re playing the 3DS version of the game, you can also make liberate, unapologetic use of the save state system to make the game a little easier on yourself.

The Summary:
Wario Land 3 really surprised me; I kind of expected the series to get a bit simpler as it progressed but, if anything, the Land sub-series just got bigger and more ambitious as it went on. This is easily the biggest of this sub-series both in terms of graphics and its scope which is great for a classic handheld title and I can’t fault the game for being packed full of content but…man, is this a long, convoluted game. Wario Land 3 really kicked my ass as I went into it expecting quick, easy, pick-up-and-play gameplay and was, instead, forced to constantly backtrack and explore all over the game’s vast overworld and numerous levels. This was great for expanding the depth and range of the sub-series and makes for an addictive and engaging handheld experience; I tried to limit my play time to short bursts of a few hours or so but often found myself getting sucked into the game as I tried to track down one more treasure chest or unlock one more level for my next session.

My Rating:

Rating: 3 out of 5.

Pretty Good

Have you ever played Wario Land 3 before? How did you find it compared to the other Wario Land videogames? Were you a fan of how big the game was and its emphasis on backtracking and exploration or did you find it maybe to be a bit too ambitious for its own good? What are your thoughts on Wario as a character and his wacky sub-series? Would you like to see more of him and his unique gameplay mechanics or do you think he’s better suited as a side character relegated to mini games? Whatever thoughts you have on Wario and Wario Land 3, feel free to drop a comment below.

Game Corner: Kid Dracula (Xbox One)

KidDraculaLogo

Released: May 2019
Originally Released: October 1990
Developer: Konami Digital Entertainment/Konami Industry Co. Ltd
Original Developer: Konami
Also Available For: Game Boy, Nintendo Entertainment System (NES), Nintendo Switch, PC, and PlayStation 4

The Background:
Well, this is it; over the past few weeks, I have been reviewing each of the titles of the Castlevania Anniversary Collection and we’re finally at the end with perhaps the most obscure title in the collection. By 1990, Konami was pretty much knee-deep into establishing Castlevania as a successful franchise; Castlevania III: Dracula’s Curse (ibid, 1989) had released the previous year and both Castlevania II: Belmont’s Revenge (ibid, 1991) and Super Castlevania IV (ibid) were due to come out in the following year. So, naturally, this was the perfect time for a chibi­-style, super-cute parody platformer starring Dracula’s son. No, not Alucard (or, at least, not explicitly…); this title would, instead, be a spin-off starring the titular “Kid Dracula”, a mischievous little imp with a super-deformed, cartoony aesthetic. His self-titled games released exclusively in Japan until the release of the Castlevania Anniversary Collection, which included the original NES version for the first time, in English, but was Kid Dracula worth the wait or is it just another example of a wacky Japanese title that never should have seen the light of day in the West?

The Plot:
After waking from a long sleep, the self-proclaimed “Demon King”, Kid Dracula, is challenged by the demon Galamoth. Arming himself with his father’s cape, Kid Dracula sets out to destroy Galamoth and his minions and retake his throne as the Demon King.

Gameplay:
Kid Dracula is a 2D, sidescrolling action/platformer that, in a change of pace, has players take on the role of Dracula’s son, Kid Dracula (also called “Lil’ Drac” and, presumably (given their similarities), a super-deformed version of Alucard), and journeying across a number of levels defeating Galamoth’s minions. Rather than using a whip, Kid Dracula attacks with a fireball-like projectile, just like his Dad. You can blast enemies in the direction you’re facing, shoot upwards, and shoot downwards while jumping, making Kid Dracula a relatively versatile character. You can also hold down the attack button to charge up a shot, which will allow you to collect Medals that you can use to play one of the game’s four mini games at the end of each level. Rather than collecting the traditional Castlevania sub-weapons, you’ll acquire new attacks after defeating each of the game’s bosses; you can switch between them by pressing the “Select” button to assist both in disposing of enemies and your traversal through the game’s nine brisk levels, though there is a significant delay in switching between attacks and there’s no option to mix and match them.

KidDraculaAttack
Take out enemies with a fireball or charged shot.

Unlike the protagonists of other Castlevania games in the Castlevania Anniversary Collection, Kid Dracula is a floaty, slippery little devil but no less sluggish in his movements. When you jump, Kid Dracula gets some serious height (even more so when jumping underwater) and floats his way downwards slow enough for you to make sudden course corrections to avoid instant-death spikes or attack enemies. However, he also comes to a dead stop when jogging, meaning it’s pretty easy to slip off platforms to your death, especially in the ice world, which has some of the worst slippery ice physics I’ve ever encountered. Kid Dracula’s health is represented by hearts; you start the game in Dracula’s Castle and with three hearts but very quickly upgrade to four and, eventually, five, by picking up bigger heart containers. Regular hearts will replenish Kid Dracula’s health and he can earn as many extra lives as he needs by playing the mini games at the end of each level.

KidDraculaGimicks
Each level has its own gimmicks and hazards, ranging from the simple to the frustrating.

Kid Dracula features a fair amount of level variety and gimmicks; in level one, you’re tasked with escaping Dracula’s Castle, a journey that takes you from the throne room (traditionally the end of most Castlevania games) and through the obligatory clock tower. It’s a very vertical opening level but the game quickly switches it up in level two, which sees you hopping over clouds across a bottomless pit of death and riding a track. A significant portion of level three is underwater and, after jumping around on rooftops in level five, you’ll end up riding a subway train, dodging low-hanging ceilings and fighting off monsters as the level auto-scrolls you forwards. Generally, Kid Dracula balances these different gimmicks pretty well but you’ll be faced with the same issues that have plagued all of the Castlevania games in the Castlevania Anniversary Collection: wonky physics, tricky jumps, and knockback from damage. As a result, a lot of Kid Dracula’s levels can be more frustrating than enjoyable and the game can be a bit of a chore to get through thanks to some dodgy enemy placement and instant-death traps; in level six (a desert), you have to jump around falling spiked blocks (just brushing the edge of these instant-death spikes will kill you), are chased by a giant boulder that will kill you the moment it touches you, have to out run a collapsing spiked ceiling, and then have to battle the boss on floating hands, meaning that one hit will send you plummeting to your death.

Graphics and Sound:
Kid Dracula has an amusingly charming little art style; it’s hyper deformed, turning Castlevania’s traditionally gothic and horrific aesthetic into a chibi, over-exaggerated, cartoony style that is pure Japan through and through. Kid Dracula himself stands out at all times thanks to his massive head and cute little face but each of his enemies hold their own as cutesy-fied monsters that seem more adorable than threatening. It’s a good job that the sprites are so large and cartoony and expressive as the game’s backgrounds leave a lot to be desired. It all kind of falls apart after you leave Dracula’s Castle, which is when Kid Dracula throws such cliché level designs as a pyramid, an ice level, and a city at you.

KidDraculaGraphics2
Kid Dracula suffers greatly from slowdown and sprite flickering.

Though there are some interesting level designs outside of the first level (the second level being set in the clouds and the airship are quite interesting), a lot of the backgrounds are criminally plain and uninteresting at times which you would think would allow Kid Dracula to run quite smoothly but you would be wrong. Instead, Kid Dracula suffers from the worst slowdown and sprite flickering in the Castlevania Anniversary Collection so far…and I’m struggling to see why. It’s not as if the game is overly complicated or full of that many moving elements but you’ll stutter and jitter about during critical moments, slipping to your doom or making fatal errors when fighting the game’s various bosses because the game slows to a crawl and the sprites start bugging out on you. Thankfully, the game has a whimsical soundtrack and loud, cartoony sound effects, all of which add to Kid Dracula’s quirky nature, but none of which can help reduce the frustration the slowdown and sprite flickering brings to the title.

Enemies and Bosses:
Kid Dracula has to battle a whole host of wacky enemies in his debut game; level one features all of the staples you’d expect from a Castlevania title (bats, zombies, spear-throwing knights, and Frankenstein’s Monster) but, from level two onwards, you’ll come up against such enemies as a broomstick-riding witch, cloud-riding imps who throw lightning bolts at you, Olympic swimmers, axe-wielding maniacs who wear hockey masks, aeroplane-throwing apes, and even aliens dropped from flying saucers. Each of these is rendered in the same exaggerated, cartoony style as the kid himself, which can often undermine the very real threat they pose to your health. Sure, the skeletons in Kid Dracula look funny but they can still be a pain in the ass when they throw their heads at you, and the enemies still respawn once you leave the screen. Luckily, most can be put down with one of Kid Dracula’s regular fireballs and those that are trickier can be done in with either his charged shot or Bomb technique.

KidDraculaBosses
Most bosses are ridiculously easy but Lady Liberty challenges you to a quiz!

As for bosses…well, you fight a giant chicken at one point so what does that tell you? The first boss is a little ghost who runs off and gets his bigger brother after you’ve damaged him enough and most of these encounters are a pretty simple affair where you just dodge their attacks or run underneath them and blast them with your more powerful attacks until they are defeated. However, when you reach the end of level five, you’ll encounter Lady Liberty who challenges you to a quiz rather than battling you, which is an amusing twist. Things get a bit trickier with level six’s sphinx head boss; you have to jump precariously from its disembodied hands and avoid the bubbles it shoots out all while floating over a bottomless pit that spells instant death. Once you reach level nine, you’ll have to run a gauntlet of sub-bosses including an massively annoying, teleporting dragon who can only be damaged in a small window of opportunity by your Ice Shot and a giant mechanical drill and is so big that it’s difficult to defeat it without taking at least one hit.

KidDraculaBosses3
Neither Galamoth presents much of a threat.

Eventually, you’ll go one-on-one with Galamoth himself not once but twice; the first time, you battle “Demon Lord Galamoth” at the end of level seven and he attacks with both a sword (easily jumped over) and a stream of fire (easily ducked). The second time, you battle “King Galamoth” at the end of level nine but, despite being the game’s final boss, he’s not much of a threat. He’s completely immune to all damage except in the small window where he opens his mouth to drop a fireball on your head; just stay between the lighting bolts he shoots down and keep as far left (or right) as you can and be sure to fire a charged (or Bomb) shot upwards before you miss your window and you’ll be back as the King of all Demons in no time.

Power-Ups and Bonuses:
Every time you defeat a boss, Kid Dracula learns a new technique; you can learn the Homing Shot (which fires a spread of projectiles that home in on enemies, but isn’t particularly strong), a Bomb Shot (which deals explosive damage and one-shots every regular enemy), and an Ice Shot (which, apparently, freezes enemies in place but I only ever used it against the aforementioned dragon boss). Kid Dracula also learns two useful techniques to help him progress further through levels and past hazardous obstacles; the first is the Bat transformation, which turns you into a bat, and the second is the “Up Up Down Down” technique that allows you to walk on ceilings. Both of these only last for five seconds so you have to be quick when using them and, while you can fire a standard projectile when on ceilings, pressing the attack button when you’re a bat instantly turns you back into Kid Dracula (and, generally, sends you falling to your death). It’s also worth noting that you’ll lose the bat transformation if you hit a wall and won’t be able to perform it at all if you’re standing too close to a wall, and it’s pretty difficult to control Kid Dracula when he’s in this form, so it’s best to have a route figured out before attempting this transformation. At the end of each level, you are asked to pick a route and, depending on how Kid Dracula makes his way downwards, will play one of four mini games: Roulette, Cancan, Garapon, and Jab ‘N Pop. In each, you must pay to play with your Medals, so it’s advisable to hit as many enemies as you can with your charge shot so you can collect a lot of Medals, and can win extra lives if your luck is in. These mini games aren’t especially difficult, just based more on chance than skill, and the instructions for their play can be a bit vague; I still don’t really get how Roulette works and I just tended to randomly select stuff and hope for the best and still walked away with at least one extra life each time.

Additional Features:
Like other Castlevania games, Kid Dracula features a password system that allows you to return to (or jump to) any of the game’s nine levels whenever you want. The Castlevania Anniversary Collection also awards you an Achievement after you clear the game, allows you to make liberal use of the save state feature, and apply different frames and display options to customise the game’s appearance to your liking as standard.

The Summary:
Kid Dracula is a quirky, amusing little title; the way the characters talk in cutscenes is charming and the game is clearly meant to be a fun little spin-off of the traditionally dark, broody, and gothic Castlevania series and I can appreciate its humour and artistic direction. Indeed, it’s hard to deny that the sprites look great; everything has this hyper deformed, chibi-aesthetic to it and it’s like playing a peculiar Japanese anime rather than a horrific battle against bloodstained monstrosities. Yet all the humour and artistic charm in the world can’t change the fact that Kid Dracula is a laborious experience; the controls are slippery, the level layouts frustrating, and the slow down and sprite flickering absolutely maddening. Maybe I’m just burned out on the series by this point, especially the issues that dogged the 8-bit Castlevania’s (and many other titles, to be fair), but I feel like Kid Dracula really doesn’t have any excuse to struggle as hard as it does to run at an appropriate speed and level of quality due to its more simplistic nature.

My Rating:

Rating: 2 out of 5.

Could Be Better

What are your feelings about Kid Dracula? Do you feel it was a worthy attempt at expanding the franchise or do you think it was maybe a bit too “out there” as a concept? What other Castlevania characters would you like to see get their own spin-off? Are there any other genres you think Castlevania could try to fit in to, like racing or a first-person shooter? Whatever your thoughts on Kid Dracula, or Castlevania in general, feel free to leave a comment below and check out my other Castlevania reviews.

Game Corner: Castlevania: Bloodlines / Castlevania: The New Generation (Xbox One)

CVBLogo

Released: May 2019
Originally Released: December 1993
Developer: Konami Digital Entertainment/Konami Industry Co. Ltd
Original Developer: Konami
Also Available For: Mega Drive, Nintendo Switch, PC, and PlayStation 4

The Background:
For the longest time, Castlevania was a series synonymous with Nintendo’s home consoles; handheld or otherwise, Castlevania was generally played on a Nintendo-branded product, meaning those of us (like me) who were playing SEGA consoles missed out on the chance to slay Dracula like those Nintendorks. Castlevania: Bloodlines (also titled Castlevania: The New Generation) changed that…or, at least, it would have except for the fact that Castlevania: Bloodlines is still one of the rarest and most expensive videogames these days. Luckily, the title was not only included as part of the Mega Drive Mini but is also available on the Castlevania Anniversary Collection, being only one of two 16-bit titles available in that collection following Super Castlevania IV (ibid, 1991).

The Plot:
It’s 1917 and the dark countess Elizabeth Bartley seeks to resurrect her uncle, none other than the evil Count Dracula. To facilitate his resurrection, she sends her minions across Europe to cause chaos and bloodshed, only to be opposed by two young vampire hunters: John Morris and Eric Lecarde.

Gameplay:
Castlevania: Bloodlines is a 2D, sidescrolling action/platformer and the first game in the Castlevania Anniversary Collection to not include one of the legendary Belmont family. Instead, players can choose to control either John Morris or Eric Lecarde right off the bat, making it only the second game in the collection to include another playable character and the only one where this character can be selected from the main menu rather than switched to mid-game as in Castlevania III: Dracula’s Curse (ibid, 1989). Choose John Morris and you’ll be in for a traditional Castlevania experience; like his forefathers, Morris wields the Vampire Killer to fend off the forces of evil. Morris isn’t quite as adept with the whip as Simon in Super Castlevania IV, though; he can only attack diagonally and upwards when jumping and can’t let the whip hang loose to freely aim it or block incoming projectiles. Similar to Simon, Morris can use his whip to swing across gaps but the mechanic is noticeably more clumsy and tricky to pull off here as, rather than swinging from hooks or metal rings, Morris dangles from ceilings and, while you can alter the length and speed of his swing, it’s far easier to just drop to your death than clear the gap.

CVBUltimate
Each character has their own screen-clearing attack.

Pick Eric Lecarde, though, and you’ll get a fresh, new Castlevania experience; Lecarde wields the Alucard Spear, giving him a greater attack range (if slightly reduced attack power). Lecarde can also attack in all eight directions, swinging his spear in a flourish to quickly attack enemies both in front and behind. Lecarde is also slightly faster and can leap higher thanks to his super jump, allowing him to reach platforms and levels Morris can’t, though I actually found him a bit clunkier and his attacks to be slower than Morris’s. Both characters have access to all the classic Castlevania sub-weapons (and even a few new ones), which are now used thanks to the acquisition of jewels rather than hearts. You have no idea how happy this makes me; like the hearts replenishing health in Castlevania: The Adventure (ibid, 1989), having jewels rather than hearts just makes so much more sense. Unlike Super Castlevania IV, there’s only one piece of meat available to replenish your health, but you can still upgrade each characters’ weapon by collecting orbs and even perform an “Item Crash” manoeuvre; this unleashes a more powerful super attack for each sub-weapon at the cost of a substantial number of jewels.

CVBPlatforming
Platforming is still a risky, tricky business…

Both characters are noticeably faster and more manoeuvrable than their predecessors but still fly backwards upon receiving damage, often to their doom. Thankfully, Castlevania: Bloodlines finally ditches the limit limit of the previous games and is light on the instant-death traps and spikes; often, when you jump or fall into water, your health will be slowly drained as you take damage (presumably to represent the character drowning) rather than immediately dying. That’s not to say that bottomless pits and instant-death spots aren’t present, or that you won’t find yourself just slipping or walking off a ledge when you meant to jump thanks to a slight (but glaring) delay in the game registering your button presses, or that you won’t be tasked with making some difficult jumps or awkwardly swinging across gaps while fending off projectiles or enemies. After two games focused more on rope climbing, the staircases are back! And, what’s more, it’s super easy to climb up and down them, and to stop and attack enemies while on them; there’s no sudden dropping to your doom here…unless you’re stupid enough to jump through the staircases. Like Super Castlevania IV, Castlevania: Bloodlines also uses the power of its 16-bit hardware to render some impressive graphical mechanics; you’ll jump up rotating platforms, traverse the Leaning Tower of Pisa as it sways alarmingly, and hop across floating platforms as the screen auto-rises and auto-scrolls.

CVBPlatforming2
Auto-scrolling is far less punishing than in other Castlevania titles.

Yes, auto-scrolling is a thing in Castlevania: Bloodlines but, for the most part, its far less stressful or annoying than in previous Castlevania titles; not only are there are more opportunities to save yourself from death and far less enemies to contend with, you also don’t die from touching the top of the screen, which is always useful. Castlevania: Bloodlines operates using a simple six-stage formula; you progress across Europe via an automated map screen and, in each unique area, you’ll face different platforming requirements, obstacles, enemies, and, of course, a boss. Of all the Castlevania games I’ve played for this marathon, Bloodlines has the most variety in terms of its graphics, stages, and enemies; rather than simply ploughing your way towards, or through, a gothic castle, you’re exploring a munitions factory or exploring the ruins of Atlantis. Some of these locations have been hinted at before, or served as inspiration for the aesthetic and atmosphere of the Collection’s other games, but nowhere have they been more fully-realised than in Castlevania: Bloodlines. That’s not to say that the game is flawless though (but then again, few games are). Sometimes, the game takes its new mechanics and features a bit too far, asking you to jump across platforms while upside down or your vision is distorted by mirrors. While this wouldn’t be too bad, the developers also threw in erratic Medusa Heads and constantly-respawning skeletal demons to make these sections more frustrating. It doesn’t help that I found myself just as likely to simply walk off a platform to my death or pointlessly hop in place rather than make a successful jump, or that you’re seemingly destined to jump right into the path of an enemy or projectile if they’re onscreen but, thankfully, these sections are few and far between and, for the most part, Castlevania: Bloodlines is a crisp and visually impressive experience.

Graphics and Sound:
Super Castlevania IV set a high standard for the series, dragging it out of the 8-bit era and into the glory of full-colour, arcade-style 16-bit graphics and Castlevania: Bloodlines only builds upon that foundation. Sprites aren’t as big as in Super Castlevania IV but they’re no less detailed for it; both Morris and Lecarde stand out from the game’s many and varied detailed backgrounds, popping out at you thanks to their unique colour palette and sprite art, and enemies are easily spotted and fantastically animated thanks to the game’s 16-bit engine. Simply put: there is a lot going on in this game’s stages. Not only do they slant or flip upside down, they’re also filled with some fantastic blood and gore as corpses and hanged victims litter the background of a lot of the stages.

CVBGraphics
Platforms crumble beneath your feet and spiral around you with detail and depth.

You’re also required to pull off some tricky jumps from rotating platforms, gears, and moving platforms and stages are filled with variety and teeming with life and danger alike. Konami borrowed a trick from another of their fantastic titles, the criminally under-rated Rocket Knight Adventures (ibid, 1993), for the water reflection effects seen in stage two, where (as in Rocket Knight Adventures) you’ll use the reflections in the rising and falling water to jump safely across the ruins of Atlantis. You’re also tasked with attacking the crumbling, ancient pillars to create new platforms and jump from others as they collapse beneath your feet and jumping from platform to platform up the swaying Leaning Tower of Pisa, which is a cakewalk compared to having to negotiate the small, annoying, rotating platforms in stage five. Given its more modern setting, you’ll also have to content with conveyor belts, pistons, massive gears, and razor-sharp circular saws in stage four, all of which only add to the game’s more steampunk-inspired aesthetic.

CVBGraphics3
The game mixes the traditional Castlevania gothic with a steampunk aesthetic.

The danger in the stages is compounded further by the way Bloodlines incorporates enemies into each stage; Minotaurs break parts of the marble pillars off and attack you with them in stage three, Fish Men leap from the depths below, Medusa Heads swarm around you as you hop from wooden platforms while the water level lowers, skeletons throw bones at you from behind a chain-link fence in stage four (they also jump over the fence and pop out of barrels without warning) and form (and re-form) from a bloodied water fountain in stage five, where skeletal monkeys wing at you from vines, tossing explosives at you and trying to cut you in half. The game returns to its gothic roots by the time you storm Castle Proserpina, the game’s final stage, which sheds the more steampunk-driven aesthetic for a traditional, stone castle familiar with anyone who has ever played a Castlevania before. All of these graphical and gameplay elements, while impressive, do lead to some noticeable slow-down in many areas of the game, however, which can (literally) drag down the otherwise thrilling experience Castlevania: Bloodlines has to offer. This is accentuated further by the game’s impressive and atmospheric soundtrack; the 16-bit games really did put all their power and benefits to the best use possible, allow this game to not only look fantastic but, thanks to Michiru Yamane’s fittingly gloomy soundtrack, sound amazing as well.

Enemies and Bosses:
Castlevania: Bloodlines offers one of the more diverse and varied bestiaries in the Castlevania Anniversary Collection; unlike many of the other titles, which simply recycled the same enemies with some minor tweaks or alterations, I felt like Bloodlines actually put some effort into really giving even the most basic enemies some life and vigour. Sure, all the usual suspects are here (skeletons, bats, ravens, the Pillar of Bones, etc) but even some of these have been spruced up to offer more of a threat. Skeletons wield swords, shields, and whips and there’s a variant that swings a massive axe and another massively annoying one that swings at you from vines. You’ll also encounter Harpies (who attack unevenly from the sky with spears), Mummies (who both float their bandages at you and try to whip you with them), man-eating plants, plants that screw up your controls (which is always annoying), mace-wielding barbarians who leap right in your face, and charging Minotaurs.

CVBSubBosses
You’ll have to get past some monstrous sub-bosses to progress.

In keeping with the game’s more steampunk-inspired aesthetic, you’ll also face a wide variety of knights; there’s knights that sprint at you, ones that brandish swords (as well as that old favourite, the Axe Knight), ones that fire arrows at you in an arc, and even ones with giant mallets, gatling guns(!), and on wheels! The level of detail in each enemy is impressive and even the most small and seemingly-insignificant enemy can be a threat thanks to their placement, attack patterns, and the limitations of Morris’s whip. Castlevania: Bloodlines also stands out by its use of sub-bosses; you’ll face the likes of Hellbound (a bloodied, half-skeletal beast that haunts the ruins of Dracula’s Castle), two large, armour-plated heavies (one with an axe, one with a mace), sentient faces brought to life by some kind of poltergeist and even a Castlevania custom, Frankenstein’s Monster. Some of these are, honestly, a bit more creative and visually interesting than the stage’s actual bosses, such as the giant suit of armour that barely poses much of a threat at the end of the first stage.

CVBBosses
Some bosses are better than others but they’re all visually impressive.

Things pick up considerably once you reach stage two’s Golem, however; in this fight, you have to first whittle away chunks of the creature’s mid-section before you can attack its vulnerable head and actually do some real damage, all while dodging falling rocks from the ceiling. Stage three’s Gargoyle can also be a bit of a pain without the right sub-weapon (…unless you use Lecarde) as it buzzes around your head, trying to whip at you with its rock-like tail, all while the top of the tower you’re on (and the background) excitingly rotates. The mess of gears and cogs that acts as stage four’s boss is probably the wildest and most ill-fitting of all the Castlevania bosses I’ve fought so far; don’t get me wrong, I love a good bit of steampunk but this…thing…was not only kind of boring to fight (despite its multiple forms and attacks) but also needlessly frustrating. The Princess of Moss from stage five is marginally better but ridiculously easy even after she transforms into a giant…moth…?

CVBReaper
You’ll have to defeat all the previous bosses again before you can face Death.

Once you get to Castle Proserpina, the shit really hits the fan as you have to face a gauntlet of sub-bosses and bosses, each with different forms and attacks at their disposal. First, you’ll battle the Grim Reaper once again; this time, Death surrounds himself with tarot cards and, as you attack, you’ll either spawn a whole mess of health-restoring food, get attacked by a fireball, or be warped to one of the game’s previous bosses. Luckily, these guys are much weaker the second time around but, once you’ve defeated them again, you’ll have to face Death himself once again. Fortunately, Death isn’t anywhere near as formidable or daunting as in previous titles; he glides around above you throwing sickles at you, tries to rush you with his scythe, and sits in the corner throwing his scythe like a razor-sharp frisbee but all of these attacks are easily dodged or avoided and he’ll go down pretty easily (especially if you have the axe). After that, you’ll battle Medusa; this isn’t like the floating, snake-haired head from previous titles, though. This Medusa is a horrific, snake-like creature that blasts at you with two different types of fireball, tries to whack you with its tail, and then awkwardly crawls towards you to try and throttle you. Each attack is predictable and relatively slow, meaning you can deal massive damage even while the Medusa is attacking, to say nothing of when she shuffles towards you like a slug. Once she’s dealt with, you’ll have to fight Elizabeth Bartley herself; ol’ Liz likes to teleport from one side of the screen to the other and throw a fireball at your head and, if you don’t damage her enough times (the number of hits is determined by the different elemental orbs she summons, though these can’t hurt you), she’ll unleash a powerful attack upon you. This shouldn’t happen, though, as it’s ridiculously easy to duck under her one projectile and hit her no matter which side she choose to spawn on, meaning she will fall without much bother at all.

CVBDracula3
Dracula’s final form is intimidating but his attacks are predictable and easy to dodge.

Finally, you’ll face Dracula himself who, despite your efforts, once again awakens from his coffin. Initially, Dracula attacks very similar to Super Castlevania IV, teleporting in through a column of light and tossing fireballs at you with a sweep of his cape. However, his teleport cannot damage you and, while you only have a small window to hit his head, it’s pretty easy to land a hit and still dispose of his projectiles without taking a hit. After you’ve drained his health, Dracula transforms into a floating, cloaked sorcerer form and darts around the screen above your head in an inconsistent pattern. Being as he’s often just out of reach, this can be tricky with Morris as jumping to hit Dracula may cause you to make contact with him and take damage, so it’s best to keep a safe distance and use the axe. Dracula blasts two fireballs at both sides of the screen in this form (these travel down the screen and across the floor and can be tricky to avoid thanks to the game’s janky jumping physics) and drops columns of energy into the arena that can deal massive damage if you’re not standing in a safe area. Still, this form isn’t especially difficult and I found it more than doable to destroy him before he could unleash this more devastating attack. Once bested, Dracula transforms into his largest and more horrific form yet: a massive, Devil-like creature with a fanged stomach, huge devil horns, wings, and claws. As intimidating as it looks, though, this final form isn’t much of a threat; it lumbers around in a clear and identifiable pattern, first throwing sickles at you in a spray, then trying to roast you with fireballs that are easily ducked (in the far corner) or jumped over, and, finally, spewing bones at you. These can be tricky to avoid if you’re caught on the wrong side but there’s a clear gap between them you can dart into and, even with Morris’s difficulty in attacking upwards and diagonally, it isn’t long before Dracula is done in once more. What makes Dracula so difficult this time around is the fact that you have to face all three forms in a gauntlet, with no healing in between and only the health, ammo, and weapons you have on you.

Power-Ups and Bonuses:
All is standard in Castlevania titles, you can upgrade the Vampire Killer and the Alucard Spear to increase their reach and damage output. When you fully upgrade the Vampire Killer, it takes on a glowing, plasma-like appearance that looks more like energy or lightning than the usual fire, while the Alucard Spear glows with an ethereal magical power. Sadly, though, you’ll lose an upgrade when you take damage, meaning that you may be left with you bog-standard weapon by the time you reach the stage boss. As always, this means relying on the game’s items to help turn the tide when things get rough; you can grab 1-Ups on the rare occasions that they appear, briefly become invincible, and wipe out all onscreen enemies and grab one of the three sub-weapons: the axe (which travels in a high arc and is perfect for aerial enemies and bosses whose weak points are out of reach), the Holy Water (which travels along the ground in a fiery path), and the boomerang (here an actual boomerang rather than clearly being a cross, this time being razor sharp and travelling high and low to return to you, which is perfect for dealing additional damage). Additionally, as noted, you can perform an “Item Crash” with each of these weapons and each character has a specific “Ultimate Item” they can pick up: Morris has the Water Dragon (which fills the screen with a powerful, homing orb) and Lecarde has the Thunderbolt Spear, which unleashes a torrent of thunderbolts and lightning.

Additional Features:
Castlevania: Bloodlines features thee difficulty levels (Easy, Normal, and Expert) and the ending you get depends on which character you use and which difficulty setting you pick. Finishing the game on Easy takes you straight to the credits, while Normal only gives you a brief glimpse of your character’s ending and challenges you to try the game on Expert in order to earn a more complete ending. The game also employs a password system to allow you to return to the stage where you left of, jump to different stages with different characters, or start the game with extra lives. Castlevania: Bloodlines has two Achievements tied to it; you get one for beating the game as Morris and another for beating it as Lecarde. With the features available in the Castlevania Anniversary Collection you can also save your progress at any time, apply different display filters and effects, and play with one of three different frames around the game screen as with the other titles available in the collection.

The Summary:
Castlevania: Bloodlines is easily one of the top three titles available in the Castlevania Anniversary Collection; you should purchase this collection for this game alone and see the others as a bonus as it really is a tight and well-crafted videogame. Despite some issues with slipping off platforms and mastering Morris’s awkward whip-swing mechanic, the controls are smooth and generally responsive; Morris and Lecarde both move at a far faster pace than their predecessors and, between the two of them, offer as much versatility as seen in Super Castlevania IV. Bolstered by its incredibly detailed graphics and atmospheric soundtrack, Castlevania: Bloodlines is probably the darkest and most foreboding title collection thanks to the inclusion of blood and gore. This really lends to the game’s atmosphere and the franchise’s tendency towards macabre horror that it is so often stunted by the localisation and restriction these early Castlevania titles had to endure. The steampunk aesthetic is married with the series’ trademark gothic styling which, while it does include in some weird and ill-fitting enemy designs, results in some amazingly detailed sprites and environments and makes Castlevania: Bloodlines a solid successor to Super Castlevania IV.

My Rating:

Rating: 5 out of 5.

Fantastic

What did you think of Castlevania: Bloodlines? How do you think it compares to Super Castlevania IV? Were you lucky enough to own an original copy of this game back in the day or did you pay out through the nose to get a copy of it only to find it much more affordable in this collection? Whatever your thoughts on this title, and other Castlevania videogames, leave a comment below and check out my other Castlevania reviews.

Game Corner: Castlevania II: Belmont’s Revenge (Xbox One)

CV2BRLogo

Released: May 2019
Originally Released: July 1991
Developer: Konami Digital Entertainment/Konami Industry Co. Ltd
Original Developer: Konami
Also Available For: Game Boy, Game Boy Color, Nintendo 3DS, Nintendo Switch, Nintendo Wii, Nintendo Wii U, PC, and PlayStation 4

The Background:
So far, since I started working my way through the Castlevania Anniversary Collection, I’ve realised two things: first, Castlevania II: Simon’s Quest (ibid, 1987) was easily the worst of the Castlevania titles released on the Nintendo Entertainment System (NES) and, second, Castlevania: The Adventure (ibid, 1989) was a disappointingly frustrating debut for the series on the Game Boy. Yet, despite this, Konami returned to everyone’s favourite monochrome handheld in 1991, just a few months before the release of the fantastic Super Castlevania IV (ibid, 1991). By this time, the Game Boy had finally made the jump to colour and developers were actually able to put its limited capabilities to good use, even as its lifecycle began to wind down, but does Castlevania II: Belmont’s Revenge manage to outperform it’s handheld predecessor or is it more of the same, exasperating gameplay?

The Plot:
Fifteen years after defeating Count Dracula in Castlevania: The Adventure, Christopher Belmont, of the renowned Belmont family of vampire hunters, is forced to take up his legendary whip, the Vampire Killer, and confront Dracula once again after the Count’s evil spirit corrupts both Christopher’s son, Soleil, and erects four castles to consolidate his power once more.

Gameplay:
Castlevania II: Belmont’s Revenge is a 2D, sidescrolling action/platformer in which players once again take control of Trevor and Simon’s ancestor, Christopher Belmont. Luckily, age has actually improved Christopher’s performance rather than slowing him down as, while he still limps along in the trademark Belmont shuffle, his jumping mechanics are vastly improved over those seen in Castlevania: The Adventure. Now, when you jump, you no longer plummet like a stone or feel as though you’re constantly fighting against gravity in a losing battle; he still jumps backwards (often to his death) when hit and platforming can still be a tricky business, but it’s far better than in the last game, finally bringing the controls back on par with…the first Castlevania (ibid, 1986).

CV2BRWeapons
Battle with the whip or the returning sub-weapons!

Christopher once again battles with his whip, the Vampire Killer, which can again be upgraded to be both longer and to shoot fireballs as in the last game. Unfortunately, he can still only attack in the direction he is facing, meaning you’ll have to jump or use ledges to dispose of airborne enemies…or make use of the game’s sub-weapons. Yep, conspicuous by their absence in their last game, sub-weapons return here and, while we only get two of them, they’re the two I’ve used the most in the series thus far (the Holy Water and the axe). As always, you can whip candles to collect hearts, which once again act as the ammo for your sub-weapon due to the debut of meat into the Game Boy series; however, in my playthrough, I never actually found a single piece of health-restoring meat and had to settle for cheesing save states and having my health bar refilled after besting each of the game’s bosses. Like in the last game, you can also grab coins to increase your score and 1Ups to earn extra lives, and this game also features the debut of the traditional door transitions from one area to another, again bringing it more in-line with its NES counterparts. Castlevania II: Belmont’s Revenge is a notable return to form for the Castlevania series in that, of the two Game Boy titles, it is the one that most closely replicates its NES counterparts. Yet, like its predecessor, the game is still short on stages; you’ll visit four castles (Cloud, Rock, Crystal, and Plant), each of which can be selected in any order from the main menu. While it doesn’t really matter which order you take on the castles, each has different enemies and gameplay mechanics to overcome. Take on the Plant and Crystal castles, for example, and you’ll be tasked with travelled from the right-side of the screen to the left, which goes against almost every instinct in my body. I found Rock Castle to be the best one to start with as it has the easiest boss, enemies, and level layout, while Cloud Castle was one of the hardest takes to the inclusion of the Night Stalker enemy. Regardless, once you’ve cleared the four castles, a fifth, Dracula’s Castle, rises up and presents the game’s toughest challenge.

CV2BRRope
Belmont’s Revenge is all about the ropes.

Like its predecessor, Castlevania II: Belmont’s Revenge is an extremely vertically-orientated videogame; Christopher clambers up and down ropes, rather than taking staircases, to reach higher and lower areas of each castle. Luckily, as he’s often once again faced with walls of spikes looking to impale him, he can now quickly slip down a rope to quickly clear these obstacles, but he’ll also be tasked with jumping from one rope to another, which can be a tricky task. The biggest hindrance to this is that Christopher won’t jump from his rope if he doesn’t have a clear path so you’ll have to make sure to manoeuvre Christopher beyond the edge of the stage or risk taking damage. As part of this, Christopher can now use spider webs to clear gaps; spiders will descend and ascend down a web line and you’ll have to use your weapons to kill them, leaving yourself a series of lines to jump to. As with all Castlevania games, the enemies respawn, so, if you mess up, you can just respawn the spiders by walking a little off-screen so you can try again. The breaking and collapsing platforms of Castlevania: The Adventure also make a return; you’ll again have to contend with Big Eye’s exploding and destroying bridges though, for the most part, you’ll simply drop to a marshy layer below. While this does slow your forward momentum, it’s still preferable to dropping to your immediate death. Rather than hopping from one collapsing platform to another, as in the last game, Christopher is now faced with blocks of crystal; when he lands on them, the block starts to crack; wait too long to make your move and the block will shatter, dropping Christopher to his death, meaning it’s best to plan ahead a bit and hop to safety as soon as possible. Thankfully, the auto-scrolling sections and abundance of instant-death spikes of Castlevania: The Adventure have been ditched; you’re still asked to make some difficult jumps, will have to contend with spiked platforms, and you’ll have to frantically slide away from some spiked walls but it’s nothing like in the last game.

CV2BRTraps
Each castle features its own traps and hazards.

Instead, you’ll now be faced with massive weighted spikes that must have their central column destroyed in order for you to pass by safely; a similar mechanic was present in Castlevania: The Adventure but its far more prevalent here and you’ll have to risk taking some damage to use the weight’s height to reach a rope before the weight drops too low. Plant Castle also uses a blackout feature at one point; whenever you destroy a candlestick in this section, the entire background and foreground will go pitch-black, meaning it’s usually best to avoid destroying the candlesticks unless you’re confident of where you’re walking and/or jumping. Cloud Castle tweaks the rope-based mechanics of the title by having gears turn the ropes up and down in intervals; since touching the gears is liable to drain your health quite quickly, it’s best to jump from rope to rope as quickly as possible. You’ll also jump to ropes weighed down by spiked balls; as you jump to these, the weights will shift and you’ll also be at risk of taking damage from spikes or the gears unless you jump to safety. All of these gameplay mechanics and obstacles are ramped up to eleven by the time you reach Dracula’s Castle, fitting as this is the game’s most difficult level by far. However, despite some tricky platforming and the presence of some truly annoying enemies, Castlevania II: Belmont’s Revenge is far less merciless than its predecessor. Since Christopher no longer drops like a stone every single time he tries to clear even the smallest gap, it’s far easier to navigate through the game’s handful of castles which, while still limited compared to other Castlevania titles, are also much bigger than in the last game.

Graphics and Sound:
Castlevania II: Belmont’s Revenge is still a Game Boy title so you can’t expect too much here but, unlike the last game, this title actually features a decent level of detail in each of its environments. Crystal Castle features a Greco-Roman aesthetic in the background and an abundance of semi-transparent crystal platforms and blocks, Rock Castle is dotted with cracks and holes for rats to leap out at you and resembles a cave-like dungeon, Plant Castle seems coated in moss and/or slime and features a quagmire-like swamp beneath its destructible bridges, and Cloud Castle (fittingly) has mountains in the background and is full of gears and pulleys. Dracula’s Castle begins with a fairly elaborate gated courtyard filled with statues, progresses to a rock-like dungeon, and culminates with a stained-glass throne room lined with chandeliers, portraits, and large paned windows. It’s all very elaborate and nicely detailed, giving each area is own unique look and feel, yet not being so detailed that you can’t see the sprites.

CV2BRGraphics
Belmont’s Revenge has some varied and nicely detailed environments.

Speaking of which, both Christopher and his enemies look pretty much the same as in the last game; classic, blocky little 8-bit sprites are the order of the day but, thanks to the game better balancing its limited colour palette and backgrounds, it’s much easier to see where Christopher is at any time…except when you’re forced to travel right to left, which always confuses my line of sight. Similar to Castlevania: The Adventure, the Castlevania Anniversary Collection only offers a black-and-white, monochrome, or colour filter rather than the more detailed gradients offered by the original Game Boy Color version but, despite this, the game is noticeably faster and suffers from less (if any) sprite flickering. Unlike its predecessor, Castlevania II: Belmont’s Revenge also features a few limited cutscenes; after clearing the four castles, Dracula’s abode dramatically rises on the map screen and, each time you visit a castle or an area of Dracula’s Castle, you’ll be treated to an animation of Christopher heading there. Additionally, after defeating later bosses, you’ll actually get some dialogue boxes pop up that give some context to the game’s events, which was a nice (and surprising) touch. Similarly, the game features a fairly decent and catchy soundtrack; not only does each castle have its own theme, when you progress far enough into the castle the music will switch to a more ominous tune to help keep things interesting as you play.

Enemies and Bosses:
Every enemy from Castlevania: The Adventure makes a return in this sequel, meaning you’ll still be going up against giant eyeballs, sloppy Mud Men, annoying crows, and pizza-spitting globby monsters. The Under Mole boss from the last game is recycled as the regular rat enemies, which leap out at you from holes just like that boss did, and the last game’s worst enemy, the Night Stalker, returns more frustrating than ever as it is nigh-impossible to dodge his flying sickles without taking damage. There are some new enemies on offer here as well, though; there’s a giant bat that, when destroyed, results in two smaller, regular bats buzzing around you until you take them out as well; skeletons make their Game Boy debut, here clambering up and down and jumping to and from ropes erratically whilst throwing bones at you, and you’ll also have to contend with jellyfish-like enemies who soak up damage like a sponge and drain your hearts when touched. Perhaps the most interesting new enemy is the Cave Snail; these are dormant until you make the lights go out in Planet Castle, when they’ll unfurl and plod towards you. They’re not the most difficult, exciting, or sexy enemy but it’s an interesting gameplay mechanic, if nothing else. Aside from the Night Stalker, you may also have difficulty whenever you face off with the dagger-throwing Lizard Men but, once you learn their pattern, it’s pretty easy to safely avoid them as they hop around chucking daggers at you.

CV2BRBosses
Belmont’s Revenge has some massive bosses.

Bosses in Castlevania II: Belmont’s Revenge are a step up from the last game in terms of their size, variety, and threat; while the armoured Iron Doll, statue-like Twin Trident, and teleporting wizard Dark Side aren’t too much of a challenge, you’ll also face the two-headed Angel Mummy, which is a skeletal creature that has fused to a wall, takes up the entire right-side of the screen, and launches both boomerang-like energy waves and fireballs at you, making it perhaps the most difficult of the regular bosses. The Bone Dragon can be a bit of a bastard as well; this is where the auto-scrolling comes back with a vengeance and you’ll be forced to lumber ahead so that you can avoid the dragon’s bony body, spiked tail, and land a few hits to its big ugly head.

CV2BRDracula
Those spheres make this battle with Dracula one of the toughest so far.

Once you reach Dracula’s Castle, you’ll have to battle Christopher’s son, Soleil, who has been possessed by Dracula’s corrupting influence. The toughest boss of the game so far, Soleil not only throws daggers across the screen that can rain down on you, he attacks with his own whip and can absorb a great deal of punishment. Luckily, his pattern is quite easy to predict so you can pre-emptively toss Holy Water at him to damage him when he’s standing still and get a few hits in with your whip at the same time. After freeing Soleil, Christopher goes on to battle Count Dracula once more in an area strikingly similar to the one they fought in in Castlevania: The Adventure (another nice call-back). While Dracula only has the one form this time around, he’s far tougher than before as, this time, he surrounds and protects himself with a series of spheres, blasting them out in a spiral pattern as he teleports around the spiked-lined arena. As always, you can only damage his head and, due to the nature of his teleportation animation and the aforementioned spheres, you have a very limited window to land a hit and get to safety. As a result, the axe is a must-have item for this boss as it allows you to get into a safe position and still hit Dracula without risking the jump to a higher platform but, even then, this was one of the hardest of the 8-bit Dracula boss battles for me.

Power-Ups and Bonuses:
Everything for the last game makes a return here, meaning the Christopher can still throw fireballs out of his whip once it’s fully powered up. These do feel slightly nerfed than in Castlevania: The Adventure, though, as they’re slower and can’t be thrown successively (this, however, does seem to have improved the game’s sprite flickering and performance). You also get the axe and the Holy Water as sub-weapons, which is a welcome return, and, while you could complain about the lack of other Castlevania sub-weapons, they’re not needed thanks to the versatility of Christopher’s whip.

Additional Features:
Like pretty much every Castlevania videogame, Castlevania II: Belmont’s Revenge features a “Hard Mode” that, as the name suggests, offers a greater challenge. Unlike its predecessors, though, the only way to play the game’s Hard Mode is by inputting a password as beating the game simply leaves you in the “The End” graphic. Passwords can also be used to jump to the game’s various stages and bosses and grant extra lives, but don’t offer any other benefits; there’s no way to play as Soleil, for example, which is a bit of a shame. Furthermore, the Castlevania Anniversary Collection bestows upon you an Achievement after you clear the game, allows you to make liberal use of the save state feature, and apply different frames and display options to customise the game’s appearance to your liking.

The Summary:
Castlevania II: Belmont’s Revenge is a dramatic step up from its predecessor; featuring far more detailed and varied environments, the return of classic Castlevania tropes like the doors to new areas and sub-weapons, and proving that the Game Boy is more than capable of producing a worthy counterpart to its NES cousins. Honestly, this is the Castlevania Game Boy title we should have gotten in the first place as, rather than being a frustrating, subpar experience, Castlevania II: Belmont’s Revenge is actually relatively decent to play simply due to the fact that you don’t plummet to your death every time you jump. With far larger and layered stages, more visually striking and challenging boss battles, and a difficulty curve that is based on your level of skill and ability rather than simply (literally) weighing you down with slowdown, sprite flickering, and sloppy physics, it’s still far from surpassing its NES equivalents but Castlevania II: Belmont’s Revenge is a decent enough Castlevania title, especially for a Game Boy game.

My Rating:

Rating: 2 out of 5.

Could Be Better

What did you think about Castlevania II: Belmont’s Revenge? Do you agree that it showed that Castlevania: The Adventure was capable of so much more or do you still rank it low on the totem pole of Castlevania titles? What was your favourite Game Boy title? Whatever your thoughts about Castlevania II: Belmont’s Revenge, or Castlevania, in general, drop a comment below and check out my other Castlevania reviews.

Game Corner: Castlevania: The Adventure (Xbox One)

CVALogo

Released: May 2019
Originally Released: October 1989
Developer: Konami Digital Entertainment/Konami Industry Co. Ltd
Original Developer: Konami
Also Available For: Game Boy, Game Boy Color, Nintendo 3DS, Nintendo Switch, Nintendo Wii, Nintendo Wii U, PC, and PlayStation 4

The Background:
Understandably, it seemed like Nintendo had a rule of sorts back in the day: If a title was successful on the Nintendo Entertainment System (NES) then it was getting a port, or some kind of sister release, on the Game Boy…and Castlevania (Konami, 1986) was no different. Back then, of course, Nintendo’s Game Boy was quite the popular bit of kit; even after SEGA released their technically superior Game Gear in 1990, the Game Boy was still the go-to handheld gaming device. However, Castlevania: The Adventure (not The Castlevania Adventure, as the title seems to suggest) was an early Game Boy title and, as such, is largely subpar even compared to the NES Castlevania but is it still capable of telling a halfway decent Castlevania story or does it crash and burn in all its monochrome glory?

The Plot:
A century before Simon Belmont’s adventures in Castlevania, his ancestor, Christopher Belmont, took up the legendary whip, the Vampire Killer, and went on his own journey to confront the dreaded Count Dracula.

Gameplay:
Castlevania: The Adventure, despite its title, is a 2D, sidescrolling action/platformer in which players take control of Christopher Belmont. However, just like Trevor and Simon in the series’ NES titles, Christopher is a clunky, heavy lump of meat; he trudges forwards as if walking through soggy mud, has very slow reaction times, jumps backwards upon taking damage, and has some of the most awkward jumping mechanics I’ve ever seen, to say nothing of in the Castlevania series. When you press the jump button, Christopher does a pitiful little hop; holding it allows him to jump higher and, when combined with a direction, theoretically allows him to clear gaps…but he has a hell of a hard time doing this. Generally, when you try and clear a gap, Christopher prefers to drop like a stone to his death, meaning you can burn through your limited lives quite easily just trying to jump across a small gap. Like his counterparts, Christopher wields the Vampire Killer, a whip that you can upgrade to first make it longer and then, revolutionarily, spit out a fireball. Each time Christopher takes damage, he loses a portion of health and his whip downgrades one level, meaning you may struggle with later enemies and bosses if you take too much damage.

CVAWhip
Christopher’s whip can be upgraded to shoot fireballs!

Due to the limited power of the Game Boy, Christopher cannot pick up sub-weapons in this game, meaning that you’re heavily reliant upon the whip’s fireball mechanic. This also means that, for the first time in the series, picking up a heart actually replenishes your health! Whipping candles also allows you to pick up coins for extra points (being granted an extra life upon every 10,000 points) and, on the rare occasion, a 1Up that gives you an extra life. And you’ll definitely need to grab these when you see them as Castlevania: The Adventure is one tough cookie, probably the most difficult of the 8-bit Castlevania’s so far. This is primarily due to three prominent gameplay mechanics: the first is the game’s use of breakable and falling platforms. In one particular area, you can destroy Big Eye’s, which explode upon being attacked and take out a section of a bridge. In many other areas, Christopher must jump from one platform to another but, upon landing, the platforms will almost immediately drop, meaning you have to have pitch-perfect timing to even attempt a clumsy jump to the next platform. The second is the game’s use of looping sections; at times, you’ll be faced with the choice of taking a higher or lower path, usually using a rope. Castlevania: The Adventure loves to have you climbing up and down ropes, for some reason, rather than climbing stairs, making for the most vertically-orientated Castlevania title thus far. Sometimes, though, you’ll simply loop around again and again because you’re supposed to take the other route; this isn’t so bad but it’s compounded by the game’s timer, which continually counts down at the top of the screen, and, of course, the fact that the game’s enemies respawn when you leave an area.

CVASpikes
You’ll be outrunning a lot of instant-death spikes!

The third and most annoying element is the game’s use of auto-scrolling sections. The game only has four stages so, to make the third stage more difficult and annoying (and, no doubt, to pad the game out by sapping you of all your lives), the stage sees Christopher being inexorably chased by a wall of spikes. You have to climb up ropes and make tricky jumps across gaps (and on to falling platforms) to escape the rising spikes and then rush to the left past enemies and jumping from rope to rope as the spikes chase you from the right. It’s a tense, frustrating section of the game that pretty much lasts for the entirety of the third stage; the fourth and final stage might be lined with instant death spikes but at least they don’t force you to plod along as fast as Christopher’s heavy ass can take him (which is not very fast at all). Unlike every other 8-bit Castlevania title, Castlevania: The Adventure is a cruel, mercilessly cheap little platformer; no matter how good your skills are, the game’s plodding pace and insistence on having Christopher drop like a stone every time you press the jump button means that you are, more often than not, going to die at least once per stage when playing this game. Perhaps this is the reason why the game doesn’t have many enemies (well, that and the Game Boy’s lack of processing power…) and is quite generous with its health and 1Ups because the moment you try and hop across a gap, you’re probably going to plummet to your doom regardless of your skill level.

Graphics and Sound:
As a Game Boy title (and a very early Game Boy title at that), Castlevania: The Adventure is, understandably, quite bland. Each of the game’s four stages is unique in its presentation, which is honestly surprising as it would have been so much easier for the developers to have the entire game take place inside Dracula’s Castle. Instead, you’ll journey through a gloomy graveyard, a haunted forest, and different areas of the Count’s spike-filled castle, which helps keep the game visually interesting stage by stage.

CVAGraphics
Castlevania: The Adventure looks quite good…in colour…

As for the game’s sprites, Castlevania: The Adventure actually does a pretty decent job of replicating the aesthetics of its 8-bit counterpart; unfortunately, the Castlevania Anniversary Collection only offers the original, black-and-white version of the title, which is a shame as the Game Boy Color version is much easier on the eyes. Even with the Collection’s colour filter, Christopher struggles to stand out from his surroundings and enemies and the game suffers from slowdown and blurriness, which leads to some noticeable sprite flickering, all of which only makes the difficult platforming even more frustrating. Surprisingly, the game has quite a decent little soundtrack; each area has its own catchy themes (with the first stage’s “Battle of the Holy” being a standout track), which, again, is surprising as I would have understood if the developers had just used one or two tracks throughout the game.

Enemies and Bosses:
Castlevania: The Adventure manages to separate itself from its 8-bit counterparts by featuring a few different enemies; sure, you’ll still have to contend with bats and variations of the crows and fireball-spitting bone pillars, but, rather than being faced with waves of skeletons, zombies, and axe-throwing knights, you’re faced with some unique foes. Christopher battles giant eyes that explode on contact, the shuffling Creeper, variations of the mud men (who don’t split into pieces and are more like the old zombie enemies), annoying little worms that can curl into balls to attack you, and perhaps the game’s most annoying enemy, the Night Stalker. Like the axe knights, the Night Stalker tosses a projectile at you (in this case a sickle) either up high or down low; what makes this guy so annoying, though, is that the sickle will circle around and you’ll have to either awkwardly try and jump over it or desperately try to duck under it in time, meaning the fireball whip is highly recommended against these guys.

CVABosses
The game’s bosses aren’t much of a threat, even when they appear as regular enemies.

As the game only features four stages, you’ll only have to battle four bosses, none of which are particularly difficult. The game throws a wrench in the works by having Gobanz, the armour-clad boss of the first stage who can repel your fireballs (they won’t hurt you though) and wields a retractable spear, pop up as a regular enemy in the final stage but, as long as you attack his head from a distance, he’s not much of a threat. The game even cheaps out a bit by having the Under Mole simply be a gauntlet against a near-endless wave of the creatures but it’s pretty simple to stay completely safe from danger and destroy them as their pattern is pitifully predictable.

CVADracula
Though he has two forms, Dracula is a bit of a pushover here.

The game’s most difficult bosses are easily the Death Bat and the two-stage finale against Dracula. After you destroy Dracula’s human form, he’ll transform into a giant bat and send three smaller bats out to damage you; this battle also takes place over a pit of spikes but, for the most part, its pretty simple to camp out on a platform for both bosses and deal some decent damage before dodging or switching your position, meaning their actual threat is minimal, at best.

Power-Ups and Bonuses:
Whip at candlesticks and you may produce an orb; collect one to make the Vampire Killer longer and another to have it shoot fireballs. You can also grab a Cross to receive a generous invincibility but that’s about it for power-ups. Collect coins for points; you’ll get an extra life for every 10,000 points and, the more enemies you destroy, coins you collect, and faster you beat a stage, the more points you’ll receive as a bonus. Otherwise, that’s pretty much all there is.

Additional Features:
As is a tradition in the Castlevania series, once you defeat Dracula and sit through the game’s credits, you’ll be deposited back into the first stage only, this time, you’ll be playing in “Hard Mode”. Every time you beat the game, you replay it again and again, with the enemy’s dishing out greater and greater damage each time for an added challenge. Unfortunately, there is no password system for this title, though you are given an infinite number of continues if (well, when) you run out of lives. As with all titles in the Castlevania Anniversary Collection, you can earn an Achievement for clearing the game, use save states to cheese the game’s difficulty save your progress, and apply different frames and display options (but, sadly, there’s no colour option).

The Summary:
Castlevania: The Adventure does a decent enough job of recreating the look and feel of the first Castlevania while doing just enough (literally the bare minimum) to stand out as its own title. However, most of the features that make this game unique are the most frustrating parts of the game; omitting the sub-weapons makes the game so much tougher as you really need the fireball whip but you’ll lose it the moment you take damage and the game’s janky controls and insistence on making jumping as difficult as possible means it’s very difficult to jump and whip and clear a gap while collecting an item that much harder. With only four stages, a handful of bland enemies, and four of the franchise’s easiest boss encounters, Castlevania: The Adventure clearly struggles to get the most out of the Game Boy. As an early release, though, it was clearly hampered by the fact that other developers hadn’t yet found ways to working around the handheld’s limited capabilities and, as we have seen, the Game Boy is perfectly capable of producing decent 2D sidescrolling titles so it stands to reason that Castlevania: The Adventure could have been so much more than a slow, clunky title with a penchant for having you plummet to your death at every press of the jump button.

My Rating:

Rating: 1 out of 5.

Terrible

Did you ever play Castlevania: The Adventure on the Game Boy? Do you give the game a pass (or, at least, some slack) because it was a Game Boy title or did you think Nintendo’s handheld was capable of producing a much better Castlevania title? What was your favourite Game Boy game back in the day? Whatever you think about the game, or Castlevania, in general, leave a comment below and check out my other Castlevania reviews.

Game Corner: Super Castlevania IV (Xbox One)

CV4Logo

Released: May 2019
Originally Released: October 1991
Developer: Konami Digital Entertainment/Konami Industry Co. Ltd
Original Developer: Konami
Also Available For: Nintendo 3DS, Nintendo Switch, Nintendo Wii, Nintendo Wii U, PC, PlayStation 4, and Super Nintendo Entertainment System (SNES)

The Background:
So, thanks to the Castlevania Anniversary Collection, I recently found out that Super Castlevania IV is actually a remake of Castlevania (Konami, 1986), though the US version of the game positions itself as a sequel to Castlevania II: Simon’s Quest (ibid, 1987). Either way, though, Super Castlevania IV (a grandiose title I adore as it implies there was a “regular” Castlevania IV), is widely regarded as one of the best (if not the best) entries in the entire Castlevania series thanks to its tight controls, gameplay mechanics, soundtrack, and, of course, sporting some of the most impressive 16-bit graphics ever seen. Despite the fact that I grew up playing the Mega Drive, I’ve probably played Super Castlevania IV the most out of all the classic Castlevania games thanks to emulators and the SNES Classic Edition. Of all the games available on the SNES Classic, this is one of the only ones I actually took the time to play and beat so I was excited to jump back into it as part of the Castlevania Anniversary Collection.

The Plot:
When the immortal vampire Count Dracula threatens the land, Simon Belmont, of the legendary Belmont family of vampire hunters, takes up the feared whip of his ancestors, the Vampire Killer, and journeys into Dracula’s castle to end this threat.

Gameplay:
Super Castlevania IV is a 2D, sidescrolling action/platformer that once again casts players in the role of Simon Belmont. Unlike every Castlevania I’ve played as part of this marathon, though, Simon actually controls well in this game. And not just “well”; his control is superb and unparalleled to his predecessors thanks to the 16-bit power of the SNES. For the first time, you can properly control Simon as he jumps and he doesn’t feel like he has weighted lead in his boots. As always, he attacks with the Vampire Killer, a whip that can be upgraded to a chained variant within the first few minutes of play. However, unlike in all previous Castlevania games, players can now attack in eight different directions! This means Simon can attack airborne enemies much easier thanks to his upwards and diagonal attacks and while also making short work of those beneath him. Additionally, by holding down the attack button, the whip goes limp, acting as a shield of sorts and can be manipulated by the player to damage enemies.

CV4Whip
The whip is at its most versatile in Super Castlevania IV.

Simon can also use the whip to swing across gaps and, of course, to destroy candles to acquire the traditional Castlevania sub-weapons, hearts (the ammo for his sub-weapons), and bags of gold for extra points. In a nice change of pace, he can also acquire a small health boost from chicken drumsticks also found in these same candles (as well as being able to find the odd pot roast by smashing breakable walls). While you can break through some walls to find hidden areas, or will often find power-ups and bonuses hidden away in the game’s stages, the branching path system of Castlevania III: Dracula’s Curse (ibid, 1989) is gone, replaced by a far more linear progression system, but the game’s various stages are so large and varied that I wasn’t even bothered. The game also does away with the frustrating auto-scrolling sections of Castlevania III and replaces them with far simpler (though no less exhilarating) sprints across crumbling platforms and walkways.

CV4Mode7
Mode 7 allows backgrounds and sprites to dynamically rotate and expand.

The majority of Super Castlevania IV is spent fighting your way towards Dracula’s Castle rather than journeying through it as in the original Castlevania. This takes Simon through some stunning and varied environments, each of which is populated by the usual traps, ghouls, and ghosts of the Castlevania series but also bolstered by some impressive graphical elements. You’ll go through gate doors in chain fences to explore the background of a stage, swing across gaps, leap across swinging chandeliers, and contend with a rotating background thanks to the SNES’s “Mode 7” capabilities. This graphics mode was further employed not only to rotate certain parts of levels in dynamic fashion, but also bolsters some of the boss battles; Simon will encounter the biggest, most complex bosses of the series so far in this game and they’re made all the more impressive by the way they expand or contract thanks to the added power of the SNES. As always, a lot of Simon’s quest will involve him travelling through gothic environments; luckily, platforming has never been better. Simon still flies backwards upon being attacked, which can still send him careening down bottomless pits or into deadly spikes, but the flexibility of Simon’s attack range makes it far easier to strike enemies while making tricky jumps. Additionally, it’s much easier to ascend and descend staircases in this game than in Castlevania III; there was no accidental plummeting to my death when trying to do something as simple as going down stairs in this game and, even better, Simon can even “moonwalk” and is far less open to attacks when on stairs thanks to the flexibility of his whip.

Graphics and Sound:
Unsurprisingly, Super Castlevania IV was the best the series had ever looked at that point. Crisp, highly detailed sprites and environments are the order of the day as the game takes full advantage of the SNES’s vastly improved graphics power and colour palette. Backgrounds are alive with animation and additional elements, enemies pop out from behind background obstacles, and Simon and his gothic surroundings are finally fully realised in fantastic detail.

CV4Graphics
The game can handle multiple enemies and/or effects with only minimal slow down.

Thanks to the added power of the SNES and the Mode 7 graphics, the game can handle multiple enemies and projectiles on screen at once; though there is, admittedly, some slow down in some areas with more graphical effects than others (the rotating corridor springs to mind), it’s nowhere near as bad as in the 8-bit titles and there’s never any sprite flickering here. As for music, Super Castlevania IV has some of the most memorable tunes in the series. Even better, by the time you reach Dracula’s Castle, the game will bust out 16-bit renditions of classic 8-bit tracks like “Vampire Killer” and “Bloody Tears”. The added power of the SNES really bolsters the creepy, gothic atmosphere of the game, allowing for weather and sound effects to punctuate the catchy, energetic soundtrack.

Enemies and Bosses:
Being as it was intended as a remake of Castlevania, all of the classic and traditional Castlevania enemies make their 16-bit debut in Super Castlevania IV. Simon primarily contends with skeletons; some will just walk back and forth, some pop out from the background, some throw bones at him, some leap at him and attack with whips, the red variants can reform after being destroyed, and the gold variants are tougher to destroy. He’ll also be swarmed by bats, Medusa Heads, knights who attack with lances or throw axes at either Simon’s head or crotch, and mud men who break into progressively smaller variants the more you attack them. There are some new enemies to content with here, however; the amusingly named “Mr. Hed” (which is a bloodied, disembodied horse’s head that attacks like a Medusa Head), ghosts, floating, severed hands, possessed caskets and dinner tables, and swarms of vipers that spontaneously spawn at Simon’s feet at the most inappropriate times. You’ll also contend with frogs and bothersome little gremlins, who jump around erratically, annoying little hedgehog-like creatures that roll into spiked balls, dogs that rush at you at high speed, and even enemies that emerge from the walls and scenery to grab or injure you.

CV4Boss2
Some bosses are tougher than others, though at least Death has a more forgiving attack pattern.

Super Castlevania IV’s bosses that range from ridiculously easy (like the skeletal horseman from the first stage and the giant bat made entirely of gold coins from the ninth stage), the visually impressive (the massive golem Koranot, which grows so large it fills the entire screen), and the down-right frustrating (I’m looking at you, Slogra!) You’ll also notice that a lot of the bosses from past Castlevania games return here, rendered in all their 16-bit glory: we’ve got twin-headed, fire-breathing dragons, Frankenstein’s Monster, the Medusa Queen and, of course, the Grim Reaper. Unlike in the 8-bit titles, though, while Death is one of the more troublesome bosses, it is much easier to attack and dodge his scythes and he has a clear attack pattern this time around, making it a challenging encounter but not one I wanted to rage-quit over. Before you can even face Dracula, you’ll have to endure a gauntlet of three bosses: Solgra (who is a massive pain in the ass until you learn to dodge, duck, and jump out of his wide-reaching attacks and hit box), Gaibon (a gargoyle-like creature who, despite having a second, faster form, is a joke compared to Solgra), and the aforementioned Grim Reaper. While you might think that this will leave you at a disadvantage for the final boss, there is a well-known hidden staircase just before this battle where you can refill your health and hearts to give you a fighting chance.

Watch out for Dracula’s lightning attack and fry his ass!

As always, Dracula’s weak spot is his head; this time, however, he initially teleports across this throne room in beams of light and attacks with a spread of fireballs. With the boomerang, you can increase your chances of hitting his weak spot and concentrate on using Simon’s limp whip to block these projectiles; once you’ve done enough damage, Dracula spawns two flaming skulls that follow Simon around. You can destroy them relatively easily but still have to be wary of their splash damage; luckily, though, unlike other Dracula fights, you’ll be able to pick up a little bit of health during this battle, increasing your chances. You’ll also need to use the limp-whip technique to shield yourself from a smaller fireball that blasts projectiles in a circular motion and, after you’ve damaged Dracula enough, he’ll assume a more demonic visage and try to fry you alive with four columns of lightning. Standing between them, you can attack his head and, when his health is depleted, the morning sun will break through the castle windows and destroy the Count.

Power-Ups and Bonuses:
All the standard Castlevania power-ups and pick-ups are available here; you can upgrade Simon’s whip three times, acquire the ability to throw two or three sub-weapons in quick succession, destroy all enemies on screen with the Rosary, and briefly turn invincible. All the same sub-weapons return in Super Castlevania IV in exactly the same way you’d expect; this time around, I favoured the axe and the boomerang and had little use for anything else. Honestly, I’m a little disappointed that Konami didn’t take the opportunity to bring in some new sub-weapons or Simon’s fire whip but I guess they were more concerned with tightening up Simon’s controls and gameplay and taking advantage of the SNES’s increased graphical power than changing their tried-and-true combat mechanics.

Additional Features:
As with previous Castlevania titles, Super Castlevania IV employs a password system to allow you to return to a saved game after a game over; additionally, once you finish the game, you’ll automatically return to the first stage with your score, lives, hearts, and last-used sub-weapon intact to take on the game’s “Hard Mode”. You can also earn an Achievement on the Xbox One Castlevania Anniversary Collection for finishing the game and apply the same frames and display options as the other games in the collection. In a way, it’s disappointing that Super Castlevania IV doesn’t offer more in terms of replayability (there are no additional characters or even helpful codes to input beyond the level passwords), but I would still rather come back to this title again and again than any of the previous 8-bit games (with, perhaps, the exception of Castlevania III).

The Summary:
With its tight controls and impressive 16-bit graphics, Super Castlevania IV finally allows the series to live up to the ambition it was striving for in Castlevania III and the game more than earns the its reputation as an absolute classic of the 16-bit era. I enjoy the first and third Castlevania’s but it was obvious that Konami had ambitions for their franchise that Nintendo’s 8-bit consoles just couldn’t realise; thankfully, the SNES changed that and we finally got a Castlevania game that looked, sounded, and (crucially) controlled the way they always intended. Every bit of praise you’ve heard for Super Castlevania IV is deserved; graphically, it’s on another level. It builds atmosphere brilliantly thanks to its gothic, moody environments, music, and aesthetic and the game’s difficulty builds just as naturally. All the familiar tropes and mechanics that made the Castlevania series work prior to this game are present, meaning you still have to watch out for sudden tumbles to your doom and the game requires only your very best platforming skills, making for a rewarding and thoroughly enjoyable romp through the haunted hallways of Dracula’s infamous castle.

My Rating:

Rating: 5 out of 5.

Fantastic

What did you think of Super Castlevania IV? Where do you rate it in the Castlevania series? What were your favourite games on the SNES? Whatever your thoughts on Castlevania, drop a comment below and check out my other Castlevania reviews.