Game Corner [Mario Month]: Super Mario Advance 4: Super Mario Bros. 3 (Game Boy Advance)


So, for no better reason than “Mar.10” resembling Mario’s name, March 10th is widely regarded as being “Mario Day”, a day to celebrate Nintendo’s portly plumber, an overalls-wearing mascot who literally changed the videogame industry forever and shaped the home console market of the nineties.


Released: 11 July 2003
Originally Released: 23 October 1988
Developer: Nintendo R&D2
Original Developer: Nintendo R&D4
Also Available For: Nintendo Entertainment System (NES), Nintendo Switch Online, Nintendo Wii, Nintendo Wii U, Playchoice-10, Super Nintendo Entertainment System (SNES) Classic Edition, SNES

The Background:
Following the infamous videogame crash after an influx of numerous overpriced consoles and mediocre titles, Nintendo were propelled to the forefront of the dying market by the unprecedented success of Super Mario Bros. (Nintendo EAD, 1985). Surprisingly, considering the game’s success and popularity, development of its sequel became one of the most bizarre stories in all of gaming. Since the difficulty of Super Mario Bros. 2 (Nintendo R&D4, 1986) caused concern for Nintendo of America, whimsical Mario clone Yume Kōjō: Doki Doki Panic was retooled into an official Super Mario Bros. sequel and, despite its vast differences, became a highly praised best-seller. After briefly toying with employing an isometric perspective for the third game, developer Shigeru Miyamoto sought to both return to Mario’s roots and vastly expand upon his world and repertoire through new power-ups and a gaggle of new mini bosses based both on his staff and famous classical musicians. A shortage of ROM chips saw the release of Super Mario Bros. 3 significantly delayed; however, Nintendo used this time to employ a unique marketing strategy by licensing their products to be included in the kids adventure film The Wizard (Holland, 1989), with Super Mario Bros. 3 featured as a centrepiece. This resulted not only in many watching The Wizard just to get a glimpse of Mario’s latest adventure but also in the game becoming a best-seller for the NES and being universally praised upon release. Super Mario Bros. 3 was so influential and celebrated that it formed the basis of a new Super Mario Bros. cartoon and the game has received several ports, including a 16-bit remaster for the SNES as part of Super Mario All-Stars (Nintendo EAD, 1993). This version of the game served as the basis for the later Game Boy Advance port, which was the fourth in the Super Mario Advance series of re-releases for the popular handheld. Featuring updated graphics and vocal performances from Mario voice actor Charles Martinet, Super Mario Advance 4 was also compatible with the short-lived e-Reader add-on (unless you lived in Europe) and the game was met with equally positive reviews that lauded the recreation of Mario’s classic gameplay and the expansion of his world and abilities, despite the smaller screen resolution and lack of additional content.

The Plot:
When the Koopalings, the children of the Koopa King Bowser, conquer each of the seven kingdoms of the Mushroom World by stealing magical wands from their kings, it’s up to the Super Mario Bros. to travel to each kingdom, retrieve the stolen wands, and confront Bowser his own realm, the Dark Land.

Gameplay:
As is generally the case for a classic 2D Super Mario videogame, Super Mario Bros. 3 is a 2D, sidescrolling action/platformer in which players must make their way through eight Worlds, each containing up ten Levels, running, jumping, and hopping from blocks and fantastical enemies to reach an end goal, this time in the form of a square that, when hit, will award an item card (collecting three of the same will award an extra life). This version of the game offers three save files and you can pick two ways to play, either as Mario alone or as Mario and Luigi, with you swapping between characters after losing a life or from the overworld map, and even being able to lend extra lives to the other player if they’ve run out. The controls are as simple as you could want from this type of game: A is for jumping and B is for running. However, holding A will see you jump higher and further, holding B for an extended time sees you build up the P Meter and break out into a sprint to cover greater distances (or even fly with certain power-ups), and you can also pick up blocks and certain enemies with B, similar to Super Mario Bros. 2, which can be tossed at other enemies or used to blow up or break through blocked walls. Pressing down will not only see you crouch to avoid projectiles but also allows you to slide down slopes to take out enemies or fit through small gaps when running, though I found it’s usually easier to use the character’s smaller base form to accomplish this. While both Mario and Luigi have the same capabilities, there are differences; Luigi is taller and has a little flutter jump to make him a superior jumper, but he’s also much slipperier to control and that’s really saying a lot considering how poor Mario’s traction is in this game!

Mario is back, bigger than ever and with a whole host of new abilities at his disposal!

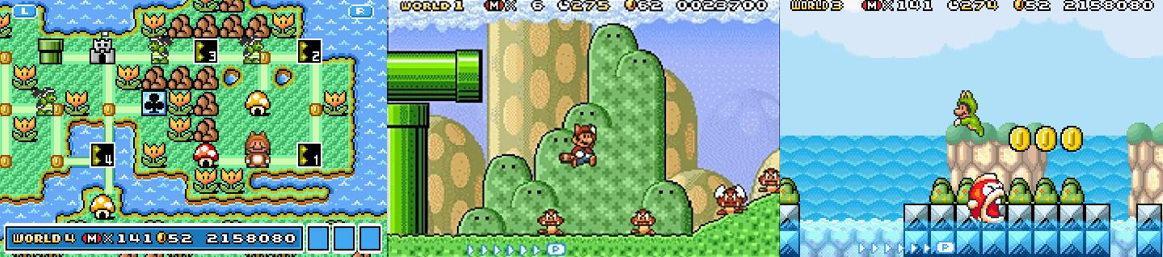
Although it’s a shame to go from playing as four characters to just two, Super Mario Bros. 3 makes up for this by being absolutely massive! Each World has its own distinctive overworld, with different layouts, animations, and music accompanying them; you move across the map to access each Level or a Toad House to play a mini game, but you can also use pipes to warp around to different areas, access shortcuts, and take on optional battles against the likes of the Hammer Bros. for additional power-ups. While you’re not free to go wherever you like, there are options to skip Levels using these power-ups and other shortcuts, though you won’t get a “Perfect Clear” if you don’t conquer each Level and Fortress contained in each World. Levels are presented as short obstacle courses that gradually test your patience, platforming skills, and deductive reasoning; things start out simple enough, with you jumping to blocks, over gaps, and warping about using pipes against a variable time limit, knocking off enemies to increase your score and earn extra lives, but things quickly become very tricky once the hazards and requirements start to ramp up. Falling or temporary platforms, moving platforms, and projectile spitting enemies are commonplace here, as are respawning enemies, nigh-invincible enemies (unless you have a block or power-up handy), and you’ll often find yourself either trapped in a tight corner or sent plummeting to your death thanks to various hidden blocks popping up at the worst possible times! Sometimes, you’ll hit a block and a power-up will pop out; mostly, you’ll get Coins, but other times a climbable vine will lead to a secret power-up room, a P-Switch to grab some Coins, or the Level’s exit. Other times, you need to hop to erratic moving platforms, bounce off flying enemies for an extra boost, toss Bob-ombs to break through walls, or even grab a series of Starmen to make yourself invincible and bypass spikes, snapping piranhas, and flame bursts. Each World ends with you battling across the Koopaling’s Airships, dodging Bullet Bills, cannonballs, hopping across bolts, and avoiding jet flames as the screen bounces and tilts about. In World 8, you’ll also have to hop across tanks in a horizontal scroller, dodging many of the same obstacles, which naturally represent some of the hardest and most aggravating challenges in the game.

You’ll need all the help you can get to beat the rising difficulty and tricky platforming challenges!

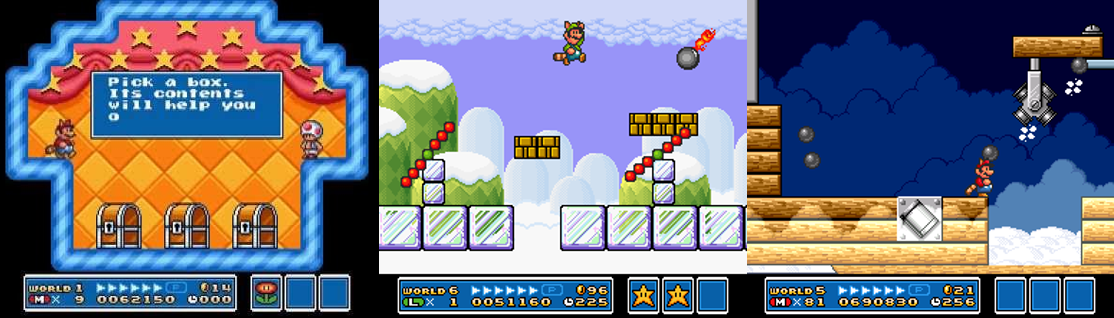
While many of the game’s hazards and enemies will inevitably repeat, they are often used in creative and more difficult ways later in the game, from simple stuff like mixing different enemies into the Levels to more annoying inclusions, like constantly respawning enemies or platforms coming to life beneath your feet, or having to bounce perfectly off music note blocks and run across falling platforms. You’ll sometimes have to swim underwater, tapping A or making use of the Mario’s new Frog Suit power-up to more efficiently bypass Cheep-Cheeps and Bloopers; other times, the Levels autoscroll horizontally, vertically, and diagonally, putting your reaction times and platform skills to the test. There are also a number of looping mazes, often involving pipes or the lava-infested Fortresses, with some having exits so obscure that you’ll have no choice but to consult a guide (World 6-5, for example, traps you in an endless loop and forces you to awkwardly fly up a specific part of the stage using the Raccoon Suit while holding a Koopa shell to break through some blocks and reach the exit, none of which is very intuitive). As if the small platforms, singular blocks, and broken bridges aren’t bad enough, you’ll also have to contend with projectiles, blocks coming to life, timid ghosts who chase you when your back is turned, bottomless pits, instant-death lava, temporary moving platforms that you must jump on to change their direction to progress upwards, suffocating quicksand, leaps of faith, and treacherous platforming nightmares up in the clouds. Thankfully, you have infinite continues; when you lose all your lives, you can continue on with a fresh stock, though your score resets to zero. You’re prompted to save your game after clearing every Fortress and Airship, though you can manually create a temporary save at any time from the pause menu if you need to take a break. Gameplay is mixed at the Toad Houses, where you play various mini games for power-ups and extra lives; these reset after you lose all your lives and continue your game but can be really tricky. One sees you having to stop sliding tiles at just the right time, which I found all-but impossible; one sees you turning over cards to find doubles; the other has you picking from three chests; or you can fight a couple of Hammer Bros. to earn a chest containing a random power-up.

Graphics and Sound:  
This version of Super Mario Bros. 3 may very well be the best, visually speaking; while some changes were inevitably made to accommodate for the Game Boy Advance’s hardware and software specifications, the presentation is absolutely top-notch. The game pops with vibrant colours at all times, with some fun visuals in the backgrounds (such as big green hills, pyramids, clouds, and Bowser portraits), and a lot of visual variety even when some Levels recycle assets from others (the Fortresses, Airships, and most underwater Levels are the most obvious examples). Palm trees, icy platforms and slippery, snowy landscapes, unstable or incomplete bridges over water filled with ravenous fish or bubbling lava, and block- or cloud-based environments are commonplace, as you’d expect, but you can also venture underground into dank caves, crystalline mines, and sewage systems filled with a network of pipes and a wraparound screen feature similar to the original Mario Bros. (Nintendo R&D1, 1983). World 4 was one of my favourites as everything is gigantic here, including the pipes and enemies, turning even regular Koopas into monstrous foes, but I quite enjoyed the jaunts into the desert areas, even with that maniacal sun chasing after me! World 6 was one of my least favourites as everything’s covered in snow and ice, making a slippery game a hundred times more difficult to play, and the pipe mazes of World 7 also caused quite a headache. Things get suitably ominous in World 8, a lava-filled hellscape full of tanks, submarines, and airships; even the overworld is affected, restricting your vision until you clear certain Levels, and dropping you into darkened deserts and deep jungles filled with tricky platforming sections.

The game is whimsical and colourful, with some fun tunes and great visual variety.

One added benefit to being on the Game Boy Advance is the inclusion of voice samples; Mario and Luigi will shout with joy and wail in pain whenever they snag a power-up or lose a life, respectively, and the game is bolstered by some of the catchiest tunes in the entire franchise. While many of these are recycled across the game’s many Worlds, they never fail to be infectious and keep things whimsical, even when you’re tearing your hair out because you somehow slipped off a platform or weren’t quite pixel-perfect enough to make a jump. A couple of cutscenes also help punctuate the action; dialogue boxes have the Toads pleading for help when you reach each World’s castle and see the state of their king (there’s even a Yoshi cameo at one point); you’ll see the brothers hop onto the Airships and fall from the sky in triumph after securing each magic wand, and Princess Peach (and, later, Bowser) leaves letters for you containing words of encouragement and rare power-ups (or, in Bowser’s case, a final challenge). If you manage to get to the secret warp zone, you can skip ahead to different Worlds, which alters the order you play the game and also results in different cutscenes playing (such as seeing the Koopalings invade a castle beforehand) if you, for example, skip right to the final confrontation before besting the other Worlds. World 3 also has you control a little raft to get to different Levels and Toad Houses, World 2 contains pyramids for you to scale and conquer, and World 8 is littered with tanks and dangerous optional squares that pit you against some of the game’s toughest foes while hopping across a lava pit using precarious platforms! Although neither character has any idle animations, they can transform into a variety of super fun different forms with their different power-ups and everything runs very smoothly. This version of the game even includes a brand new opening cutscene, styled like a pantomime, in which Peach begs for help after the Koopalings attack, and you’ll even spot her screaming for help when battling your way through World 8.

Enemies and Bosses:
Unlike Super Mario Bros. 2, which featured entirely new and fantastical enemies, Super Mario Bros. 3 features the return of many of Bowser’s most recognisable minions: Goombas, Koopa Troopas, Bloopers, Bullet Bills, Cheep-Cheeps, Spinys, Piranha Plants, and the ever-annoying Lakitus are constant hazards across each of the game’s eight Worlds. Spinys will drop from the ceiling and dash at you, Koopas will re-emerge from their shells if you hold them too long, and both them and the Goombas can be seen fluttering around with wings this time. The Hammer Bros. also return, usually guarding the end of Level goal or as mini boss challenges on the overworld; boomerang and fire-flinging variants also crop up, as do larger Sledge Bros., who can stun you with a ground slam. The only enemy to return from Super Mario Bros. 2 is the Bob-ombs, who will be endlessly spat out of cannons or spawn into areas where you need to use them to break certain blocks, and Super Mario Bros. 3 sees the debut of Mario staples such as the Thwomps (massive, angry blocks that try to crush you), Boos (shy ghosts who freeze when you’re facing them), Big Bertha (a massive Cheep-Cheep who’ll swallow you whole if you get too close), Chain Chomps (ravenous Pac-Man-like mouths attached to chains), and Dry Bones (skeletal Koopas that reassemble after being jumped on). You’ll also have to try and dodge the annoying wrenches tossed by the endlessly respawning Rocky Wrenches on the Airship Levels, be aware of spikes and blocks tossed by smaller enemies, hop across gaps on giant cannonballs, quickly jump over laser-spitting Bowser Statues, and run for your life when the Angry Sun swoops out of the sky!

Considering how tough it is to get to them, it’s a shame there’s not more variety to the Boom Boom fights.

While you can challenge the Hammer Bros. and their variants by landing on them on the overworld, it is possible to skip these confrontations; when you battle them, it’s highly advisable that you have the Fire Flower power-up, which makes short work of their constant stream of projectiles, and defeating them can net you a nifty rare power-up and make traversing the overworld a little easier. These mini bosses might be optional, but if you’re going for 100% completion then you’ll definitely have to battle one at the end of World 8-Tanks and you’ll need to go head-to-head with Bowser’s primary henchman, Boom Boom, on numerous occasions. Boom Boom awaits at the end of every Fortress in the game and acts as a mini boss throughout World 8; generally, getting to him is tougher than the battle itself as Boom Boom waits at the end of lava-, fireball-, Thwomp-, and hazard-filled obstacle courses that can really test your endurance. Boom Boom himself is fought in an enclosed arena, sometimes with mid-air blocks that act as obstacles, sometimes with an icy floor to send you sliding right into him, and sometimes he takes to the sky with wings and dive bombs you. In each fight, the strategy is the same: Boom Boom will wander back and forth, occasionally leaping at you with his spiked shell or diving at you from the sky, and you must hop on his head three times (or blast him three times with a power-up) to be victorious. If you’re playing the Nintendo Switch version, or the Japanese version of this game with the e-Reaper feature, you’ll also battle two Boom Booms at once on the World-e map, but I have to say that fighting this guy over and over, sometimes up to four times for each World, quickly grew as tedious as the multiple encounters with Birdo in Super Mario Bros. 2 and it’s a real shame that more variety wasn’t included here (like giving Boom Boom different power-ups or having more hazards in the arena).

There’s not much to the game’s boss battles, with even Bowser being pretty simple to best at the end.

Sadly, this disappointment also extends to the Koopaling you encounter at the conclusion of each Airship. Each Koopaling wields a magic wand that fires a projectile into the cramped arena and jumps around, often retreating into their spiked shell to protect themselves, and can be defeated in three hits. While Wendy O. Koopa and Iggy Koopa can jump a little higher than others, which can mess up your attack strategy, Roy and Ludwig von Koopa can stun you by creating earthquakes, which leaves you vulnerable to their slow magic projectiles. Wendy and Lemmy Koopa are probably the most unique and memorable of the seven as Wendy fills the screen with candy rings that bounce all over the place and Lemmy rolls about on a magical ball firing smaller balls that can hurt you or be used as platforms to avoid his erratic rolling and bop him on the head. Again, though, while each of the Koopalings looks different and has slightly different attack patterns, they’re all basically the same; if you can reach them with a Fire Flower or Hammer Suit then you’re laughing, but the hardest thing about most of them is that you have the suffer through the entire Airship course all over again if you die fighting them. Their father, Bowser, appears only as the final boss of the game; after enduring some of the game’s hardest Levels, defeating more Boom Booms and dodging a whole host of enemies and hazards, you’ll reach Bowser’s Castle, a maze-like shrine to the Koopa King with branching and looping paths and lava pits. Bowser himself spits fireballs at you that you must duck or jump over and will leap into the air to crush you with a butt stomp; simply dash underneath him and cause him to destroy some of the blocks. Do this three times in the same area (or manage to blast him with enough projectiles) and he’ll plummet to his doom, leaving you to free Princess Peach and restore the peace to the land. You’ll also battle him twice more in World-e, with one battle being functionally the same and the second being made harder by the presence of unbreakable blocks included on the floor.

Power-Ups and Bonuses:
After being disappointed by the lack of power-ups in Super Mario Bros. 3, I’m happy to say the Super Mario Bros. 3 goes above and beyond with its power-ups! Staples such as the 1-Up Mushroom, Super Mushroom, and Fire Flower return, granting an extra life, an extra hit, and the ability to throw fireballs, respectively, alongside Coins that grant extra lives when 100 are collected and the Starman, which grants brief invincibility. Super Mario Bros. 3 also debuts some brand new power-ups that have since become franchise staples, such as the warp whistle and cloud that will teleport you across the overworld, Blue Coins (though they have no additional value), hammers to break overworld blocks, and a music box to send enemies to sleep in this same area. Mario and Luigi also have some new forms here, such as the Frog Suit (which allows greater movement when underwater at the cost of impeding land movement), the Hammer Suit (which lets you toss a bunch of hammers and protect yourself from projectiles and the cost of sliding down hills), and by far my favourite Mario power-ups: the Super Leaf and Tanooki Suit. These grant you cute little raccoon ears and a tail (or a full raccoon suit, respectively) that lets you attack with a tail swipe, flutter jump by tapping A, and fly through the sky after building up enough speed. Pressing down and B while wearing the Tanooki Suit also transforms you into a statue to avoid damage from enemies and projectiles, and you can fly indefinitely when awarded with a P-Wing, easily allowing you to soar over the game’s more troublesome sections. There’s also an additional, somewhat secret power-up in the game; if you defeat a the shoe-wearing Goombas in World 5-3 in just the right way, you can hop into the shoe and safely pass over spikes and defeat spiked enemies, all while retaining any other power-ups you already have.

Additional Features:
There are eight Worlds to explore in Super Mario Bros. 3, but that doesn’t mean you have to conquer every Level or Fortress found in each. The warp whistle and Lakitu’s Cloud items will let you skip entire Worlds and Levels if you wish, though you won’t be greeted with a “perfect” completion screen and the score on the save file menu won’t be at its maximum until you beat every Level in the game. There are numerous extra lands and shortcuts to find on the overworld that lead to Toad Houses where you can play mini games for extra power-ups, but some just lead to dead ends unless you beat Levels to unlock the gates or use a hammer item to smash the rock blocking your path. The NES and SNES versions of the game see players compete head-to-head to see who will challenge a Level, but this is entirely absent from this game as a traditional two-player mode is omitted. As mentioned, there is a whole extra World to explore included here, one that includes power-us, collectibles, and features from previous and subsequent Super Mario games, but it’s locked out from the European version of the game so the only way you can play World-e is to either import the game, cards, and e-reader or just play the re-release on Nintendo Switch Online. However, this version does still include a 16-bit remake of Mario Bros. that you can select from the main menu. This version of the game can be played with others and features all-new backgrounds, assets, and music; new POW Blocks, the Super Mario Bros. 2 power squat jump, and quality of life features have also been included, but there are no mirror mode, harder difficulty, or other unlockables included in this version of Super Mario Bros. 3.

The Summary:
I knew what I was getting into when I chose to play this version of Super Mario Bros. 3; I didn’t actually have to play the Game Boy Advance version as I could’ve made things a lot easier on myself and played the Nintendo Switch Online or SNES Mini version but I decided that I wanted to experience the game on real hardware, especially as I just so happened to own the Game Boy Advance cart. In the end, I was conflicted: on one hand, this is a massively enjoyable platformer, with some of my favourite tunes and power-ups and containing a sprawling, surprisingly varied gameworld. Super Mario Bros. 3 definitely set a new standard for the franchise, which would pretty much always include an overworld, multiple power-ups, shortcuts, and battles against the Koopalings. Levels are short, action-packed obstacle courses that will really test your skills as a player; there are a lot of opportunities to snag new power-ups, different ways to tackle each Level depending on what you have in your inventory, and I the overall presentation is whimsical and fanciful. However, on the other hand, Super Mario Bros. 3 can be hard as balls sometimes! Now, granted, I’m not the most accomplished 2D Mario player; I often struggle with the precision platforming, abundance of death pits and instant-death traps, and Mario’s notorious lack of traction, but I was frequently left frustrated with Super Mario Bros. 3’s repetitive and uninspired bosses, almost unfair level of challenge, and the unintuitive methods required to beat certain Levels. For a game as big as this is, it’s really a shame that so much gets recycled; I don’t understand why every World ends with an Airship when assets for a Tank and Submarine-based variant exist in World 8 and could’ve mixed things up a bit. I don’t get why every Fortress has to include a fight against Boom Boom when we could’ve fought a Sledge Bro or Big Bertha or given him some different power-ups. And the final battle against Bowser was pretty underwhelming, to the point where I was expecting a second phase and genuinely surprised when the ending cutscene played. In the end, this is easily the best of the NES Mario games; it’s large and packed full of stuff to do, but is mired by a difficulty curve that is just a little too frustrating for me at times (though probably well within the skills of a more accomplished Mario gamer).

My Rating:

Rating: 3 out of 5.

Pretty Good

Did you enjoy Super Mario Bros. 3? Which version of the game is your favourite and which console did you first play it on? Were you disappointed that there weren’t more characters to play as or did you feel like the new power-ups made up for this? Did you also struggle with the traction and platforming challenges on offer here? Were you disappointed by the repetitive stage design and bosses or did the sheer size of the game balance this out? Which power-up or World was your favourite, and did you ever play through World-e? How are you celebrating Mario’s birthday this year? Whatever your thoughts on Super Mario Bros. 3, feel free to share them below or drop a comment on my social media and be sure to check out my other Mario content across the site!

Game Corner [Sci-Fanuary]: Metroid II: Return of Samus (Nintendo Switch)


January sees the celebration of two notable dates in science-fiction history, with January 2 christened “National Science Fiction Day” to coincide with the birth date of the world renowned sci-fi writer Isaac Asimov, and HAL 9000, the sophisticated artificial intelligence of Arthur C. Clarke’s seminal 2001: A Space Odyssey (1968), being created on 12 January.


Released: February 2023
Originally Released: November 1991
Developer: Nintendo
Original Developer: Nintendo R&D1 Intelligent Systems
Also Available For: Game Boy, Nintendo 3DS, Nintendo Wii, Nintendo Wii U

The Background:
Brain-blasting bounty hunter Samus Aran shocked the gaming world when she was revealed to be a woman in the challenging Nintendo classic, Metroid (Nintendo R&D1 Intelligent Systems, 1986). Although highly praised and crucial to the popularisation of the “Metroidvania” sub-genre, Metroid’s sequel came not on the Nintendo Entertainment System (NES) like Nintendo’s other franchise characters, but on their revolutionary (and incredibly popular) handheld system, the Game Boy. Many of Metroid’s developers returned for the sequel, which separated itself from other Game Boy titles with graphics comparable to its 8-bit counterparts and expanding upon Samus’s abilities and narrative in ways that would influence future games. Not only was Metroid II my first experience of the franchise, but it also included a unique palette for when played on the Game Boy Color, though it largely divided critics upon release. Reviews praised the quality of life improvements and expansion upon the gameplay of its predecessor, while also criticising the music and limitations of the Game Boy hardware. Yet, Metroid II endured; a fangame remake was scuppered by Nintendo prior to them remaking the game for the Nintendo 3DS in 2017, with Metroid: Samus Returns (MercurySteam, Nintendo EPD) being largely well received. The original version of the game also found a home on Nintendo’s online services, including this Nintendo Switch Online version, to help keep this cult classic alive for new gamers.

The Plot:
Following her encounter with the Metroids, bounty hunter Samus Aran is sent to the Metroid home world, SR388, to destroy the entire species.

Gameplay:
Metroid II: Return of Samus is a run-and-gun adventure game with an emphasis on exploring the various alien landscapes of SR388, upgrading Samus’s suit and abilities, and hunting down forty Metroid variants to curb the malicious species. Players once again assume the role of the intergalactic bounty hunter Samus Aran, who sports the same abilities from the first game and more, most notably the ability to shoot upwards and while crouching, simple additions that make blasting aliens and destructible blocks so much easier. You’re given three save files to play with, which can be switched to or deleted from the main menu, though there are no options to reconfigure any game settings, like the controls or difficulty. However, since it was originally a Game Boy title, you’ll only make use of two buttons during gameplay: A lets you jump (and you can hold it to jump a little higher) and B lets you shoot (and you can hold it to continually fire at foes). Samus will compress into a spherical Morph Ball if you press down on the directional pad twice, and you can switch from her infinite gun arm to her finite supply of missiles by pressing the – button. The + button pauses the game, but you again won’t find a map screen, here, meaning exploration is still a chore, despite Metroid II being a slightly more forgiving and straightforward title.

Run, shoot, and roll your way through a confusing alien world hunting Metroids.

Unlike in the last game, players can make use of save stations to save their progress and sporadic refill pods for their health and ammunition, reducing how often you’ll blast away at enemies to farm for resources. As before, enemies will respawn whenever you enter an area, though this time around to you must alter the environment, clearing lava and other hazards so you can progress further. Puzzle solving isn’t really a thing in Metroid II; the closest you get are blasting certain doors with your missiles to open them and navigating deep chasms, some of which are somewhat maze-like and have hidden holes that drop you to lower levels, though you’ll sometimes have to use Samus’s Bomb power-up to blast away boulders. This game debuts the Spider Ball, which allows Samus to slowly crawl up walls and ceilings, and you’ll be using this a lot to scale cliffs and ruins, especially as the game progresses. However, your primary objective is to hunt down the forty Metroid variants hidden around SR388; you can keep track of how many remain using the game’s limited heads-up display, but you won’t be given any hints or direction about where to find them beyond hitting dead ends until you’ve acquired new power-ups. Occasionally, Samus will dive into water or must traverse sticky goop; spikes and lava pits are commonplace, as are destructible elements like weeds and sandstone, and you’ll also have to navigate a pitch-black area later in the game that’s incredibly frustrating as there’s no way to light your path. Mostly, though, you’ll be exploring long corridors, deep shafts, and crawling up walls and through narrow tunnels, blasting enemies and hoping the path leads to an upgrade or another Metroid.

Graphics and Sound:
Releasing a couple of years after the debut of the Game Boy, Metroid II is quite a bland looking game, especially as far as the backgrounds are concerned. Backgrounds are largely completely blank, either white, black, or that weird green colour the Game Boy favoured, with very little in the way of foreground details, for the most part. Some areas are the exception to this rule, of course, with an abundance of overgrown stone ruins, rocky caves, and biomechanical areas peppered throughout the game so you know when you’ve transitioned from what could loosely be called the overworld to an area of some significance. Many areas contain lethal lava, dank water, or gloopy muck that restricts your movements but are largely indistinguishable from each other; sometimes the rocks look more like peanuts, sometimes they’re metallic, and sometimes they’re almost like bubbles, but the game becomes disappointingly and confusingly uniform very quickly. Caverns, ruins, and mechanical trappings signpost areas containing Metroids and power-ups, but it’s easy to think you’ve accidentally backtracked as SR388 isn’t exactly divided into elemental sections. Having the overworld be rocky and the main sections be distinctly water-, metal-, botanical-, or lava-themed would’ve helped to distinguish them but, as is, there’s only a handful of areas that impress when it comes to their aesthetics. While this is commonplace on the Game Boy, it’s not as if there weren’t games that were able to do a little more with the hardware, so it’s pretty disappointing here, especially as the game lacks a map.

As impressive as many of the sprites are, the backgrounds, locations, and music suffer.

On the plus side, Samus looks great, far better than she did on the NES and showcasing a surprising level of detail. While she doesn’t have any idle poses, her suit changes to reflect her upgrades and she has more poses to assume thanks to her expanded moveset. In addition to her iconic ship sat in the opening section, you’ll always know when a Metroid is nearby by the presence of a hatched Metroid egg, there are a couple of cutscenes showing the Metroids evolving into new, more powerful forms, the Chozo Statues are nice and big (with one even being destroyed), and there are usually some fun hidden paths to take towards goodies. Sadly, the music isn’t all that impressive, aiming for claustrophobic and ominous but being limited by the Game Boy hardware. However, the biggest disappointment for me was the complete lack of any story; there’s no story text, the title screen is incredibly bland, there’s no introductory cutscene, and the game just…ends, albeit with an impressive large sprite of Samus running alongside the credits that changes depending on how fast you beat the game.

Enemies and Bosses:
In addition to the indigenous Metroid population, SR388 is home to a whole host of alien lifeforms, from bug-like creatures to robotic forces and defences that I have assume were left behind by the Space Pirates. All of these will respawn after you exit an area and, while most can be defeated in one or two shots, others will be almost invulnerable until you acquire new power-ups or continually spawn and chase after you to bash you into spikes or lava. We’ve got floating slug-like enemies, laser turrets, hopping toad-like creatures, tiny bugs that drop from ceilings, weird flying proboscis-type things that drop you towards hazards, bat-like drones, and slug-like fish that slither around platforms. Speaking of which, the bone-armoured Motos resist your blaster and can only be taken out from behind or with the Screw Attack (though they often drop larger health orbs); they’re often found alongside Ramulken, who are similarly armoured but jump about the place, though most enemies can simply be blasted or outright avoided, especially if you’re close to a health point. The only boss-type enemy you’ll encounter that isn’t a Metroid variant is the armadillo-like Arachnus, which disguises itself as a Chozo Sphere and not only spits projectiles at you but completely resists your attacks when rolled up. However, it’s vulnerable to your bombs, so you can lay a bunch of those to take it out and pry the Spring Ball from its remains.

You’ll need plenty of missiles (and patience) to snuff out the various monstrous Metroids.

As in many Metroid games, the titular, jellyfish-like aliens will appear near the end of the game, latching onto you and draining your health and only being vulnerable when frozen by the Ice Beam and peppered with missiles. The forty other Metroids you battle in several mini boss encounters are evolved Metroids that take on an insectile, ant- or wasp-like form that allows them to fly. The most common of these are the “Alpha” variant, which are largely harmless and simply float about the place, meaning the “Gamma” variant is quite the sharp difficulty curve with its more monstrous appearance and lightning bolt appendages. They’re a joy compared to the “Zeta” Metroids, though, which frustratingly badger you from behind, spit fireballs, and can only be damaged when blasted in the face with missiles. Similarly, while the “Omega” Metroids are far slower, they spit electrical sparks that produce splash damage and float about the place, making them a difficult target despite their size. Each of these may also be fought in enclosed arenas, above spikes or lava, within sandstone, or in areas with small platforms or blocks to make avoiding damage even more troublesome. Once you’ve destroyed thirty-nine of them, nine more regular Metroids need to be dispatched before you face off with their monstrous, dragon-like queen. While technically a simple battle, requiring only that you use the Screw Attack to escape damage and blast the queen with missiles (you can even Morph Ball to safety to refill your health and ammo using a convenient tunnel), this is a laborious and dull fight thanks to the restricted area, the aggressiveness of the queen, and the fact that you need to hit her with 100 missiles! Apparently, there’s a way to Morph Ball into her mouth and lay a bunch of bombs in her, but I couldn’t manage that so it was a lot of tedious evading, blasting (missing), and rewinding when I took too much damage.

Power-Ups and Bonuses:
As ever, enemies will drop health orbs and missiles to refuel you but, this time around, you can also find larger, dedicated, and inexhaustible refuel stations to top these up in a pinch, and they’re not always hidden away either. Similarly, you can find Energy and Missile Tanks to expand your health bar and maximum ammo (though these are often hidden away or at the end of winding tunnels). As is often (if not always) the case, Samus mysteriously loses all the upgrades she got in the last game and needs to reacquire them from Chozo Statues hidden throughout SR388. You can upgrade her arm cannon to the Wave Beam (which increases accuracy), the Ice Beam (which temporarily freezes enemies), the Spazer Laser Beam (which fires a triple shot), and the Plasma Beam (the most powerful, which passes through objects and enemies), and will even get the chance to switch back to them at one point (with the Ice Beam being required for the final section). Samus’s jump can be extended with the High Jump Boots before allowing her to reach higher, further areas (through carefully timed taps of A) with the Space Jump, before becoming an offensive move with the iconic Screw Attack. Her Morph Ball can also be upgraded to drop bombs, bounce, and cling to walls, which, while slow, is basically a requirement in some areas.

Additional Features:
Sadly, there’s not much to Metroid II. Like I said, there are Energy and Missile Tanks to find that you could conceivably miss but that’s about it. The only reason you’d replay the game beyond enjoying wandering around a confusing handheld landscape is to try and beat the game in under three hours so you’ll be treated to seeing Samus in a bikini; otherwise, there are no bonus or extra features to speak of here. As ever, you can make liberal use of the Nintendo Switch’s rewind and save state features to make the game a lot easier, though it’s still a challenge at times.

The Summary:
I’m glad I finally played through Metroid II: Return of Samus; when I was a kid, I had the original cartridge for my Game Boy, but I remember getting stuck fairly soon into the game. Low and behold, I hit the same dead end here and quickly became reliant upon an online guide, which is not my preferred way of playing any game. Sadly, it’s basically required here as there’s no map system, which is weird as I definitely think a rudimentary map could’ve been inserted whenever you pause the game. Ultimately, this was a tough one for me; I liked how much the gameplay mechanics of the original were improved, even if only in basic ways, but I don’t think this kind of game works on the Game Boy; Metroid is all about exploration and backtracking and, while Metroid II is a bit more linear than others in the series, it still requires more than the Game Boy is capable of delivering. Yes, the sprite work looks good, but every area is too constricted and repetitive to stand out like they would on even the NES and it gets a bit boring facing the same batch of Metroids over and over again. There is a lot to like here, with some fun encounters and areas and the thrill of upgrading Samus’s suit and abilities, but I think Metroid II was trying to be a little too ambitious for the Game Boy. I’m tempted to see what the Nintendo 3DS remake is like to compare it but, sadly, it’s ridiculously expensive to get hold off so I’m left with this paradoxically technically impressive and technically limited entry in the series that felt too much like a chore to play through for mee to properly enjoy.

My Rating:

Rating: 2 out of 5.

Could Be Better

Are you a fan of Metroid II: Return of Samus? Did you own it on the Game Boy and, if so, how did you cope without a guide or the rewind features? Were you impressed with Samus’s new abilities and combat options? What did you think to the more linear mission and Metroid-hunting gameplay? If you’ve played the Nintendo 3DS remake, how does it compare to the original? Which Metroid game is your favourite? Whatever your thoughts, feel free to leave a comment below or on my social media, and be sure to check out my other Metroid reviews.

Game Corner [Turtle Tuesday]: TMNT III: Radical Rescue (Xbox Series X)


The first issue of Kevin Eastman and Peter Laird’s Teenage Mutant Ninja Turtles (TMNT) was published in May of 1984. Since then, the TMNT have gone on to achieve worldwide mainstream success thanks not only to their original comics run but also a number of influential cartoons, videogames, and wave-upon-wave of action figures. This year, I’m emphasising third entries and time travel shenanigans in the popular franchise every Tuesday in May!


GameCorner

Released: 30 August 2022
Originally Released: 25 November 1993
Developer: Digital Eclipse
Original Developer: Konami
Also Available For: Game Boy, Nintendo Switch, PC, PlayStation 4, PlayStation 5, Xbox One, Xbox Series S

The Background:
The Teenage Mutant Ninja Turtles were almost unrivalled in popularity back in the late-eighties and early-nineties; known as Teenage Mutant Hero Turtles here in the UK, the “Heroes in a Half-Shell” dominated an entire generation with their comics, cartoon, extensive toy line, and videogames. Konami’s efforts not only proved a hit at arcades but also took 16-bit gamers by storm and helped to make Nintendo a household name in the UK. Additionally, Konami produced three handheld TMNT titles for Nintendo’s ground-breaking portable console, the Game Boy; though restricted by the Game Boy hardware, the first two games impressed in their ambition and even tried to incorporate elements from the arcade releases. However, for this third game, Konami chose to completely overhaul not just the graphics and gameplay, but the genre too; unlike the previous two handheld efforts, Radical Rescue was a “Metroidvania” title with a heavy emphasis on exploration rather than mindless brawling. This resulted in mixed reviews, with some criticising the decision due to the Game Boy’s hardware being insufficient for such a genre and others praising the genre shift as a means to improve upon its predecessors. Either way, Radical Rescue remained a Game Boy exclusive title for nearly thirty years before it was finally re-released in the 2022 Cowabunga Collection alongside a host of other TMNT games and quality of life features.

The Plot:
When their arch-nemesis, Oroku Saki/The Shredder, strikes again by kidnapping their master and father-figure, Splinter, the TMNT leap into action one turtle short. Now Michelangelo must venture into the Shredder’s hazardous mine to rescue his brothers, and their master, and put a stop to their enemy’s latest scheme.

Gameplay:
As mentioned, Radical Rescue is a 2D adventure game with a heavy emphasis on exploration as much as combat; it thus falls under the “Metroidvania” banner and will have you constantly consulting a barely useful grid-like map to discover new paths and areas to explore in your quest to locate the other TMNT. This means that, unlike every other TMNT game I’ve ever played up to this point, you can’t select a character from the start; instead, you’re stuck with Michelangelo and must defeat bosses to acquire keys to free his brothers and then hunt down key cards to access new areas, using each turtle’s unique skills to get past enemies and obstacles. Each turtle controls the same; you use X to attack and A to jump and press X while jumping to do a flying kick. Unlike in the TMNT’s last two Game Boy outings, you can neither throw shurikens or perform a slide kick with down and X, though you can toss shuriken when climbing ladders and you’re able to switch to one of the other turtles at any time from the pause menu and each one not only has their signature weapons but comes with different abilities to get past hazards and access new areas of Shredder’s diabolical mine. Mikey actually ends up being one of the most useful characters; I found myself defaulting back to him a lot as he can perform a helicopter-like glide with his nunchakus when you press and hold A while jumping, which is great for drifting past spike pits or reaching out of the way platforms.

Each turtle has their own unique abilities to aid with exploration as well as combat.

While I can’t be certain, I’m fairly sure that the game forces you to rescue each of Mikey’s brothers in a specific order; I definitely found myself following a particularly path but then my logic was based simply on going for whichever boss and key card was closest to where I was. Thus, the first turtle I rescued was Leonardo, who’s given the bizarre ability to burrow through certain blocks by pressing down and A, effectively turning him into a living drill. Next, I rescued Raphael who can pop into his shell with down and A to pass harmlessly over spikes (until you inevitably have to jump up to a platform) and through small gaps and tunnels; this also makes him immune to certain attacks, which is helpful. Finally, I rescued Donatello, who can cling to and scale walls by jumping at them, which is basically required to access the final areas of the mines. Naturally, each turtle has their own strengths and weaknesses in combat, with Raph and Mike limited in their reach compared to their brothers, but I found myself favouring Mike since there’s more emphasis on jumping than any of the turtle’s other abilities. Every time you defeat a boss, your health will be fully restored, which is useful; rescuing a turtle (and, later, Splinter) grants you a password that you can jot down from the pause screen to continue if you fail in your quest, but your main enemy here will be trying to find your way around the mine and surviving its mechanical trap rooms.

Exploration and backtracking are greatly emphasised to find secrets and rescue your allies.

Radical Rescue all takes part in one large interconnected map; you start on the outside of the main area and venture out here a couple of times to reach other otherwise inaccessible parts of the mine, and will go through doors (either using a key card or passing through from a certain direction) to enter mechanical areas where a boss lurks. These areas, and the mine itself, and crawling with respawning enemies and numerous hazards; we’ve got falling boulders, spike pits, wall lasers, bursts of flame, ceiling spikes, Foot Soldiers trying to run you down in giant mine carts, and extremely annoying bubble-like projectiles that clog up the screen and follow you incessantly. The Cowbunga Collection allows you to activate “helpful map icons” and I’d definitely recommend doing this; it doesn’t help the basic nature of the map but it’s useful to know that you’re heading to a boss, key card, or captive in need of rescue. This will serve you well when it comes to exploration; naturally, you’re somewhat limited in how far you can go in the mines when you only have one or two turtles on hand but, when you have them all, it’s very easy to get turned around because the map is so simplistic and many of the game’s environments all look the same. Because of this, it’s not uncommon to locate a captive turtle but not have a key or to run into a door that requires a key card you haven’t gotten yet, or to have to backtrack halfway across the map to get an item you require. Once you get used to the map and have all four turtles rescued, exploration gets a little easier; you can take shortcuts by climbing or digging down certain areas, for example, but a quick travel system to the four compass points of the map would’ve been much appreciated.

Graphics and Sound:  
To be fair, Radical Rescue is a step up from the TMNT’s last two Game Boy titles. Sprites are smaller now, but actually benefit from it; you get more screen space to work with and the game runs much smoother by default. As a trade-off, though, the game’s taken a step back in some areas; Leo and Raph only hold one of their weapons again, there are no idle animations, and the common Foot Soldiers simply wander about the place. However, the TMNT are far more versatile this time around; their new abilities help them to be more unique and offer up some new ways to play and some new animations and the boss sprites are far bigger and more visually interesting. Additionally, the story cutscenes are the best yet for a TMNT Game Boy title; text and large sprite art are used to convey the general plot and whenever you rescue an ally and, while these barely contain any frames of animation, they’re much more detailed than in the previous games.

The visuals are far better but environments are too similar to impress all that much.

The game’s music isn’t bad, either; while sound bites are at a minimum this time around, Radical Rescue still features a pretty good version of the classic TMNT theme and each area of the game has different music associated with it. However, where the game falters, for me, is in the variety of its presentation; while it’s nice to not be ploughing through the sewers, streets, and Technodrome again, I question the logic of setting the entire game in a drab, repetitive mine. Sure, there are ladders, lanterns, and some different rocky formations here and there but the Game Boy simply isn’t powerful enough to make this large and boring environment visually interesting. When you’re outside, it’s a different story; the background is still quite plain and generally just shows clouds or mountains, but it’s a nice change of pace from rocks and shit. The mechanical areas do help to break things up as well, but these all look and feel the same as well; it’s way too easy to get lost because most of these areas are largely indistinguishable from each other. I think it would’ve helped to theme them after the elements; have one take place under water or covered in snow, one have more lava pits and fire hazards, maybe implement a wind theme…anything but the same screens over and over. In this way, while Radical Rescue is easily the biggest and most involved of the TMNT’s Game Boy adventures, it also paradoxically feels the least innovative because it’s just not very engaging to plod from one dark cave to one mechanical hellscape and back again.

Enemies and Bosses:
As is to be expected, the Shredder’s Foot Soldiers are all over the place. Unlike in the TMNT’s last two Game Boy games, they’re a little bit more competent here; they mostly just wander around but the greater emphasis on horizontal and vertical exploration means they’re often in awkward places and the fact that they constantly respawn can make traversal a bit difficult at times. The Foot Soldiers will toss grenades at you (which you can destroy), wield pickaxes, and fly overhead with jetpacks to drop bombs on you, as well as try to run you down in large mine carts. You’ll also encounter little laser firing spider-like robots, these weird rock-like humanoids, and mechanical frog-like enemies that hop about and fire at you. Traditional TMNT enemies like Mousers and Roadkill Rodneys are absent here, replaced by swooping bats and an abundance of environmental hazards, such as homing missiles and spikes. Another area where Radical Rescue is a step back from its predecessors is its bosses; the game boasts only five boss battles, with all but one being some of the TMNT’s more obscure enemies (at least for me). Each one sports a health meter and each boss fight takes place in an enclosed arena that’s ripped right out of the Mega Man series (Capcom, 1987 to present).

Bosses are fought in enclosed arenas and will test your patience at times.

The first boss I thought was Scratch, who jumps about, swipes at you up close, and hurls a ball and chain at you from a distance. Scratch very much sets the standard for Radical Rescue’s bosses in that they have quite large hit boxes, deal quick, heavy, and nigh-unavoidable damage up close, and you need to get into a bit of a rhythm to land an attack; rather then simply tank through their hits and whittle their health down, it’s better to keep your distance and play things smart, something that serves you well in the fight against Dirtbag. This mining mole dashes at you with a super annoying uppercut and swipes with his pickaxe, but will also leap into the air and stun you if you’re touching the ground when he is. It’s pretty hard to avoid him as he always aims to land on top of you, so you need to jump away and then quickly double back to hit him and then jump away again to avoid taking damage. I was probably getting the hang of the game by the time I fought the Triceraton as he actually seemed a bit easier; for this fight, stay out of his crosshairs and avoid the lighting bolt he fires out while being mindful of his charge attack, but otherwise he’s not too dissimilar from the Rocksteady and Bebop bosses of previous TMNT games.

As if battling these tricky bosses wasn’t bad enough, you’re forced into a boss rush before the finale.

Lastly, you’ll battle with Scale Tail, probably the most difficult of the four main bosses; Scale Tail lashes at you with his tail when you’re up close and spits a projectile at you that becomes a plume of fire. If you manage to avoid this, the snake will try to blow you into the hazard, though this is actually your best chance to attack him providing you can fight against the rush of air and avoid taking damage from his large hit box. After battling through the hazardous final section of the game, you’ll have to fight all four bosses again, one after the other, with no health items or reprieve between each bout! While this is easily one of the laziest gameplay mechanics of any game, I actually found the bosses a little easier the second time through, probably because I was more aware of their attack patterns and had a tried-and-tested strategy in mind for beating them. After defeating them all again, you’ll get to take on “Cyber Shredder” in a two-phase boss battle where he gets a whole new health bar after the first round while you get nothing, making for easily the toughest segment of the game. Shredder flies across the screen with a knee attack, levitates overhead and spams a diving kick, throws kicks at you up close, and launches an orb-like projectile that becomes a plume of fire. In the second phase of the fight, these flames are bigger, the Shredder gains an aerial projectile, and his attacks become faster and more aggressive.

Power-Ups and Bonuses:
Unfortunately, despite being a Metroidvania adventure, Radical Rescue doesn’t offer anything that new in terms of pick-ups and power-ups. Each turtle acts as a power-up in a way, offering new traversal options, but the best you’ll hope for in any tangible way is the odd slice of pizza dropped by defeated enemies to refill your health. Two new aspects though, are the ability to pick up and store a whole pizza, which will replenish your health bar when it’s drained (a literal lifesaver in boss rooms) and the ability to permanently extend your health bar by picking up hearts hidden throughout the game.

Additional Features:
Another way Radical Rescue is a bit of a step back is the lack of any in-game options; there are no difficulty settings here, no bonus games, and the only real option available to players is to continue their progress with the password system. When playing the Cowabunga Collection, you’ll net a sweet 70G Achievement for completing the game; you can also check out the game’s box art and manuals, switch between the Japanese and American version, apply various borders and display options (including an LCD display to recreate the feeling of playing on the Game Boy’s eye-watering screen) and make use of a strategy guide for some helpful tips. While the only enhancement on offer is to activate helpful map icons, you can still rewind the game with the Left Bumper and access save states using Right Bumper, both of which are incredibly helpful during the game’s trickier platforming and boss sections.

The Summary:
I was completely caught off-guard by Teenage Mutant Ninja Turtles III: Radical Rescue; I was not expecting it to be this sprawling Metroidvania-style game and it took me some time to come to terms with the dramatic genre shift compared to the more action-oriented TMNT games I’ve played. That’s not to say there’s a lack of combat here; you’ll still be busting plenty of heads, but the emphasis is much more on exploration, back-tracking, and thinking about how to get past obstacles and progress to new areas. In some ways, this is much appreciated; the game is surprisingly big, definitely offers something different from the TMNT’s usual games, and I liked that the TMNT each had their own abilities to help differentiate them. While I appreciate that it’s offering something different, it’s pretty tough to find your way around the repetitive environments and I’m unimpressed by the mine setting, as large as it is. There was also little incentive for me to switch between turtles, the bosses were unnecessarily troublesome at times, the inclusion of a boss rush was beyond lazy, and I don’t think the enemies, environments, or bosses really captured the depth of the TMNT license. Still, the gameplay wasn’t bad and it’s clear that Konami had finally come to grips with the Game Boy’s capabilities by this point so it’s probably worth another go-around as long as you play this version of the game, with all the handy features to get around its more frustrating aspects.

My Rating:

Rating: 2 out of 5.

Could Be Better

Did you have Teenage Mutant Ninja Turtles III: Radical Rescue in your Game Boy library back in the day? What did you think to genre shift towards exploration and Metroidvania mechanics? Which character’s ability was your favourite and which one did you play as the most? What did you think the the game’s presentation and the boss battles? What’s your favourite Metroidvania title? Whatever you think about Teenage Mutant Ninja Turtles III: Radical Rescue, feel free to share them in the comments below or leave your thoughts on my social media.

Game Corner [PokéMonth]: Pokémon: Crystal Version (Nintendo 3DS)


Upon the release of Pokémon: Blue Version and Pokémon: Red Version (Game Freak, 1996), a new craze swept through playgrounds across the world. An entire generation grew up either playing Pokémon, watching the anime, playing the trading card game, and watching the feature-length movies as clever marketing and a co-ordinated release and multimedia strategy saw Nintendo’s newest franchise become not just a successful videogame franchise but a massively lucrative and popular multimedia powerhouse that endures to this day. Accordingly, February 27th is now internationally recognised as “National Pokémon Day”, which I’m expanding to an entire month of Pokémon every Tuesday in February.


Released: 26 January 2018
Originally Released: 14 December 2000
Developer: Nintendo
Original Developer: Game Freak
Also Available For: GameBoy Color

The Background:
I’ve talked before not just about Pokémon but also about how Pokémon: Gold Version and Pokémon: Silver Version (Game Freak, 1999) are my favourite games in the franchise. Thanks to the success of not just the first Generation of Pokémon videogames but also an aggressive multimedia strategy, Pokémon became an instant cultural phenomenon across the world, and yet the developers originally intended for Pokémon: Gold and Silver to be the final entries in the series. The sequels immediately sought to improve upon the gameplay, graphics, and mechanics of the first games; developed exclusively for the GameBoy Color, the game would feature a greater colour palette, backwards compatibility with the previous games, a real-time internal clock, and one-hundred new Pokémon to collect and battle (in addition to two new Types, Dark and Steel). Although many of these Pokémon were dropped, or significantly redesigned, during the game’s development, Nintendo offered the otherwise-inaccessible Celebi as a promotional extra and Pokémon: Gold and Silver were highly anticipated by me, personally, thanks to the new Pokémon cropping up in the anime and movies.

Anticipation was high for all-new Pokémon videogames thanks to the anime and the franchise’s popularity.

This Generation stands out for me for including things like a day/night cycle, breeding, and including the entire region of Kanto as post-game content and, like Pokémon: Blue and Red, Pokémon: Gold and Silver were not only highly praised at the time but also soon followed by a third entry, Pokémon: Crystal. While essentially the same game, Pokémon: Crystal was a trend-setter for the franchise, allowing players to choose the gender of their avatar, including partially animated battle sprites, featuring a whole additional side-story revolving around Suicune and the Unown, and debuting the ever-popular Battle Tower for players to further test their mettle. Again, thanks to Pokémon’s popularity and including additional elements as an incentive for a further purchase, Pokémon: Crystal was well received upon release and has been noted as one of the best Pokémon games. Many elements from Pokémon: Crystal became series staples in subsequent releases, and featured prominently in the Gold and Silver remakes, and the game was later released on the 3DS Virtual Console with the Celebi event included as standard.

The Plot:
The time has come to receive your first Pokémon from Professor Elm and challenge the Gym Leaders and Pokémon of the Johto region. However, your journey is disrupted by your mysterious rival, who stole one of Professor Elm’s Pokémon, and the villainous Team Rocket, who seek to return the group to their former glory. Things are further complicated when you cross paths with Eusine, who has made it his life gal to earn the respect of the legendary beast Suicune.

Gameplay:
As I said, I regard the second generation of Pokémon games as my favourite in the franchise; I remember going out of my way to get Pokémon: Blue when it first came out, and then snapping up Pokémon Yellow Version: Special Pikachu Edition (ibid, 1998) simply because of how popular the franchise was, and me and my friends were so eager for new Pokémon games that we readily downloaded barely-translated ROMs of Gold and Silver just to experience them. I had Pokémon: Silver back in the day, but always wanted Pokémon: Gold and never had the chance to play Pokémon: Crystal as I was firmly into collecting for the Game Boy Advance by then, so I jumped at the chance to get it before the 3DS Virtual Console shut down for good simply because of how much I enjoyed Pokémon: Silver and Pokémon: HeartGold (ibid, 2009). Essentially, Pokémon: Crystal is the same Pokémon you know and love: the game is a top-down role-playing game (RPG) in which players get to first pick their gender, name their avatar, select from three starter Pokémon, and embark on a journey to raise a well-balanced team, challenge the Johto Gym Leaders, and take on the Pokémon League. As was the style at the time, Pokémon: Crystal isn’t prone to holding your hand; you can talk to non-playable characters (NPCs) for clues, tips, lore, and some instructions but you’re mostly left to your own devices, though the game often bars your progress behind impassable objects like trees, bodies of water, or battling trainers that can only be bypassed by defeating Gym Leaders or acquiring Hidden Machines (HMs). As before, Pokémon: Crystal utilises an extremely simple control scheme that lets you organise your party, equip and use items, and save your progress or alter settings quickly and easily, and the user interface is vastly improved over the last games, with your pack now divided into pockets for key items PokéBalls, and healing items and even lets you set an item to the ‘Select’ button for quick use.

Pick your Pokémon and head out into Johto to tackle a whole new crop of Trainers and challenges.

As ever, gameplay is divided into exploring the overworld and one-on-one battles against wild or trainer-owned Pokémon. On the overworld, you’ll chat to NPCs with A, activate switches and pressure pads, and pick up items; if you walk into grass, caves, or surf on water, you’ll soon encounter a wild Pokémon, which switches the game to a battle screen where you and your opponent take turns to inflict damage or status effects on each other, or use in-battle items to heal or relieve status effects or try and capture the Pokémon. You can also run from wild Pokémon (as long as you’re a higher level), but not from a Trainer battle, and many wild Pokémon can also now flee from battle, which can make capturing them trickier. Pokémon battles are dictated by a “Type” system that’s basically a version of Rock/Paper/Scissors; Water-Type Pokémon inflict greater damage against Fire-Type Pokémon, for example, while Grass-Types trump Water and are weak to Fire. There are now seventeen different Types of Pokémon in the game, with Dark- and Steel-Types adding an extra dimension to battle as the previously all-powerful Psychic-Type Pokémon now have a formidable weakness in Dark-Type Pokémon and moves. While some moves, like Bite, have changed Type to align with this new system, it’s all pretty simple to figure out thanks to battle text informing you when moves are “Super effective” or “Not very effective” and external factors like your location, wild Pokémon names, and their colouring and appearance cluing you in on the best attack strategy. If you’re fishing in the sea, for example, and hook a Qwilfish (which is blue, clearly identified as a fish), it’s pretty obvious that you need to use a Grass- and Electric-Type to inflict maximum damage. At the beginning, you can pick between three different Pokémon, a Fire-, Grass-, or Water-Type, and I recommend keeping them in your party and five to ten levels higher than the rest of your team simply because they are your first Pokémon. You can choose to give this Pokémon, and any others you catch (but not ones you acquire via trading) a nickname to personalise them, and you’ll you can swap around your Pokémon’s moves at any time either in-battle or from the pause menu, or swap or release them from the PCs found in Pokémon Centers.

Level-up to become stronger, and make use of the game’s new evolution methods to discover new Pokémon.

To ease you into the game, early wild Pokémon and Pokémon Trainers are all at low-levels and you’re usually always at an advantage because your Pokémon have higher stats. Winning Pokémon battles will award your Pokémon with experience points (EXP); earn enough, and your Pokémon will level-up, which will increase their Hit Points (HP), Attack, Defence, Speed, and Special stats (now split into Special Attack and Special Defense) and thus make them more powerful. One of the best quality of life improvements in Pokémon: Crystal is the addition of an in-battle EXP progress bar so you can easily keep track of your Pokémon’s progress, and you can swap out Pokémon in battles to share EXP and level them up faster, which you’ll want to do as it’s helpful (though not necessarily necessary by any means) to have a diverse team with decent Type coverage. Don’t level-up too fast, though, as your Pokémon will disobey you if they’re too high a level and you don’t have the appropriate Gym Badge. I like to circumvent this by grinding between Gym battles; by keeping my main Pokémon five to ten levels stronger, but a few levels below the level cap, it can ensure that I’m always stronger enough for the next battle, though I did notice that I was spending more time grinding between Gyms than in my Pokémon: Yellow playthrough. Pokémon will learn new moves from levelling-up, or from Technical Machines (TMs), and it’s recommended to give your Pokémon moves that play to their strengths (if they have a high Attack stat, for example, you don’t really want to have moves that are all Special Attacks) and go against their Type (teaching Poison-Type moves to Grass-Type Pokémon, for example) so they have greater Type coverage in battle. In addition to the untrackable Effort Value (EV) points (earned by consecutively battling certain Pokémon, so defeating a bunch of Hoothoot in a row will boost your HP stat by one point), Pokémon: Crystal also introduces a hidden “Happiness” stat. the more you travel with, use, and care for your Pokémon, the happier it will become; you can boost this stat by grooming them and feeding them Vitamins (which also boost individual stats) or equipping them with certain items in order to max out their Happiness and trigger their evolution.

You can shrug off status effects with Berries, and new HMs offer more exploration options.

As before, battles and gameplay are as hard as you make them; if you don’t bother levelling-up a diverse team, then battles will eventually become harder to win. You can avoid a Trainer battle by staying out of the sight line of Trainers, but I recommend battling every Trainer you come up against to strengthen your team and earn PokéDollars, and some Trainers will even give you their phone number and call you with tips or for a rematch. Trainers are much more capable this time around; not only do they have all the same options as you when it comes to swapping and healing their Pokémon, but they also don’t have to worry about running out of Power Points (PP). Pokémon can still only know four moves at a time, so you’ll have to either replace an existing move to learn a new one or visit the Move Deleter to do this outside of levelling-up or to forget HM moves, and each move has a certain number of PP. When you’re all out, you can’t use that move anymore and will eventually either have to use “struggle” (which inflicts recoil damage to you), replenish PP with a Berry or Elixir, or restore your Pokémon at a Pokémon Center. If you’re not careful in battle, your Pokémon will end up “fainting” when their HP is drained and, if all your Pokémon faint, you’ll “white out”, lose some money, and respawn at the last Pokémon Center you visited. As before, you also need to be wary of status effects, which can cause Pokémon to flinch (basically miss a turn), become confused (often resulting in them hurting themselves), miss their attacks, fall sleep or become paralysed or poisoned (which also drains HP when on the overworld), burned, or frozen. While some attacks and items will also boost your stats and your chance at inflicting greater damage with a “Critical Hit”, Pokémon: Crystal features far more moves that power up and negate certain Types, like Sunny Day and Rain Dance buffing Fire- and Water-Types, respectively. You can undo these status effects using certain items, and can have your Pokémon hold Berries that they’ll automatically eat when inflicted with a status effect or at low HP or PP to help them shake off these debilitating effects.

New mechanics and quality of life improvements make the game much more fun to play.

Victory in Trainer battles earns you PokéDollars to spend in PokéMarts and at vending machines on healing items, hold items, Vitamins, single-use power-ups, and other useful gear to help you in battle or with raising your Pokémon. Items and Pokémon can be stored in PCs when required (you can still only have six Pokémon at a time, so any additional Pokémon are automatically transferred to your PC) but you can choose to have your mother save some money for you, which will award you with extra items and toys to furnish your bedroom with. Although you still only get one save file, you can manually save your progress at any time on the overworld and I recommend saving frequently, and especially before Gym Leader battles or encounters with Legendary Pokémon so you can reset if you make a mistake. Just like before, you need to defeat eight Gym Leaders to earn their badges and challenge the Pokémon League while also working on completing Professor Oak’s PokéDex by capturing Pokémon. The PokéDex has also received an upgrade, making searching for and viewing Pokémon much easier, but you’ll still only be able to fully complete it by trading with Gold, Silver, and even the Generation One games using the “Time Machine” function and by evolving Pokémon through battle, raising their Happiness, using special stones, or by trading (often now with them holding a special item). You can manually cancel some evolutions, and even have Pokémon hold an Everstone to suppress their evolution, which is sometimes recommended as Pokémon learn moves faster in their weaker forms and some moves can only be learned prior to evolution. Another new feature in this game is breeding; each Pokémon is either male, female, or gender neutral and you can leave two Pokémon at the Day Care to be raised outside of battle or, if they’re compatible, breed either a pre-evolution like Pichu and Igglybuff or a slightly stronger version of an existing Pokémon with moves they wouldn’t normally learn. When Pokémon breed, you’re given an egg; these eggs will hatch after you’ve taken a certain number of steps or cycled a certain distance, and breeding can be a great way or filling up the PokéDex quickly alongside regular battling, though you won’t be able to breed Legendary Pokémon and some take longer to produce an egg than others.

Of all the side quests, the one involving Suicune is the most prominent.

A Pokémon’s gender is clearly visible next to their name in battle, and a further quality of life feature is that you’ll see a little PokéBall next to a wild Pokémon’s name to indicate that you’ve caught it, and the game is littered with similar helpful additions mainly tied to your PokéGear. This device houses your map, phone, and a radio which lets you listen to shows offering tips or music that will either wake up Pokémon or put them to sleep and allow you to track the mysterious goings-on at the Runs of Alph. Here, you’ll investigate strange symbols and encounter the useless Unown, though there are slide puzzles to play here and twenty-four different variations of this Pokémon to find and record for a nearby scientist. Your progress is again restricted by trees, water, and dark caves, but now you also have to content with waterfalls and whirlpools. You can again get past these obstacles with HMs, which again double as faster ways of traversing the map: Fly, for example, lets you fly to any Pokémon Center on the map, but you can also use Dig to quickly exit caves (especially useful when you’re out of Escape Ropes), Teleport to warp to exits, and acquire a bicycle (but, sadly, not a skateboard) to dramatically increase up your movement speed. Many of the same minor puzzles return from the last game, meaning you’ll be pressing switches or pushing boulders or using teleport pads to get around, though you’ll also encounter slippery ice, a strange plant that can only be moved using a special water bottle, and numerous instances where the local Gym Leader is either busy with another task or won’t battle you until you’ve complete a side quest. These primarily involve the returning Team Rocket, who have been cutting the tails off Slowpoke, take over the radio tower, and steal vital components from the Kanto power plant. When team Rocket is in town, you’ll need to clear them all out to make the Gym and other areas accessible, but you’re also hounded by your rival, a red-haired boy who stole a Pokémon from Professor Elm and is obsessed with power. Other side quests include searching for a Farfetch’d in Ilex Forest, competing in a bug-catching contest, fetching medicine for a sick Ampharos, feeding Berries to a poorly Miltank, exploring Dragon’s Den, and capturing a strange Gyarados at the Lake of Rage. This will most likely by your introduction to “Shiny” Pokémon, extremely rare palette swaps of Pokémon that occasionally appear in battle. Perhaps the most prominent side quest here involves the Legendary Beasts, specifically Suicune; the three beasts are released into the wild early into the game but, while you’ll randomly encounter Entei and Raikou while wandering around and be left tearing your hair out as they constantly flee from battle, you’ll come across Eusine in his search for Suicune as you journey around Johto and eventually be able to tackle the elusive beats one-on-one to add it to your collection.

Graphics and Sound:
Obviously, Pokémon: Crystal is still going to be noticeably limited compared to later games in the series, but the improvements between this game and not just the first generation but even Gold and Silver are pretty impressive. I never thought of the Game Boy Color as being an especially powerful device compared to the original Game Boy, but this game is huge compared to the first games, with a vibrant colour palette that is far more detailed than what we saw in the first games. Towns and routes are much more visually interesting, with grass and trees and plants swaying and bobbing as you explore, the town and route names popping up onscreen, and a distinctly Japanese aesthetic to the far more impressive interiors of buildings. All of the sprites have been given a complete makeover, meaning overworld sprites and battle sprites are far more diverse and detailed; there are new Trainer classes available in the game, new animations for the PokéBalls, and not only a bunch of new moves added to the game but much more interesting and visually exciting attack animations, with more frames and colours being utilised to really make the most of the Game Boy Color’s capabilities. Although you can’t have a Pokémon follow you around like in Pokémon: Yellow, Pokémon now have little animation frames when they appear onscreen, sparkle when they’re Shiny, and even their menu and HM sprites have been overhauled to make them more distinctive.

It’s amazing how much better Pokémon looks, sounds, and plays on the Game Boy Color hardware.

While Johto’s towns and areas aren’t really all that different from Kanto’s, and are probably a little less visually diverse than I’d like, there’s still some fun locations to explore here. Goldenrod City has a Game Corner and a large PokéMart like Celedon City, but also an underground passage, a radio tower, an ice cave, and the Magnet Train which can allow swift access to and from Johto to Kanto; structures like Bellsprout Tower, Burnt Tower, and Tin Tower are not only great places to train ut also key to catching the game’s Legendary Pokémon; and you can even explore a lighthouse (which is full of holes to fall down) and the entirety of Kanto! Perhaps the biggest new feature in this generation was the inclusion of a day/night cycle; at the start of the game, you set the date and time and, as day turns to night, the palette changes accordingly and this even affects the evolution and appearance of some Pokémon. Different NPCs and events will also happen on certain days, and noting the date and time is essential for completing the PokéDex and acquiring certain items. Although the game is bolstered by some jaunty, memorable little chip tunes and Pokémon cries are much improved, the sound is still a bit of a weak spot here; you can tune into different radio channels to change the music though, which is fun. While your pack is far easier to navigate, its capacity is still limited, but storing and retrieving items is much easier this time around, as is rearranging the order of items in your pack, and you can interact with far more on the overworld: Berry plants, Pokémon blocking your path, and even certain trees can all be interacted with to pick-up items or trigger a battle, and you can again use the Itemfinder to seek out hidden items. Like in Pokémon: Yellow, Pokémon: Crystal features an all-new intro sequence, this one focusing on Suicune and the Unown, and you can even choose to play as a girl if you like (though this has no impact on the gameplay other than changing your sprite).

Enemies and Bosses:
In your quest to conquer the Pokémon League, you’ll battle a wide variety of Pokémon both in the field and in use by various Pokémon Trainers. Wild and Trainer Pokémon begin at low levels, generally between three and six, but get progressively stronger as you advance to new areas and when you’re called for a rematch, which will help you to grow stronger on a rising curve. Your ability to weaken these Pokémon for capture or defeat them is directly tied to your Pokémon’s current level and moves; if your Pokémon is weak and only knows moves like Bubble and Leer or bring an Electric-Type into a forest or a Bug-Type into a cave you’ll struggle to advance. The same applies to Pokémon Trainers; they start off using one or two weak Pokémon like Sentret and Spinarak but eventually use more formidable and evolved Pokémon. They’ll also withdraw them, heal them, or buff them with items and, while you can exploit the enemy A.I. at times, Pokémon Trainers tend to use moves that have a Type advantage over your current Pokémon. Pokémon: Crystal introduces new moves that can prolong or frustrate battles as well; Protect will render your next attack useless, Spikes will damage any Pokémon you send into battle, and some moves, like Dynamic Punch, not only hit hard but also inflict confusion on their victim. Still, with enough grinding and a diverse team, you can easily overcome every opponent you face; simply take some time between Gym battles to level-up, develop specific stats if that’s your jam, and bringing your team as close to the level cap as possible, utilising moves that are super effective and sharing EXP wherever possible, and you can easily trample over the opposition once you’ve gotten past the uphill battle at the start of the game.

Team Rocket are back and you’re hounded by an arrogant rival with a superiority complex.

After being absent for a few years, Team Rocket has come back but they’re far less of a threat than in the first generation; these nefarious individuals are easily identified by their black attire and caps and will impede your progress until you’ve cleared them out of towns, towers, and buildings. When exploring their hidden base in Mahogany Town, you’ll be constantly beset by the gang when you walk in front of security cameras, though Pokémon League Champion Lance is on hand to help you out by healing your team. When you encounter them in the radio tower, you’ll have to battle a Rocket Executive posing as the tower’s director, and they’ve been cutting off Slowpoke tails to sell them earlier in the game, but Team Rocket’s grunts really aren’t much of a threat and tend to stick to common Pokémon like Rattata, Muk, and Zubat. In comparison, your rival is much more malicious than Blue from the last game; this guy (often dubbed “Silver”) is not just rude, arrogant, and obsessed with training only the most powerful Pokémon, but also a conceited bully, pushing you away and past you and refusing to help fend off Team Rocket since it doesn’t suit his goals. Unfortunately, the rivalry between you isn’t as big of a factor as in the last game; the rival pops up at various points throughout the game, but it’s easy to forget he even exists and he doesn’t even end up being the Pokémon League Champion, which is a shame as it would’ve been easy to have him be the mastermind behind Team Rocket’s return and maybe tie him into the Ruins of Alph and Suicune sub-plots. Your rival will steal whatever starter Pokémon has a Type advantage against yours (in my case, he took Chikorita) but eventually expands his team to include Sneasel, Golbat, Magneton, Alakazam, and Gengar to give him good Type coverage across the board. However, a diverse and high-levelled team can easily send him packing in every encounter; in my playthrough, I barely even needed to swap my Pokémon out between each round thanks to teaching my Feraligatr Bite, Ice Punch, Surf, and Dynamic Punch and going into every encounter at least ten levels higher than him, making him a visually interesting but hardly challenging successor to Blue.

You’ll occasionally need to complete some side quests or solve a puzzle to battle the Gym Leaders.

A whole new world to live in means eight all-new towns and eight new Gym Leaders to battle, each specialising in a specific Pokémon Type and often (but, oddly, not always) protected by a number of protégés and some light puzzles, such as a maze, obscured path, or the pushing of boulders. Other times, Gyms will be empty, locked, or otherwise barred and you’ll need to complete a side quest to gain entry. While you don’t have  to fight the Gym Leader’s minions, I recommend it so you don’t miss out on some EXP and cash, and it’s again recommended to have a diverse team on hand (though you can often helpfully find wild Pokémon nearby that can counteract the Gym’s specialty). Your first challenge is Falkner, who uses Flying-Type Pokémon; as long as you don’t have a Grass-Type on hand and, honestly, why would you?) this isn’t anything to worry about and you can improve your chances by taking a slight detour and catching a Ground-Type Phanpy. Bugsy is a walk in the park if you have a Fire-Type, though I felt the pinch against his Scyther’s Fury Cutter since I opted for Totodile instead of my usual Cyndaquil. Most players run into a brick wall when faced with Whitney and her Miltank, which can deal increasingly more devastating damage with its Rollout attack, but I honestly had no trouble besting it was a Level 28 Croconaw using Bite and Ice Punch (though a Fighting-Type Pokémon or moves are your best bet against her). Neither Morty or Chuck are much of a challenge either since you can take both out with Psychic-, Dark-, and Electric-Type moves, while Fire- and Water-Types are your best bet at taking out Jamsine’s Steelix. Electric- and Fire-Types will also allow you to make short work of Pryce’s Ice-Type Pokémon (indeed, the hardest thing about him is skidding about on the icy floor of his Gym) and, while Clair’s Dragon-Types can be intimidating and easily paralyse you, they’ll also fall pretty quickly if you have Ice-Type Pokémon or moves on hand. Defeating each Gym Leader awards you a badge that increases the game’s level cap, powers up certain stats, and allows you to use HMs outside of battle to reach new areas, and also awards you some useful TMs, like Dynamic Punch and Shadow Ball, but take care after defeating Whitney as you won’t immediately earn her badge and must talk to one of her underlings to convince her to hand it over.

The best of the best await at the Pokémon League…unless you’re levels ahead of them…

Once all of the Gym Leaders are defeated, you’re ready to take on the Pokémon League. To reach the League, you need to use your HMs to navigate through Tohjo Falls and the cavernous Victory Road, where you’ll battle your rival once more and encounter some high-level Pokémon to help push your levels higher. You’ll want to make use of the makeshift Pokémon Center and PokéMart right before the Elite Four to heal up and maybe stock up on restorative items since you again need to battle all four Trainers, and the champion, consecutively to become the champ. Each of the Elite Four has a full team of Pokémon, with a general speciality in mind but also Type coverage to keep you on your toes; your first challenge is Will, who uses Psychic-Type Pokémon but, thankfully, these are dual-Types so you can use Dark-, Ghost-, Electric-, and Fire-Type moves to easily cut through his Pokémon, though you could be caught off-guard by confusion or freezing if you’re not careful. Next up is Koga, upgraded from a Gym Leader to one of the Elite Four and still rocking the Poison-Types, making him easy pickings for your Ground- and Flying-Type attacks. The only member of Elite Four to return from the first generation is, ironically, one of the weakest of that game, Bruno. Though he’s got a bigger, more diverse team, he’s still a Fighting-Type specialist so you can easily best him with Psychic-Type moves. These are slightly negated against Karen, however, since she has Dark-Types on hand but, again, her Pokémon are dual-Types so you can balance things out with Fire- and Water-Type Pokémon. Your final challenge is against Lance, the Dragon-Type expert who’s now the Pokémon League Champion. Lance is easily the toughest Trainer battle so far…on paper, at least…since he has three Dragonites and even fan favourite Charizard on his team. However, but this point my Feraligatr was way overpowered and I managed to sweep his whole team using Bite, Surf, and Ice Punch without any issue. Toppling the Elite Four sees you and your team again entered into the Hall of Fame and declared Pokémon League Champion; you can battle the Elite Four again and again to earn more cash and level-up your team, but you’ll find challenge enough awaiting you in the post-League content.

Some of Kanto’s Gyms have undergone a bit of a reshuffle, with Blue installed as your final opponent.

Becoming the Pokémon League Champion earns you a ticket to board the S.S. Aqua and travel to Kanto, where you can not only explore the entirety of the region from the first game, battling new Pokémon Trainers with higher-level Pokémon, but also take on the eight Kanto Gym Leaders once more! Because you start in Vermillion City, the order you battle the Gym Leaders is mixed up; some are missing their puzzles and protégés as well, and all have bigger, more diverse teams and, though you’ll earn their Badges and they’ll be added to your total, you can’t view these on your Trainer Card and only two of them will award you TMs after you beat them. First up is Lieutenant Surge, now rocking two Electrode and an Electabuzz alongside his signature Raichu, but he was nothing compared to my overpowered Donphan. I got a bit mixed up and fought Misty next, which you can only do after fighting past the Nugget Trainers and interrupting her date; while her Water-Type Pokémon don’t stand much of a chance against a good Electric-Type Pokémon, this won’t help you against her Quagsire so maybe switch to a Grass-Type instead. I battled Erika next, who can be frustrating with her tendency to use Full restore, cast Sunny Day, and her ability to drain HP from your Pokémon, but at this point my Feraligatr’s Ice Punch and Suicune’s Aurora Beam were more than enough to topple her. Koga’s daughter, Janine, now resides in Fuschia City’s Gym but she uses Poison-Types just like her dad so you can get past her in much the same way you did him, and Brock and Sabrina are similarly easily taken out using Water- and Dark-Types, respectively. Since Cinnabar Island was wrecked by a volcanic eruption, you won’t find much of anything there except a Pokémon Center and Blue, the Viridian City Gym Leader, who directs you to the similarly barren Seafoam Islands to battle Blaine. Neither Blaine nor Blue have any underlings to worry about and, while Blue’s team is as diverse and powerful as ever, yours should be more than up to the task of matching him blow for blow and recapturing the Kanto Gym Badges.

As if Red wasn’t tough enough, the Legendary Beasts will flee from battle and the new Birds take a lot of Balls to snag!

With these in your possession, Professor Oak allows you access to Mount Silver and the game’s most taxing challenge of all: a battle against Red, the protagonist from the first game, who’s well-rounded team not only has great Type coverage but is also in the high-seventies (with his Pikachu being the highest-level Pokémon you’ll face in the game at a whopping Level 81). While battling Red is tough in and of itself, it’s made all the more difficult by the fact that you need all the GMs to even reach him, meaning you’re at a severe disadvantage since you’re either down a couple of Pokémon to make room for a HM slave or have had to substitute better moves for HMs. Aside from red, there are some one of a kind Pokémon to find in the wild, too: Sudowoodo block your paths and need triggering with the Squirtbottle, you’ll need to tune into Kanto’s radio stations to awaken the Snorlax blocking your path, a Shiny Gyarados waits in the Lake of Rage, and you’ll encounter a wild Lapras in Union Cave’s basement every Friday. Although Kanto’s Legendary Pokémon are entirely absent (the power plant is now up and running, Seafoam Islands is a simple cave, Victory Road has been rearranged, and Cerulean Cave is inaccessible), Johto’s are literally out and about to find. Entei and Raikou will randomly appear in different areas of Johto, fleeing immediately (or using Roar to scare your Pokémon off) and forcing you to use the PokéDex to track them down and use moves like Spider Web and Mean Look just to have a chance at catching them, damage and status attacks you inflict will carry over even if they flee, however, but these two are still a massive headache to get a hold of and Pokémon: Crystal makes things unnecessarily difficult by forcing you to have caught all three Legendary Beasts to even spawn an encounter with Legendary Bird, Ho-Oh, atop Tin Tower. Conversely, one of my favourite Pokémon, Lugia, can only be fought at Whirl Islands after reaching Pewter City and acquiring the Silver Wing, and all of these Legendary Pokémon (and some wild Pokémon) can be a chore to catch unless you inflict sleep or paralyse and whittle them down to a slither of health as they just love to break out of PokéBalls and, unlike the last games, where you obviously used the instant-catch Master Ball on Mewtwo, it can be tough to decide which Pokémon to use your Master Ball on here (though I’d recommend Ho-Oh).

Power-Ups and Bonuses:
Both Johto and Kanto are littered with pick-ups to be found, gifted from NPCs, or bought from PokéMarts. All the same healing and restorative items from the last games return, such was Potions, Revives, Awakenings, and Antidotes, though you can now find various Berries that have the same function and can be held and automatically used by Pokémon in battle. As you progress, PokéMarts will start to sell more advanced items, like Hyper Potions, Max Revive, Escape Ropes, PokéDolls to help you flee battles, and likes of X-Attack for a one-time stat boost. Vitamins and evolutionary stones a far harder to find on the overworld, but can be bought from Goldenrod and Celadon City’s Department Stores and are great for raising individual stats and quickly evolving Pokémon, and you’ll also find Nuggets to sell for cash (and sell most items you find) and key items like the Itemfinder, EXP All, and various rods. Another new addition to the game are held items that give your Pokémon certain boosts and buffs; Quick Claw can make them move faster, fr example, while Amulet Coin will double the cash you earn and Leftovers will see them restore a little bit of health between every move. Many of these will increase the power of certain Types, such as Charcoal powering-up Fire-Types, and some are even needed to be held for Pokémon to evolve.

There are more items than ever before, and even your radio can help you out in a pinch.

As ever, you’ll need a steady supply of PokéBalls if you want to catch ‘em all; these again come in three purchasable types (regular PokéBalls, slightly better Great Balls, and even better Ultra Balls), with the Master Ball being a one-of-a-kind, never-fail PokéBall that is best saved for a Legendary Pokémon. You can also find Acorns in trees and, when you give these to Kurt in Azalea Town, he’ll turn them into one of seven new PokéBalls after a day of waiting: Level Balls make catching lower level Pokémon easier, Friend Balls increase a Pokémon’s Happiness stat faster, Lure Balls make it easier to catch Pokémon encounter while fishing, Moon Balls make it easier to catch Pokémon that evolve using a Moon Stone, Heavy Balls are best used against heavier Pokémon, Fast Balls can be useful against Pokémon like Entei and Raikou who like to flee from battle, and Love Balls increase your chances of catching Pokémon of the opposite gender to your own. Like last time, TMs can only be used once, while HMs can only be unlearned using the Move Deleter, and different Pokémon level-up, breed, and hatch at different speeds and at different times of the day; some don’t learn useful moves for some time, others don’t learn any decent moves at all (I’m looking at you, Unown!) or moves that boost their stats, which is useless to me as I prefer to fill my move slots with offensive moves. Some Pokémon also don’t evolve at all, which can lower the incentive on using them as you don’t see as much progression when battling with them, while other Pokémon have abilities like Sweet Scent that can attract wild Pokémon, and you can also have Pokémon hold various mails to send messages to other Trainers you trade with.

Additional Features:
Although Generation two added one-hundred extra Pokémon to the original 151, “only” 223 are actually obtainable within the base Pokémon: Crystal game so you’ll need to trade with Gold, Silver, Red, Blue, and/or Yellow in order to complete the PokéDex and fulfil Professor Oak’s life dream and earn yourself a nifty little certificate for you efforts. A lot of your post-game time and energy will be spent catching, raising, trading, and breeding Pokémon to fulfil this objective, and the day/night cycle and new additions to the gameplay mean you are given far more options to evolve and acquire Pokémon. As mentioned, you can store a limited number of phone numbers on your PokéGear and battle Trainers again when they call you, or travel to Viridian City and make use of the Trainer House to battle either a random challenger or the last human player you fought against, which remains a fun addition, and battles and trades such as this are a great way to extend the life of the game and motivate you to getting your team up to the maximum level. Also, you’ll be spending a lot of time in the Game Corners trying to buy or earn the coins necessary to get those elusive Pokémon and traipsing around Johto trying to lure out the Legendary Beasts, but this generation of Pokémon remains my favourite for its unmatched post-Elite Four content.

Travel to Kanto in the post-game, tackle the Battle Tower, and spawn in a Celebi to catch!

As mentioned, you get to travel to Kanto after becoming the Pokémon League Champion! This, effectively, doubles the timespan of the game but, while Kanto is now populated with much tougher Trainers than before, your team should be more than capable of winning the day. Still, I’ve always loved this feature, and Kanto is notably different, too; towns, caves, and routes have been switched about, new Pokémon are included, and certain areas are either inaccessible or altered, which really shows the flow of time since the last games. You can talk to Red’s mother in Pallet Town, where you find out he took off and hasn’t been seen in years, get the power plant back up and running so you can hop on the Magnet Train, and pay a visit to the new radio tower in Lavender Town, which replaces the haunted Pokémon Tower. Viridian Forest is now gone, as is Cerulean Cave, and Mount Moon is much shorter than before, but I loved seeing Blue installed as the Viridian Gym Leader and just being able to explore this region again and really wish that subsequent Pokémon games had done something similar. Pokémon: Crystal is also notable for being the first game to include the Battle Tower; located just off the coast off Olivine City, this facility lets you battle other Trainers and awards you Vitamins for consecutive victories. Though never really something I’ve enjoyed, the Battle Tower is a fun extra inclusion, and even offers level and Pokémon restrictions to keep you from using Legendary Pokémon. Best of all, though, is that the 3DS version of the game includes the GS Ball event, meaning you can place the GS Ball in a shrine at Ilex Forest to spawn the elusive Celebi and finally, legitimately, catch the little blighter!

The Summary:
I’ll be the first to admit that, when it comes to the second generation of Pokémon games, I’m extremely biased when it comes to these games. For me, this was when Pokémon was at its peak of popularity; we were so desperate to play these new games and so captivated by the new Pokémon and mechanics, and while I’ve enjoyed Pokémon games since these, none of them have quite been able to recapture the magic of Johto. Consequently, it was an absolutely joy to finally play through Pokémon: Crystal; the game is such a massive step up from its predecessors, improving and refining basically everything from the first game and adding much-needed quality of life mechanics like the EXP bar, better item and Pokémon management, and vivid, impressively detailed graphics for such a basic handheld system. The new features offered in this generation were also fantastic; the day/night cycle was a fun little inclusion, one I missed from the Game Boy Advance titles, and adding breeding really helped to speed up PokéDex completion as you could raising Pokémon traditionally whilst also getting in the steps to hatch and egg and get Pokémon to breed all at the same time. Adding the ability to rebattle previous Trainers was great too, though the constant interruptions from phone calls does get annoying; while I love the aesthetic, detail, and colour of the game, I have to admit that Johto doesn’t really stand out all that much and is basically like a reskin of Kanto for the most part, but Pokémon: Crystal adds a few extra bells and whistles to compensate for that. Animating the Pokémon, for starters, really helps to make the game feel much more alive, as do all the additional attacks and battle animations that help the game feel faster, more action-packed, and less like a Tiger Electronics LCD game like in the first generation. Being able to play as a girl was a nice inclusion, as was the attempt to expand on the Legendary Beasts by giving Suicune a larger role, but ultimately these aspects and the rival system weren’t as prominent as they could’ve been. Thankfully, the new Pokémon more than make up for this, with some of my all-time favourites being found in Johto (Ampahros, Lugia, Houndoom, Typhlosion, and Marill, to name a handful), and I loved seeing how the world has changed since the last game. Of course, this is best seen in the still-unmatched post-game content; letting you travel to, explore, and challenge Kanto once more was an ingenious idea and makes the game feel so much bigger than even some of the Nintendo DS titles, which generally settled for the Battle Frontier and little else. Add to that the tough-as-nails battle against Red, the ability to trade to the previous generation, and the addition of Celebi to the game and you have what very well may be the definitive version of classic Pokémon for me.

My Rating:

Rating: 5 out of 5.

Fantastic

Are you a fan of Pokémon: Crystal Version:? How do you think it compares to the original games and which of the second generation titles was your favourite? What did you think to the new mechanics introduced here, like breeding, genders, and the day/night cycle? Did you struggle against Whitney and her Miltank? What did you think to the rival? Did you enjoy getting to revisit Kanto and did you ever capture Entei and Raikou? Which of the Pokémon games, and titular monsters, is your favourite? How are you planning to celebrate National Pokémon Day this year? Whatever your thoughts on Pokémon, sign up to leave them below or drop your comments on my social media and be sure to check in next week for more Pokémon content!

Game Corner [PokéMonth]: Pokémon Yellow Version: Special Pikachu Edition (Nintendo 3DS)


Upon the release of Pokémon: Blue Version and Pokémon: Red Version (Game Freak, 1996), a new craze swept through playgrounds across the world. An entire generation grew up either playing Pokémon, watching the anime, playing the trading card game, and watching the feature-length movies as clever marketing and a co-ordinated release and multimedia strategy saw Nintendo’s newest franchise become not just a successful videogame franchise but a massively lucrative and popular multimedia powerhouse that endures to this day. Accordingly, February 27th is now internationally recognised as “National Pokémon Day”, which I’m expanding to an entire month of Pokémon every Tuesday in February.


Released: 27 February 2016
Originally Released: 12 September 1998
Developer: Nintendo
Original Developer: Game Freak
Also Available For: Game Boy

The Background:
Although I’ve talked about Pokémon quite a bit in the past, a review of one of the classic titles is long overdue. Initially developed as Capsule Monsters, Pokémon was the brainchild of game designer Satoshi Tajiri, who spent his childhood collecting insects and sought to make a videogame around the same subject, one that emphasised exploration and collecting rather than needless violence. It was the legendary Shigeru Miyamoto who suggested producing two GameBoy cartridges to realise Tajiri’s dream of allowing players to trade and battle using the system’s Link Cables. Artist and long-time friend of Tajiri Ken Sugimori spearheaded the designs of the titular Pokémon alongside a handful of others (including Atsuko Nishida) than ten people who conceived the various designs for all 151 Pokémon, and the original Pocket Monsters: Red and Green proved an immediate hit in their native Japan and were soon followed by a third version, Pocket Monsters: Blue, which included upgraded sprites, alternative dialogue, and other gameplay tweaks. This was the version of the game that served as the basis for Pokémon: Blue and Red, which became an instant cultural phenomenon upon release in the West.

Just as Pokémon: Yellow was influenced by the anime, so too did it impact later Pokémon videogames.

For its international release, Pokémon was accompanied by an aggressive multimedia marketing strategy and ancillary merchandise; much of this revolved around franchise mascot Pikachu, who was at the forefront of the still-ongoing anime series, which served as the perfect accompaniment to the videogames. So popular was Pikachu, and the anime, that a fourth version of the game was produced to capitalise on both; Pokémon: Yellow Version not only featured all-new battle sprites and gameplay mechanics, but also contained characters, references, and alterations based on the anime. The game was made to coincide with the franchise’s first feature-length adventure, was the last Game Boy title released for the system outside of Japan, and became the fastest-selling handheld game of all time upon release. Because it was essentially the same highly praised videogame as before, Pokémon: Yellow Version was highly praised; while some questioned its release and viability considering all-new Pokémon games were set to be released, critics noted that the game offered just enough to keep fans and newcomers happy. Pokémon: Yellow Version was pretty influential; the gameplay mechanic of having a Pokémon following the player’s avatar around would return in later titles, the game received a manga adaptation, and it was eventually released on the 3DS Virtual Console with the ability to communicate with the then-current Pokémon titles.

The Plot:
The time has come for you and your childhood rival to receive your very own Pokémon from Professor Oak, However, you arrival too late and are lumbered with a disobedient Pikachu to accompany you as you challenge the eight Kanto Gym Leaders in a bid to become a Pokémon Master. Your journey is also fraught with danger as the vindictive Team Rocket seeks to steal Pokémon for their own nefarious ends, to say nothing of having genetically created the most powerful Pokémon of all!

Gameplay:
Just like its predecessors, Pokémon Yellow Version: Special Pikachu Edition is a top-down role-playing game (RPG) in which players are introduced to the wonderful world of Pokémon by the kindly, if forgetful, Professor Oak. After naming your avatar and your rival, you’re charged with heading out into the Kanto region, exploring fields, caves, and buildings in search of Pokémon, powerful native creatures that are used to trade, raise, and battle with other Pokémon Trainers. If you’ve played Pokémon: Red, Blue, or even Green before, you’ll be immediately familiar with the concept but, even though it lacks the influx of hand-holding and mandatory tutorials of the modern games, Pokémon: Yellow does a good job of introducing you to the context and mechanics of the game and then sending you on your way to figure things out for yourself or find clues by chatting to the many non-playable characters (NPCs) scattered throughout Kanto. Since it released on the Game Boy, Pokémon: Yellow has a very simply two-button control system and user interface; I say “simple” for this latter aspect as it’s both easy to navigate and incredibly restrictive. You can open your bag to view your inventory from the pause screen, and your items will be listed in the order you picked them up; you can shuffle them about using the ‘Select’ button but your inventory is limited, so you’ll need to deposit some items on your PC to make room. Your PC inventory is similarly arranged; everything’s in a list here and there’s no onscreen text to tell you what items do, so it can be a little tricky to navigate and figure things out at times. Gameplay is divided into two distinct modes: exploring towns and other areas, and battling Pokémon. In the former, you wander around on a four-way grid, chatting to NPCs with A, activating switches, and picking up items; if you enter grass, you’re very likely going to trigger an encounter with a wild Pokémon, who also spontaneously attack in caves and when traversing the sea. When this happens, the game switches to a battle screen in which you and your opponent take turns to inflict damage or status effects on each other, or use in-battle items to heal or relieve status effects or try and capture the Pokémon. You also have the option to run, however if the opposing Pokémon is at a higher level than yours or you’re in a Trainer battle this option is either limited or completely restricted.

A diverse team with wide Type coverage is key to besting your opposition and growing stronger.

Pokémon battles operate using a “Type” system that is, essentially, a version of Rock/Paper/Scissors; Water-Type Pokémon will be more effective against Fire-Type Pokémon, for example, while Grass-Types trump Water and are weak to Fire. There are fifteen different Types of Pokémon in the game and each has different capabilities against the other; Normal-Type Pokémon moves won’t have any effect against Ghost-Types and will barely touch Rock-Types, for example. It’s a pretty simple system to figure out and battle text will always tell you if moves are “Super effective” or “Not very effective” so you can figure out the best course of attack; location, Pokémon names, and their colouring and appearance can also clue you in on the best attack strategy, too. So, if you’re in a cave and encounter a Zubat, you’ll probably want to use an Electric- or Rock-Type attack to inflict maximum damage and if the opposing Pokémon is blue or encountered at sea, it’s mostly likely a Water-Type. Unlike in the previous games, you’re forced to start your journey with a Pikachu, one who refuses to stay in its PokéBall and who follows you around on the overworld. You can interact with Pikachu at any time and the game stresses treating it well so that it shows more affection towards you, though unlike in the modern games this has no real in-game benefits and you can just as easily deposit it in a PC and never use it. Having Pikachu is an issue in the early game as your first real challenge is Rock-Type Pokémon Gym Leader Brock, so you’ll need to explore the nearby towns and fields to catch a Fighting- or Grass-Type Pokémon to actually stand a chance against his Pokémon, but the game has a pretty consistent difficulty curve. Early wild Pokémon and Pokémon Trainers are all low-level Pokémon with limited moves, and you’re generally always at an advantage as your Pokémon usually always have higher stats. Pokémon battles will award you with experience points (EXP); earn enough, and your Pokémon will level-up, which will increase their Hit Points (HP), Attack, Defence, Speed, and Special stats and thus make them more powerful and more capable in battle. Unlike in later games, there’s no onscreen indication of your EXP progress unless you manually head into the menu screen, which can make levelling-up a bit of a chore.

Be mindful of the nearest Pokémon center as you’ll need them to heal from battles and status effects.

While you can get pretty far with just one or two powerful Pokémon, it’s recommended that you have a diverse team with decent Type coverage in their moves; many Pokémon can learn moves either from levelling-up or from Technical Machines (TMs) that are of a different Type, so you can have a Water-Type Pokémon bust out Ice- or Psychic-Type moves, which can make them more useful in battles, and you can both swap out your Pokémon to share the EXP gained from battles and earn hidden Effort Value (EV) points by consecutively battling certain Pokémon (so, for example, if you battle a bunch of Geodude in a row, you’ll gain an extra boost to your Defence when you level-up) and you can also find (or purchase, for an extortionate price) Vitamins that will boost individual stats. While it’s important to consider things like this in battle, and the moveset of your diverse team, it’s not always that necessary and is only as complicated as you make it; I usually settle for my starter Pokémon being about ten levels higher than my other Pokémon, then train up the rest in teams of two (usually Water/Fire, Electric/Psychic, and a wild card) to have a consistently strong team. If you walk in front of another Pokémon Trainer, they’ll initiate an inescapable battle with you; in a Trainer battle, you can’t run or catch the opposing Pokémon, and trainers have all the same options as you while not being limited by Power Points (PP). This means that they can swap out their Pokémon, heal or buff them, and they can attack without fear of running out of PP; each move has a different amount of PP, from five to thirty, which dictates how often you can use that move. When you run out of PP, you can’t use that attack anymore until you replenish it with an Elixir or restore your Pokémon at a Pokémon Center; if all your PP is drained, your only option is to “struggle”, which inflicts some serious recoil damage, so it’s wise to use your best moves sparingly. In battle, Pokémon will take damage; when their HP is drained, they’ll faint and need to be revived with a Revive or for free at a Pokémon Center but, if all of your Pokémon faint, you’ll “black out”, lose some money, and respawn at the last Pokémon Center you visited. You also need to be wary of status effects, however; some Pokémon attacks will cause you to flinch (essentially miss a turn) or become confused (which can cause your Pokémon to hurt themselves) and, in this version of the game, have a tendency to miss entirely or land “critical hits” for extra damage, but Pokémon can also be put to sleep, paralysed, poisoned, frozen, and burned, all of which will either drain your HP or leave you vulnerable to attack. You can undo these status effects using certain items, but even if you emerge victorious your Pokémon will still steadily lose health on the overworld if poisoned, so you’ll either need to keep your inventory well stocked or be mindful of the nearest Pokémon Center.

Level-up your Pokémon to evolve them, give them nicknames, or store them in Bill’s PC system.

Winning Trainer battles also nets you PokéDollars, which you can spent in PokéMarts and at vending machines on healing items and other useful gear to help you out in battle or in raising your Pokémon. Items and Pokémon are stored in PCs when you run out of room (you can only have six Pokémon at a time, so any additional Pokémon are automatically transferred to your PC, though you’ll need to heal them if you choose to use them) and the game allows you to manually save your progress at any time (though you only get one save file to use). I recommend saving frequently, and especially before Gym Leader battles or encounters with Legendary Pokémon as this allows you to reset the game on the off-chance that you’re defeated, thus sparing you from losing money. You’re given two primary goals in the game: Battle the eight Gym Leaders to earn their badges and challenge the Pokémon League and complete Professor Oak’s PokéDex, which you do by capturing every Pokémon in the game. When you encounter a Pokémon, its basic data is stored in this encyclopaedia so you can see where it appears on the overworld; you can then hunt it down and catch it and either try to capture its next form or “evolve” it by levelling-up, using special stones, or trading it. The majority of Pokémon will evolve into at least one extra form through levelling-up, which will add their new form’s data to the PokéDex and make them stronger; you can cancel evolution at any time by pressing B and this is sometimes recommended as Pokémon learn moves faster in their weaker forms and some moves can only be learned prior to evolution. Similarly, each Pokémon can only know four moves at a time; when it grows strong enough to learn a new move, you can choose to either replace an existing move or not learn the new one, but you’ll need to visit the Move Deleter to do this outside of levelling-up or to forget Hidden Machine (HM) moves. When you capture a Pokémon, you’re given the option of nicknaming it; again, this doesn’t really do anything beyond personalising them to your Trainer and your characters are limited, but it’s a nice touch for making your team unique.

Side quests, some basic puzzles, and some fun little mini games are on offer to spice things up.

Navigation in Pokémon: Yellow is pretty simple; you can get a town map early on (or view them in Pokémon Centers) that shows you the different towns, locations, and “Routes” you can travel, but your progress is constantly restricted by trees, bodies of water, dark caves, and patches of grass. You can climb ladders to reach different levels of caves, hop over ledges for shortcuts, and get past these obstacles with HMs but you’ll progressively earn more convenient ways to travel across the map. Pokémon like Abra can Teleport you back to the last Pokémon Center you visited, Escape Ropes will allow you to quickly exit any areas you’re in, you’ll acquire a bike that dramatically speeds up your movement speed, and you’ll eventually be able to fly and surf to quickly get around the overworld. Some areas will require some rudimentary puzzle solving, generally involving pressing switches (either hidden ones or by pushing boulders onto them) to open doors, teleporting using special pads, or spinning around in maze-like environments. You’ll also be given some fetch quests to complete that will open up new areas and gift you items, need to acquire keys and tickets to open doors or access locations, and be able to trade (or buy…) with NPCs to acquire new Pokémon. Trading can also be done in Pokémon Centers, which allows you to trade Pokémon with a friend (or battle them, if you like) to get Pokémon that aren’t in the game or evolve certain Pokémon, like Haunter/Gengar. Traded Pokémon level-up faster then regular Pokémon, though you can’t change their nicknames and they’ll always have the Trainer ID of their original Trainer. You also need to be mindful of levelling-up too quickly; if you’re Pokémon is too high a level, and you don’t have the appropriate Badge, they may disobey you by ignoring your commands or loafing around. In addition to the slot machines available to play in the Celadon City Game Corner and the Safari Zone in Fuchsia City (which gives you a time limit to catch rare Pokémonby baiting or angering them), Pokémon: Yellow also adds printer functionality for the Game Boy Printer and a cute little mini game that lets you net points by pulling of mad tricks with your surfing Pikachu!

Graphics and Sound:
Since it released on the original Game Boy, Pokémon: Yellow is pretty limited in terms of its graphics and visual presentation compared to later games in the series, but I think these early Pokémon games still did a really good job of making the most of their limited hardware. While most of the towns don’t really look that different, they vary in size and colour palette and all have a unique music track associated with them; some have larger buildings like the Celadon City Department Store, a science museum, and the haunted Pokémon Tower, while others are flanked by caves, bodies of water, or are literally islands in the middle of the ocean. Towns all contain a number of houses with NPCs to talk to, some of whom will give you hints, items, or side quests to progress further; Routes are sometimes blocked by trees or a sleeping Snorlax, and you’ll find fun elements to interact with, like a Super Nintendo Entertainment Systems (SNES) in your bedroom, Mr. Psychic, and Copycat. Routes are generally littered with Pokémon Trainers, grass, and items to find but some items are hidden from view; you can tap A to pick these up at random but an Itemfinder will help by emitting a beep whenever a hidden item is nearby, and HMs like Cut and Flash will make short work of trees, grass, and dark caves to help you progress.

Though essentially the same game, Pokémon: Yellow is bolstered by a new colour palette and new additions.

Sprites are all pretty adorable as well; while many NPCs all look the same, they have a lot of personality in the things they say and all have an appreciation or some kind of advice to give regarding Pokémon. Your avatar is clearly recognisable despite the limited graphics and colour palette, and you’ll always be able to spot your rival, Gym Leaders, and agents of team Rocket thanks to their unique sprites and accompanying themes. In Pokémon: Yellow, Pikachu is your constant companion, waddling around behind you on the overworld and spitting out a grainy, but ambitious, cry of “Pika!” when thrown into battle. Pikachu has unique entrance and exit animations in battle since it doesn’t use a PokéBall, but otherwise battles remain largely the same; limited animation frames are used to convey the impact of moves on Pokémon and the moves themselves are represented by the screen shaking, flashing lights, and partially animated sprite work that is largely reused over and over. You can actually turn battle animations off in the settings, which speeds the game up a bit, but takes away some of the fun in my opinion; still, the frame rate can struggle a bit at times both in and out of battle, and you’ll find the Pokémon cries are a little distorted because of the hardware. Pokémon: Yellow completely overhauls the in-battle sprites of the Pokémon and adds in numerous influences from the anime in the form of additional NPCs who gift you new Pokémon, Chansey’s being in Pokémon  Centers, and Jesse and James of Team Rocket fame, which helps add a little visual flair to the game but I really don’t care for many of the new battle sprite designs. Finally, all of the jaunty, memorable tunes are here to enjoy in all their chip-tune glory, and the game features a brand new intro video and theme tune as well.

Enemies and Bosses:
As you journey around Kanto, you’ll encounter a variety of wild Pokémon out in the field and in use by a number of different Pokémon Trainers. Wild Pokémon start off at a low level, usually between three and six, and stay at that level in each area; a level four Caterpie you encountered in Viridian Forest will stay level four when you return in the post-game, but wild Pokémon levels increase as you journey to new areas, meaning you’ll face progressively tougher opposition as you go on, which will help you to grow stronger on a rising curve. Your ability to weaken these Pokémon for capture or defeat them entirely is directly tied to your current level and the moves you know; if your Pokémon are under-levelled, you’ll face a tough time even with the Type advantage, but if you bring a Normal-Type into a cave or a Fire-Type to the sea then you may struggle even if you’re at a higher level. This is true of the Pokémon Trainers you encounter; while they start off pretty simple and use weak Pokémon like Rattata and Pidgey, they eventually use more formidable and evolved Pokémon and also have more on hand. They’ll also withdraw them, heal them, or buff them with items and, while the enemy A.I. can be janky and easily exploitable at times, Pokémon Trainers tend to use moves that have a Type advantage over your current Pokémon. Still, with the right training regime and a diverse team, you can easily overcome every opponent you face; simply take some time between Gym battles to level-up, maybe focus on developing certain stats, and bringing your team as close to the level cap as possible, utilising moves that are super effective and sharing EXP wherever you can, and you can easily trample over the opposition once you’ve gotten past the uphill battle at the start of the game.

As if Team Rocket wasn’t bad enough, your asshole rival constantly pops up to challenge you.

Your most persistent foes in the game are the nefarious Team Rocket; easily identifiable by their black attire and caps, this gang of Poké-nappers have taken over buildings and even entire towns in a bid to steal Pokémon for their own evil uses or to acquire technology like the Silph Scope and Master Ball. For the most part, Team Rocket grunts aren’t much different from other Pokémon Trainers you encounter and are actually fairly predictable as they stick to common Pokémon like Zubat and Ekans, but you’ll also have to battle the duo of Jesse and James a few times throughout the story as these buffoons have been added in as sub-boss battles in key areas of the game. Like their anime counterparts, Jesse and James use Koffing/Weezing, Ekans/Arbok, and Meowth in battle and even spout their famous catchphrase, though they’re basically just another grunt to fight past rather than being pivotal to the plot. Another recurring obstacle is your rival; this arrogant and rude little git will pop up at the worst times, challenging you to a battle to prove his superiority over you and changing up his team as the game progresses to show how he’s tried to amass the most powerful Pokémon team possible. Unlike in the previous games, your rival starts off with an Eevee, which he eventually evolves into either Flareon, Jolteon, or Vaporeon (in my case, it was Flareon), and your rival will be both the first Pokémon Trainer you battle and the last as he eventually manages to become the Pokémon League Champion in keeping with his annoying ability to always stay one step ahead of you. While your rival can be a tricky customer, a diverse and high-levelled team can easily fend him off; in my game, he ended up with a team of Sandslash, Alakazam, Exeggutor, Cloyster, Magneton, and Flareon so it’s simply a case of shuffling your team so that your Water-Type goes out first and then swapping out your Pokémon between each knock out so you can hit a super effective move or have a better chance to resisting his attacks. Probably his biggest advantage is speed, as he often has Pokémon that have higher Speed stats, his Type coverage, and his eventually use of Potions and buffs to keep his team going strong but you can overcome him at every turn if you just take the time to do some grinding.

Eight Gyms await you, some with puzzles to solve beforehand, but they’re easily bested with grinding.

In your quest to challenge the Elite Four, you’ll need to travel to at least eight different towns and battle the eight Kanto Gym Leaders. Each Gym Leader specialises in a specific Pokémon Type and is protected by a number of protégés, but some Gyms even include little puzzles that you have to solve. You’ll need to investigate the bins in Lieutenant Surge’s Gym to lower the electrical barrier protecting up, navigate an invisible maze in Koga’s Gym, take an optional quiz in Blane’s Gym, and travel along spinning pads in Giovanni’s Gym. Other times, Gyms will be closed, locked, or otherwise barred and you’ll need to go on a short (or long, in the case of the last Gym) side quest to gain access but, once inside, you can often choose to avoid fighting the minions if you don’t feel like it (but I don’t recommend this as you’ll miss out on some EXP and cash). Since each Gym specialises in a Pokémon Type, the game pushes you to have a diverse team on hand, but you can often find helpful Pokémon in the wild nearby that can counteract the Gym’s specialty. Things start off relatively easily; as long as you can grab a Mankey, you can easily take out Brock, and your Pikachu will absolutely trounce Misty, but things can get difficult when fighting Lt. Surge and his Raichu…unless you’ve been grinding or snagged a Diglett from the nearby cave. By the time you reach Koga, you should be powerful and varied enough to easily overcome every subsequent Gym, though he and Erika can cause issues by inflicting status effects with their Poison- and Grass-Type Pokémon. Blaine can also be tough because of his powerful Arcanine, but you can easily overpower him with a Water-Type if you’ve been training one for a while. Giovanni, the leader of team Rocket who you battle prior to tackling him in his Gym, is heralded as Kanto’s most powerful Gym Leader but, while he has some intimidating Pokémon on hand, his focus on Ground-Type moves means a Water- or Flying-Type can significantly neuter this threat (especially if you snagged Articuno earlier).

The Elite Four are a tough prospect, but bested with smart training, item use, and a diverse team.

Defeating the Gym Leaders nets you not just a big cash payout and their Gym badge, but also a TM that allows you to teach their favourite move to one of your team. You’ll need every one of these Gym Badges, and most of the HMs, to navigate through Victory Road, a cave full of high-level Pokémon (and a great place to level-up your team) that stands as your final challenge before the Elite Four, the most formidable Pokémon Trainers in all of Kanto but, before you can reach them. Thankfully, there’s a makeshift Pokémon Center and PokéMart right before the Elite Four, so you can heal up and buy some restorative items before tackling them, and you’ll probably need these as you have to face all four Trainers in a row, and the champion, without any healing breaks in between, so you’re left with your team and the items you have on you. Lorelei and Bruno don’t really pose much of a problem; focusing on Water- and Ice-Type and Fighting-Type Pokémon respectively, you’re in a great position to overwhelm them with your Pikachu, which should be about level sixty by this point, and an Ice- or Psychic-Type Pokémon like Kadabra or Poliwrath. Agatha is a bit of a hurdle, however; specialising in Ghost-Type Pokémon, her Gengar’s love to confuse you, put you to sleep, and drain your health with their moves, so again it’s helpful to have a strong Psychic-Type Pokémon on you. Lance is probably the most unique challenge in the whole game as he utilises Dragon-Type Pokémon, a Type that you really don’t encounter anywhere else in the game except in the safari Zone. Sporting powerful moves like Thunderbolt, Hyper Beam, Ice Beam, and Dragon Rage, his Dragonairs and Dragonite can be tough to get past unless you have Ice- or Dragon-Type Pokémon or moves of your own, which you definitely will if you snagged Articuno our taught Ice Beam to someone on your team. After you topple the,, and the champion, Professor Oak registers you and your team in the Hall of Champions and you can review this, and any subsequent victories, from your PC after the credits roll.

Four powerful, Legendary Pokémon await you in the game’s toughest areas.

Although you’re given a multitude of opportunities to catch the wild Pokémon encountered in the game, some are much rarer than others. In Mount Moon and the Fighting Dojo, you’ll be given the opportunity to pick from one of two Pokémon (with the former being fossilised and needing to be restored on Cinnabar Island), immediately meaning that you won’t be able to acquire the other without trading. You can win (or buy) Game Coins to purchase rare Pokémon in Celadon City, encounter unique Pokémon like Kangaskhan and Dratini in the Safari Zone, and, while you’ll battle an enraged Marowak, the only way to acquire one is to evolve a Cubone. Similarly, you’ll have just two chances to capture a Snorlax as the bulbous Pokémon block your path in two places, but you’ll only get one chance to catch the three Legendary birds, Articuno, Moltres, and Zapdos. These powerful elemental birds are found in Seafoam Islands, Victory Road, and the Power Plant, respectively, and you absolutely need to save before battling them as they won’t appear again if you knock them out and save after. You’ll also need a hefty supply of PokéBalls, Pokémon moves that inflict paralysis, freezing, or sleep, and a whole lot of luck and patience as the game’s annoying tendency to have balls “miss” can make these battles needlessly frustrating. When trying to catch the bird son this play through, I continuously ran out of Ultra Balls or kept knocking the birds out, but then random managed to catch each within five throws of a weaker Great Ball, so go figure. After besting the Elite Four, Cerulean Cave will open up; this cavernous area is a great place to level-up and find some new items, but is also home to the most powerful Pokémon in the entire game, Mewtwo. This genetically-engineered, Psychic-Type Pokémon can deliver massive damage with Psychic and even heal itself with recover but, while it’s entirely possible to capture it using status effects and Ultra Balls, it’s much easier to simply toss the never-miss, one-throw capture Master Ball at it and add it to your team to wipe out all subsequent challenges.

Power-Ups and Bonuses:
As you explore the wide land of Kanto, you’ll find plenty of pick-ups strewn around, be gifted them from NPCs, or will be able to buy a variety of items from PokéMarts. These include healing items like Potions, Super Potions, and Hyper Potions, restorative items like Revive and Max Revive, and status-healing items like Awakening and Antidote. These are relatively commonplace, though are not widely available across the region; the PokéMart in Pewter City will forever sell the basic PokéBalls and Potions, while only the more expensive items are available in Celadon City and at Victory Road. Other items can also be acquired that can aid you in battle; PokéDolls can help you flee from battle, the likes of X-Defend will boost your stats for that battle, and you can snag a PokéFlute that lets you wake up sleeping Pokémon without having to constantly buy Awakenings. Vitamins and evolutionary stones are far harder to find on the overworld, but can be bought from Celadon City’s Department Store and are great for raising individual stats and quickly evolving Pokémon to their more powerful forms, and you can also fend of random encounters with repels, find Nuggets to sell for cash (and sell most items you find), a Coin Case to play slot machines, and key items like the Itemfinder and EXP All if you capture enough Pokémon to appease Professor Oak’s aide.

Buy, find, or acquire items to boost your abilities, progress the story, and learn new moves.

One of the most common items you’ll need are PokéBalls; these come in three purchasable types (regular PokéBalls, slightly better Great Balls, and even better Ultra Balls) and you’ll need a lot of them to complete your PokéDex, especially as they often miss when tossed at their target. The Master Ball is a one-of-a-kind, never-fail PokéBall that is best saved for Mewtwo, and you’ll also need to plan out exactly how you want to use your TMs as these can only be used once. Some can be bought for Game Coins, but mostly you get one use and that’s it; conversely, HMs can be used multiple times but you’ll need to visit the Move Deleter to unlearn them. As you level-up, your Pokémon will learn new moves, with their most powerful moves becoming available if you put the effort into raising them. Some are harder to evolve than others as they level-up slower or don’t learn decent moves for some time, others mainly learn moves that boost their speed, attack, or defence, which doesn’t help me as I prefer to fill my move slots with attacking moves. Some Pokémon also don’t evolve at all, which can lower the incentive on using them as you don’t see as much progression when using them.

Additional Features:
Of the 151 Pokémon available in this generation, 137 are available to catch or own in Pokémon: Yellow either by evolving or trading in-game. As you play, you can consult with Professor Oak on your progress and he’ll offer feedback and tips for where to catch new Pokémon, and you’ll need the three fishing rods and the HMs to find all the Pokémon available in the game. Even if you catch or evolve everything available, you’ll still need to trade with a copy of Pokémon: Red and/or Blue to complete the PokéDex; although you unfortunately still have no legitimate way to acquire the elusive Mew, you don’t need it to complete the PokéDex and will be gifted with high praise from Professor Oak and even a certificate from the game’s developers. While many of the areas you visit are mandatory, some are optional; you can explore caves to find new Pokémon and shortcuts, bring water to checkpoint guards to make travelling a lot easier, and tackle the Fighting Dojo to earn either Hitmonchan or Hitmonlee. Although there’s no way to battle any of the Pokémon Trainers or Gym Leaders again after you’ve beaten them, the aforementioned Seafoam Islands, Victory Road, and the Power Plant all include diverging paths that lead to one of the Legendary Birds, and you can challenge the Elite Four and the champion over and over again to level your team up to the maximum level and earn big cash to spend in the Game Corner and snag those rare Pokémon and items. You can revisit the Safari Zone as often as you can afford the entry fee and search about for the rare Pokémon found there, and pull off a few glitches to both allow these Pokémon to appear in the overworld and duplicate your items (though you risk corrupting your save file if you do this). Post-game content is primarily focused on completing the PokéDex and travelling to the Cerulean Cave to capture Mewtwo; otherwise, you’ll probably be spending most of your time grinding, capturing, or trading and battling with other players using the online functionality.

The Summary:
It’s been a long time since I played the first generation of Pokémon and it is a little jarring returning to a simpler time before many of the gameplay mechanics and quality of life improvements that were introduced in subsequent games. The core gameplay is still there, and it’s just as simple to get to grips with the mechanics once you get going, but there’s no denying that things are much slower and more aggravating in Pokémon Yellow Version: Special Pikachu Edition. The lack on an in-battle EXP bar, the messy organisation of the PCs and inventory, and not being able to keep track of the Pokémon you’ve caught outside of viewing the PokéDex make things a bit tedious as you’re constantly going back and forth and scrolling between menus (you even need to manually activate HMs rather than the option simply appearing when you press A near objects). Battles are made incredibly frustrating due to the janky A.I. that sees critical hits, confused attacks, missed moves and missed PokéBalls dragging things down, and many of the new artwork for the Pokémon really is incredibly ugly. On the plus side, though, this remains a timeless gaming experience; everything you loved about the first generation of Pokémon is here, plus a little more thanks to the influences from the anime: while it’s annoying that you can’t evolve your Pikachu, it’s cute having it following you around and saying its name and playing the surfing mini game, and I loved seeing Jess and James pop up as opponents (I just wish they had played a bigger role in the narrative). Pokémon Yellow Version: Special Pikachu Edition is certainly the definitive game of the first generation, allowing you to acquire all three of the Kanto starters and offering a variety of Pokémon previously exclusive to its predecessors and even including new layouts for some areas. While subsequent sequels quickly made these first games irrelevant by improving every aspect of the presentation and gameplay, there’s still a lovely hit of nostalgia to be found here and Pokémon Yellow Version: Special Pikachu Edition remains as entertaining now, despite its flaws, as it was back in the day.

My Rating:

Rating: 3 out of 5.

Pretty Good

Did you enjoy Pokémon Yellow Version: Special Pikachu Edition? How do you think it compares to the original games, and which of the first generation titles was your favourite? Did you enjoy having Pikachu as your partner or did you just leave it in a box? Which of the Gym Leaders did you struggle against? Did you nickname your Pokémon and who made it into your final team? Did you ever complete the PokéDex? Which of the Pokémon games, and titular monsters, is your favourite? How are you planning to celebrate National Pokémon Day this year? Whatever your thoughts on Pokémon, sign up to leave them below or drop your comments on my social media and be sure to check in next week for more Pokémon content!

Game Corner [Turtle Tuesday]: TMNT II: Back from the Sewers (Xbox Series X)


Ever since Kevin Eastman and Peter Laird’s Teenage Mutant Ninja Turtles (TMNT) first debuted, the franchise has enjoyed worldwide mainstream success thanks to action figures, cartoons, and videogames. Since I found some free time this December, I decided to spotlight four such videogames every Tuesday of this festival season.


GameCorner

Released: 30 August 2022
Originally Released: 15 November 1991
Developer: Digital Eclipse
Original Developer: Konami
Also Available For: Game Boy, Nintendo Switch, PC, PlayStation 4, PlayStation 5, Xbox One, Xbox Series S

The Background:
In the late-eighties and early-nineties, you’d be hard pressed to find a franchise more popular than Teenage Mutant Ninja Turtles. Known as Teenage Mutant Hero Turtles here in the United Kingdom, the original dark and violent comic books exploded into an incredibly successful cartoon and extensive toy line, and a slew of videogame outings courtesy of developer Konami. Konami’s efforts helped to make the NES a household name here in the UK, produced two of the most beloved titles for arcades and home consoles, and also extended to three handheld titles for Nintendo’s super successful portable, the Game Boy. Building upon the standards set by its predecessor, Back from the Sewers improved upon the visuals despite the obvious limitations of the Game Boy hardware and expanded the gameplay options available to bring the sub-series more in line with its bigger, better 16-bit counterparts. Since a complete physical version of the game is still ridiculously expensive for the quality of the game, I was still glad to see Back from the Sewers included in the 2022 Cowabunga Collection alongside a host of other TMNT games and quality of life features.

The Plot:
The TMNT’s archnemesis, Oroku Saki/The Shredder, returns, now bolstered by the forces of the sinister Krang and kidnaps April O’Neil to get his revenge on the foursome.

Gameplay:
Like its predecessor, Back from the Sewers is a simple sidescrolling action game rather than a traditional arcade style beat-‘em-up. After selecting from three difficulty levels (Easy, Normal, or Hard), you pick one of the four turtles and battle your way from the left side of the screen to right across six stages (referred to as “Acts”). Again, the Game Boy’s limited colour palette means that the turtles are only distinguished by their individual weapons, but they again have different strengths and weaknesses: Leonardo is a bit of an all-rounder, for example, with Raphael having a fast attack but a terrible range. Sadly, the shuriken projectiles are gone; they’re replaced by a sliding kick that I only found a handful of uses for as it often leaves you open to enemy attacks, but you can toss shuriken when using ladders. The buttons have been remapped, with A allowing you to jump (holding it again allows you to get some extra height with a reanimated somersault) and X performing your attack; you can pull off a jumping attack by pressing X in mid-air and the game still allows you to hit back or destroy most incoming projectiles with your attack. Screen transitions are much more involved this time and initiated by climbing ladders but you’ll also clamber along pipes to cross gaps and there is a lot more emphasis on vertical traversal, with you hopping up and down girders and platforms using up and down on the directional pad and A.

The graphics and gameplay have been overhauled to more closely resemble the arcade titles.

The essential gameplay remains mostly unchanged; the screen and hardware limitations mean things are still very restrictive but there are far more influences from the TMNT’s arcade titles (the Foot jump up from manholes and you can fall down the holes, for example). The most obvious of these is in Act 2, which sees you racing along a bridge on a rocket-powered skateboard attacking enemies and dodging barrels, and Act 6, which recreates the classic Sewer Surfin’ level, to say nothing of the inclusion of not one but two traditional elevator sequences in Act 3 and 6. There are also some additional gameplay elements here, such as a race away from a rolling boulder in Act 4, mines being scattered across the ground, bursts of flames and machine gun fire, and jumping to a series of floating platforms in Act 5. Levels are a bit longer and more involved but the game loves to artificially up the difficulty by swarming you with an endless barrage of Mousers and bug ‘bots; these fuckers will pop out from holes in the caves and sewers and from mechanical ports and it can be extremely frustrating trying to fend them all off and back jumps in Act 3’s construction sites. Some stages seem to be on a loop as well, though I think this is just a consequence of the limited hardware, and you’ll still have to avoid the same obstacles like falling hazards and electrical bolts. As before, you can pick a different character between stages and if your health is drained; each turtle has their own health bar, any damage you take carries over to the next Act, and any captured turtle can be rescued in bonus games, with these now taking place upon completion of an Act and seeing you chasing around an enclosed arena to refill your health as much as possible in a short time limit.

Graphics and Sound:
Although Back from the Sewers is still handicapped by the Game Boy’s hardware, it’s an obvious graphic step up over its predecessor right from the start, where it ambitiously recreates the cartoon’s iconic opening sequence, and the game even includes some limited sound bites to punctuate the action. The game’s overall presentation is far more akin to the cartoon than many other TMNT titles as it not only basis its story art on the cartoon but even includes level intros and a pause screen that mimic the show’s episode titles. All of the sprites and environments have been overhauled and are all the better for it; the TMNT are bigger and more detailed, with Leonardo and Raphael now carrying two weapons each and all four having a more detailed idle animation. Although the sprites appear a bit stiffer and more clunky than other TMNT titles, they pull an amusing panic face when running from the aforementioned rock and will be left charred when caught in flames and explosions.

Sprites and environments have been greatly improved, despite the Game Boy’s limitations.

Similarly, the game’s environments are far more detailed than those seen in the previous game; this is evident from the opening Act, which actually provides a level of depth and visual interest to the sewers despite the lack of moving water. This extends to the streets as well, where vehicles and there’s an attempt to showcase some depth to the backgrounds can be seen, and in the overhauled Technodrome which now sports many of the same hazards and features as the arcade versions. While there are only a handful of unique environments, such as a cave and an overused construction site, there is much more to spot in the background, from Splinter working in a pizza parlour, Foot Soldiers hiding behind cover and sliding at you, chain link fences and cityscapes, and holes in the environment leading to sewers and such, though the caves can be a bit of a mess. There are far more enemies onscreen at any one time thanks to those damnable Mouser holes and turrets, and you’ll still get an annoying beep when your health is low, and the ending is even sparser than in the first game. On the plus side, the music is much more varied and there are some fun in-game cinematics, such as Splinter piloting the turtle blimp, and options to move around in a wider area like in the arcade titles once you’re descending down the stairwell.

Enemies and Bosses:
Surprising no one, you’ll primarily be battling against the Shredder’s inexhaustible army of robotic Foot Soldiers; they’ll jump in at you but actually managed to land a hit or two this time with their sliding kicks, dynamite, large projectiles, standing on each other’s shoulders, and firing bazookas at you. As indicated, the Mousers and bug ‘bots return; they might not bite your hand anymore but they are absolutely relentless, spawning so fast and so frequently that it’s hard to fend them off and progress through some stages. Roadkill Rodneys are also back, now firing laser bolts, and the game even includes a handful of mini bosses this time around; a swarm of Foot Soldiers, a Pizza Monster in the sewers, Baxter Stockman’s fly form on a rooftop, and the Game Boy debut of the Rock Warriors in General Traag and Granitor.

Boss are greater in number, strength, and visual appeal this time around.

Each Act naturally concludes with a boss battle; each sports a life bar but they’re all just variations on the boss battles we saw in the last game. Once again, your first test is against Rocksteady; this time, he jumps about while Foot Soldiers drop objects from the windows above and shoots deflectable bullets at you, pausing to laugh and leaving himself open for your attacks. Bebop (and his ridiculously disproportinate head) awaits at the end of the bridge stage, firing out a spread of diamond projectiles and knocking you silly with an uppercut when he’s not hopping all over the place. Krang makes a rare appearance in his little walker at the end of Act 3, stomping about firing rings and raining bombs on the arena, and leaping overhead to try and crush you in a nigh-unavoidable attack. You’ll have rematch with the Shredder at the end of Act 4; this time, he fires an energy wave at you that you can jump over but not duck under, dives at you with a flying kick, and runs from one side of the screen to the other, meaning you’re basically guaranteed to take damage as the window of opportunity to dodge and counterattack is so small. Granitor confronts you in Act 5, rolling about the place and roasting you with his flamethrower, but the additional movement options afforded in this arena help to make this more manageable. When you get to the Technodrome in Act 6, you’ll have to battle General Traag to get inside the machine in a conflict made more troublesome by the 2D pane and the treadmill under foot. The Shredder mutates into his Super Shredder form for the penultimate boss, plodding about and swiping at you, teleporting about the place, and confusing you with a bevvy of duplicates to try and land a sneak attack. Finally, you’ll take on Krang’s android body in the finale; this time, Krang is nice and big and is able to stun you with a ground-shaking stomp, however he’s far weaker than in the last game and much easier to defeat than either of the Shredder fights in this game since you can just jump kick him and run underneath him when he’s jumping in for an attack.

Power-Ups and Bonuses:
As in the last game, your only pick-ups are the odd slice of pizza; these are sometimes carried by enemies and sometimes found floating around the environment, generally before a boss battle, but are noticeably rare and still the only power-up available.

Additional Features:
Back from the Sewers trumps its Game Boy predecessor by including three difficult levels, but it’s still very limited in terms of in-game options. Luckily, the Cowabunga Collection awards a 70G Achievement for completing the game, offers a strategy guide to help with the game’s trickier sections, lets you view the game’s box art and manuals, includes both the Japanese and American versions, and offers various borders and display options (including an LCD display to recreate the Game Boy’s headache-inducing screen). The game also allows you to rewind the game with the Left Bumper and access save states using Right Bumper and you can take advantage of the enhancements to jump to any level you wish and enable infinite lives without fear of missing out on your Achievement.

The Summary:
Undoubtably,Teenage Mutant Ninja Turtles II: Back from the Sewers is a vast improvement over the TMNT’s previous Game Boy title. If the first one was a pretty basic proof of concept, this sequel takes the capabilities of the handheld system and uses them to its advantage to produce a title that’s still very restricted by its hardware but much more akin to a 2D version of its arcade counterparts. While the sprites and animations are still a bit stiff and limited, they’re far more detailed, as are the backgrounds, and I loved how the game included versions of the sidescrolling chase sequences from the arcade games. Placing the bonus game sat the end of Acts was a nice way to break up the monotony and I enjoyed the improved music, cutscenes, and the expanded length; tossing in a few mini bosses also helped and it was just great to have so much to se happening around you. Unfortunately, it’s still not perfect; I don’t mind the loss of a turtle as a life system but the endless swarm of Mousers and bug ‘bots was needlessly frustrating and some of the bosses were almost impossible without full health. The strange loop system and slide kick were also odd inclusions, but the overall presentation was much improved and far more fitting for the license and the standards set by its technically superior counterparts. There are still better games on the Game Boy, and better TMNT videogames, however, but this one is a little bit more worth your time compared to its predecessor.

My Rating:

Rating: 2 out of 5.

Could Be Better

Was Teenage Mutant Ninja Turtles II: Back from the Sewers included in your Game Boy library back in the day? How do you think it compares to the last TMNT Game Boy game? What did you think to the additional elements included from the arcade titles? Were you a fan of the overhauled sprites and backgrounds, and which character was your favourite? What did you think to those Mouser holes and the addition of mini bosses? Do you have any fond memories of the Game Boy? Whatever your thoughts, you can share the, in the comments section below or you can join the discussion on my social media.

Game Corner [Turtle Tuesday]: TMNT: Fall of the Foot Clan (Xbox Series X)


Ever since Kevin Eastman and Peter Laird’s Teenage Mutant Ninja Turtles (TMNT) first debuted, the franchise has enjoyed worldwide mainstream success thanks to action figures, cartoons, and videogames. Since I found some free time this December, I’ve decided to spotlight four such videogames every Tuesday of this festival season.


GameCorner

Released: 30 August 2022
Originally Released: 3 August 1990
Developer: Digital Eclipse
Original Developer: Konami
Also Available For: Game Boy, Nintendo Switch, PC, PlayStation 4, PlayStation 5, Xbox One, Xbox Series S

The Background:
Back in the late-eighties and early-nineties, it was tough to find a franchise more popular than Teenage Mutant Ninja Turtles (or Teenage Mutant Hero Turtles as we knew them in the UK); the Teenage Mutant Ninja Turtles (1987 to 1996) cartoon and extensive toy line saw the “Heroes in a Half-Shell” dominate an entire generation. The TMNT were also prominent videogame characters thanks to the efforts of Konami, which saw them help to make the NES a household name here in the UK and produce two of the most beloved arcade games that also impressed on home consoles back in the day. Not content with their arcade and 8- and 16-bit titles, Konami also produced three handheld titles for Nintendo’s ground-breaking portable console, the Game Boy. Limited by the Game Boy hardware, Fall of the Foot Clan was obviously lacking in many areas and struggled to live up to the standards of its technically superior predecessors, though it was still praised for its ambitious attempt to give fans a portable TMNT experience. With a complete version of the title being pretty expensive for what it is, it was very much appreciated to see it included in the 2022 Cowabunga Collection alongside a host of other TMNT games and quality of life features.

The Plot:
When their archnemesis, Oroku Saki/The Shredder, kidnaps April O’Neil, the TMNT emerge from the sewers to take on the Shredder’s Foot Clan once more.

Gameplay:
Unlike most TMNT videogames at the time, Fall of the Foot Clan is a pretty simplistic sidescrolling action game; you pick from one of the four turtles and travel from left to right across five stages attack enemies with their signature weapons. The TMNT are even more indistinguishable from each other thanks to the Game Boy’s non-existent limited colour palette but are, as ever, identified by their weapons and the reach offered to them. Raphael gets up close and personal with foes with his sai, for example, while Donatello is afforded a greater reach with his longer bo staff, however this is so far the only TMNT game I’ve played that allows you to throw shuriken by default (and an infinite number to boot), thereby affording even the most limited ninja turtle a projectile attack. The controls are as simple as you could want; you press X to jump (and holding the button sees you jumping higher into a somersault) and A to attack. You can attack in mid-air and press down and A to toss your shuriken, but a big mechanic in this game is the ability to swat away most incoming projectiles with your attack, which is almost mandatory given the much smaller screen size of the Game Boy.

A basic sidescroller that mixes up its gameplay with bonus games and mild platforming.

Gameplay is very restrictive and doesn’t really ask all that much of you other than to continue to the right, slashing at enemies as they jump at you, and avoiding the odd level hazard, such as falling blocks, bouncing balls, electrifying obstacles, and spiked ceilings. Here and there you’ll get the option to hop up to a higher level or wade through sewer water; you can destroy barriers to reach bosses, hop on and rush underneath pistons, jump over fire pits, and leap from log to log over a raging river. If your turtle runs out of health, they’ll be “captured” and you’ll have to pick another to tackle the stage again, though you’ll helpfully be placed at the start of the boss battle if you reached that point when you died. One mechanic Fall of the Foot Clan incorporates that separates it from pretty much all of the classic TMNT games is the presence of hidden bonus areas in every stage; these aren’t immediately obvious (though the strategy guide clearly highlights them for your benefit) and allow you to restore your health by guessing the number Master Splinter has in mind, fighting with Krang by eradicating as many stars as possible, or partaking in a bit of target shooting. You’re generally given a few chances to succeed at these but they’re not particularly inspired or fun or easy, though I appreciate the attempt to mix the simplistic gameplay up a bit with these little distractions.

Graphics and Sound:
Naturally, you need to keep expectations low here; not only is Fall of the Foot Clan a Game Boy title, it’s an early game Boy title so it plays things very safe and doesn’t try to throw too much at the player or tax the game engine. The result is enemies leaping at you largely one at a time and barely launching an attack before you take them out in one hit and keeping the amount of onscreen action to a minimum, but there are a surprising number of little details that certainly make it somewhat ambitious. The TMNT don’t have idle animations and Leonardo and Raphael only have one weapon each rather than the usual two, but their weapons move as they walk, and Raphael and Michelangelo even twirl theirs as they plod along. When ensnared by a Roadkill Rodney, you’ll even see your turtle’s skeleton as they’re shocked and they get crushed by pistons and weights as well, all of which are nice little touches I wouldn’t really expect from such a limited title.

Though basic, the graphics and presentation are ambitious at times.

Environments aren’t really anything to shout about; stages are pretty long, consisting of a few different screens and transitioning from different areas as you progress, but there isn’t a great deal of detail in the background in environments like the Technodrome. At the same time, the streets have a bit going on, with graffiti and posters on the walls behind you, and you’re even able to hit a parking meter to use it as a projectile at one point. I also liked seeing the mountains in the background of Stage 4 but easily the most visually interesting stage is Stage 3, which sees you jumping across the backs of trucks and vehicles down a speeding highway. Sprites are all nice and big and certainly capture the essence of the cartoon; the Foot even drive past in a jeep at one point and the classic TMNT theme plays, with the rest of the chip tune soundtrack being very fitting to the franchise and the action. The game’s story is as basic as you could want and is told using some basic text under pretty decent sprite art recreating scenes from the cartoon. Unfortunately, the ending falls a little flat, with the Technodrome just disappearing from frame and the epilogue consisting of a bunch of text, and you’ll be assaulted be an incessant beeping when your health is low, which is always a pain.

Enemies and Bosses:
You’ll never believe it but you’ll primarily be fighting off an endless supply of Foot Soldiers on your short journey; they’ll come jumping in and be reduced to a little explosion before even getting a chance to attack, but they’re capable of tossing darts and bricks at you but are largely disposable. Generic enemies like bats, fish, and anthropomorphic fireballs are also a problem, but the classic TMNT enemies like Mousers and Roadkill Rodneys are also present and capable of chomping on your hand and electrocuting you, respectively. Each stage naturally culminates in a boss battle against five of the TMNT’s most recognisable and popular villains, each of which is afforded a life bar.

Classic TMNT enemies are recreated in the Game Boy’s limited hardware.

The first boss you’ll battle is Rocksteady, who simply wanders across the screen blasting at you from his rifle; Bebop ups the ante by rushing at you in a charge, punching you up close, and firing rings from his pistol, but it’s not exactly a stretch to hop over them, swipe them with your weapon, or toss a shuriken their way. Baxter Stockman attacks in his fly form at the end of the all-too-brief Stage 4; he hovers overhead, firing projectiles at you, and swooping down in a dive, but again you can just jump over him and attack without too much difficulty. In a change of pace, the Shredder is encountered as a penultimate boss rather than the final battle; he can be a bit tricky if you go in with low health, advancing towards you and swiping with his katana before teleporting to safety after. This means that Krang is the game’s final challenge; he emerges in his android body from a transport wall and stomps about, completely immune to your shuriken and trying to kick you in the face. While he’s quite a large target and he likes to jump about, you can again jump over him and attack him and whittle his health down if you stay in a good rhythm.

Power-Ups and Bonuses:
As ever, the TMNT can restore their health by picking up the odd slice of pizza; these are sometimes dropped by enemies and sometimes found floating around the environment, occasionally before a boss battle, but are noticeably infrequent and are the only power-up you’ll find in the game.

Additional Features:
Unlike most TMNT videogames, there’s no two-player option here. In fact, there aren’t any options to speak of in the base game, not even a difficulty mode or any sound options. Thankfully, the Cowabunga Collection remedies that, awarding you a 70G Achievement for completing the game and allowing you to view the game’s box art and manuals, switch between the Japanese and American version, and apply various borders and display options (including an LCD display to recreate the feeling of playing on the Game Boy’s eye-watering screen). The enhancements not only allow you to remove slowdown and sprite flicker, rewind the game with the Left Bumper and access save states using Right Bumper, but you can also choose to practice the bonus games if you want to bump up your health in your next playthrough.

The Summary:
I don’t like to throw too much shade at Game Boy titles, especially early ones, but Teenage Mutant Ninja Turtles: Fall of the Foot Clan really isn’t all that impressive or fun to play through. There are some ambitious and admirable elements here and there, don’t get me wrong; the odd bit of animation, the ability to throw shuriken, the attempt at variety in the stages are all positives and I liked how it did the best it could with the hardware limitations to adapt the aesthetic of the cartoon. However, there’s no denying that this is a far too simple effort to really give it too high a score, especially compared not only to the obviously better arcade and home console TMNT games but also the later Game Boy titles. This feels like a proof of concept to show that a simple sidescrolling action game can be cobbled together with the license rather than an attempt to really try anything too innovative with the platform. Throwing in bonus games was a nice, if frustrating, touch and there was even some call-backs to the superior arcade titles here and there, but the TMNT would definitely be represented far better in subsequent Game Boy games and I can’t see myself going back to this one over the other TMNT games included in the Cowabunga Collection.

My Rating:

Rating: 1 out of 5.

Terrible

Did you have Teenage Mutant Ninja Turtles: Fall of the Foot Clan in your Game Boy library back in the day? What did you think to gameplay and presentation of the game, especially regarding its simple sidescrolling format? Which of the characters was your favourite to play as and which boss was the most exciting for you? Were you able to beat the bonus games? What did you think to the additional features added to the Cowabunga Collection? What’s your favourite Game Boy title? I have a comments section down below where you can share your opinions on the TMNT’s Game Boy debut, or you can start the discussion on my social media.