Story Title: “Hawkeye, The Marksman!” Published: 1 September 1964 Writers: Stan Lee and Larry Lieber Artists: Don Heck and Larry Lieber
The Background: In November 1941, Mort Weisinger and George Papp introduced readers to Oliver Queen/Green Arrow, a crimefighting archer heavily influenced not just by Robin Hood and The Green Archer (Horne, 1940) but who also borrowed more than a few inspirations from Bruce/Wayne/Batman. In perhaps one of the more blatant borrowings from their competitor, Marvel Comics later introduced an archer of their own, Clint Barton/Hawkeye. Created by Stan Lee and Don Heck, Hawkeye was initially portrayed as a villainous character but would soon repent his mercenary ways and go on to not just be a member of the Avengers, but even lead his own off-shoot, the West Coast Avengers. Despite sharing a similar gimmick, Green Arrow and Hawkeye couldn’t be more different in terms of their personalities and status; indeed, while Hawkeye may have been a D-list hero in the grand scheme of Marvel Comics, he was involved in some of their most prominent storylines and became a household name thanks to Jeremy Renner’s portrayal of the character in the Marvel Cinematic Universe. Consequently, for many, the character is one of Marvel’s most relatable and inspirational heroes since he lacks any kind of superpowers and he’s even become a symbol of representation for the deaf community in recent years, and it all started here with his first appearance as an antagonist for ol’ shellhead himself, Tony Stark/Iron Man.
The Review: It’s hard to say definitively, but I’m fairly certain that I’m far more familiar with the exploits of Green Arrow than Hawkeye. To be fair, it’s probably about 50/50; maybe weighted a little more towards Hawkeye as he tends to show up in the Avengers stories I’ve read. I mostly know Hawkeye from his appearances in the first season of the under-rated Iron Man cartoon (1994 to 1996) and from being a playable character in Captain America and the Avengers (Data East, 1991), both of which were firm staples of my childhood. I’m also relatively familiar with his background and characteristics, but have always been somewhat…meh about him. I don’t really care that he’s an archer or that he doesn’t have any superpowers, as plenty of superheroes get by just being regular people with extraordinary gifts, and I’ve never really questioned his capability as an Avenger, I’ve just never had much of an inclination to seek out any of his stories even though I’m a fan of Jeremy Renner’s portrayal of the character in the Marvel Cinematic Universe. Thus, I went into “Hawkeye, The Marksman!” without any real expectations and with an open mind, ready to see how Marvel handled his debut story, which opens with Iron Man heroically saving a factory worker from being doused by molten steel. This story is set during the time when the official line was that Iron Man was Tony Stark’s personal bodyguard, so no one really questions what ol’ shellhead is doing flying about one of Stark’s weapons facilities, but this also means that Harold “Happy” Hogan has no idea that he’s pouring his heart out to Stark himself when he asks Iron Man to grease the wheels with Stark’s secretary, Virginia “Pepper” Potts, to get him a date.
Hawkeye is so jealous of Iron Man that he crafts a costumed identity to earn the respect of the public.
While Stark now has a reputation as a womaniser, at this point he’s reluctant to get serious with any female since he’s entirely dependent on the transistor-powered device permanently grafted to his chest to keep him alive from the deadly shrapnel lodged dangerously close to his heart, and yet he longs for a more intimate relationship with Pepper and can’t help but feel jealous at Happy’s advances towards her. However, when Stark attempts to raise the subject with Pepper, he makes a poor attempt at it and she immediately assumes that he’s asking her out so she readily accepts, much to the heartache of Stark’s faithful footman. Rather than try and explain things to Pepper, or give her the brush off, Stark decides to take her on a date but not to a fancy theatre show or to dinner; instead, he takes her to Coney Island, where an archer known as Hawkeye fails to impress the sceptical crowd with his perfect marksmanship. While Stark is desperately hoping that Pepper doesn’t suggest riding the Tunnel of Love or moving on to a more intimate setting, fate intervenes (as it so often does in Marvel tales) when the Flying Pinwheel suddenly goes out of control, endangering the lives of its passengers. Seeing the crisis, Stark excuses himself with a paper-thin white lie (“I’ve got to call the factory!!”) so he can clamber into his Iron Man suit (which he generally carries around in a briefcase, though the artwork doesn’t show him holding it here…) and save the day, much to the adulation of the crowd. One man who’s not so impressed, however, is Hawkeye; annoyed that the audience dismisses him in favour of Iron Man, he sulks off to a “basement workshop” to put together a garish outfit for himself in order to emulate the Golden Avenger’s reverence as a costumed adventurer. Armed with little more than a quiver full of specially-made arrows and his unmatched marksmanship skills, Hawkeye vows to show up every other masked hero out there even without any superpowers and immediately feels the thrill of swinging across rooftops using his roped arrows and stopping a jewel thief with a perfect shot.
Assumed a thief, Hawkeye falls under Black Widow’s spell and is soon going up against Iron Man.
Unfortunately, Hawkeye’s decision not to deliver a fatal shot to the thief results in the crook getting away and, as the archer is investigating the loot of precious stones the man stole, he’s discovered by the cops and immediately pegged as the perpetrator. Choosing to run rather than waste time explaining himself, Hawkeye is randomly picked up by none other than alluring Russian superspy Natalia Romanova/Black Widow, herself also a recurring femme fatale for Iron Man during this time. Instantly smitten by the captivating spy, Hawkeye willing allows himself to be taken to her luxurious estate, where Black Widow is easily able to charm him into going up against Iron Man in exchange for upgrading his arsenal and the implied promise of winning her over if she’s able to defeat the Avenger. Speaking of whom, Stark’s personal life continues its drama as, when he goes to apologise to Pepper for leaving her high and dry, he finds that she’s soured on him and has finally agreed to date Happy (although she does this purely to make Stark jealous. Poor Happy!) To lure out his foe, Hawkeye easily sneaks into one of Stark’s factories and causes an explosion with one of his trick arrows; sure enough, the Avenger flies in to investigate and is startled when Hawkeye fires at him with arrows laced with a rust-inducing chemical. Realising that the substance is quickly hardening, Iron Man swiftly takes cover and removes his boots and gauntlets (and, as ever, I remain in awe of just how cloth-like Iron Man’s “armour” is). Hawkeye discovers the discarded pieces of Iron Man’s armour and is elated, hoping that analysing them will allow him to learn the Avenger’s secrets and increase his threat ten-fold; while he’s able to escape from the factory unopposed as Stark is frantically (and literally) re-arming himself with spare parts from the facility, it’s not long before Iron Man has tracked the archer down and run him off the road with a blast from his “Power Ray”.
After injuring Black Widow, Hawkeye’s forced to retreat and Iron Man is unable to pursue them.
Since he’s run out of his special rusting arrows, Hawkeye is forced to rely on the rest of his quiver, which Iron Man is easily able to deflect with his magnetic Repulsor Beams. However, realising that his transistors can’t power his weapons forever, Iron Man tries to swoop down and subdue Hawekeye and ends up ensnared in nylon rope strands that restrain him for all of one panel. By the next panel, Iron Man is not only free but crashing into a wooden pier and flinging Hawkeye into the water, which effectively renders the archer unconscious. As the Black Widow looks on with unimpressed disgust, Hawkeye tries one last trick to complete his mission and win over the gratitude of the gorgeous Russian spy: a “Demolition Blast” arrow that he hopes will conquer the Armoured Avenger once and for all. Unfortunately, the arrow simply ricochets off Iron Man’s armoured hide and the resulting energy blast injures the Black Widow with a glancing blow. Grief stricken and aghast at having injured the “only one [he’s] ever loved”, Hawkeye ignores the stunned Iron Man in favour of spiriting the hurt spy to safety on her nearby boat. Thanks to a convenient fog descending, and the fly zone of La Guardia airport, Iron Man is unable to pursue the two and is forced to return to his factory to brood over his complicated social/love life and to wonder where and when his next threat will arise.
The Summary: “Hawkeye, The Marksman!” actually ended up being a pretty decent little Iron Man story. I should also point out that I’m not massively familiar with Iron Man’s comics either, though I’ve read a decent amount thanks to the various Marvel Platinum complications that Marvel have published. Consequently, it was interesting to see Stark portrayed as a conflicted and lovelorn man who desperately wants to confess his love of Pepper but dare not because of his dependence upon his armour to stay alive. It was also interesting seeing him torn between his feelings for her and his loyalty towards Happy; he wants to do the right thing by his friend, however difficult and tragic that is for him personally, but at the same time he willingly takes Pepper to Coney Island on what she naturally assumes is a date since she’s also besotted by him. This paints Stark as a morally grey individual since he could have easily just given Pepper the brush-off, but he’s got eyes for her so of course he wants to spend time with her, though he also doesn’t want to step on his friend’s toes (even though he already did…) so he takes her to the least romantic place he can think of. If anyone looks really bad in all this, though, it’s Pepper; she’s infused with that besotted obsession that was all-too prevalent in comic books of this era so she naturally jumps at the chance to date Stark and then only agrees to go out with Happy because she wants to make Tony jealous.
Although he’s got no superpowers and is easily led astray, Hawkeye proves to be a formidable foe.
Thankfully, all of this is just a brief distraction from the main focus of the narrative, which is the introduction of Hawkeye. Here portrayed as a talented but underappreciated circus marksman, Hawkeye provides an interesting and little-seen glimpse into another side of Marvel’s fictional world. In Marvel Comics, the public are generally very fickle, easily forgetful and emotionally chaotic people who will laud the accolades of the Avengers one minute while hating and fearing Mutants and the likes of Peter Parker/Spider-Man the next while also tuning on them in either positive or negative ways on the flip of a coin. In a world so readily populated by super-powered individuals, what chance does a simple archer have of impressing the crowd? Thus, it’s no surprise that Hawkeye should feel jealous that Iron Man stole his thunder, consciously or not, and it’s somewhat understandable that he chooses to craft a brightly-coloured outfit for himself in order to share in some of the glory afforded to other costumed heroes. Unfortunately, his first tentative attempt at masked heroics ends with him being labelled a thief and then being manipulated by Black Widow; it really doesn’t take much more than a sultry glance and some irresistible charm from Madame Natasha for him to not only join her cause but to fall in love with her at first sight and, very quickly, Hawkeye’s initial plan to usurp his peers has been twisted into battling Iron Man on the urging of his newfound partner. The result is a surprisingly layered character; we don’t learn much about Hawkeye (his name and full origins are a mystery here) except that he craves acknowledgement of his unparalleled skills and is easily manipulated by a pretty face, and yet I find myself completely relating to his plight. While you could argue that he’s a naïve buffoon who allows himself to be manipulated, I see him as angry and misguided and trying to do the right thing but unable to resist the allure of the gorgeous Black Widow. Even more amusing his how completely clueless Iron Man is to all of this; he doesn’t even realise Black Widow is involved in the plot, treats Hawkeye as a mere annoyance, and is more concerned about his personal troubles than the archer’s threat. In the end, this was an entertaining introduction to Marvel’s most famous archer, who would go on to show additional layers to his personality and motivations in subsequent appearances, and I think the main takeaway from this was the tragedy that Hawkeye wished to be a celebrated hero like Iron Man and was quickly and easily led down a darker path mere moments into his debut as a costumed avenger.
My Rating:
⭐⭐⭐
Rating: 3 out of 5.
Pretty Good
Did you read “Hawkeye, The Marksman!” when it was first published? If so, what did you think to it at the time and what were your thoughts on Hawkeye? Did you enjoy his portrayal as a spurned archer looking for adulation or did you find him perhaps a bit corny? What did you think to Stark’s personal drama and did you enjoy Black Widow’s repeated attempts to defeat Iron Man during this time? What are some of your favourite Hawkeye stories and moments? Do you think he’s earned his place as an Avenger or do you find him to be a bit pointless? Whatever your thoughts on Hawkeye, feel free to sign up and leave them below or drop a comment on my social media, and check out my review of his Disney+ series.
Ever since Kevin Eastman and Peter Laird’s Teenage Mutant Ninja Turtles (TMNT) first debuted, the franchise has enjoyed worldwide mainstream success thanks to action figures, cartoons, and videogames. Since I found some free time this December, I’ve decided to spotlight four such videogames every Tuesday of this festival season.
Released: 30 August 2022 Originally Released: 12 May 1989 Developer: Digital Eclipse Original Developer: Konami Also Available For: Amiga, Amstrad CPC, Atari ST, Commodore 64, MS-DOS, MSX, Nintendo Entertainment System (NES), Nintendo Switch, Nintendo Wii, PC, PlayChoice-10, PlayStation 4, PlayStation 5, Xbox One, Xbox Series S, ZX Spectrum
The Background: The Teenage Mutant Ninja Turtles (or Teenage Mutant Hero Turtles here in the UK) were the in thing for kids in the eighties or nineties thanks, largely, to the popularity of the Teenage Mutant Ninja Turtles (1987 to 1996) cartoon and an extensive toy line. A couple of years before Konami brought the “Heroes in a Half-Shell” to the arcades, the developers helped to make the NES a household name here in the UK with this adventure title, produced at a time when videogames (especially those on Nintendo’s ground-breaking platform) were built to last by ramping up their difficulty. Reportedly the first TMNT product to release in Japan, the game suffered from glitches and exploits across all its versions and is often cited as one of the hardest NES games of all time thanks, largely, to it featuring in an early episode of The Angry Video Game Nerd. regardless, the game was a huge success at the time and sold over four million copies worldwide despite mixed reviews, with some praising the controls and graphics and others flagged the lack of polish and recognisable elements from the franchise. Although readily available at the time on a variety of consoles, Teenage Mutant Ninja Turtles has been pretty difficult to come by after being removed from the Wii Shop Channel in 2012, that is until this Cowabunga Collection released for modern consoles alongside a host of other TMNT games and quality of life features.
The Plot: The Turtles are on a mission to retrieve the Life Transformer Gun from their archnemesis, Oroku Saki/The Shredder, who has kidnapped their friends and is terrorising New York City with bombs, ninjas, and his army of robots.
Gameplay: Unlike the vast majority of TMNT videogames, the original NES Teenage Mutant Ninja Turtles title is a 2D, sidescrolling action platformer that allows you to switch between the four titular turtles at any time via the pause screen. Being as it was an NES title, your controls and options are somewhat limited, but also effective; X sees you attacking with your turtle’s signature weapon and A allows you to jump, and you can both hold A for a higher and longer jump and attack while in mid-air or crouching. The TMNT are separated not only by the colour of their bandanas but by the range, speed, and power of their weapons; Donatello has the longest reach and is great for dispatching enemies above or below with his bo staff, for example. He and Raphael also seem to dish out more damage, destroying some enemies in one hit that would take Leonardo and Michelangelo two or three, however Leo and Mike have better options for attack with an arc or a swing. You’ll also comes across a number of secondary weapons with limited ammo, which you can switch to using the Xbox controller’s ‘View’ button and will find some pick-ups that activate automatically to carry you across gaps. Each turtle has their own health bar, and the game “helpfully” alerts you when you’re at low health by emitting a warning wound, so you’ll need to switch between them to get past trickier sections with fire pits and the like. If a turtle’s health is depleted, he’ll be captured and unplayable until found and rescued, though it’s game over if all four are captured.
Navigate through mazes, repetitive areas, and the infamous electric seaweed to rescue your allies.
The game is split into two very distinct sections; the first is a top down overworld, a recreation of New York City and the surrounding district, which is split into six areas that act as the stages of the game. Here, you can wander about, attacking enemies and avoiding larger vehicles such as Roller Cars, carpet-bombing fighter jets, and helicopters with search lights. At one point, you’ll hop into the turtles’ Party Wagon, which allows you to blast at Roller Cars and enemies on the overworld with X, though you’ll need to search for a handful of high-powered missiles to destroy barriers with X and progress further. The second part of the game is the 2D, sidescrolling action stages, which are accessed via manholes placed all over the overworld or by entering certain buildings. These drop you into claustrophobic sewers, aircraft hangers, enemy warehouses, and robot factories and see you navigating past enemies, hazards, and tricky jumps to small blocks or platforms to either progress, find health and pick-ups, rescue a comrade, or access new areas, like the rooftops and caves. Not only to enemies respawn when you leave the screen for just a second, but hazards are numerous; you’ll be stuck on conveyor belts, walking across some smaller gaps and trying to jump across others to tiny blocks, and hopping over spike and lava pits. At some points, you’ll be dumped back onto the outside if you fall while jumping across the rooftops or landing in the raging sewer waters, and you’ll also have to contend with spiked ceilings and instant-kill crushing spiked walls near the end of the game. Easily the game’s most infamous section is encountered pretty early on when, after reaching the damn, you’re given 2:20 to navigate an underwater section full of electrical bolts and electrifying seaweed in search of eight bombs to disarm. While it’s true that this is a difficult section thanks to the unfair hit boxes, the tight time limit, and the labyrinthine nature of the section, it’s made all the easier with the Cowabunga Collection’s rewind feature and you can tank through some of it using well-timed character swaps.
Graphics and Sound: Since it’s an NES title, the graphics are obviously somewhat dated; the top-down sections on the overworld aren’t great, with movement being noticeably clunky, and the game’s reliance on mazes and looping paths can get annoying when you’re stumbling around the airport trying to find the correct path or dodging searchlights in the dark to find the right manhole. The variety in these top-down locations is appreciated, though; you’re in the city, visit a dam, pop along the JFK Airport, and infiltrate the Shredder’s secret base under cover of darkness, and the game opens with a pretty ambitions character introduction screen and is accompanied by some fitting chip tunes to help ease even the most annoying sections, and each stage ends with a rendition of the TMNT theme to punctuate your victory. When you pause the game, you’ll get access to a pretty basic grid-like map that isn’t much help but it’s better than nothing; April O’Neil and Splinter will also offer some limited advice to give you an idea of what you’re looking for or how to defeat the game’s bosses, but these features are stripped from you in the final area as you’re “lost”.
Although limited by the hardware, the game’s fairly distinctive and graphically ambitious.
The 2D sections are where the game shines since you can actually see the TMNT in action, though the actual sprites obviously don’t emote or animate all that much unless they’re being swept away by the current. Mostly, the controls work just fine; you’re generally restricted in your horizontal and vertical movement so it’s rare that you have to make precise jumps but, when you do, they have to be pretty bang-on. Hit boxes are quite big, which is an issue in such close quarters, and backgrounds can be disappointingly bland and repetitive; all that separates one sewer section from another is the amount of brown and green, for example, so it can be easy to get lost, especially in sections that have to warping about trying to find the right exit. Things pick up a bit as you progress, with large background elements being used as static boss sprites, and you can avoid any slowdown or sprite flickering by turning them off with the Cowabunga Collection’s enhancements (though a fair amount still remains, perhaps unavoidably). The game’s story is primarily told through limited text and some art portraits, but the game doesn’t include any credits and it’s a bit cheap how the enemies constantly respawn but the health items and other pick-ups don’t, meaning you sometimes have to backtrack into dangerous areas to restock your health and ammo.
Enemies and Bosses: Considering the source material has a near inexhaustible cast of characters to choose from, Teenage Mutant Ninja Turtles features some truly bizarre and misplaced enemies; I may not be able to remember every TMNT character but I could barely recognise any of the enemies encountered here, with the shuriken-throwing Foot Soldiers and the Mousers being the most familiar for me. There are some really weird baddies here, ones that are far too generic for a TMNT game and sadly symptomatic of this era of gaming; we’ve got robot bugs, spider-like jumpers, flaming men who spit out smaller minions, a large porcupine that shoots spines at you, a big bald asshole with a chainsaw, flying eye drones, this weird blank slate of a humanoid who becomes invulnerable when crouched down, another bald asshole who tosses boomerangs, crawling eyes, giant mutated frogs and fleas, and some truly aggravating Dimension X Troopers who hover about firing lasers right at you, no matter where you are, and always attack in groups! Some of these enemies will act as mini bosses, gaining a health bar and teaching you their attack patterns and such, but most of the time they’ll swarm the screen just to annoy you and screw up your jumps.
You’ll need to defeat TMNT mainstays and a robo-turtle to rescue April and Splinter.
Each stage of the game ends in a boss battle, generally with the life of one of the TMNT’s allies at stake; Bebop goes solo in this game as Rocksteady is holding April hostage, though he attacks in very much the same way as he always does, by charging at you with a head of steam, punching you when you get close, and jumping at you with a kick. It’s pretty simple to stay at the right side of the screen, jumping up to where Rocksteady and April are to avoid Bebop’s limited attacks, and smack him with your weapons. Rocksteady gets in on the action at the end of the warehouse stage and follows very much the same pattern; while April sits all tied up, Rocksteady charges at you with his horn, tries to jump at you, and fires bullets at you. However, you can destroy these projectiles, which is always helpful, and you can absolutely cheese this by hopping on top of the crates on the right-hand side and using Donatello’s crouch attack to defeat him without taking a single hit! When you finally figure out where the rope is and how to get across the rooftops, you’ll find Splinter held hostage by a dark version of Leonardo; this guy attacks exactly as Leo would when you play as him, with sword swipes and such, but draining his health reveals that he was the “Mecaturtle” (not to be confused with Metalhead…) all along. The Mecaturtle hovers about using its rocket boots and fires homing missiles at you, punching when up close, but there’s a lot of room to dodge and land hits.
Bosses get bigger and tougher near the end, though the Shredder’s a bit of a joke.
After fighting through the Shredder’s robot factory, you’ll battle one of the more visually impressive bosses of the game – a giant Mouser that’s rendered as a background element and reminds me of the titular war machine from the original Metal Gear (Konami, 1987). While it looks intimidating, its lack of movement and predictability make this a pretty easy boss; it fires twin laser beams from its eyes that are simple to avoid, the smaller Mousers it drops are easily defeated, and you can easily smash away at the weak point in its mouth using Donatello’s ridiculously long bo staff. Naturally, you’ll eventually make your way to the Technodrome, which also acts as a large, impressive, and formidable boss battle; the humongous machine idles along on its treadmill base, frying you with electrical currents from its front and back spokes and protected by two turrets and an endless supply of Foot Soldiers. You need to fight against the pull of the treadmill, fend off the ninjas, and attack the Technodrome’s giant eye to eventually blow open an entrance, but this is easily the toughest and cheapest boss battle in the game. Once you fight your way through the insanity of the Technodrome, the game ends with a one-on-one encounter with the Shredder; after teleporting in with a burst of lightning, he jumps about the enclosed arena trying to punch you and firing deadly shots from his one-hit-jill de-evolution pistol. However, it’s laughably easy to avoid this and stay out of his way, especially with Donatello, and you can even trap him in a corner using Leo’s rapid sword swings to make short work of the would-be-conqueror.
Power-Ups and Bonuses: As ever, you’ll occasionally find pizza strewn about in the 2D sections to refill either two bars of your health with a slice, four with half a pizza, and the entire bar with a whole pizza. Like all of the game’s items, these are quite rare and hard to track down thanks to the maze-like nature of the levels, and you’ll need to remember to switch to a turtle with low health when you spot one to keep everyone in tip-top condition. You can also find a turtle-face icon that looks like its should be an extra life but actually grants your temporary invincibility and puts you into an awkward frenzy. In one specific area of the game, you’ll also need to track down missiles for the Party Wagon to destroy the barrier son the overworld, though you can just about get by with one load of ten if you plan your route and shots correctly. Areas three and four also hide the rope item, which you’ll need to automatically cross large gaps across rooftops in area four.You can also pick up additional weapons, which you can switch to with the ‘View’ button and which act as projectiles, with each having a limited amount of ammo. Sometimes enemies will drop additional ammo, but mostly you’ll just stumble upon the weapons out in the open in 2D sections and they’re extremely effective, killing many enemies in one hit. You can grab shurikens, tossing either one or a triple-shuriken spread for maximum coverage, a boomerang, and a “kaiai”, which fires out a powerful energy wave.
Additional Features: In a change from most TMNT videogames, there’s no two-player option here; in fact, there aren’t any options to speak of in the base game, not even a difficulty mode or any sound options. Luckily, the Cowabunga Collection remedies that, awarding a 70G Achievement for completing the game and allowing you to view the game’s box art and manuals, switch between the Japanese and American version, and apply various borders and display options. While the enhancements only allow you to remove slowdown and sprite flicker, you can still rewind the game with the Left Bumper and access save states using Right Bumper, and choose to watch the game play itself if that’s your jam.
The Summary: I was actually surprised by how much I enjoyed the TMNT’s first venture onto the NES. It helped that I knew all about some of its more frustrating and obscure moments thanks to watching the Angry Video Game Nerd and the reputation that game as earned over the years online as one of the most difficult NES titles. While the game’s presentation and execution are a bit janky, opting for a restrictive and confusing 2D sidescroller rather than a mindless beat-‘em-up, I liked that each turtle was selectable at any time and shared their own health and weapons. While they all control the same, they’re made unique by their individual weapons, which can be particularly game-breaking in certain situations, and I liked the top-down sections of the game, despite how confusing it can be to navigate at times. What lets the game down is the oddball nature of the enemies on show; it’s almost as if this could’ve been any NES action game as the enemies are decidedly off-brand for the TMNT, and the environments just aren’t detailed or distinctive enough to really make an impact or make best use of the license. The respawning enemies and labyrinthine gameplay certainly add to the game’s difficulty; some of the enemies are needlessly cheap and make it extremely difficult to not take damage. However, I enjoyed the boss battles, especially the presentation of the giant Mouser and the Technodrome, and it’s fun to add a little more depth to the TMNT beyond just repetitively pummelling enemies. Tense, frustrating, and head scratching at times, Teenage Mutant Ninja Turtles has a fair amount of action packed into it for such a limited title and it’s definitely worth checking out, especially with the enhancements offered by the Cowabunga Collection, which definitely reduce the challenge offered by this influential NES title.
My Rating:
⭐⭐⭐
Rating: 3 out of 5.
Pretty Good
Was Teenage Mutant Ninja Turtles a part of your NES library back in the day? What did you think to gameplay and presentation of the game, especially regarding its maze-like aspects? Which of the characters was your favourite to play as and which boss was the most exciting for you? Were you able to make it through the underwater section? What did you think to the additional features added to the Cowabunga Collection? What’s your favourite challenging game from the NES days? I have a comments section down below where you can share your opinions on this classic NES title, or you can start the discussion on my social media.
Released: March 1992 Developer: Electronic Arts Also Available For: Amiga, MS-DOS, Mac OS, Master System, Lynx, Game Gear, Game Boy, SEGA Mega Drive Mini II, Super Nintendo Entertainment System (SNES), PlayStation Portable
A Brief Background: By 15 March 1991, the Gulf War came to an end; after about six months of conflict and thousands left dead, the atrocities of the war would be felt for years to come and, naturally, this meant that Desert Strikecaused some controversy when it was released due to the Gulf War being fresh in people’s minds. Desert Strike was spearheaded by Mike Posehn, who built off the air rescue mechanics of Choplifter (Dan Gorlin, 1982) by incorporating nonlinear, mission-based gameplay in a sandbox environment that eschewed typical videogame mechanics like bosses and power-ups. Inspired by Matchbox toys, Posehn designed the 3D models to resemble toys and programmed the game in such a way that players would be forced to restart if they went off-mission. Several months were spent perfecting the game’s physics and controls, all of which served it well upon release and Desert Strike has been highly praised as one of the Mega Drive’s top titles; reviews praised the graphics, the mission variety, and the strategy involved in tackling missions, though the difficulty curve and its more frustrating moments proved to be a cause of contention. Though many may have forgotten the series in recent years, Desert Strike kicked off a slew of similarly–themedsequels that built and improved upon the original’s formula; I used to play the Amiga version all the time back in the day and knew that the series was a must-buy once I really started collecting for the Mega Drive.
First Impressions: Desert Strike is a top-down, isometric shooter in which players take the controls of an Apache helicopter and undertake a number of missions in a sandbox-like map in the middle of the Gulf Desert. At the start of the game, you can pick from a variety of control and gameplay options: by default, A fires your Hellfire missiles, B fires your Hydra missiles, and C fires your chain gun, but you can customise these to your liking. You can also choose to control the helicopter either from the cockpit (which makes movement a lot easier) from above (which leaves less room for error), or “with momentum” (the default setting, which has the helicopter move more realistically). I chose “from cockpit” and never had any issues with the control scheme; the helicopter is surprisingly manoeuvrable considering you’re essentially flying over a grid, and you can easily reverse away and bank out of firing range if need be. Once you’re happy with your controls, you can pick a co-pilot; while you’ll control the helicopter’s flying and weapons, the co-pilot you choose can greatly impact your gameplay as some cause the winch to jam while others are a bit more trigger happy. From there, you can either start from the game’s first campaign or enter a password to skip ahead to a later level, and you’ll be awarded with one of these codes after successfully completing each campaign. Sadly, despite some pumping tunes blaring during the title sequence and cutscenes, Desert Strike is devoid of in-game music, leaving only the sounds of your helicopter blades and weapons to hold your attention. Each of the campaigns also takes place on the exact same map, though the sand colour changes to indicate a different time of day and you’ll find different buildings, vehicles, and enemy placements in each campaign.
Check your map to identify mission objectives and targets to destroy or POWs to rescue.
While you need to press C on the title screen to view the game’s story, mission debriefing and cutscenes will take place before each campaign (and during the mission when you rescue prisoners of war (POWs) or capture enemy commanders) using large, detailed, and partially animated sprite art and onscreen text. Once you start the campaign, you’ll need to fly from the frigate and to the desert, and right away you’ll see just how large the game map is. You can view the map from the pause menu and use the directional pad to switch between different mission objectives and points of interest on the map, which allows you to easily see where your next target is and what resources you can acquire along the way. You can also view the status of your missions, and get additional information about each one (this tells you how many POWs you need to rescue, or how many targets you need to destroy, in order to clear the mission). The instruction manual stresses that you complete each mission in order; if you don’t destroy the radar dishes first, you’ll encounter greater enemy resistance throughout the campaign, but it’s also advisable to clear out enemies or do some prep work on your way to your next objective (for example, if you’re going to fly past where an enemy spy is hiding, break them out and pick them up before destroying the power plant, then loop past the fuel on your way to taking out a SCUD Launcher). Since onscreen text is limited to warning you when you’re in a danger zone or low on fuel and armour and other situational notifications, you’ll only be able to keep track of your ammo, armour, fuel, lives, current load, and current score from the pause menu. Your helicopter’s chain gun is your weakest weapon, but also holds around a thousand rounds, meaning it’s sometimes better to hang back, angle yourself just right, and use the gun to blow open buildings rather than waste your more powerful missiles. Ammo crates are scattered all over the map, but ammunition is scarce; if you’re too trigger happy, you’ll have a hard (or almost impossible) time destroying the campaign’s bigger targets or tackling more formidable enemy units, like tanks and Rapiers.
Campaigns quickly get very challenging as you’re given a variety of missions to complete.
Your helicopter can take a decent amount of damage, but you’ll be reduced to smouldering wreckage under sustained heavy fire or if you’re not careful and bash into rocks or buildings. You start the game with three lives and, when they’re exhausted, you have to restart the entire campaign over. You can, however, earn additional lives by accumulating a high score or hop back into the later missions using the password system. If you die mid-campaign, you’ll respawn right where you failed but your weapons won’t be replenished after each death. You’ll get a bit of extra fuel, though, but it’s usually not enough to get to one of the handful of fuel drums also scattered across the map. As a result, you really have to think about the best routes and the most efficient way of tackling the missions; fuel, ammo, and armour all need to be considered so you can’t just fly in all guns blazing, and you can only carry six passengers at a time so you’ll need to be mindful of where the nearest landing zone is, too. Resources and passengers are automatically picked up by flying over them, which drops a winch for you to latch onto them. Your helicopter will also land so your co-pilot can get out and rescue targets, which leaves you flying about fending of heavily-armed enemy forces before recovering them, and you also won’t lose fuel when flying over the sea, which is useful in the game’s later campaigns. Missions are generally grouped into two categories: destroying targets and recovering targets. Radar dishes, power stations, airfields, and chemical weapons facilities all need taking out and you’ll need to recover both POWs and enemy commanders to learn the exact location of things like SCUD Launchers or bomb shelters. You’ll be orchestrating jail breaks, rescuing United Nations ambassadors, uncovering and destroying missile silos (before they launch their ordinance), airlifting soldiers from life rafts out in the ocean, and angling yourself just right to stop oil spills as you progress through the game. Practically every target is either defended by or soon reinforced by enemy forces, ranging from soldiers packing both machine guns and rocket launchers to tanks, AAA turrets, mobile Rapier launchers, and even an enemy helicopter in one of the later missions. There are no traditional bosses to speak of, but the more heavy-duty enemy vehicles can easily catch you in a crossfire, especially if you’ve wasted all your best ammo blasting buildings. Things would be a lot easier if you could restock your weapons, fuel, and armour at the frigate but this isn’t an option; rescuinf missing soldiers can restock your armour but resources are so scarce that you’re easily left with no better option than to completely start over since you won’t have the necessary weapons or fuel to continue, making for a challenging gameplay experience
My Progression: I’ve played Desert Strike, and its sequel, before; as mentioned, I had it on the Amiga and I remember borrowing both from friends back in the day, but my memories are a little vague on the specifics. After replaying it on the Mega Drive, though, I can only conclude that my version must have been one of the many Amiga games I had that was cracked, allowing me to play with such benefits as infinite fuel, armour, and ammo as Desert Strike really is one of the most challenging Mega Drive titles I’ve played. Thankfully, it’s not unfair, exactly, just extremely frugal with its fuel, armour, and ammo and you really need to have a plan of attack in mind before taking on your objectives. If you run out of missiles destroying enemy vehicles or targets, you’ll never be able to destroy five out of the six SCUD Launchers before they fire their missiles, for example, so you shouldn’t just blast away willy-nilly or pick up ammo crates unless you need them, and while you do get extra points for destroying other targets and picking up soldiers, it’s best to stay on-task and only attack and rescue those that you need to. All of this is to say that I couldn’t get past the second campaign, and it was only through a great deal of trial and error that I was even able to beat the first campaign (!), which requires you to destroy three radar dishes, take out a power station, destroy some heavily-defended airfields, and then rescue a secret agent from a bunker while fending off enemy forces.
You’ll be hard pressed to take on the game’s later missions even with the level skip passwords.
Campaign two starts out with much of the same, asking you to destroy radar dishes, a power station, and a chemical weapons facility, but the resources are far scarcer are there are a lot more passengers that need picking up between the jail break and SCUD commanders, meaning you’ll be doing a lot of back and forth between landing zones. I was able to achieve all of these objectives except for destroying the SCUD Launchers as I was completely out of missiles by the time they appeared on my map and thus unable to destroy them before they launched their load. Even using the ten lives code didn’t really help here as I kept running out of the resources I needed to complete the campaign, so I used a password to jump ahead to the other campaigns and see how they fared. As you progress, not only do the number and aggression of the enemy forces increase, but so do your mission objectives: Campaign three has you rescuing U.N. ambassadors, destroying a chemical weapons complex, locating and destroying missile silos before they can launch, destroying a power station, blowing a hole in the Madman’s yacht and rescuing his hostages while fending off speedboats, and then protecting your co-pilot as he drives a bus to safety. I believe I died trying to locate the enemy ambassadors, so I tried the final campaign and was similarly met with failure. At first, you only get two objectives: destroy the tanks attacking an oil field and drop some commandos off to take the complex over and stop oil pumping into the sea with well-timed shots, but additional missions pop up soon after, including locating bomb shelters and destroying specific garbage trucks carrying bomb parts, but I was all out of ammo, fuel, and lives before I really got a chance to go any further than that.
Despite the fact that I couldn’t actually complete the game, and barely managed to clear even one campaign, I still really enjoy Desert Strike. While enemies and the game’s speed aren’t exactly action-packed or at a breakneck speed, combat is exhilarating as you need to try and circle around or stay out of firing range to quickly take out enemies or blow open buildings, without catching their attention and to conserve your more powerful weapons. The controls are surprisingly slick, and there’s a lot of little things to see and do in each campaign, from vehicles idling down the road, security checkpoints, POWs fighting with the enemy, enemy fire damaging buildings, and the amount of objectives crammed into each mission is staggering. In fact, there may be almost too much to do, certainly too much for the limited resources available; thus, Desert Strike is a game that involves a lot of strategy and asks that you plan out your route and how you tackle objectives and then restock your weapons, though the developers were really stingy with the fuel, ammo, and armour, which means that this isn’t really a game you can just casually playthrough. Still, it remains an under-rated Mega Drive classic and I’d love to hear your thoughts on Desert Strike down in the comments or on my social media so please feel free to share your memories and opinions and check back in next Saturday for my thoughts on the sequel.
Story Title: “Introducing Captain Marvel!” (or simply just “Capt. Marvel!”) Published: February 1940 Writer: Bill Parker Artists: C.C. Beck
The Background: After DC Comics (then known as National Comics) saw incredible success with their benchmark superheroes, Clark Kent/Superman and Bruce Wayne/Batman, the comic book industry was ripe for a whole slew of new costumed heroes to take the stage. Not wanting to miss out on the action, Fawcett Publications set about establishing their own colourful superheroes, each sporting the powers of Greco-Roman Gods, but it was Ralph Daigh who decided to combine them into one superpowered entity to directly oppose Superman, which he initially dubbed “Captain Thunder”. Taken by the concept, both writer Bill Parker and artist C.C. Beck saw the concept as a chance to tell a story that hearkened back to the folk-tales and myths of old. Initially, Captain Thunder debuted in the pages of a comic published as both Flash Comics and Thrill Comics but, when trademark issues arose concerning all of these names, artist Pete Costanza suggested the alternative name of “Captain Marvelous”, soon shortened to Captain Marvel, and the Big Red Cheese proved to be a massive success when his debut issue sold over 500,000 copies. Sadly, legal issues would continue to dog the character even after Fawcett was absorbed into DC Comics and Captain Marvel started rubbing shoulders with the Man of Steel and the Justice League, creating some confusion about the character’s name since Marvel Comics had since established their own Captain Marvel, leading to the Big Red Cheese often being dubbed “Shazam” instead. Whatever you want to call him, Captain Marvel has quite the legacy; he’s shared his powers with a colourful extended family (including a bumbling uncle and a talking tiger!), clashed with Superman and been involved in some of DC’s biggest crossover and Crisis events, and his phenomenal success on the big screen in 2019 led to not only a sequel and a spin-off but a newfound surge in popularity for the magical man/boy superhero.
The Review: Our story begins with a youngster in a bright red jumper and jeans hanging around outside the city subway trying to sell newspapers. He’s approached by a mysterious man in a black overcoat and fedora and we learn that, despite his clean-cut appearance, the boy is homeless and sleeps in the subway to stay warm. The mystery man bids the lad to follow him into a danky subway tunnel and, naïve as he is, the boy goes along; there, he boards a strangely garish-looking subway car and thinks absolutely nothing of it when he’s transported to an ominous subterranean cavern. Seriously, the boy barely says a word and seems perfectly happy to be whisked away by this darkly-garbed figure to the bowls of the city. His youthful trust (or stupidity, you decide) leads to him entering a vast underground hall where crude, cartoonish carvings of the Seven Deadly Enemies of Man (Pride, Envy, Greed, Hatred, Selfishness, Laziness, and Injustice) adorn the walls of the cavern, which is lit only by flaming torches and home to an enigmatic, heavily bearded old man who sits on a huge marble throne. The old man (who bares more than a passing resemblance to God) introduces himself as Shazam and demonstrates his all-knowing demeanour by identifying the boy as Billy Batson. Even more incredibly, upon speaking his name, Shazam causes a bolt of lighting to fill the cave and the names of six Gods and their attributes to magically appear on the wall behind him: Solomon (wisdom), Hercules (strength), Atlas (stamina), Zeus (power), Achilles (courage), and Mercury (speed).
Naïve Billy is taken to meet Shazam and transformed into a superhuman being!
Shazam explains that he has utilised the powers of these Gods to defend the Earth from the forces of evil for three-thousand years; in that time, he claims to have “seen everything – known everything” and, rather than using his incredible magic to prove this, falls back on a “historama” – a “super-television screen capable of depicting past, present and future events” – to show how Shazam watched as Billy was driven from his childhood home after the death of his parents by his wicked uncle, who sought to get his grubby hands on the money and bonds Billy was willed by his father. This is, apparently, enough of an explanation as to why Shazam brought Billy to his mysterious cave; after battling injustice and cruelty for centuries, Shazam is looking for a successor to carry on his work as “the strongest and mightiest man in the world”, Captain Marvel. Upon speaking the old man’s name, Billy is transformed by a magical lightning bolt into a tall, physically powerful adult male in a bright red costume and fancy side-cape and unquestionably pledges to continue Shazam’s legacy. After Captain Marvel speaks the magic word once more, however, Shazam appears to be crushed under a massive granite block that’s randomly suspended over his head. Okay… Anyway, in a flash of lightning, Billy’s back to his normal self and outside the subway with his newspapers, and left thinking that it was all a dream. The next morning, a couple of no-good gangsters buy one of Billy’s papers to read up on their boss’s handiwork: a madman known as “The Phantom Scientist” has threatened the United States radio system and is demanding $50,000,000 for…something. Suspecting the two, Billy follows the gangsters to “the swanky Skytower apartments” but is turned away by a pushy doorman. He then tries to get word to the radio “head”, Sterling Morris, by dashing into his office after the receptionist tries to shoo him away. Unfortunately, Morris dismisses Billy’s story as hogwash simply because the gangsters are holed up at somewhere as reputable the Skytower apartments.
Captain Marvel disrupts Sivana’s plan and earns his child alter ego a job as a radio reporter.
Undeterred, Billy vows to find the Phantom’s laboratory and even manages to convince Morris to award him a job as a radio announcer if he succeeds in this goal. Since he can’t enter Skytower apartments directly, he takes the elevator to the rooftop of the nearby office building and, deciding that he didn’t dream up his extraordinary encounter the other night after all, transforms to Captain Marvel with his magic word. Captain Marvel easily clears the gap between the two buildings with a mighty leap (like Superman in his first appearance, the Big Red Cheese can’t fly yet) and, in an astounding piece of luck, finds himself right outside of the Phantom’s laboratory. Inside, he learns of the Phantom’s true identity: he’s Sivana, a balding, gnarled little man who operates through a number of hired goons and plans to put an end to any and all radio broadcasts at midnight unless his hefty ransom is paid. Having seen enough, Captain Marvel bursts in, hurling one of Sivana’s men into his complex “radio-silencer” machine, smashing it to smithereens. The other man flees to a private elevator but to no avail; Captain Marvel rips the door from its hinges and then hauls the elevator up with his incredible strength, laying the goon out with a wallop to the back of his head. With the mooks tied up, Captain Marvel addresses Sivana directly using the mad scientist’s gigantic television screen, with both vowing to confront each other again…though only Captain Marvel delivers a death threat to the odd little madman. With Sivana’s plan thwarted, Captain Marvel turns back to Billy and calls Morris over; though perplexed, Morris is suitably impressed by Billy’s actions and the plucky boy earns himself a job as a radio reporter, while also vowing to continue fighting the good fight as Captain Marvel!
The Summary: I’ve not read much of Captain Marvel. I think the only solo stuff of his I’ve read prior to this was the initial Power of Shazam (Ordway, et al, 1995 to 1999) run. Other than that, he’s rarely cropped up in other DC stories and crossovers I’ve read, but I’ve always wanted to read a little more from the character as I find him pretty interesting as a source of wish fulfilment. What kid hasn’t wanted to become a superhero, after all, and the idea of a homeless little boy suddenly being able to transform into a literal superman has a great deal of appeal. As ever with Captain Marvel’s stories, the art is of a slightly different calibre to his contemporaries, favouring a more whimsical and cartoonish style that, for all the colour and pop-art appeal, really falls flat when it comes to portraying backgrounds and environments. Shazam’s cave, for example, is quite poorly rendered compared to the other, more realistic locations. C.C. Beck shines in rendering facial expressions, his work being very reminiscent of pulp stories and characters like Samuel Bradley/Sam Bradley, and he even brings to like quasi-science-fiction elements like Sivana’s technology in adorable detail that is perfectly in keeping with the technology of the time, but just a touch more fanciful but not in a way that’s needlessly overdesigned like some of Jack Kirby’s work.
Captain Marvel impresses, despite some narrative hiccups in his debut story.
Narratively, Captain Marvel’s debut is a bit wonky, however. We don’t really get to learn much about Billy beyond what Shazam shows us with his “historama” and it’s really odd that he so willingly went along with the dark stranger. Who even was that, anyway? He just disappeared once they got to Shazam’s cave and there was no real explanation behind him. I think having it be Shazam himself might’ve been a little better, but it kind of made Billy look like a naïve fool. His reaction to meeting Shazam is also very one-sided in the old man’s favour; Billy questions none of it, instantly accepts his new mission, and yet doesn’t even explore his superpowers since he dismisses it all as a dream. He has some pep to him, I’ll give him that, in the way he barges in to see Morris and hoodwinks the guy into giving him a job, but there’s not much to Billy and no personality shift between the boy and his superpowered alter ego. Captain Marvel himself looks great, but we don’t really see many of his powers on show; he does a leap, tosses some goons around, and that’s it, so he’s hardly on par with Superman in terms of abilities in the context of this issue. Sivana’s plot was also a bit low-key; I mean, disrupting radio stations for money? Is that really the best he can come up with? Overall, though, I did enjoy it, even if the narrative is a bit scattered and questionable; I definitely think subsequent retellings and revisions have made Captain Marvel’s origin and personality more interesting and diverse, though.
My Rating:
⭐⭐⭐
Rating: 3 out of 5.
Pretty Good
Were you a fan of Captain Marvel’s debut story? What did you think Billy’s presentation and the depiction of his first meeting with Shazam? Were you impressed by Captain Marvel’s powers and costume? What did you think to Sivana’s threat? Which of the Captain Marvel family is your favourite? What are some of your favourite Captain Marvel stories and moments? Whatever your thoughts Captain Marvel, feel free to leave them below or drop a comment on my social media.
Released: 11 November 2022 Director: Ryan Coogler Distributor: Walt Disney Studios Motion Pictures Budget: $250 million Stars: Letitia Wright, Tenoch Huerta, Angela Bassett, Danai Gurira, Lupita Nyong’o, Winston Duke, Dominique Thorne, and Martin Freeman
The Plot: With Wakanda in mourning after the tragic death of their beloved monarch, T’Challa/The Black Panther (Chadwick Boseman), Princess Shuri (Wright) is forced to step into the unlikely role of ruler and protector when her nation is threatened by their imperious K’uk’ulkan, Namor (Huerta), who wishes to wipe out the surface world.
The Review: Like many, if not all of us, I was stunned to learn of Chadwick’s passing in 2020; it really did come out of nowhere and raised some uncomfortable questions about the future for the character of the Black Panther. Obviously, real world tragedies like this are more important than any fictional narrative but it was still a difficult situation for the MCU to address; a recast could anger Chadwick’s fans, ignoring his passing could be seen as disrespectful, and the question of whether anyone would accept a new character taking on the Black Panther mantle led to some pretty despicable shows of toxic masculinity across the internet despite the fact that Shuri has adopted the role in the source material. Personally, as much as I enjoyed Black Panther (Coogler, 2018), it almost felt as though it might be best to downplay Wakanda’s influence in the MCU going forward; perhaps merge any future stories into other movies, such as their upcoming Fantastic Four reboot, since the situation was so delicate. Instead, the decision was made to forge ahead and immortalise Chadwick’s legacy with a celebration of his life and to allow every involved, the creators, characters, actors, and the audience, to commemorate his life and mourn his loss collectively in this sequel. Even with this in mind, I was very surprised to see the film open on the eve of T’Challa’s death not long after the events of Avengers: Endgame(Russo and Russo, 2019); like the late Chadwick, T’Challa was stricken by a fatal illness and suffered in silence, with his condition being discovered far too late for Shuri’s advanced technology to be of any help. Indeed, she was so desperate to try and artificially recreate the mystical heart-shaped herb to cure her brother than she spent all her time in her lab and even prayed to the panther god Bast for help, only to be devastated to learn of T’Challa’s untimely passing despite her best efforts.
Wakanda mourns their loss, but none feel T’Challa’s passing more so than Queen Ramonda and Shuri.
The entire nation of Wakanda was united in mourning for their fallen king and protector; Wakanda’s traditions teach that death is simply the first step on a great journey in the afterlife, a belief that brings little solace to Shuri. With one foot planted in science and the other in spirituality, she’s conflicted over the loss, finding little comfort in the assertions of her mother, Queen Ramonda (Bassett), that T’Challa lives on in spirit around them. Instead, she’s abandoned her efforts to recreate the heart-shaped herb, believing that it and the symbol of the Black Panther are relics of the past that should be laid to rest with her brother, and has been busying herself crafting new weapons and technology for Wakanda’s all-female army, the Dora Milaje, much to the chagrin of her mother and General Okoye (Gurira). In the wake of T’Challa’s death, Queen Ramonda has had to forge on as Wakanda’s sovereign ruler; though the tribes of Wakanda are fully united and behind her, with even the hulking M’Baku (Duke) and his Jabari tribe now represented on the council, Wakanda has come under fire from the United Nations as the world’s superpowers begin to feel threatened by Wakanda’s advanced technology and exclusive access to Vibranium. Although T’Challa opened Wakanda’s borders and established a number of outreach centres across the glove to help oppressed and struggling people, Queen Ramonda resolutely promises swift and aggressive retribution against any party or nation that tries to take Wakanda’s resources (especially their Vibranium) by force, upsetting the geo-political perception of the nation and putting Wakanda at risk of all-out war.
Shuri forges new relationships to work through her grief, including protecting Riri from Namor.
Of all the returning characters, Shuri obviously receives the most obvious growth; in the first film, she was an outspoken rebel, as arrogant in her scientific acumen as Anthony “Tony” Stark/Iron Man (Robert Downey Jr.) and who openly mocked Wakanda’s traditions. Now, she’s a broken young woman struggling with a burning desire for vengeance; grief is consuming her and has hardened her demeanour, yet her moral integrity is strong enough to oppose Namor’s desire to kill scientific prodigy Riri Williams (Thorne) after she creates a machine capable of detecting Vibranium, purely on a whim, and threatens to expose the lost underwater nation of Talokan to the world. Although clearly wanting to be seen as an intimidating figure, Namor makes an effort to appeal to Shuri, bringing her to the depths of Talokan and sharing both his backstory and some of the history of his aquatic people. Believing he’s found a kindred spirit in Shuri and that she will join him in launching a pre-emptive strike against the surface world, Namor proposes an alliance while both threatening Riri’s life and promising that Talokan’s superpowered forces, further empowered by their own Vibranium weapons, are no match for Wakanda. Ultimately, Shuri chooses to protect Riri, who meant no harm and poses no threat to anyone, incurring Namor’s wrath; his attack upon Wakanda sees the capital city partially flooded, eventually evacuated, and leaves untold numbers dead, including Queen Ramonda. With this act, Namor only further stokes the raging fire burning within Shuri; having literally lost her entire family, she now finds herself promoted to sovereign ruler and having to live up to expectations that were never asked of her before, and is finally compelled to continue her research into the heart-shaped herb so that the Black Panther can live again and give her the means to take her revenge upon Namor.
In addition to fleshing out returning characters, the film introduces a new child prodigy to the MCU.
T’Challa’s passing means a greater focus on Wakanda’s supporting characters; as mentioned, M’Baku and the Jabari are now fully integrated into Wakanda society, though he remains a proud and outspoken man mountain. He’s given greater depth, however, by him assuming the role of Shuri’s protector and confidante; charged by T’Challa with providing Shuri with council, he urges her to embrace her role as Wakanda’s leader and protector while also warning against provoking endless war against Talokan and killing their God-king since this would set not only her down a self-destructive path but bring ruin to their homeland. The stoic and implacable Okoye is equally devastated by her king’s passing; as loyal as ever, she convinces Queen Ramonda to allow Shuri to accompany her to Cambridge, Massachusetts to intercept Riri, only to end up being disgraced and discharged from her duties after failing to protect them from Namor’s forces. Despite her resistance to utilising Shuri’s technology, Okoye upgrades to a superhero persona of her own by the end of the film as she and fellow Dora Milaje Aneka (Michaela Coel) make use of Shuri’s “Midnight Angel” armour in the final battle against the Talokan warriors. While Riri’s involvement in the movie is somewhat akin to the introduction of Peter Parker/Spider-Man (Tom Holland) to the MCU and has more than a few parallels to Iron Man’s origin, she quickly forms a bond with Shuri, Okoye, and Nakia (Nyong’o), with the four being united in their grief and common enemy. Since the first movie, Nakia has left Wakanda and become a schoolteacher; the pain of T’Challa’s passing was too great for her to attend his funeral, but she readily agrees to rescue Shuri and Riri from the outskirts of Talokan after Okoye’s dismissal. Everett K. Ross (Freeman) of the Central Intelligence Agency (CIA) also returns in a small role as an outside ally to Wakanda; with the United States legitimately considering going to war with Wakanda over their Vibranium, he tries to convince the Secretary of State (Richard Schiff) and CIA director Valentina Allegra de Fontaine (Julia Louis-Dreyfus) of the Talokan plot only to be arrested on charges of treason by Valentina, who’s revealed to be his ex-wife, further placing him in Wakanda’s debt. Ross is right to be concerned; Talokan is a serious threat not just to Wakanda but to the entire world. Their people’s origins are as seeped in mysticism as the Wakandans, with their ancestors being directed to the same heart-shaped herb by divine intervention, however this one was found near an underwater deposit of Vibranium and thus mutated the Talokan into a water-dwelling species.
While his enforcers aren’t very memorable, Namor is a complex and alluring anti-hero.
Establishing a fully functional city deep beneath the ocean, one seeped in Mesoamerica traditions and aesthetics, the Talokan have been ruled for centuries by their God-king, Namor, whom they refer to as “K’uk’ulkan” (or “Feathered Serpent God”). Born a Mutant, able to fly thanks to wings on his ankles and drawing both superhuman strength and oxygen from the water directly through his skin, Namor is the child of two worlds but has absolutely no love for the surface world. After witnessing first-hand the aggression of colonisers and invaders, he has prepared a dedicated and formidable water-dwelling army to strike back against humanity before they can even think about trying to raid Talokan’s depths for their resources and Vibranium. Although charming, alluring individual who makes intelligent and persuasive arguments, Namor is nonetheless an aggressive and driven warrior who’s willing to threaten not just Wakanda but also Riri’s life since he doesn’t want her creating any more machines that could expose Talokan. While the Talokans are far more tribalistic in their ways and strategies, they’re no less dangerous; they’re capable of luring targets to their deaths with a hypnotic siren’s song, boast superhuman strength and speed and Vibranium weapons, employ destructive concussive water grenades, and can both command water and travel through the sea on whales. Namor’s chief enforcers are Namora (Mabel Cadena) and Attuma (Alex Livinalli), two characters with little personality or development beyond forging a rivalry with Nakia and Okoye, respectively, but I can forgive this as the film rightfully forces on fleshing out Namor’s character. He’s a very layered antagonist, assuming more of an anti-hero role since he fights to protect his people and prove Talokan’s strength rather than simply for sheer bloodlust but, as understandable as his motives are, he still strikes a devastating blow against Wakanda and Shuri when both were already struggling with their grief and comes very close to sparking a global conflict.
The Nitty-Gritty: As you might expect, a major theme in Black Panther: Wakanda Forever is grief. Although Wakanda celebrates death and makes a big exhibition about honouring T’Challa and seeing him off to the Ancestral Plain in glorious fashion, it’s of little comfort to Shuri. Even Queen Ramonda and Okoye, who staunchly uphold the traditions and beliefs of Wakanda to the letter, after clearly shaken by their loss, and the pain was so great that it drove Nakia away from her homeland for six years. Since she’s a scientist first and foremost, Shuri struggles to find the same comfort in her spiritualism as her mother and isn’t ready to let go of her pain, fearing that it would mean forgetting her brother or lead her to resent the entire world in her grief. Although she’s putting on the face of a strong leader, Queen Ramonda has been deeply affected by the loss of her husband and child; when Okoye delivers news that Shuri has been lost as well, the queen launches into an emotional outburst while stripping the general of her duties, showing just how deep her pain runs. Shuri’s own pain is only exacerbated by her mother’s death; although she was awestruck by Talokan and felt a kinship with Namor’s tragic childhood, she resorts to pure, unbridled vengeance after he attacks Wakanda. Her determination to see Namor dead unsettles even M’Baku, who is resolutely against killing Namor and risking a lifetime of war against Talokan’s formidable forces, yet Shuri is able to convince…no, demand…his loyalty and assistance by finally asserting herself as Wakanda’s leader and protector, showing just how far her character has grown given the hardships she’s suffered.
Namor and the Talokan deliver some of the film’s most impressive visuals and action sequences.
Black Panther impressed with its picturesque beauty and its sequel is certainly no slouch in this department; Wakanda is bathed in the red-orange glow of dusk and bustling with celebrations and tributes to their fallen king, with new aspects of their culture being highlighted as a result of this loss. Their technological acumen remains as advanced as ever; Shuri now has the capability of replicating organic life, eventually extracting the essence of the heart-shaped herb from Namor’s bracelet to repopulate the flower, and has become far more reliant on her interactive artificial intelligence, Griot (Trevor Noah), in creating new weapons and tools for her people. Riri holds her own in this area as well; like Stark, he’s able to cobble together unimaginably advanced tech from spare parts and her own initiative, building not only a machine that can detect Vibranium but also a fully-functioning (if crude) Iron Man-esque suit for herself. Astounded by the resources on offer in Wakanda, she’s able to create a much more impressive armoured suit, one that’s sleek and aerodynamic and gives her the tools to play and active role in the finale but is inexplicably taken from her by Shuri so that Riri can rediscover her origins in her upcoming Disney+ spin–off. However, as impressive as all this is, one of Black Panther: Wakanda Forever’s primary goals is on establishing the underwater nation and race of Talokan. Their city, which is reminiscent of Mayan architecture and society, is hidden deep beneath the ocean depths; unlike Aquaman’s (Wan, 2018) elaborate and fantastical representation of Atlantis, Talokan is dark, devoid of tangible gravity, and is seeped in a tribalistic mentality the sees them worship the seemingly ageless Namor like a God. Namor brings light to his kingdom through an artificial sun, has equipped them with the tools to pose a significant threat to surface dwellers, and reveals in this worship, sporting ceremonial beads and pieces of armour, comprised of Vibranium, to cut an intimidating figure. While his race is depicted with blue skin on the surface, speaking in an ancient dialect and utilising special masks to breath out of the water, Namor is freely able to come and go as he pleases and speaks a variety of languages. Namor also delivers some of the film’s best action sequences; while the majority of the action is centred on wide-scale conflict between Wakanda and Talokan, Namor darts around the sky in a really unique way, cutting through bodies and vehicles alike and is both touted, and presented, as an incredibly formidable superhuman force against which Wakanda’s armies potentially stand now chance.
Ultimately, Shuri assumes her brother’s role and leads Wakanda against the Talokan forces.
This is, of course, unless Shuri is able to synthesise the heart-shaped herb; since all of Wakanda’s supply was torched by N’Jadaka/Erik Stevens/ Killmonger (Michael B. Jordan) in the last film, their enhancing properties and the mantle of the Black Panther had remained dormant as Shuri has focused on other things. Namor’s threat leads her to finally making a breakthrough and, as Wakanda’s ruler, drinking the herb’s liquid to enter the Ancestral Plane. There, rather than meeting with her beloved family, she has an emotional confrontation with Killmonger’s spirit as he tries to foster the rage building inside of her. Indeed, upon assuming he mantle of the Black Panther, Shuri is hellbent on drawing Namor out, weakening him with intense heat, and battling him to the death to make him pay for killing her mother and endangering her people. Despite showcasing a superhuman agility and a multitude of technological armaments built into her nanotech Black Panther suit, Shuri is no match for Namor one-on-one so she works with Riri not only to perfect her Ironheart armour but also to trap Namor in a super-heated prison that will sap his strength and even the odds. While her allies battle the Talokans in the middle of the Atlantic Ocean, Namor and the Black Panther have a brutal fight in the sweltering desert that leaves the K’uk’ulkan severely dehydrated and scarred by Shuri’s talons and the young princess impaled on a pole. Through sheer force of will, she’s able to free herself, sever (or, at least, severely wound) one of Namor’s ankle wings, and force him to yield after catching him in a burst of jet flame. Queen Ramonda’s spirit is able to calm Shuri’s rage and convince her to show Namor mercy and the conflict comes to an end; however, while Namora expresses disappointment in Namor’s surrender, he insists that it’s all part of a larger plan to allow Talokan with Wakanda for an inevitable conflict against the surface world and the question of Wakanda’s position within the geo-political climate is left up for debate. Although Shuri appears to step away from her role as Wakanda’s ruler, she finally achieves a measure of peace, burning her ceremonial funeral garments and discovering a lifeline to her lost family in the surprising appearance of Nakia and T’Challa’s young son, Toussaint/T’Challa (Divine Love Konadu-Sun) and having forged new relationships with both Everett Ross and Riri Williams and a newfound level of respect for the likes of Okoye and M’Baku.
The Summary: Black Panther: Wakanda Forever had an unenviable task; not only did it have to follow up one of the most influential and well-regarded superhero movies of all time, but it had to tackle the tragic passing of its star actor. Fittingly, the film is dedicated to Chadwick and the first part, especially, is focused on giving him a celebratory send off and allowing us to all collective mourn his passing. It’s a tall order to ask anyone, man or woman (or otherwise), to fill his shoes and I think there’s always going to be that cloud of trepidation surrounding the character going forward, but the film did a really good job of exploring that journey and those emotions through Shuri. Her development into a much more hardened and well-rounded character was great to see, and hit a lot of similar beats to T’Challa’s journey in the MCU with her learning to work past her personal grief and rage for a greater cause. The film also nicely established that the MCU can continue trucking along quite nicely by building up secondary characters; increasing the prominence of the likes of Okoye and M’Baku gives Shuri a strong support network and introducing new characters lie Riri Williams continues to expand the MCU, even if her role could’ve easily been cut from the film without impacting the narrative all that much. For me, though, the true highlight was Namor; I loved the changes they made to his backstory and how multifaceted his character and motivations were. He continues the staple of having more human and understandable villains who are more shades of grey than purely black or white and added another new visual flair to the already jam-packed variety of the MCU not just in his appearance and portrayal but in the presentation of Talokan. I think we’ll come to find Black Panther: Wakanda Forever one of the most pivotal MCU films going forward, not just for establishing these new characters but also for the way it alters the existing lore; big things are clearly brewing, and I think this will be where that all links back to. Overall, this was an enjoyable experience; it was a tasteful tribute to Chadwick and treated his memory with dignity and respect while actually tackling the subject of death head-on in a way most superhero films simply gloss over.
My Rating:
⭐⭐⭐⭐
Rating: 4 out of 5.
Great Stuff
Did you enjoy Black Panther: Wakanda Forever? What did you think to the way it handled Chadwick Boseman’s passing? Were you happy to see Shuri step into the title role or would you have preferred a different character take up the mantle? What did you think to Namor, the changes made to him and the presentation of his culture and abilities? Where would you like to see Wakanda go in the future? What do you think to the building intrigue surrounding Valentina Allegra de Fontaine? Whatever you think about Black Panther: Wakanda Forever, feel free to share your thoughts and memories of Chadwick Boseman in the comments below or on my social media.
The Date: 18 November 2001 The Venue: Greensboro Coliseum Complex; Greensboro, North Carolina The Commentary: Gorilla Monsoon and Jesse “The Body” Ventura The Referee: Joey Marella The Stipulation: Ten-man elimination tag team match The Competitors: Team Hogan (WWF Champion Hulk Hogan, Bam Bam Bigelow, Don “The Rock” Muraco, Ken Patera, and “Mr. Wonderful” Paul Orndorff), Team André (André the Giant, “The Natural” Butch Reed, King Kong Bundy, One Man Gang, and “Ravishing” Rick Rude)
The Build-Up: Over its many decades as the dominating force in sports entertainment, World Wrestling Entertainment (WWE) has been known for creating some of the industry’s most successful competitors, changing the face of pay-per-view entertainment, and delivering genre-defining match types and wrestling cards. In 1987, the World Wrestling Federation (WWF, as it was known then) had taken their first step towards global domination with the successful gamble that was WrestleMania, a pay-per-view showcase of their greatest talent that brought the organisation into the mainstream with celebrity cameos. With the National Wrestling Alliance (NWA) due to broadcast their Starrcade event over the Thanksgiving weekend, WWF chairman Vince McMahon add the Survivor Series event to the WWF’s calendar and strong-armed many cable companies into showing his event instead of Starrcade or risk losing out on WrestleMania IV. The entire event was comprised of four ten-man elimination tag team matches, with the main event pitting WWF Champion Hulk Hogan and his team against bitter rival André the Giant and his team of bad guys (or “heels”). The motivation behind the two forming teams and squaring off came from André’s heel turn earlier that year, which saw him memorably challenge the Hulkster at WrestleMania III only to be planted with an iconic body slam. Since André was managed by one of wrestling’s greatest heel managers, Bobby “The Brain” Heenan, it made sense for him to ally with Heenan’s smorgasbord of man-mountain wrestlers, though Hogan wasn’t short on allies either, with the recently debuting Bam Bam Bigelow and the now-righteous (or “babyface”) Ken Patera joining Hogan’s team to get some payback against Heenan and his goons.
The Match: Honestly, I’ve had an on-again, off-again relationship with the Survivor Series over my many years as a wrestling fan. When there’s an actual storyline behind it and the teams make sense, it can be a fun concept but, often, the WWE cobble together teams just because the event is coming up and they even stupidly diluted the concept by having a separate Bragging Rights event that really should’ve just been merged with the traditional Survivor Series card. The WWE fluctuates its focus on tag teams at the best of times and large teams (or “stables”) of wrestlers are difficult to come by in the modern WWE landscape, which can make justifying a ten-man elimination match difficult. However, when it works and is used sparingly, it can be a unique concept and, from what I can tell from my research, it made sense to form these two massive teams and extend the Hogan/André rivalry in a way that both protected the latter, whose health was deteriorating rapidly at this point, and build anticipation for their inevitable rematch for the WWF Championship. The match began with Heenan in the ring giving a special introduction to the “Eighth Wonder of the World”, who lumbered to the ring and greeted his teammates. Jesse Venture raised the question of whether Hulk Hogan could truly trust Paul Orndorff who, until recently had been more of a heel, teasing the potential for dissention within Hogan’s team but, when interviewed by “Mean” Gene Okerlund backstage, Team Hogan seemed incredibly fired up for the match. Each man made his way to the ring to an ever-increasing rapture from the crowd, which exploded into a crescendo as the Hulkster came down the aisle way carrying Ol’ Glory, his focus squarely on André (and playing to the audience).
Although Rick Rude took the brunt of the early assault, it was Butch Reed who was the first to be eliminated.
Don Muraco and Rick Rude started the match for their respective teams, with the two exchanging blows in the corner before Rude took advantage with an eye rake. A boot to the gut cut off Rude’s attack, however, and Rude tagged in Paul Orndorff, who came off the top rope with an elbow strike. A shot to the gut and a knee strike saw Rude on the receiving end of more offense before Orndorff rammed him head-first into Hogan’s boot and tagged in the champion. Hogan planted Rude with a clothesline and then dropped three elbows in quick succession before tagging in Bam Bam Bigelow, slamming Rude and setting him up for a big body splash from Bigelow, which he followed with a military press before tagging in Ken Patera. Although Patera attacked right away, Rude was able to collapse in his corner, finally allowing another heel, Butch Reed, to get in the ring. Reed didn’t fare too well, however, easily being taken down and rolled up into the first pin attempt of the match and falling afoul of a dropkick courtesy of Don Muraco. Orndorff then showed up his teammate by tagging in and delivering two dropkicks of his own and even getting a cheap shot in on King Kong Bundy before dodging a Reed elbow shot in the corner and bringing the Hulkster back into the match for a double clothesline. Hogan then hit the Atomic Leg Drop and Reed was eliminated without even throwing a single punch; Hogan was spared from tangling with André after tagging in Patera during his celebration. Since André only wanted Hogan, though, he immediately tagged in Bundy to face the Olympian.
Thanks to eye rakes and cheap tactics, the heels scored two eliminations in quick succession.
Patera went on the attack right away, even downing Bundy with a clothesline, but he was too slow to keep the One Man Gang from tagging in to lock up with Orndorff. One Man Gang initially, very briefly, actually got to show some offense but Orndorff fired back with a slew of punches that rocked the big man; a counter in the corner shut Orndorff down, however, and allowed Rude to come back in and start working him over…until Orndorff scored with a clothesline, a body slam, and an elbow drop for a two count. Muraco came back in to hit a stiff clothesline but a thumb to the eye allowed Rude to create some separation and tag in the One Many Gang but Muraco was able to avoid a corner charge, roll over to his corner, and tag in Patera, who survived another eye rake to hit an awkward running crossbody for another near fall. Although Patera hit a running knee to the corner, another thumb to the eye allowed the One Man Gang to put a beating on the Olympian in the heel corner with the assistance of his teammates. A standing front facelock slowed the match to a crawl and then the One Man Gang managed to pin Patera for the three count following an awkward “double clothesline” for an anti-climactic elimination. Hogan immediately went after the One Man Gang, throwing hands, rushing him into a corner, and then bringing in Bam Bam Bigelow for a double Big Boot. Whatever momentum Bam Bam had built up went right out the window, however, when the two big men clumsily bumped heads off a double shoulder block, which saw Rude and Orndorff go at it again. Orndorff panted Rude with a suplex, another elbow drop, and a flapjack before Bundy ran in to interrupt a piledriver attempt; this was enough for Rude to score a roll up with a handful of tights to eliminate Mr. Wonderful from the match.
After twenty-five minutes of plodding action, Hogan and André finally squared off once more.
Rude made the mistake of flexing to rile up the crowd, meaning Muraco planted him with an atomic drop and a clothesline before bringing in Bam Bam to deliver a big side kick. A big suplex set Rude up for a rare running knee strike from Hogan, who then brought Muraco in for a powerslam and that was enough to take Rude out of the match and even the odds at three-on-three. Bundy came in and started beating on Muraco, downing him with a back elbow smash, but he missed a running knee strike; Muraco targeted Bundy’s leg with a series of attacks but Bundy was able to fight him off and bring the One Man Gang back in. The Rock’s attempts to fight off the One Man Gang saw him crushed under the big man’s weight; he was able to kick out at two, however, so the One Man Gang threw him into an inelegant headbutt from André which, when coupled with a body splash, was enough to eliminate the Rock. The One Man Gang switched his focus to Bam Bam Bigelow, crushing his chest when he went for a sunset flip pin and bringing in Bundy to hit a powerful clothesline that turned Bam Bam inside out. Hogan broke up the pin attempt but Bundy stayed in control and brought the One Man Gang back in, who shut down Bam Bam’s counterattack with, what else, but a thumb to the eye before choking him on the ring ropes. Bundy came back in for a knee to the gut and a double axehandle smash before quickly tagging the One Man Gang back in. A back elbow caught Bam Bam right in the eye and Hogan, and the crowd, were absolutely desperate for the big man to make the tag as Bundy came back for some more punishment. Bam Bam managed to avoid the elbow drop, and kick out of a pin attempt, and finally made the tag after rolling to the corner and avoiding a big chop from André. Hogan attacked his rival with a flurry of punches; they exchanged strikes and chops in the corner before Hogan slamming André’s face into the top turnbuckle, but his offense was interrupted when Bundy pulled him from the ring.
Bam Bam fought valiantly but ultimately fell, leading to Hogan to attack André after the match.
The two brawled at ringside, with Hogan slamming both Bundy and the One Man Gang on the outside, but he took so long messing about with the two that he got counted out! The crowd was incensed as Hogan was forced from the ring, leaving Bam Bam all alone in a three-on-one situation, much to Hogan’s disgust. Showing no fear, Bam Bam went right for Bundy, planting him with a clothesline and scoring a two count off an elbow drop and a falling headbutt. After dodging a Bundy charge in the corner, Bam Bam finally eliminated the big man with an impressive slingshot splash from the ring apron but he was too fatigued to fend off the One Man Gang, who immediately choked and beat him on the ropes. Still, Bam Bam easily kicked out of a clothesline (that looked to give the One Man Gang a heart attack) and had the wherewithal to dodge a splash off the top rope. This one mistake cost the One Man Gang and meant the match boiled down to Bam Bam and the lumbering André, who wasted no time smacking Bam Bam around with big chops and headbutts. Bam Bam used the ropes and his comparative quickness to avoid André’s plodding attacks but a missed splash in the corner saw him taking some shoulder blocks to the spine and being easily pinned following a half-underhook, facelock slam…suplex…thing. As André was announced the winner, Hogan stormed the ring and attacked the Giant with the WWF Championship, stealing the spotlight and entertaining the raucous crowd with his trademark flexing while André seethed on the outside. I don’t really like to rag on this era of wrestling too much; things were obviously very different back then, but this was a bit of a let-down considering some of the star power and storylines featured in it. Obviously, André couldn’t really do a lot and needed to be protected but we barely got to see him and Hogan go at it again, much less really see the Giant in any kind of action. It works on the one hand to show him as this unbeatable “final boss” but…we know he can be beaten as we saw Hogan pin him at WrestleMania III so I think I would’ve preferred to see him and Hogan as the final two and them brawl to a double count out. Interestingly, this ended up primarily being a showcase for Bam Bam; he was the last man on Team Hogan and impressed the most with his athleticism for such a big man but, on the flip side, there was way too much boring, plodding offense from the One Man Gang and King Kong Bundy was barely a factor in it as well. As a first go-around for the concept, the WWF definitely put some of their biggest names into it but it’s clear a lot of them were limited in their mobility and having Hogan get counted out only to run in for the cheap heat at the end made this a pretty mediocre affair.
The Aftermath: Naturally, the issues between Hulk Hogan and André the Giant continued to be a focal point of the WWF’s programming; André joined forces with “The Million Dollar Man” Ted DiBiase and the two continued to harass Hogan until he agreed to another championship match at The Main Event. This time, André came out on top, though he immediately sold the belt to DiBiase at it was subsequently held up for grabs in a tournament at WrestleMania IV. Don Muraco, Butch Reed, the One Man Gang, Bam Bam Bigelow, and Rick Rude all made it onto the WrestleMania IV card as well, participating in the same tournament, but they would all fall short. Even Hogan and André lost the chance to regain the belt thanks to a double disqualification, so the vacant belt went to “Macho Man” Randy Savage for the first time after he defeated DiBiase in the main event. As for the Survivor Series, the event continued to be an annual part of the WWF/WWE calendar, with multi-man and woman matches taking place regularly every year. The event would be shaken up somewhat by being used as the staging ground for the final clash between the WWF and the alliance of World Championship Wrestling (WCW) and Extreme Championship Wrestling (ECW) and also saw the first appearance of the Elimination Chamber match and clashes between the WWE’s flagship shows, Raw and SmackDown!
My Rating:
⭐⭐
Rating: 2 out of 5.
Could Be Better
What did you think to the inaugural Survivor Series match? Were you excited to see Hulk Hogan and André the Giant across the ring from each other and thus disappointed that they barely interacted in the match? Who was the stand-out performer for you in this clash? Do you think André winning was the right decision? Were you also annoyed that Hogan got counted out? Which Survivor Series match or event is your favourite? How was your Thanksgiving this year? Whatever your thoughts on Survivor Series, feel free to leave them below or drop a comment on my social media.
In the episode “Me2” (Bye, 1988) of the classic British science-fiction comedy show Red Dwarf (1988 to 2020), it is revealed the Arnold Rimmer’s (Chris Barrie) last words were “Gazpacho soup!” and that he made a point to celebrate November 25th as “Gazpacho Soup Day” after a particularly traumatising visit to the Captain’s Table. While this is the perfect date to celebrate the long-running cult series, it clashed with another celebration this year so I’m a day late, but better late than never…
Series One
Air Date: 15 February 1988 to 21 March 1988 Director: Ed Bye OriginalNetwork: BBC2 Stars: Chris Barrie, Craig Charles, Danny John-Jules, Norman Lovett, C. P. Grogan, and Mac McDonald
The Background: In the mid-1980s, creative duo Rob Grant and Doug Naylor created a sci-fi comedy show for BBC Radio 4, Dave Hollins: Space Cadet; this, along with influences from sci-fi classics like Dark Star (John Carpenter, 1974) and The Hitchhiker’s Guide to the Galaxy (Adams, 1978; Bell, 1981), served as the basis for what would become Red Dwarf. Putting character and comedy before genre, their concept of a comedy set in space featuring dysfunctional characters in an extraordinary setting was initially a hard sell due to its sci-fi trappings. Originally, Alfred Molina was cast in the role of Second Technician Arnold J. Rimmer but, when he dropped out due to difficulties with the character and concept, impressionist Chris Barrie (who’d previously worked with Grant and Naylor) stepped into the role. Liverpudlian “punk poet” Craig Charles was cast as Third Technician Dave Lister and, despite being an hour late to his appointment, singer and dancer Danny John-Jules was cast as “The Cat”, with the actors tackling their roles as being larger-than-life caricatures of themselves. Sardonic stand-up comedian Norman Lovett was cast the the ship’s neutronic computer, Holly, and gained a bit of a reputation, insisting on appearing on camera rather than merely a voice over and refusing to work unless his confiscated football was returned to him. Against all the odds and despite a tight budget, Red Dwarf finally made it to TV screens; however, while five million viewers tuned in to watch “The End” (Bye, 1988), those numbers dropped over the course of the series. Nevertheless, audience feedback was so strong that the BBC commissioned a second series, where the show really hit its stride and became a cult hit. About ten years later, Grant and Naylor revisited the first three seasons and enhanced them with additional digital effects, replacing many model shots and even excising some lines and jokes, which resulted in these Remastered episodes being largely criticised. Still, following this first series, Red Dwarf proved consistently popular even as the duo experimented with more outlandish concepts. After they parted ways and Red Dwarf disappearing altogether, the show returned with a three-episode special, which led to a questionablerevival that focused on the far more jaded principal cast members.
The Plot: When the crew of deep space mining ship Red Dwarf are all killed following a radiation leak, the ship drifts aimless in space for three million years. When the background radiation dies down the ship’s computer, Holly, releases slovenly technician Dave Lister from his incarceration in suspended animation and he’s left alone in the endless void with only the hologramatic recreation of his overbearing superior and bunk mate, Arnold Rimmer, and a creature who evolved from the ship’s cat for company.
The Review: I grew up watching Red Dwarf, but perhaps not in the way you’d expect. My dad was a big fan of the series and had taped each episode as they aired so we could easily just go to the shelf and shove in a VHS tape to watch it whenever we wanted, but our collection originally started from series two (Bye, 1988). In fact, I’m pretty sure that we were up to series four (ibid/Paul Jackson, 1991) or five (Various, 1992) before I had even seen the first series. This was because, back in the early nineties, re-runs didn’t really work the way they do now; we didn’t have catch-up TV or streaming services, VHS tapes were extortionately expensive and often only contained two or three episodes, and there weren’t any channels like Gold or Dave that constantly showed repeats. I remember being stupidly excited when the first series was announced to be returning to BBC2 in anticipation of the latest series, only to find that the first series was very different to what I have experienced so far, even from the technically similar second series. Of all the classic series’ of Red Dwarf, series one is easily my least favourite and, even now, I rarely choose to watch it over the second or third (Bye, 1989); while I can understand that the show was establishing itself and finding its footing, many of the episodes drag and aren’t very visually interesting to look at. You can tell from the live audience’s reactions that this sentiment was shared as many of the jokes fall a bit flat and the audience seems confused about the premise. This wouldn’t be an issue in the next series and wouldn’t reoccur until Grant and Naylor stopped working together and the show took a noticeable nosedive, but it’s unmistakable here and does somewhat stunt my enjoyment of the first series despite there being a few standout moments and episodes.
The show’s premise is surprisingly dark, with the human race extinct except for one slob.
The show begins with the titular mining vessel fully crewed and out in the depths of space. According to Officer Frank Todhunter (Robert Bathurst), the ship houses 169 crew members, from dosgbody technicians like Rimmer and Lister to officers and the ship’s captain, Frank Hollister (McDonald). The dynamic between Lister and Rimmer is established in the very first sequence of the first episode; Lister, a lowly Third Technician, is a lifelong slacker and career slob who is endlessly bored by their mundane duties, which include unclogging food dispensing machines. To amuse himself, Lister likes to wind Rimmer up with singing, humming, and other annoying habits, which has earned him no less than 247 complaints from his superior and bunk-mate. Truth be told, Rimmer is equally as unsatisfied with his job, which isn’t assigned to the ship’s service robots (known as “Skutters”) simply because the machines have a better union. However, Rimmer, believes wholeheartedly in the importance of their essential routine maintenance in keeping the ship and her crew safe on their long journey and is a stickler for the rules and professionalism even though it’s earned him a reputation as a “Smeghead”. This is the primary reason why Lister is so insubordinate towards Rimmer; he can’t stand Rimmer’s stuck up, kiss-ass attitude and would much prefer he got the rod out of his ass, but Rimmer is determined to impress and advance his career to get the respect he feels he deserves. Although Rimmer believes Lister is content to simply slob around with no ambition, Lister actually has a few dreams; his first love is music and he’s an enthusiastic (if terrible) guitar player; he also plans to buy a farm on Fiji where he can breed horses and own a sheep and a cow. He believes he’ll achieve this goal since he saves money by not buying deodorant, socks, and soap and because the prices on Fiji are ridiculously low thanks to a volcanic eruption leaving most of the land three feet below sea level. While Rimmer mocks this plan, Lister is determined to make it work, ideally, with Navigation Officer Kristine Kochanski (Grogan) by his side. Unlike in later series’, Kochanski is Lister’s dream girl who he has been working on plucking up the courage to ask out rather than a former flame who he longed to get back with, and he always makes sure to flirt with her during his many trips to the captain’s office.
Lister’s slovenly ways grate on Rimmer and conflicts with his status as the Cat’s “God”.
While Lister’s insubordinate attitude sees him getting numerous write-ups and reprimands, it’s his housing of an illegal animal that ends up with him being sentenced to the stasis booth for breaking the ship’s quarantine procedures. Refusing to give up his pregnant cat, Frankenstein, Lister is released to find that the entire crew has been wiped out by a radiation leak thanks to Rimmer’s sloppy work. Unlike in the novelisations, where Lister falls into a deep and self-destructive depression following the revelation that everyone he knows (literally everyone) is dead, Lister takes this news surprisingly well; he’s gutted that Kochanski’s dead and that his plan will never come to fruition but still coherent enough to crack jokes about overdue library books. “Balance of Power” (Bye, 1988) offers a glimpse into Lister’s despair as he sits alone in the bar, remembering the fun times with his friends; before the accident, Lister was surrounded by the equally slovenly Petersen (Mark Williams), Chen (Paul Bradley), and Selby (David Gillespie) and the three of them delighted in mocking Rimmer whenever possible, drinking, smoking, and slacking off together at every opportunity. He feels their loss deeply, but is largely ruled by his regret at never making a move on Kochanski, and his pining for her is a recurring theme throughout the series as he tries, and fails, to convince Rimmer to allow him to spend some time with her hologram. Unlike Rimmer, who believes wholeheartedly in the existence of aliens, Lister is of the belief that humanity is alone in the vast universe, but jumps at the chance to pull a prank on Rimmer when he mistakenly believes a garbage pod contains the remains of the fictional “Quagaar” race. Lister does suffer a crisis of conscience, however, when he learns that, during this three million year sleep, the cats evolved into a humanoid species, Felix sapiens, that worshipped him as a God, “Cloister the Stupid”, who would lead them to the promised land of “Fuchal”. The extent of this thread is explored in “Waiting for God” (Bye, 1988), where Lister learns from smell reading the Cat’s books and bible that the cats engaged in violent wars over differing interpretations of Lister’s dreams of opening a hot dog and doughnut diner on Fiji. Lister is distraught at having been “misquoted” but gains a modicum of catharsis when he’s able to pose as his holy self and help bring some peace to a blind, disillusioned, and dying elderly an elderly cat priest (Noel Coleman).
The neurotic Rimmer’s insistence on barking orders often leads to his humiliation.
A huge part of the series is the love/hate relationship between Lister and Rimmer, with both despising the other’s annoying habits and accusing them of holding them back. While Lister doesn’t really care all that much what people think of him, Rimmer is obsessed by it, constantly trying to impress his superiors and pass his engineer’s exam, only to be met with a series of embarrassing failures, including writing “I am a fish” four-hundred times. So desperate is Rimmer to pass his exams and become an officer that he often resorts to cheating (either using illegal “learning drugs” or writing the answers on his arms and legs as an “aid to memory”), but it’s also stated that his tendency to self-sabotage is just as to blame for his failures as his lack of capability as he wastes weeks creating revision schedules rather than actually revising. Lister is constantly frustrated by Rimmer’s neurotic ways and insistence on following rules and procedures, but Holly explains that he brought Rimmer back as a hologram rather than one of Lister’s friends since he was statistically the best person to keep him sane. Rimmer’s newfound intangibility and sudden death only adds to his neuroses; the first thing he does upon seeing Lister is blame him for choosing the save Frankenstein and thus not being able to help replace the drive plate, before whining that any dreams he had of advancing his career or having a sex life have been forever lost thanks to him now being dead. Rimmer finds solace in maintaining his officious and aggravating personality; he goes out of his way to insult and bring down Lister for being a lazy slob, and throws his weight around as the ship’s highest ranking officer to order Holly to perform menial tasks for him and give him access to the crew’s confidential files, which always results in Rimmer being embarrassed in some way. Interestingly, while Rimmer is later personified by his abject cowardice, he actually tries to attack the Cat when they’re properly introduced and shows so co-dependency on his slovenly bunk mate; he’s distraught at the idea of being turned off when Lister plans to go back into stasis and constantly denies Lister access to Kochanski’s hologram disc simply out of fear of whatever little life he has left being snuffed out completely.
The vain and self-obsessed Cat is more concerned with his appearance than helping others.
Rimmer also has little time or patience for the Cat, a suave, sharply-dressed, hyperactive humanoid with a propensity for dancing, traversing the ship via the air ducts, stopping to admire himself, and claiming everything he sees as his. Though he exhibits knowledge of his species’ reverence for Cloister/Lister, he’s not really a true believer and is more interested in sex, food, and looking good and disparagingly refers to Lister as a “monkey”. His curiosity often causes problems for Rimmer, who has restricted Lister’s access to his vices (mostly cigarettes and booze) to try and coerce him into co-operating with menial tasks; Rimmer’s horrified when the Cat finds Lister’s cigarettes and claims them for himself since they’re so shiny and manages to convince him to return the fags in exchange for being taught how to use the vending machines. This backfires on Rimmer and the Cat, however; not only does the Cat betray him, costing him some leverage in trying to talk Lister out of taking the chef’s exam and thus becoming his superior officer, the Cat gorges himself on fish and ends up suffers from stomach pains. The Cat is largely used as a comedic break; he wanders the corridors “investigating” and looking for food and showing off his “shiny thing”, a yo-yo that fascinates and excites him in its simplicity, much to Rimmer’s disgust and irritation. In “Confidence and Paranoia” (Bye, 1988), the Cat momentarily expresses concern when he spies Lister’s unconscious body but quickly moves on, more concerned with finding something to have sex with and then showing no interest in helping when Rimmer tries begging him for assistance since he’s more focused on playing with his Chicken Marengo. Later, when Lister recovers, the Cat does try to cheer him up with “presents” but ends up stealing his pillow and blanket and trying to take a nap, and even seems genuinely hurt when Rimmer snaps at him. The Cat plays a large role in the series, however, despite his comparative lack on screen time; not only is Lister deeply shaken by his influence over the Cat’s society, he’s determined to keep the Cat from losing a tooth in “Future Echoes” (Bye, 1988) in order to prevent his own inevitable and violent death. Though he’s unsuccessful, and the Cat is largely incredulous to the drama between Lister and Rimmer throughout the series, the Cat does end up socialising with Lister on a few occasions and has some fun moments, such as becoming paranoid about the presence of a dog, taking a crap in Rimmer’s boots, and roller-skating around with a megaphone and large bouquet of flowers trying to court any lady cats.
Driven senile from isolation, Holly is more capable of pulling pranks than running the ship.
Finally, there’s the ship’s computer, Holly, who boasts that he has an IQ of six-thousand (“the same IQ as six-thousand PE teachers”). Before the accident, Holly was merely a glorified announcement system, but three million years of isolation have driven him “a bit peculiar” and resulted in him dropping any formalities and indulging in decidedly un-computer-like conduct. Despite his high IQ, Holly has quite a few limitations; he can only sustain one hologram at a time, he can’t observe or communicate with anyone or anything in the cargo hold, and he’s frequently forgetful, meaning that he’s initially overwhelmed when he has to figure out the precise calculations needed to navigate the ship when it exceeds the speed of light following three million years of constant acceleration. To properly marshal his efforts, he even sets up an answering machine to keep people from bothering him, and he’s ill equipped to handle the lightspeed trip, which overwhelms him once it occurs (as he puts it, “me bottle’s gone!”) Rimmer also makes constant menial demands of him, demanding haircuts and answers to problems happening on the ship without consideration for Holly’s feelings or duties. As a result, Holly enjoys pulling pranks on Rimmer almost as much as Lister does, messing about with his hair and image file to give him Peterson’s arm and keeping the truth of the garbage pod from him for “a laugh”. Holly’s propensity for jokes and pulling pranks also extends to Lister, however; he later tries to stave off his boredom in “Me2” with an early April Fool’s joke where he claims that Norweb have dispatched fighters to claim debts owed by Lister. He also constantly interrupts Lister’s attempts to enjoy a heart-breaking film in “Confidence and Paranoia” when he finds himself at a loose end after reading every book ever written. Frustrated at the constant interruptions, Lister agrees to erase Holly’s knowledge of Agatha Christie in lieu of the computer’s inability to create a lifelike replica of a woman, only to be exasperated when Holly has no idea of what’s happened!
The Summary: One of the first things to note about series one of Red Dwarf is how long and boring the opening title sequence is; sadly, it wouldn’t be until the third series that things would get a bit more interesting and exciting in this regard, and every episode opens with a slow, dramatic, even ominous series of shots showcasing the vastness of the titular mining vessel against the endless black of outer space. It’s not particularly thrilling or engaging, and the presentation (like much of the series’ music) veers oddly towards the ominous rather than the comical. Thankfully, every episode after the first also begins with Holly providing either a bit of context to life onboard the ship, catching people up with the show’s general premise, and dropping a few jokes here and there, almost as a warm-up act to the remainder of the episode. The series also lacks a real appealing visual identity; every corridor looks the same, drab grey (there’s even a joke about this in “Me2” when Rimmer insists on repainting the walls from ocean grey to military grey) and boring grey labels cover all the food and drink throughout the series as well. Even the cigarette packets are unappealing to look at, as are the crew’s uniforms, though this does help Lister, the Cat, and the show’s other colourful guest stars to pop out a bit more with their wild attire. The show’s technology and sci-fi elements are primarily introduced in the first episode and recur in easy to digest ways throughout the series; robotic Skutters glide about the place performing menial tasks (they later showcase some amusing personality quirks, like begging Lister not to leave them with Rimmer, enjoying a movie, and flipping Rimmer off behind his back) and the ship is outfitted with dispensing machines that frequently malfunction. The stasis booth is the focus of the first couple of episodes and essentially functions as a brig for insubordinate crew members, but also allows Lister to survive the radiation leak, but the most prominent technology is Holly’s ability to “resurrect” dead crew members as holograms. We’re introduced to the concept through Flight Coordinator George McIntyre (Robert McCulley) but much of Rimmer’s neurotic behaviour boils down to him being recreated almost perfectly except for the large H on his forehead and the fact that he cannot lift or touch anything and is, essentially, a digital ghost.
The conflict between Lister and Rimmer is at the forefront of the series.
Perhaps more so than any other series of Red Dwarf, series one hinges on the chaotic relationship between Lister and Rimmer. The two cannot stand each other and are constantly finding ways to either put the other down or wind each other up and, while every episode explores their relationship in some way, “Balance of Power” (Bye, 1988) goes all-in with showing just how frustrated Lister is by Rimmer’s oppressive and borderline insane hang-ups. Rimmer despairs of Lister’s hygiene, his taste in music, his lack of ambition, and his slobby nature but is also paranoid about losing his fragile existence in favour of Kochanski. To that end, Rimmer arranges to hide the hologram discs from Lister and refuses to entertain even a short switch off, so Lister resolves to force him to listen to him by passing his chef’s exam. This shakes Rimmer, not just because he believes a chef is a “white-hatted ponce” rather than a real officer, but also because of the very real fear that Lister could actually succeed, especially given that Lister showcases flashes of intelligence and capability throughout the show and he actually tries to revise rather than making excuses like Rimmer. When his attempts at reasoning with Lister fail, he assumes Kochanski’s form and tries to talk Lister out of his efforts; however, while initially crushed by her rejection, Lister quickly sees through Rimmer’s charade, exposing him with ease. Their issues finally come to a head in the final two episodes; interestingly, Rimmer shows genuine concern when Lister’s pneumonia causes physical manifestations of Lister’s Confidence (Craig Ferguson) and Paranoia (Lee Cornes) to appear. In a flash of uncharacteristic concern, and despite how similar Paranoia is to him, Rimmer sees them as dangerous and symptomatic of Lister’s illness since, as long as they exist, Lister can’t recover. Rimmer even tries to distract Paranoia so a Skutter can sneak up on him to sedate him but is unsuccessful, but his concerns are largely out of his selfish desire not to be left alone with just Holly and the Cat for company. In the end, he’s proven to be right, and then gets the last laugh by swapping Kochanski’s disc with his own, creating two Rimmers. At first, both Rimmers and Lister are happy to be rid of each other; Lister delights in being free from Rimmer’s rules and irritations and the Rimmers deck their quarters out with everything they need to motivate (procrastinate) and succeed (self-aggrandise), much to Lister’s amusement.
The series eventually delves deeply into Rimmer’s issues and introduces some fun technology.
However, conflict soon grows between the Rimmers; one is noticeably more driven, more focused, and more demanding than the other and they eventually verbally attack each other and descend into childish squabbling. Lister is able to use this to his advantage, however, to learn the secret of Rimmer’s last words (“Gazpacho soup”). When Rimmer 1 shows up for his erasure in his finest attire and showing off his long service medals, he relates how he embarrassed himself at the Captain’s Table by sending back a bowl of gazpacho soup since he didn’t know it was meant to be served cold. Haunted by the experience, he blamed his ignorance for his subsequent lack of confidence and stunted career, raging at the injustice of such a simple mistake costing him his aspirations. When Lister wipes the other Rimmer, the series seems to end with them finally reaching a level of mutual respect…only for Lister to make a “soup-er” pun to keep their relationship decidedly antagonistic. Gags such as this are commonplace throughout the series, which primarily focuses its dialogue and jokes on grounded, relatable subjects rather than resorting to incomprehensible space jargon. This does happen a few times, however, and mostly lands quite well, but it’s just as amusing seeing Lister accidentally put shaving cream under his armpits, the crew’s interactions with the chirpy Talky the Toaster (John Lenahan), and making topical references about the French and Germans. Probably the best episode of this series is “Future Echoes” for its hilarious use of double takes and time dilations that see Lister have one-sided, out of synch conversations with Rimmer, frantically trying to prevent his death, and him and Rimmer puzzled at how they manage to get two babies on the ship without a woman.
The potential is definitely there but the show would quickly exceed the efforts of its first series.
Primarily, the show is focused on the four main characters; some fun personalities appear in the first episode before being reduced to ashy powder and the memories of them haunt both Lister and Rimmer alike throughout the series. The crew are joined by a couple of additional cast members in the form of Lister’s Confidence (a loud, outspoken, encouraging, and enthusiastic individual who compliments everything about Lister, however slovenly and unappealing) and Paranoia (a twisted little man who criticises everything about Lister and seeks to question him, bring him down, and attack every decision he makes). Frustrated by Rimmer’s overbearing nature, Lister jumps at the chance to spend time with Confidence, who’s won over by his musical “talent” and is so admiring of his “King” that he even keeps Lister’s discarded cigarette butts. Although Lister is a little uncomfortable by Confidence’s blinkered belief in him, he’s inspired by him to search for the hidden personality discs so he can finally be reunited with Kochanski. Lister’s resolve falters when Confidence reveals that he not only destroyed the medical unit but also killed Paranoia to keep them together and he’s distraught when Confidence takes his helmet off in the vacuum of space to bolster his confidence and instantly explodes as a result. Even despite some of its genuinely amusing moments and the pull of nostalgia, I still have to admit that series one is one of my least favourite of the show’s many seasons; everything’s a bit dull and lacking in visual variety and the characters and concepts would be fleshed out far better in even the following series. Even watching the Remastered version of the series doesn’t help as some of the CGI shots, additions, and changes made actually throw off the original jokes. In the end, there’s a lot of potential here; the dynamic between Lister and Rimmer is at the forefront and helps to carry series one to some funny moments, usually at Rimmer’s expense or at Lister’s slovenly ways, but the show definitely found its footing in later series and improved upon the foundations laid down by this first enjoyable, if somewhat awkward, season.
My Rating:
⭐⭐
Rating: 2 out of 5.
Could Be Better
What did you think to series one of Red Dwarf? Were you a fan of the show and the concept when it first aired? Did the jokes and gags work for you? What did you think to the chaotic relationship between Lister and Rimmer? Were you a fan of the Cat and his surprisingly dark history? Which episode of series one was your favourite? When did you first discover Red Dwarf and which character, season, and ship is your favourite and why? Would you like to see more seasons and specials, maybe one that finally closes the book on the Red Dwarf story, or do you think it’s best to leave it be for now? How are you celebrating Gazpacho Soup Day today? No matter what you think, feel free to leave a comment about Red Dwarf down in the comments.
In November 1961, Marvel Comics readers witnessed four intrepid explorers be forever changed by mysterious cosmic rays. Marvel’s “First Family” of superheroes were the first of many colourful superheroes for Marvel Comics and are more than deserving of some attention today.
Released: 7 August 2015 Director: Josh Trank Distributor: 20th Century Fox Budget: $120 to 155 million Stars: Miles Teller, Michael B. Jordan, Kate Mara, Jamie Bell, Toby Kebbell, Reg E. Cathey, and Tim Blake Nelson
The Plot: Genius scientist Reed Richards’ (Teller) research into teleportation attracts the attention of Professor Franklin Storm (Cathey), who invites him to help complete Victor Von Doom’s (Kebbell) “Quantum Gate”, which he recklessly travels through to a parallel dimension alongside his co-workers. Though they are transformed by their exposure, Doom is stranded and Reed becomes a fugitive, but he is forced to repair his fractured relationships when Doom plots to harness the dimension’s power for his own nefarious ends.
The Background: Considering that there is somecontroversy surrounding the creation of Marvel’s First Family of superheroes, perhaps it’s fitting that Stan Lee and Jack Kirby’s dysfunctional family of intrepid adventurers has had a rocky road towards a big-budget, live-action adaptation. Although German producer Bernd Eichinger’s attempts to get a film off the ground resulted in the production being shut down and the negatives being confiscated to keep it from seeing the light of day, director Tim Story’sefforts at least resulted in actual movies being released. While the films were both modest successes at the box office, they were met with mixed reviews, despite praise for some of their performances, and plans for further movies and spin-offs were cancelled because of this mediocre reception. 20th Century Fox first announced their intentions to reboot the franchise in 2009; the initial script included another interpretation of Galactus but, when director Josh Trank signed on to the film, he immediately set about reworking the script into something more grounded and realistic. While Trank sought to evoke a specific tone and atmosphere with his new take on the Fantastic Four’s origin, other creators and producers offered contradictory statements regarding the reboot’s connection to Fox’s X-Men franchise (Various, 2000 to 2020), and the film attracted controversy by casting up-and-coming actor Michael B. Jordan in the role of Johnny Storm/The Human Torch, a character traditionally depicted as white (though Trank later revealed that he planned to make the entire Storm family black to create more diversity within the team). Additional problems occurred when 20th Century Fox ordered a number of reshoots after being dissatisfied with Trank’s efforts, and the film was further cut up and changed from Trank’s original vision in the editing room. The result was one of the most ridiculed superhero films ever made; Fant4stic’s underwhelming $167.9 million gross made it a box office flop and critics universally panned it, with even Trank actively distancing himself from the finished product. Although 20th Century Fox initially planned to produce a sequel, the film was quietly removed from their production slate; the characters subsequently became the property of Marvel Studios when Disney purchased 20th Century Fox in 2017 and another reboot was soon announced as part of the Marvel Cinematic Universe.
The Review: While Tim Story’s Fantastic 4 movies may not have bee the greatest superhero or science-fiction tales ever produced, they were decent enough in their own right and seemed to be heading in the right direction with the second film; a third movie, and a spin-off, seemed likely and I have to say that I was a little let down that we never got to see another entry in that series of films. When I first heard that 20th Century Fox were producing a reboot, I was sceptical until I saw the first few trailers; the movie seemed to be advertised as a cross between Interstellar (Nolan, 2014) and easily Trank’s most notable film, the excellent Chronicle (Trank, 2012), with its darker, gritter approach and focusing more on the scientific aspects of the team. I was actually okay with this, and some of the casting changes, and barring one exception everything seemed to be shaping up okay…until I started hearing that it really wasn’t very good and saw how poorly it performed. When I first saw it, I remember actually thinking it wasn’t that bad, but it’s true that it’s probably my least-watched of the three commercially released movies.
Reed and Ben’s prototype for a teleporter eventually catches the attention of Franklin Storm.
Fant4stic separates itself from its predecessors by beginning in 2007 to show us Reed’s childhood as a child genius (Owen Judge) who has aspirations of building a teleportation device; although he is mocked by students and even his teacher, Mr. Kenny (Dan Castellaneta), for his claims to already be building the device, he catches the eye of young Ben Grimm (Evan Hannemann). While Reed is unfazed by the mockery he receives, Ben comes from a rough neighbourhood and an even rougher home where he is continuously abused by his brutish older brother, Jimmy (Chat Hanks), and forms a fast friendship with Reed when he sees first-hand that the boy’s prototype (powered by a number of Nintendo 64’s and materials scrounged from Ben’s family junkyard) is able to transport matter to an unknown dimension (though it also causes a massive blackout in the process). Seven years later, the now grown-up friends confidently display their newest prototype at their high school’s science fair (despite clearly being in their mid-thirties rather than around seventeen/eighteen); although Reed’s device is still a little wonky and destructive, it nevertheless works but, oddly, Mr. Kenny continues to be unimpressed (labelling it as a magic trick), and Reed is left dejected at the response to his lifelong project.
Doom agrees to work with the team despite his distrust of the suits overseeing the project.
His sprits soon turn, however, when Dr. Storm and his daughter, Sue (Mara), approach him, seeing the potential in Reed’s research and impressed by his progress; Storm has been working on a similar project but has been unable to retrieve matter from the source dimension, and immediately offers Reed a full scholarship to the Baxter Foundation so that he can help them finalise an interdimensional transporter. Reed jumps at the chance to move to the city and be appreciated for his intellect for a change and, though it means being separated from his childhood friend, Ben fully supports his academic endeavours. Reed awkwardly tries to strike up a conversation with Sue, an intelligent young woman in her own right who uses music to help her concentrate on her work and specialises in “pattern recognition”. Still, Storm’s project attracts scrutiny from Doctor Harvey Allen (Nelson), who doesn’t subscribe to Storm’s claims of alternative dimensions, or his tendency to recruit children from science fairs or unpredictable wild cards like Victor Von Doom. Reimagined as a reclusive, unappreciated genius, Victor distrusts the military and governmental officials behind the Baxter Foundation but agrees to return to the project out of his affection and trust for Sue. Initially, Victor is so paranoid that he believes that Reed stole his research, but despite being critical of Reed’s childish drawings, is nevertheless impressed with his efforts; although he has little faith in the future of humanity or Storm’s dreams of using the Quantum Gate to repair the environmental damage done to the world, he’s willing to work alongside Sue and Reed on the proviso that they get to be the first ones through the gate to explore this mysterious other dimension.
The team is joined by Johnny and forever transformed by Planet Zero’s wild energies.
To complete the project, Storm drafts in his outspoken, hotshot son Johnny (Jordan), a rebellious youngster who’s more interested in street racing than putting his incredible engineering talents to good use alongside his father. Resentful of his father’s work, which has left him feeling undervalued, Johnny is forced to join the project after smashing up his car, but forms a fast friendship with Reed after he actually speaks to and treats him with some respect on a peer-to-peer level. In time, the four complete the Quantum Gate and successfully transport a chimp to this other dimension, dubbed “Planet Zero”, a primordial world of chaos that Storm believes holds the key to understanding human evolution and providing clean, renewable energy sources for the entire planet. However, the team is distraught and angered when Allen refuses to allow the four to be the first to travel to Planet Zero, resulting in them deciding the make the trip against orders after getting half-cut on alcohol. Intoxicated, Reed calls Ben and insists that he join them in making the trip, and in a bizarre turn of events Ben is transported alongside Reed, Johnny, and Victor while Sue…stays behind in the control room and wasn’t even asked to be a part of the experiment. In fact, she only finds out that they’re using the machine when her computer alerts her, meaning that she misses out on visiting the new world, which turns out to be an extremely hostile environment and home to a protoplasmic substance. However, when a series of eruptions force them back into the Quantum Gate, Victor is left stranded and the three are bombarded with the strange energy of the planet, which fundamentally alters their genetic structure to bond them with the four elements of the planet (with Sue being caught by a burst of energy from the returning gate).
The four’s powers are presented as monstrous, painful, and unstable genetic abnormalities to be feared.
Unlike in the 1994 movie and Tim Story’s first film, the four are immediately and horrifically changed by this process; Johnny is left a burning body, Ben is buried under a pile of alien rocks, Sue flickers in and out of sight, and Reed’s limbs are left strewn around the ruined laboratory. Following this, the four are subjected to a series of studies and tests by governmental officials as their powers rage out of control. Interestingly, in this version of the story, neither Ben or Johnny can control their powers; Johnny requires a specially-modified suit to regulate his flames, and even Reed struggles to concentrate on keeping himself in proportion, making the four’s abilities far more monstrous and dangerous as a result. Since she wasn’t at ground zero like the others, Sue’s powers are far more stable and, in time and with training, she’s able to control them, but Ben is left in constant pain and horrified by his rock-like appearance. Terrified and guilt-ridden, Reed flees the facility and goes on the run in a desperate attempt to stabilise his condition and find a cure for Ben’s hideous affliction, however this results in Allen manipulating Ben into becoming a weapon for the government and preparing Johnny for the same fate. After a year in hiding, Reed is finally tracked down by Sue, brought in by the enraged Ben, and agrees to complete a new Quantum Gate in return for the resources to cure his friends, and himself, of their dangerous powers, only to find that Victor also survived and has been irrevocably and dangerously altered by Planet Zero.
The Nitty-Gritty: I mentioned above that Fant4stic is far more focused on the scientific content of the film, and that’s true; once Reed arrives at the Baxter Foundation, he is awestruck by the scope, resources, and technology offered by the facility and much of the film’s first act is devoted entirely to the fledgling team and Victor’s efforts to finalise the Quantum Gate. This involves a hefty montage of such science stuff involving Reed and Victor scribbling on a whiteboard, Sue creating the team’s protective suits, and the construction of the Quantum Gate itself. This is juxtaposed with the four slowly bonding over time, sharing meals and a real enthusiasm for the work they’re doing, though Ben is noticeably absent from the entire team-building process as Reed never once thinks to bring him in on the project.
The government takes an immediate interest in the military applications of the four’s powers.
Once the team returns from Planet Zero, the film takes a dark and dramatic turn; as a stereotypical governmental sleazeball, Allen is determined to not only take advantage of Ben, Johnny, and Sue to sell them as assets to the military, but to also mine the transformative properties of Planet Zero for similar uses. While Johnny is all for using his powers for something worthwhile, and pushing them (and himself) to the limit, Sue is determined to not be used as some tool for the government like Ben, who has become a despondent and stoic killing machine in Reed’s absence. While I question the casting of Jamie Bell in the role of Ben since he lacks the physicality and stature typically associated with the character, he does a pretty good job at portraying a loyal friend to Reed and the Thing’s torment at the emotional and physical pained caused by his grotesque transformation. Kate Mara is a much better fit for Susan Storm compared to Jessica Alba since she’s not some glamorous supermodel cosplaying as the Invisible Girl; instead, she’s a smart and slightly quirky scientist in her own right and has far better chemistry with Reed and Johnny than Alba’s version of the character. All I ever hear is people banging on about the reshoots and Mara’s wig but I can’t say it really bothered me that much or was even something I noticed; similarly, I really enjoyed Teller’s version of Reed as an awkward but likeable young man who is incredibly smart but still very relatable, and Michael B. Jordan delivered a great performance as the Human Torch thanks to his boundless charisma. The only real criticism I had about the casting was to do with some of the script and narrative choices; leaving Ben out of the team means that we don’t really get to see the same rapport between him and Johnny as in the previous movies and comics (Johnny generally directs his snark towards Victor instead), but otherwise this was a really strong cast.
CGI is used to bring the four to life, and for the most part it holds up pretty well and does a decent job.
One area where Fant4stic excels above its predecessors is in the CGI and special effects used to bring the titular heroes to life; while I have to say that I do prefer a practical suit to be used for the Thing, the CGI employed here goes a long way to emphasising just how monstrous and fearsome this version of the character is. A hulking, destructive being of superhuman strength and durability, the tragedy of the Thing is only heightened by his grotesque appearance and his being turned into a weapon by Allen. Similarly, the fire effects used to render the Human Torch are worlds better than in the previous film and probably some of the best fire effects I’ve ever seen, resulting in him being a fittingly blazing inferno. Sue’s invisibility is about the same, though there’s more of a blue tint to her forcefields and such; generally, her powers are used more to protect the others from harm and to allow the Thing to get the drop on Doom in the finale, meaning the vast potential of her abilities is again set aside in favour of trying to highlight each member of the time. Finally, there’s Reed; while he looks a little plasticy when he’s all stretched out following his return to Earth, his elasticity mostly looks much better (while his cobbled together suit isn’t massively comic accurate, it seems more suited to the CGI than the blue used in the last films) and we even get a scene that better showcases his ability to disguise his features.
Doom ends up being a raggedy, obsessive ass who wants to reshape the world in his image.
Rather than being a despicable monarch or a sleazy corporate scumbag, this version of Victor Von Doom is an arrogant, cynical slimeball who believes himself to be the most intelligent person in any room and who is obsessed with Sue (why that has to keep happening in these films is beyond me). Determined that the world will remember his name for his contributions to science, he refuses to be forgotten in favour of some hot-shot astronaut and his obsessions lead to him blundering into Planet Zero’s protoplasmic substance without thought for the consequences, causing the planet to erupt around them, granting the four their powers, and leaving him stranded on Planet Zero, where he is consumed by its strange energies. Infused with his suit and with a mysterious, otherworldly power coursing through his veins, Victor is transformed into a monstrous and vicious being who exhibits deadly telekinetic powers that he uses to explode people’s heads, repel bullets, and lay waste to the facility in order to return to Planet Zero. Driven mad by his powers and time in isolation, Victor takes the name “Doom” and plans to turn the destructive energies of Planet Zero against the Earth in order to forever transform it, reshaping it in his own image in order to avenge himself on those who have wronged him, killing both Allen and Storm in the process and refusing to listen to reason. To put an end to Doom’s plot to destroy the world using a black hole, the four travel to Planet Zero, where they find themselves overwhelmed by Doom’s command of the landscape; when their individual efforts to stop Doom are met with failure, the four set aside their differences in order to work together to defeat him. Following a co-ordinated assault using all of their powers in unison, the four are able to set Doom up so that the Thing can smash him into his own energy beam, disintegrating him and sparing the Earth (though the immediate area is left devastated). In the aftermath, the four are commended by the United States government and enter into an agreement where they are afforded the freedom to operate independently in return for lending their services for the good of the world as a superpowered team.
The Summary: I’m a bit torn, to be honest; I feel there’s a lot of potential in Fant4stic, especially in the cast and the general direction that the film took. Focusing on the science and being this more gritty, grim retelling of the team’s origin was a good way to separate it from what had come before (which, to be fair, is essential for a good reboot), but I can see why this would have put off long-term or even casual Fantastic Four fans. There are some stumbles in the story that I seriously doubt even a director’s cut could fix; not having Ben be part of the Quantum Gate team until the machine is complete being chief among them, as is Sue not accompanying the team to Planet Zero, both of which were very strange choices to make. I liked that the film tied the team’s origin in with an adaptation of the Negative Zone to help mix things up, and having the Thing be tormented by physical pain and turned into a tool for the military was an interesting wrinkle to add to the story, as was the focus on the government desiring to harness and manipulate the team’s powers and those of Planet Zero. As ever, it’s the depiction of Doom where the film falters; had the script stuck to the original idea of him being a herald for Galactus, this may have helped with this new depiction of the character, but this is still a far cry from the maniacal despot of the comics and I almost feel like it would’ve been better to leave Doom’s fate unresolved and have the team battle a Planet Zero native, someone like Annihilus maybe, and tie up Doom’s loose end in the sequel. But, then again, I doubt even that change would have helped a sequel being produced, and that’s a real shame as I feel like a follow-up could have really improved upon the missed potential of this film and given everyone a bit more time to shine. Overall, I find myself actually enjoying this more than I expected, but it’s maybe a little too far away from the source material and the core of what makes these characters work, though I don’t actually think it deserves as much hate as it often gets.
My Rating:
⭐⭐
Rating: 2 out of 5.
Could Be Better
What did you think to Fant4stic? Were you a fan of the new cast and their depictions of the characters and what did you think to Johnny Storm being race swapped? Were you disappointed that Ben wasn’t a part of the machine’s construction and that Sue didn’t travel to Planet Zero? What did you think to the depiction of Victor Von Doom this time around? Do you think CGI is a better way to bring the Thing to life or did you prefer the practical suits of the previous films? Would you have liked to see a sequel to this film, or an extended director’s cut release someday? How have you been celebrating the debut of Marvel’s First Family this month? Whatever your thoughts on Fant4stic, leave a comment below.
After the release of Sonic the Hedgehog(Sonic Team, 1991), Sonic had firmly established himself as the hot new icon on the block and catapulted SEGA to the forefront of the Console Wars. Anticipation was high for a sequel and, in keeping with their aggressive marketing strategies, SEGA dubbed November 24, 1992 as “Sonic 2sday”, a marketing stunt that not only heralded the worldwide release of the bigger, better sequel but changed the way the videogame industry went about releasing games for years to come.
Released: June 2013 Originally Released: 29 October 1992 Developer: SEGA Original Developer: Aspect Also Available For: GameCube, Game Gear, Master System, Nintendo Wii, PC, PlayStation 2, Xbox
The Background: I went into great detail about just how important a release Sonic the Hedgehog 2 (SEGA Technical Institute, 1992) was for SEGA; hot off an aggressive marketing campaign and the incredible sales of the first game, Sonic 2 saw SEGA’s supersonic mascot catapulted into mainstream popularity and success. Like with the first game, SEGA also commissioned an 8-bit version of the game; unlike its predecessor, Sonic 2’s 8-bit version was developed by Aspect and, unlike its 16-bit counterpart (and despite the game’s title cards), it did not feature Sonic’s new sidekick, Miles “Tails” Prower, as a playable character. Similar to the 8-bit version of Sonic the Hedgehog, I first played the 8-bit Sonic 2 on the Master System, before its 16-bit counterpart, and the game was noticeably different from its equivalent. Despite being more difficult on the Game Gear, the 8-bit Sonic 2scored high upon release and, even years later when it was re-released on Nintendo’s Virtual Console, it was praised for not being a mere clone of its Mega Drive cousin.
The Plot: Doctor Eggman is back! This time, he’s kidnapped Sonic’s new friend, Tails, and invaded South Island in search of the six Chaos Emeralds once more. Only Sonic has the speed, the skills, and the attitude to bust up Dr. Eggman’s Badniks, find the Chaos Emeralds, and rescue Tails from the egg-shaped madman’s grasp.
Gameplay: Like its predecessor, and pretty much every Sonic the Hedgehog videogame, Sonic the Hedgehog 2 is a 2D, sidescrolling action/platformer in which you must guide Sonic through seven stages (referred to as “Zones”) with three levels (referred to as “Acts”) each. Unlike in the 16-bit game of the same name, Sonic’s arsenal remains unchanged from the previous title; pressing any button will see him become a whirling ball of spikes and allow him to break open power-up monitors and smash Dr. Eggman’s Badniks with his patented “Super Sonic Spin Attack” and you can also put him into a similar spin by pressing down on the directional pad (D-Pad) when running along or down slopes. Pressing up or down also lets you scroll the screen vertically but, otherwise, that’s it for Sonic. While he doesn’t have the Spin Dash here, Sonic is noticeably much faster than in the last game; the game, overall, runs much smoother than its predecessor and there are numerous quality of life improvements as well. While the heads-up display (HUD) is still limited, with your Golden Rings counter still rolling over to zero after you collect more the ninety-nine Rings and your life counter capped at nine despite you accumulating more lives in the end of Act score screen, you can now recollect a few Rings when you’re hit, which is a hell of a boon over the last game, and there’s far less periods of slowdown unless you’re underwater.
The game’s much bigger and smoother than its predecessor, if still restricted by its hardware.
There are, however, some noticeable omissions that make the game much harder. Gone are the Arrow Monitors and neither Signposts or Starposts are present, meaning that you’ll need to restart the entire Act if you lose a life. There’s also far less benefit to finishing Acts with fifty Rings or more; sometimes you’ll get a Ring or life bonus but there are no Special Stages to play this time around and, while extra life monitors can be found in Zones (usually off the beaten track or hidden behind hidden walls), these bonuses are much less prevalent than in the last game. Finally, while it’s great that the sprites are bigger and much more detailed, screen size is a real issue in the 8-bit Sonic 2; I don’t recall it being as big an issue in the Master System version but the Game Gear version definitely suffers from bottomless pits, spike pits, and other hazards being hidden off screen and, in a first for me, respawning Badniks whenever you leave the screen. Where the 8-bit Sonic 2 excels, though, is in its clear desire to mix things up a bit more. It bares absolutely no resemblance to its 16-bit counterpart and instead features entirely different Zones; while some are familiar, and their gimmicks are similar, the two are like night and day. This is seen right away in the first Zone, Underground Zone, which is a far cry from the bright, colourful levels that generally open Sonic games. This Zone features destructible blocks (which make their 8-bit debut here), ceiling spikes, lava pits, and, of course, the mine cart gimmick that appears again later in the game. Sonic’s options while riding a mine cart are limited to simply jumping from it before he meets a sudden end but your options are even more limited in Scrambled Egg Zone’s fast-paced tubes.
Spike pits are plentiful but the game’s finicky bubble and hang glider are a massive aggravation.
Similar tubes last you around in other Zones but these will require split-second decision making on your part and will often return you to the beginning of the maze, at best, or spit you out onto a spike pit or into the path of a Badnik at worst. You can also skim over the surface of the water in Aqua Lake Zone and explore its underwater ruins, collecting air bubbles to breathe and desperately fighting with the game’s clunky controls as you navigate Sonic through narrow, spike-filled tunnels while trapped in a big bubble. The 8-bit Sonic 2 also features the game’s trademark loop-de-loops, which appear most prominently in Green Hills Zone, a stage that features many uphill slopes and blind jumps over long spike pits. You’ll also roll around on spinning cogs in Gimmick Mountain Zone, bash through Dr. Eggman-branded blocks in Crystal Egg Zone, and generally find that most of the game’s Zones are much bigger and more difficult to navigate as a result. By far the absolute worst Zone in the game is Sky High Zone; at first, it’s a pretty typical sky-based level but, once you get past the collapsing platforms, sneaky spike pits, and figure out which clouds can be run along or bounced off, you’re met with the worst gimmick in this (or any) videogame: the goddamn hang glider! Controlling this damn thing is the hardest thing ever as you must have a lot of speed built up to stay airborne, tap left on the D-Pad in just the right way to gain height, and will fall to the ground (and usually your death) if you press the jump button, hit the ceiling, or hit a wall. All they had to do was have it so that you tapped up to stay afloat but, as it is, the controls are extremely counterintuitive and I have no doubt that many players’ experiences of the 8-bit Sonic 2 ended the moment they were forced to use this damn thing.
Graphics and Sound: Sonic the Hedgehog 2 is a marked improvement over its predecessor in terms of presentation; apart from the aforementioned differences in screen size, there’s next to no discernible difference between the sprites and Zones of the Master System and Game Gear versions. Sonic’s sprite is thus bigger, more colourful, and much more cartoony; he has a whole new idle pose where he shrugs his shoulders with indifference when left idle and a whole bunch of new animations thanks to the game’s new gimmicks. Sadly, the Badniks don’t really get the same upgrade; you’ll encounter the same handful of enemies in every Zone and most of them are just recycled versions of Motobugs, Crabcrawlers, and Newtrons, with none of them really standing out.
Zones are bigger and more varied but have very sparse backgrounds.
The game’s Zones are quite the mixed bag; on the one hand, I absolutely love how they’re completely different from the 16-bit version and they’re definitely very unique, with some big and detailed foreground elements. On the other hand, the backgrounds are actually less detailed than before, with only Gimmick Mountain Zone really impressing me with its background elements. While Green Hills Zone is somewhat derivative, it distinguishes itself from its predecessor by having more slopes and (unfair) spike pits. Aqua Lake Zone might be similar to Aquatic Ruins Zone and Labyrinth Zone but stands out by allowing you to take the upper path across the water or using the new bubble mechanic. It was also quite the bold strategy to start the game with the dank and dreary Underground Zone but the use of mine carts and lava helps to make it a fun and simple enough opening stage.
Jaunty music, odd-ball Zones, and some fun little cutscenes add to the game’s flavour.
Perhaps the most bonkers Zone is Crystal Egg, which is populated by flying fish Badniks, cacti plants, falling crystal blocks, and a maze of translucent scenery that is a far cry from the mechanical hellscapes of most final Zones. Indeed, Scrambled Egg Zone (which bares more than a few similarities to Hidden Palace Zone from later Sonic titles) arguably would have been a better choice for the final stage, especially as the final boss is fought in an arena that’s more like Scrambled Egg Zone than Crystal Egg Zone. In addition to featuring a short opening cutscene, more detailed title cards (which replace the map of the last game and, oddly, feature Tails accompanying Sonic), and the traditional ending cutscene (including a cute little sprite of Tails), the game’s music is also quite a step up. Still featuring jaunty, catchy chip tunes, Sonic 2’s music is much longer and more layered than in its predecessor and more than makes up for the game’s less impressive sound effects (though the “SE-GA!!” chant at the beginning was a welcome and unexpected addition).
Enemies and Bosses: As I alluded to above, the 8-bit Sonic 2 kind of drops the ball when it comes to its Badniks; once again, the only time you’ll see Sonic’s woodland friends dancing about is when you free them from the Dr. Eggman-branded flying saucer at the end of Act 3 and you’ll encounter the same handful of baddies in every Zone. There’s only really one new one (the hovering turtles, or “Game-game”, which are a constant pain in the ass) but some returning Badniks have been given an upgrade; Bomb, for example, spews pellets when it explodes and Buton appears as a more fearsome version of Ball Hog but lacks the former’s bomb-throwing ability.
Dodge Dr. Eggman’s bombs to destroy the Antlion and watch for the Goose’s little minions!
Rather than taking on Dr. Eggman in Act 3 of every Zone, you’ll instead have to battle the mad scientist’s six “Master Robots”, which each one appearing as a large, mechanical creature. As before, you’ll have to navigate through a few obstacles to even reach the boss without the aid of any Rings, which can be a pretty tall order when spikes and hazards are much more prominent this time around. Indeed, Dr. Eggman even inexplicably saves you from an unavoidable dip in lava to force you into battling the Antlion Mecha, a mechanical beetle that waits for you at the bottom of a steep slope. To defeat the Antlion Mecha, you have to jump over or avoid the bombs that bounce in from the left side of the screen so that they damage the boss instead of you. This is much easier said than done thanks to the slippery slope and the Game Gear’s reduced screen size; also, Dr. Eggman will rush in to try and ram you near the end so be sure to hop over him. The Goose Mecha requires a lot less strategy; it drops little Mecha Hiyoko around the clouds that you must take out and then bobs around the arena shooting projectiles at you. Simply ram it in the head and avoid getting hit and it’ll go down pretty easily.
Unlike the last game, many Master Robots require a more strategy than just head-on attacks.
Strategy rears its head again when you face the Mecha Sea Lion; if you try and attack as you would a normal Badnik, the Mecha Sea Lion simply balances Sonic on its nose and tosses him around. You can only damage it when its blowing up a red balloon; attack this before it can launch it at you and you’ll land a hit but, otherwise, this is a pretty simply battle. Similarly, the hardest thing about tackling the Pig-Boar Mecha is the spikes on its back and the rocks it causes to fall from the sky. Jump over it when it charges and it’ll stun itself, leaving it vulnerable for a quick hit before charging at you again, kind of like a mixture of the Emerald Hill Zone and Mystic Cave Zone bosses. The Pig Mecha can also be quite a pain; not only is it arguably the hardest boss to even reach thanks to you needing to spring your way over vast spike pits but it also can only be damaged when not curled up into a ball and the window of opportunity to strike is quite small. The Pig Mecha will roll, jump, or fly across the arena and screen trying to hit you and then uncurl to taunt you, making it functionally very similar to the fight against Mecha Sonic in the 16-bit game.
Defeat Silver Sonic without the Chaos Emeralds and you’ll never see the good ending.
Speaking of Sonic’s robotic doppelgänger, you’ll encounter Silver Sonic at the end of Scrambled Egg Zone. Despite its sleeker, more futuristic appearance, though, Silver Sonic is far easier to take on; it tries to slap you with an extending arm and will repel your Spin Attack with one of its own but is otherwise very easy to attack when it’s standing out in the open or trying to charge at you with its rocket boots. If you didn’t find the five Chaos Emeralds before this boss, your game will end here but, if you did, Silver Sonic relinquishes the sixth and final Emerald and you get to play Crystal Egg Zone. This culminates in a final battle against Dr. Eggman; this time, he summons spinning energy balls, arena-filling electrical storms, and little thunderbolts to try and kill you but, while this fight is certainly more harrowing than in the last game, it’s actually more about patience and timing. Sonic must hop into the tubes and circle the arena over and over, popping out to land a hit only when the timing is right and the hazards are gone, which can take some time and be a bit frustrating. Once you defeat Dr. Eggman, he’ll flee once more but, rather than delivering a final blow, Sonic is content to be reunited with Tails.
Power-Ups and Bonuses: Oddly, Sonic the Hedgehog 2 actually includes less power-ups than its predecessor. You can still find monitors in Zones that will grant you an extra ten Rings or an extra life, but there are no longer shield monitors and I don’t recall seeing any speed-up shoes, either. The invincibility is still present, though, and not only appears far more often but is actually required to reach the Goal Post in some Zones as it’s the only way of safely crossing the spike pits.
Additional Features: Like the previous game, playing the 8-bit Sonic 2 on the 3DS is highly recommended; the game is much tougher than its predecessor so the save states are massively helpful when trying to hunt down the six Chaos Emeralds. With no Special Stages to play, you once again have to hunt for the gems in Zones, with all of them being found in Act 2 this time around. However, these are much harder to get to than before, requiring you to stay on higher paths when it’s almost impossible to do so, jump through hidden walls that don’t look any different to other parts of the environment, and making pixel-perfect bounces on springs. They’re also far more important than in many Sonic titles as, if you don’t have all five by the time you fight Silver Sonic, you can’t play the final Zone or rescue Tails; indeed, the game’s bad ending heavily implies that Tails dies as a result of your inadequacies! Sadly, you’ll probably see this ending a lot without a guide; the Master System version has a convoluted level select code that used to help me out a lot as a kid but legitimately beating this game with the good ending takes a great deal of skill…and it’s not like you get to play as Tails for your efforts, or at all for that matter.
The Summary: Sonic the Hedgehog 2 contains many quality of life improvements over the original; the game is bigger, with more colourful and detailed sprites, has a more developed soundtrack, more Zones, and runs a lot fast and smoother (especially when underwater). There’s loads of fun new gimmicks introduced here that help the game stand out from its 16-bit counterpart; the two are like night and day, with each Act being a little different from the last and new mechanics at your disposal so that it isn’t just more of the same Sonic action. However, at the same time, there’s noticeably less; no Special Stages, no real incentive to finish Zones with Rings, less power-ups, and the noticeable absence of Sonic’s two-tailed companion. Not only that but the game is far more difficult, almost unreasonably so, and made even trickier by the Game Gear’s lower screen resolution. Tracking down the Chaos Emeralds this time around was an absolute chore rather than being fun and making it so that you have to have them to even play the full game was a bit of a stretch. However, by far the worst thing is that damn hang glider; it basically derails the entire game as it’s almost impossible to control and, while you can finish Sky High Zone (and even acquire its Chaos Emerald) without using them, I can’t help but feel like this mechanic could have been better implemented. Overall, I’d say it’s definitely a worthwhile inclusion to your library but do yourself a favour and get it on a console like this that allows for save states as it makes the game far more enjoyable.
My Rating:
⭐⭐
Rating: 2 out of 5.
Could Be Better
What did you think to the 8-bit version of Sonic the Hedgehog 2? How do you think it compares to its predecessor and its Mega Drive counterpart? Which of its unique Zones is your favourite? Were you annoyed that Tails was reduced to a hostage rather than being a playable character? Did you ever manage to get the hang of the hang glider and find all the Chaos Emeralds? How are you celebrating “Sonic 2sday” this year? Whatever your thoughts on Sonic 2, and Sonic in general, drop a comment below.
On this day, the 23rd of November, in 1963, the longest-running and most successful science-fiction television series ever, Doctor Who, first aired on BBC One in the United Kingdom. Since then, the rogue Time Lord has gone through numerous incarnations, travelled throughout the entirety of the past, present, and the future, and is widely celebrated as one of the most iconic and recognisable mainstream cultural icons in the world.
Season Ten, Serial One: “The Three Doctors”
Air Date: 30 December 1972 to 20 January 1973 UK Network: BBC One Stars: Jon Pertwee, Patrick Troughton, Stephen Thorne, Katy Manning, Nicholas Courtney, and William Hartnell
The Background: In 1963, the Head of Drama at the BBC, Sydney Newman, commissioned a show to fill a gap in the BBC’s schedule that would appeal to both children and adults alike. After writer Cecil Webber created a brief outline for Dr. Who, a collaborative effort saw the concept refined into the debut episode, An Unearthly Child (Hussein, 1963), and Doctor Who captivated audiences with the following episode, which introduced the long-running and iconic antagonists, the Daleks. Doctor Who attracted strong ratings during its first season but, by 1996, star William Hartnell’s health was becoming an increasing concern, so story editor Gerry Davis came up with a genius idea to allow the actor to step away from the role while continuing the show. Davis conjured the idea of “regeneration”, a process all Time Lords would undergo when mortally injured or at the end of their lives and which would allow them to take on a new face and altered persona up to thirteen times. Patrick Troughton took over the role, eventually becoming one of the most beloved incarnations of the Doctor despite a great number of his episodes being lost. Fearing being typecast, and fatigued by the gruelling shooting schedule, Troughton left the role three years later and my first, favourite Doctor, John Pertwee, was brought on for the show’s big debut in full-colour and became one of the character’s most popular incarnations. In 1972, to celebrate the tenth anniversary of the series, Barry Letts and script editor Terrance Dicks decided to bring together the three actors responsible for the show’s success in the first of many multi-Doctor crossovers. Sadly, Hartnell’s poor health kept him from participating as heavily as was originally intended, but the four-episode serial drew strong ratings and decent reviews, despite some criticisms of the script and characterisation of the main villain.
The Plot: Omega (Thorne), the solar engineer responsible for the Time Lords’ ability to travel in time, seeks revenge on the Time Lords after they left for dead in a universe made of antimatter. Desperate for aid, the Time Lords bend their laws to recruit three incarnations of the Doctor (Pertwee, Troughton, and Hartnell) for aid when Omega drains their civilisation’s power and threatens their destruction.
The Review: I’ve always enjoyed the spectacle of multi-Doctor stories; Doctor Who is one of the few television shows or science-fiction properties where you can easily have an in-built excuse to have previous actors meeting up and going on a little adventure together, and something about seeing the past incarnations of the Doctor interact has always been appealing to me. I think a lot of it stems from the fact that Doctor Who wasn’t on television when I was a kid; they didn’t even air reruns of the show, so watching it was extremely difficult, but I grew up reading the novelisations by Terrance Dicks and had always tried to consume as much of the early days of the show as I could (within reason; a lot of it is unavailable of hasn’t aged too well). The top of my list, alongside the various Dalek adventures, were the multi-Doctor stories, and I’d always had a particular fascination for The Three Doctors (Mayne, 1972 to 1973). This is probably because it was the first of such crossovers but, either way, these types of stories have always been a favourite of mine, even if they’re not always actually that good.
With the Doctor, and Gallifrey, under siege, the Time Lords bring the Second Doctor in to help.
The Three Doctors is a four-part adventure set during John Pertwee’s tenure as the Third Doctor; after being captured and tried by the Time Lords at the conclusion of his second incarnation (and, apparently, as a cost saving measure) the Doctor was forced to regenerate into his third incarnation and left stranded on Earth, where he worked as a scientific advisor alongside the United Nations Intelligence Taskforce (UNIT) and continually tried, in vain, to repair his disabled time machine, the Time And Relative Dimension In Space (TARDIS). Accordingly, The Three Doctors begins in much the same way as many of the Doctor’s adventures during this time (and beyond): on Earth. While investigating cosmic rays, Doctor Tyler (Rex Robinson) comes across a series of unexplained, faster-than-light signals that leave him, and especially UNIT’s commanding officer, Brigadier Lethbridge-Stewart (Courtney), stumped. Intrigued by the signal, which appears to defy all known laws of physics, the Doctor takes Jo Grant (Manning) with him to investigate, unaware that the mysterious signal is causing those that tune into it to be abducted by a flash of light and bringing with it a strange, amorphous blob. This bizarre piece of camera trickery is intent on abducting the Doctor (with the others being taken purely by chance) but, rather than go out searching for the creature, the Doctor insists that they simply stay put and wait for it to find them, which results in a number of UNIT solders being killed when a number of aggressive, seemingly indestructible gelatinous aliens storm the UNIT base. Taking refuge in the TARDIS, but unable to flee, the Doctor begrudgingly sends a call for help to the Time Lords, who find themselves equally under siege from an energy-draining beam emitted from the void of a black hole. Although they cannot spare the energy and manpower (such as it is) to directly assist the Doctor, the Time Lord President (Roy Purcell) violates the First Law of Time by having the Second Doctor materialise in the Third Doctor’s TARDIS to help.
The First Doctor gets his successors on track, and they’re shocked to find Omega behind it all!
Unimpressed with his successor’s redesign of the TARDIS, the two Doctors immediately struggle to get along; both claim to be the real deal, both want to take charge of the situation, and both believe that they are more than up to the task without the other. Even after bringing the Second Doctor up to date with the situation via an awkward telepathic conference, the two Doctors continue to bicker, primarily because the Second Doctor continually gets distracted by his recorder and interfering with the TARDIS. In order to ensure that the two are more effectively able to pool their resources, the President bends time and space ever further by drafting the First Doctor to keep them in order. Though unable to physically materialise due to the Time Lord’s failing power, the First Doctor advises from the TARDIS viewscreen and is unimpressed with both of his replacements, whom he views as “a dandy and a clown”, and their inability to co-operate, but still able to identify the blob as a “time breach” that is intended for crossing through time and space. Much to the shock of Sergeant Benton (John Levene), who stays behind as the Second Doctor’s makeshift assistant, the Third Doctor allows himself to be taken by the time breach, but accidentally takes Jo with him. The two materialise in an antimatter universe full of the objects and people taken by the blob, and the same alien creatures attacking UNIT, where they reunite with Dr. Tyler, who agrees on the impossibility of their situation, all while being completely unaware that they’re being monitored by a mysterious, armoured individual who commands the blob-like creatures. Despite Dr. Tyler’s insistence they should try to escape and his scepticism regarding the antimatter universe, the Third Doctor’s wish to meet their host is granted and he is awestruck to come face-to-face with the legendary Time Lord, Omega. An enigmatic former scientist trapped in a regal armour, Omega is determined to avenge himself on his fellow Time Lords, whom he feels abandoned him to the antimatter universe after discovering the secret of time travel.
Omega overwhelms the Third Doctor but is enraged to find he can never leave his prison.
On the advice of the First Doctor, the Second Doctor disables the TARDIS’s forcefield and allows the entirety of UNIT headquarters to be transported to the antimatter universe, much to the Brigadier’s chagrin, and the Second Doctor and Sgt. Benton are captured and brought to Omega almost immediately. Omega is as angered at the Second Doctor’s attempts to deceive him as he is by the Third Doctor’s insistence that Omega is revered and honoured as a hero, by both himself and the other Time Lords. Omega cannot let go of his hatred and affront at his brethren and, apparently having been driven half-mad by his exile, desires to become a God. With completely mastery over his antimatter universe, Omega is freely able to conjure objects out of thin air and reveals that he survived his dangerous and deadly excursion into the black hole through sheer force of will. However, when the two Doctors stand opposed to Omega’s destructive intentions, the exiled Time Lord engages the Third Doctor in a telepathic battle against the “dark side of [his] mind” in an awkward slow-motion fight sequence that sees even the Doctor’s Venusian aikido overwhelmed. The timely intervention of the Second Doctor spares the Third Doctor’s life and convinces both of Omega’s unconquerable power; as powerful as Omega is, however, he requires the Doctor’s assistance to be free of his antimatter prison since he is forever bound to that world (the moment he tries to will himself to escape, he will ensure his destruction, and he only continues to exist because of his world). Wishing for the Doctor to take his place and allow him to escape, Omega has the two remove his mask, which they will require to keep the antimatter universe intact. However, Omega is enraged to discover that he has become a being of pure will, with no physical form, and is therefore unable to ever be free from his prison.
The two Doctors defeat Omega and the Third Doctor’s exile to Earth is finally lifted as thanks.
Pushed to the edge of his sanity, Omega resolves to destroy everything in a fit of rage, driving the Doctors and their companions back into the TARDIS, where the First Doctor leads another telepathic conference that directs them towards the TARDIS’s forcefield generator, which they hope to use to bargain for their freedom, and with it the very key to defeating Omega. All throughout the serial, the Second Doctor has been banging on about his recorder, having lost it early into the story; it turns out that it fell into the forcefield generator, and as a result was not converted from matter to antimatter. Initially, the Doctors planned to offer to use the forcefield generator to free Omega, but by this point the insane Time Lord has become content to live out his exile alongside his fellow Time Lords and thus spare their universe and friends from his reprisals. Infuriated at the Doctors’ attempts to placate him with “trinkets”, Omega casts the forcefield generator aside, thereby destroying himself and his antimatter universe when the unconverted recorder falls to the floor. The two Doctors are returned to Earth triumphant, though the Third Doctor laments that he/they couldn’t offer Omega any freedom other than death and the Second Doctor bemoans the loss of his recorder. After bidding farewell to the First Doctor, and an amicable parting between the Third and Second Doctors, Third Doctor is elated to find that the Time Lords have restored his knowledge of how to travel through time and space, and provided the TARDIS with a new dematerialisation circuit, thus ending his exile on Earth and restoring his freedom at long last.
The Summary: When watching early Doctor Who episodes, it’s best to do so without a massively critical mindset. If you go into it expecting groundbreaking special effects and production design then you’re obviously going to be a little disappointed, and The Three Doctors is no different. The weird, blob-like entity that captures the Doctor is pretty laughable now, being a mere trick of light spliced into every scene its in, and is surpassed only by Omega’s odd gel creatures that shamble all over the place looking ridiculous. Omega’s antimatter throne room is pretty impressive though, and certainly far more visually interesting than the Time Lords’ control centre, and I won’t begrudge the serial for being hampered by the budget and technology of the time. Furthermore, I’ve always been impressed and amused by the ingenuity and adaptability of early Doctor Who; back then, with little money and some spray-painted Styrofoam, the showrunners would have the Doctor visit all kinds of strange, alien worlds or creature ridiculous alien lifeforms but, these days, it seems like the Doctor is constantly anchored to Earth. To be fair, the Third Doctor was similarly handicapped, but just one episode of modern Doctor Who probably has more money behind it than the entire first series of the Third Doctor’s adventures so you’d think that the showrunners could have him/her stray away from London every once in a while.
In addition to featuring some classic characters, the serial introduces a bombastic villain.
What makes the serial work, and what has always made Doctor Who work, is the fantastic use of characters, such as the Brigadier, whose stiff-upperlipedness always lends itself to some amusing moments as he would be frequently bamboozled by the Doctor’s technobabble and the increasingly bizarre events happening around him, and finding the return of (from his point of view) the first Doctor only perplexes him further. This serial also marks the first time that the Brigadier enters the TARDIS, which is an interesting statistic, and much of the comedy comes from his frustration with the Second Doctor’s easily distracted nature and inability to understand all of the complex time travel mumbo-jumbo happening around him. In comparison, Sgt. Benton is far more adaptable and willing to take the Second Doctor’s lead, though his trigger-happy nature clashes with the Doctor’s more pacifistic approach to matters. Although she’s not a scientist, Jo is probably one of the Doctor’s more capable assistants from around this time; she makes up for her lack of scientific knowledge with a boundless enthusiasm, does a good job of translating the Doctor’s technobabble, and catches on to the serial’s bizarre events far quicker than the Brigadier. In an interesting twist, the Time Lords find themselves in an unusual position where they have no choice but to break their own laws; though their energy is being drained and their civilisation and very way of life is threatened, the Chancellor (Clyde Pollitt) vehemently objects to the President’s actions, despite there apparently being no other option available to them. Although the Doctor has no love for the Time Lords or their stringent rules, he’s directly opposed to Omega’s plot to eradicate Gallifrey since the Doctor is all about the preservation of life. Those who are only familiar with modern-day Doctor Who may be surprised to see other Time Lords in this serial, particularly a Time Lord antagonist who isn’t the Master (Various), and I would love for the show to bring back some of the other antagonistic Time Lords as it really does help flesh out the universe beyond it always being the Doctor and the Master over and over again. Omega makes for a bombastic and intriguing villain composed entirely of antimatter and fuelled only by rage; he resents being left in exile and is so consumed by his lust for power and vengeance that he refuses to listen to the Third Doctor’s pleads that he (as in Omega) hasn’t been forgotten and brings about his own end simply because his rage and solitude have left him unable to control his emotions.
The squabbling Doctors must learn from their predecessor and work together to defeat Omega.
Of course, like all multi-Doctor stories, the main appeal of The Three Doctors is seeing the Doctor interact with his other incarnations. While it’s disappointing that the First Doctor was unable to take a more active role in the serial, making this more like The Two-and-a-Half Doctors, it’s interesting seeing his characterisation here; although the oldest actor of the three, the First Doctor is technically the youngest and least experienced of the Doctor’s incarnations, something which comes up in subsequent stories, so it’s somewhat amusing that he’s the more mature and rational of the three. While the Second and Third Doctors constantly bicker and get on each other’s nerves, the First Doctor remains impassive and logical, deducing solutions and offering insight that his successors have missed due to their more flamboyant natures. The Second Doctor is annoyed when the Brigadier describes him as the Third Doctor’s “assistant” and the Third Doctor finds the presence of his predecessor an unnecessary and dangerous event, at best, and an insult at worst. It is only when they and their companions are captured by Omega that the two Doctors finally set aside their grievances and agree to work together and, encouraged by Jo, are able to manipulate Omega’s antimatter universe in their favour. It’s great seeing the how different, and yet similar, all three incarnations of the Doctor are; each are extremely intelligent, proud, and stubborn Time Lords with their own aristocratic flair, and the more mischievous nature of the Second Doctor riles up not only his successor but both the Brigadier and Omega as well. While the Third Doctor is much more in control of his emotions, he frequently lets his predecessor’s playful ways get under his skin, and only the wise council of the First Doctor can help keep the three focused on the greater task at hand.
My Rating:
⭐⭐⭐
Rating: 3 out of 5.
Pretty Good
What did you think to The Three Doctors? Are you a fan of multi-Doctor adventures or do you find that they’re confusing and lacklustre affairs? Which of the first three Doctors was your favourite and what did you think to their interactions with each other? Were you disappointed that William Hartnell was unable to properly participate in the adventure, and what did you think to Omega? Would you like to see Omega and other antagonistic Time Lords return to the series or do you prefer the Doctor to be from a near-extinct race? How are you celebrating Doctor Who Day today? Let me know your thoughts on Doctor Who and its first multi-Doctor adventure down in the comments by signing up, or leave a reply on my social media.

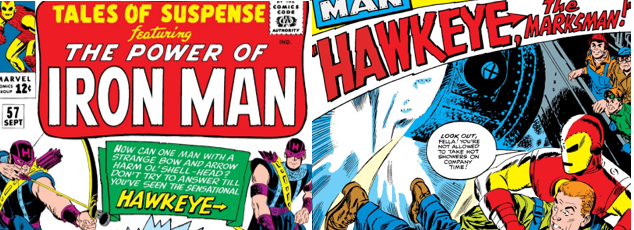
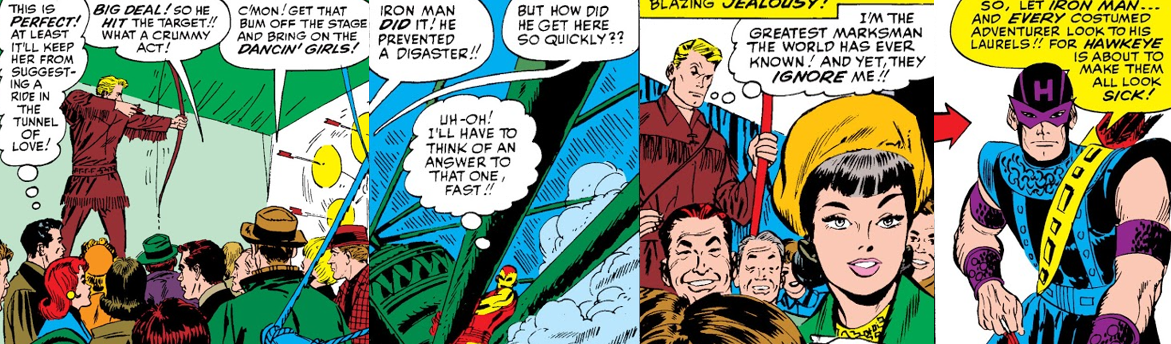

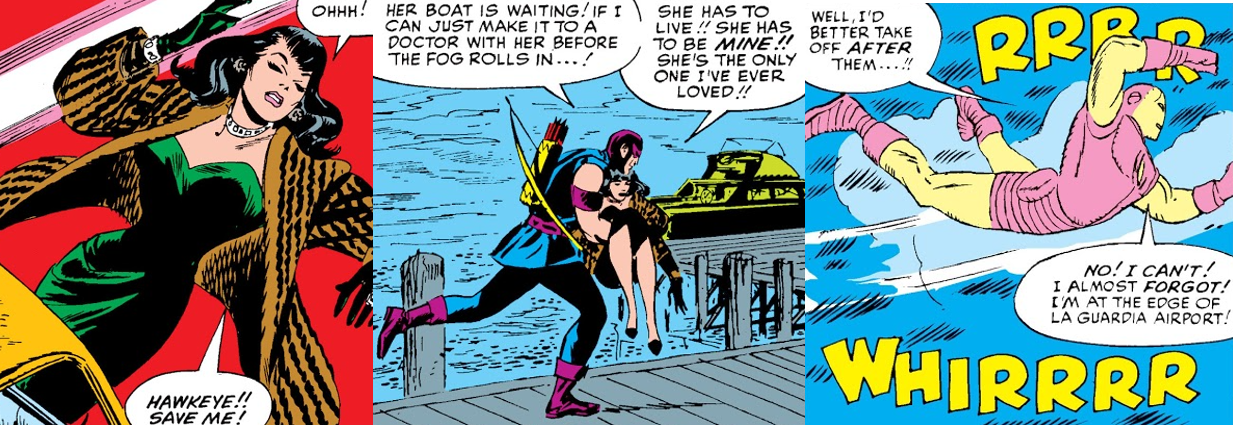


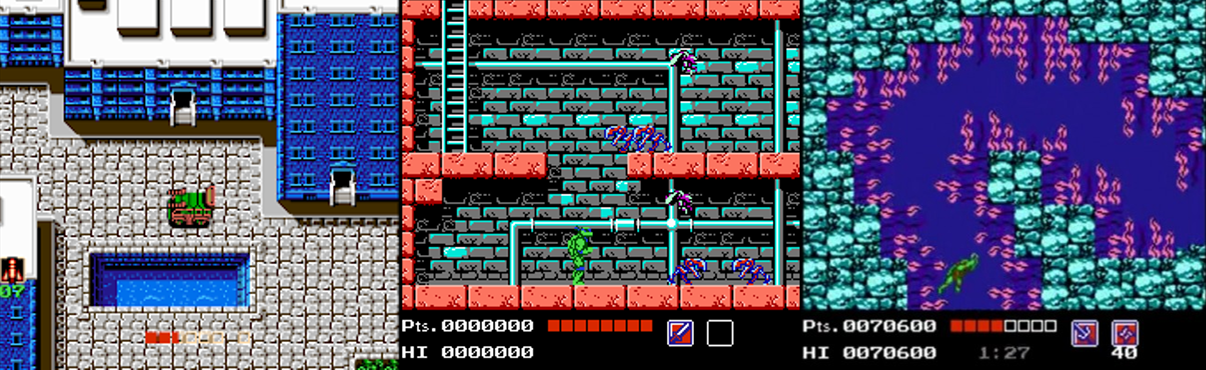

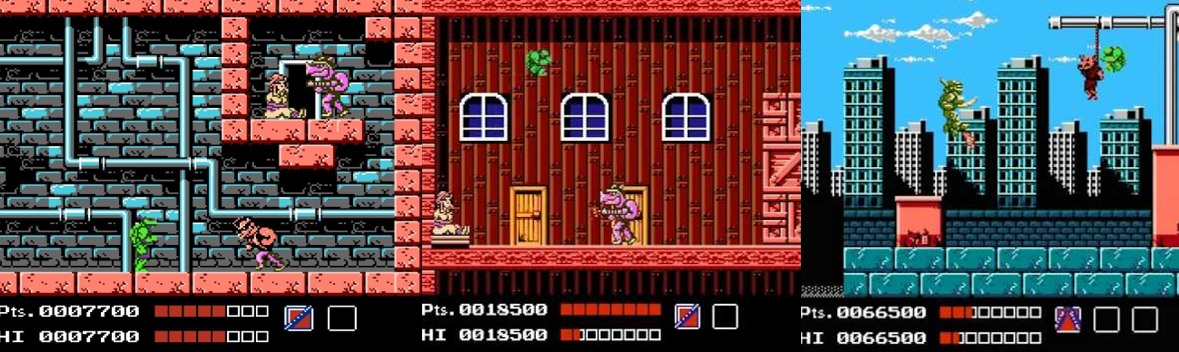
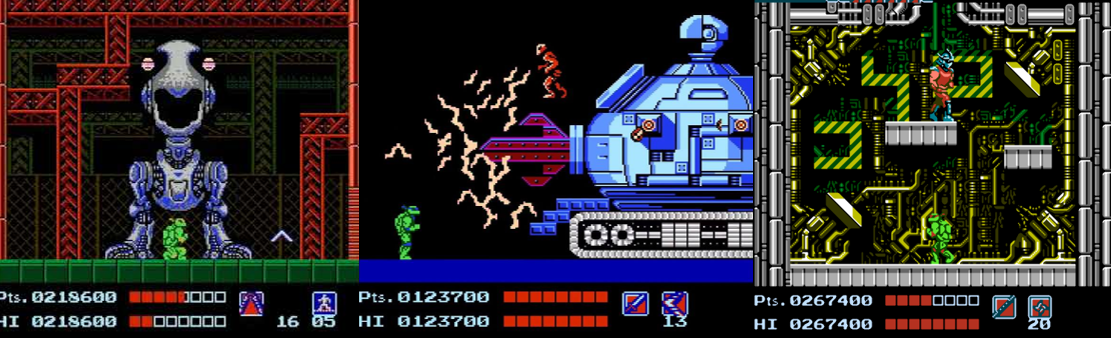


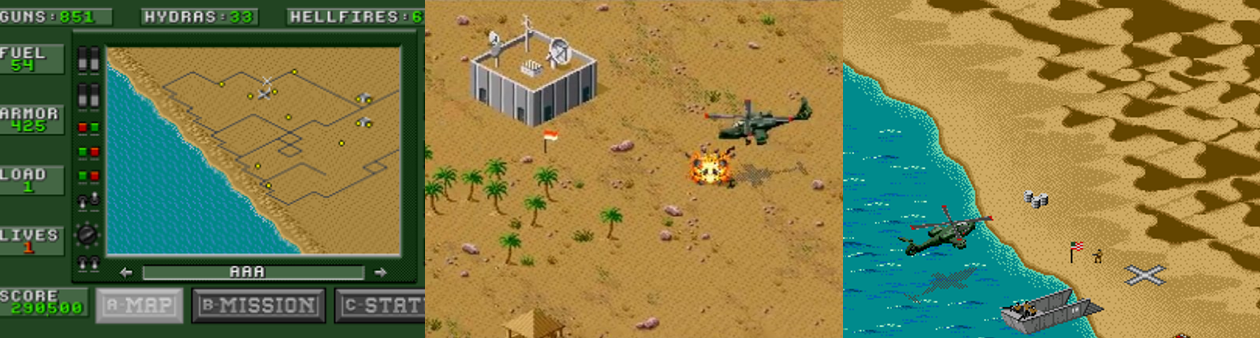

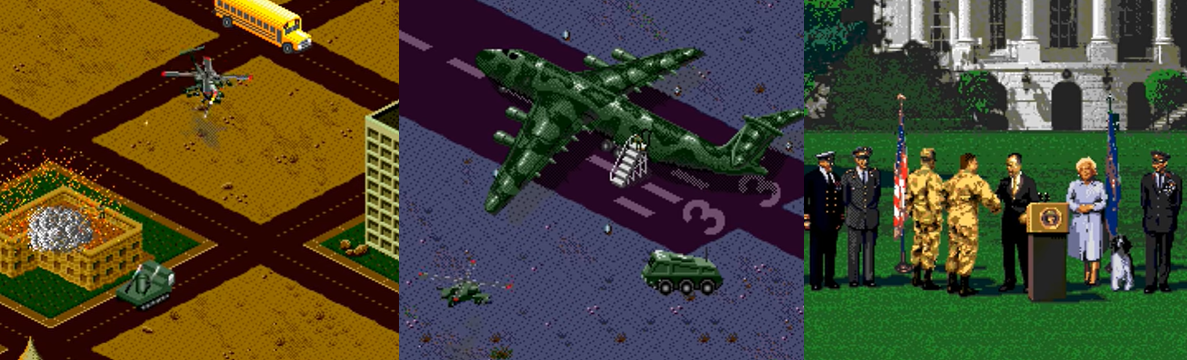


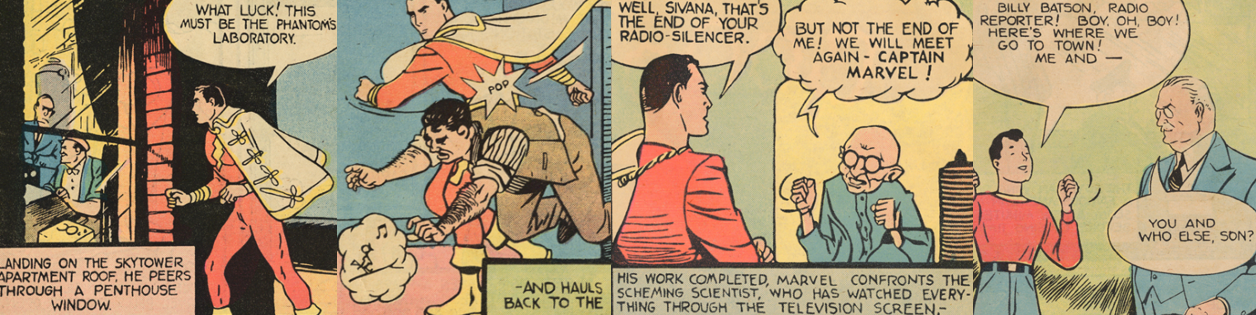
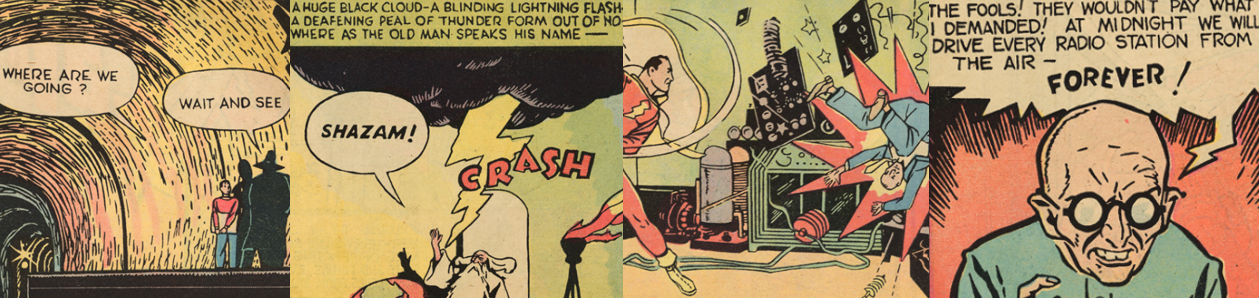


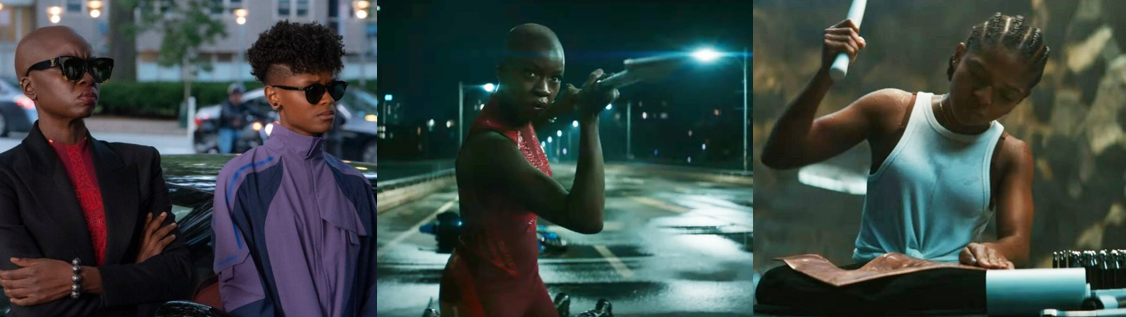

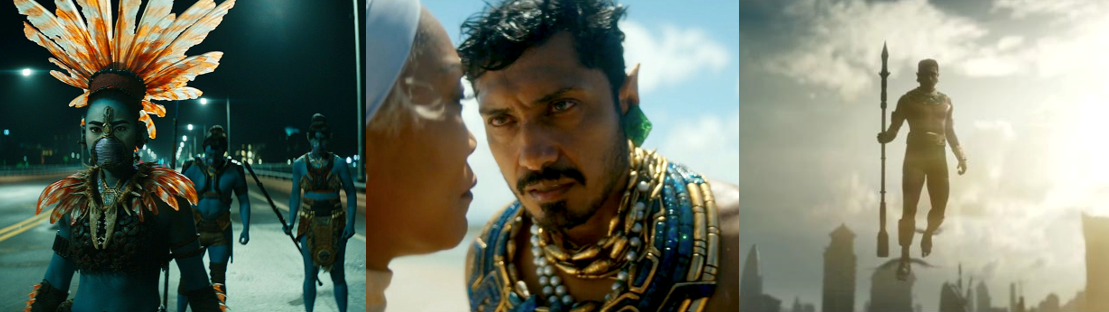
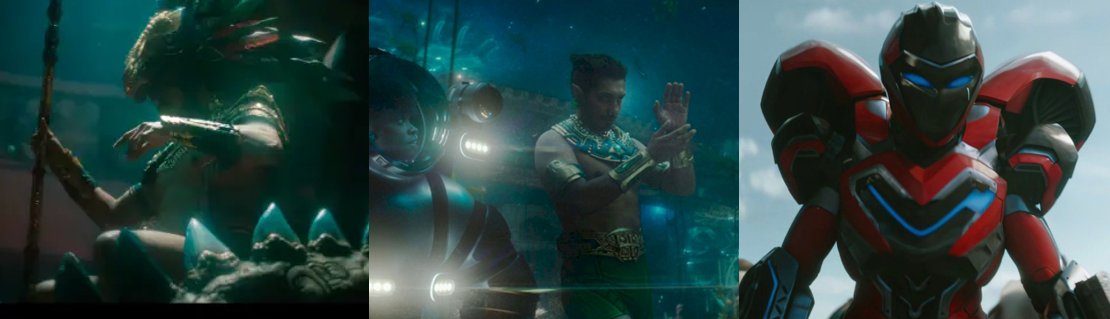
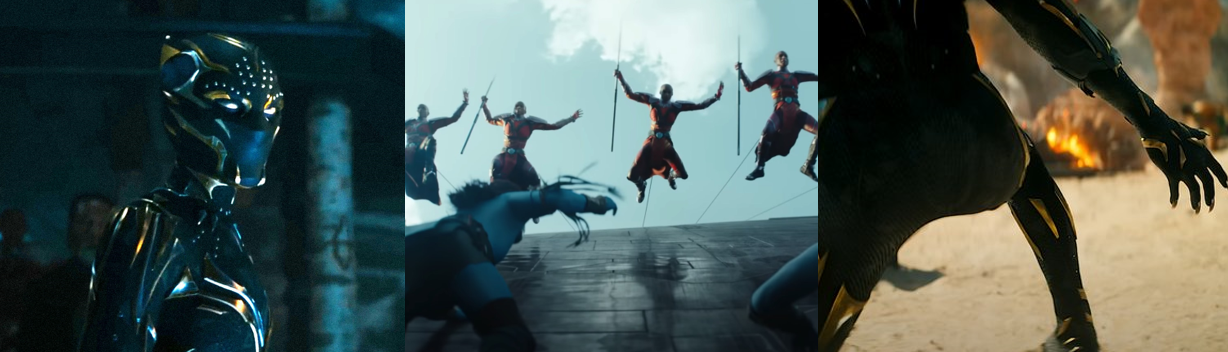


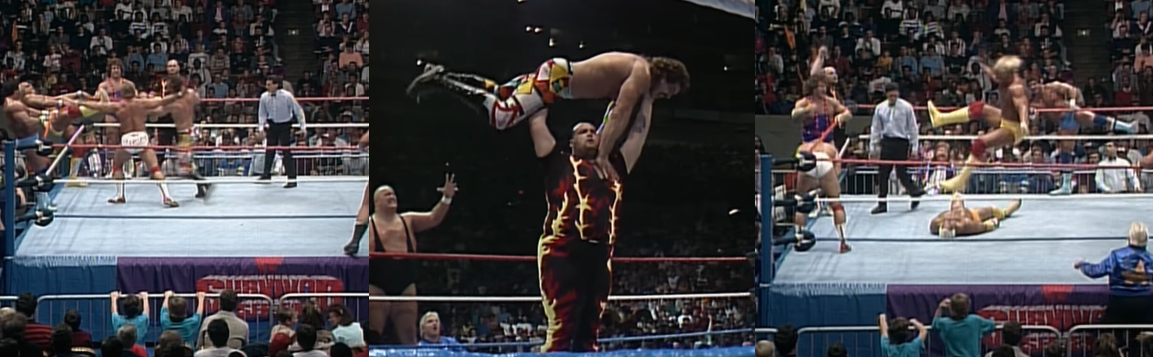


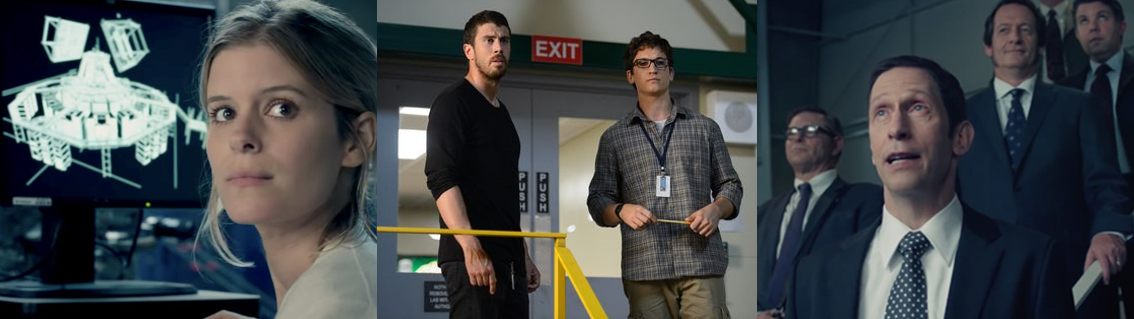
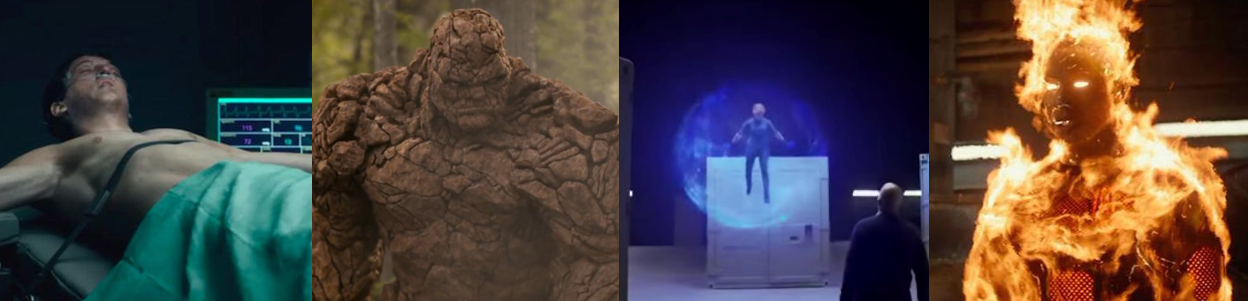
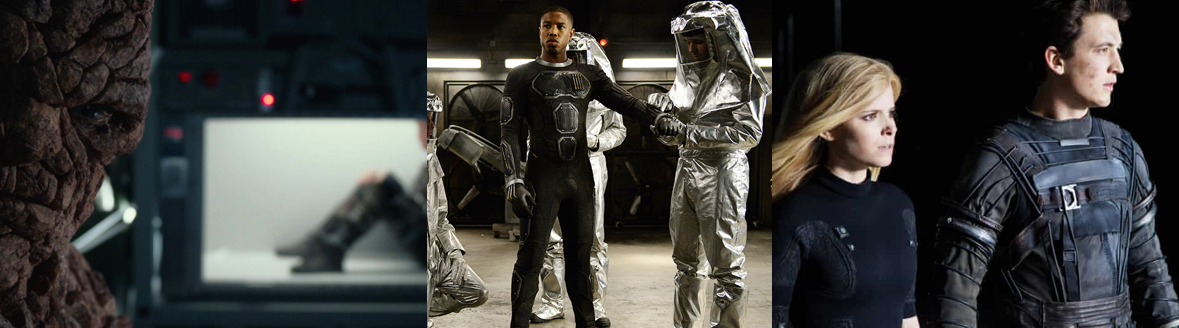
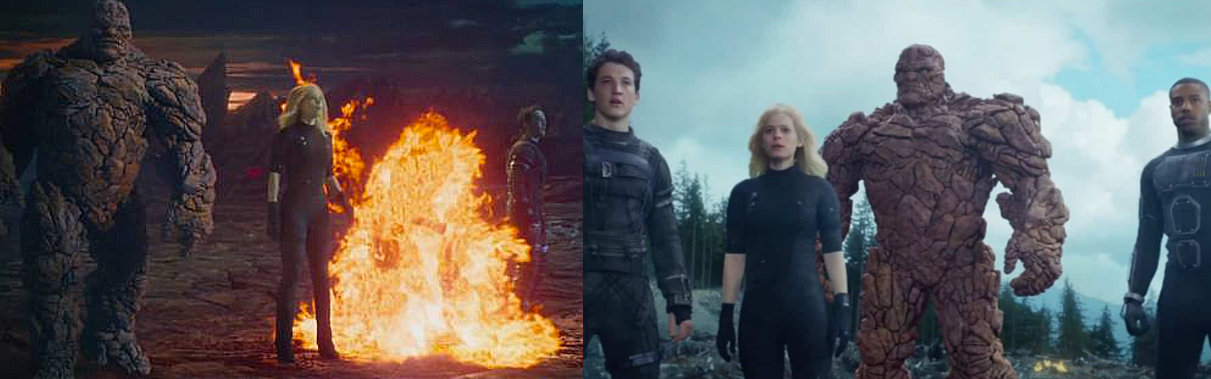


You must be logged in to post a comment.