Game Corner [Zelda Month]: The Legend of Zelda: A Link Between Worlds (Nintendo 3DS)


On 21 February 1986, The Legend of Zelda (Nintendo EAD, 1986) was first released in Japan. The creation of legendary game designer Shigeru Miyamoto and Takashi Tezuka, The Legend of Zelda launched one of Nintendo’s most popular franchises. This year, I’ve been dedicating every Wednesday to Nintendo’s most famous silent protagonist, Link and his vast and enduring fantasy world of sword and sorcery.


Released: 22 September 2013
Developer: Nintendo EAD

The Background:
Selling well over 6.5 million copies and widely regarded as one of the greatest adventure games of all time, Shigeru Miyamoto’s original Legend of Zelda was a big success for Nintendo. Although its sequel was a more divisive title, it also sold well but both paled in comparison to the, game-changing, widely acclaimed best-seller that was The Legend of Zelda: A Link to the Past (Nintendo EAD, 1991). Not content with setting the template for the series going forward, A Link to the Past was also followed by a comic book and manga adaptation and an enhanced Game Boy Advance port. In 2009, development began on a new Zelda game for the Nintendo DS, one that emphasised communication. Miyamoto nixed this concept, however, and suggested a gameplay mechanic that would allow Link to merge onto walls as a 2D image; although this was met with praise, development was shelved to focus on launch games for the Wii U. The project was revived after the success of The Legend of Zelda: Ocarina of Time 3D (Grezzo, 2011) with an all-new team in place and reconfigured into a direct follow-up to A Link to the Past release exclusively on Nintendo’s 3DS system. The game’s top-down perspective raised a number of challenges for the team, resulting in a more slanted, 2.5D perspective to allow for greater field of view. Since the 2D mechanic had already changed their approach to puzzles and dungeons, the team also sought to give players more freedom by allowing them to rent items to proceed as they wished. A Link Between Worlds released to widespread acclaim and became the second highest scoring 3DS game of 2013; reviews praised the innovative gameplay, the rental system and the level of challenge it offered, as well as the visuals and music.

The Plot:
Apprentice blacksmith Link quests to rescue Princess Zelda from the clutches of the evil sorcerer Yuga, who seeks to resurrect the demon king Ganon using the power of the Seven Sages. When Yuga escapes through a rift into the parallel world of Lorule, Link follows, aided by a magic bracelet that allows him to merge into walls as a 2D painting.

Gameplay:
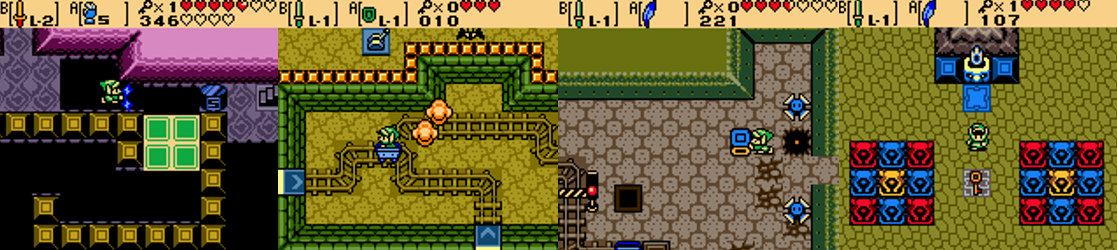
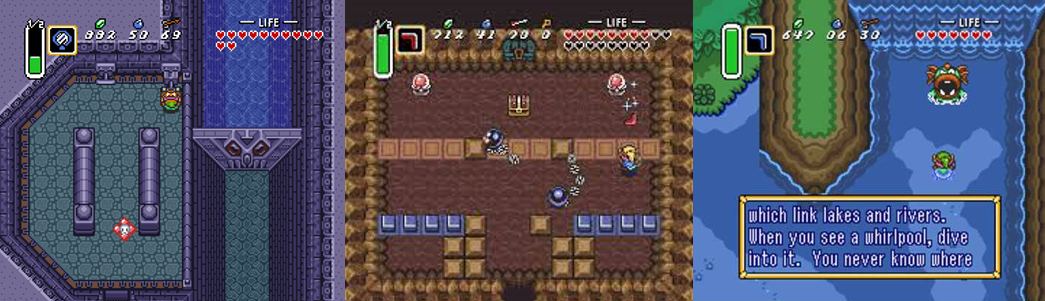
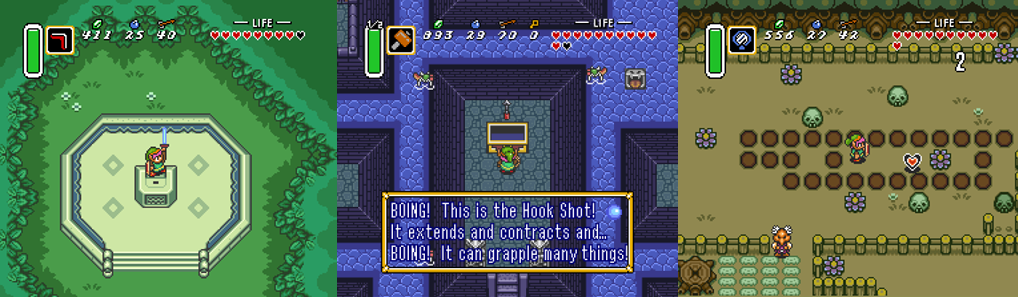
The Legend of Zelda: A Link Between Worlds is a top-down, 2.5D action/adventure game that’s stylised in classic Legend of Zelda fashion; more than anything, the game is essentially an updated version of A Link to the Past, taking place in the same world, featuring many of the same characters and locations, and updating the gameplay mechanics to utilise the optional 3D effects of the Nintendo 3DS and the touch screen. Series protagonist Link is now able to travel in all directions smoothly and effortlessly with the 3DS control stick; he still can’t jump but he’s able to pick up and throw pots, small (and, later, larger) rocks, and open chests and doors with A and attack enemies with his sword using B. Holding down B will see Link charge up and release his patented Spin Attack and, when he acquires the Master Sword later on, he’ll send out an energy waves when at full health. When Link gets a shield, it’s assigned to the Left trigger; holding L will defend Link from most attacks and, later, defend against certain magical and energy-based attacks. Both of these items are automatically assigned to their respective buttons and cannot be swapped out, but Link will naturally acquire other items throughout the game which can be assigned to the Y button via the touch screen.

Link must now rent his equipment and their use is tied to an energy meter, which has pros and cons.

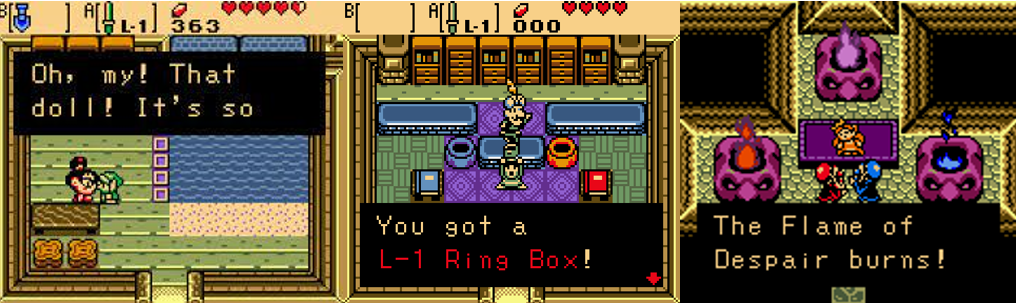
Items are incorporated very differently in A Link Between Worlds than in other Zelda games. While Link will still find the odd weapon or upgrade in a big chest in the game’s many dungeons, the majority of his weapons are now rented from the mysterious Ravio, a tradesman located in Lorule. Link has an energy meter that depletes as he uses each item but which will replenish over time, effectively giving him infinite ammo; energy potions found by slashing grass, smashing pots, or defeating enemies will also fill this gauge and you can even extend the length of it later in the game. When you rent an item, it’s yours to keep until your hearts are depleted; then it returns to Ravio’s shop and you need to rent it again, however you can later permanently purchase each item at the cost of a few thousand Rupees and also upgrade their efficiency and range by finding lost Maiamais throughout the two worlds. This system offers a range of freedom rarely seen in the Zelda series and effectively means you can tackle the game’s dungeons in any order you wish, however you will need to explore some dungeons first to find a key item needed to access or complete others. Personally, I’m not a huge fan of this system; I constantly walk around slashing at everything to fill up my Rupees, meaning I was easily able to rent every item and, later, purchase them all to load Link up with all of his weapons early on and a lot of the fun of exploring a dungeon is now lost as defeating a mini boss generally only yields a warp point or opens the way to the boss key rather than awarding an item.

Link can now become a 2D painting to reach new areas, avoid detection, and outsmart certain bosses.

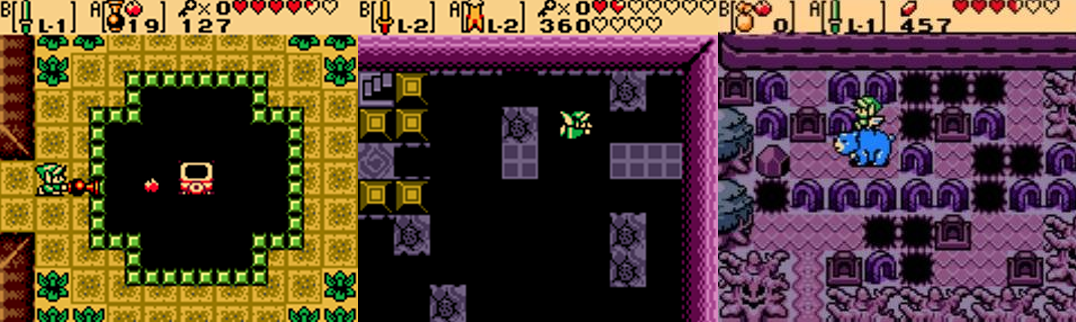
A Link Between Worlds’ other big mechanic is Link’s ability to merge with walls and become a 2D painting for as long as his energy gauge lasts. This is often used in clever ways to add new dimensions to the dungeons, allowing you to race around the perimeter of a room or tower to reach new areas, switches, chests, and levels to progress. When in his 2D form, Link cannot attack or do anything except run, but that’s okay as you won’t have to worry about enemies until the finale. While Link cannot bypass cracks or blockades in this form, he can attach to other surfaces; so you’ll often merge with a moving block and then merge into another to reach a higher or further platform and it can be pretty interesting to play around with the mechanic. As the game progresses, this system is essential as it’s the only way to travel to and from Hyrule and Lorule; ominous dark slits appear all over the map and allow you to travel to each world and, since Lorule is in a fragmented state, you’ll need to go to certain areas of Hyrule, travel between a rift, and then work your way to your destination in Lorule. Despite this, however, I don’t think the mechanic lives up to its full potential; it’s essentially just a quirky means of solving puzzles and navigating dungeons and to travel between worlds and I do feel like the developers missed an opportunity to expand upon it with 2D sidescrolling sections or mini games. There are hidden challenge rooms you can find that often make innovative use of the mechanic, but it’s rare that you’ll need it in a boss battle and a lot of the uses it has could’ve easily been supplanted by your items.

Link’s items and new abilities will allow him to reach new areas and solve puzzles.

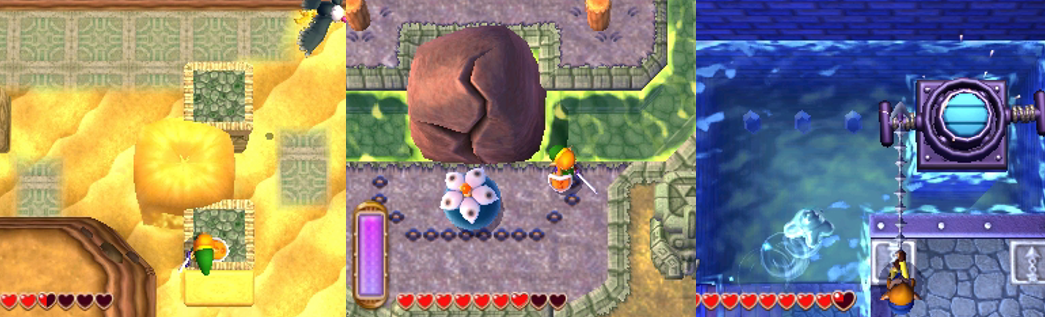
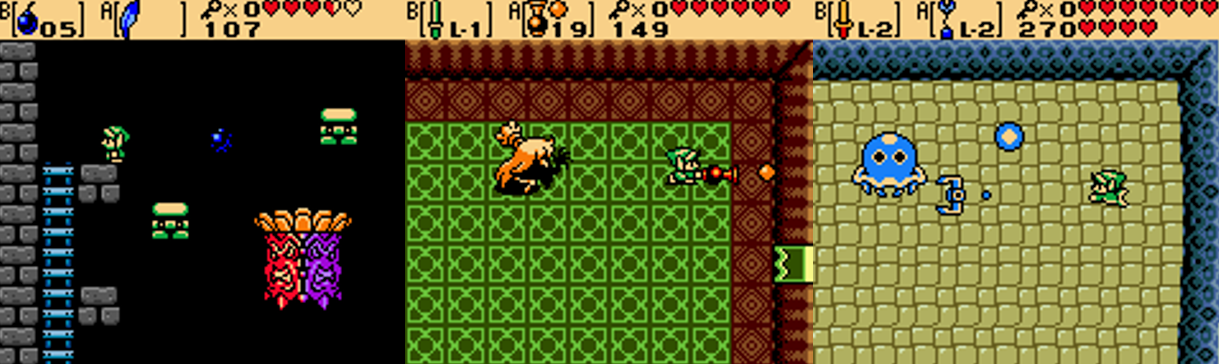
Thanks to the 3DS’ dual screens, the bottom screen makes item management and map navigation easier than ever. You can switch between the Hyrule and Lorule maps at the press of the screen, view your Rupee count and see how many Maiamais are hidden in each area, zoom in, and even place pins over the map (though you can’t label them so this can get a little messy). You can freely shuffle about your items and even make use of a quick-item function (though I never had a need for this); later, you receive a bell that lets you fast travel across the map courtesy of Irene the witch and her flying broomstick. This lets you fast travel to any of the weather vanes you’ve activated across the map; these vanes also act as your primary save point, which is a bit of a pain as I much prefer being able to save at any time and the vanes also have the gumption to encourage you to take a break if you’ve been playing for a while. If you’ve played A Link to the Past, the game world will be immediately familiar to you; even many of the dungeons are the same and the game has a very similar structure, with Link being tasked to find three pendants before venturing to a dark version of Hyrule to rescue the seven Sages. Link’s ability to navigate the world depends on what items you have; you won’t be able to blow up rocks without bombs, for example, or cross the desert without the sand rod or swim in water without the flippers and these items are also essential for uncovering secret caves, shortcuts, fairy fountains, and other areas. One new aspect you’ll come across a couple of times is the big bomb flower; you’ll need to press A to have this large bomb follow you and safely guide it to large cracked rocks to access new areas, but you need to be careful as one hit or knock and it’ll explode prematurely.

Puzzles and hazards feature in dungeons that’re largely vertically aligned to use the 3D feature.

For the most part, puzzles and dungeons will be immediately familiar to any Zelda player, especially anyone who’s played A Link to the Past. You’ll be lighting torches with your lamp and fire rod, or extinguishing them, to open doors or spawn chests, acquiring small keys to unlock doors, climbing ladders and stairs, riding a variety of moving, spinning, and temporary platforms, and activating a number of switches and pressure pads. Sometimes this means dragging a statue onto them, other times you need to trick a Wallmaster into hitting them, and occasionally you need to do both while standing on a third. Blue and red switches will raise and lower their respective walls, partially invisible platforms and mazes dog your progress, requiring more innovative use of flames, and you’ll be hammering down pegs or springs to reach new areas, crossing narrow platforms, and pulling or hookshotting levers to open doors. A couple of times, you’ll need to find eyeball-like orbs to toss into statues to progress, or create temporary platforms using the ice rod, or melt away blocks of ice while skidding on slippery floors. You’ll be diving into water, crossing lava pits on pop-up columns that you must also guide boulders over, riding wind currents, dropping caged bridges to create safe passage, and making use of warp tiles to fast travel about. Many dungeons require more vertical navigation to utilise the 3D function, meaning you need to find new ways to travel upwards, push statues or fall down to lower levels to reach items and doors. You’ll also need to watch for flaming hazards and spiked logs, use your bombs to bring in some light to solve puzzles, use your hookshot to pull rafts across water and lava, navigate foggy mazes, rescue a thief girl and bring her safely to the dungeon’s exit, and even travel outside of some dungeons to reach new areas. Thankfully, you can make use of each dungeon’s compass to help you find your way and you automatically have a map available when you enter, though the only way to save is to exit to the outside, which respawns any enemies you’ve defeated.

Graphics and Sound:  
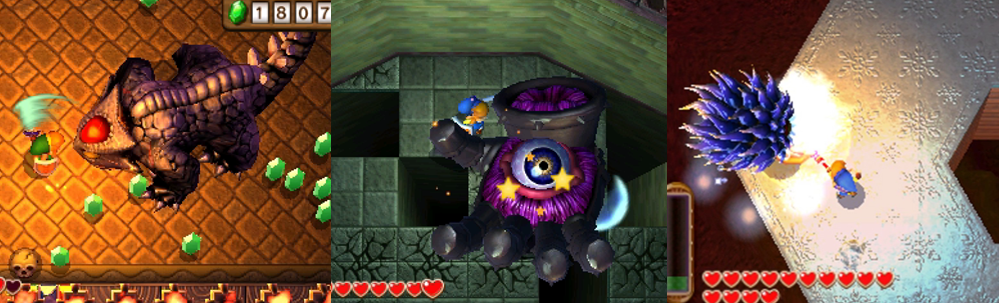
Since I am a big fan of the classic, top-down perspective, I cannot fault A Link Between Worlds’s presentation. This was the best that a 2.5D Zelda had looked at the time and I love how the game has a kind of plasticine/figurine look that brings the characters to life in a way that recalls both the toon style and the classic Link to the Past aesthetic. Link is a squat, chubby little swordsman who grunts, screams, and pants as he attacks, gets hurt, or is low on health. He trots around nicely, all of his attacks and weapons are crisp and smooth, and he exudes a lot of personality and determination in his stances, victory poses, and facial expressions during the game’s few more dynamic cutscenes. For the most part, the game uses traditional text boxes and in-game graphics as non-playable characters (NPCs) deliver exposition or threats to Link but, sometimes, the game switches to a more cinematic presentation to showcase Yuga’s power or introduce new elements, like the 2D mechanic and Lorule.

Hyrule is largely the same as before but brought to vivid life by the colourful, 2.5D aesthetic.

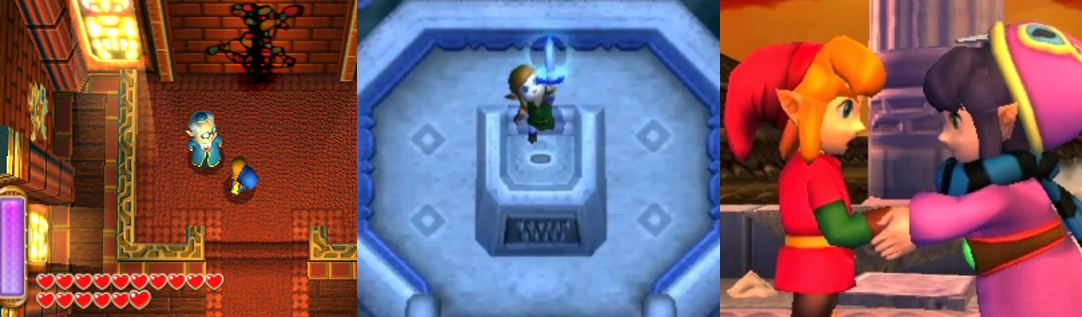
As already stated, the game world is an almost exact recreation of the Hyrule seen in A Link to the Past; all the areas from that game are back, brought to life in eye-catching 2.5D and bolstered by the 3D effect if you can stomach it. There are numerous little new touches here, too, such as birds that fly away as you come close, Majora’s Mask appearing as an Easter Egg, and an array of paintings inside the now peaceful Hyrule Castle. Locations such as the Eastern Palace, Tower of Hera, Desert Palace, and Skull Woods all return, as do the Lost Woods (where you must again venture to claim the Master Sword), Kakariko Village (complete with Cuccos and blacksmith), the haunted graveyard, Zora’s Domain, Lake Hylia, and Death Mountain (complete with falling rocks from the erupting volcano). This naturally means that you’ll venture into many of the same dungeons, though the means by which you enter and their layouts and rewards are somewhat different, and that the game includes many remixed themes from A Link to the Past. One thing I really enjoyed about the soundtrack was how it slowly builds up in the early going; the full, triumphant Zelda theme doesn’t kick in until you acquire the Master Sword, allowing for a clear and recognisable feeling of accomplishment. This is matched by the progressive difficulty of the game; to start with, the dungeons are quite short, and the enemies only take a few swipes of even your normal sword to kill but, once you travel to Lorule (via a quick little cutscene that only slightly outstays its welcome), the dungeons become much more complex and the enemies, especially those on the overworld, become much tougher.

While similar to the Dark World, Lorule is its own beast, with remixed dungeons, enemies, and bosses.

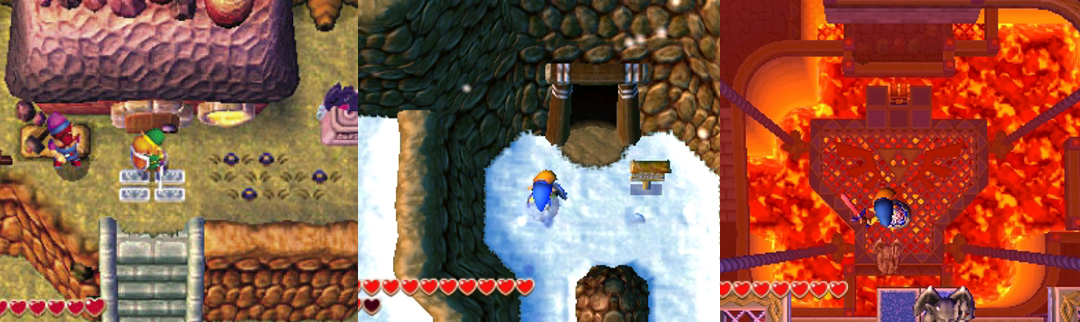
Although functionally similar, both in concept and visual execution, to A Link to the Past’s Dark World, Lorule is actually a completely different, desolate parallel dimension. Despite this, many of its areas are analogous to the Dark World and its dungeons, including a ransacked version of Kakariko Village, the Thieves’ Town, a skeleton-infested perversion of the Lost Woods, a poisonous and murky swamp, and the lava-spewing horrors of Turtle Rock. Perhaps my favourite aspect of Lorule was that Death Mountain is now a frozen wasteland and home to the Ice Ruins which, while essentially a remixed version of A Link to the Past’s Ice Palace, was enough of an alteration to hammer home how different the two worlds are. This is further reinforced by the different, far more ominous overworld theme, the fragmented nature of Lorule (some areas are inaccessible without finding a rift part in Hyrule), and the tumultuous dirge hanging over the central Lorule Castle. It’s a far cry from Ganon’s Tower and the Pyramid of Power, but Lorule Castle is seeped in a dark energy that can only be breached by the Sages’ power and the Triforce of Courage and is a perverted mirror of Hyrule Castle, awash in thunder and lighting and featuring almost every gimmick seen in previous dungeons, alongside some remixed boss battles. Furthermore, Lorule is home to counterparts of Link, Zelda, and even Ganon in the form of Princess Hila, Ravio (spoilers!), and Yuga as well as a gaggle of thieves and distraught citizens just trying to survive as their world crumbles around them.

Enemies and Bosses:
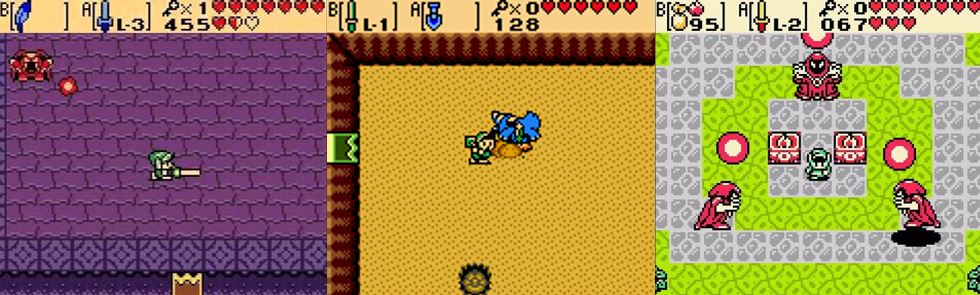
Both Hyrule and Lorule are populated by swarms of enemies who will be immediately familiar to A Link to the Past players. Blobs (including regular green one and electrifying yellow ones), bees, crows, Chasupas, Tektites, Deadrocks, Octoroks, Popos, rats, Poes, sand crabs, Ropes, and Like-Likes are commonplace across Hyrule but, once Yuga’s plan is set in motion, sword, spear, and archer soldiers start patrolling the overworld as well. Variants of these can be found in Lorule, such as the Dactos, Hyus, Ropas, and snap dragons but Lorule’s enemies are far more dangerous than Hyrule’s. Guys like the bomb- (or snowball) tossing Hinox, pig-like Taros, flame-spewing Zarak, shield-carrying Moblins, and far tougher Lorule soldiers can not only take a lot of punishment but also dish it out, too, immediately turning your carefree adventure into a fight for survival. And this isn’t even factoring in the formidable Lynels, teleporting elemental Wizzrobes, mummy-like Gibdos and the Freezors (who are extremely susceptible to fire…), jellyfish-like Biris, cyclopean Eyegores, mimicking Goriyas, and terrifying Wallmasters. Some enemies, like the mace-wielding soldiers, nimble Stalfos, sand worm-like Devalants, sliding Pengators, and flaming Gimos act as mini bosses in the game’s dungeons. Generally, this means they attack as a group or alongside other hazards, like flying tiles, moving platforms, or flaming obstacles, though the two flaming Heedles have lava pools in their path and require the tornado rod to defeat and you’ll need to time your attack against the Gigabari and it spawn to avoid being electrocuted.

Although easy enough in their first encounters, the game’s returning bosses are more formidable later.

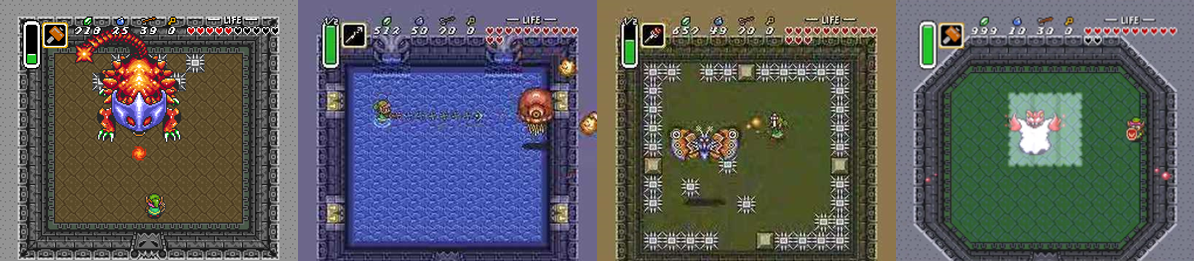
The first boss you’ll face is the game’s primary antagonist, Yuga, who you first battle in the Eastern Palace. Yuga fires projectiles from across a pit hazard and hides in the wall as a painting when you get close, so you need to stun him with arrows to land a hit. As the battle progresses, Yuga gets faster and more aggressive and races around the room as a painting but you can simply wait for him to pop out to continue your assault. The second boss I fought was Moldorm, one of many returning bosses from A Link to the Past. This large, spherical worm-like thing slivers about on a small caged platform trying to knock you over the edge or down a hole into the bladed hazards below. Simply avoid this and slash at its tail to defeat it but beware as it becomes faster and more erratic as the fight progresses. I finished up Link’s initial quest by facing Margomill, a strange column with a fearsome central eye that awaits in the House of Gales; Margomill spins around the room trying to push you down the bottomless pit that surrounds the platform you battle it on. You’ll need to use the tornado rod to avoid its attack and reach its eye; however, every time you deal damage, it grows a new part to its body to make the eye harder to reach. Both Yuga and Moldrom return as mini bosses in Lorule and Hyrule Castle, respectively; while Moldorm isn’t too difficult, despite the expanding and contracting walls making it a close-quarters fight, Yuga is far more formidable. In this bout, you must strike the correct duplicate of Yuga or be forced to fend off increasing waves of enemies while avoiding his various magical projectiles. The real Yuga is identified through his glowing staff, but this battle can get pretty tough if you don’t keep your eyes open; at the same time, I found it just as easy to camp out in a corner and slash away, dodging his projectiles until I hit the right Yuga!

Bosses will be more or less challenging depending on the order you challenge them and the items you have.

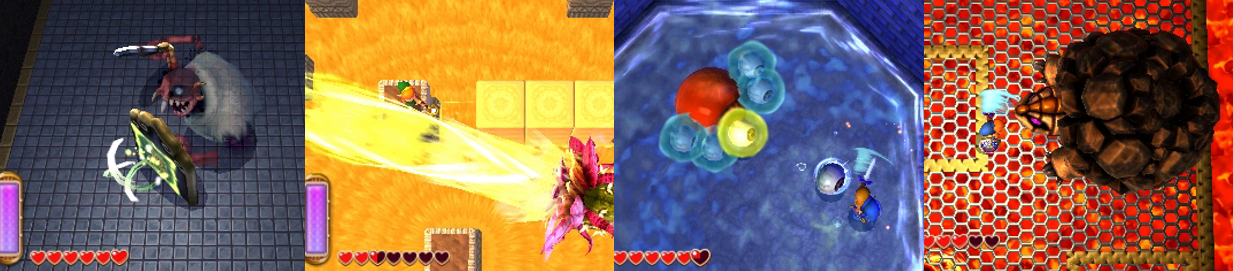
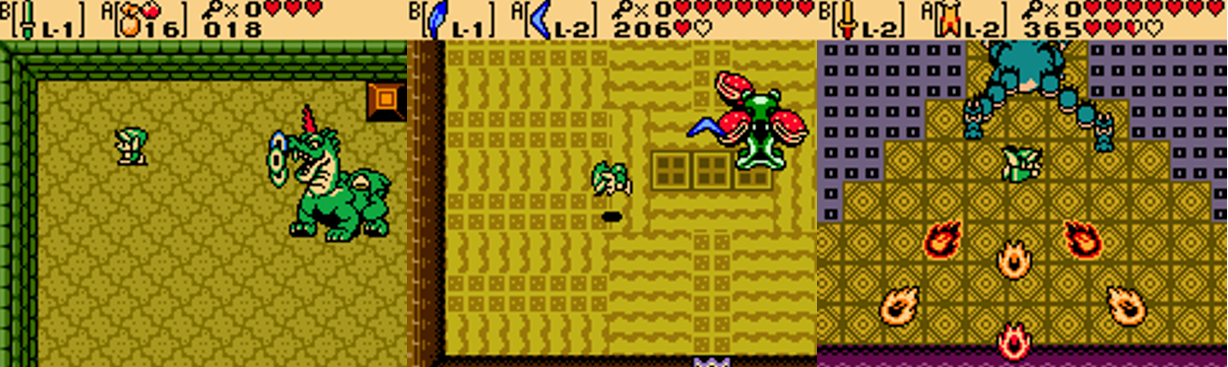
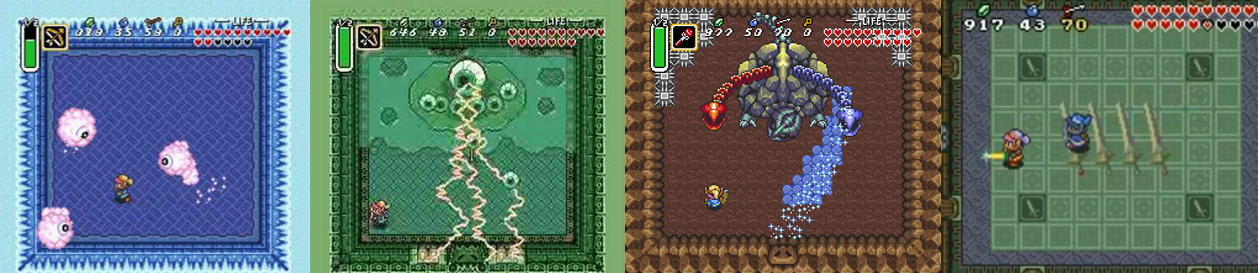
Once you’re in Lorule, you can effectively tackle its dungeons and bosses in any order provided you’re renting the right equipment. The first of the next set of seven bosses I fought was Stalblind, a monstrous spirit armed with a large sword and shield who you battle on a small platform surrounded by a bottomless pit. Stalblind makes innovative use of the 2D mechanic in that you need to merge onto his shield to stun him so you can attack, though you’ll need to avoid his dark magic. Stalblind’s attacks become more aggressive, but also more predictable, as the fight progresses; he eventually ditches his shield, busts out his own version of the Spin Attack, and even sends his head flying around to spit fire at you, though he’s left vulnerable when his sword gets stuck in the ground. As I next took on the Desert Palace next, I fought Zaganaga; this was quite a complex battle as you need to use the sand rod to create temporary platforms and reach the smaller columns to attack Zaganaga, who constantly moves around the arena and spits projectiles. Eventually, it switches to a far more devastating blast of sand and proved to be my first real challenge of the game, meaning my next boss, the returning Arrghus, was a cake walk in comparison. As long as you have the hookshot, Arrghus is barely a threat; simply extract the Arrgi surround it and destroy them, then avoid being squashed as it bounces around and the jets of steaming hot water and it’ll go down in no time. I fought Grinexx next, which is a massive rock turtle who blasts lava plumes up from a lava pit below. As it passes by the gaps in your platform, you must drop ice on it with the ice rod to damage it and eventually bring it to the surface. Then you need to attack its snapping head while blocking or avoiding its spinning shell attack and explosive shockwave for a fun battle that’s not too challenging as long as you’re quick on your feet and with the ice rod.

Repackaged bosses offer new challenges and some even require the use of Link’s new 2D abilities.

After that, I ventured to the Dark Palace and fought the Gemesaur King, which is functionally the same as A Link to the Past’s Helmasaur King; in addition to swinging its massive tail, the Gemasaur King spits crystals in a spread and is protected by its gem-encrusted helmet, which you must shatter with bombs. Once this is destroyed, Rupees scatter about, the Gemesaur King’s projectiles increase, and it snuffs out the torches to try and trample you in the dark. Relight the torches to expose it and unload with your sword to finally put it down for good but watch for its bite and surprising speed! The Knucklemaster awaits in the ominous Skull Woods; a giant Wallmaster encased in a gauntlet and sporting another glaring eye, this creature mainly attacks by flying at you as a clenched fist. You need to merge with the walls or use the tornado rod to avoid this attack and stun it so you can hit it, but it’ll get pissed off and try and squash you, which also causes it to destroy large chunks of the floor and thereby restrict your movements, but this was still another fun and pretty simple boss battle. The last of the regular bosses I fought was Dharkstare, which is basically the same boss as A Link to the Past’s Kholdstare; you need to melt its protective ice barrier with the fire rod while avoiding it as it hops about. You can then attack the unshielded monster, but it’ll speed up and become more aggressive as it takes damage; Dharkstare also encases you in use using a triangle of freezing energy and can be quite a frenetic boss, but it’s not too challenging to tackle, even when it doubles its freezing projectiles, despite the slippery ground and bottomless pit.

Yuga channels the power and ferocity of Ganon for an epic, multi-stage final battle!

Once you’ve rescued the seven Sages, you’ll venture into Lorule Castle. Here, you’ll battle Moldorm, Gigabari, and Arrghus again in slightly different and more taxing encounters, alongside battling a Lorule soldier wielding a flaming mace; defeating all four will break the seal on the door and allow you to reach the top floor of the castle and its throne room, where Hilda (who had previously offered assistance as a disembodied voice) turns against you to acquire the Triforce and save her land. Her agent in this endeavour is an empowered version of Yuga, who fuses with Ganon’s Dark Beast form and gains both his dark power and the power of the Triforce of Courage for a two-stage final battle that’s fundamentally very similar to the final showdown against Ganon from A Link to the Past. Yuga Ganon wields a large trident that blocks your attacks and he also teleports around the throne room; you need to avoid his swipes and strike from behind with your sword, or from a distance with your bow. As he takes damage, Yuga Ganon will add thrusts and a charging attack to his arsenal, as well as rain projectiles down on you and toss his trident in a spinning arc. Once you’ve defeated his first form, he’ll absorb Hilda and the Triforce of Wisdom; now, he floats above the arena and launches projectiles that you must deflect back at him in a game of dead man’s volley. Succeed and he’ll be forced into a 2D painting; since he’s invulnerable to conventional damage, Zelda will gift you the Bow of Light, which you can only use when you’re in 2D and in this battle. You need to merge with the wall, distract him with a Light Arrow, then unmerge and merge behind him to force him out of the wall so you can attack with your sword. After that, Yuga Ganon adds a charge to his 2D attack, forcing you out of the wall faster, and finally shrugs your arrow off entirely, forcing you to fire it in the opposite direction for the final blow, with him summoning purple blasts of energy that turn into unblockable and unkillable bats between hits

Power-Ups and Bonuses:
As ever, Link will pick up Rupees and hearts to purchase new items and replenish his health, respectively. Fairy fountains will also refill his health, or yield small fairies that you can catch in a net and keep in a bottle to refill some of your hearts when you’re defeated. Link can also store various potions in his bottles, which he can have brewed up for him by gifting the various monster parts he finds to an old witch. Link’s maximum health can be increased by finding four Pieces of Heart or defeating bosses, which yields a Heart Container; as mentioned, he can also increase his energy gauge by finding the Stamina Scroll but he can find a Blue and Red Mail that will not only change his outfit but also dramatically increase his resistance to damage. Finally, the Bee Badge has wild bees help rather than hinder you, the Zora’s Flippers allow you to swim and dive in water, and the Pegasus Boots let you charge around with the Right trigger to knock down keys or shake Maiamais, Rupees, or apples out of trees. Many of Link’s most recognisable weapons return in A Link Between Worlds; the bombs, boomerang, hookshot, and bow are all present and accounted for and function exactly as you’d expect. I never really found much use for the boomerang, especially compared to the fire and ice rod, which are essential for a couple of dungeons. The sand rod is only really useful in and around the Desert Palace, same with the tornado rod, which I didn’t use much past the House of Gales. You can also get a pair of Hint Glasses, which will expose a helpful ghost who will offer assistance in exchange for a Play Coins (acquired automatically if you walk around with the 3DS in your pocket). You can also purchase scoot fruit and foul fruit, which allow you to quickly exit dungeons and defeat all onscreen enemies, respectively, and upgrade the efficiency, range, and effectiveness of each of Link’s weapons by finding all one-hundred lost Maiamai and bringing them to their mother.

Additional Features:
These lost Maiamai are all over Hyrule and Lorule; you’ll hear them squeak when they’re close by and your map will show you how many are in a given arena, and you’ll need to knock them out of trees, uncover rocks, cut down grass, and push them off walls using your 2D ability. Finding all one-hundred will upgrade Link’s Spin Attack to the more powerful Great Spin Attack in addition to powering up each of his weapons. There are also five bottles to be found, with some being gifted after you complete tasks, though there’s no trading sequence to complete here. There are a couple of challenges available to you, from navigating obstacle courses to races, Rupee-collecting games, and Octoball Derby, all of which yield Rupees or a Piece of Heart. There are twenty-eight Pieces of Heart to be found, either in hidden caves, these mini games, or accessed using your different items and collecting them all with vastly increase your chances at the Treacherous Tower, where the Tower of Hera once stood. In here, you’ll face off against waves of enemies in three different difficulty modes, with each one costing more to take on, culminating in a boss battle and earning you higher Rupee rewards and eventually an upgraded net. You can also acquire a pouch that lets you use two items instead of just one, find Master Ore that is used to upgrade the Master Sword, and completing the game will unlock the more challenging “Hero Mode” for you to play through.

The Summary:
This was only my second playthrough of The Legend of Zelda: A Link Between Worlds, and I first cleared it before I beat its predecessor, A Link to the Past, and yet I really enjoyed this fun little handheld throwback to a new-bygone era of Zelda gaming. Don’t get me wrong, I enjoy the large, expansive open world nature of modern Zelda games but the top-down, 2D/2.5D perspective is very nostalgic and timeless for me and always my preference. The game looks and sounds fantastic; at the time, it really was the most visually impressive revamp of the classic Zelda style and it’s great to see this world come to life with this plasticine aesthetic. I enjoyed how the game was both familiar and yet different enough to be its own beast; it’s extremely similar to A Link to the Past and, in many ways, is a modern remake of that game but has enough new mechanics to be unique. I may not have loved the rental system, energy gauge, or the 2D mechanics, but they added new levels of freedom to the tried-and-true Zelda gameplay; I just think they could’ve done a little more with them rather than make them simple gimmicks. Although I didn’t play with the 3D effects on, the game is nicely geared towards it with a lot of vertical sections; I enjoyed the remixed tunes and locations, and the returning or altered bosses, even though the game was a little too easy at times thanks to my habit of farming Rupees and your ability to hold 9999 right off the bat (wallet restrictions might’ve helped with this). Ultimately, this was a really enjoyable, classic Zelda experience with a sprinkling of fun new mechanics and colourful characters that worked perfectly as a follow-up to A Link to the Past while still expanding upon that game’s lore in interesting ways.

My Rating:

Rating: 4 out of 5.

Great Stuff

Have you ever played The Legend of Zelda: A Link Between Worlds? If so, how do you think it compares to A Link to the Past and did it work as a sequel for you? What did you think to Lorule and do you think there was enough to distinguish it from the Dark World? Did you enjoy the rental system and Link’s ability to turn into a 2D painting? Which of the dungeons, bosses, and weapons was your favourite? What did you think to the visual presentation of the game and the incorporation of the 3D mechanic? Did you ever find all of the lost Maiamai and fully upgrade Link’s arsenal? How are you celebrating the franchise this month? Whatever your thoughts on A Link Between Worlds, leave a comment below or share them on my social media.

Game Corner [PokéMonth]: Pokémon: Let’s Go, Eevee! (Nintendo Switch)


Upon the release of Pokémon: Blue Version and Pokémon: Red Version (Game Freak, 1996), a new craze swept through playgrounds across the world. An entire generation grew up either playing Pokémon, watching the anime, playing the trading card game, and watching the feature-length movies as clever marketing and a co-ordinated release and multimedia strategy saw it become not just a successful videogame franchise but a massively lucrative and popular multimedia powerhouse. Accordingly, February 27th is now internationally recognised as “National Pokémon Day”, which I expanded to an entire month of Pokémon this February.


Released: 16 November 2018
Developer: Game Freak

The Background:
Pokémon was an instant cultural phenomenon back when the games first dropped, taking playgrounds by storm and dominating almost every aspect of my generation through a slew of merchandise. I remember being so adamant about purchasing Pokémon: Blue Version that I bought it brand new rather than getting a cheaper copy of Pokémon: Red Version and my friends and I routinely played at school or on the Nintendo 64 thanks to Pokémon Stadium (Nintendo EAD/HAL Laboratory, 1999). Although the developers originally intended my favourite games/generation of Pokémon, Pokémon: Gold Version and Pokémon: Silver Version (Game Freak, 1999) to be the final entries in the series, Pokémon videogames continued to be developed, with new features, improved graphics and mechanics, and a whole bunch of new Pokémon being introduced in each generation. Yet, in all that time, we never really got a proper version of Pokémon on home consoles; they were always spin-offs, battling games, or neutered versions of the main role-playing experience, which remained exclusive to Nintendo’s handhelds. Nintendo’s development of their Switch console changed that, however; thanks to the Switch’s unique ability to be both a handheld and a home console, players were finally able to experience a main series Pokémon game in glorious high definition with the release of Pokémon: Let’s Go, Pikachu! and Pokémon: Let’s Go, Eevee! (ibid, 2018) Though remakes of the first Pokémon games, the Let’s Go games (like pretty much all Pokémon games) proved both successful and popular.

The Plot:
The time has come for you and your childhood rival to receive your very own Pokémon from Professor Oak and challenge the eight Kanto Gym Leaders in a bid to become a Pokémon Master. However, your progress is fraught with danger as the nefarious Team Rocket seek to steal Pokémon for criminal acts, in addition to genetically creating the most powerful Pokémon of all!

Gameplay:
Essentially, Pokémon: Let’s Go, Eevee! is exactly the same Pokémon game we’ve been playing for decades now, though this is only to be expected as it’s another remake of the original games. Like other Pokémon titles of this calibre on the Nintendo Switch, the game is played from a top-down, slightly isometric perspective that evokes the style of the Game Boy and Nintendo 3DS Pokémon titles; while the gameplay retains a simple control system (you control your avatar with the left stick, make selections with A, back out of decisions with B, and bring up the in-game menu with X), you can choose to play with the Joy-Cons attached (my preferred style), separated, or even use the Poké Ball Plus accessory when catching Pokémon. Interestingly, Pokémon: Let’s Go, Eevee! is somewhat light on the handholding; Professor Oak will run you through the basics of Pokémon at the start of the game, as always, and non-playable characters (NPCs) offer hints, tips, and additional information regarding battling, catching, trading, and raising Pokémon, but gameplay isn’t interrupted every few minutes for a tutorial or bout of exposition, which actually makes the game feel a little too barebones at times as it seems content to simply offer a graphical and mechanical overhaul of the original games. Still, the modern conveniences are well welcome; items are divided into “Pockets” in your bag, allowing you to quickly find, use, and arrange healing items, evolution stones, Technical Machines (TMs), and candies to restore, power-up, or evolve your Pokémon. Unfortunately, you can’t assign an item to a quick button like in later Pokémon games but, to be fair, you really don’t have much need for this since items like the fishing rods and bicycle are missing this time around. Your inventory space now seems to be unlimited, which is even better, so you never have to worry about trekking back to a PC to dump items to pick up others.

I wasn’t a fan of the game’s new motion-sensor catching mechanics.

As ever, wild Pokémon will be encountered all over Kanto, hiding in grass, bopping in the sea, and emerging from the ground when in caves. This time around, the Pokémon all clearly appear onscreen; while they can spawn out of nowhere and swarm all around some locations, you can see where they are and even get an idea of how big or small or rare they are thanks to on-screen colourings and indicators, meaning it’s easier than ever to spot a shiny Pokémon or avoid an encounter altogether since random battles are effectively a thing of the past here. New to this game is the “Combat Point” (CP) mechanic, which allows you to see, at a glance, how good a Pokémon’s stats are, and Pokémon naturally still have “natures” that determine their statistical growth. Once you encounter with a wild Pokémon, you’ll see how different Pokémon: Let’s Go, Eevee! is from its predecessors and contemporaries; the game switches to a  first-person perspective and essentially borrows the gameplay mechanics and functionality of Pokémon Go (Niantic, 2016). You can select different Poké Balls, with each one having a different capture rate, one of numerous berries which can calm the Pokémon down, make them easier to catch, or increase your chances of acquiring items and bonuses from a successful capture, get some help, or flee from the battle. You won’t be inflicting damage on the wild Pokémon; instead, you must ready your Poké Ball, wait for the Pokémon to settle down, and toss the Poké Ball between some coloured rings to try and snag it. The level, size, and rarity of the Pokémon generally determine show difficult it is to catch, but even low-level Pokémon can burst out of Poké Balls if your throw is bad or just to be annoying, and you have to be quick and accurate as wild Pokémon can flee from battle. Some certain Pokémon, like the Legendary Birds and the two Snorlax, will need to be battled before you can catch them, which gives you about five minutes to whittle their Hit Points (HP) down before switching to this new capture system. Since I’ve never played Pokémon Go, I wasn’t a fan of this new mechanic, which basically boils down to mindlessly tossing Poké Balls, trying to get a “Excellent!” rating, and swinging the Switch around like an idiot to get a better aim. It’s an extremely different strategy and mindset for long-term players, one that encourages you to catch every single Pokémon you see as this is the primary way of earning experience points (EXP) and levelling-up. Thankfully, Poké Balls, Great Balls, and Ultra Balls are easily obtained from shops and NPCs, but I found this forced mechanic too the “Gotta Catch ‘Em All” tag line a little too literally.

In addition to traditional battles, you can pet and feed Eevee to keep it happy.

Pokémon Trainers are still a thing, so you’ll still have the chance to take part in some traditional battles. Here, you and your opponent take turns to inflict damage or status effects on each other or use in-battle items to heal or relieve status effects. You can’t run from a Trainer battle, but you can switch your Pokémon between rounds, which you’ll want to do when your opponent uses a different “Type” of Pokémon to yours. As ever, this is like Rock/Paper/Scissors, making Water-Type Pokémon “Super effective” against Fire-Type Pokémon, Fire-Types melt Ice-Types, and Fighting-Type Pokémon shatter Rock-Types. Thanks to onscreen text, the advantages of the modern user interface, and the colourings of certain Pokémon, it’s a pretty simple system to figure out. Trainers have all the same options as you, so they can switch their Pokémon at any time, heal or buff them with items, but can attack without fear of running out of Power Points (PP). Each move is limited by PP; when it runs out, you’ll need to use an Elixir or heal up to restore it or risk resorting to “Struggle”, which inflicts serious recoil damage. While it’s possible to succeed with just one or two powerful Pokémon, it’s best to have a diverse team with decent Type coverage in their moves; thankfully, Pokémon: Let’s Go, Eevee! makes this even easier by including far more moves and TMs, especially for your Eevee, to allow for greater Type coverage with each Pokémon. Similar to Pokémon Yellow Version: Special Pikachu Edition (Game Freak, 1998), you’re forced to start with a specific Pokémon, in this case Eevee. Sadly, you can’t evolve Eevee, but certain NPCS will teach it a number of super useful elemental moves, allowing it greater Type coverage than usual. Eevee is your constant companion and can be petted and fed berries to increase your bond with it; this affords you benefits in battle, such as Eevee holding on with 1HP or shaking off status ailments. This’ll also happen with the other Pokémon in your party, however; any Pokémon can follow you around, like in Pokémon: Yellow and Pokémon HeartGold and SoulSilver (ibid, 2009), allowing you to interact with them to see how they’re doing, ride certain Pokémon in place of the bicycle, and they’ll even sniff out or dig up items. Pokémon can also now be renamed at any time and marked with symbols, you can easily move them and their moves around as you like and, even better, you no longer need to visit a PC to move Pokémon to and from your party; you simply do this at any time from the menu, and you can also send the many wild, disposable Pokémon you’ve caught over to Professor Oak where they’ll be lost forever in return for some candies.

Eevee can be bolstered with candies and learn Secret Techniques to expand the world.

These candies take the place of the vitamins and feathers of the previous games, allowing you to feed them to your Pokémon to boost their stats (Attack, Speed, HP, etc). You’ll find these across the game as well and they’re great for quickly boosting stats, with some candies even being specific to Pokémon and giving a boost across all stats, though Pokémon will require more candies the stronger they get and some are locked behind a level cap. Levelling-up can be a bit of a chore thanks to the massive emphasis on catching Pokémon, meaning it’s best to put your money into stocking up on Poké Balls or talking to NPCs to get some extra ones to help you get more powerful. Thankfully, you can still track your progress from a handy onscreen EXP bar; by default, all Pokémon automatically earn EXP from every encounter as well, meaning levelling-up is easier and faster than ever, and you can still trade and use special stones to evolve Pokémon into more powerful forms. This also facilitates the ongoing plot of completing Professor Oak’s PokéDex, a handy-dandy encyclopaedia that tells you where Pokémon frequent and gives you insight into them. Evolving Pokémon also gives them access to newer, usually better moves, though each can only learn four moves at a time; you can either replace an existing move or not learn the new one. An NPC allows your Pokémon to relearn forgotten moves in return for Heart Scales and you can use the TMs as many times as you like, which is always useful. Even better, Hidden Machines (HMs) are now a thing of the past; instead, Eevee learns “Secret Techniques” from NPCs, generally by completing story-based side quests. These allow you to chop down trees blocking your path, light up dark caves, surf across water, and fly to Kanto’s different towns using Eevee and relegates moves like Surf and Fly to TMs. This is extremely useful as it now means you don’t need to clog up your party with HM slaves or have useless HM moves in your arsenal. As ever, your Pokémon can be afflicted with status effects that slow, damage, or hinder them; poison, burns, sleep, and paralysis are the most common though you’ll also have to watch out for moves that cause you to “flinch” and miss a turn, Pokémon avoiding your attacks, and being put into a confused state. Treat and train your Pokémon well and they’ll shake off these ailments, but you can also use various items and the ever-useful Pokémon Centers to restore your Pokémon to full health. If you go into a battle unprepared without taking advantage of the manual save feature, you may be overwhelmed and end up defeated, which’ll cost you some hard-earned PokéDollars and return you to the last Pokémon Center you visited, but you’ll also find helpful NPCs, beds, and healing zones in some areas that avoid a long trek to heal up. You also need to be mindful of levelling-up too quickly; if your Pokémon is too high a level, and you don’t have the appropriate Badge, they may disobey you by ignoring your commands or loafing around.

You’ll tackle some familiar puzzles alongside visiting a handful of new areas.

If you’ve played the original Pokémon games and their remakes before then you’ll be instantly familiar with Kanto which, despite a new coat of paint and some tweaked quality of life features, is basically exactly the same as before. You’ll be taking ladders through maze-like caves, exploring a luxury ship, fetching stuff for NPCs, and solving some rudimentary puzzles using teleporters, hidden switches, and pushing blocks to lower doors. Quite often, you’ll explore areas to acquire keys to progress, which means clearing out Team Rocket and rescuing NPCs. While the Celadon City Game Corner is still present, you can’t play the slot machines anymore; the Safari Zone is also gone, with the rare Pokémon from these areas now appearing out in the wild and the latter replaced with the Pokémon GO Park, where you can transfer Kanto Pokémon from Pokémon Go. In-game trades allow you to acquire different Pokémon and even different forms from other Pokémon regions, and you can still trade and battle with friends as long as you’re paying for the Switch’s online functionality. There’s a very limited incorporation of the “Mega Evolution” mechanic here, too; certain NPCs award you special stones that allow a small handful of Pokémon to “Mega Evolve” once per battle, making them tougher and more fearsome, and some Trainer battles will also see you facing off against a Mega Evolved Pokémon. Very rarely, you’ll also take part in double battles, either by yourself or alongside your rival, though these really don’t happen as often as they could (and should, considering how often you encounter Jesse and James of Team Rocket). Finally, you have a few rudimentary customisation options for your avatar, including gender and skin colour, and can mix and match various outfits that you’re awarded from NPCs; Eevee can also be dressed up, which is quite cute, but this isn’t as in-depth as in other Pokémon games.

Graphics and Sound:  
Pokémon: Let’s Go, Eevee! naturally benefits from the greater graphical processing power of the Nintendo Switch, utilising a slick, colourful 3D anime approach that really brings Ken Sugimori’s artwork to life in the best way possible. Freed from the grid-system of the original titles but not overwhelming the player in open-world gameplay, Pokémon: Let’s Go, Eevee! transforms the formally limited, pixelated environments of Kanto into far bigger, much more detailed locations. Unfortunately, there’s no day/night system and no weather or seasonal elements, but towns and routes are bright and full of NPCs to chat to, buildings to enter, and Pokémon to encounter. The characters are all instantly familiar but with a new coat of paint; your NPC and rival aren’t strictly the Red and Blue of old, looking and acting slightly different (the rival is way more friendlier and actually helps you at a few points) and Blue actually shows up to offer advice and take Giovanni’s place as the Viridian City Gym Leader. The game also takes inspiration from the anime and Pokémon: Yellow by including and expanding upon the role of Jesse and James, with their Meowth often preceding their appearances and the duo have a far greater impact on the plot by taking the place of other Team Rocket grunts and executives.

The whole game pops thanks to its colourful, 3D, anime aesthetic.

Although the game’s Pokémon are limited to the first 151 from the original games, outside of a few different forms from later games in the franchise, they’re all full of life and can get very energetic when you encounter them in the wild, bouncing, floating, and dodging about the place and even swiping at you (though this just causes your Poké Ball to miss). Pokémon also appear more or less to scale, meaning Onix bursts from the ground and dominates the screen, Voltorbs are tiny globes, and some (like Arcanine) can be rode around to speed up your movement. Each has remixed cries from the original game apart from Pikachu, which gleefully shouts its name, and Eevee, which has a series of squeaky chirps. As if making towns bigger and livelier wasn’t enough, the Gyms have also had an impressive overhaul; spectators are often present, in addition to more detailed interiors, and you’ll even be treated to special cutscenes when encountering Legendary Pokémon and such. The script seems mostly the same as before, with a few alterations here and there that kind of place it as both a follow-up and a retelling of the first two games, and all the redone tunes are as charming and memorable as ever.

Enemies and Bosses:
During your Pokémon journey, you’ll battle with other budding Pokémon Trainers; their Pokémon start at low levels, generally with only one or two in their party, but you’ll face progressively tougher opposition as you progress. While you can usually predict what an enemy Trainer will do as they tend to use moves that have a Type advantage over your current Pokémon, they can sometimes surprise you and it pays to go on a mad catching spree between battles to level-up, focus on increasing certain stats, and bringing your team as close to the level cap as possible, utilising moves that are super effective and taking advantage of the shared EXP to easily dominate the opposition. As ever, your most persistent foes throughout Kanto are the nefarious Team Rocket; this gang of Poké-nappers have taken over buildings and even entire towns in a bid to steal Pokémon or technology like the Silph Scope and Master Ball for their own evil ends. Generally, Team Rocket grunts aren’t much different from other Pokémon Trainers and stick to common Pokémon like Zubat and Ratatta, but you’ll also battle Jesse and James a few times thanks to their added importance on the plot. Like in the anime counterparts, they’ll use Koffing/Weezing and Ekans/Arbok but don’t send out Meowth this time around. You’ll also encounter your rival at various points; he’ll either be one step ahead of you, join you for certain side quests, offer advice and award items, and will challenge you to test your skills. A new Trainer class in this game are the Coach Trainers; these guys must be manually challenged and will award TMs and other goodies after you best them, but generally offer a tougher or more advanced challenge compared to regular Pokémon Trainers.

After conquering the Gyms and the Elite Four, some powerful Legendary Pokémon await you.

Your Pokémon journey requires you to travel far and wide across Kanto defeating the eight Gym Leaders to earn their Badges; these increase the strength and level cap of your Pokémon and allow entry into the Pokémon League and each Gym Leader specialises in a certain Type of Pokémon (though, handily, opposing Types can usually be found nearby if you need one). Before battling the Gym Leader, you’ll need to get past their proteges and, often, a puzzle of some kind, such as pressing hidden switches, navigating an invisible or hedge maze, or teleporting from room to room. This time around, many Gyms cannot be fought until you have a certain Type or level of Pokémon, encouraging catching and grinding, though the Gym Leaders remain as simple as ever to any experienced player. After defeating the Gym Leaders, you can battle them again once a day for some extra cash, which is always appreciated as Trainer rematches are disappointingly sporadic in this franchise. Once you’ve defeated them all, you challenge the Elite Four and the Pokémon League Champion without any breaks or free health restoration between bouts. Again, these have been bolstered by the Switch’s graphical power and some of the moves and line-ups of the Elite Four have been mixed up; I mostly noticed this with Lance, who now doesn’t have those two Dragonairs. While the Pokémon League offers a daunting challenge, it’s pretty simple to stock up on Hyper Potions and Revives to help if things get tough and you can battle them as many times as you like afterwards to help level-up. Although you won’t battle wild Pokémon 99% of the time, you still encounter the likes of Snorlax, the Legendary Birds, and Mewtwo; these are timed battles and can be a bit jarring as you suddenly have to shift to the traditional style of play, subduing the opponent with status ailments and whittling their HP to zero so you can start the laborious process of catching them, essentially turning these bouts into mini bosses, of sorts.

After beating your rival, you’ll challenge the best of the best across Kanto.

As he’s a lot friendlier than Blue, your rival is far more easy-going and any sense of urgency about wiping that smug smirk off his face is gone this time around. To counter your Eevee, your rival uses Pikachu (which, annoyingly, he eventually evolves into a Raichu, which isn’t fair as you can’t evolve your Eevee) and will not only amass a well-balanced and diverse team of Pokémon by the time he beats you to the Pokémon League but can also Mega Evolve his Pidgeot during the final battle. While he often presents a slightly more formidable challenge, especially once he’s got his aforementioned Pidgeot and Raichu teamed with Vileplume, Rapidash, Slowbro, and Marowak, defeating him isn’t any harder than beating any other Trainer or Gym Leader; simply strengthen your team, swap them as necessary, and hammer away and you’ll soon be crowned the Pokémon League Champion. Your rival might not be a complete douchebag this time around, but Blue is still a smarmy git and he shows up a few times throughout the story to help fend off Team Rocket and test your mettle as a Pokémon Trainer. After you defeat Giovanni and conquer the Pokémon League, Blue installs himself as the Viridian City Gym Leader, offering one of the game’s three hardest battles, the other two being Green and Red, with Green awaiting your challenge inside the Cerulean Cave after you’ve caught Mewtwo. Once you best the Pokémon League, 153 “Master Trainers” appear all around Kanto; these guys specialise in one Pokémon and, annoyingly, you can only battle them with that same Pokémon and they’re at such a high level that you basically need to grind-train every possible Pokémon just to stand a chance against them. If you manage to defeat six of them, Red can be fought outside of the Pokémon League, with all three of the original Trainers having a diverse team of high-level Pokémon and fully capable of Mega Evolving one of their Pokémon.

Power-Ups and Bonuses:
It seems like even more items, both obvious and hidden, are strewn all over Kanto; they’re either onscreen or sniffed out by your Pokémon, gifted by NPCs, or bought from PokéMarts. Healing items like the various Potions, restorative items like the Revives, and status-healing items can take care of your ailments either in battle (at the cost of a turn) or outside of battle and you can temporarily buff your Pokémon’s status with items like X-Speed. You can also buy the game’s various Poké Balls from PokéMarts (being awarded a Premier Ball with bulk purchases) but these are also freely given by NPCs, after battles, and found all over so you’re never short of catching devices. You can find nuggets and stardust to sell for big cash, special stones to evolve Pokémon, and even items that fend off wild Pokémon or draw out more powerful and rarer variants. Berries make a return to the franchise, though in a slightly different capacity; you can feed them to Eevee to improve your bond but they’re best used against wild Pokémon to make them easier to catch, though you can’t have Pokémon hold items for in-battle buffs (potentially because battling is such a secondary feature in this game). Other items are slightly changed, too; the Poké Flute can’t be used in battle, for example, moves like Teleport and Dig can’t seem to be used outside of battle, and you’ll give the guards tea (given to you by Brock) rather than water, just to mix things up.

Additional Features:
Pokémon: Let’s Go, Eevee! keeps things incredibly simple with its available Pokémon; no Pokémon outside of the original 151 (and a couple of different forms and a new Pokémon) appear in the game and some are missing since you can’t get the likes of Sandshrew/Sandslash, Grimer/Muk, and Scyther in this game, requiring you to trade with a friend who owns Pokémon: Let’s Go, Pikachu! Trading is also key to evolving certain Pokémon, like Machoke and Haunter, and you’ll need another player to acquire both fossil Pokémon. Once you’ve beaten the game, there’s a little bit of post-game content to come back to; obviously, there’s the PokéDex to complete and the Master Trainers to find and challenge, though this latter is more tedious than exciting. In what will probably be a disappointment to many, there’s no Battle Frontier or anything like that, and there are no other areas to visit beyond the likes of the Cerulean Cave and Power Plant, which is disappointing to me as we don’t even get the Sevii Islands here. Mewtwo awaits in the Cereluen Cave, as mentioned, and the Legendary Birds are in the usual locations, offering inconsistently difficult encounters (I caught Articuno on my second Ultra Ball, Moltres took a few more, Zapdos was quite erratic, and I simply tossed the never-miss Master Ball at Mewtwo). Pokémon legends Red, Blue, and Green are also out there for you to battle but getting to Red isn’t the most enjoyable task available and the rewards are negligible. Similarly, beating the Master Trainers and competing the PokéDex primarily just gives you kudos and bragging rights, though you will be able to ride certain Pokémon to fly across Kanto after beating the Pokémon League, which offers a slightly different dimension to your travels. Otherwise, you can try and hunt down shiny Pokémon, look for the biggest and smallest Pokémon around, and make use of the co-op mode to journey alongside a friend and the Mystery Gift and Pokémon Go functionality to transfer other Pokémon into the game.

The Summary:
Although my love for the franchise has ebbed somewhat over the years, basically to the point where I don’t really buy new Pokémon games on the regular since they’re largely the same and don’t really offer much new material, I am a fan of the series and I was somewhat interested in journeying through Kanto one more time in Pokémon: Let’s Go, Eevee! Graphically, the game is very impressive; with the series seemingly moving more towards open-world, open-ended gameplay and introducing more extraneous mechanics to the franchise, it’s nice to get back to basics, but Pokémon: Let’s Go, Eevee! is maybe a little too basic for its own good. Opting more for a fancy new coat of paint rather than really expanding upon the original games’ content in any meaningful way, Pokémon: Let’s Go, Eevee! is a fun enough nostalgia trip but lacking in many ways; not including much in the way of substantial post-game content was a disappointment, to say nothing of the laborious Master Trainers and the decision to not include Pokémon or mechanics from other regions and games (like a day/night cycle, weather effects, hold items, and such). What really soured the experience for me was the incorporation of Pokémon Go mechanics; I admit that I’m biased about this as I don’t really play or like Pokémon Go, but there wasn’t much fun to be had in tossing Poké Balls at Pokémon without much skill or thought. You simply wait for the circles to line up, and for a good opening, and just toss Poké Balls and/or berries until you catch it, making for an extremely simplistic and monotonous level-up system. I loved that Jesse and James had a bigger role, and that Blue showed up on the side and being able to battle him, Red, and even Green (though I was a little disappointed that Professor Oak wasn’t the Pokémon League Champion at the end). Riding Pokémon was quite fun, as was letting Pokémon travel beside you and giving Eevee a real personality, but the lack of customisation options and challenge was unfortunate. Overall, if Pokémon was “Baby’s First RPG”, Pokémon: Let’s Go, Eevee! is “Baby’s First Pokémon” and, while I enjoyed it well enough, it was a bit of a barebones package that played things a little too safe, and a little too quirky, for my liking.

My Rating:

Rating: 3 out of 5.

Pretty Good

Did you enjoy Pokémon: Let’s Go, Eevee!? How do you think it compares to the original games and their remakes, and which Pokémon game is your favourite? Did you enjoy having Eevee as your partner and what did you think to the special moves it could learn? What did you think to the new catching mechanics and did they make or break the game for you? Did you ever defeat all of the Master Trainers and Red? Who made it into your final team and did you ever complete the PokéDex? Which Pokémon is your favourite? How are you planning to celebrate National Pokémon Day this year? Whatever your thoughts on Pokémon, feel free to leave them below or on my social media.

Game Corner [Zelda Month]: The Legend of Zelda: Oracle of Ages / Oracle of Seasons (Nintendo Switch)


On 21 February 1986, The Legend of Zelda (Nintendo EAD, 1986) was first released in Japan. The creation of legendary game designer Shigeru Miyamoto and Takashi Tezuka, The Legend of Zelda launched one of Nintendo’s most popular franchises. This year, I’m dedicating every Wednesday to Nintendo’s most famous silent protagonist, Link and his vast and enduring fantasy world of sword and sorcery.


Released: 27 July 2023
Originally Released: 27 February 2001
Developer: Nintendo
Original Developer: Flagship
Also Available For: Game Boy Color, Nintendo 3DS (Virtual Console)

The Background:
My very first introduction to the Legend of Zelda series (Nintendo EAD/Various, 1986) was The Legend of Zelda: Link’s Awakening (ibid, 1993) on the original Game Boy, which began life as an unsanctioned side project of programmer Kazuaki Morita and became a critically acclaimed best-seller for the system, a success that Nintendo duplicated with its Game Boy Color upgrade in 1998. Link’s Awakening was followed by two relatively obscure and hard to come by Zelda titles that initially came from Yoshiki Okamoto’s desire to remake the original game for the Game Boy Color. Zelda creator Shigeru Miyamoto suggested making a trilogy of interconnected games that would directly communicate with each other through the use of shared assets and passwords, but the logistical challenge of this forced the developers to scale the project down to two games. The technical limitations of the Game Boy Color also caused the developers significant issues, but they were bought more time to refine the concept when the release of the Game Boy Advance was pushed back, giving them that chance to incorporate elements from the 3D Zelda titles. The games sold over 3.96 million copies, making them a commercial success, and they were met with rave reviews that praised their visuals and the replay value offered by the password system. However, many gamers (like myself) were unable to legitimately play the games for an affordable price for some seventeen years, when they were finally added to the Nintendo 3DS Virtual Console, but a whole new generation of gamers were able to experience these often-forgotten games when they were added to the Nintendo Switch Online service in 2023.

The Plot:
In Oracle of Ages, Link finds himself in Labrynna and charged with rescuing Nayru, the Oracle of Ages, from the evil clutches of Veran by travelling through time to collect the eight Essences of Time. In Oracle of Seasons, Link must rescue Din, the Oracle of Seasons, from the evil Onox, questing for the eight Essences of Nature and battling wild elements. Defeating these evil forces brings Link into a final confrontation with Twinrova, who wish to sacrifice Princess Zelda to resurrect the dark lord Ganon!

Gameplay: 
If you’ve played the original Link’s Awakening, or any of the top-down Zelda titles, then the Oracles games will be immediately familiar to you. You’re given three save slots, the ability to rename your character, and dropped into one of two fantasy worlds, Labrynna or Holodrum, and tasked with questing to retrieve eight mystical items to rescue each game’s Oracle and restore the lands from evil. Since these were Game Boy Color titles, the Oracles games operate on a very simple two-button setup; players can enter the inventory menu by pressing ‘Start’ and equip two items, one to A and one to B, to use to defeat enemies, solve puzzles, and open new paths. Primarily, this will be your sword and shield; Link can attack in four directions or charge up his trademark Spin Attack to attack in a circle and can defend himself from incoming attacks by holding down the shield button. As you progress through both games, you’ll acquire these weapons, and other items either by finding them in one of the dungeons, buying them from one of the many shops, or being gifted them by a friendly non-playable character (NPC). Initially, you can’t access anything, not even the pause menu, and you later must equip two specific items in conjunction to get past obstacles, such as using the Pegasus Seeds and Roc’s Feather to clear longer gaps. 

Link must channel the seasons and time itself to save these chaotic lands.

Link’s journey takes him all over each land and both are filled with enemies and hazards; some are easily overcome with your basic sword, others require more tactical use of your weapons (such as directing the Magical Boomerang to hit switches or dropping bombs to blow open cracks in walls), and it’s worth attacking most enemies, cutting grass, and digging up dirt to unearth hearts, Rupees, and ammo to keep yourself well stocked. Link begins with three hearts (or four, it seems, in a “Linked Game”) and can replenish them with hearts or extend his life bar by finding Heart Containers, but you’ll need Rupees and Ore Chunks to purchase items from shops. All of this is very familiar to any Zelda fan, exposing hidden paths and even switching to a sidescroller perspective in certain areas, but there are a couple of gimmicks that make each game stand out. First, each game contains two overworld maps; in Oracle of Ages, you’ll travel hundreds of years into the past and in Oracle of Seasons you’ll travel back and forth to the underground realm of Subrosia. Travelling to the past alters the landscape somewhat, allowing you to access new areas by warping to dead ends in one era, and changing events in the past will affect the future as well. In addition, Link’s swimming abilities are greatly expanded upon in Ages; you’ll get to dive deep underwater and explore coral-filled areas to progress, and not just in the overworld, where you’ll visit Zora’s Domain, but in dungeons, too. In comparison, Subrosia is a more fragmented landscape; here, you’ll find your way blocked by rivers of magma, the environment beset by exploding volcanos, and inhabited by cloaked, dwarf-like people obsessed with ore and mining. Subrosia is also home to the Temple of Seasons, which you gain additional access to as you conquer dungeons and acquire new gear, which in turn powers up the Rod of Seasons and allows you to change the seasons in Holodrum. 

In addition to underwater and sidescrolling sections, Link has animal friends to help him out.

You’ll find tree stumps all around Holodrum and, from these, you can wield the Rod of Seasons to cycle between spring, summer, autumn, and winter, with each season altering the landscape in some way. Winter sees snow pile up, for example creating higher paths and snow piles that need digging up; autumn sees mushrooms bloom, allowing you to pick them up to access new paths, spring activates flowers that boost you to higher levels, and summer sees climbable vines appear on the overworld. You’ll often need to switch seasons regularly to access different areas and then backtrack to reach a new path, and the seasons change sporadically as you explore, creating new obstacles and requiring you to switch weapons. Eventually, Link also gains the ability to fast travel around the map with Warp Seeds, to swim and dive in water, and to call an animal companion to help get past specific obstacles, though you won’t be using magic in either game. In Ages, time travel is initially quite limited as you need to use the Harp of Ages at specific points, but eventually you gain the ability to freely travel back and forth through time to solve puzzles, complete fetch quests, and access new dungeons and regions. Almost every task in Ages is some kind of convoluted puzzle or fetch quest requiring you to talk to numerous NPCs and travel between eras multiple times just to access a Dungeon Key. Easily the most frustrating example of this is when Link visits Tokay Island and has all his equipment stolen by the lizard-like Tokay; you’ll need to track each piece down one at a time and use them, in conjunction with time travel shenanigans (such as pushing seeds next to walls so the sprout into climbable vines), to retrieve everything so you can continue on your quest.

Puzzles are a huge aspect of Ages, including some annoying coloured-based puzzles.

Like Link’s Awakening, Link is tasked with visiting eight dungeons in each game to acquire new items, conquer the bosses within, and claim the eight mystical objects needed to confront each game’s big bad. Although Ages focuses more on puzzles and Seasons is more action-orientated, many familiar Zelda puzzles are found in each game. You’ll be stepping on or pushing pots or statues onto switches, defeating groups of enemies, pushing blocks (either in a specific way or onto certain tiles), lighting torches, and taking stairs or dropping through holes to access new areas, open doors, or acquire keys to progress further. Like in Link’s Awakening, you’ll use sidescrolling sections to hop to moving blocks, Thwomps, climb ladders, or swim past Cheep Cheeps, though both games place great emphasis on mine carts; you’ll ride these to new areas in the dungeons, hitting switches to change their direction or lighting torches as you speed past. Each dungeon hides a Compass and Map to help you navigate and you’ll unlock a warp point after defeating the mini boss, which is useful when you have to backtrack to find or use keys and items. In Seasons, many puzzles are solved by using Link’s Magnetic Gloves to move magnetic balls and hover over gaps on small rotating diamonds, or by dropping blocks down to lower levels, or activating bridges across gaps and you’ll need to be quick on your feet or to hide behind your shield when the floor suddenly collapses or comes to life to attack you. Occasionally, you’ll lose traction in icy areas, navigate maze-like woods, play hide and seek, and be sent to take out fortified areas or rescue animal companions to reach new areas to say nothing of dodging fireballs, floor spikes, crushing weights, and rolling logs. While puzzles appear in Seasons, they’re far more prominent in Ages, with the most infamous being those involving pushing a coloured cube in a specific way so it lands on the right coloured tile, or using the Cane of Somaria to create a block to press multiple switches at once, or rearranging statues. You’ll enter rooms where you need to step on all the tiles in a specific path to access keys, or jump to coloured tiles to make them all match up, or defeat coloured Gels when the room is a specific colour. Sometimes you’ll need to navigate invisible paths (where the Cane of Somaria again comes in handy), bomb walls or blocks in mazes, navigate past bladed obstacles or arrows, and even change the dungeon layout entirely, though oddly the time travel and season gimmicks rarely play a part within the dungeons.

Graphics and Sound: 
Both Oracles games heavily reuse assets from Link’s Awakening, recycling sprites, environmental details, and certain gimmicks and presenting them in new ways. This could be seen as a negative but something about the presentation makes the games pop in a way that outdoes its predecessor; maybe it’s that the games were purposely built for the Game Boy Color or the influence from The Legend of Zelda: Ocarina of Time (Nintendo EAD, 1998), which sees familiar tunes and species from that game (particularly the Gorons and Zoras) integrated on the small screen. NPCs are much livelier and more integrated into the plot as well; engagements with them carry over between games, changing your interactions with them, and you’ll find all sorts of fun NPCs on offer in both games, from a hyperactive child, to talking animals, to lovesick anthropomorphic trees, lost souls, and skeletal pirates. Each game may visually resemble the other and Link’s Awakening but they’re noticeably different; the changing seasons mean you effectively have four different overworld maps in Seasons and the past of Ages is far less vibrant and more a work in progress, with each time period (and Holodrum and Subrosia) having their own overworld themes or variations on the classic Zelda theme. Link directly changes each area in various ways, from altering the seasons to unlocking gates, flooding areas with water or lava, to allowing a pirate ship stuck between worlds to venture from the sands of Subrosia to the docks of Holodrum. Travelling through time lets you explore ancient Labrynna, where towns are still being built, Queen Ambi and her palace are prominent, and the towering and dangerous Restoration Wall leads to the decimated Symmetry Village, a location you directly improve by travelling through time.

The anime aesthetic and visual borrowings from the 3D games add to the colourful variety.

One area where both games shine is the incorporation of large sprite art for various cutscenes, such as the opening and when Link meets the Oracles. These are rendered in an anime style that recalls the artwork of The Legend of Zelda: A Link to the Past (Nintendo EAD, 1991) and are partially animated. These are used sparingly, however, and the in-game sprites are once again relied on to convey the bulk of each game’s story, with dialogue boxes and input from the Maku Tree (or consultation with an Owl Statue or some chatty birds) guiding you or offering hints. Perhaps as a consequence, the games include some new and updated sprites; while Link is largely unchanged and many of the enemies are recycled from Link’s Awakening, NPCs are more varied than ever and there are some large and detailed boss sprites. The overworld greatly benefits from this newfound attention to detail; Goron City, Zora’s Domain, and the various towns and castles are bustling and varied, with both games including fun elements from Ocarina of Time (like Jabu-Jabu) alongside guessing games, target practise, and aggravating dancing mini games (which are especially prominent in Ages). Sadly, the same can’t be said about the dungeons; many are largely interchangeable and contain the same recycled elements, though they naturally get bigger, more maze-like, and more complex to reflect a rise in difficulty. These means that, while some have different colour palettes and may feature greater emphasis on water, gaps, or other hazards, there’s not much to differentiate them as you’ll see the same gimmicks recycled, though they are used in ways that continually tax you. Of the two, Oracle of Ages has the better, more varied dungeons; Jabu-Jabu’s Belly is largely flooded, requiring you to dive to access new areas, Crown Dungeon makes better use of the coloured block gimmick, and generally there is a lot more to do in Ages’ dungeons, even though this can be frustrating as you need to do a lot of wandering around, backtracking, and trial and error to access keys and doors.

Enemies and Bosses: 
As near as I can tell, every enemy in the Oracles games is recycled from Link’s Awakening with the exception of the Lynel, a tough centaur-like wolf that deals as much damage as it can absorb. Otherwise, you’ll be encountering various Moblins and Darknuts (who wield spears, swords, and spiked maces), Octoroks, shield-eating Like Likes, snake-like Ropes, bat-like Keese, and electrifying Buzz Blobs. Some will attack when you cut down grass or fall from the sky, like the Floor- and Wallmasters that spawn in to drag you back to a dungeon entrance or the ghost-like Ghinis that haunt various graveyards. Anti-Fairies will bounce around, similar to Bubbles, chipping away at your hearts; Arm-Mimics copy your every move, mummy-like Gibdos shrug off your shots, Wizzrobes constantly teleport in and out shooting energy waves at you, the Mini Masks must be attacked from behind (or have their metal masks removed), and you’ll need to take cover behind the environment to avoid being blasted by Beamos statues and be quick on your feet to outrun the many small and large blade traps. Some enemies are hiding in plain sight, such as the Old Men who will rob you, the wandering witch who steals items from you if you bump into her, or the guards fastidiously overseeing Queen Ambi’s grounds. While enemies are shared across both games, a couple are unique to each; you’ll only encounter Candleheads in Ages and Magnites in Seasons, for example, though this element could’ve been expanded upon to give each game their own unique enemies.

When bosses aren’t being recycled from previous games, they require your various sub weapons.

Each game features nine mini bosses, with two being shared between the games; the Great Moblin and Vire, who you’ll have to battle in a fortified keep and the Ancient Ruins, respectively. While Vire attacks exactly as in Link’s Awakening, flying about and shooting coloured projectiles and splitting into smaller parts and only being vulnerable when charging, the Great Moblin is fought after avoiding his fortress cannons with your animal companion then tossing his own bombs back at him. Some of Ages’ mini bosses will be readily familiar to players of Link’s Awakening as Smasher and the Angler Fish return, and even the Giant Ghini can be traced back to that game, though their attack patterns are altered; you still need to throw Smasher’s balls back at it but they now disappear after a short time, the Angler Fish is fought on the ground (though still from a side-on perspective) and has additional bubble attacks, and the Giant Ghini is now a more formidable foe accompanied by smaller minions and capable of charging you. Ages also has three unique mini bosses; Subterror is a mole-like monster you dig up with your shovel, the Armos Warrior is a giant Armos whose shield can only be destroyed by tossing its huge sword back at it, and the Blue Stalfos is a Grim Reaper-like foe whose energy balls must be reflected back at it. Another returning boss from Link’s Awakening is Façade, who’s fought twice in Seasons but defeated in the same way as ever (simply bomb its face when it appears on the ground and watch for falling rocks). Seasons also has you fight the Brother Goriyas (who toss a boomerang between each other), three Omuais (who you must yank out of the water to attack), the Agahnim-like Agunima (who, like Agahnim, splits into copies and fires magical bolts at you and can only be defeated when all the torches are lit), the sabretoothed ball of teeth known as Syger (who’s only weak spot is the red ball on his tail), the two mischievous Poe Sisters, and the elemental spirit Frypolar, who can only be defeated by tossing its own icicle constructs back at it. 

Returning bosses are given new life and made more dangerous than ever,

There are also eight primary bosses in each game, with a final boss to be conquered at the end. Although each game has unique bosses, six of Seasons’ bosses return from the first Legend of Zelda game. Aquamentus, Dodongo, Gohma, Digdogger, Manhandla, and Gleeok all return here, with Manhandla and Gleeok being two of the toughest. Manhandla can only be damaged by attacking its beak-like mouths when they’re open; unfortunately, this is also when they spit projectiles, and its attacks only increase as each “head” is knocked off, exposing its vulnerable insides. The two-headed dragon Gleeok again remains stationary and spits fireballs from its heads, one of which will fly about after being severed, but it’s actually easier to battle than in the original game. Mothula returns from A Link to the Past, with a similar attack strategy of circling the room and firing at you; though the moving floor is gone, you’ll need to watch for holes and jump over gaps to attack Mothula when it lands. This means that Seasons’ sole unique boss is the Medusa Head, which teleports about, turns you to stone, and fires a massive laser beam from its eyes but is easily stunned with your Pegasus Seeds. Aquamentus still spits fireballs, but now also has a charge attack; you must first force the Dodongo to swallow a bomb and then toss it onto the spikes surrounding the arena with the Power Bracelet; you’ll need to avoid being grabbed and tossed by Gohma’s claw, sever it, and then shoot its eye; and finally make use of the spiked magnetic ball to smash Digdogger and its mini doubles into the ground. 

Unique perspectives and methods are required to topple many of the game’s tougher bosses.

In comparison, Ages’ bosses are exclusive to that game, which helps to make it more unique, though some are reminiscent of previous Zelda bosses (Ramrock, for example, resembles King Bongo Bongo, though you defeat it by timing bomb throws into its giant stone hands). The first boss you’ll face is Pumpkin Head, who wanders around shooting a spread of fireballs; his only weak spot is his torso, which you attacked to grab and toss his jack-o’-lantern head to reveal its true form. The Head Thwomp is pretty unique as it’s fought from the side-on perspective and sees Link hopping around avoiding projectiles and falling rocks and dropping bombs into the boss’s head to make its expression change to red, causing damage and dropping hearts or bombs. The Shadow Hag also requires a unique strategy to defeat; she splits into multiple shadow forms and protects herself with moths, meaning you must fire a seed so it ricochets back into her. Eyesoar also requires the use of one of Link’s other weapons to damage; it protects itself with smaller eyes and relentlessly moves towards Link, so you need to clear them away and snag it with your Switch Hook to stun it and whack it with your sword. Smog is probably Ages’ most aggravating boss; it is fought in four rounds, each with a different arrangement of blocks, and its smaller form charges around tossing fireballs. You need to strategically place blocks with the Cane of Somaria to get the smaller parts to converge into one, which you can then attack, which each stage getting more difficult as Smog adds lightning attacks to its arsenal. The Octogon constantly swims around Link spitting projectiles at him; you need to angle your seed shooter to attack its weak spot on the back, and dive underwater to smack it with your sword, which can get quite chaotic. You’ll need to use these same seeds when battling the Veran-possessed Queen Ambi as this is the only way to drive Veran’s spirit from her body so you can stun her with the Switch Hook and attack with your sword. The Switch Hook’s upgraded form, the Long Hook, is also the only way you’ll defeat Palsmarine, two jellyfish-like enemies who can only be damaged by causing them to run into each other’s attacks.

As if the monstrous final bosses weren’t bad enough, a deranged version of Ganon also appears.

Once you’ve collected the eight mystical artifacts in each game, you break the spell keeping you from the big bads. In Ages, you battle the evil witch Veran at the Black Tower, a maze-like castle filled with Lynels and Wizzrobes, and whose battle consists of two phases. First, Veran summons Dark Links to distract you, dashes about, and throws a variety of fireballs. Once defeated, she transforms into three monstrous forms: a large beetle that crashes to the ground to temporarily cause acidic hazards to appear, a large bee that quickly flies around and slows your movements with its barrage of stingers, and a horrific spider that stuns and slams you with its web. These forms are random (I never actually saw the bee form) and require different strategies, such as attacking the beetle’s face, firing a seed at the bee, and tossing bombs at the spider. In Seasons, the antagonist is the formidable, heavily armoured General Onox whose castle is a labyrinth filled with some of the game’s toughest enemies and a rematch with Façade. When you reach Onox, he first swings and hurls a massive, spiked mace, causes boulders to rain down, and stuns you with whirlwinds and the only way to damage him is with your Spin Attack and swipe the Rod of Seasons when he uses Din to shield himself. Afterwards, you drop down a hole and face Onox’s dragon form! You need to avoid his flaming projectiles and being squashed by his claws and hop onto his hands to slash at the crystal on his head, which can be tricky if you cheese your jump. If you’ve cleared a Linked Game, you’ll be dropped into the Room of Rites to rescue Princess Zelda. This means battling Koume and Kotake, first separately (reflecting their elemental attacks back at each other) and then in their fused state as Twinrova (which conjures flaming pits or turns the floor to ice and must be stunned with Mystery Seeds) not unlike in Ocarina of Time. Defeat the witches and they’ll sacrifice themselves to resurrect Ganon, forcing you to fight an unhinged version of the Gerudo King in a battle not unlike A Link to the Past. Ganon teleports around the room and unleashes some devastating attacks, such as a charged swipe of his trident, stunning you with a ground-quaking drop, or charging up a huge energy ball. Ganon can only be damaged with a Spin Attack so you need to unleash it and quickly jump or dash away to avoid being hit, the timing of which can be tricky but I actually found this an easier bout than in A Link to the Past as there’s less to worry about onscreen.

Power-Ups and Bonuses: 
One aspect not carried over from Link’s Awakening are the temporary power-up Acorns; Link also won’t be getting new tunics either, which is a shame, but in their place is the Ring system. As you explore, you’ll find Gasha Seeds that can be planted in soil patches; these blossom into acorns that gift you Rings, or you can find them in chests or buy them from shops. Take them to Vasu the jeweller to appraise them for 20 Rupees and you can equip a Ring to enable certain effects, such as doubling your attack power, sensing secrets, increasing your throw distance, and even turning Link into an Octorok! Some Rings have negative effects as well, such as upping your attack power at the cost of you taking more damage, or no effect at all and simply being keepsakes. You can eventually hold multiple Rings in your Ring Box, but you can only equip one at a time so it’s best to think about what benefits you might need in the long-term. Another new aspect are the animal companions; Ricky the boxing kangaroo, Moosh the flying bear, and Dimitri the friendly Dodongo will help you throughout your quest, ploughing through hazards, flying you over gaps, and scaling waterfalls, respectively, when you call for their help but you’ll eventually have to settle on one as your primary companion, which is then reflected in the Linked Game. 

Link’s new weapons and companions provide new ways to traverse and solve puzzles.

Another new aspect here is that Link utilises a slingshot or a seed shooter rather than his traditional bow and arrows; the slingshot can fire a variety of seeds, from Ember Seeds to Mystery Seeds. The slingshot can even be upgraded to fire three shots at once, a luxury not afforded to the seed shooter (though you can aim your shots to ricochet to their target). Link’s seeds are very useful as well; the Gale Seeds allow him to warp, and the Pegasus Seed awkwardly take the place of the Pegasus Boots, allowing Link to run fast for a short period of time. Otherwise, weapons and items are very familiar; Link can toss bombs or a boomerang, pick up rocks with the Power Bracelet, and jump gaps with the Roc’s Feather. Many of his weapons can be upgraded, such as Link’s sword powering up to shoot a beam when he’s at full health and his shield deflecting incoming attacks, but two of the most useful upgrades are Age’s upgraded Mermaid Suit, which lets you dive and attack underwater, and Seasons’ upgraded Roc’s Cape, which lets you glide over gaps. Ages’ Cane of Somaria is required to press multiple switches at once to solve puzzles, as is the Switch and Long Hook, which let you switch places with diamonds, jars, and other objects to clear gaps, defeat or damage certain enemies, and press switches. Link will also make good use of the Harp of Ages and Rod of Seasons to travel through time and change up the seasons on the overworld, respectively, and playing a Linked Game allows you to access additional weapons, such as homing Bombchus, the Biggoron’s Sword, and the Mirror Shield.

Additional Features: 
As ever, Link can extend his health by collecting Heart Containers; you’ll be granted an extension for every four you find or after beating a dungeon boss, allowing you to extend Link’s health to sixteen hearts. Link’s weapons can also be upgraded, though some are optional and require you to explore or perform certain tasks. As you explore the overworlds, you’ll come across hidden caves containing Rupees or fairy fountains to replenish your health, and find Maku Seeds which must be planted to acquire new Rings. Both games include a lengthy trading sequence where you exchange key items between NPCs, fleshing out the world, your relationships with the characters, and earning the Noble Sword in the process. Almost every area requires some kind of fetch quest in Ages, such as finding Mystery Seeds to meet Queen Ambi to get the bombs you need to enter the Wing Dungeon, travelling back and forth between time to placate the Gorons, or acquiring a sea chart and talking to Tingle to reach Crescent Island. There are some stronger golden variants of enemies to find and defeat in Seasons that will net you the powerful Red Ring, and you can transfer elements from one game to another after completing them and earning a password. This begins a Linked Game, where you start with four hearts instead of three and with a weapon in your inventory; certain NPC interactions will change, the Hero’s Cave will be considerably more challenging and reward special Rings, Rings and other special items can also be transferred via passwords, and each game includes additional features (such as a familiar 2D rescue of Princess Zelda in Ages and a rematch with the Great Moblin in Seasons) that are only accessible this way and thus encourage multiple playthroughs. 

Various side quests and a unique link feature expand the games.

Once you’ve cleared one game and then completed a Linked Game, you can experience the “Hero’s Game” to experience the other game as intended and also access the true final challenge of both games. If you play each game normally, you’ll receive a code to use in the other game; playing a Linked Game sees NPCs reference your heroics and actions from the other game, as well as providing you with additional passwords you can use to access extra items and bonuses. If you play a Linked Game through to the end, you’ll automatically be taken to the Room of Rites to battle Twinrova and Ganon; defeating them gifts you the “Hero’s Secret”, which essentially allows you to play the original, unlinked version of the other game but with more hearts and being able to transfer over your Rings. It’s a pretty unique feature and invites multiple playthroughs, though it does lock some traditional Zelda elements (such as the Mirror Shield and Master Sword) off from you as these can only be accessed with the codes. Back in the day, you could automatically play a Linked Game using a Game Boy link cable; the Nintendo Switch Online version doesn’t currently allow you to jump straight into a Linked Game, but you can choose between the NTSC and PAL versions (though I’m not sure what the difference is between the two) and make use of save states and the rewind feature to make the experience a lot less difficult.

The Summary: 
For the longest time, the Oracles games were inaccessible to me; as prices soared and I upgraded past the original Game Boy, they became unplayable outside of emulation until they were finally released digitally. I’ve played through both before on the Nintendo 3DS but that was ages ago and I’ve hesitated to revisit them due to the playtime needed to properly experience both, and that’s a mistake on my part as they really are some fun, challenging, and vibrant Zelda adventures. While it’s fun warping between different time periods in Ages, I feel this mechanic wasn’t as prominent as it could’ve been; rarely do your actions in the past impact the future (these events are more noticeable in cutscenes) and I would’ve liked to see more visual differences between the past and present, like a decimated present that gets fixed as you visit the past. In comparison, I really enjoyed the season mechanic in Seasons; being able to manually cause snow or a blazing summer is fun and opens new opportunities for exploration, even if it’s not utilised outside of the overworld. I do have some gripes, but they’re mainly due to limitations of the hardware; for example, it’s annoying having to equip the Power Bracelet every time you need to use it and as good as the map is when you’re warping, it’s not always clear where you’re going. Although the weapons and items aren’t much to shout about and the bland dungeons disappointed me, I enjoyed how much the overworld popped and the boss battles presented; I liked all the returning battles, but the original ones were even better, but I quickly became frustrated with Ages’ focus on repeating puzzles and forcing you to run all over the place for the most mundane tasks. Although the linking system is a little clunky and it’s a shame we didn’t get a third game (and I feel a modern remake would be better served packing all two-and-a-bit games together), I liked the increased emphasis on interactions with NPCs and the incorporation of the animal companions, however brief they are. Including aspects from Ocarina of Time was also a great idea, and the epilogue offered by the Linked Game made for a satisfying conclusion, though again I think more could’ve been done with this feature. In the end, this was like one big Zelda experience spread over two titles…mainly because that’s exactly what it was! Seasons was more my speed overall, but there were elements I liked from Ages like the more varied overworld. Play both back-to-back for the complete experience and you can’t go wrong, though it can’t be denied that there’s a little lacking from each due to them having different mechanics and equipment. 

My Rating:

Rating: 4 out of 5.

Great Stuff

Have you ever played the Oracles games? Which one did you prefer? Did you like that they incorporated elements from the 3D Zelda titles? What did you think to the different overworlds and gameplay mechanics? Did you prefer travelling through time or altering nature? What did you think to the recycled bosses from previous Zelda games? Did you ever link both games and see the true ending? Would you like to see these games remade like Link’s Awakening was? How are you celebrating The Legend of Zelda this month? Leave your thoughts and comments below or on my social made and go read some of my other Zelda reviews on the site!

Movie Night [PokéMonth]: Pokémon 4Ever: Celebi – Voice of the Forest


Upon the release of Pokémon: Blue Version and Pokémon: Red Version (Game Freak, 1996), a new craze swept through playgrounds across the world. Entire generations have grown up with Pokémon as clever marketing saw Nintendo’s newest franchise become a massively lucrative and popular multimedia powerhouse that endures to this day. Accordingly, February 27th is now internationally recognised as “National Pokémon Day”, which I’m expanding to an entire month of Pokémon every Tuesday in February.


Released: 7 July 2001
Director: Kunihiko Yuyama
Distributor: Toho
Budget: Unknown
Stars: Veronica Taylor, Dan Green, Tara Sands, Kazuko Sugiyama, Rachael Lillis, Eric Stuart, and Masahiko Tanaka

The Plot:
After being transported through time by the legendary Pokémon Celebi (Sugiyama), young Sammy (Sands) teams up with Pokémon Trainer Ash Ketchum (Taylor) and his friends to defend the spritely Pokémon from the nefarious Iron-Masked Marauder (Green), who seeks to enslave Celebi with a Dark Ball.

The Background:
Pokémon (Nintendo/Creatures/Game Freak, 1995 to present) became an instant phenomenon once it came over from Japan: it dominated playgrounds as kids played the videogames, collected the trading cards, and tuned in to the still-ongoing anime series (1997 to present). So successful was this multimedia marketing strategy that it led to the aptly-titled Pokémon: The First Movie: Mewtwo Strikes Back (Yuyama, 1998), a box office success that started a slew of feature films that expanded upon the anime and promoted the newest Pokémon videogames, especially the franchise’s most powerful and elusive creatures. Despite earning less than the first film, Pokémon the Movie 2000: The Power of One (ibid, 1999) still made over $130 million against a $30 million budget; however, while Pokémon 3: The Movie: Spell of the Unown (ibid, 2000) had a far smaller budget, its $68.5 million box office made it the least successful Pokémon movie. Miramax took over the international distribution and released the fourth movie straight to video rather than in cinemas, one that followed a similar formula to is predecessors, and successors, by featuring a Pokémon almost elusive as Mew at the time due to only being legitimately available through a special event. Unfortunately for the super cute sprite, Pokémon 4Ever was met with largely negative reviews that criticised its pacing and execution. Despite this, its limited theatrical run saw it make around $40.8 million and Pokémon movies continued to be produced over the years, with Celebi making a feature-film return in 2010.

The Review:
Like many kids who played Pokémon back in the day, I was enamoured at the prospect of Legendary Pokémon, rare, incredibly elusive creatures who often represented the elements. Back in the first and second generation of Pokémon, none were more scarce than Mew, the 151st Pokémon that couldn’t be legitimately obtained in the original games outside of Japan. Rumours and hearsay regarding Mew persisted and, for me, it was this mystery as much as Pokémon’s irresistible popularity that made the first movie such a big hit at the time. When it came time for my favourite games in the series to be released, I was all over the marketing and anticipating the next batch of Legendary Pokémon; while I don’t recall anywhere near as many rumours revolving around Celebi, the time travelling pixie was equally elusive for the longest time. It wouldn’t be until the second generation games were remade and made available on the Nintendo 3DS’s Virtual Console that Celebi became legitimately available and you’d be lucky to pick one of them up in one of Nintendo’s giveaway events. However, while there was still enough intrigue surrounding Celebi and Pokémon, I distinctly remember that I started to lose touch with the franchise around the time that Pokémon 4Ever was released; the third movie lacked compared to its predecessors, I was moving on to other interests, and, for a while, I was just a bit burned out from the franchise at the time, so this is definitely about when my fandom towards Pokémon became much more casual.

Ash and friends befriend a time-displaced boy and help protect an injured Celebi.

Pokémon 4Ever is the first of the Pokémon movies to begin with a helpful introduction; for any clueless parents watching or uninitiated kids, former Pewter City Gym Leader and Pokémon Breeder Brock (Stuart) delivers an opening monologue that establishes the world and Ash’s dreams of becoming a Pokémon master. As is often the case, Ash is so distracted by his unending desire to prove himself in battle that he almost misses his ferry to Arborville, a town built out of treehouses deep within a dense forest in the Johto region. On the way, they spot a Suicune (Tanaka) on the riverbank and perplexed by this unusual Pokémon, Ash calls his friend and mentor Professor Samuel Oak (Stuart Zagnit). Professor Oak identifies it as a Legendary Pokémon who “personifies the North Wind” and is capable of personifying water, something he offhandedly claims to have first-hand knowledge of. Excited at the prospect of encountering more rare Pokémon nearby, Ash naturally runs head-first into the forest and comes across Sammy, a time-displaced boy who’s jumped ahead forty years thanks to a panic-stricken Celebi. Despite an initial misunderstanding due to his confusion, Sammy quickly befriends Ash and his friends and eagerly joins them in seeking out Celebi and the renowned “Lake of Life”, though he lacks Ash’s adeptness for physical exertion. A Pokémon enthusiast who sketches wild Pokémon, Sammy bravely shields the Celebi and forms a bond with it not unlike the one between Ash and his long-time partner, Pikachu (Ikue Ōtani), fighting alongside both with his own Pokémon that pop from archaic PokéBalls.

The carefree Celebi is corrupted by a Dark Ball and only Suicune can help defend the forest!

First seen being pursued through the forest by a selfish hunter (Stuart), the fairy-like Celebi is one of a species of extremely rare Pokémon that is regarded as the “Voice of the Forest”. Like almost every Legendary Pokémon featured in the movies, Celebi is a Psychic-Type Pokémon but, in a change of pace, can’t telepathically communicate with its newfound friends and it’s barely able to defend itself with psychic barriers and vines. Instead, Celebi uses its unique time travel ability when in extreme distress, which transports it and quiet, unassuming Sammy, to the present day. Injured and weak, Celebi depends on the assistance of others to protect it, which the protagonists and wild Pokémon are only too happy to do. Once restored to full health, Celebi exhibits a joyful, childlike playfulness, heals Misty’s (Lillis) briefly-injured ankles and takes Ash and Sammy on a flight over the forest. Unfortunately, Celebi undergoes a dramatic change of character when captured and corrupted by one of the Iron-Masked Marauder’s “Dark Balls”; its powers are amplified and turned against the forest it so coveted, turning it into another of the evil-doer’s mindless slaves and encasing it within a “big twig monster”. Luckily, nature has a more proactive defender nearby to help out; Suicune, sensing the danger, spirits Ash, Sammy, and Pikachu to safety and bests the Iron-Masked Marauder’s Tyranitar (Unknown), though even Suicune’s power fails against Celebi’s monstrous form and it takes a desperate plea from Ash and Sammy to bring Celebi to its senses. As much as I like Suicune, I can’t help but be disappointed that the three Legendary Beasts were split up between movies and specials; Entei, Suicune, and Raikou wouldn’t appear together in a film until 2010 (ironically reuniting Suicune with Celebi, although they were all different versions of these Pokémon) but Suicune fares slightly better than Entei as it’s at least closer to its actual in-game depiction.

The Iron-Masked Marauder seeks to corrupt Celebi’s power and twist it to his own destructive whims.

Naturally, Ash and his friends are pursued by Jessie (Lillie), James (Stuart), and Meowth (Maddie Blaustein) of Team Rocket, who are instantly undone first when Jessie gets a leg cramp and then when they crash to the ground after delivering their motto. Although Sammy is concerned for their welfare, the others simply ignore them with barely a glance, severely diminishing what little threat they might’ve had in favour of the new villain, the reprehensible Iron-Masked Marauder. Although also allied with Team Rocket, this mysterious and egotistical foe has his own ambitions to overthrow Giovanni (Ed Paul) using Celebi’s time travelling powers. The Iron-Masked Marauder uses his custom-made Dark Balls to capture Pokémon and bend them to his will, favouring powerful Pokémon like Tyranitar that he turns “evil” and far more dangerous. Selfish, vindictive, and craving destruction, the Iron-Masked Marauder is about as one-dimensional a villain as you could ask for, lacking a true name and any motivation beyond power for the sake of power. Unlike Team Rocket, whose ambitious contraptions always fail them, the Iron-Masked Marauder helms a gigantic mechanical, spider-like walker and is so infamous and fearsome that Team Rocket are instantly besotted after witnessing his power. Bolstered by their newfound alliance, Team Rocket brazenly confront their enemies, backed up by the Iron-Masked Marauder’s formidable technology, which he uses to easily capture and corrupt Celebi and devastate the natural landscape. However, even Jessie, James, and Meowth are horrified when the dark Celebi twists the forest into a lumbering, kaiju-esque monstrosity and goes on a rampage, with the Iron-Masked Marauder at the helm and Jessie trapped within.

The Nitty-Gritty:
While there are often themes regarding the power and misuse of nature in Pokémon, often with the titular creatures at the forefront of these issues, they’re particularly prevalent in Pokémon 4Ever. This wouldn’t be the first or last time we’d see a diminutive, innocent Pokémon used for evil or a natural landscape plundered by a ruthless villain, but it’s all the more potent here since Celebi effectively “speaks” for nature itself, and represents its carefree spirit with its cheery demeanour. Thus, while it futilely lashes out with vines to protect itself, Celebi is by far the weakest and most vulnerable of the Legendary Pokémon seen so far; it’s entirely dependent on anonymity, the kindness of others, and the healing power of the Lake of Life, meaning it’s easily overwhelmed by the Iron-Masked Marauder’s Tyranitar. Paradoxically, Celebi is also one of the most powerful Legendary Pokémon because it can travel through time. This aspect is only really a small part of the movie, featuring as a local legend, Celebi’s signature ability, and a means to displace Sammy from time. However, this also introduces an interesting wrinkle in that this version of the movie explicitly reveals that Sammy is a young Professor Oak, suggesting Professor Oak favoured Ash because of the friendship they built as children and that his PokéDex came from his love of drawing the Pokémon he encountered as a boy. Most of Pokémon 4Ever takes place in a dense forest that is home to a shrine and the fabled Lake of Life, a healing water where Celebi is said to flourish. CGI is used to give the forest depth and speed to make Celebi’s flying more exciting, but the film is undeniably more like a longer episode of the anime with a greater budget and lacks the cinematic punch seen in the first two movies, despite some attempts to establish atmosphere with waterfalls and a dense fog.

Celebi is revived, the Marauder is defeated, and the forest is saved through the power of teamwork.

While CGI works for the various battles, sweeping scenes, and background elements of the movie, it falls completely short when bringing the corrupted Celebi’s forest-dragon form to life. A swirling mess of twigs and branches, this ugly monstrosity looks more like a heap of hideous wet autumnal grass than anything remotely intimidating, no matter how many mouth lasers it spits out. Due to its more whimsical nature, Pokémon 4Ever is surprisingly light on battles; much of the film is focused on Ash, Sammy, and Celebi’s friendship, so Misty and their newfound friends have little to do but offer support, though Brock does have his Onix (Unknown) help Suicune deal with Tyranitar. Consequently, battles are very brief due to the Iron-Masked Marauder’s corrupted Pokémon being so much more powerful and requiring either a bit of thought or a greater power to topple. Despite this, the forest is badly ravaged; although Ash and Sammy bring Celebi to its senses, the effort of it destroying its draconian body proves fatal and the Lake of Life is unable to revive it due to the damage caused by the battle. Luckily (and conveniently), Suicune is on hand to purify the lake, restoring it to full vitality and, after a brief period of doubt (Ash trying to force feed the shrivelled Celebi berries is particularly heart-breaking), Celebi as well. Following a victory lap with its kin, Celebi repays the favour when he plummets to the ground after dispatching the vengeful Iron-Masked Marauder, who’s left dishevelled, unmasked, and helpless to the mercy of the locals and wild Pokémon. With the forest restored, Suicune impassively departs and a grateful Celebi transports Sammy back to the past following a heartfelt farewell to his new friends. Although Ash is happy to see his friend returned home, he can’t help be sad but, when he shares the news of his adventure with Professor Oak, we learn that his promise to see Sammy again came true as the boy grew up to become his wise and friendly mentor.

The Summary:
I’ve made no secret about my love for the second generation of Pokémon; the Johto games remain my favourite in the entire franchise and a huge reason for that is both the simplicity of Pokémon and its popularity at the time. However, as much as I enjoy these games and this time in the franchise, even I have to admit that the Johto movies suffered from the law of diminishing returns; rather than getting bigger and more grandiose, the third and fourth movies opted for smaller, more interpersonal tales, which is fine but I wonder if children really watch Pokémon for this sort of content. Celebi is cute, for sure, and it makes a change to see a Legendary Pokémon onscreen that isn’t a rampaging powerhouse, but there’s not a lot of substance to Pokémon 4Ever to really keep me engaged. I appreciate the attempt to tell a more whimsical and carefree story, one that makes you re-evaluate Ash’s relationship with Professor Oak, but I can’t help but be disappointed with the execution. Perhaps if it had been done a little differently, like having the Iron-Masked Marauder commanding corrupted versions of the Legendary Beasts and Ash teaming up with Ho-Oh instead (or alongside Celebi). I think what fundamentally lets Pokémon 4Ever down is the lack of cinematic punch; as much as I love the soundtrack from Mewtwo Strikes Back, it’s a little cheap to recycle elements of its score, the opening titles are lazy and boring, and the lack of exciting battles or visually interesting CGI makes this easily one of the most forgettable Pokémon movies. There are no lessons on offer here that kids couldn’t learn from better animated movies or the Pokémon anime, which taught the same lessons about friendship and respecting nature and freedom on a regular basis, and even the allure of the elusive Celebi can’t save this one from being a disappointment.

My Rating:

Rating: 2 out of 5.

Could Be Better

Did you enjoy Pokémon 4Ever? What did you think to the choice to craft a more low-key, whimsical story? Did you like the depiction of Celebi and the friendship between it, Ash, and Sammy? What did you think to the Iron-Masked Marauder as the main antagonist and his corruption of other Pokémon? Were you disappointed that the Legendary Beasts were split up across the movies and specials? Which Pokémon game, generation, and creature is your favourite and why? How did you celebrate National Pokémon Day this year? Whatever your thoughts, drop them in the comments below or on my social media and be sure to check out my other Pokémon content.

Movie Night: Madame Web

Released: 14 February 2024
Director: S. J. Clarkson
Distributor: Sony Pictures Releasing
Budget: $80 million
Stars: Dakota Johnson, Tahar Rahim, Sydney Sweeney, Celeste O’Connor, Isabela Merced, and Adam Scott

The Plot:
After a near-death experience,.paramedic Cassandra “Cassie” Webb (Johnson) begins seeing glimpses of the future revolving around Ezekiel Sims (Rahim), a superpowered businessman determined to kill three teenagers before they can kill him in the future as Spider-Women, compelling Cassie to begrudgingly discover the truth of her past and protect the girls.

The Background:
After Sam Raimi’s Spider-Man trilogy (2000 to 2007) proved a phenomenal success, Marc Webb’s reboot films proved sadly mediocre and led to an unprecedented agreement between Sony Pictures and Marvel Studios that allowed the iconic wall-crawler to appear in the Marvel Cinematic Universe (MCU) and Sony to release tangentially-connected spin-offs featuring Spidey’s villains and side characters. Encouraged by the financial (if not critical) reception of their Venom (Various, 2018 to present) movies (and seemingly undeterred after the car-crash reception of Morbius (Espinosa, 2022)), Sony not only signed off on a solo project for Sergei Kravinoff/Kraven the Hunter, but also the enigmatic clairvoyant Cassandra Webb/Madame Web. Created by Dennis O’Neil and John Romita Jr., Madame Web first appeared in The Amazing Spider-Man #210 and significantly influenced Spider-Man’s battles against multiversal forces, but is perhaps best known for her inclusion in the Spider-Man animated series (1994 to 1998), where she was voiced by Joan Lee (wife of the legendary Stan Lee). Writing began on a Madame Web feature while Morbius was still in production and saw numerous rewrites, even after director S. J. Clarkson signed on and retooled it into Sony’s first female-centric Marvel film. Producer Lorenzo di Bonaventura expressed difficulties in adapting Madame Web’s clairvoyance to the screen and emphasising secrecy surrounding the project given her relative obscurity, a fact explicitly addressed by the inclusion of other, more recognisable Spider-Women. The cast appear to have been mislead as to the status of the film in the wider MCU; this may explain the bizarre marketing campaign that saw star Dakota Johnson seemingly openly criticise the film, though she wasn’t the only one. After numerous delays, Madame Web released to scathing reviews; the film made just shy of $100 million at the box office and critics attacked the poor dialogue and script, lacklustre special effects and pacing, and the blatant false advertising regarding three of the lead characters.

The Review:
So, if I had a whole bunch of negativity towards making standalone, Spider-Man-less films about the likes of Eddie Brock/Venom and Doctor Michael Morbius, you can be damn sure that I was baffled to the point of insanity by the decision to make a solo Madame Web movie. Not only is she an extremely obscure Spider-Man character, but her depiction is generally as a wizened, blind mentor who manipulates Spider-Man like a chess piece as part of Marvel’s on-again/off-again insistence on convoluting Spidey’s origins and mythos with semi-paranormal cosmic ideas of Spider Totems and “Webs of Fate”. It’s ironic, really, as the concept could have worked a little better if Madame Web had been depicted as a Professor Charles Xavier/Professor X-type figure, mentoring and recruiting Spider-Women to oppose the Inheritors, despite my dislike for them, because at least then the focus would be on the spider-powered women and not this thoroughly unlikeable paramedic who, despite choosing a carer where she’s sworn to protect lives and being depicted as a workaholic who rushes to do that very thing, is reluctant to help the three girls targeted by Ezekiel Sims. Much of Cassie’s reluctance stems from her lingering feelings of abandonment, confusion about her true self and past, and what’s framed as an unconventional upbringing since her mother, Constance (Kerry Bishé), died during childbirth and Cassie was raised in the foster system, left with only mementos of her mother, Constance’s research into the near-mythical spiders of the Peruvian jungles, and the mistaken, childish belief that Constance cared more about her arachnids than raising her daughter. Consequently, Cassie has a bit of an abrasive edge to her; while she tirelessly works to save lives alongside her friend and partner, Ben Parker (Scott), she’s uncomfortable with receiving gratitude for this, has no idea how to act around children, and would much rather spend time in her apartment with a local stray cat than socialise with her colleagues or even Ben’s pregnant sister-in-law, Mary Parker (Emma Roberts). Her anxiety and social awkwardness is only exacerbated after she nearly drowns and is sporadically bombarded by visions of the past and near future, all framed by a mysterious web-like pattern, though she initially dismisses these visions and it takes her a ridiculously long amount of time to realise that they’re not only true, but that the fates she is witnessing can be changed.

Three girls destined for greatness must rely on Cassie’s sporadic clairvoyance to survive.

Central to her visions are four individuals – a violent killer clad in a somewhat-familiar spider-themed costume and possessing superhuman strength and spider-like abilities, and three twenty-somethings teenagers that Cassie sees horribly murdered by this assassin time and again. As fate would have it, their destinies are all intertwined and lead Cassie to encounter the three girls individually to establish some surface-level characteristics for the three that are partially developed as the film chugs along. Julia Cornwall (Sweeney) is the quiet, shy girl who’s struggling with her parents’ divorce, Anya Corazon (Merced) is both book smart (she literally wears a t-shirt proclaiming her love of “math”) and dealing with fending for herself after her father’s deportation, and skater Mattie Franklin (O’Connor) is the streetwise rude girl with a chip on her shoulder since she comes from money. The three couldn’t be more different but quickly form a genuinely enjoyable sisterhood after they’re saved by Cassie; while initially distrusting of her, they eventually come to believe in her janky clairvoyance after she saves them from Ezekiel multiple times. However, Cassie is seemingly impulsively compelled to do this, and it takes her a while to realise the responsibility she has towards the girls; she routinely abandons them, chastises them, and even jets off to Peru to investigate her origins and undergo a spiritual journey that finally teaches her that she has an obligation to protect the three with her abilities. The three girls do their best with the materials, appearing fun and likeable and adding some pathos to their characters through their shared feelings of abandonment, but the script is rarely in their favour. The same is true for Cassie, who constantly narrates her life like an idiot and acts very irrationally for a paramedic, though eventually she settles into the role of a reluctant surrogate mother and protector to the girls.

Ezekiel targets the girls to save his own life, but is a pretty weak and one-note villain.

The girls are targeted by Ezekiel since he’s been plagued by visions of his death at their hands at some point in his future. Previously working alongside Constance, Ezekiel betrayed and killed her to get his hands on a mysterious spider that granted him his amazing powers, but also cursed him with the knowledge of his impending death. In the interim, he built a vast, indistinct corporate empire and has become obsessed with finding and killing the three Spider-Women who’ve haunted his nightmares, aided by his “girl in the chair”, Amaria (Zosia Mamet), who hacks into the police database and CCTV cameras all over the city to track the girls down. It’s not made clear why the Spider-Women would hunt down and kill Ezekiel in the future, or what he’s done that makes him such a diabolic villain except one confirmed kill, but boy does he like to mumble and grumble about how badly he wants them dead and his desire to ensure he lives on! As if having all the wealth and technology he needs at his disposal isn’t enough, Ezekiel also possesses spider-like powers; he can walk and climb on walls, leap vast distances, possesses superhuman strength and reflexes, and can poison his victims with a touch, eventually causing cardiac arrest. He also seems to display some degree of clairvoyance and psychic power to rival that of Cassie, communicating to her on the astral plane at one point, and dresses in an admittedly cool looking outfit when out on the prowl. How he changes in and out of this isn’t made clear either, however, as he’s often seen wearing the form-fitting suit in one scene and then fully in his business attire in the next with no explanation, and he’s routinely humiliated by Cassie since she can anticipate his actions ahead of time. While Cassie doesn’t demonstrate the same superhuman powers, the three girls do in the frantically-edited visions of the future, though it’s unclear how, when, or why they gained superhuman powers. Ezekiel does, however, share his powers with the mysterious Las Arañas, a secret Peruvian tribe who dress in makeshift jungle attire that’s very similar to Spider-Man’s and try to save Constance when she’s wounded, delivering Cassie and then later making her realise that her mother ventured into the jungle to save her, not because she didn’t care about her. Frankly, I find this whole aspect to be borderline insulting; I hate the idea of a tribe of Spider-People and of a spider species that can grant these powers as it diminishes Spider-Man’s uniqueness, though the depiction of the spider-powered people clambering and leaping about the place is pretty good and surprisingly horrific, especially when Ezekiel is tossing bodies around in Cassie’s visions.

The Nitty-Gritty:
There’s a shared feeling of abandonment between the four female leads; all of them feel like outsiders to some degree, isolated from others and even their families since they either don’t have a parental figure, or their parents don’t seem to care about them. While their individual personalities initially clash because of their different backgrounds and current social standing, they quickly bond once they realise how much they have in common, with the three girls, especially, forming a makeshift sisterhood due to their current circumstances. Although Julia is Cassie’s most vocal supporter, they initially believe she’s either crazy or just another adult they can’t rely on and decide to go against Cassie’s warnings and fend for themselves, an action that very nearly sees them all killed by Ezekiel before Cassie intervenes. She chastises them, angry at their irresponsible and reckless actions, but struggles to give them the answers they want and to properly care for them since he’s apparently so maladjusted that she can barely stand to be around her handful of friends, much less look after three scared teenagers. Thus, she turns to Ben to shelter the girls while she tries to find answers in Peru; this turns out to be a good decision since Ben is a much more emotionally stable individual. He deeply cares for his sister and is extremely excited about being an uncle, but is also devoted to his friend and partner, to the point where he resuscitates Cassie after she drowns, begs her to socialise with his family and their colleagues, and agrees to look after the girls even though he has no idea what kind of danger they’re in. As good as Adam Scott was in the role (I particularly liked the banter he shared with Cassie, which hinted at a former attraction, and his struggles to keep up with the girls), the only reason he’s here is for fan service: yes, he’s playing the future Uncle Ben and, through him, we even see the birth of his nephew (who ridiculously goes without a name) and get hints towards his future, despite Madame Web taking place in its own separate continuity from previous Spider-Man movies. There’s also something really weird about Julia, Anya, and Mattie all being older than Peter and the frustration of the three running around in normal street clothes instead of the awesome Spider-Women suits we barely get a glimpse of in their future.

In the absence of the Spider-Women, we’re left relying on Cassie’s visions and Ezekiel’s threat.

Yes, Madame Web is another great example of Sony lying to us; the trailers and posters showcased Julia, Anya, and Mattie as fully-empowered Spider-Women but this isn’t the case at all. I guessed that we wouldn’t see them suit up until the very end, but the truth is far worse; they only wear their costumes in fleeting visions, with no explanation of how they get their powers, and the film has the gall to setup a potential sequel that actually addresses these issues, but to me it’s a dropped ball that completely derails the movie. The bulk of Madame Web is focused on Cassie’s struggles to reconcile her past and understand her newfound powers; there are numerous scenes of her witnessing snapshots of the future, meaning we get a lot of time loops and confused looks from Cassie that border on the maniacal as she tries to understand what’s happening. Primarily, though, these visions are used as fake outs; almost every time, the scene will show Ezekiel coming in, wrecking fools, and killing his targets in an almost effortless manner, only to suddenly snap back to Cassie and show her taking action to avoid this fate. It’s all very reminiscent of the Final Destination films (Various, 2000 to present), which is fitting but kind of lowers a lot of the stakes since you can just assume every violent scene or action sequence is just a vision. When Ezekiel does get a chance to fight, he’s effectively peerless; none of the protagonists have the strength or ability to go toe-to-toe with him, meaning Cassie drives a lot of cars into him and catches him off-guard with her clairvoyant powers, leaving him perplexed and looking stupid. When the Las Arañas appear, it’s all shot with an unsettling, nightmarish shaky-cam filter that makes their appearances and abilities not only difficult to pin down, but also appear needlessly cartoonish.  There are some decent effects at times, such as when Cassie takes her spiritual journey and interacts with the Web of Fate and the lingering memory of her mother, and things are surprisingly grounded for a Sony Spider-Man-adjacent movie, with Ezekiel being unable to swing from webs and more reliant on his physical abilities. This, in conjunction with his intimidating costume, does paint him as a formidable figure; he’s almost like a slasher villain at times, draining the life from his victims, breaking their limbs, and pouncing like an animal, but this persona is awkwardly juxtaposed with his pandering civilian identity, where he may as well twirl an old-timey moustache as he spouts generic villain dialogue with little charisma or conviction.

Cassie accepts her fate to defeat Ezekiel and mentor the future Spider-Women.

So, all these recent revelations help Cassie make sense of her mother’s notebooks; while she previously resented Constance’s apparent fixation on her spider research, she realises that her destiny has been intertwined with Ezekiel’s since before her birth and takes herself to Peru to find answers. There, a Las Arañas, Santiago (José María Yazpik), helps her to realise that her mother was trying to cure her of some disease and that she has a greater destiny, one that will bestow her with “great power” once she accepts the “responsibility” that comes from her abilities. Before, she saved and sheltered the girls simply because it was the right thing to do; she had little interest in watching over them or bonding with them, or of their greater destinies as Spider-Women, but her spiritual journey motivates her to actively shield them from Ezekiel’s wrath, and gives her greater control over her future sight. After rescuing them and allowing Ben and Mary to get to safety, Cassie takes the girls to a fireworks warehouse and they finally set aside their differences to set a trap for Ezekiel, planting flares all over the place to cause a series of explosions. This actually causes quite a few issues for the protagonists, however, as the explosions destroy the helicopter Cassie called in to rescue them and eventually sees Julia, Anya, and Mattie separated and facing fatal falls. Luckily, Cassie masters her powers enough to…somehow…spiritually duplicate herself long enough to help the three to safety, incurring Ezekiel’s anger. Despite him being haunted by very specific visions of his death at the hands of the three Spider-Women, Cassie changes his fate and claims that she was always the one who was destined to end him (which doesn’t seem true, but okay) and lures him onto unstable ground, eventually causing him to plummet to his death and be crushed by debris. Cassie also takes a plunge but, luckily, she taught the girls CPR earlier and they’re able to revive her, though she’s not only inexplicably left paralysed with no explanation but also winds up blinded by a stray firework. Still, she’s not bothered by this; in fact, the film ends with her happier than ever since she can now, presumably, use the full extent of her psychic powers and clairvoyance to see and understand the future and is prepared not just to take on the three as their foster mother, but to mentor them into the Spider-Women they are destined to become…effectively ending the film where it really should’ve started! Like, why not have Cassie already be infirm but fully empowered and training, say, Julia, showing their origins through flashbacks and exposition, and have Julia be the point woman in recruiting Mattie and Anya when Ezekiel, an Inheritor assassin, targets them? It could’ve been Sony’s answer to the X-Men, in a way, and even take place in the same universe as their other pointless spin-offs, and might’ve been more enjoyable because then we would’ve gotten to see the gorgeous Sydney Sweeney in their slick, form-fitting Spider-Woman costume for a lot more of the runtime!

The Summary:
I went into Madame Web expecting it to be bad based on the trailer, the disaster that was Morbius, and my dislike for the concept in general. I tried to have an open mind, however; the cast, for example, intrigued me, as did the costume design, and to be fair there is the ghost of a semi-decent idea here, it just would’ve worked better as a side plot in a Spider-Man film or reworked to have Julia Carpenter/Spider-Woman at the forefront, with Cassie as a mentor figure. Any goodwill the film might’ve gotten from its Spider-Woman costumes is flushed down the toilet since we barely get a good look at these and the girls don’t even become Spider-Women in the movie; Ezekiel’s costume and action scenes somewhat make up for this, but he’s such an ineffectual and confusing villain that it’s hard to care when he’s onscreen. The relationship between the protagonists was somewhat enjoyable; I liked how the girls bonded, their shared feelings of abandonment, and them coming together as a surrogate family, but it’s executed so poorly and, although the girls do try, they’re all hampered by a really awful script. Dakota Johnson suffers from this the most, I think; she was some weird, awkward silences and quirks and is forced to spit out some really awful dialogue and nonsensical exposition. Add to that the fact that Cassie is a weird and pretty unlikeable character, abandoning and yelling at the girls even though she’s supposed to be a paramedic and you have a main character who’s hard to relate to, a villain as flat as a piece of paper, and three boisterous young girls who are completely wasted in this travesty of a film. It’s more than a step back for the genre; Madame Web harkens back to a time when superhero movies were not only afraid to use codenames and costumes, but outright ashamed of them, delivering cookie cutter dramas that falter at the first hurdle. It’s a sad state of affairs and I have lost all hope for Sony’s future Spidey-adjacent movies, and my expectations were already at the bottom of the barrel to begin with!

My Rating:

Rating: 1 out of 5.

Terrible

Did you enjoy Madame Web? If so…what’s the matter with you? What did you think to the performances and the dynamic between the four protagonists? Were you disappointed that the girls didn’t actually become Spider-Women in the film? What did you think to Ezekiel, his characterisation, and the nonsense about the Las Arañas? Do you think a Madame Web movie could ever work, or would you rather see a Spider-Woman take the forefront? Which Spider-Woman is your favourite? I’d love to know your opinion of Madame Web, so leave a comment below and be sure to check out my other Spider-Man and Marvel content.

Back Issues: The Punisher #1-5

Writer: Steven Grant – Artist: Mike Zeck

Story Title: “Circle of Blood”
Published: 8 October 1985 (cover-dated January 1986)

Story Title: “Back to the War”
Published: 5 November 1985 (cover-dated February 1986)

Story Title: “Slaughterday”
Published: 10 December 1985 (cover-dated March 1986)

Story Title: “Final Solution: Part 1”
Published: 7 January 1986 (cover-dated April 1986)

Story Title: “Final Solution: Part 2”
Published: 11 February 1986 (cover-dated May 1986)

The Background:
By February 1974, Marvel Comic’s iconic teenage superhero, Peter Parker/Spider-Man, had become a mainstay of the publication following his 1962 debut in Amazing Fantasy #15. After earning his own ongoing book, The Amazing Spider-Man, the following year, he amassed quite the gallery of villains, such as Doctor Otto Octavius/Doctor Octopus, Flint Marko/The Sandman, and, of course, Norman Osborn/Green Goblin. In February 1974, Gerry Conway and Ross Andru introduced readers to the Jackal, a crazed scientist whose cloning technology eventually resulted in one of Spider-Man’s most infamous storylines, but who first employed the services of Vietnam veteran-turned-mercenary vigilante Frank Castle/The Punisher to target the web-slinger. Inspired by The Executioner (Pendleton, et al, 1969 to present), designed by Gerry Conway, and named by Marvel mastermind Stan Lee, the Punisher was such a hit that he graduated to this self-titled series. Naturally, given the Punisher’s propensity for killing his enemies, it was difficult for him to amass his own recurring antagonists but one of his most memorable foes is easily William “Billy” Russo/Jigsaw, a mutilated mobster created by Len Wein and Ross Andru who has returned time and again, defying death and fate, to torment the Punisher for nearly fifty years.

The Review:
As huge a fan of the Punisher I am I haven’t really read too much of his stuff. I like to pick up Marvel’s Platinum collections for their characters as they bring together a variety of iconic stories for their biggest names, and sadly the Punisher hasn’t yet received one of these so my experience with him is a little sporadic. Still, I love the simplicity and bleak grittiness of the hardened vigilante and find him to be an extremely compelling and layered character so I’m always glad to read his stories, especially his most influential ones. The Punisher’s first solo series begins with him locked up on Ryker’s Island, a gothic-style prison on a small isle adjacent to New York City. A conversation between warden Jerome Gerty and his aide, Tommy, gives the uninitiated a quick rundown on the Punisher’s backstory (you know the drill: Vietnam vet who turned to vigilantism after his family was killed in a mob attack) and reveals that he’s been locked up after a recent bout of drug-induced madness The warden appears to have big, potentially sinister, plans for the Punisher, whose reputation is so intimidating that all the inmates are scared stiff by his presence. All except for “The Mule”, Frank’s loud-mouthed, musclebound cellmate; unfortunately for the human ox, Frank isn’t impressed by his offer to protect him for a few favours and the Punisher quickly overpowers the Mule and forces him to do his bidding and feed him information. Considering his drug episode originated during a prior stay at Ryker’s, Frank puts the wind up Frisky Martin, one of the inmates who works in the prison cafeteria, and delights in the fear he’s causing amongst the populace. With Frisky suitably intimidated, Frank follows him to the source of the prison’s drug operation and is unsurprised to find Jigsaw peddling the wares from within the walls.

The Punisher infiltrates Ryker’s to get to the bottom of Jigsaw’s drug operation.

After making short work of Jigsaw’s goons, Frank walks into hostile territory, Block D, where the mutilated mobster living in luxury in his cell, only to find himself vastly outnumbered by the violent criminals awaiting there. Following a brutal beating, the Punisher is restrained and facing a broken glass bottle to the face as recompense for him destroying Jigsaw’s face, only for him to power his way out if it and crush Jigsaw’s hand, driving shards of glass into it. Although Jigsaw orders the guards to shoot Frank, the fracas is interrupted by Carlo Cervello, the prison’s resident mafia Don known as “The Brain” for always thinking one step ahead. Cervello reprimands Jigsaw and, to his surprise and outrage, welcomes Frank into his operation when the Punisher offers to join him in breaking out of Ryker’s. A few nights later, the plan begins and Cervello immediately double crosses the Punisher by sending his muscle, Gregario, to kill him using a homemade silencer. This cobbled together appliance is faulty, however, and the Punisher is able to outsmart “The Brain” using a simple mattress. As the escape turns into a full-blown riot, Frank lets the violence play out to whittle down the obstacles in his way before making a break for the control tower, wounding Gregario and scuppering the escape plan using the tower’s defensive measures. Cervello and Jigsaw make their way to the warden’s office where they take Gerty and Tommy hostage and demand the Punisher lays down his gun, only for it to literally backfire in Jigsaw’s face as he tried to shoot unsuitable bullets with it. When Cervello threatens to shoot Gerty, Frank calls his bluff with a cold-hearted stoicism that terrifies Cervello so much that he willingly returns to his cell.

With the Kingpin presumed dead, the Punisher incites a turf war that winds up the local mobsters.

Frank, however, tries to murder the mobster for the attempt on his life and then demands that Gerty escort him out of the prison. Although armed guards defuse the situation, Gerty vouches for the Punisher and reveals that he and Tommy work for a mysterious cartel known as “The Trust”, a well-oiled group who share Frank’s concerns regarding crime. Not only does Gerty offer to allow Frank to escape (though still a wanted man) and furnish him with his iconic skull outfit, he offers to bankroll his operation, asking only that the Punisher eradicate organised crime once he’s out. Despite his suspicions, Frank cannot say no to the opportunity to return to the war, unaware that would-be-doctor Tony Massera has been coerced by his mobster uncle, Charlie Siciliano, to take revenge on the Punisher for killing his father. Ignorant to this, the Punisher gets back to work with a bang, quite literally, by storming the office of the untouchable Kingpin of Crime himself, Wilson Fisk, only to find himself duped by a dummy and sent hurtling out of the seventy-storey building by an explosive trap. Although he slows his fall, the Punisher takes a bad landing and goes into shock, only to awaken in the lavish riverside home of the alluring Angela, who begs to assist the Punisher’s crusade, even offering her body, since organised crime left her family dead. In the aftermath, Frank ruminates on his age, the mistake that almost cost him his life, and his never-ending war; to help tip the odds in his favour, he calls Ben Urich of the Daily Bugle and reports that he assassinated the Kingpin in order to incite a mob war to fill the void, allowing him to easily take care of whoever’s left after the bloodshed. Accordingly, mobsters are offed all across the city and, desperate to avoid all-out war, Siciliano tries to broker peace amongst the disparate mobsters, completely unaware that the Punisher is listening to his every word from his kitted-out Battle Van.

Troubled by the collateral damage, the Punisher tries to stem the cycle of violence he started.

The heads of the city’s top crime families, and some of their lackeys, gather at Grand Central Station, of all places, that evening to hear Siciliano out, only to be set upon by Nolo Contendre, a hitman from Detroit. Although the Punisher is pleased by the ensuing anarchy, he wants to know who hired Contendre so he chases him down to the subway where a violent game of cat-and-mouse breaks out between the two. Frank takes a direct shot to the chest (though he’s saved by his heavy body armour) and is incensed when Contendre breaks the rules of his profession by opening fire upon civilians. Frank wounds Contendre with a knife, enraging him, and ends up decapitating the thug by kicking his head through a window, where it’s promptly taken off as the train pulls into Times Square Station. Seeing the fear in the eyes of the wounded passengers, Frank chastises his recklessness and vows to stop to the violence he has incited, only to be thrown off kilter when his van explodes before his eyes, which his Trust contact, Alaric, suggests is a sign that he needs to partner with the organisation on a more formal basis. Perhaps taking this to heart, the Punisher goes out of his way to protect mobster Tomas Santiago from an assassination attempt by rival gangster Simon Ejszaka all to set up another peace conference with Siciliano. In the interim, he opens up to Angela about the “circle of blood” that surrounds his life and she tries to convince him of the benefits of working with the Trust so he can have some support and back up, with the story revealing to the reader that the Trust not only blew up Frank’s van but also planted Angela to sway him to their cause. Ignorant to this, the Punisher spots Massera watching her building and confronts him, only for Massera to reveal he’s rooting for the Punisher since he can’t stand the violence surrounding his life, with the Punisher warning him to stay out of it or suffer the same fate as his father.

The Punisher is aghast to learn that Alaric has built an army of fake Punishers.

Frank pays a visit to Ejszaka and threatens him into going to Siciliano’s peace meeting and for information regarding Marcus Coriander; he then goes to visit Santiago, only for it to be revealed that Siciliano has been murdered by a fake Punisher! Although Frank puts down the faker, Santiago is killed and all the recent mob murders are revealed to have been perpetrated by Coriander and his gaggle of Punisher look-a-likes. Frank drops in on Coriander, who reveals that he formed this “Punishment Squad” to follow the Punisher’s example and disrupt the city’s criminal underworld before the Kingpin could return to power. After taking care of the fake Punishers (off-panel for maximum imagination), Frank is stunned when Coriander also opens fire on innocent civilians to cover his escape, gunning down a little girl in an experience that breaks the formally small-time crook. When the Punisher confronts him, Coriander exhibits signs of mental trauma but reveals that it was Aleric who was behind everything, right before Angela murders him and shoots the Punisher. He recovers pretty quickly, and without explanation, however (primarily because people refuse to shoot him in the head!) and returns to Ryker’s Island to talk with Gerty about the Trust, an organisation whose goals he can relate to but whose methods fly in the face of his strict moral code. There, he finds Tommy dead courtesy of another doppelgänger, whom he puts down a few blocks (and panels) later when he tracks down Gerty, threatening the warden with death unless he spills the beans on Alaric and the Trust. It turns out that Alaric has brainwashed criminals into his own personal death squad and the fear of Alaric’s reprisals, or being locked in his own prison, leads Gerty to shoot himself in the head before the Punisher’s grim-faced façade. The cops arrive at that exact moment; since the Punisher refuses to fight the police out of respect, he allows himself to be arrested, only for the Punishment Squad to arrive and try and kill them.

The Punisher callously makes short work of Jigsaw and Alaric and returns to his never-ending war.

One cop goes down but the Punisher convinces the other to uncuff him so he can kill his look-a-likes and coerce Siciliano into taking him to Alaric’s compound outside the city, where he forces his subjects to endure electroshock treatments and a special gas to condition them into thinking they’re the Punisher. Frank creates a distraction and makes his way into the compound, only to find that Jigsaw has also been brainwashed to be one of Alaric’s goons. A haymaker to the jaw is enough to undo Jigsaw’s conditioning and Frank easily hitches a ride to Alaric’s main building via a passing helicopter. Alaric begs his lover, Angela, to get to safety so he can hold off the Punisher without worrying about her and tries one last time to convince the Punisher to join his cause. When Frank stubbornly refuses, he falls into one of Alaric’s electroshock rooms and is subjected to the same brainwashing process so he can lead the Punishment Squad; thankfully, he’s able to withstand the pain of the electroshock floors, plug up his mouth, and make an explosive escape as he had all his equipment on him. His body wracked with pain and nursing several injuries, the Punisher is easy prey for Jigsaw, who delights in brutalising and taunting him, but spends too long gloating and Frank stabs him and beats him into submission. However, Frank inexplicably allows Jigsaw to live, but his actions scare off the Punishment Squad and clear the way for him to reach Alaric. Still, Alaric does a pretty good job of defending himself, surprising the Punisher and frantically beating him with the butt of his rifle, only to be sent into a desperate frenzy by the blood and violence. A stalemate of sorts occurs until Frank wounds Alaric and fends off his attack dog; again, rather than killing his enemy, the Punisher threatens him with death unless he blows the whistle on the Trust, which in itself will mean a death sentence for him when the mob come looking for revenge. Satisfied that Alaric will be punished one way or another, the Punisher leaves with his dog, only to be confronted by Siciliano; the Punisher’s able to talk him down, however, with a soliloquy about the cycle of violence and his part in it. As he leaves the compound, Angela tries to run him down and he callously leaves her to her fate after wrecking her car, heading off into the night to continue his never-ending war.

The Summary:
The first thing that strikes me about these five issues is the art work; fittingly, the Punisher’s solo series uses a far less exaggerated and comic book aesthetic (for the most part), depicting a much darker and grittier side to Marvel Comics that works perfectly with the Punisher’s more no-nonsense and violent attitude. Sure, Mike Zeck makes the Punisher a bit of a man mountain at times and Jigsaw’s face is a bubbling mess of scarred flesh but, for the most part, things are quite realistically done here. The Punisher suffers injuries, dislocating his shoulder, going into shock, and even fearing paralysis on a couple of occasions, which again speaks to his vulnerability as a character as opposed to his more virtuous and superhuman peers. He’s also far more introspective and stoic; his dialogue boxes are both “real time” narration and reflections from his war journal, which reinforces that he sees his mission as a war against all crime, and he’s not one for spouting quips or cliché puns at his victims. In fact, almost every word out of his mouth is a threat or some bleak meditation on the cycle of violence that is his life, and it goes a long way to added depth to his character and laying the foundation of what the Punisher is all about.

The Punisher is tormented by the cycle of death and violence that his life has become.

Indeed, there are many times when the Punisher laments the “circle of blood” that has surrounded his life. With nothing to lose, he’s fully committed to this cycle and he knows full well that it will end in his death and will even carry on after he died, meaning that his life’s mission is ultimately meaningless, and yet he is compelled, almost addicted, to killing criminals and saving as many lives as he can. His grim façade cracks only when there’s mention of his lost family or when he sees innocents being harmed; he’s enraged when Contendre and Alaric fire on civilians, suffering flashbacks to his family’s murder, and distraught by his part in the collateral damage, seeing himself as no different from those he’s sworn to punish. Since he’s just one man, the Punisher sets up a mob war to have the city’s mobsters to wipe each other out and make his job easier; a good plan that almost immediately goes sour. We see very little of this mob war beyond a few key gangsters being assassinated and a lot of dialogue talking about how things have escalated out of control with very little visual representation of this. Literally a few pages after he gets the ball rolling, the Punisher is beating himself up over the collateral damage as though he didn’t think anyone would get hurt in the crossfire, which is a bit ridiculous. I would’ve liked to see the gang war take place over an entire issue, with Frank coming to this realisation at the end or part-way through the next issue and then trying to stop what he started but, as presented, it’s quite rushed and nonsensical as he has to shut down his plan almost right away. Still, this was quite an intense story. I liked how each issue introduced a kind of rival for the Punisher, be it Contendre or one of the other head mobsters, and that his actions had consequences; Siciliano has a vendetta against him for killing his gangster father and, most prominently, Alaric brainwashed criminals into forming the Punishment Squad and perverted the Punisher’s skull logo specifically because he was inspired by Frank’s crusade.

Despite some weak villains, the story delves into the Punisher’s motivations and psychology.

Naturally, the Punisher guns down almost everyone who crosses his path without mercy or hesitation, meaning any kind of prolonged conflict between him and the likes of Contendre or his many look-a-likes is supplanted by a relatively quick kill from the Punisher. When his rivals put up more of a fight, the art really shines; it’s great seeing the Punisher walk into situations with no regard for his own safety and fight, beat, or gun down multiple armed assailants at once and I really enjoyed how many in the criminal underground fear him for his uncompromising mercilessness. Jigsaw is an exception to this rule; his hatred of the Punisher is so strong that it allows him to break free of Alaric’s brainwashing but his presence in the story is more of an extended cameo. It’s not entirely clear why the Punisher doesn’t kill him, either; he’s perfectly happy to kill everyone else but spares Jigsaw out of some half-assed sense of kinship given his own mental imbalance. This leaves Alaric as the story’s primary antagonist and he’s not really capable of matching Jigsaw’s visual or thematic appeal; I think the story might’ve benefitted from Jigsaw being behind the Punishment Squad and his motives being to further tarnish the Punisher’s reputation as Alaric is more of a pen pusher than a fighter. He’s reduced to a quivering wreck when he accidentally kills a little girl and before the Punisher’s fury and is only able to fight back because Frank is a bit weakened, making for a lacklustre villain. Overall, though, it’s an enjoyable Punisher story that explores his motivations and offers some introspection into his mission. There’s a sense of duty, obligation, and self-loathing to the Punisher, whose callous and grim demeanour make him stand out from other Marvel heroes and villains. He’s so committed to his cause that he’ll try and kill the Kingpin the first chance he gets and that disregard for his own wellbeing is wonderfully conveyed here. It’s not perfect but, for fledgling or casual Punisher fans, this miniseries is the perfect place to start reading.

My Rating:

Rating: 3 out of 5.

Pretty Good

Have you ever read the Punisher’s first solo series? What did you think to the deeper insight into Punisher’s character and motivation? Would you have liked to see more focus on the mob war? What did you think to the villains of the miniseries; would you have liked to see more from Jigsaw or Contendre? What are some of your favourite Punisher stories and villains? How are you celebrating the Punisher’s debut this year? Whatever you think about the Punisher, share your opinions down below.

Game Corner [Zelda Month]: The Legend of Zelda: A Link to the Past (Nintendo Switch)


On 21 February 1986, The Legend of Zelda (Nintendo EAD, 1986) was first released in Japan. The creation of legendary game designer Shigeru Miyamoto and Takashi Tezuka, The Legend of Zelda launched one of Nintendo’s most popular franchises. This year, I’m dedicating every Wednesday to Nintendo’s most famous silent protagonist, Link and his vast and enduring fantasy world of sword and sorcery.


Released: 5 September 2019
Originally Released: 21 November 1991
Developer: Nintendo
Original Developer: Nintendo EAD
Also Available For: Game Boy Advance, Nintendo 3DS (Virtual Console), Nintendo Wii, Nintendo Wii U, Satellaview, Super Nintendo Entertainment System (SNES) Classic Edition, SNES

The Background:
Created by designer Shigeru Miyamoto, The Legend of Zelda was purposely designed to emphasise exploration and experimentation, with Miyamoto drawing inspiration from his childhood love of exploring forests and caves. The game was a massive success for Nintendo, selling well over 6.5 million copies and being widely regarded as one of the greatest adventure game of all time. Miyamoto followed this breakout hit with a decidedly different experience; Zelda II: The Adventure of Link (Nintendo R&D4, 1987) remains one of the franchise’s more divisive titles for ditching the top-down perspective in favour of traditional 2D sidescrolling sections, incorporating a level-up mechanic, and its unreasonable difficulty spikes that saw even Miyamoto express regret over the game’s execution, which was simply hampered by the hardware of the time. Though the game sold well and was met with positive reviews, and is often seen as being ahead of its time, Miyamoto returned to the top-down perspective for the third entry, which he initially planned to include a party of protagonists and which was developed to showcase the power of Nintendo’s new 16-bit console. Utilising a 8 Mbit cartridge as opposed to the usual 4 Mbit allowed A Link to the Past to be the largest and most detailed Zelda adventure yet; graphical decompression and clever use of overlays allowed the game to include two worlds, the bright and vibrant Hyrule and its far more desolate (and game-changing) Dark World counterpart, resulting in what many have deemed to be the greatest Legend of Zelda game of all time. This was reflected upon the game’s release, with it becoming a best-selling SNES title and being accompanied by overwhelmingly positive reviews. Not only was A Link to the Past host to one of gaming’s most obscure Easter Eggs, adapted into both a comic book and a manga, and eventually followed by a direct sequel, it was ported to the Game Boy Advance alongside some additional gameplay mechanics and elements and made available on numerous later Nintendo consoles for new generations to play.

The Plot:
A young apprentice named Link takes up his uncle’s sword and shield to rescue Princess Zelda from the clutches to the malevolent sorcerer Agahnim. However, Agahnim is merely a pawn of the King of Evil, Ganon, who imprisons seven maidens in the Dark World, a dimension of evil and chaos, into which Link must venture to restore peace to Hyrule.

Gameplay:
The Legend of Zelda: A Link to the Past is a top-down adventure game in which players once again assume the role of Link, a young boy in a green tunic whom they can now rename from the file selection screen in order to personalise their quest. In many ways, the game is an expanded and enhanced remake of the original Legend of Zelda and follows many of the same gameplay tropes, but also brought them to life in ways that would come to define the franchise for decades. The game employs a simple control scheme, with Link enjoying a greater freedom of movement compared to the Nintendo Entertainment System (NES) releases thanks to the SNES’s hardware; in this version of the game, you can control Link with either the left stick or the directional buttons, which offers even more freedom of movement. There are multiple functions tied to the A button; it allows you to grab and throw objects (bushes, pots, rocks, bombs, and so forth), open chests to acquire new items and keys, advance dialogue boxes and, later, you can hold it down to charge up a running dash when you get your hands on the Pegasus Shoes. Once you acquire your uncle’s sword and shield, B allows you to attack enemies with slashes; holding down B will charge Link’s patented Spin Attack to defeat multiple enemies at once and, when you later upgrade to the fabled Master Sword, your sword will shoot out a swirling energy projectile when you’re at full health. Link’s shield is automatically equipped and will defend against most projectiles, but you’ll need to upgrade it to fend off later energy attacks. The Y button allows you to use an equipped item; you’ll find and acquire many different items from chests and helpful non-playable characters (NPCs) and you can equip them using the ‘Start’ button. These range from familiar weapons like the boomerang, bow and arrows, and bombs, to items that drain your magic meter (including magic powder, the lantern, and the elemental rods) and consumables stored in bottles. As is often the case, Link cannot jump; he can drop down from ledges or through holes and climb up ladders and staircases but you won’t be performing any mid-air attacks here. The Pegasus Shoes do allow you to blast yourself over some gaps, however, but mostly you’ll be relying on the hookshot, magic platforms, and various other means to progress. As Hyrule is bigger than ever, this means a great deal of backtracking, exploration, and trial and error; often, areas will be blocked off by larger rocks, bodies of water, or even ancient texts or the use of powerful magic medallions.

Link embarks on his biggest adventure yet, solving puzzles and acquiring new items to progress.

Link’s quest will take him all across Hyrule, which you can view at any time with the X button; story-specific locations are indicated on this map but you’ll need to converse with NPCs and pay attention to signs and dialogue to work out where you need to go. There’s a degree of freedom here but the game’s dungeons are best conquered in numerical order so you have all the tools you need to progress; there’s nothing worse than venturing all the way to the swamp to find you need the Book of Muldora to read the ancient text and open up the dungeon, or making it all the way to the top of Death Mountain without the Quake Medallion. Thankfully, you can later acquire a flute to fast travel across the map and make use of the Zora Flippers to warp to various points using whirlpools, but it can be difficult figuring out where you need to go and what you need to do. To start with, you’ll need to travel to three dungeons and acquire three magical pendants in order to rescue Princess Zelda. This offers a taste of A Link to the Past’s formula and sees you venturing into hazardous dungeons, acquiring new items in each along with a map and compass to help you navigate via a grid-like map on the menu screen, and defeating a boss. Dungeons are typically maze-like, growing more complex and involved as the game progresses, and contain many puzzles that you’ll soon become familiar with: you’ll be pulling levers, defeating all enemies, and stepping on switches to open doors or spawn chests containing keys, pushing blocks, activating crystal switches to raise and lower coloured blocks, struggling on ice and moving platforms and paths, dodging fireballs, running across narrow paths as they collapse beneath you, lighting torches, and blowing up weak walls to find new areas. When in dungeons, you can find special tiles to converse with the wise Sahasrahla for hints, but mostly you have to figure out what you’re doing on your own, which can quickly become very tough; it’s easy to end up wandering around aimlessly, taking out the respawning enemies and searching every nook and cranny to try and progress. Some dungeons require you to venture outside and change something on the overworld in order to progress, such as opening a dam, navigating a haunted forest, or using your magical medallions. Others see you dropping through or pushing blocks down specific holes to reach chests, warping around on tiles, escorting NPCs, blasting across lava pits through pipes, creating your own platforms with a magic wand, avoiding various spiked hazards, and lighting up dark areas with your lantern or by blowing up cracked floor tiles.

Link travels to the desolate Dark World to free the seven maidens and confront Ganon.

Just reaching the dungeons can be a quest in itself as you venture through caves, guide NPCs to safety, pay a cheeky monkey to open the way, buy a bigger bomb to blow open a wall, and figure out the path through the misty Lost Swords to retrieve the legendary Master Sword. Most prominent, however, is the presence of the Dark World; this ashen, nightmarish dimension is reached through warp tiles found across Hyrule and will render you defenceless without the aid of a special item. When in the Dark World, the map changes in various ways; not only are the enemies tougher, the overall atmosphere more ominous, and the land reduced to an apocalyptic hellscape, but certain paths are now blocked and alternative ones are opened up, and just navigating this hazardous landscape is made all the more difficult as a result (and the fact that you can’t use your flute to warp about). Link can return to Hyrule at any time using a Magic Mirror, which also leaves behind a sparkling warp point to quickly shunt back to the Dark World if necessary, and you’ll be jumping between these two worlds to solve puzzles, access new dungeons, and progress through the story. As the game progresses, things get noticeably tougher for Link; newer, more powerful enemies appear on the map and the dungeons get longer and more complicated, though you can pay a fortune teller to point you in the right direction. You can also find fairy fountains to replenish your health (but not your magic), acquire Heart Pieces and Heart Containers to extend and refill your health, and purchase various useful items from shops or from NPCs using Rupees, Hyrule’s traditional currency. Be sure to save your game often; you’ll be returned to the title screen and won’t restart at full health, but this allows you to pick from various starting points, which can make getting around easier. There are also some distractions on offer to help break things up, such as a time trial race, a shooting gallery, a chest opening game, and numerous hidden rooms; often, these award Rupees and Heart Pieces, but you’ll occasionally encounter NPCs in need of assistance who will bestow you with a new item or upgrade your existing ones (though often at a price).

Graphics and Sound:  
Without a doubt, A Link to the Past is the finest 2D Zelda experience on offer. The first game was ambitious but painfully limited in its visuals, but this isn’t an issue here thanks to the SNES’s greater power. The game absolutely pops with colour and variety; parts of Hyrule are often overcast by raging thunder and rainstorms, each compass point of the map feels distinct from the others while still being logically connected, and there’s an incredible amount of detail packed into every aspect of the game. No longer an obscure mish-mash of green and brown pixels, Link is an expressive and colourful sprite; he doesn’t have any idle animations but he strains with effort when pushing and pulling rocks, sports a mop of red hair, holds up items and his sword in triumph, collapses comically in defeat, flashes his skeleton when he’s electrocuted, and the Game Boy Advance port even includes sound bites from his 3D adventures. The game’s NPCs are also far more varied and lively; inhabitants of Kakariko Village will scream and run into their houses, alerting the guards when you’re near, a lazy thief naps outside the swamp, a mysterious flute boy plays for an audience of cute little woodland critters before vanishing, the blacksmith worries for the fate of his brother, two lumberjacks hack away at a tree at the foot of Death Mountain, and various fairies and sea-dwelling creatures await in caves and bodies of water. When in the Dark World, Link will be able to talk to more monstrous NPCs and is transformed into a strange, bunny-like creature devoid of weapons. When he acquires upgrades to his tunic, sword, and shield, Link’s sprites change colours so you can see this progression and even the game’s enemies exhibit a lot of personality, charging at you the moment they see you and hopping and stomping about the place.

Easily the most beautiful, varied, and detailed 2D Zelda game ever made.

Hyrule is larger, more varied, and more luscious than ever before; at the centre is Zelda’s Castle, a massive structure of stone and regality where Ganon’s forces constantly patrol. To the North looms Death Mountain, identified by its confusing network of dark caves and the constant barrage of falling boulders falling; to the East lies the Desert of Mystery, a scorching desert filled with cacti plants and ancient ruins; South is home to Lake Hylia, with Hyrule’s rivers eventually taking you to the outskirts of Zora’s Domain; and heading West will taking you to the murky swamps, the bustling Kakariko Village, and the misty and mysterious Lost Woods. You’ll be exploring and opening up new areas in each of these locations throughout the game, lifting rocks to discover hidden pathways, blasting open caves, and altering the landscape with your items and magic. Link enters many buildings on his quest, such as the church-like Sanctuary (and its network of rat-infested sewers), shops, and other homesteads, and will explore forests, a haunted graveyard, and caves. There are always enemies, NPCs, and other objects to encounter and interact with in every area but, when you travel to the Dark World, even the friendliest of areas becomes far more ominous as wrecked houses, rotting trees, and bones of titanic animals litter the landscape. Zelda’s Castle is replaced by a gigantic and foreboding Pyramid of Power, the bright and sunny sky replaced by an unsettling dusk (or raging thunderclouds around Death Mountain), and even Kakariko Village is replaced by the post-apocalyptic Village of Outcasts. Both the swamp and the Lost Woods become dangerous and haunted wastelands, Lake Hylia is transformed into a polluted sea home to a frozen temple, Ganon’s magically sealed tower looms atop Death Mountain, and the entire overworld takes on a dark, depressing colour palette to separate it from its livelier counterpart.

While dungeon interiors and gimmicks get recycled, the story is suitably epic and engaging.

Much of this visual variety doesn’t really translate to the game’s interior locations; caves are mostly the same, sometimes being darker, more maze-like, or requiring different items to bypass hazards and pits but mostly utilising the same sprites. The dungeons are generally distinguishable only by their different colour palettes and altered layouts, but there are some exceptions; the Eastern Palace sports bulbous cycloptic statues, the Tower of Hera features more vertical traversal and pits, the Dark Palace has ramps you need to propel yourself off with the Pegasus Shoes, you’ll lose a lot of traction in the Ice Palace and need to open floodgates to traverse the Swamp Palace, find yourself heading outside to reach new areas of the Skull Woods, and will navigate a series of platforms in the cavernous Turtle Rock. All the puzzles, gimmicks, and most of the enemies you’ve encountered will be recycled in each dungeon, especially the final one, Ganon’s Tower, a perverted mirror of Zelda’s Castle that features a veritable gauntlet against everything you’ve encountered previously. As visually impressive as the game is, the music is equally memorable; things start out dark and ominous but the iconic Legend of Zelda theme kicks in triumphantly once you bring Princess Zelda to Sanctuary and will accompany you on the overworld from then on. Dungeons and boss battles are punctuated by suitable menacing overtures, victorious symphonies play whenever you conquer a dungeon or acquire a new item, and more calming, even melancholic melodies play whenever the story is being related through dialogue. The game’s few cutscenes are rendered entirely using the in-game sprites and graphics, with simply dialogue boxes being the order of the day, but there are some impressive instances of layering (paths, bridges, and walkways overlapping with lower areas), weather effects (lightning, rain, clouds, even a brief drought), parallax scrolling (particularly when at the peak of Death Mountain), and even a 3D effect to render the legendary Triforce onscreen.

Enemies and Bosses:
The forces of darkness are many and varied throughout Hyrule; Link will have to fend off smaller, weaker enemies like bat-like Keese, snake-like Ropes, crows, rats, crabs, and even killer bees if he disturbs the wrong tree with his Pegasus Shoes. River Zoras pop up from the various streams around the map to spit projectiles at you, thieves steal your ammo, Rupees, and even your weapons, Buzz Blobs will electrocute you if struck with your sword, and you can’t even attack the chicken-like Cuccos without facing harsh retribution. Hyrule is filled with strange monsters, too, such as the spider-like Tektites, Goomba-like Deadrocks (which turn to stone when struck), annoying Anti-Fairies that bounce around and reduce your magic and your health on contact, Armos Knights that tremble to life and bounce around when you touch them, and helmeted enemies that have an annoying tendency to send you ricocheting down pits. Ganon’s forces are far more dangerous and versatile, however; his knights come in various different colours and sporting various weapons, from swords, spears, bows and arrows, bombs, and even chained maces. Octoroks wander about spitting rocks at you, their balloon-like counterparts explode when hit, Wizzrobes teleport about firing energy waves, Beamos statues blast you with a high-powered laser beam, pig-like Moblins attack with spears, and you’ll find more than a few hulking, bomb-tossing Hinox in the Dark World. Ganon’s Tower is guarded by the tough Lynels, centaur-like creatures that spit fireballs at you and require an upgraded sword to defeat; Pikkus and Goriyas also prove troublesome as they mirror your movements, while Eyegroes are best defeated with your arrows. Stalfos and Gibdos are also quite common, with the former jumping about or throwing bones at you and the latter proving almost as difficult to dispatch as the Freezors and Geldman unless you utilise your elemental rods. You should also watch for Wallmasters dropping from above to return you to the dungeon entrance, indestructible Chain Chomps, and the dragon-like Zazaks.

The first four bosses return in Ganon’s Tower with slight variations to make them tougher.

By far the most intimidating of Ganon’s regular enemies, however, are the Stalfos Knights; unlike other Zelda games, A Link to the Past doesn’t contain any mini bosses but these large, sword-wielding skeletons almost fit the bill. However, they’re easily reduced to a pile of bones with a swipe of your sword and dropping a bomb on their remains will finish them off before they can reform to pester you again. Your quest will see you battling twelve mammoth bosses, with four of them being encountered again in the gruelling gauntlet that is Ganon’s Tower. The first boss you’ll face is actually six large Armos Knights; they’ll bounce around in a circle, expanding and constricting and charging at you, but you can make short work of them using the bow and arrows as opposed to even your upgraded Master Sword, though the fight is made tricker in Ganon’s Tower thanks to the ice covering the floor. Next, you’ll face three Lanmola, giant worms that burst from the sand and send small rocks flying your way; as long as you avoid these projectiles, and their writhing bodies, they’re pretty easy to defeat, especially if you use the Ice Rod, though you’ll also need to watch for a fireball-spitting statue when facing them in Ganon’s Tower. The last Pendant is defended by Moldorm, a large, strange worm-like creature that slithers erratically around a small platform. Its only weak point is its tail and Link will bounce back, most likely down to a lower floor, if he attacks any other part of the creature; though the surface area of the rematch against Moldorm is even smaller in Ganon’s Castle, this fight is a joke with the fully powered-up Master Sword. Once you have all three Pendants of Virtue, you can confront the dark wizard Agahnim in Hyrule Castle; Agahnim cannot be attacked directly with any of your weapons, instead you need to deflect his projectiles back at him much like boss battles in later Zelda games. Agahnim will teleport around the enclosed arena and charge up a projectile, but you can only hit the large, flaming ones back at him and these can sometimes go off course; when you face him again in Ganon’s Tower, he duplicates himself to make things tougher, but it can actually speed things up as you potentially get three shots to reflect back at him.

The difficulty of bosses varies wildly, with some being pushovers and others proving more troublesome.

After being sent to the Dark World, Link must defeat seven more bosses before having a final showdown with Ganon. First up is the gigantic Helmasaur King, a dragon-like creature whose weak spot is initially hidden behind a mask. Using the Magic Hammer, Link can break and eventually destroy this mask to target the Helmasaur King’s glowing weak spot with either his sword or arrows, but players will need to watch out for the creature’s extendable spiked tail and the fireballs it spits from its mouth. Though visually less intimidating, Arrghus is a slightly more laborious boss; Link must use his hookshot to extract and destroy the individual Arrgi protecting this jellyfish-like creature until Arrghus is fully exposed, after which it tries to crush Link and moves erratically around the room, being vulnerable only upon landing but causing splash damage if you’re not careful. Mothula awaits in the Skull Woods and is perhaps the most difficult boss so far thanks to its crazed movements making it best to use the magic-consuming Fire Rod, the moving floor sending you into the spiked hazards surrounding the arena (which also move at you), and the creature itself both trying to ram you and firing lasers, though you can make things easier if you have a Golden Bee in a bottle as this will attack the boss and allow you to focus on avoiding damage. You’ll battle Blind the Thief in Gargoyle’s Domain only after exposed an NPC you’ve rescued into the light and revealing her to be this demonic former thief in disguise. Blind hovers about shooting lasers and can only be damaged by hitting his head; eventually, his shroud drops and he sends his head floating around the arena to blast at you independently from his body, which sprouts another head for up to three times the danger, but it’s not especially difficult to avoid these heads and the fight’s all the easier since you don’t need to make use of the dungeon’s weapon to defeat Blind.

Trinexx was the only Dark World boss who caused me trouble, and you’ll only fight Dark Link on the GBA.

This isn’t quite true of Kholdstare, a bulbous eye that you must first free from its block of ice using either the Fire Rod or the Bombos Medallion while avoiding the blocks of ice it drops from above. Once freed, Kholdstare splits into three and just kind of wanders about doing nothing, making it a ridiculously easy boss. Vitreous provides a bit more of a challenge; another eye-themed boss, this glaring monster sits in a puddle of swamp water and is protected by several smaller eyeballs, which it also uses as projectiles. The sword, bow, and hookshot are all useful here but you need to watch out for the erratic bolts of lightning Vitreous will occasionally send your way; once all the smaller eyes are gone, Vitreous resorts to bouncing around in a temper tantrum, leaving it vulnerable. If you venture into Turtle Rock without some green potion or, at the very least, having awoken the Mad Batter to reduce your magic consumption, Trinexx can prove to be especially difficult. This massive rock-like dragon sports three heads: a red one the breathes fire, a blue one that freezes the ground and ruins your traction, and a stone one that extends at you. You need to use the Fire Rod on the red head and the Ice Rod on the blue head, but don’t just fire away willy-nilly; time your attack to hit and stun the head and then switch to you sword because you’ll have no way of damaging either head if you run out of magic. Once these two heads are destroyed, Trinexx dramatically (and explosively) changes into a snake-like form, frantically slithering about but easily finished off by swiping its glowing middle section. If you’re playing the Game Boy Advance version of the game, you can also tackle the optional Palace of the Four Sword dungeon, where four dark variations of Link reside; each one is battled separately and showcases many of the same attacks and abilities as Link, such as his Pegasus Shoes and Magic Cape, while also unleashing their own versions of the Spin Attack and even a jumping strike. Blind, Mothula, the Helmasaur King, and Arrghus are also battled again in this dungeon, which rewards Link with the Four Sword.

Ganon is unquestionably the toughest boss in the game and will put your skills and patience to the limit.

Regardless of which version of A Link to the Past you’re playing, your adventure culminates in the hardest and longest dungeon of the game, Ganon’s Tower. Here, many of the game’s enemies and almost all the hazards and gimmicks you’ve encountered are recycled, with some of the toughest enemies attacking in large groups and you being forced to battle the first four bosses again with slightly different variations to each. It’s absolutely essential that you fully upgrade the Master Sword and your bow and arrows before tackling this dungeon, as it leads directly into the final confrontation with Ganon and you’ll need the Silver Arrows to finish him off. Assuming his monstrous pig form, Ganon awaits in the Pyramid of Power and is easily the game’s hardest and most laborious boss and will put all of your skills to the test. Make sure you’re swiping as soon as you drop into the arena to land a couple of free shots on him while he’s gloating, then avoid his trident when he tosses it at you; Ganon is invulnerable and intangible when teleporting but is open to a few good hits before he throws his trident so make sure you get them in while you can. The second phase greatly increases the difficulty; Ganon will surround himself with tiny flames that he transforms into indestructible bats to use as projectiles, making it very difficult to get close and land a hit. In the third phase, these bats leave a circle of fire around Ganon, who stomps about and destroys the tiles lining the outside of the room. After a few more hits, Ganon will extinguish the two torches and become invisible as well as intangible; you must light both torches to expose his location, hit him with your sword, and then fire a Silver Arrow at him when he turns blue. Do this four times and the King of Evil will finally be defeated, restoring peace to Hyrule, but make no mistake this is a gruelling encounter; you’ll need all four bottles filled with a variety of restorative potions in order to best him, or make liberal use of the Switch’s save and rewind feature to get around his more erratic and frustrating attack patterns.

Power-Ups and Bonuses:
If you’re anything like me, you play your Legend of Zelda games constantly swiping at bushes, breaking pots, and defeating enemies to fill up your health, magic, ammo, and Rupees. Link can carry 999 Rupees, which is an easy enough limit to reach thanks to the many secret Rupee rooms and chests found all over the place, and can spend these on potions, ammo, shields, and other items in various shops. Some prices are higher than others, however; you’ll need to toss an extortionate amount of Rupees into the Lake of Happiness to increase the maximum number of arrows and bombs you can carry, and it’ll cost you a whopping 500 Rupees to acquire the Zora’s Flippers so you can swim, but tempering your sword is surprisingly cheap. Other times, you simply need to find hidden fairies or NPCs who will provide new items or upgrade existing weapons like your sword, bow, and boomerang for free or locate the Big Key and the large chest in each dungeon to acquire some nifty new gear. Link begins his journey with a regular sword but later embarks on a quest to acquire the legendary Master Sword, which boasts a higher attack power and a variation on the Sword Beam; this can then be tempered and finally magically upgraded into the far stronger Golden Sword. Similarly, his shield can be upgraded to defend against small fireballs and is later replaced by the Mirror Shield, which reflects laser bolts.

You’ll need to explore both worlds to uncover all the game’s weapons, items, and upgrades.

Many recognisable Zelda weapons and items are up for grabs here. Link can toss a boomerang as a ranged weapon, blow open walls with bombs, shoot enemies from afar with his bow and arrows, and cross gaps with the hookshot (which, like the boomerang, can also pick up faraway items). Link can dash across the screen and swim when he acquires the Pegasus Shoes and Zora Flippers, respectively, lift heaver objects with the Power Glove and Titan’s Mitt, call a bird to fast travel across Hyrule with the flute (more of an ocarina, really…), dig up items with a shovel, pound down certain blocks with the Magic Hammer, and capture bugs and restorative fairies with the bug-catching net (providing he has one, or all, of the four empty bottles). There are also many magical items available: the Bombos, Ether, and Quake Medallions cause the ground to explode, call down a lightning storm which also illuminates hidden paths, and unleash a shockwave, respectively, while the Cane of Byrna and Cane of Somaria protect Link with a magical barrier and spawn moveable blocks, respectively. The Magic Cape also renders you invisible and invincible for as long as you have it equipped and your magic meter lasts, and you’ll find both a blue and red mail that not only change Link’s sprite but also greatly reduce the amount of damage he takes.

Additional Features:
There’s a fair amount to do in A Link to the Past, though some Zelda staples are noticeably missing; there is no trading sequence here, no fishing game, and no collectibles to trade in for upgrades and other items. You can find items such as a mushroom and NPCs like the blacksmith’s brother to acquire new items, and will receive upgrades from fairy fountains and such, and there are four empty bottles to be discovered. These can be filled with coloured potions to restore your health and magic, fairies to resurrect you, and bugs to attack your enemies so they’re well worth tracking down. There are also twenty-four Heart Pieces scattered throughout Hyrule and the Dark World; every time you collect four, you’ll gain an extra heart of health and you’ll also get a whole new one for every boss you defeat, bringing Link’s health up to a maximum of twenty hearts. You can also reduce the amount of magic you use by half, are required to locate the Moon Pearl to freely move about in the Dark World, and can find hidden rooms (usually behind destructible walls) that yield Rupees and other goodies. You get three save files to play on and can take on Ganon as many times as you like after finishing the game, and hunt down any items and Heart Pieces you’ve missed, though there’s no second, harder adventure to unlock here. This version of the game also allows up to four save states and lets you rewind the game if you make a mistake, which is a godsend for some of the tougher areas, and the Game Boy Advance version of the game includes an optional dungeon, two additional quests that yield new items, and a multiplayer mode in which two to four players work together to solve puzzles and defeat bosses.

The Summary:
There’s a reason why The Legend of Zelda: A Link to the Past is so lauded within the Zelda community. It really was the greatest Zelda experience at the time, expanding upon the ambitious but limited first adventure and the aspiring attempt of the second game to be a more elaborate role-playing experience, and delivering the quintessential Legend of Zelda formula that was retained even when the series moved into 3D. A Link to the Past has long eluded me; growing up a SEGA kid, I wouldn’t get the chance to play it until I went out of my way to buy the Game Boy Advance port, which I was able to play through all the way to the final battle but never actually carried through to finish the game. The Nintendo Switch version offers gamers far more options to make this difficult adventure title a little easier thanks to the rewind function and save states, but this is still a title that refuses to hold your hand; the overworld is large and full of secrets, enemies, NPCs, and locations to explore, some of which are relevant and others you’ll have to come back to later when you have the right items. The presentation is absolutely top-notch; it’s a colourful, very detailed title that showcases the power of the SNES, with only a few moments of slowdown caused when there’s a little too much happening on the screen. The inclusion of the Dark World helps to keep things visually interesting, creating a distinct atmospheric vibe between the vibrant Hyrule and its desolate dark counterpart. The dungeons are a little too samey and confusing at times, some of the bosses were a bit disappointing, and it was lacking a few of the more prominent side quests and distractions that made later Zelda games so much fun to revisit, but I loved the sheer amount of detail packed into every aspect of the game. I didn’t grow up with A Link to the Past so I can’t say it’s my favourite of the classic Zelda games, but after finally playing it all the way through and really experiencing everything it has to offer, it definitely belongs in the top five of all-time Zelda greats and it’s obvious to me that this game alone fully justified the purchase of a SNES back in the day as it’s a fantastic showcase of everything that console was capable of.

My Rating:

Rating: 5 out of 5.

Fantastic

Was The Legend of Zelda: A Link to the Past a part of your SNES library back in the day? If not, when did you first play the game and how do you think it compares to other Zelda titles, particularly the two that came before it? What did you think to the introduction of the Dark World and Link’s quest to rescue the seven maidens? Which of the dungeons, bosses, and weapons was your favourite? What did you think to the visual presentation of the game, and would you say that A Link to the Past is the best 2D Zelda title? Did you ever find all of the Heart Pieces and fully upgrade Link’s arsenal? How are you celebrating the franchise today? Whatever your thoughts on A Link to the Past, leave a comment below or share them on my social media.

Game Corner [PokéMonth]: Pokkén Tournament DX (Nintendo Switch)


Upon the release of Pokémon: Blue Version and Pokémon: Red Version (Game Freak, 1996), a new craze swept through playgrounds across the world. Entire generations have grown up with Pokémon as clever marketing saw Nintendo’s newest franchise become a massively lucrative and popular multimedia powerhouse that endures to this day. Accordingly, February 27th is now internationally recognised as “National Pokémon Day”, which I’ve expanded to an entire month of Pokémon every Tuesday in February.


Released: September 2017
Originally Released: 16 July 2015
Developer: Game Freak
Also Available For: Arcade and Nintendo Wii U (Original Release)

The Background:
Ever since it was brought over from Japan, the Pokémon franchise has been all about spin-offs and ancillary media; the first generation of videogames and tie-in merchandise ensured that Pokémon was an instant cultural phenomenon, taking playgrounds by storm through the games themselves, the trading cards, stickers, magazines, and toys galore. It didn’t take long at all for spin-off videogames to be produced alongside the main series; we got a videogame of the aforementioned trading card game, some pinball and puzzle games, and even a much-loved on-rails photography videogame. Although battling is very much at the heart of the Pokémon series, the closest it came to being featured in a one-on-one fighter was the inclusion of Pokémon characters in the Super Smash Bros. series (Various, 1999 to 2018) until Pokémon Company CEO Tsunekazu Ishihara brainstormed new ideas for the franchise with Tekken (Various, 1994 to 2018) producer Katsuhiro Harada and Soulcalibur (Bandai Namco Studios, 1995 to 2018) producer Masaaki Hoshino. While Ishihara wanted mainly Fighting-type Pokémon featured in the game, Hoshino pushed for more variety amongst the playable fighters, and the game was initially released as a somewhat unpopular and unprofitable arcade fighter before being ported to the Wii U, where it was received much more favourably. An enhanced port was then released for the Nintendo Switch a few years later; this new version of the game included all the previous downloadable content (DLC) and was also met with largely positive reviews.

The Plot:
The player’s created character aspires to reach the top of the Ferrum League alongside their partner Pokémon. However, the tournament is soon interrupted by a mysterious and violent Shadow Mewtwo, which has been corrupted by a strange phenomenon in which Gaia, the energy that allows Synergy Stones to bond the humans and Pokémon in Ferrum, is draining away.

Gameplay:
Pokkén Tournament DX is a 3D fighter in which players customise a 2D avatar and synch up with one of twenty-one different partner Pokémon using a “Synergy Stone” to not just command them to battle as in the mainline games, but effectively battle as the Pokémon in what basically amounts to a series of never-ending battles in different towns across the Ferrum region in the appropriately named Ferrum League. Unlike in the mainline Pokémon games, you won’t actually be traversing an overworld map; instead, the Ferrum region is represented by a simple map screen where you can navigate to different towns, each of which allow for different options, such as initiating online battles, changing your game settings, customising your avatar and Pokémon, or partaking in the single-player story mode, or single or team-based battles. Before you jump into the story or an actual battle, your guide, Mia, strongly advises you to check out the game’s tutorial and this is heavily advised as well, though the game’s controls actually aren’t as complicated as the tutorials make you think (it doesn’t help that there are a lot of tutorials, with each aspect of battling being broken down into separate categories and sections).

Battles take place on two panes and your attack choices depend on what your opponent’s doing.

Still, the tutorials relate the basics of battle: X unleashes a strong attack while Y sends out a weaker or ranged attack, and mixing and matching these inputs (along with movements of the analogue stick or control buttons) will allow you to string together combo attacks to deal additional damage. B allows you to jump, and you can also attack in mid-air, while A performs one of a series of Pokémon-specific attacks, some of which can drain your hit points (HP) or inflict status ailments on your opponent. You can bring up your Pokémon’s attacks, special moves, and combos from the pause menu at any time, and even alter the controls to suit your specifications, but there really isn’t that much depth to the combat; I got along pretty well just using a standard series of combos and heavier attacks, but the tutorial also details how you can hold the R trigger to block, roll and dash out of harm’s way, and initiate a switch between the “Field Phase” and the “Duel Phase” using certain attacks, charging a “Piercing Attack”, or grabbing your opponent for a throw by pressing Y and B together. When in the Field Phase, you’re free to navigate the fighting arena, restricted only by the energy fields that surround you, and easily able to jump over, counter, or charge right through attacks. The Duel Phase switches to a 2.5D sideways perspective like a classic Tekken game and slightly alters the controls to accommodate this, allowing for low attacks and high-stance attacks to knock your opponent’s feet from under them or intercept an aerial attack. This makes fights more about getting up close and personal with your opponent, and you’ll quickly find yourself pummelled unless you counter incoming attacks with X and A or block against hem (though beware as you’ll get staggered if the opponent breaks your guard). Although Pokkén Tournament DX doesn’t include the usual Type-advantage where Water-types trump Fire-types and so forth (despite Mai claiming attacks to be “Super effective!” during battle), each Pokémon favours either power, speed, long-ranged attacks, or is a slightly more well-balanced fighter, and it also features variation of this in the “Attack Triangle” feature. This allows counter moves to trump normal attacks, grabs to win over counters, and normal attacks to fend off grabs, and successfully timing each attack based on what your opponent is doing will not only deal damage and potentially change the battle field, but also refill a small amount of your HP and fill up your “Synergy Gauge” and “Support Gauge”.

Burst Attacks and Support Pokémon can fundamentally change the course of a battle.

When your Synergy Gauge is full, you can press L and R together to enter “Burst Mode”, which will change your Pokémon’s appearance (generally to a Mega Evolution) and not only power-up their attacks but also allow you to pull off a devastating “Burst Attack” which unleashes their most powerful move against your opponent, though this can be blocked and even countered. Filling up the Support Gauge allows you to call in a temporary Support Pokémon; you’ll pick from a whole bunch of these before each battle, and they come in groups of two. While you unfortunately can’t mix and match these to create a customised support team for yourself, each Support Pokémon has their benefits; Support Pokémon will either attack your foe, disrupt them in some way (usually with status effects), or enhance your fighter, meaning you could get a temporary speed, power, or health buff or your opponent may become stunned or disorientated, and timing the use of a Support Pokémon is key to turning the tide in a battle. Battles are fought in a best-of-three format and, between rounds, you must switch to a different Support Pokémon, though you can assign “Cheers” to Mia that will boost your gauges in different ways and potentially allow you to summon a Support Pokémon automatically in the next round. While the Support Gauge fills over time, and you can pick up “Synergy Power” across the arena to boost both gauges, Pokkén Tournament DX definitely emphasises fast-paced, arcade-style action over any kind of patience as your battles are timed and your opponents quickly become very aggressive, though you can alter some of these settings in the options menu. While the tutorials make it seem like battles are quite complicated, they’re really not; I barely even used the block button, and found it annoying that the counter option wasn’t mapped to it as well. Consequently, I found it much easier to spam some ranged attacks at the start of a fight, hit a grab, and charge a Piercing Attack to pummel my opponents, landing a few character-specific attacks here and there (this was risky as I fought with Shadow Mewtwo, and a lot of its special attacks drained its HP) before finishing them off with a Burst Attack.

You’ll find yourself battling endlessly to clear the Ferrum League and complete the optional missions.

Mia claims that you need to learn about the different opponents and arenas but, again, you really don’t; you can best most opponents by attacking aggressively and, while Synergy Energy does spawn differently in each arena and they are either bigger or more enclosed, the fights quickly became very monotonous for me. This wasn’t helped by the success criteria for the single-player story, which sees you battling through the Ferrum League over a series of battles. You start at Rank D and must win a certain number of fights, either in single battles or by tackling five opponents in a row in League Matches, to increasing your standing in the rank. Once you’ve won enough fights, you’ll enter an eight-man tournament, which you must win to face the League Master in a “Promotion Test”. Win that battle and you’ll move on to the next rank to do it all over again, battling more and more opponents to qualify for more fights and finding your foes becoming faster and more aggressive with each Rank. After every fight, win or lose, you’ll receive a star grading based on your performance; varying your attacks and ending with a Burst Attack flourish will score you more points and earn you more PokéGold, which buys clothing and outfits for your avatar and Mia. You’ll also earn experience points (XP) from each victory and loss; when you earn enough XP your Partner Pokémon will level-up and you’ll earn Skill Points that you can use to upgrade their attack, defence, the speed their gauges charge, and how long their gauge effects will last when triggered. Each Rank also comes with some missions for you to complete; these generally involve winning a certain number of battles, winning in a certain way or using a certain number of specific attacks, and summoning specific Support Pokémon a set number of times. With enough victories, you’ll be given one Bonus Key per mission board to automatically complete a mission, and successfully completing them all will complete a picture puzzle, net you additional PokéGold and titles and clothing for your avatar, and will load up another board with more missions to complete. If single battles start to wear thin for you (and, trust me, they will), you can take part in team battles from the main map. This sees you pick a team of three Pokémon to battle against another team of three in an elimination battle; the damage you take and the amount your gauge is full carries over between rounds, but you can still set your Support Pokémon between each round. Sadly, these battles don’t ever appear in the main story, meaning there’s little incentive to deviate from your chosen Partner Pokémon as that’s the easiest way to stay strong enough to compete with the higher Ranked matches.

Graphics and Sound:
While it lacks some of the more memorable tunes seen in the mainline games, Pokkén Tournament DX makes a great first impression with a spectacular CG opening sequence; sadly, such cinematics are few and far between during the bulk of the game. They’ll pop up here and there, but the majority of the game’s story is told using 2D avatars that barely move and using text and dialogue boxes rather than cutscenes. This, as much as the pretty generic battle music, really lets the game down; I get that it’s just a standard arcade fighter, but a little bit more effort could’ve gone into the story and the presentation of the game outside of the main battles. Instead, the story is very secondary; occasionally, your opponents will talk smack to you before and after battles, Mia will chime in with some story-specific spiel to advance the narrative, and you’ll have to move to areas outside of the main overworld map to meet story objectives, but it’s all very cheap and not very becoming of a game that carries such a hefty price tag. Additionally, the map screen is as basic as it gets, and you’ll be absolutely bombarded with Mia’s “helpful” advice during battles unless you shut her off in the main settings.

The opening cutscene and in-battle graphics are where the game’s presentation really shines.

Once you actually get into a battle, things noticeably improve; all the game’s Pokémon are beautifully rendered in just the right balance between realistic and fantastical, very much in the same style as seen in Pokémon: Detective Pikachu (Letterman 2019). Pokémon have a number of different intro and outro animations, and these change depending on whether you’re in Burst Mode or not, and will take on different colours in mirror matches. Attacks are big, colourful, and eye-catching, with Pokémon like Sceptile, Gengar, and Charizard impressive with twisting vines, portal-based spectral fists, and plumes of fire, respectively. Also impactful are the Burst Attacks, which basically amount to a short cutscene when your Pokémon will unleash their most powerful attack, and this really helps to sell the danger of these moves so you definitely want to make sure that you unleash yours before your opponent does. Unfortunately, the arenas don’t fare anywhere near as well as the fighter’s character models; I barely even noticed any difference between each arena, even when inside a haunted house or on the deck of a ship with Magikarp flailing about. You can see buildings and other Pokémon in the background in almost every arena, but there’s really nothing much there to make them all that interesting; there are no stage hazards to worry about, no weapons to pick up, and the only things that really change between them are how restrictive they are and where the Synergy Energy spawns in. Thankfully, battles are generally too fast to really make this much of an issue but you’re forced to have so many fights that it’s hard not to notice that the areas are pretty bland and almost interchangeable.

Enemies and Bosses:
In true fighting game fashion, every single Pokémon you can select from will be your opponent at some point in the game. I would say that it pays to get to know what each Pokémon is capable of, but that’s not really that true; sure, Machamp is bigger and slower than, say, Lucario and will buff itself up rather than striking fast and using ranged attacks, and Croagunk is a sprightly little bastard who can whittle down your health pretty quickly with its lightning-fast attacks, but what works against one will generally work against all. There’s a decent array of Pokémon on offer here; while the absence of guys like Hitmonlee and Hitmanchan is questionable (and I don’t really get why we needed two Pikachu…), the inclusion of Suicune, Chandelure, and Darkrai helps to make the available roster very varied so it’s not all focused on Fighting-Type Pokémon. As mentioned, it is useful to take note of what your Pokémon can do; I stuck with Shadow Mewtwo the entire time, whose special attacks drained its HP, but some Pokémon are better attacking from a distance, so you need to be more aware of the field and where you are, while others need to be up close and personal to deal heavy damage. When battling them, though, a simple strategy of dodging, jumping, and keeping up the aggression until you can call in a Support Pokémon or hit your Burst Attack will win you the day more often than not, and the only time I really struggled with anything other than this was when I was trying to complete the different missions and had to hold back on my attacks as a result.

Alongside challenging the Ferrum League, you’ll also contend with the super powerful Shadow Mewtwo.

To advance up to the next Rank, you’ll need to best the League Master. While you’d think that these battles offer something different, they really don’t; League Masters will use Pokémon you’ve probably fought five or six times up to that point, and the only real difference is that they might be at a higher level, and thus have more HP or be more aggressive. After you best each League Master, however, the story will kick back in and you’ll have to battle Shadow Mewtwo; this thing is pretty much well beyond you for the majority of the story, boasting HP in the thousands and making short work of you. I think it might be possible to beat it early on, but I sure as hell couldn’t; in fact, I was barely able to eek out a victory when the story culminated in battling it head-on since it’s easily the toughest fight you’ll have in the story mode. Before you battle it, you’ll have to face three trainers in three new areas a bid to try and cure Mewtwo of its corruption, and these fights actually offer something different as you’re denied the use of Support Pokémon and/or your Synergy Gauge. When you finally battle Shadow Mewtwo for the last time, you must endure the first round without your Synergy Gauge and your Support Gauge will only fill up once Shadow Mewtwo is constantly in Burst Mode in this fight and you’re also denied the buffs Mia provides between rounds. In the second round, you’ll also enter a permanent Burst Mode but will only be able to use your Burst Attack once and there’s no Synergy Power to collect, meaning that these battles can be extremely gruelling as Shadow Mewtwo is a very fast, very aggressive foe who’s constantly coming at you and looking to land his Burst Attack.

Power-Ups and Bonuses:
Your primary power-up during a fight will by the Synergy Power that spawns in across the arenas; you’ll need to get in their quickly as your opponent can pick these up as well, and it means the difference between filling your gauges or being on the receiving end of their Burst Attacks. It’s a good job the game subjects you to endless battles as you’ll quickly see the benefits of applying Skill Points to your Partner Pokémon; I’m much more focused on attacking so I tended to boost the attack stat above the others, but lengthening the duration of your burst and speeding up your gauges can really help make the tougher battles a lot easier. Unfortunately, though, that’s about it; you don’t learn any new moves, you can’t assign different items or power-ups to your Pokémon, and just about the only other thing you have at your disposal are the Burst Attacks and Support Pokémon. Support Pokémon are a mixed bag; each one charges up at a different speed, and they each have positives and negatives, but it sucks that you can’t customise your own little support team and are stuck with what the game gives you.

Additional Features:
You might think battling through the main leagues will be the end of your journey here, but sadly it’s not. After you purge Shadow Mewtwo, two more unlock, with the last one full of the game’s toughest challenges. You can also revisit the Shadow Mewtwo stages from the story mode whenever you like to take on those unique gauge-less battles, return to each of the leagues you’ve already cleared to mop up any outstanding missions you have left, and you’ll even unlock a new arena to battle in after clearing the story. Throughout the course of the game, you’ll amass a great deal of PokéGold; unfortunately this is all spent on clothing and gear for your avatar and Mia rather than interesting stuff like new arenas or fighters. The clothing options are kind of limited, despite there being a decent variety and colour options, since you can’t mix and match them. New items unlock when you hit certain milestones or complete missions, and you’ll also unlock titles for your avatar and can assign them taunts. There’s an online battle mode, and daily challenges to complete as well, but there really isn’t anything all that fun to unlock. As if that wasn’t bad enough, this “DX” version of the game isn’t even complete as you need to shell out to purchase two more fighters, which also come with two more sets of Support Pokémon and outfits for Mia, which really soured me on the game as I expect a “DX” version to include everything available from the game.

The Summary:
I was really excited to get my hands on Pokkén Tournament DX; I’m not a big Tekken fan but the game looked and seemed really unique and exciting and I was hoping for a really fun brawler that did new things with the franchise. Technically, I got that: Pokkén Tournament DX is very similar to other 3D fighters you might find available as online-exclusive releases in that it has a minimalist approach to its interface and story and focuses on frantic, hard-hitting action with just enough bells and whistles to keep you interested. Unfortunately, it’s lacking in a lot of depth; the customisation, battle, and story options are extremely limited and it’s ultimately pointless earning all that PokéGold and those titles once you’re satisfied with your avatar. There’s also very little incentive to try out the other Pokémon as this actually puts you at a disadvantage due to the level-up mechanic; if the emphasis on the different fighting styles had been more prominent, and the story mode different depending on which Partner Pokémon you chose like other fighters, this might have encouraged experimentation but, for me, it really didn’t. Also, the game becomes very laborious very quickly; after about an hour, you’ve pretty much seen everything it has to offer and there’s very little to keep you engaged as it’s just battle after battle, with the same tactics triumphing 99% of the time, in bland arenas with an excitable girl bellowing annoying statements at you. While the game’s fighters look great and the presentation is pretty impressive at times (in battles and the rare CG cutscenes), the whole package feels very cheap and like it should have just been a budget digital-only title, making for an overall lacklustre experience that left me disappointed since I was expected a little but more (and definitely not expecting to have to pay for additional content!)

My Rating:

Rating: 2 out of 5.

Could Be Better

Have you ever played Pokkén Tournament DX? If so, did you enjoy and where did you first play it? Which Pokémon was your go-to fighter, who was your favourite support duo, and which Pokémon was your least favourite? Did you enjoy the focus on continuous battling or did it grow tiresome for you, as well? What did you think to the plot involving Shadow Mewtwo and did you ever conquer all of the leagues? Would you like to see another game in this style sometime, and if so what improvements would you make? Which Pokémon spin-off is your favourite and why? How are you celebrating National Pokémon Day this month? Whatever your thoughts on Pokkén Tournament DX, share them below or comment on my social media and be sure to check out my other Pokémon content.

Back Issues: The Amazing Spider-Man #210

Story Title: “The Prophecy of Madame Web!”
Published: 12 August 1980 (cover-dated November 1980)
Writer: Dennis O’Neil
Artist: John Romita Jr.

The Background:
After a blockbuster success with the Fantastic Four, Marvel editor and head writer Stan Lee spearheaded one of Marvel’s best selling publications with teenage superhero Peter Parker/Spider-Man. Spidey’s popularity soon saw him headlining other comics, such as Marvel Team-Up, amassing one of the industry’s most colourful and memorable rogues galleries, and his supporting cast ballooning as Parker aged and his life became more complicated. In November 1980, The Amazing Spider-Man readers were introduced to blind, crippled psychic Cassandra Webb/Madame Web, an enigmatic figure who both tasked Spider-Man with opposing certain villains and used her clairvoyance to direct his destiny. Madame Web played a significant role once Spider-Man was threatened by outside and multiversal forces, ultimately dying at the hands of a vengeful Vladimir Kravinoff/Grim Hunter, with her last act being to pass her powers to Julia Carpenter/Spider-Man. Madame Web’s most significant portrayal, however, was in the Spider-Man animated series (1994 to 1998), where she was voiced by Stan Lee’s wife, Joan, and acted as a mysterious mentor to Spider-Man (Christopher Daniel Barnes), often frustrating him with her manipulative ways. Years later, Sony Pictures inexplicably decided the best way to capitalise on their limited library of Spider-Man characters was to produce a Madame Web live-action movie, teaming this obscure side character with a handful of Spider-Women in an attempt to subvert audience expectations.

The Review:
We begin in the basement storage room of the New York Globe, a rival newspaper to the Daily Bugle, where Robert Dockery, circulation manager for the newspaper, directs a gang of masked hoodlums whom he’s hired in a bid to seize complete control of the publication. This plot point is then put on hold as the story joins Peter Parker, who’s strolling through Chinatown alongside Debra “Debbie” Whitman, an obscure love interest of Peter’s even for me whom he met while studying at Empire State University. Peter’s surprised to learn that the normally level-headed and pragmatic Debra has booked an appointment with a fortune teller, the titular Madame Web, though Debra insists that she’s simply exploring the fascinating subject of psychic phenomena rather than being scammed by a faux clairvoyant. Although Peter enjoys teasing her over this, he’s unable to join her to see Madame Web in action as, wouldn’t you know it, he’s late for a meeting at the New York Globe. Rather than web-sling over there, Peter takes the more traditional route but is forced to switch to Spider-Man when he’s denied access to the editorial department due to a managerial mandate. This is all part of Dockery’s plot, of course. He’s taking a meeting with his senior staff and introducing them to Katrinka Janice “K.J.” Clayton, publisher of the New York Globe, a provocative woman who, until now, has been a silent partner of the newspaper. Just as she announces Dockery’s ascension to power, those masked hoodlums burst in, accost the staff members, and take Clayton hostage.  

When a publishing mogul is seemingly kidnapped, Spidey turns to a mysterious psychic for help.

Luckily, Spider-Man was climbing up the outside of the building, so he bursts in to break up the party, easily dodging their machine gun fire with his superhuman speed and reflexes and fighting off the armed thugs even when they dog-pile him. They do, however, delay him long enough for Clayton to be kidnapped and, thanks to Dockery “clumsily” getting in his way, Spidey is a step too slow to pursue them and is unable to catch up due to a lack of windows. With no other options, Spidey decides to indulge Debra’s fantasy and pay Madame Web a visit to see if the elderly medium can help him track Clayton down. Spidey web-slings over the Madame Web’s apartment and is stunned to find she’s an elderly blind lady who’s hooked up to an elaborate web-based life support machine, created by her late husband, that sustains her so she can aid others with her gifts. She describes herself as a “soothsayer, a psychic, a witch” and claims to be capable not just of “second-sight” but fostering the psychic powers of others. Impressed by her presentation and boastful claims, Spider-Man asks for her insight into Clayton and, though she stresses that her abilities aren’t 100% guaranteed due to the nature of the paranormal, she immediately picks up that Clayton is the victim of a malicious deceit, perpetrated by Web’s own student, Belinda Bell, to be held hostage for financial gain. At Spidey’s urging, Madame Web intuits that Belinda and Clayton will perish in a horrific train crash if he doesn’t find Bell, who is his only hope of tracking down Clayton. The next scene shows that the deceit runs even deeper as Belinda was paid to impersonate Clayton and, for her assistance, she finds herself tied up in a toy store (of all places) and at the mercy of Dockery’s ruthless mercenaries. 

Thanks to Madame Web, Spidey saves Clayton, though her true nature remains a mystery.

Across town at the New York Gloe, Dockery confronts the real Clayton (actually a much older woman) and openly threatens her, mocking the vanity that so easily allowed him to have her impersonated to hand control of the newspaper over to him. Confident in his victory, Dockery calls his thugs and orders Belinda’s execution, but Spider-Man arrives to save her, having deduced that Madame Web’s vision of crashing trains actually meant the toy store that Dockery owns which…is a bit of a leap but sure, okay. Once again, Spider-Man easily dispatches of the goons, burying them beneath shelving units and stock, and freeing Belinda. Angered by the betrayal and grateful for the rescue, Belinda warns Spider-Man of Dockery’s intentions towards Clayton so he races over to the New York Globe, arriving just in time to find her office engulfed in flames thanks to Dockery dousing gasoline everywhere and starting a raging inferno. Spider-Man brings Clayton to safety, setting her down outside the building just as Dockery makes a run for it, only to find his car up-ended by the web-slinger. Defeated, Dockery folds like paper and Peter later reads that he’s run similar scams before, although Dockery’s imprisonment means that Peter is now out of work (I’m not sure exactly why, surely the New York Globe is still publishing and employing staff, but then I’m unfamiliar with this period in Peter’s life so maybe his job was somehow linked to Dockery?) Before he can descend into complete despair, Peter suddenly gets a phone call from Madame Web, who learned of his dual identity through her powers; she both promises to keep his secret and reassures him that his financial woes will soon be resolved. While this sounds positive on paper, the final panel of the issue reveals that his cantankerous former boss, J. Jonah Jameson, is literally chomping at the bit to re-employ the troubled young hero! 

The Summary:
“The Prophecy of Madame Web!” was an inauspicious debut for the mysterious psychic; Madame Web herself was more of a secondary (or even tertiary) character to the main plot, which was surprisingly low-key for a Spider-Man story, involving no colourful supervillains and being a simple story of a greedy man going to extreme lengths for more power. In other Spider-Man stories, Dockery would’ve employed the services of a low-tier Spider-Man villain, someone like MacDonald “Mac” Gargan/The Scorpion, Herman Schultz/The Shocker, or even Dmitri Smerdyakov/The Chameleon either to take Belinda’s role of impersonating K.J. Clayton or masquerading as Dockery himself. Indeed, I do wonder if maybe the story would’ve been more enjoyable with a supervillain in place of Dockery’s nameless, faceless goons, who offer no physical challenge to Spider-Man and don’t even respond to his witty remarks and cheap quips. Without a colourful villain, the fights aren’t as interesting and the stakes are quite low in terms of Spidey’s safety; there’s no question he can out-punch these mercenaries, so the drama revolves around ensuring Belinda and Clayton are safe instead. This would be fine but, again, there isn’t much emphasis on them being in danger; Belinda is tied up and taunted as the mercs wait for the order to kill her, rather than just being shot right away, and Dockery goes to the effort of setting Clayton’s office on fire to stage her death as an accident rather than just shoving her out a window or gunning her down. I don’t mind a more grounded, low-stakes Spidey story – in many ways, it’s a change of pace – but the narrative here is littered with contrivances and conveniences that make it decidedly run-of-the-mill compared to other Spidey tales. 

Madame Web’s look and powers impress, but the plot is middling and forgettable.

Madame Web makes for a visually interesting character; decked out in a slick black/red dress with a spider motif, blindfolded, and hooked up to a web-like life support system, she’s got a memorable design, for sure. Although Peter dismissed her as a fraud (which is a bit odd considering Peter has chummed with the X-Men before, a team known for their psychics), she proves to be completely legitimate, though her clairvoyance is paradoxically accurate and unreliable, meaning she can only vaguely point Spidey in the right direction and stress fatal consequences should he fail. Thankfully, Spider-Man uses his head (off panel, of course) and, rather than searching every trainyard in the city, realises that Dockery owns a toy shop, which turns out to be the right location. Truthfully, though, I didn’t really like this; it felt rushed and forced and again lowered the stakes as it meant we wouldn’t be seeing Belinda or Clayton threatened by oncoming trains. The twist of Madame Web learning Spidey’s secret identity was interesting as very few characters were in on this back then and taints her mysterious aura with a potential menace as her intentions might not be as benevolent as they seem, but she’s ultimately a non-factor in this story. I have no issues believing that Spider-Man could’ve figured out where Belinda was without Madame Web’s help, making her largely superfluous. I almost wonder if it might’ve been better to have Madame Web be the linchpin of the story; perhaps she’s a true medium who’s targeted by gangsters or hosts a psychic television show and is kidnapped by a villain for a ransom, or just something a little more engaging that Spider-Man giving up pursuing the hoodlums and randomly deciding to ask for her help.  

My Rating:

Rating: 2 out of 5.

Could Be Better

Have you read “The Prophecy of Madame Web!”? If so, what did you think to it? Were you impressed by her debut, or did it fall as flat for you as it did for me? Did you like that it was a more grounded story, or would you have preferred to see Spidey tangle with a supervillain? What are some of your favourite Madame Web stories or moments? Are you excited to see her live-action debut? Whatever your thoughts on Madame Web, drop a comment below or on my social media and be sure to check out my other Spider-Man content across the site. 

Game Corner [Zelda Month]: Zelda II: The Adventure of Link (Nintendo Switch)


On 21 February 1986, The Legend of Zelda (Nintendo EAD, 1986) was first released in Japan. The creation of legendary game designer Shigeru Miyamoto and Takashi Tezuka, The Legend of Zelda launched one of Nintendo’s most popular franchises. This year, I’m dedicating every Wednesday to Nintendo’s most famous silent protagonist, Link and his vast and enduring fantasy world of sword and sorcery.


Released: 16 January 2019
Originally Released: 14 January 1987
Developer: Nintendo
Original Developer: Nintendo R&D4
Also Available For: Famicom Disk System, Game Boy Advance, GameCube, Nintendo 3DS (Virtual Console), Nintendo Entertainment System (NES), NES Classic Edition, Nintendo Wii, Nintendo Wii U

The Background:
The brainchild of designer Shigeru Miyamoto, The Legend of Zelda purposely emphasised exploration and experimentation based on Miyamoto’s childhood love of exploring forests and caves. Selling well over 6.5 million copies, the game was a massive success and has been widely recognised as one of the greatest adventure games ever made. A sequel was released the very next year, one that proved to be one of the more divisive titles in the franchise for abandoning almost all of the original’s gameplay mechanics, This, however, was Miyamoto’s intention all along; he assembled an all-new team for Zelda II and infused traditional role-playing game (RPG) mechanics with both the adventuring gameplay of the first game and the sidescrolling action of the likes of Super Mario Bros. (Nintendo R&D4, 1985) and CastleVania (Konami, 1986). Emphasising tactical combat, obscure dialogue, and levelling-up to improve your abilities, Zelda II was a stark contrast to the first game but, surprisingly, this didn’t impact its sales or reception at the time. The game sold nearly 4.40 million copies worldwide and was apparently met with positive reviews for its unique presentation, expansion of the formula, and challenging gameplay. However, while many consider it a hidden and underappreciated gem in the series, Zelda II retains a largely negative reception; interestingly, while Miyamoto returned to the familiar top-down formula for the far more successful sequel, Zelda II went on to influence the franchise’s larger narrative and jump to 3D. The game has been re-released multiple times, though never with any enhancements beyond save states and rewinds, to allow new generations of players to form their own opinions of this black sheep of the franchise,

The Plot:
After saving the kingdom of Hyrule, fated hero Link must embark on a new quest to awaken Princess Zelda’s slumbering ancestor by placing six crystals in six temples, all while contending with monstrous forces seeking to revive the Dark Lord, Ganon, using Link’s blood!

Gameplay:
Zelda II: The Adventure of Link is a 2D action/adventure game in which players assume the role of the titular green tunic-clad protagonist and journey across the fantasy land of Hyrule, which is divided into forests, deserts, caves, and towns, searching for six crystals to revive a sleeping princess. At first glance, things are somewhat similar to the last game; you’re given three save files which you can name (though this name isn’t reflected in the in-game dialogue) and dropped into the game world after a bit of story text for context. However, as soon as you take control of Link, the differences between the first and second games become immediately apparent; firstly, Link begins in Zelda’s throne room in a traditional sidescrolling format like Super Mario Bros. This comparison becomes increasingly apt as you play with the controls and progress through the game; pressing B or X will see Link swipe with his sword, unleashing his patented Sword Beam when at full health, while A jumps! Jumping?! In a Zelda game? Outrageous! Link can also crouch (though less to duck beneath projectiles and more to perform a low attack) and holds a shield that will defend against some incoming ranged and melee attacks, but that’s it for his options at the start of the game. As soon as you leave the throne room, the game suddenly switches to a top-down view, but one markedly different to that of the first game; rather than presenting an action-oriented overworld, Zelda II takes more inspiration from traditional RPGs like Final Fantasy (Square, 1987) this time, with a few interactable elements and swarms of random battles appearing on the map. 

Gameplay is now infused with RPG elements, placing more emphasis on interaction and combat.

Yes, as you move around the overworld, little black monsters will randomly appear and make a beeline for you; if you come into contact with them, you’ll be warped to a sidescrolling section where you’ll either have to battle past enemies, simply walk offscreen, hop between platforms and over hazards, or collect special items to exit to the overworld. The enemies you face are determined by the sprite that touches you, the area you’re in, and how far into the game you are; touching a Bot-like enemy usually puts simpler enemies in your path, but touching a larger monster will spawn a greater challenge. Sometimes, these sidescrolling sections are mandatory to progress; you’ll randomly be deposited into a lava-filled cave, onto a bridge swarming with Bago-Bagos, or into a haunted graveyard and will have to fight your way out to move on. Defeating enemies will usually (but, annoyingly, not always) award experience points (EXP); yes, like other RPGS, Link must now gain EXP to level-up and increase his attack, health, and magic, all of which is essential for overcoming the game’s more challenging enemies and bosses. Occasionally, you’ll find Point Bags (either out in the open or dropped by defeated enemies) which will give you an EXP boost, and conquering each of the game’s Palaces will automatically award you with a free level. Link can level-up to a maximum level of eight and you’ll be able to select whether its your health, magic, or attack that’s increased each time you level-up, but the amount of EXP you need to level-up increases each time so it’s definitely worth defeating as many enemies as you can and grabbing all the Point Bags you see to get stronger faster. If you were paying attention there, you’ll have seen I mentioned magic; Zelda II introduced magic to the franchise, though it’s used a little differently than you might think. Each town Link visits shelters a wise old man who will freely teach you a spell (though sometimes you need to perform tasks, such as talking to specific non-playable characters (NPCs) or jumping down chimneys, to reach the old man). Pressing + brings up your list of spells and displays how many points they cost to use; you can then press – to perform the spell, though you can only perform them in sidescrolling sections, and the effects will only last for as long as the screen you’re on. Spells range from reducing the damage you take to changing your Sword Beam into a fireball and increasing your jump height and they’re absolutely essential for clearing the game’s Palaces. 

Zelda II is frustratingly obtuse at times and features an inconsistent difficulty level.

The first game is notoriously obtuse, rarely giving you much guidance about where to go and what to do, and Zelda II tries to address this by placing more emphasis on interacting with NPCs but, unfortunately, mistranslations muddy the water and leave you either with nonsense vagaries or out-right lies. In each of the game’s towns, Link can talk to NPCs for “hints” or have his health and magic restored, though some NPCS are actually enemies in disguise! There are also times when you need to perform fetch quests or talk to specific NPCs to gain new items or access to new areas; it’s again all annoyingly vague so I’d recommend just cutting out the middleman and using a guide right from the start. All the walkthroughs and level-ups in the world can’t help you when it comes to the game’s difficulty, though; while Zelda II is light on puzzles, requiring little more than the acquisition of keys and the use of certain items on the overworld, its Palaces are often sprawling mazes filled with instant-death lava or water and frustrating enemies, many of whom either take multiple hits to defeat or can resist your Sword Beam, making it useless a lot of the time. While enemies won’t respawn screen to screen, some come in seemingly endless swarms, others are invisible or invincible without certain items or spells, and others are placed in cramped hallways, making attacking and avoiding their attacks extremely aggravating. Perhaps because he’s not used to hopping over platforms, Link’s momentum is a bit janky here, meaning it’s easy to slip or bounce into death pits, and he also flies back upon taking damage, easily costing you a life. Yes, Zelda II also uses a life system; you start with three lives and, when they’re drained, you’re given the option to save your game or continue, which will return you to North Castle or the start of the current Palace, respectively, reducing your current accumulated EXP to zero in the process. While I can just about forgive a lot of the game’s oddities, the combat is awful here; since many enemies block your Sword Beam, you’ll be relying on jumping slashes to attack them, and Link’s range of attacks is sadly limited even after he gains new sword abilities, meaning combat is often as much of a chore as the tricky platforming and insane difficulty spikes peppered throughout the game. 

Graphics and Sound:
Fundamentally, Zelda II is graphically superior to the last game; the sidescrolling sections allow for greater detail in the sprites, particularly Link, and more detailed backgrounds than in the last game. Depending on where you are, you’ll load into various different areas on the overworld, from swamps that restrict your walking speed, to forests and traditional caves. The game’s Palaces share the same Roman-inspired aesthetic, featuring bricks and columns and statues and elevators, but each has a different colour palette and utilises its labyrinthine nature in different ways, such as incorporating crumbling platforms, destructible or falling blocks, lava pits, hidden drops, or pits that lead to lower areas. While Link looks more impressive than in the last game, he has no idle poses and his animation frames are severely limited; his sprites change when you acquire new moves or utilise certain spells, but he’s still limited by the NES hardware so he’s little more than a clunky lug here. Indeed, Zelda II may have been a little too ambitious for the time as the game’s performance struggles noticeably when enemies swarm on the overworld and when there are multiple sprites onscreen in the sidescrolling sections. Sprite flickering, slowdown, and even some glitches are surprisingly commonplace, which is odd considering how well made the first game was and how simplistic so much of the game is. Zelda II even struggles in the various towns, when NPCs wander around, going in and out of houses, to say nothing of the haunted graveyards and hazardous bridges, and you’ll see a lot of sprite tearing and performance issues when battling against the game’s bosses, too. 

While the game is a graphical improvement, it’s perhaps too ambitious for the NES hardware.

On the plus side, Zelda II includes some chirpy and memorable tunes; the main Zelda theme is here, of course, and the main Palace and boss themes are fun little earworms (which is good as you’ll be hearing them again and again). Sound effects like Link’s Sword Beam and blocking projectiles and nice and clear, too, and there’s a decent amount of variety in the game’s locations, if not in the Palaces, which are very copy/paste even with their different colour schemes. Occasionally, you’ll find areas on the overworld where you need to use certain items, either manually (like the hammer and flute) or automatically (like the raft), and there are even some hidden paths and tiles that lead to Point Bags, Magic Jars, or upgrades to your health or magic bar.  Although Zelda II emphasises interacting with NPC, dialogue is extremely limited and littered with mistranslations; thankfully, you can simply hit B to skip dialogue without missing out on the benefits, such as having your health restored. Cutscenes are basically non-existent here; there’s a little animation on the title screen, some story text, and some flashing visuals when you defeat a boss, but that’s basically it until you reach the final Palace. Zelda II is one of the few Zelda games where series antagonist Ganon doesn’t appear at all (unless you lose all your lives and then he’ll taunt you from the Game Over screen) and it also doesn’t feature Link’s iconic secondary weapons like the boomerang or bow and arrow, meaning things get very basic and repetitive very quickly. 

Enemies and Bosses:
A wide variety of monstrous beings will dog Link’s progress in the game’s sidescrolling sections and Palaces, many of them new and unique to this game (as far as I can tell). We’ve got the standard bat-, bird-, snake-, spider-, and jelly-like cannon fodder that swoop, spit, and pounce about, annoying skeletal fish that leap out from water and spit projectiles, and ghostly eyeballs and floating heads that swarm the screen endlessly, bobbing about and decimating your health bar in seconds. It’s not long before you’re challenged by more frustrating enemies; Moblins, Iron Knuckles, Lizalfos, and Stalfos quickly become commonplace, defending against your Sword Beam and attacking with daggers, swords, maces, tridents, and even jump attacks. It can be difficult to land hits on them since you’re reliant on your jumping attacks and their projectiles can be incessant, making them frustrating encounters even when you’re at a higher level. This threat is escalated by the likes of the Doomknockers, Fokkas, Fokkerus, and various teleporting wizards; these guys will hop about, toss a barrage of axes or flames, and need the use of a spell in the latter’s case to even defeat. Toss in the barrage of damage sponge Bubbles, expendable Wosus, fireball-spitting statues, and worm-like creatures and it quickly becomes an uphill battle getting past even the simplest of areas as you have to avoid attacks or switch up your playstyle to overcome the enemies before you.  

The game’s enemies and bosses can be aggravating due to the clunky combat mechanics.

Seven crystals in seven Palaces means, you guessed it, eight bosses to overcome in Zelda II, including the game’s true final boss. This time around, the bosses all have a life bar, similar to the Mega Man series (Capcom, 1987 to present), and drop a key after being defeated, which unlocks the Palace exit. The first boss you encounter is the horse-headed Mazura, whose armour protects him from all your attacks and whose swinging mace will decimate you if it makes contact. Your best bet here is to avoid being backed into a corner and activate your Shield spell to reduce the damage you take since you’ll need to use jumping slashes to hit his only weak point, his head. You’ll use these same tactics against the second boss, Jermafenser, a massive armour-clad knight whose head will detach after a few hits! However, Jermafenser is a bit of a joke; your shield will block his projectiles and, by this point, you should have the downward thrust, which makes short work of him, meaning the journey through Death Mountain and battles against the aggravating Dairas is more of a challenge! The third boss you encounter, Rebonack, is essentially a blue Iron Knuckle on a mechanical horse. He’ll charge across the screen and try to skewer you with his lance, meaning you need to time a downward thrust to rob him of his steed, after which you simply need to block, jump, or duck to defend against his barrage of daggers and attack his head as you would a normal Iron Knuckle. What makes Rebonack unique, though, is that you battle him again later in the game as he appears twice more as a mini boss in Three-Rock Palace, though he’s even easier in these encounters since you’re more powerful at that point. When you reach the Great Palace, you’ll also encounter another mini boss-like enemy, a Giant Bot that splits into several regular Bots upon being hit and slows the game to a crawl as a result. 

Many bosses are surprisingly disappointing and nowhere as challenging as the journey to them.

Journeying through Maze Island Palace will see Link clash with the wizard-like Carock, which is essentially a larger Wizzrobe variant. Because of this, battling it is extremely easy as you can simply activate the Reflect spell and crouch down in a corner; Carock will teleport about firing energy waves at you, but Reflect will send them right back, killing it in seconds. In comparison, the hulking Gooma is more of a challenge; slow and lumbering and wielding a spiked, chained ball, this monster requires a lot of patience as you use the Jump, Shield, and Life spells to avoid and endure his attacks and land hits to his torso. The dragon-like Barba was probably a lot harder in the original game but is made a lot easier with the Nintendo Switch’s rewind feature; it randomly rises from one of three lava pits to spew easily-voidable flame breath at you, so you need to be in the right spot to attack its head when it appears, which is easy to do when you can rewind the game on the fly! The penultimate boss, Thunderbird, poses the most significant challenge; not only must you reach it with a full magic bar since you need to cast Thunder to make it vulnerable, but it floats about spitting endless fireballs and can only be damaged by hitting its face. Once you defeat it, you’ll go straight to the final room and boss, with the damage and magic you lost fighting Thunderbird carrying over. Thankfully, the final boss, Dark Link, can be a bit of a let down; while Link’s shadow copies all his sword attacks and blocks yours with his shield, you can crouch or stand in the corner and easily cheese him, making the final challenge extremely anti-climactic considering how tough the rest of the game is. 

Power-Ups and Bonuses:
Unlike most Zelda games, Zelda II doesn’t include Rupees or shops and defeated enemies will not drop hearts to refill your life meter. The only way to restore Link’s health is to find a fairy on the overworld or in a sidescrolling section, level-up, visit an NPC at a town, or find a Heart Container, meaning you’ll mostly be relying on spells like Shield and Life to help reduce damage and restore your health. On the plus side, NPCs will aid you for free, though you’ll sometimes have to jump through some hoops to reach the old man and helpful knights who provide new spells and attacks. Although Link doesn’t get to use iconic sub-weapons like the bombs or hookshot, he can acquire items in each Palace to aid his quest; many of these are passive, automatically activating once you acquire them, such as the candle, raft, boots, key, and magic cross. These automatically light up dark areas, reveal hidden enemies, allow you to traverse streams or bodies of water, and open every door in the game unlike items like the hammer, flute, handy glove, which are activated on the overworld in the case of the former and powerup your sword attacks in the case of the latter to let you smash blocks. 

In place of his usual weapons, Link utilises spells and new sword attacks to progress.

Link is taught eight spells throughout the game that are required to conquer the Palaces. Some are more tactical than others; for example, you don’t have to cast Shield or Life if you’re skilled enough to defeat enemies and bosses with little to no damage, and I only cast Spell a few times in dungeons swarming with Girubokkus and Moas since it turns them (and many other enemies) into harmless Bots. However, you absolutely will need to cast Jump to increase your jump height and reach new areas, you’ll need Fairy to transform into a tiny fairy and bypass larger gaps, and Fire and Reflect are both necessary to defeat certain enemies. Thunder, the most powerful spell in the game, will obliterate all onscreen enemies but it costs so much to use that I only employed it against Thunderbird since that’s the only time it’s unavoidable. Link can also learn two additional sword attacks, the downward and upward thrust, which are super useful for defeating enemies beneath and above him, though it’s not going to help you against Iron Knuckles and other similar enemies, which is annoying. Finally, in addition to finding Point Bags and magic jars, you’ll occasionally come across Link Dolls that will grant you an extra life, though this is sometimes detrimental as it means wasting more time just trying to save the game. 

Additional Features:
As is tradition for the Zelda franchise, numerous Heart Containers can be found all across Hyrule; acquiring these will refill and extend your health bar, and you only need to find one to do this rather than four or five like in other games. Additionally, Magic Containers will do the same thing for your magic bar, so it’s worth exploring a bit to find these, even if it means battling more enemies. As alluded to earlier, some NPCs will only help you after you’ve performed certain tasks or spoken to certain characters; there’s a mirror, water, and kidnapped child to find in order to learn certain spells, Link will need to use Jump and Spell to reach certain houses or unearth areas, and you’ll need to use the flute and hammer on the overworld to eliminate otherwise impassable monsters or reveal hidden areas. Finishing the game allows you to save and alters your save file; selecting it will begin the game anew, with all your spells and level-ups intact, though you’ll have to find all the items and beat all the Palaces again. You can skip to this game by selecting the “SP” version from the Nintendo Switch Online menu, and of course you can abuse the rewind and save state feature to make the game a bit less challenging, but it’s still a tough experience even with these quality-of-life features. 

The Summary:
I put off playing Zelda II: The Adventure of Link for years; I purposely downloaded it for the Nintendo Wii just to play it years ago but never actually sat down with it until this playthrough, and even then I was very reluctant after all the negativity surrounding it. Unfortunately, I have to say that the criticism this game often gets is entirely justified; it’s such a radical departure from the first game that it’s almost like a completely different game, and the challenge it offers is neither fun or rewarding. Things start out okay enough, but the difficulty spikes dramatically once you reach Death Mountain (the second area of the game, I might add!) and then becomes wildly inconsistent after that. Sometimes you’ll be bombarded with small, annoying enemies and projectiles or forced to fight tricky enemies like Iron Knuckles in narrow hallways, and other times rooms will be largely empty or contain simple platforming sections. I wasn’t a fan of the basic overworld, the aggressive random battle system, or the switch to a sidescrolling perspective; this only works in small doses in Zelda games and the NES just isn’t capable of giving Link the range of movement or attack options required to best utilise this perspective. I didn’t mind the level-up mechanics, or the use of spells, and grinding wasn’t too much of a slog for me unless I was battling Iron Knuckles, but the spells were quite mundane and circumstantial, and I missed using other weapons and solving puzzles. Instead, the game relies on mazes, vague hints, and trial and error to nudge you along, making for a confusing and aggravating experience as I don’t like referring to a walkthrough when I’m playing games. I liked the music, and aspects of the graphics, and the bosses were visually quite impressive, if mostly ridiculously easy compared to what you go through to reach them. Ultimately, I don’t think you’re missing out if you’ve never played this one; it’s a curious oddity in the franchise, one that’s easily skipped over in favour of the more enjoyable sequels, but it could provide some enjoyment for nostalgic gamers seeking to relive the days when videogames were unnecessarily difficult.

My Rating:

Rating: 2 out of 5.

Could Be Better

Have you ever played Zelda II: The Adventure of Link? Were you put off by the changes to the gameplay and mechanics, or did you enjoy that it mixed up the formula? What did you think to the game’s difficulty and use of RPG mechanics? Did you struggle to work out where to go and what to do? Which of the game’s spells and bosses was your favourite? What did you think to the final boss? Would you like to see Zelda II remade or a return to this style of game for the franchise? How are you celebrated The Legend of Zelda this month and where games are your favourite? Whatever your thoughts, leave a comment below and maybe check out my other Zelda content.