
On 21 February 1986, The Legend of Zelda (Nintendo EAD, 1986) was first released in Japan. The creation of legendary game designer Shigeru Miyamoto and Takashi Tezuka, The Legend of Zelda launched one of Nintendo’s most popular franchises. This year, I’ve been dedicating every Friday to Nintendo’s most famous silent protagonist, Link and his vast and enduring fantasy world of sword and sorcery.

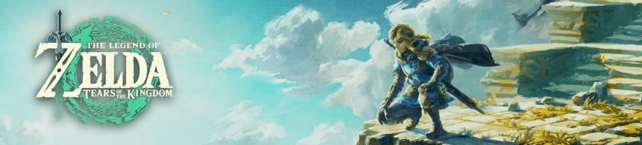
Released: 12 May 2023
Developer: Nintendo EPD
The Background:
Selling over 6.5 million copies, The Legend of Zelda was a big hit for the Nintendo Entertainment System (NES) and kickstarted one of Nintendo’s most lucrative and popular franchises of all time. After a successful jump to 3D with The Legend of Zelda: Ocarina of Time (ibid, 1998), Zelda titles have only gotten more ambitious with each successive entry, though none were more ambitious than the critical and commercial success of The Legend of Zelda: Breath of the Wild (Nintendo EPD, 2017). While producing the downloadable content for Breath of the Wild, the developers had so many ideas that they were inspired to create a follow-up title and sought to expand upon the existing world and game engine with new areas. The Dungeons were revised to be more visually unique compared to the last game and the developers added a building mechanic to allow players to craft new vehicles and expand their exploration potential, with Link’s new abilities presenting new challenges for the developers to overcome. Like its predecessor, The Legend of Zelda: Tears of the Kingdom was met with universal acclaim; reviews praised the expanded map, the implementation of Link’s new abilities, and the expansive story. While the Dungeon design and performance was criticised, the game still sold 21.04 million copies worldwide and won numerous awards.
The Plot:
Years after Breath of the Wild, Link and Zelda discover the rancid “Gloom” seeping from the depths beneath Hyrule, heralding Ganondorf’s return. When Zelda disappears and the Master Sword is shattered, Link turns to an ancient race to combat the Dark King once more.
Gameplay and Power-Ups:
Like its predecessor, The Legend of Zelda: Tears of the Kingdom is an open-world action/adventure game in which players control Link (in one of the rare instances of him not only having that name but being the same incarnation) and explore the vast wilds of Hyrule, a diverse and treacherous land of sword and sorcery. Fundamentally, the controls and basic gameplay mechanics remain unchanged from Breath of the Wild, for better or worse. You press A to talk to Hyrule’s many and varied non-playable characters (NPCs), interact with the environment or pick up objects (stones, weapons, etc), and open treasure chests. To run, simply hold B but keep an eye on your stamina wheel as Link will quickly get exhausted unless you expand it by conquering the returning mini Dungeons (again dubbed “Shrines”). Y swings your currently equipped weapon in a simple combo; hold it to charge up a spin but, again, watch your stamina as you don’t want to end up dizzy and vulnerable. X jumps, with Link deftly hopping over most low objects or executing a jumping attack; you’ll also use this to clamber up walls and surfaces (again, stamina willing). When in combat, press ZR to target the nearest enemy and raise your currently equipped shield to fend off attacks. Successfully tap A while raising your shield to perform a “Perfect Guard” that reflects certain attacks and leaves enemies stunned (though I still can’t get the timing right). Similarly, pressing X at just the right time to dodge an attack allows you to hit a powerful “Flurry Rush” to whittle down their health. Pressing in the left stick sees Link crouch and stealthily sneak around, allowing for one-hit strikes, and you can hold down R when at full health to unleash a Sword Beam.
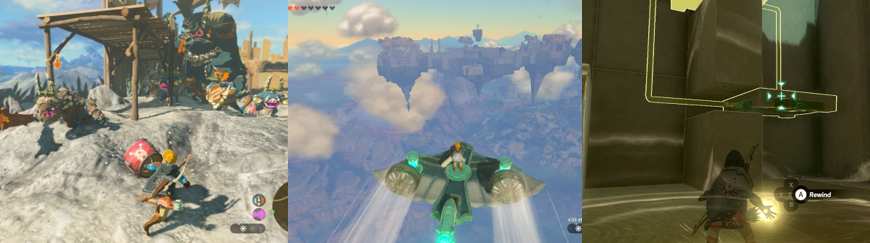
As before, Link can utilise almost anything as a weapon; sticks, skeletal arms, various swords, clubs, and axes are all acquired by defeating enemies or exploring your surroundings. Each has a different power rating that determines not just how much damage it does, but also how durable it is. The lower the rating, the more likely your weapon will shatter after a few hits. Wooden weapons also catch fire and metal weapons attract lightning, so you must swap them out or drop them to avoid taking damage or being caught short. Similarly, items like pot lids, wooden circles, and iron shields can defend against incoming attacks and have the same elemental issues to consider. Link also acquires various bows, with some firing more shots at the cost of their durability and others hitting harder; similar effects are also applied to weapons and shields. Link can also throw items and attach them to his arrows for additional effects, such as blowing up rock walls and enemy hoards with Bomb Flowers, freezing them with Ice Fruit, or setting vines and baddies alight with Fire Fruit. In Tears of the Kingdom, this comes courtesy of Link’s new Purah Pad, and upgrade to the previous game’s Sheikah Slate, which quickly allows him to “Fuse” objects to his arsenal. This is a versatile ability, allowing you to Fuse items to your swords (and even combine weapons) for added effects and damage. Fuse makes shields more durable or rocket you into the air with…well, an attached rocket…and is also essential for solving puzzles since you must cobble together wooden boards to create bridges, rafts, or more complex vehicles. You can manipulate almost anything with the “Ultrahand” ability, which telekinetically picks up objects to be awkwardly rotated to solve puzzles or piece together your creations. Eventually, you learn the “Autobuild” ability that makes this much easier but at the cost of “Zonaite”, a new mineral that powers your creations and allows your gliders to fly, your fans to blow, and your carts to roll along. Perhaps Link’s most useful new ability is “Ascend”, which sees him clip upwards through the environment when able, eliminating the need to expend stamina climbing rugged mountains and sheer walls. Link can also rewind time, to a limited degree, with “Recall”, allowing him to dart into the sky by reversing the direction of falling debris and bypass raging lava flows on makeshift rafts.
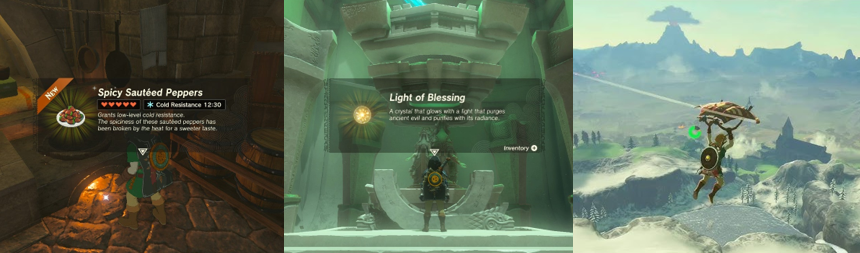
As before, Link’s weapon inventory is painfully limited. It can be expanded by finding Korok seeds, but only one slot at a time and the cost increases as you progress. Link’s defensive options are also tied to his outfits, which are found in chests, tied to tricky side quests, or bought from various shops for ridiculous prices. Instead of relying on gathering Rupees, you’re better off selling the precious gems you find by smashing rocks with rock-Fused weapons. You’ll need to do this as Link won’t last long in extreme heat or cold without the right outfits, and some offer additional perks such as speeding up your swimming rate, rocketing you up waterfalls, resisting elements, and upping your attack and defence. Rather than collecting hearts from defeated enemies, Link can either spend Rupees at an inn, collect a “Light of Blessing” from Shrines, or cook meals. This time, any meals you cook are recorded for easy reference; meals can also have added effects, such as temporarily increasing your maximum hearts and stamina wheel. To permanently extend these, you must trade four Light of Blessings at prayer statues dotted around Hyrule to gain either a new heart container or an extra slither to your stamina wheel, a process that remains as tedious as before. Similarly, you can still sneak up on and tame wild horses, adding them to stables and calling them with a whistle. If you have a Breath of the Wild save file, your horses will even be carried over, which is nice. There is a generous fast track mechanic, as before, but you must again activate towers (revealing more of the map in the process) or beat Shrines to utilise this. Finally, you can jump from high places and glide using your Paraglider and, though you can’t drop bombs like before, you can whip out your bow and use the slowdown effect to pick enemies off and, eventually, speed up your gliding with a gust of wind.
Like in Breath of the Wild, Link is aided in his journey by reincarnations of the ancient Sages. Following the main story quest (something easily done from the extensive “Adventure Log”) sees you conquer five ancient “Temples” and encounter these allies, who then join your quest, in spirit. Tulin blasts a gust of wind that speeds up your gliding and blows over enemies; Yunobo cannonballs ahead, setting fire to grass and smashing rocks; Sidon protects you with a water shield and blasts foes with a burst of water; Riju adds a lightning bolt to your arrows; and you can pilot Mineru’s mech, attaching various accessories to essentially make a Rock ’Em Sock ’Em Robot. Each ability has a cooldown element (with Mineru’s abilities tied to Zonite) and each Saga follows you on the overworld unless dismissed, battling enemies and bosses alongside you to take some of the heat off you. Mineru is especially usefully when explore the “Depths”, a vast, pitch-black, incredible dangerous environment found beneath Hyrule and accessed via chasms. Down here, you’ll activate Lightroots and toss Brightbulbs to brighten up the area and encounter vast deposits of “Gloom”, a Malice-like substance that permanently saps your maximum health unless you recharge at Lightroots or cook special food. Mineru walks through Gloom and lava without fear, but you must watch for Gloom-infected enemies and the horrific Gloom Spawn, which essentially act as this game’s second counterpart to the Guardians (the first being the various Zonai Constructs). While it’s not necessary to explore the entirety of the Depths, you will visit there many times throughout the story, and it can be beneficial to venture down there to collect powerful weapons or Poes to obtain new clothing. Additionally, you can blast up to the skies to explore various disparate floating ruins not a million miles away from the floating islands of Skyloft. Up here, you’ll find mine carts, caves, and the remnants of the Zonai people, alongside additional Shrines and rewards. The skies are also great for scoping out points of interest on the surface, such as Shrines, towns, or the various geoglyphs that dot Hyrule’s landscape. If you’re really lucky, you’ll spot one of four elemental dragons who can be farmed for precious minerals, with one in particular (the Light Dragon) awarding the legendary Master Sword if you have enough stamina to retrieve it.
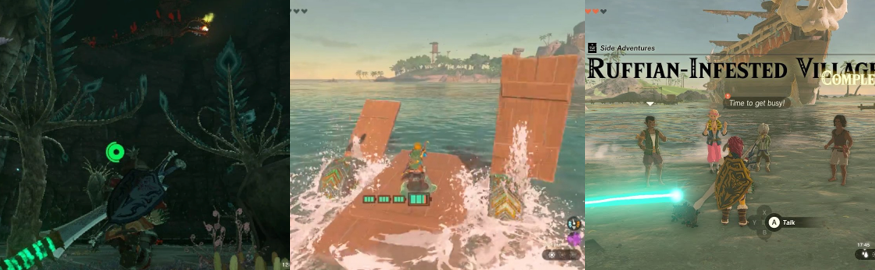
Hyrule’s surface remains relatively unchanged from Breath of the Wild; many of the same towns, locations, and landmarks can still be found, though with some alterations. Lurelin Village has been infested with ruffians who need to be fought off, for example; the Rito Village has been beset by a blizzard; and the Gorons have become obsessed with Marbled Rock Roast. The Korok Forest and eerie Lost Woods are shrouded by an impassable mist, Hyrule Castle floats above a chasm of Gloom thanks to the “Upheaval” caused by Ganondorf’s awakening, and Zora’s Domain is polluted by sludge. You must clear out these issues with both your items and by completing Temples, which are thankfully far more visually distinct this time around. Rather than every Temple relying on a clunky rotating gimmick and a repetitive Sheikah aesthetic, they’re much more traditional in their depiction and use of elemental themes. You’ll solve a primary puzzle in each, from activating propellers to unlock giant locks, hitting gongs to release padlocks, powering up water wheels and ancient batteries, and collecting Mineru’s parts. While you do collect keys, this element is downplayed, though you still activate levers and switches (albeit with Ultrahand). Typically, you’re more likely to be moving or combining items, rolling giant balls into targets, and either using Ascend or fans to progress upwards. The Water Temple has a unique gravity gimmick that sees you float around in bubbles, you’ll get a prelude to the Lightning Temple’s boss battle before entering, and the Fire Temple is full of mine carts that require you to switch tracks by firing Yunobo at targets. Just getting to the Temples is a feat in itself, with you forced to venture higher and higher into the skies and cross flying ships to reach the Wind Temple and explore the murky Depths to find the Spirit Temple. Hyrule Castle again acts as a Temple, one guarded by powerful enemies and covering Gloom, and you must venture deep into the hazardous, Gloom-filled chasm beneath it to confront the Demon King. Shrines are far more challenging and diverse this time around, ranging from combat challenges to logic puzzles that’ll have you using Link’s Purah Pad abilities in unexpected ways or battling enemies with makeshift items.
Like Breath of the Wild, Tears of the Kingdom is an unforgiving experience. Link begins with three hearts and acquiring more is a chore since you’re forced to seek out Shrines (something made much easier by completing a side quest to add the Sensor to your Purah Pad). Even then, having more health can be detrimental since it means consuming more food to replenish your health and Link is frustratingly weak at times. Even simple encounters can end in a game over, meaning it’s often better to just sprint past enemies to preserve your weapons, health, and sanity. To make matters worse, all enemies and treasure respawn when the “Blood Moon” rises, meaning the environment never gets any less dangerous. This remains a frustrating experience for me as I enjoy the combat in the Zelda games but the risk/reward of battling even simple enemies often isn’t worth it. Add to that the frustrating weather effects, which see you slip down mountains, tumble about like a ragdoll from a lightning strike, and collapse from heat exhaustion and you have a game that can be a chore to play. While the Gloom and the Depths can largely be avoided, you’ll endure both eventually and they’re a major headache as it’s not fun to stumble about in the darkness, have your hearts sapped away, and then be surprised by a Gloom-infected rematch with a boss! It seems like every NPC has a story to tell and a mission for you, be it reuniting lost Koroks, exploring wells, seeking out evidence of Zelda sightings, or bringing musicians to the Great Fairies so you can upgrade your clothing (for a small free…) Sometimes, you’re forced to battle waves of enemies or NPCs will turn out to be the aggravating Yiga Clan in disguise. Other times, you’re performing glorified fetch quests for minimal rewards or cobbling together constructs to help Addison campaign for President Hudson. Some Shrines only reveal themselves after you retrieve their crystal, either by battling a mini boss or solving some tedious nearby puzzle; others offer no challenge at all, making for a nice change of pace. Link’s building abilities can result in some remarkable craft, from boats to full-blown planes, but it can be annoying rotating pieces into position, and you’ll expend a lot of your resources to get all the pieces you need and power everything.
Presentation:
Link’s model, like all the character models, appears essentially unchanged from Breath of the Wild save for some different attire and his new monster arm. When in sweltering heat, he pants and sweats; when in blistering cold, he shivers; and when standing too close to an explosion, he catches fire. Although he doesn’t speak save for some grunts, there are dialogue options here and there that show is does communicate with those around him. Other NPCs communicate through traditional text boxes or voice acting, which is generally saved for the more dramatic cutscenes and the various memories. Link’s companions have a fair bit of personality, with Yunobo being a standout for me since he’s brainwashed into turning against his people and then determined to make up for it with an enthusiastic gusto! Tears of the Kingdom takes the expansive overworld from Breath of the Wild and expands upon it considerably. The surface is largely the same from what I remember, featuring towns, swamps, mountains, a massive volcano, and rushing waters. Settlements like Kakariko Village and Hateno Village remain, with Link now having a home and encountering many of the same NPCs (some of whom recognise him and others who strangely don’t). The landscape is altered by the presence of chasms leading to the Depths but still contains hidden caves, stables, the ruins of the old world, and recognisable landmarks like the Temple of Time. Hyrule is gigantic and full of different cultures, from the distrustful Gerudo in the arid desert to the proud Zora in their waterfall kingdom. Each area has different weather effects to worry about, from stifling heat to bitter cold, something exacerbated by random thunderstorms and the titanic elemental Gleeoks. There’s also a day/night cycle present, some mist and fog effects here and there, and a real sense of the world having changed both between games and from the fallout of the Upheaval, which sees debris rain from the skies and uncovers long-forgotten ruins that you must explore and decipher.
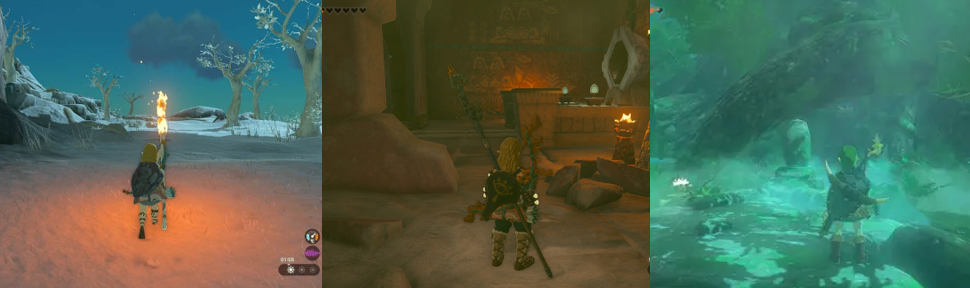
By their very nature, the Depths aren’t as immediately impressive simply because they’re seeped in darkness. It’s an oppressive, bleak, and dangerous environment with no inhabitants save for Ganondrof’s minions, the remains of a Zonai outpost, and Robbie’s tentative efforts to explore the Gloom-infested environment. Still, there is a lot to see here once you illuminate your surroundings; Zonai depots, lava flows, and Gloom-versions of the game’s bosses all dwell alongside Bargainer statues where you trade your Poes and rusted weapons you can take. The skies aren’t much better, being a fragmented series of ruins, tracks, and Zonai deposits that you must often glide between. The Shrines have been redesigned (for the worst, in my opinion) and returning areas like Hyrule’s labyrinths and even the elegant castle have an added danger thanks to being infested by Gloom. Shrine interiors are very similar to what we saw in Breath of the Wild, favouring substance over style and restricting your abilities so you can’t just glide to the exit. They retain the ancient mixture of science and magic from Breath of the Wild, but I remain unimpressed by how tedious it gets searching for Shrines just to get enough Light of Blessings to gain one extra heart that’s immediately shattered by Gloom. Still, as mentioned, the Temples are much improved this time around. They not only have a better visual identity but contain more interesting puzzles and a greater enemy variety. The standout for me was the Lightning Temple, which sits within a vast pyramid in the storm-swept Gerudo Desert and is home to the mummified Gibdos. I felt like a proper tomb raider shifting blocks and riding wind currents in here, though the Fire Temple also impressed by being an abandoned mine within a volcano. The Spirit Temple was the most disappointing since it simply hosts a boss battle, but the journey to it through the Construct Factory in the murky Depths was challenge enough.
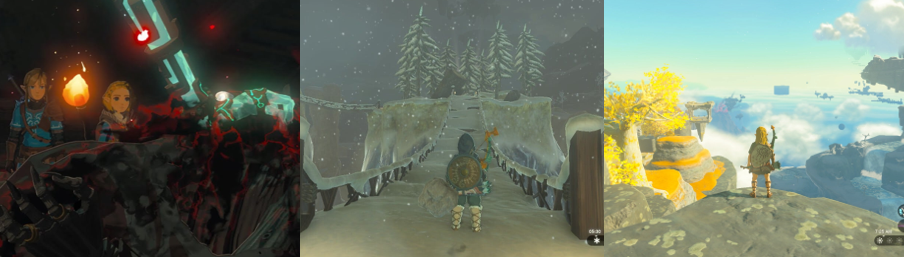
Tears of the Kingdom makes great use of ambient sound for the most part. There’s no sweeping Zelda theme when galloping across the overworld here; just the sounds of enemies approaching or light piano tunes. This changes once you get into battles, ramping up the anxiety when you’re suddenly attacked by a spear-wielding Moblin and battling the finnicky controls as you tumble down a mountainside. Music really only plays a role in the game’s cutscenes, however, which can be replayed from the Adventure Log. Like its predecessor, Tears of the Kingdom invites you to challenge yourself; if you’re brave (or stupid), you can head right to the final confrontation (and win!) and you’re free to explore every area out of sequence, for the most part. The map and Adventure Log can quickly become cluttered with waypoints and primary and optional quests, making it difficult to remember where you’re going and what’s happening next. However, I never experienced any performance issues save for one terrifying moment where the game crashed during the Yunobo fight. The environment renders well; wild animals and NPCs roam freely with no slowdown or noticeable pop-up, though the weather effects do help mask this at times, I feel. Traversing the surface is far less hazardous thanks to the absence of Guardians but the Gloom Hands definitely get your blood pumping when they slither to life and relentlessly chase you across walls and ceilings. Long-time Zelda fans should also enjoy the various nods to previous games in the names of certain locations and NPCs, as in the last game, and Tears of the Kingdom definitely feels like a celebration of the franchise’s rich history as much as anything else. Probably the best callback for me was exploring Hyrule Castle again; though much more restricted thanks to the Gloom and the damage, it was fun revisiting the library and royal rooms. Unfortunately, the plot lost me a bit; I still don’t understand why no one makes a connection between Ganondorf and Calamity Ganon and I must have been distracted when the game explained why Zelda’s been sighted across Hyrule when she’s actually flying through the skies as the Light Dragon.
Enemies and Bosses:
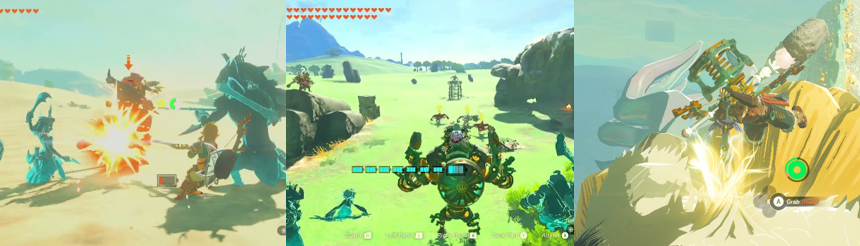
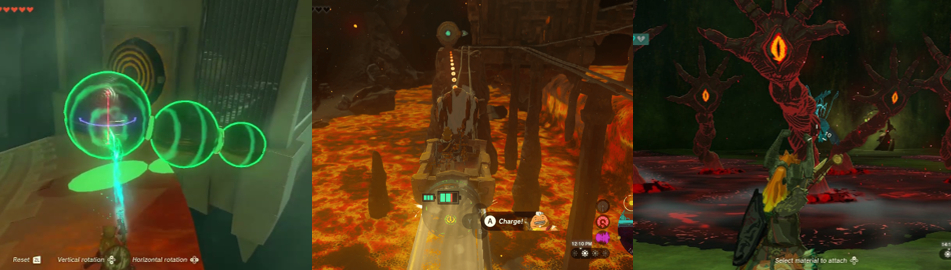
As far as I could tell and remember, every enemy encountered in Breath of the Wild reappears here, sporting the same strengths and weaknesses and dropping the same items upon defeat. Hyrule is full of sentient trees, jelly-like Chuchus, odd Pebblits, bat-like Keese, and rock-spitting Octoroks. These common enemies aren’t much to shout about, popping up as you explore and generally being more a nuisance than a threat, but the land is also patrolled by Ganondorf’s more organised and formidable forces. The most commonly encountered are the squawking Bokoblins, often found around campfires, guarding towers, or riding Battle Talus’s. They’re often subordinate to their more challenging silver-clad commanders, trailing behind bulbous Boss Bokoblins, or taking orders from large, goblin-like Moblin. Skeletal variants of these are also encountered, some ride horses on the overworld, and Gloom-infested variants swarm the Depths, but they’re also echoed in the cave-dwelling, ape-like Horriblins. Exploring deserts, swamps, and water-rich areas sees you surprised by the lizard-like Lizalfos, who spit water and turn invisible, and you’ll often face a double threat as Aerocudas patrol the skies. Bokoblins, Moblins, and Lizalfos wield various weapons, from swords to lances and bows, and will call for backup upon spotting you, making even a handful of them a significant threat. Various Wizzrobes are also encountered, often skipping and teleporting about and firing different elemental magic, and the Yiga Clan will jump you when you least expect it, disappearing in a puff of smoke and charging you with their blades. You’ll also contend with mummified Gibdos both on the ground and in the air, though fire- and lightning-based attacks make short work of them. Various armed Zonai Constructs test your combat prowess, acting as smaller but no less threatening counterparts to Breath of the Wild’s Guardians.
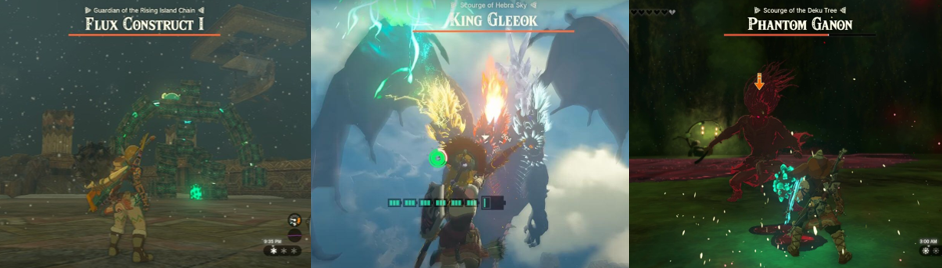
Hyrule is also populated by various mini bosses. Boss Bokoblins are larger versions of regular Bokoblins that wield big clubs and can take quite a beating, caves house different elemental Like-Likes, and giant stone Talus’ assemble from the environment to catch you by surprise, with their only real weak point being the Ore Deposit on their heads. If you’re really unlucky, a massive cyclopean Hinox will wake up and chase you (though targeting the eye turns the tide in your favour), mutated crocodile-like Molduga burrow through the Gerudo Desert and in the sands of the Depths, and a combination of the two, the Frox, also appears down there, sporting the same weaknesses as both. Flux Constructs are usually found in the skies; these sentient Zonai cubes are controlled by a central cube that must be targeted before they pummel you into the stone. Master Kohga also returns, having dropped to the Depths and mastered the Autobuild ability to fashion giant trucks, flying machines, and even a mech to rival Mineru. Though he’s more troublesome this time around, he’s quite susceptible to arrows in each encounter. Before he joins your cause, you must fight the brainwashed Yunobo, dodging his cannonball-like roll in a prelude to one of Ganondorf’s devastating charge attacks. Though far less prominent (at least in my playthrough), powerful, centaur-like Lynels still exist in Hyrule, with a silver variant encountered in the Gloom-filled Depths prior to battling Ganondorf. They’re joined by the various elemental Gleeoks, massive, three-headed dragons that breathe fire, frost, and lightning and are lorded over by an even tougher king. I’m gonna be honest and say I never fought these; I saw them flying around or standing atop mountains and felt their power in the intense weather effects they emit, but didn’t dare test myself against them (or the Lynels, for that matter). Similarly, I simply fled from every Gloom Swarm so I wouldn’t be decimated by Phantom Ganon, though you’re forced to fight this terrifying foe at least twice, once when exploring Hyrule Castle and again to free the Great Deku Tree. Phantom Ganon acts as an appetiser for Ganondrof’s battle, charging with a sword, striking with a lance, causing massive shockwaves with a club, duplicating himself, and spreading Gloom everywhere in easily some of the toughest battles in the game.
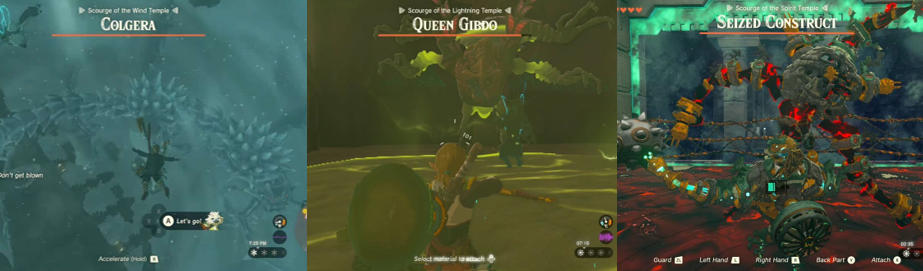
Each Temple houses at least one boss, a “Scourge”, that is, thankfully, not simply a variant of Ganon this time around. You can tackle these in any order but I first battled Colgera, Scourge of the Wind Temple, a gigantic insectoid creature that flies up from within the Wind Temple and forces you to battle it in mid-air (not unlike the game’s final challenge). Colgera emerges from portals and fires ice shards from its body, unwittingly exposing its weak spot, which you must target with Fire Arrows (using Keese eyeballs to help aid your aim). Tornados keep you in the air and Tulin gives you a speed boost, but this wasn’t an especially taxing boss, even when its weak spot switches to its underbelly in the second phase. Next, I battled the Water Temple’s Mucktorok (after getting to grips with Sidon’s abilities in battle with the Sludge Like), a cackling little imp who rides a Molduga-like sludge shark. You must blast this with Sidon’s water wave, clearing a path through the sludge, avoiding its spit attack and shockwaves and chasing the slippery devil down to give it a good thrashing. To enter the Fire Temple, you first dispatch the volcanic dragon, Moragia, that’s attached to Death Mountain by flying around on a nearby Zonai flyer and firing Yunobo at it. Inside, you’ll face the Marbled Gohma, a spider-like rock beast that tries to stomp you and fires explosive chunks of rock. You must fire Yunobo at its legs, crippling it so you can pummel its eye, then send Yunobo rolling up to smack it when it retreats to the ceiling. The difficulty noticeably spikes when you face Queen Gibdo in the Lightning Temple, mainly because you’re so reliant upon Riju’s lightning attacks and lightning-adjacent attachments to your bow. The battle’s further complicated by the Gibdos she spawns in, distracting you and making things very frustrating and difficult near the end. In comparison, the Seized Construct is much easier. Fought in an electrified boxing ring with you controlling Mineru, this thing’s a breeze with the right attachments as you stun it with your arm cannon and smash it into the electrified ropes using a wrecking ball.
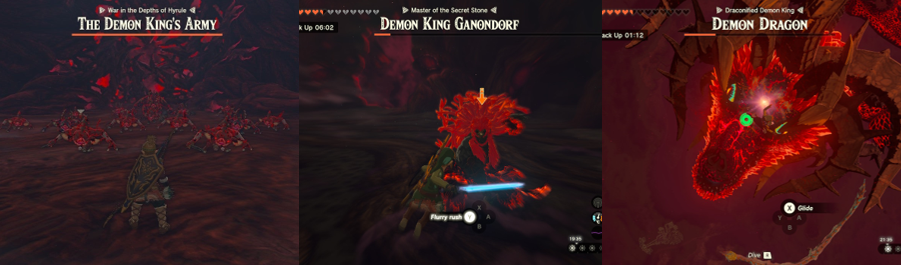
These bosses return in the Depths, if you fancy testing your skills further, and are fought as part of the final battle, much like in the last game. If you best them prior to confronting Ganondorf, however, you obviously won’t need to worry about them. The King of Evil is no joke, however, and is fought in an aggravating multi-stage battle. First, you and the Sages face four waves of Gloom-infested enemies, collecting their loot and hoping you have enough Gloom-resistant armour or food to survive the next stage. Here, you face Ganondorf one-on-one in a fight functionally identical to those against Phantom Ganon. Ganondorf switches between a sword, spear, club, and bow, inflicting Gloom damage with each hit and both parrying and perfect-dodging your attacks. With the right timing, you can whittle him down with the Master Sword; attack-boosting gear and food is a must here, as is Gloom food, but you can also fire Bomb Flowers, Rubies, and Gibdo Bones to take chunks off his health. Victory sees Ganondrof duplicate himself, gaining a ridiculously long health bar in the process. Though the Sages help you, they mostly end up cluttering the screen so it’s advisable to take to the air however you can (Fusing a rocket or Autobuilding something) to litter the battlefield with Rubies and Bomb Flowers. After many deaths, I finally got lucky and got Ganondorf back to half health, which returns the fight to a one-on-one contest. Unfortunately, the Demon King is faster and stronger than ever, sending waves of Gloom and Gloom projectiles, causing Gloom shockwaves, and charging at you, leaving a trail of Gloom in his wake. Luckily, you can strike his projectiles to stun him and, with the right food and a little luck, he’ll eventually be bested. In his rage, Ganondorf consumes his Secret Stone and transforms into a gigantic dragon! Zelda, as the Light Dragon, swoops in to save you, keeping you from falling to your doom, and giving you a boost to reach the Demon Dragon’s back. This stage is mostly a formality, however; just avoid the Gloom scales and target the Gloom pustules on the Demon Dragon’s back. When you get the chance to target the Sacred Stone on his forehead, hold Y to deliver the killing blow and then dive through the sky to rescue Zelda in freefall!
Additional Features:
There are 152 Shrines to find across the skies and surface of Hyrule. Each one houses a chest that contains a weapon or some kind of treasure and also awards a Light of Blessing. With four of them, you can trade for an extra heart or an extra sliver of your stamina wheel, which can make combat and exploration much less of a headache. There are also 120 Lightroots in the Depths which, like the Skyview Towers, simply exist as fast travel points (though Lightroots also restore your Gloom-shattered hearts). There are now a whopping 1000 Koroks to find; some are under rocks, some require transporting to their friends, and some task you with solving puzzles. Finding them all expands your inventory and again awards you with a useless (but golden) piece of poop. You’ll also find loads of treasure chests in every area of Hyrule; some house Rupees or rare materials, some gift weapons, and some have clothing. Collecting all three pieces of an armour set can award additional buffs both by default and courtesy of a Great Fairy, and you can dress Link up as his dark counterpart, an enraged God, and even to resemble various enemies. Some materials can be dyed to further customise them and you can further bolster your stats by cooking food, with recipes being saved for further use. Your horses can also be upgraded and customised; by discovering stables and boarding your horse, you’ll earn “Pony Points” to trade in for harnesses and accessories to complete side quests.
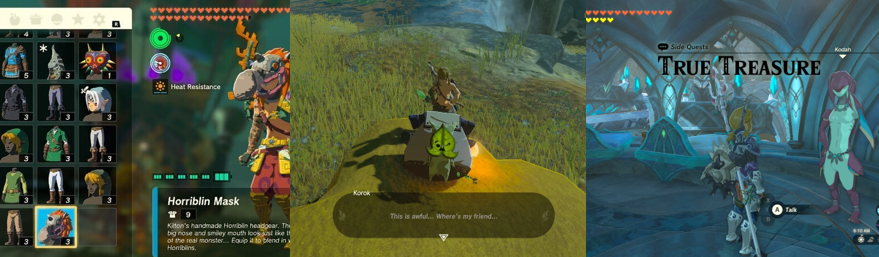
Speaking of, there are loads of optional missions in Tears of the Kingdom. Some are pretty simple, like liberating villages from enemy hordes or retrieving Shrine stones. Others see you gathering materials, photographing enemies and objects, investigating Zelda sightings, and recovering lost or stolen items. Completing side quests earns you Rupees and other rewards, such as food, additional shops, and even armour. Helping Robbie with his research not only upgrades the Purah Pad to detect Shrines and other targets, it also adds the “Hero’s Path” mode to the tablet so you can see where you’ve travelled and gifts you “Travel Medallions” that are essential when fighting your way to Ganondorf. Misko will mark the locations of rare treasure on your map, allowing you to find new armour sets, dogs can be befriended to dig up treasure chests, shop prices can be reduced, and the truth about Zelda’s draconification can be discovered if you explore high and low. Completing the game adds a star to your save file but returns you to your last manual save before battling Ganondorf, meaning you never get to see peace returned to the land on your save file. You can go back and finish any tasks remaining, however, exploring Hyrule Castle docks for the powerful Hylian Shield and collecting Poes to collect new gear. Tears of the Kingdom is also compatible with Amiibos, allowing you to scan in entire armour sets quickly and easily. Sadly, the Master Cycle from Breath of the Wild’s downloadable content isn’t available (though you can build a close approximation) and there is currently no additional content available for the game, but it’s not as if there aren’t hours of content to return to once you’ve completed the main story.
The Summary:
Since I struggled with The Legend of Zelda: Breath of the Wild, I was hesitant to get into the sequel, and these fears were entirely justified. The weapon durability mechanic is as tedious as ever, forcing me to run from most encounters when I’d rather be fighting like in the Nintendo 64 games. Link is frustratingly fragile, easily being killed by even the weakest of enemies, and the entire game is an uphill battle to learn and improve. Link’s new abilities do mitigate these issues somewhat; you can effectively double your weapon inventory by Fusing swords and shields together, though often at the cost of holding a shield. I was also very pleased by how much easier the five main bosses were compared to Breath of the Wild’s and how much more visually unique the Temples were. Getting to them was a chore at times but it was much closer to a traditional Zelda experience once I was inside. The Shrine mechanic is as annoying as before, though, and I wish there was a “Novice” option to give you at least one set of weapons that don’t break and that allocated hearts to one set of Shrines and stamina to the other. I didn’t really like the focus on building; it was finnicky to rotate and Fuse things together to solve puzzles and the vehicles weren’t very fun to control. The mechanic didn’t work for Banjo-Kazooie so I don’t see why Nintendo thought it’d work for Zelda, and it just got in the way most of the time. I liked seeing how Hyrule had changed, with familiar areas altered from the passage of time, and how much bigger the world was, but I hated the Gloom mechanic, the sky islands were dull, and battling Ganondorf was like chewing nails. The story was convoluted and somewhat lost amidst all the hundreds of other sub-plots and side quests, though I enjoyed seeing bigger, more ferocious optional bosses patrolling the overworld. Despite all the changes, though, The Legend of Zelda: Tears of the Kingdom still feels like a glorified expansion pack of its predecessor. I had the same issues as before, if not more thanks to the new inclusions, but remain impressed by the scope and sheer scale of the world, so I think it’s fair to give it the same rating as Breath of the Wild and stay in the minority of people who just don’t click with this approach to the Zelda franchise.
My Rating:
Pretty Good
What did you think to The Legend of Zelda: Tears of the Kingdom? How do you think it holds up against its predecessor and were you excited to revisit this world? What did you think to Link’s new abilities, specifically the building and Fusing mechanics? Were you also frustrated by the Depths and the dangerous Gloom? Did you also find the main bosses easier than Breath of the Wild’s only to struggle against Ganondorf? Did you ever complete all the side quests and find all the Koroks? Which Zelda game is your favourite and how did you celebrate the franchise this month? Whatever your thoughts on Tears of the Kingdom, drop a comment down below and go check out my other Zelda reviews.


2 thoughts on “Game Corner [Zelda Month]: The Legend of Zelda: Tears of the Kingdom (Nintendo Switch)”