
On 21 February 1986, The Legend of Zelda (Nintendo EAD, 1986) was first released in Japan. The creation of legendary game designer Shigeru Miyamoto and Takashi Tezuka, The Legend of Zelda launched one of Nintendo’s most popular franchises. This year, I’m dedicating every Wednesday to Nintendo’s most famous silent protagonist, Link and his vast and enduring fantasy world of sword and sorcery.


Released: 5 September 2019
Originally Released: 21 November 1991
Developer: Nintendo
Original Developer: Nintendo EAD
Also Available For: Game Boy Advance, Nintendo 3DS (Virtual Console), Nintendo Wii, Nintendo Wii U, Satellaview, Super Nintendo Entertainment System (SNES) Classic Edition, SNES
The Background:
Created by designer Shigeru Miyamoto, The Legend of Zelda was purposely designed to emphasise exploration and experimentation, with Miyamoto drawing inspiration from his childhood love of exploring forests and caves. The game was a massive success for Nintendo, selling well over 6.5 million copies and being widely regarded as one of the greatest adventure game of all time. Miyamoto followed this breakout hit with a decidedly different experience; Zelda II: The Adventure of Link (Nintendo R&D4, 1987) remains one of the franchise’s more divisive titles for ditching the top-down perspective in favour of traditional 2D sidescrolling sections, incorporating a level-up mechanic, and its unreasonable difficulty spikes that saw even Miyamoto express regret over the game’s execution, which was simply hampered by the hardware of the time. Though the game sold well and was met with positive reviews, and is often seen as being ahead of its time, Miyamoto returned to the top-down perspective for the third entry, which he initially planned to include a party of protagonists and which was developed to showcase the power of Nintendo’s new 16-bit console. Utilising a 8 Mbit cartridge as opposed to the usual 4 Mbit allowed A Link to the Past to be the largest and most detailed Zelda adventure yet; graphical decompression and clever use of overlays allowed the game to include two worlds, the bright and vibrant Hyrule and its far more desolate (and game-changing) Dark World counterpart, resulting in what many have deemed to be the greatest Legend of Zelda game of all time. This was reflected upon the game’s release, with it becoming a best-selling SNES title and being accompanied by overwhelmingly positive reviews. Not only was A Link to the Past host to one of gaming’s most obscure Easter Eggs, adapted into both a comic book and a manga, and eventually followed by a direct sequel, it was ported to the Game Boy Advance alongside some additional gameplay mechanics and elements and made available on numerous later Nintendo consoles for new generations to play.
The Plot:
A young apprentice named Link takes up his uncle’s sword and shield to rescue Princess Zelda from the clutches to the malevolent sorcerer Agahnim. However, Agahnim is merely a pawn of the King of Evil, Ganon, who imprisons seven maidens in the Dark World, a dimension of evil and chaos, into which Link must venture to restore peace to Hyrule.
Gameplay:
The Legend of Zelda: A Link to the Past is a top-down adventure game in which players once again assume the role of Link, a young boy in a green tunic whom they can now rename from the file selection screen in order to personalise their quest. In many ways, the game is an expanded and enhanced remake of the original Legend of Zelda and follows many of the same gameplay tropes, but also brought them to life in ways that would come to define the franchise for decades. The game employs a simple control scheme, with Link enjoying a greater freedom of movement compared to the Nintendo Entertainment System (NES) releases thanks to the SNES’s hardware; in this version of the game, you can control Link with either the left stick or the directional buttons, which offers even more freedom of movement. There are multiple functions tied to the A button; it allows you to grab and throw objects (bushes, pots, rocks, bombs, and so forth), open chests to acquire new items and keys, advance dialogue boxes and, later, you can hold it down to charge up a running dash when you get your hands on the Pegasus Shoes. Once you acquire your uncle’s sword and shield, B allows you to attack enemies with slashes; holding down B will charge Link’s patented Spin Attack to defeat multiple enemies at once and, when you later upgrade to the fabled Master Sword, your sword will shoot out a swirling energy projectile when you’re at full health. Link’s shield is automatically equipped and will defend against most projectiles, but you’ll need to upgrade it to fend off later energy attacks. The Y button allows you to use an equipped item; you’ll find and acquire many different items from chests and helpful non-playable characters (NPCs) and you can equip them using the ‘Start’ button. These range from familiar weapons like the boomerang, bow and arrows, and bombs, to items that drain your magic meter (including magic powder, the lantern, and the elemental rods) and consumables stored in bottles. As is often the case, Link cannot jump; he can drop down from ledges or through holes and climb up ladders and staircases but you won’t be performing any mid-air attacks here. The Pegasus Shoes do allow you to blast yourself over some gaps, however, but mostly you’ll be relying on the hookshot, magic platforms, and various other means to progress. As Hyrule is bigger than ever, this means a great deal of backtracking, exploration, and trial and error; often, areas will be blocked off by larger rocks, bodies of water, or even ancient texts or the use of powerful magic medallions.

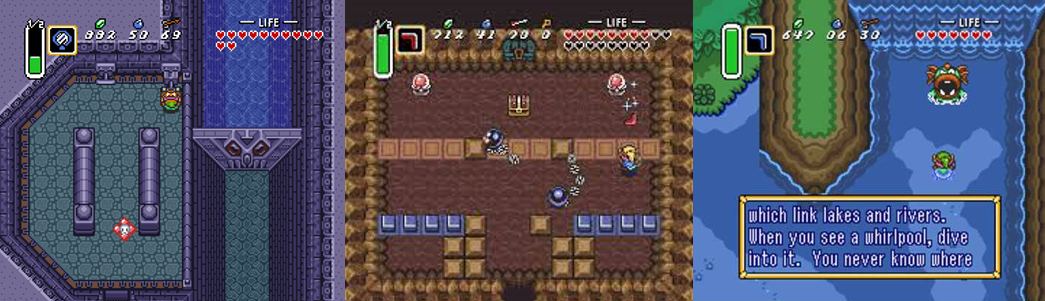
Link’s quest will take him all across Hyrule, which you can view at any time with the X button; story-specific locations are indicated on this map but you’ll need to converse with NPCs and pay attention to signs and dialogue to work out where you need to go. There’s a degree of freedom here but the game’s dungeons are best conquered in numerical order so you have all the tools you need to progress; there’s nothing worse than venturing all the way to the swamp to find you need the Book of Muldora to read the ancient text and open up the dungeon, or making it all the way to the top of Death Mountain without the Quake Medallion. Thankfully, you can later acquire a flute to fast travel across the map and make use of the Zora Flippers to warp to various points using whirlpools, but it can be difficult figuring out where you need to go and what you need to do. To start with, you’ll need to travel to three dungeons and acquire three magical pendants in order to rescue Princess Zelda. This offers a taste of A Link to the Past’s formula and sees you venturing into hazardous dungeons, acquiring new items in each along with a map and compass to help you navigate via a grid-like map on the menu screen, and defeating a boss. Dungeons are typically maze-like, growing more complex and involved as the game progresses, and contain many puzzles that you’ll soon become familiar with: you’ll be pulling levers, defeating all enemies, and stepping on switches to open doors or spawn chests containing keys, pushing blocks, activating crystal switches to raise and lower coloured blocks, struggling on ice and moving platforms and paths, dodging fireballs, running across narrow paths as they collapse beneath you, lighting torches, and blowing up weak walls to find new areas. When in dungeons, you can find special tiles to converse with the wise Sahasrahla for hints, but mostly you have to figure out what you’re doing on your own, which can quickly become very tough; it’s easy to end up wandering around aimlessly, taking out the respawning enemies and searching every nook and cranny to try and progress. Some dungeons require you to venture outside and change something on the overworld in order to progress, such as opening a dam, navigating a haunted forest, or using your magical medallions. Others see you dropping through or pushing blocks down specific holes to reach chests, warping around on tiles, escorting NPCs, blasting across lava pits through pipes, creating your own platforms with a magic wand, avoiding various spiked hazards, and lighting up dark areas with your lantern or by blowing up cracked floor tiles.

Just reaching the dungeons can be a quest in itself as you venture through caves, guide NPCs to safety, pay a cheeky monkey to open the way, buy a bigger bomb to blow open a wall, and figure out the path through the misty Lost Swords to retrieve the legendary Master Sword. Most prominent, however, is the presence of the Dark World; this ashen, nightmarish dimension is reached through warp tiles found across Hyrule and will render you defenceless without the aid of a special item. When in the Dark World, the map changes in various ways; not only are the enemies tougher, the overall atmosphere more ominous, and the land reduced to an apocalyptic hellscape, but certain paths are now blocked and alternative ones are opened up, and just navigating this hazardous landscape is made all the more difficult as a result (and the fact that you can’t use your flute to warp about). Link can return to Hyrule at any time using a Magic Mirror, which also leaves behind a sparkling warp point to quickly shunt back to the Dark World if necessary, and you’ll be jumping between these two worlds to solve puzzles, access new dungeons, and progress through the story. As the game progresses, things get noticeably tougher for Link; newer, more powerful enemies appear on the map and the dungeons get longer and more complicated, though you can pay a fortune teller to point you in the right direction. You can also find fairy fountains to replenish your health (but not your magic), acquire Heart Pieces and Heart Containers to extend and refill your health, and purchase various useful items from shops or from NPCs using Rupees, Hyrule’s traditional currency. Be sure to save your game often; you’ll be returned to the title screen and won’t restart at full health, but this allows you to pick from various starting points, which can make getting around easier. There are also some distractions on offer to help break things up, such as a time trial race, a shooting gallery, a chest opening game, and numerous hidden rooms; often, these award Rupees and Heart Pieces, but you’ll occasionally encounter NPCs in need of assistance who will bestow you with a new item or upgrade your existing ones (though often at a price).
Graphics and Sound:
Without a doubt, A Link to the Past is the finest 2D Zelda experience on offer. The first game was ambitious but painfully limited in its visuals, but this isn’t an issue here thanks to the SNES’s greater power. The game absolutely pops with colour and variety; parts of Hyrule are often overcast by raging thunder and rainstorms, each compass point of the map feels distinct from the others while still being logically connected, and there’s an incredible amount of detail packed into every aspect of the game. No longer an obscure mish-mash of green and brown pixels, Link is an expressive and colourful sprite; he doesn’t have any idle animations but he strains with effort when pushing and pulling rocks, sports a mop of red hair, holds up items and his sword in triumph, collapses comically in defeat, flashes his skeleton when he’s electrocuted, and the Game Boy Advance port even includes sound bites from his 3D adventures. The game’s NPCs are also far more varied and lively; inhabitants of Kakariko Village will scream and run into their houses, alerting the guards when you’re near, a lazy thief naps outside the swamp, a mysterious flute boy plays for an audience of cute little woodland critters before vanishing, the blacksmith worries for the fate of his brother, two lumberjacks hack away at a tree at the foot of Death Mountain, and various fairies and sea-dwelling creatures await in caves and bodies of water. When in the Dark World, Link will be able to talk to more monstrous NPCs and is transformed into a strange, bunny-like creature devoid of weapons. When he acquires upgrades to his tunic, sword, and shield, Link’s sprites change colours so you can see this progression and even the game’s enemies exhibit a lot of personality, charging at you the moment they see you and hopping and stomping about the place.

Hyrule is larger, more varied, and more luscious than ever before; at the centre is Zelda’s Castle, a massive structure of stone and regality where Ganon’s forces constantly patrol. To the North looms Death Mountain, identified by its confusing network of dark caves and the constant barrage of falling boulders falling; to the East lies the Desert of Mystery, a scorching desert filled with cacti plants and ancient ruins; South is home to Lake Hylia, with Hyrule’s rivers eventually taking you to the outskirts of Zora’s Domain; and heading West will taking you to the murky swamps, the bustling Kakariko Village, and the misty and mysterious Lost Woods. You’ll be exploring and opening up new areas in each of these locations throughout the game, lifting rocks to discover hidden pathways, blasting open caves, and altering the landscape with your items and magic. Link enters many buildings on his quest, such as the church-like Sanctuary (and its network of rat-infested sewers), shops, and other homesteads, and will explore forests, a haunted graveyard, and caves. There are always enemies, NPCs, and other objects to encounter and interact with in every area but, when you travel to the Dark World, even the friendliest of areas becomes far more ominous as wrecked houses, rotting trees, and bones of titanic animals litter the landscape. Zelda’s Castle is replaced by a gigantic and foreboding Pyramid of Power, the bright and sunny sky replaced by an unsettling dusk (or raging thunderclouds around Death Mountain), and even Kakariko Village is replaced by the post-apocalyptic Village of Outcasts. Both the swamp and the Lost Woods become dangerous and haunted wastelands, Lake Hylia is transformed into a polluted sea home to a frozen temple, Ganon’s magically sealed tower looms atop Death Mountain, and the entire overworld takes on a dark, depressing colour palette to separate it from its livelier counterpart.
Much of this visual variety doesn’t really translate to the game’s interior locations; caves are mostly the same, sometimes being darker, more maze-like, or requiring different items to bypass hazards and pits but mostly utilising the same sprites. The dungeons are generally distinguishable only by their different colour palettes and altered layouts, but there are some exceptions; the Eastern Palace sports bulbous cycloptic statues, the Tower of Hera features more vertical traversal and pits, the Dark Palace has ramps you need to propel yourself off with the Pegasus Shoes, you’ll lose a lot of traction in the Ice Palace and need to open floodgates to traverse the Swamp Palace, find yourself heading outside to reach new areas of the Skull Woods, and will navigate a series of platforms in the cavernous Turtle Rock. All the puzzles, gimmicks, and most of the enemies you’ve encountered will be recycled in each dungeon, especially the final one, Ganon’s Tower, a perverted mirror of Zelda’s Castle that features a veritable gauntlet against everything you’ve encountered previously. As visually impressive as the game is, the music is equally memorable; things start out dark and ominous but the iconic Legend of Zelda theme kicks in triumphantly once you bring Princess Zelda to Sanctuary and will accompany you on the overworld from then on. Dungeons and boss battles are punctuated by suitable menacing overtures, victorious symphonies play whenever you conquer a dungeon or acquire a new item, and more calming, even melancholic melodies play whenever the story is being related through dialogue. The game’s few cutscenes are rendered entirely using the in-game sprites and graphics, with simply dialogue boxes being the order of the day, but there are some impressive instances of layering (paths, bridges, and walkways overlapping with lower areas), weather effects (lightning, rain, clouds, even a brief drought), parallax scrolling (particularly when at the peak of Death Mountain), and even a 3D effect to render the legendary Triforce onscreen.
Enemies and Bosses:
The forces of darkness are many and varied throughout Hyrule; Link will have to fend off smaller, weaker enemies like bat-like Keese, snake-like Ropes, crows, rats, crabs, and even killer bees if he disturbs the wrong tree with his Pegasus Shoes. River Zoras pop up from the various streams around the map to spit projectiles at you, thieves steal your ammo, Rupees, and even your weapons, Buzz Blobs will electrocute you if struck with your sword, and you can’t even attack the chicken-like Cuccos without facing harsh retribution. Hyrule is filled with strange monsters, too, such as the spider-like Tektites, Goomba-like Deadrocks (which turn to stone when struck), annoying Anti-Fairies that bounce around and reduce your magic and your health on contact, Armos Knights that tremble to life and bounce around when you touch them, and helmeted enemies that have an annoying tendency to send you ricocheting down pits. Ganon’s forces are far more dangerous and versatile, however; his knights come in various different colours and sporting various weapons, from swords, spears, bows and arrows, bombs, and even chained maces. Octoroks wander about spitting rocks at you, their balloon-like counterparts explode when hit, Wizzrobes teleport about firing energy waves, Beamos statues blast you with a high-powered laser beam, pig-like Moblins attack with spears, and you’ll find more than a few hulking, bomb-tossing Hinox in the Dark World. Ganon’s Tower is guarded by the tough Lynels, centaur-like creatures that spit fireballs at you and require an upgraded sword to defeat; Pikkus and Goriyas also prove troublesome as they mirror your movements, while Eyegroes are best defeated with your arrows. Stalfos and Gibdos are also quite common, with the former jumping about or throwing bones at you and the latter proving almost as difficult to dispatch as the Freezors and Geldman unless you utilise your elemental rods. You should also watch for Wallmasters dropping from above to return you to the dungeon entrance, indestructible Chain Chomps, and the dragon-like Zazaks.

By far the most intimidating of Ganon’s regular enemies, however, are the Stalfos Knights; unlike other Zelda games, A Link to the Past doesn’t contain any mini bosses but these large, sword-wielding skeletons almost fit the bill. However, they’re easily reduced to a pile of bones with a swipe of your sword and dropping a bomb on their remains will finish them off before they can reform to pester you again. Your quest will see you battling twelve mammoth bosses, with four of them being encountered again in the gruelling gauntlet that is Ganon’s Tower. The first boss you’ll face is actually six large Armos Knights; they’ll bounce around in a circle, expanding and constricting and charging at you, but you can make short work of them using the bow and arrows as opposed to even your upgraded Master Sword, though the fight is made tricker in Ganon’s Tower thanks to the ice covering the floor. Next, you’ll face three Lanmola, giant worms that burst from the sand and send small rocks flying your way; as long as you avoid these projectiles, and their writhing bodies, they’re pretty easy to defeat, especially if you use the Ice Rod, though you’ll also need to watch for a fireball-spitting statue when facing them in Ganon’s Tower. The last Pendant is defended by Moldorm, a large, strange worm-like creature that slithers erratically around a small platform. Its only weak point is its tail and Link will bounce back, most likely down to a lower floor, if he attacks any other part of the creature; though the surface area of the rematch against Moldorm is even smaller in Ganon’s Castle, this fight is a joke with the fully powered-up Master Sword. Once you have all three Pendants of Virtue, you can confront the dark wizard Agahnim in Hyrule Castle; Agahnim cannot be attacked directly with any of your weapons, instead you need to deflect his projectiles back at him much like boss battles in later Zelda games. Agahnim will teleport around the enclosed arena and charge up a projectile, but you can only hit the large, flaming ones back at him and these can sometimes go off course; when you face him again in Ganon’s Tower, he duplicates himself to make things tougher, but it can actually speed things up as you potentially get three shots to reflect back at him.
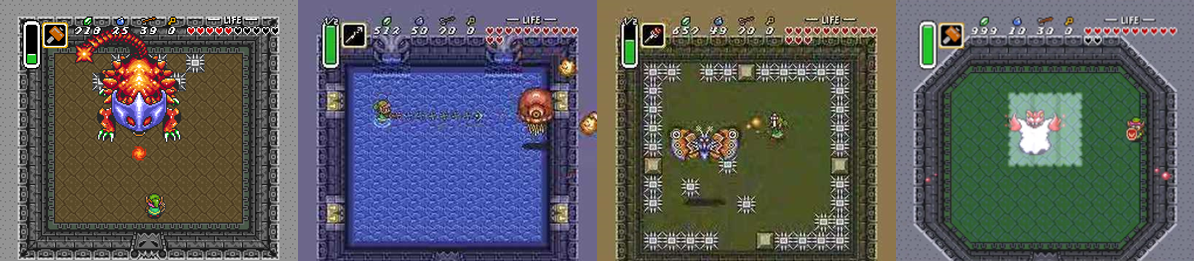
After being sent to the Dark World, Link must defeat seven more bosses before having a final showdown with Ganon. First up is the gigantic Helmasaur King, a dragon-like creature whose weak spot is initially hidden behind a mask. Using the Magic Hammer, Link can break and eventually destroy this mask to target the Helmasaur King’s glowing weak spot with either his sword or arrows, but players will need to watch out for the creature’s extendable spiked tail and the fireballs it spits from its mouth. Though visually less intimidating, Arrghus is a slightly more laborious boss; Link must use his hookshot to extract and destroy the individual Arrgi protecting this jellyfish-like creature until Arrghus is fully exposed, after which it tries to crush Link and moves erratically around the room, being vulnerable only upon landing but causing splash damage if you’re not careful. Mothula awaits in the Skull Woods and is perhaps the most difficult boss so far thanks to its crazed movements making it best to use the magic-consuming Fire Rod, the moving floor sending you into the spiked hazards surrounding the arena (which also move at you), and the creature itself both trying to ram you and firing lasers, though you can make things easier if you have a Golden Bee in a bottle as this will attack the boss and allow you to focus on avoiding damage. You’ll battle Blind the Thief in Gargoyle’s Domain only after exposed an NPC you’ve rescued into the light and revealing her to be this demonic former thief in disguise. Blind hovers about shooting lasers and can only be damaged by hitting his head; eventually, his shroud drops and he sends his head floating around the arena to blast at you independently from his body, which sprouts another head for up to three times the danger, but it’s not especially difficult to avoid these heads and the fight’s all the easier since you don’t need to make use of the dungeon’s weapon to defeat Blind.
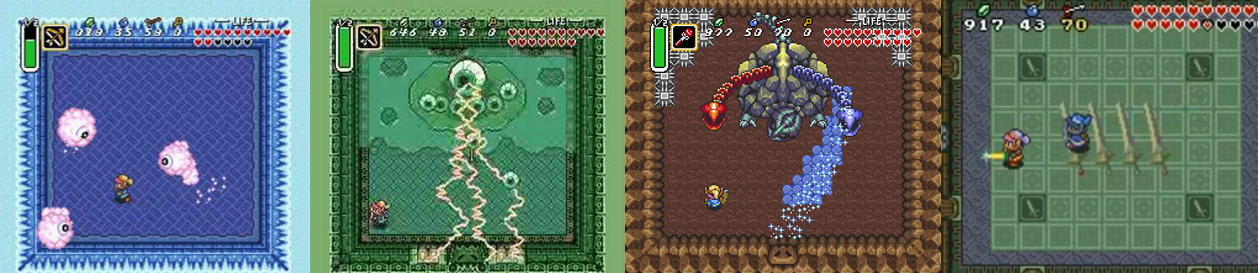
This isn’t quite true of Kholdstare, a bulbous eye that you must first free from its block of ice using either the Fire Rod or the Bombos Medallion while avoiding the blocks of ice it drops from above. Once freed, Kholdstare splits into three and just kind of wanders about doing nothing, making it a ridiculously easy boss. Vitreous provides a bit more of a challenge; another eye-themed boss, this glaring monster sits in a puddle of swamp water and is protected by several smaller eyeballs, which it also uses as projectiles. The sword, bow, and hookshot are all useful here but you need to watch out for the erratic bolts of lightning Vitreous will occasionally send your way; once all the smaller eyes are gone, Vitreous resorts to bouncing around in a temper tantrum, leaving it vulnerable. If you venture into Turtle Rock without some green potion or, at the very least, having awoken the Mad Batter to reduce your magic consumption, Trinexx can prove to be especially difficult. This massive rock-like dragon sports three heads: a red one the breathes fire, a blue one that freezes the ground and ruins your traction, and a stone one that extends at you. You need to use the Fire Rod on the red head and the Ice Rod on the blue head, but don’t just fire away willy-nilly; time your attack to hit and stun the head and then switch to you sword because you’ll have no way of damaging either head if you run out of magic. Once these two heads are destroyed, Trinexx dramatically (and explosively) changes into a snake-like form, frantically slithering about but easily finished off by swiping its glowing middle section. If you’re playing the Game Boy Advance version of the game, you can also tackle the optional Palace of the Four Sword dungeon, where four dark variations of Link reside; each one is battled separately and showcases many of the same attacks and abilities as Link, such as his Pegasus Shoes and Magic Cape, while also unleashing their own versions of the Spin Attack and even a jumping strike. Blind, Mothula, the Helmasaur King, and Arrghus are also battled again in this dungeon, which rewards Link with the Four Sword.

Regardless of which version of A Link to the Past you’re playing, your adventure culminates in the hardest and longest dungeon of the game, Ganon’s Tower. Here, many of the game’s enemies and almost all the hazards and gimmicks you’ve encountered are recycled, with some of the toughest enemies attacking in large groups and you being forced to battle the first four bosses again with slightly different variations to each. It’s absolutely essential that you fully upgrade the Master Sword and your bow and arrows before tackling this dungeon, as it leads directly into the final confrontation with Ganon and you’ll need the Silver Arrows to finish him off. Assuming his monstrous pig form, Ganon awaits in the Pyramid of Power and is easily the game’s hardest and most laborious boss and will put all of your skills to the test. Make sure you’re swiping as soon as you drop into the arena to land a couple of free shots on him while he’s gloating, then avoid his trident when he tosses it at you; Ganon is invulnerable and intangible when teleporting but is open to a few good hits before he throws his trident so make sure you get them in while you can. The second phase greatly increases the difficulty; Ganon will surround himself with tiny flames that he transforms into indestructible bats to use as projectiles, making it very difficult to get close and land a hit. In the third phase, these bats leave a circle of fire around Ganon, who stomps about and destroys the tiles lining the outside of the room. After a few more hits, Ganon will extinguish the two torches and become invisible as well as intangible; you must light both torches to expose his location, hit him with your sword, and then fire a Silver Arrow at him when he turns blue. Do this four times and the King of Evil will finally be defeated, restoring peace to Hyrule, but make no mistake this is a gruelling encounter; you’ll need all four bottles filled with a variety of restorative potions in order to best him, or make liberal use of the Switch’s save and rewind feature to get around his more erratic and frustrating attack patterns.
Power-Ups and Bonuses:
If you’re anything like me, you play your Legend of Zelda games constantly swiping at bushes, breaking pots, and defeating enemies to fill up your health, magic, ammo, and Rupees. Link can carry 999 Rupees, which is an easy enough limit to reach thanks to the many secret Rupee rooms and chests found all over the place, and can spend these on potions, ammo, shields, and other items in various shops. Some prices are higher than others, however; you’ll need to toss an extortionate amount of Rupees into the Lake of Happiness to increase the maximum number of arrows and bombs you can carry, and it’ll cost you a whopping 500 Rupees to acquire the Zora’s Flippers so you can swim, but tempering your sword is surprisingly cheap. Other times, you simply need to find hidden fairies or NPCs who will provide new items or upgrade existing weapons like your sword, bow, and boomerang for free or locate the Big Key and the large chest in each dungeon to acquire some nifty new gear. Link begins his journey with a regular sword but later embarks on a quest to acquire the legendary Master Sword, which boasts a higher attack power and a variation on the Sword Beam; this can then be tempered and finally magically upgraded into the far stronger Golden Sword. Similarly, his shield can be upgraded to defend against small fireballs and is later replaced by the Mirror Shield, which reflects laser bolts.
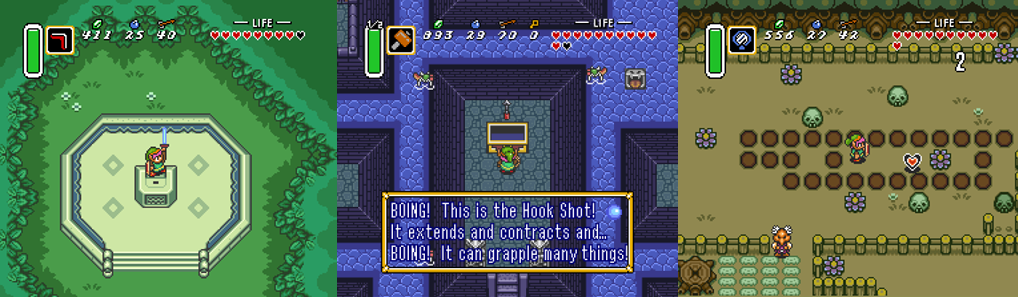
Many recognisable Zelda weapons and items are up for grabs here. Link can toss a boomerang as a ranged weapon, blow open walls with bombs, shoot enemies from afar with his bow and arrows, and cross gaps with the hookshot (which, like the boomerang, can also pick up faraway items). Link can dash across the screen and swim when he acquires the Pegasus Shoes and Zora Flippers, respectively, lift heaver objects with the Power Glove and Titan’s Mitt, call a bird to fast travel across Hyrule with the flute (more of an ocarina, really…), dig up items with a shovel, pound down certain blocks with the Magic Hammer, and capture bugs and restorative fairies with the bug-catching net (providing he has one, or all, of the four empty bottles). There are also many magical items available: the Bombos, Ether, and Quake Medallions cause the ground to explode, call down a lightning storm which also illuminates hidden paths, and unleash a shockwave, respectively, while the Cane of Byrna and Cane of Somaria protect Link with a magical barrier and spawn moveable blocks, respectively. The Magic Cape also renders you invisible and invincible for as long as you have it equipped and your magic meter lasts, and you’ll find both a blue and red mail that not only change Link’s sprite but also greatly reduce the amount of damage he takes.
Additional Features:
There’s a fair amount to do in A Link to the Past, though some Zelda staples are noticeably missing; there is no trading sequence here, no fishing game, and no collectibles to trade in for upgrades and other items. You can find items such as a mushroom and NPCs like the blacksmith’s brother to acquire new items, and will receive upgrades from fairy fountains and such, and there are four empty bottles to be discovered. These can be filled with coloured potions to restore your health and magic, fairies to resurrect you, and bugs to attack your enemies so they’re well worth tracking down. There are also twenty-four Heart Pieces scattered throughout Hyrule and the Dark World; every time you collect four, you’ll gain an extra heart of health and you’ll also get a whole new one for every boss you defeat, bringing Link’s health up to a maximum of twenty hearts. You can also reduce the amount of magic you use by half, are required to locate the Moon Pearl to freely move about in the Dark World, and can find hidden rooms (usually behind destructible walls) that yield Rupees and other goodies. You get three save files to play on and can take on Ganon as many times as you like after finishing the game, and hunt down any items and Heart Pieces you’ve missed, though there’s no second, harder adventure to unlock here. This version of the game also allows up to four save states and lets you rewind the game if you make a mistake, which is a godsend for some of the tougher areas, and the Game Boy Advance version of the game includes an optional dungeon, two additional quests that yield new items, and a multiplayer mode in which two to four players work together to solve puzzles and defeat bosses.
The Summary:
There’s a reason why The Legend of Zelda: A Link to the Past is so lauded within the Zelda community. It really was the greatest Zelda experience at the time, expanding upon the ambitious but limited first adventure and the aspiring attempt of the second game to be a more elaborate role-playing experience, and delivering the quintessential Legend of Zelda formula that was retained even when the series moved into 3D. A Link to the Past has long eluded me; growing up a SEGA kid, I wouldn’t get the chance to play it until I went out of my way to buy the Game Boy Advance port, which I was able to play through all the way to the final battle but never actually carried through to finish the game. The Nintendo Switch version offers gamers far more options to make this difficult adventure title a little easier thanks to the rewind function and save states, but this is still a title that refuses to hold your hand; the overworld is large and full of secrets, enemies, NPCs, and locations to explore, some of which are relevant and others you’ll have to come back to later when you have the right items. The presentation is absolutely top-notch; it’s a colourful, very detailed title that showcases the power of the SNES, with only a few moments of slowdown caused when there’s a little too much happening on the screen. The inclusion of the Dark World helps to keep things visually interesting, creating a distinct atmospheric vibe between the vibrant Hyrule and its desolate dark counterpart. The dungeons are a little too samey and confusing at times, some of the bosses were a bit disappointing, and it was lacking a few of the more prominent side quests and distractions that made later Zelda games so much fun to revisit, but I loved the sheer amount of detail packed into every aspect of the game. I didn’t grow up with A Link to the Past so I can’t say it’s my favourite of the classic Zelda games, but after finally playing it all the way through and really experiencing everything it has to offer, it definitely belongs in the top five of all-time Zelda greats and it’s obvious to me that this game alone fully justified the purchase of a SNES back in the day as it’s a fantastic showcase of everything that console was capable of.
My Rating:
Fantastic
Was The Legend of Zelda: A Link to the Past a part of your SNES library back in the day? If not, when did you first play the game and how do you think it compares to other Zelda titles, particularly the two that came before it? What did you think to the introduction of the Dark World and Link’s quest to rescue the seven maidens? Which of the dungeons, bosses, and weapons was your favourite? What did you think to the visual presentation of the game, and would you say that A Link to the Past is the best 2D Zelda title? Did you ever find all of the Heart Pieces and fully upgrade Link’s arsenal? How are you celebrating the franchise today? Whatever your thoughts on A Link to the Past, leave a comment below or share them on my social media.


7 thoughts on “Game Corner [Zelda Month]: The Legend of Zelda: A Link to the Past (Nintendo Switch)”